


Social proof is one of the oldest sales tricks in the book, and it still works. When a visitor lands on your site and sees that 12 other people just bought the same product, or that 500 readers signed up to your newsletter last week, hesitation drops. NotificationX Pro is the WordPress plugin that wires those moments up for you, pulling data from WooCommerce, EDD, MailPoet, Gravity Forms, Google Reviews, and dozens of other sources, and turning each event into a small live notification toast.
This walkthrough takes the long route. We will cover every notification source NotificationX Pro supports, the layout variants you can pick from, the visibility rules that decide who sees what, the analytics dashboard, and the developer hooks you can use to bend the plugin to your own needs.
Table of Contents
- What NotificationX Pro is
- Why social proof still matters
- Core features at a glance
- Free vs Pro: what is actually different
- Installation and first run
- The notification builder: a 5-step wizard
- Every notification source explained
- Layouts and themes
- Display rules and visibility targeting
- The Analytics dashboard
- Settings page tour
- Real-world use cases
- Developer reference
- Performance, compatibility, and gotchas
- NotificationX Pro vs WPfomify and TrustPulse
- Pricing and licensing
- Frequently asked questions
- Final thoughts
What NotificationX Pro is
NotificationX Pro is a WordPress plugin from WPDeveloper, the same team behind BetterDocs, EmbedPress, ReviewX, and Essential Addons for Elementor. The free version of the plugin is on the WordPress.org plugin directory and it covers the basics: WooCommerce sale alerts, a couple of form integrations, and a handful of layout variants.
The Pro add-on lifts the lid on everything else. More notification sources, an analytics dashboard, A/B testing, email-list integrations (Mailchimp, MailerLite, ConvertKit, ActiveCampaign), Google Reviews import, a sound option, branding controls, and a smarter set of display rules. If you have already used the free plugin and felt boxed in, Pro is where the actual product story sits.
The product is built around a simple loop. Something happens on your site (a sale, a subscription, a review, a form submission). NotificationX detects it through the relevant integration, queues it up as an entry, and the lightweight frontend script shows it as a small toast at the corner of the page for the next visitor. Everything in between, who sees it, how long it stays, what it looks like, where it appears, is yours to configure.
Why social proof still matters
The psychology is not new. People take cues from what other people are doing, especially when they are unsure. Wikipedia’s entry on social proof covers the academic side, but the WordPress angle is pretty straightforward: if a brand new visitor sees that real customers are buying or signing up in real time, the page feels less like an empty store and more like a busy market.
Notifications also help with the inverse problem: cold pages. A product page with no reviews and no traffic signals looks dead. Even a single "5 people are viewing this page right now" toast removes that feeling and nudges the visitor toward the buy button. The trick is not to fake it. Cheap "fake FOMO" tools that ship preset notifications with made-up names hurt trust the moment a returning visitor notices the same "John from London" three days in a row. NotificationX wires up to real events on your site, which is the entire point.
Core features at a glance
A short list of what you get once Pro is active. Each item gets a longer treatment further down.
- 15+ notification sources, including WooCommerce sales, EDD downloads, form submissions (Gravity, WPForms, Contact Form 7, Ninja, Fluent Forms, Elementor forms), MailPoet, Mailchimp, MailerLite, ConvertKit, ActiveCampaign, FluentCRM, GiveWP donations, LearnDash, LearnPress, Tutor LMS, and more.
- Reviews aggregation from Google, Yelp, WooCommerce, Yotpo, and Trustpilot.
- Multiple notification types: bottom corner toast, top or bottom announcement bar, inline embed, exit-intent popup, flashing browser tab title.
- 5-step builder (Source, Design, Content, Display, Customize) with a live preview.
- Visibility rules by URL pattern, post type, taxonomy, user role, device, login state, and time on page.
- Analytics dashboard with impressions, clicks, and click-through rate per notification.
- A/B testing of notification variants against each other.
- Live visitor counter that shows the current number of people on a page.
- Token variables like
{first_name},{title},{time},{city}that fill in real data. - CSV bulk import for seeding custom notifications.
- Shortcode
[notificationx id=NN]to drop a notification anywhere in your content. - Multilingual via WPML and Polylang.
- GDPR-friendly with options to anonymize names and run on cookie consent.
- Developer hooks under the
nx_namespace for almost every step of the pipeline.
Free vs Pro: what is actually different
The free plugin is a real, working tool. It covers WooCommerce sales, EDD downloads, comments, press bars, cookie notices, and the WPForms integration. If you only need a "John from London bought X" toast on a small store, free is enough.
Pro layers on top of that with the things you start wanting once your site grows past the basics:
- Email subscription alerts for Mailchimp, ConvertKit, MailerLite, ActiveCampaign, FluentCRM, MailPoet, and GetResponse.
- Reviews from Google, Yelp, Trustpilot, Yotpo, on top of the WooCommerce review source the free version has.
- LMS sources: LearnDash, LearnPress, Tutor LMS, LifterLMS course enrollments.
- Membership sources: Restrict Content Pro, MemberPress, Paid Memberships Pro signups.
- Donations beyond the free GiveWP slot.
- Custom Notifications that you type by hand or bulk-import from CSV.
- Analytics dashboard with per-notification impressions, clicks, and CTR. This is the big one for marketers.
- A/B testing to compare two variants of a notification against each other.
- Live visitor counter.
- Custom sound when a notification fires.
- Per-entry custom links that override the default URL the notification would have linked to.
- Combine multi-orders so three quick purchases of the same product become "3 people bought X" instead of three separate toasts.
- White-label / branding controls to remove the "via NotificationX" footer link.
- Role management for which user roles can edit notifications.
The free version is intentionally generous so you can size up the product before paying. If you have already added more than a handful of notifications and you are juggling email-list signups, reviews, and form submissions, Pro pays off fast.
Installation and first run
Drop the plugin ZIP into Plugins -> Add New -> Upload Plugin and activate it like any other WordPress plugin. NotificationX Pro depends on the free NotificationX plugin, so install that one first if it is not already on the site. The Pro plugin will prompt you if it is missing.
Once both are active, a new top-level menu appears in the WordPress sidebar called NotificationX, with the bell-and-megaphone icon. The sub-menus are:
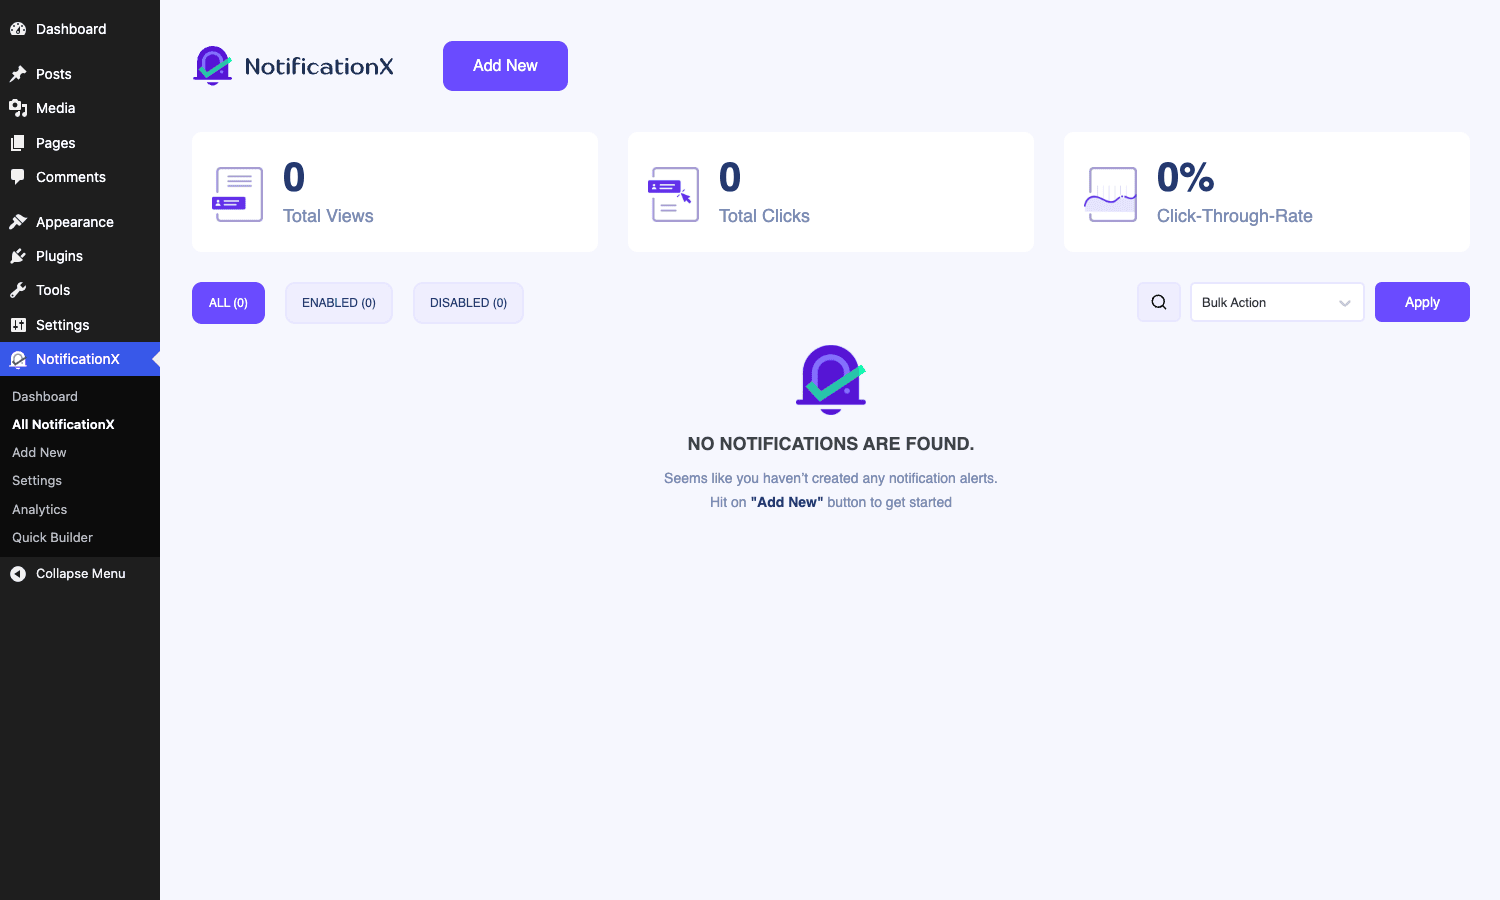
- Dashboard, the landing page with quick stats and the new-user empty state.
- All NotificationX, the list of every notification you have built, with toggle switches to enable or disable each one.
- Add New, the full 5-step builder for creating a notification.
- Quick Builder, a stripped-down 4-step version that uses presets for faster setup.
- Analytics (Pro), the impressions/clicks/CTR dashboard.
- Settings, the global plugin settings.
The first time you visit the dashboard it shows three empty cards: Total Views, Total Clicks, Click-Through-Rate. They will populate once your first notification is live and has been seen.
The notification builder: a 5-step wizard
This is where you will spend most of your time. The full builder under Add New walks through five steps, with a live preview, a title field at the top, and a Publish button on the right. Each step is a tab on the left:
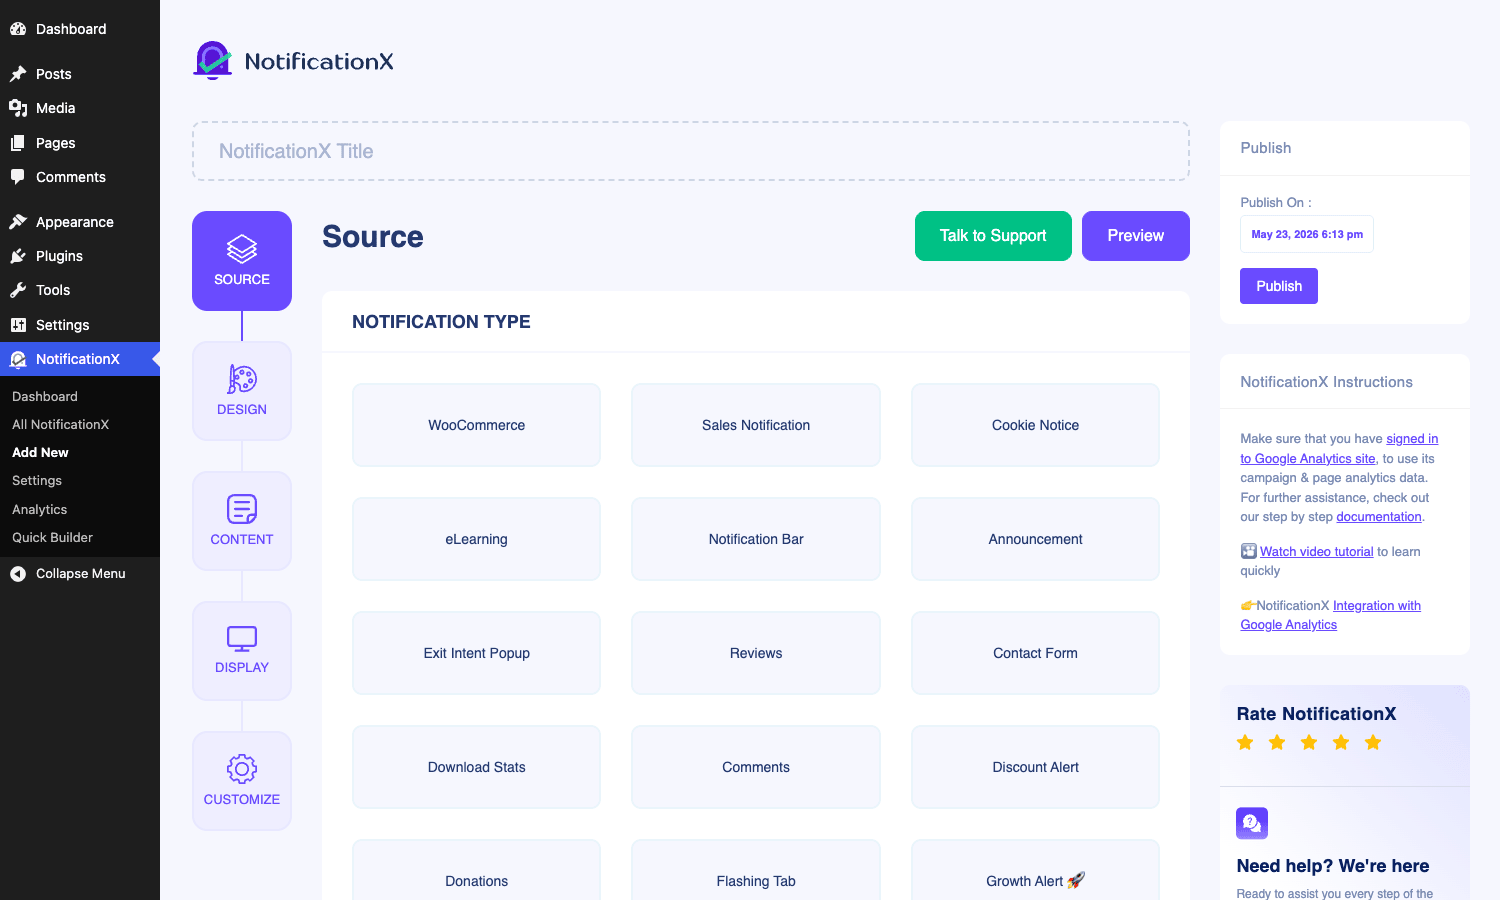
- Source, where you pick the notification type and the data source.
- Design, where you pick a template theme.
- Content, where you write the template text and pick which tokens to insert.
- Display, where you set visibility rules and image options.
- Customize, where you set position, size, animation, and frequency caps.
Source: pick what kind of notification you want
The Source step is where you tell NotificationX what kind of event you are showing off. The plugin groups the options into notification types: Sales Notification, Reviews, Cookie Notice, Notification Bar, Exit Intent Popup, Contact Form, Download Stats, Discount Alert, Donations, eLearning, Email Subscription, Growth Alert, Comments, Flashing Tab, Custom Notification, Video, Page Analytics (live visitor counter), and Announcement.
For each type the second half of the screen asks for the actual data source. Sales Notification, for example, asks which store plugin to pull from: WooCommerce, Easy Digital Downloads, or Freemius EDD. Email Subscription asks for Mailchimp, ConvertKit, MailerLite, ActiveCampaign, FluentCRM, MailPoet, or GetResponse. Reviews asks for Google, Yelp, Trustpilot, Yotpo, or WooCommerce.
If a source needs an API key (Mailchimp, Google Reviews, etc.) the builder tells you and links to the Settings page where you paste it.
Design: pick a template
Once a source is picked, the Design step shows a grid of pre-built templates. Each template is a small mock of how the notification will look on the frontend, with placeholder data filled in. There are usually four to six templates per source, plus a "Custom" option that lets you build one from scratch.
The Design tab also has a Desktop/Mobile toggle at the top. Some templates lay out differently on small screens, and you can preview both versions before publishing.
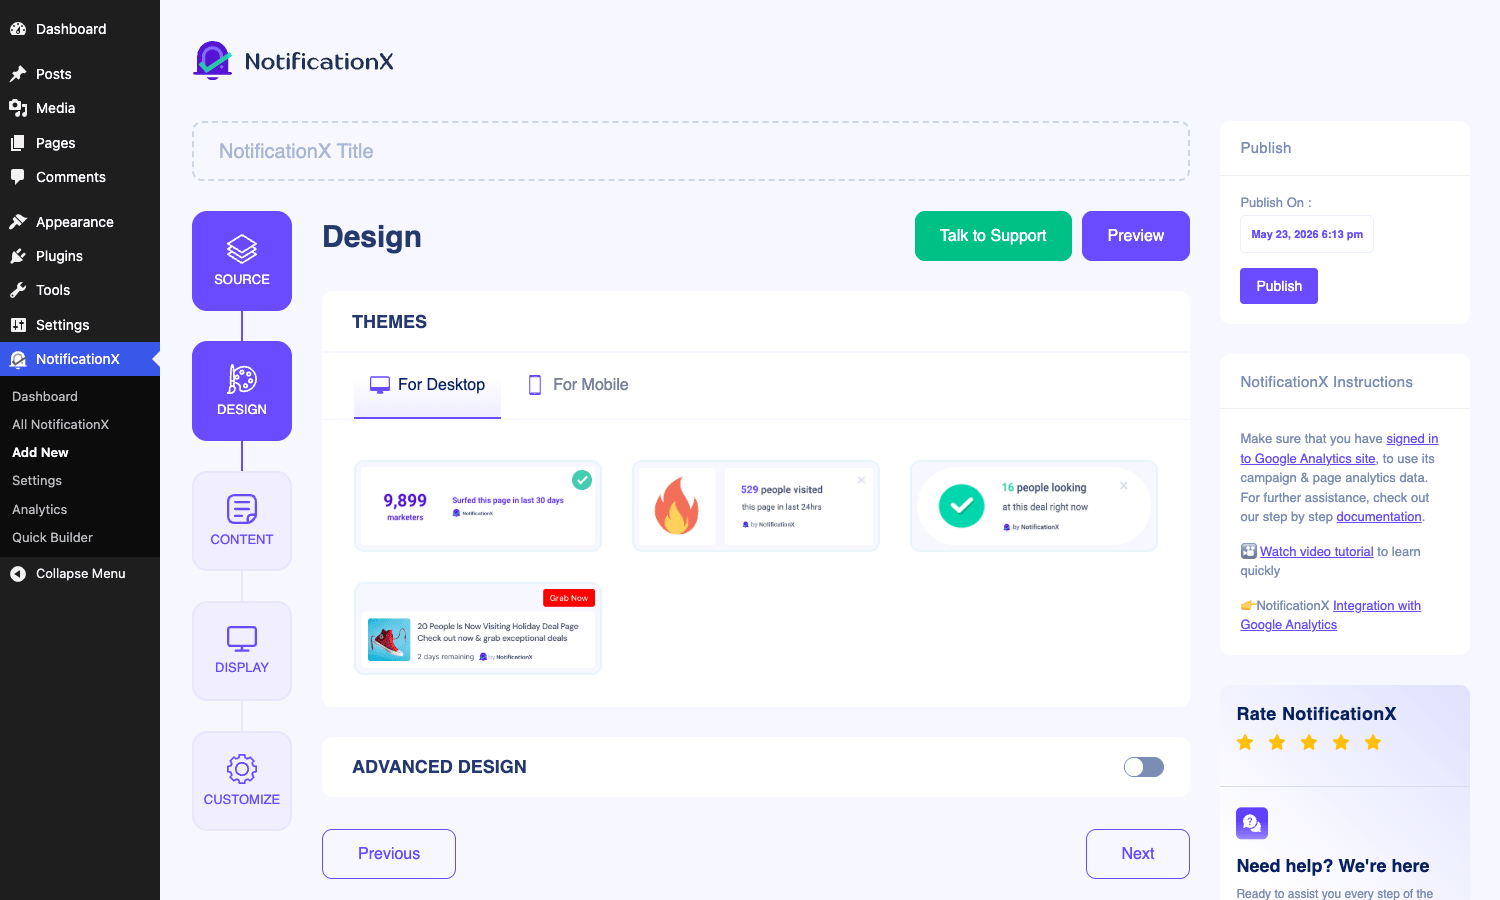
The Advanced Design toggle at the bottom unlocks per-element controls: font sizes, image radius, text colors, background colors, border radius, shadow. If you are running a tight brand, this is where you make the toast match your site’s palette instead of using the purple default.
Content: write the template text
The Content step is one of the more interesting parts of the plugin. You type a short notification template like:
{first_name} from {city} just bought {title}, {time}
The braces are token variables that get filled in from the actual event. NotificationX supports:
{first_name}and{last_name}, the customer’s name (with privacy-friendly variants like initials only).{title}, the product, post, course, or form title.{time}, a relative time string like "5 minutes ago".{city},{country}, geolocation pulled from the visitor’s IP.{tag_*}, arbitrary form field values, addressed by their input name.{anonymous_title}, a censored version of the title for adult-product or sensitive contexts.
You can mix plain text and tokens freely. The live preview at the top of the page updates as you type so you can see exactly how a real event will read.
Display: visibility rules
The Display step decides who sees the notification. It has two sub-sections: Image (whether to show a default product image, an avatar, or a custom upload) and Visibility (the targeting rules).
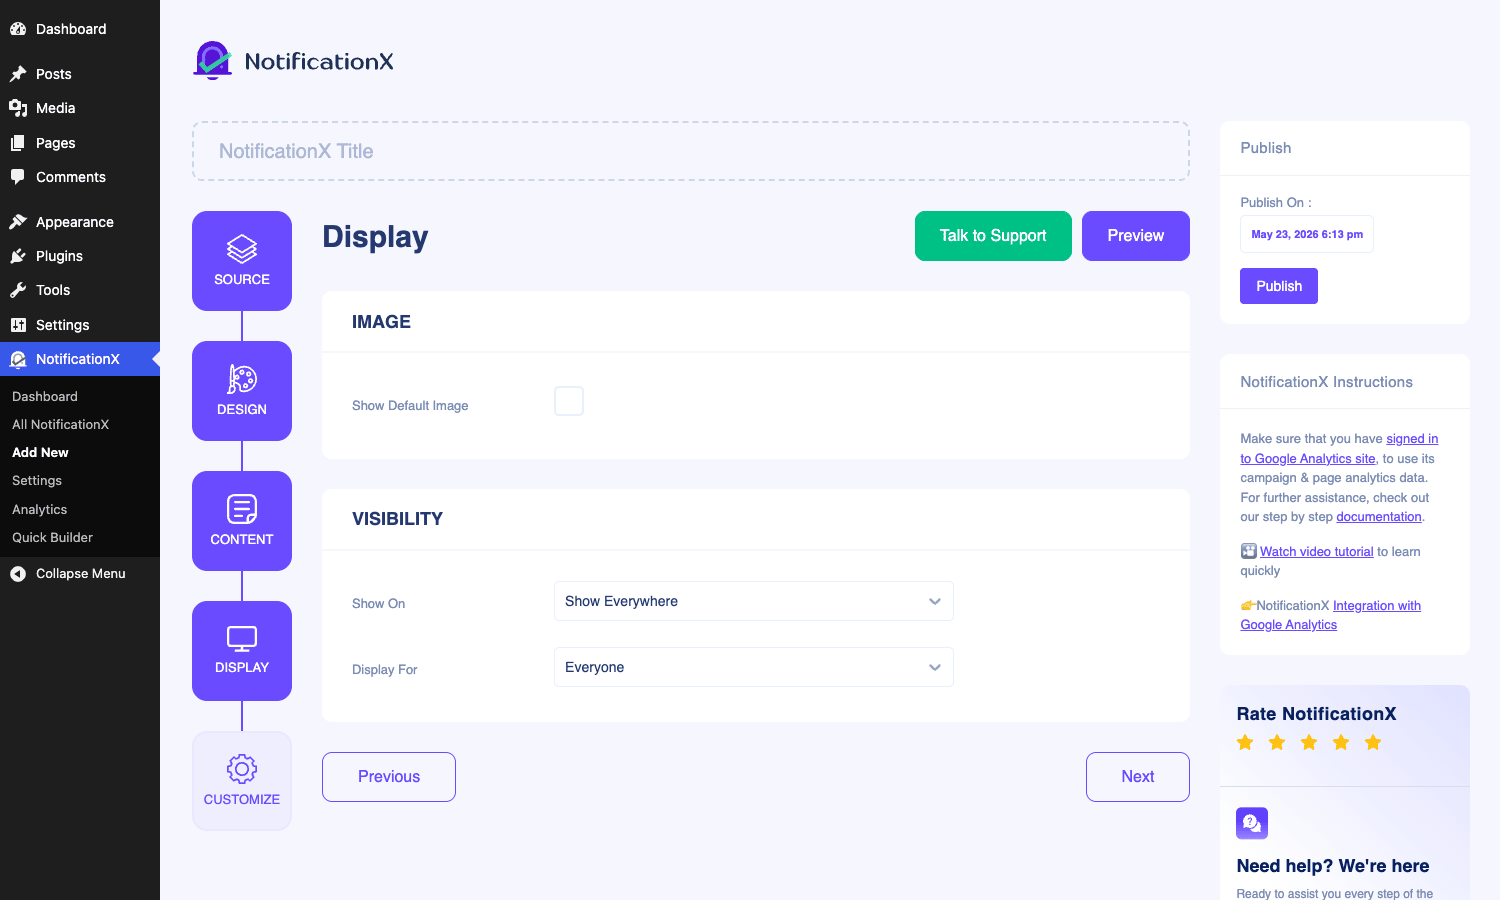
Show On has options like Show Everywhere, Only on Specific Pages, Hide on Specific Pages, Only on Posts of a Category, On a Custom Post Type, and Use Only as Shortcode. The "Use Only as Shortcode" option is a Pro feature that turns off the global toast and only renders the notification where you place the [notificationx id=NN] shortcode. Useful for landing-page-only notifications that should not bleed across the rest of the site.
Display For controls audience: Everyone, Logged-in Users Only, Logged-out Users Only, or Specific Roles. Combined with Show On, you can wire up notifications that only fire for, say, logged-out visitors browsing the pricing page.
Customize: position, size, animation, frequency
This is the polish step. You set the corner (Top Left, Top Right, Top Center, Bottom Left, Bottom Right, Bottom Center), the size (in pixels, with a max-width slider), whether to show a close button on desktop, tablet, and mobile separately, whether the notification appears on those device classes at all, and how often it reappears for a returning visitor.
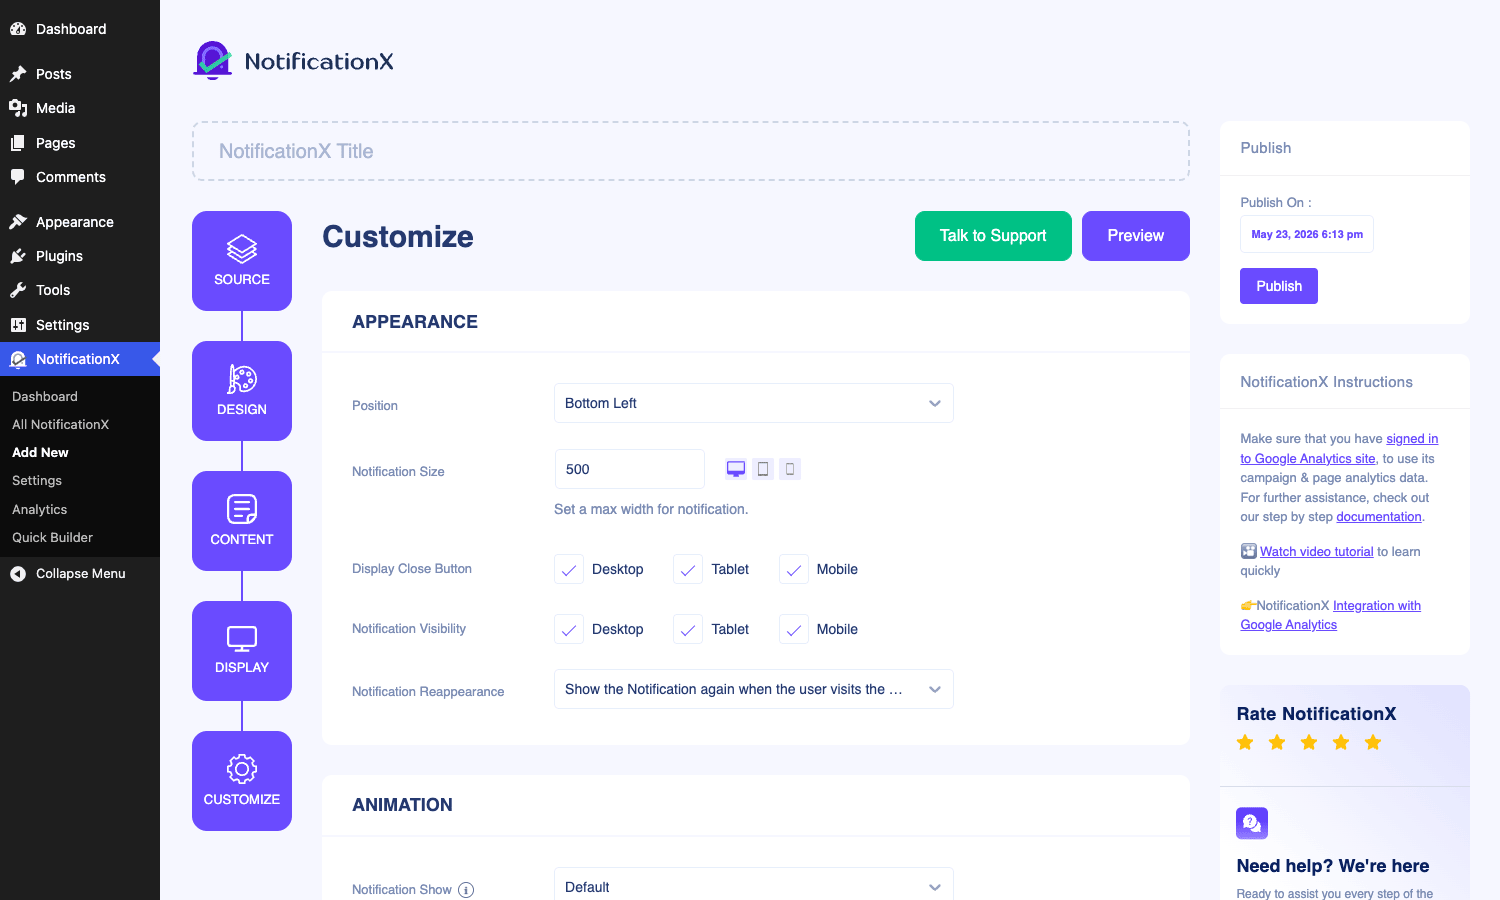
Animation has Show and Hide animation pickers (fade, slide, zoom). You can set how long each notification stays on screen (Notification Display Time) and the gap between two consecutive notifications (Display Gap), so the toasts queue politely rather than stacking.
Pro adds a Sound option that plays a soft chime when a notification fires, the kind of thing live chat tools use. Use it sparingly. A page that audibly pings every five seconds is annoying.
Every notification source explained
Here is the longer view on each source. If you are picking which integration to wire up first, this section is the cheat sheet.
WooCommerce sales
The flagship use case. NotificationX listens for new WooCommerce orders and surfaces them as "John from London just bought Long Sleeve T-Shirt". The Pro version adds the multi-order combine option ("3 people bought Long Sleeve T-Shirt in the last hour"), order status filtering (only show completed orders, or include processing), and the option to fall back to product names without buyer names when WooCommerce billing data is missing.
Easy Digital Downloads
For digital-product stores running EDD or Freemius EDD, the plugin treats downloads exactly like WooCommerce orders. Same template tokens, same visibility rules. Useful for software plugins, themes, eBooks, audio packs.
Form submissions
NotificationX integrates with most popular WordPress form plugins: Gravity Forms, WPForms, Contact Form 7, Ninja Forms, Fluent Forms, and Elementor Forms. Each new submission becomes a "Jane Doe just sent a message via the contact form" notification. The Pro version exposes individual form field values as tokens ({tag_email}, {tag_company}), which is handy for lead-magnet pages that want to show off the company name of the latest signup.
Email list signups
This is the big Pro section. NotificationX Pro hooks into Mailchimp, ConvertKit, MailerLite, ActiveCampaign, FluentCRM, MailPoet (see the MailPoet Premium walkthrough for a deeper take on that one), and GetResponse, and shows new subscribers as toasts. A blog with a 10k-strong list can keep a permanent "147 people subscribed in the last 7 days" notification running, which is much more compelling than a static counter that the reader has to take on faith.
If you prefer rolling your own newsletter list outside Mailchimp’s ecosystem, the Newsletter plugin is on the supported list too via the generic Email Subscription source.
Reviews aggregation
NotificationX can pull in reviews from Google, Yelp, Trustpilot, Yotpo, and the WooCommerce native review system, then cycle them as social proof toasts. A nicely placed five-star review with the reviewer’s name and the location ("Mary, Toronto: 5 stars on Google") at the bottom-left of a landing page does a lot more work than a static testimonials block.
If your site collects rich product reviews with photos and videos (the kind ReviewX Pro adds to WooCommerce), pair the two: ReviewX Pro for collecting, NotificationX Pro for surfacing.
Donations
GiveWP and Tip Jar WP donations both have their own notification types. Useful for nonprofits running a campaign page; a "Maria just donated $50" toast does measurable work on conversion.
LMS course enrollments
LearnDash, LearnPress, Tutor LMS, and LifterLMS course sign-ups all feed into the eLearning notification type. A course landing page that shows "Alex enrolled in Advanced SQL, 4 minutes ago" reduces the are-other-people-actually-buying-this hesitation that kills course conversions.
Membership signups
Restrict Content Pro, MemberPress, and Paid Memberships Pro send signups into NotificationX so subscribed-membership sites can show "12 new members joined this week" or similar.
Page Analytics: the live visitor counter
This one is its own type, not a sub-source. It shows a notification with the current count of people viewing the page in real time. The data is pulled from a lightweight in-plugin counter, not Google Analytics, so it works on the lower-traffic sites where GA’s sampling makes the number unreliable. Pair it with MonsterInsights for the broader GA story, but use NotificationX for the live FOMO toast.
Custom Notification
If you want to type a notification by hand ("Spring sale ends in 3 days", "New plugin released") instead of wiring up an event source, the Custom Notification type lets you create as many entries as you like, even bulk-import them from a CSV. Useful for marketing campaigns where the messages are scheduled rather than event-driven.
Press Bar and Announcement
These are top-of-page or bottom-of-page bars rather than corner toasts. A Press Bar can announce a sale, hold a promo code, or run a countdown timer. The Pro version adds device-specific show/hide and granular page targeting.
Flashing Tab
Browser tabs can grab attention while the visitor is on another tab. NotificationX flashes the page title between your usual title and a custom message ("Come back! Your cart is waiting"). Aggressive, useful in cart-abandonment flows, easy to overdo.
Exit Intent Popup
A bigger interruption: a modal that fires when the visitor’s mouse moves toward the browser’s close button. Combine with a discount code or a lead-magnet form for the classic "wait, here’s 10% off" play.
Layouts and themes
NotificationX is not just about toasts. Each notification type has its own layout family.
The classic corner toast is the smallest, sized around 320 pixels wide, with an image, a short text line, and a small "via NotificationX" link at the bottom (which Pro can hide). It animates in from the corner, sits for 4-6 seconds, then animates out.
Notification bars and Press bars stretch across the top or bottom of the viewport. They are persistent, with an optional close button. Great for "Free shipping on orders over $50" or "Sale ends Friday".
Inline notifications appear in the body of a page where you place a shortcode. They look like a small card and do not move. Perfect for "23 people purchased this in the last 24 hours" right under the buy button on a product page.
Exit-intent popups are modals that center on the screen with a backdrop and a close button. The Pro version adds delay timing and frequency caps so the popup does not annoy returning visitors.
Video and Image popups are the show-off layouts that include a video player or a larger image. Useful for tutorials or product reveals.
Flashing Tab is not a visual layout per se but a meta-layout: it changes the browser tab title only, no in-page element.
Each layout supports the Desktop/Mobile responsive toggle from the Design step, so the small corner toast that looks fine on a 1440-pixel-wide laptop will reflow on a phone instead of clipping.
Display rules and visibility targeting
This is where the plugin’s depth shows up. Display rules let you slice the audience finely enough that a single notification only fires for the right visitor at the right time.
The Show On dropdown has these options:
- Show Everywhere is the default. Toast appears on every page.
- Specific Pages (Include) lets you list page URLs, slugs, or wildcards where the notification should appear.
- Specific Pages (Exclude) does the opposite: hide on these pages, show everywhere else.
- On Post Type restricts to a chosen post type. Pick "product" to show only on WooCommerce product pages, "course" to show only on LearnDash courses.
- By Taxonomy / Category narrows further to specific taxonomy terms.
- Use Only as Shortcode turns off automatic placement so the notification only renders where you write
[notificationx id=NN]in your content.
Display For controls audience:
- Everyone.
- Logged-in users only.
- Logged-out users only.
- Specific roles (multiselect: subscriber, customer, contributor, etc.).
The Customize tab adds visit-frequency controls: Notification Reappearance can be set to "Show again every time the user visits" or "Show once per user" or "Show every N days". This is how you keep returning visitors from being hammered by the same toast forever.
You can also gate by device class in the Customize tab: Display the notification on Desktop, Tablet, and Mobile independently, with three checkboxes. A bottom-bar promo that takes 60 pixels of vertical space on desktop might eat half a phone screen on mobile, so turning it off there is a real win.
The Analytics dashboard
The Pro Analytics page is one of the things that pays for the upgrade.
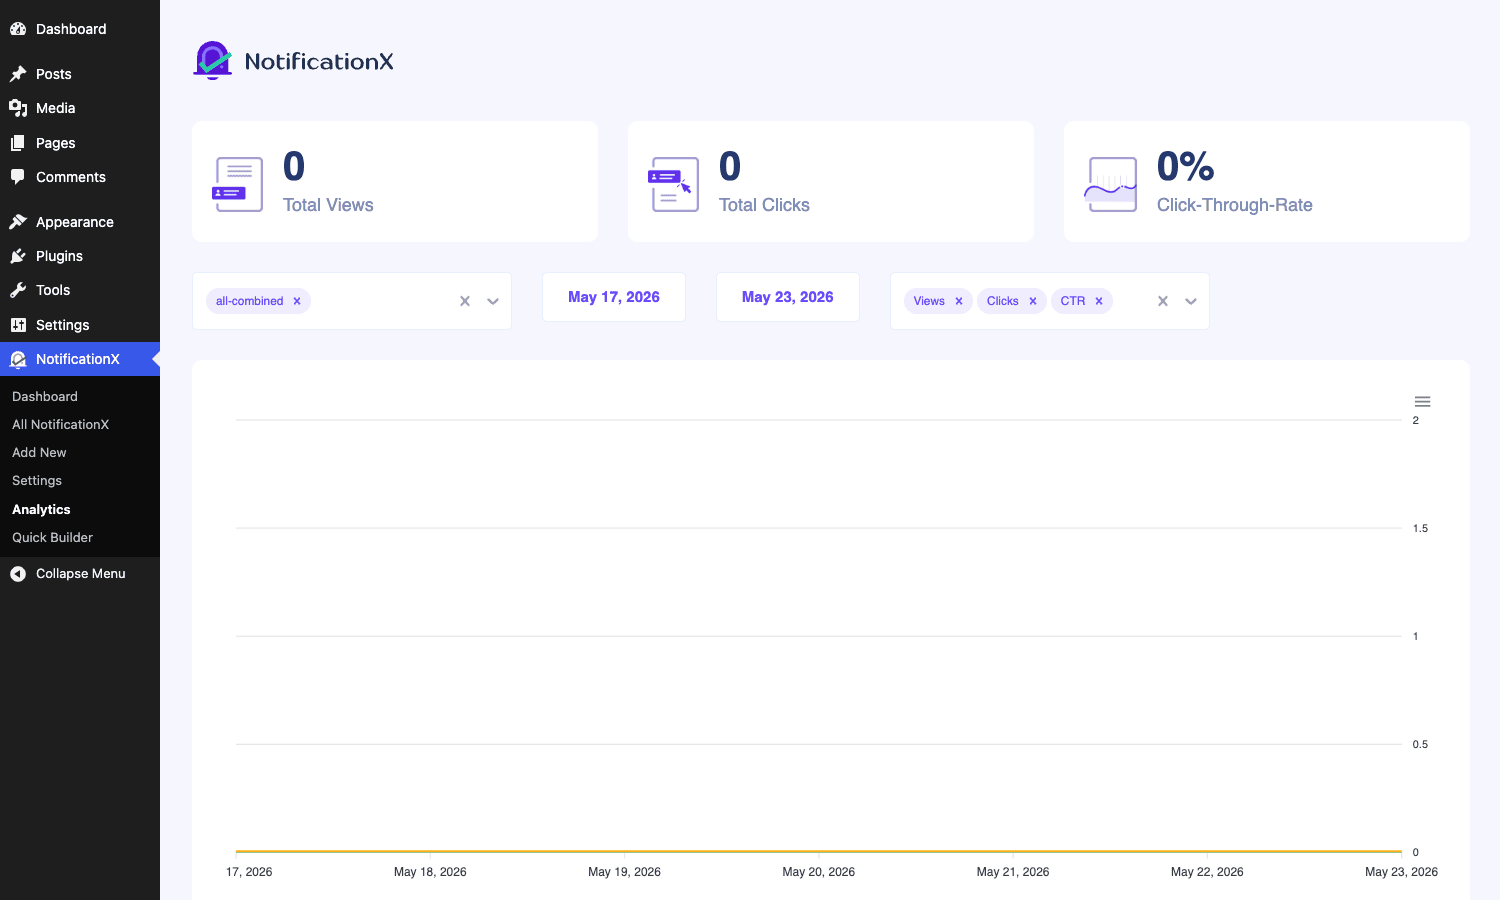
You get three big metric cards at the top: Total Views, Total Clicks, Click-Through-Rate. A date range picker lets you compare any two days or any custom window, and a notification picker lets you filter the chart to a single notification or to "all combined".
The chart itself plots impressions, clicks, and CTR over time. You can toggle each metric on or off so you can read the chart at a glance. If you are running a campaign, you can watch the impressions spike on launch day, then watch the CTR settle as the novelty wears off.
The analytics data is also what powers A/B testing. NotificationX Pro lets you create two variants of a notification, split traffic between them, and let the dashboard pick a winner over a week or two of running. The setup is straightforward: create the second variant under the same notification entry and let the plugin handle the split.
Settings page tour
The Settings page is where the global toggles live, separated into eight tabs.
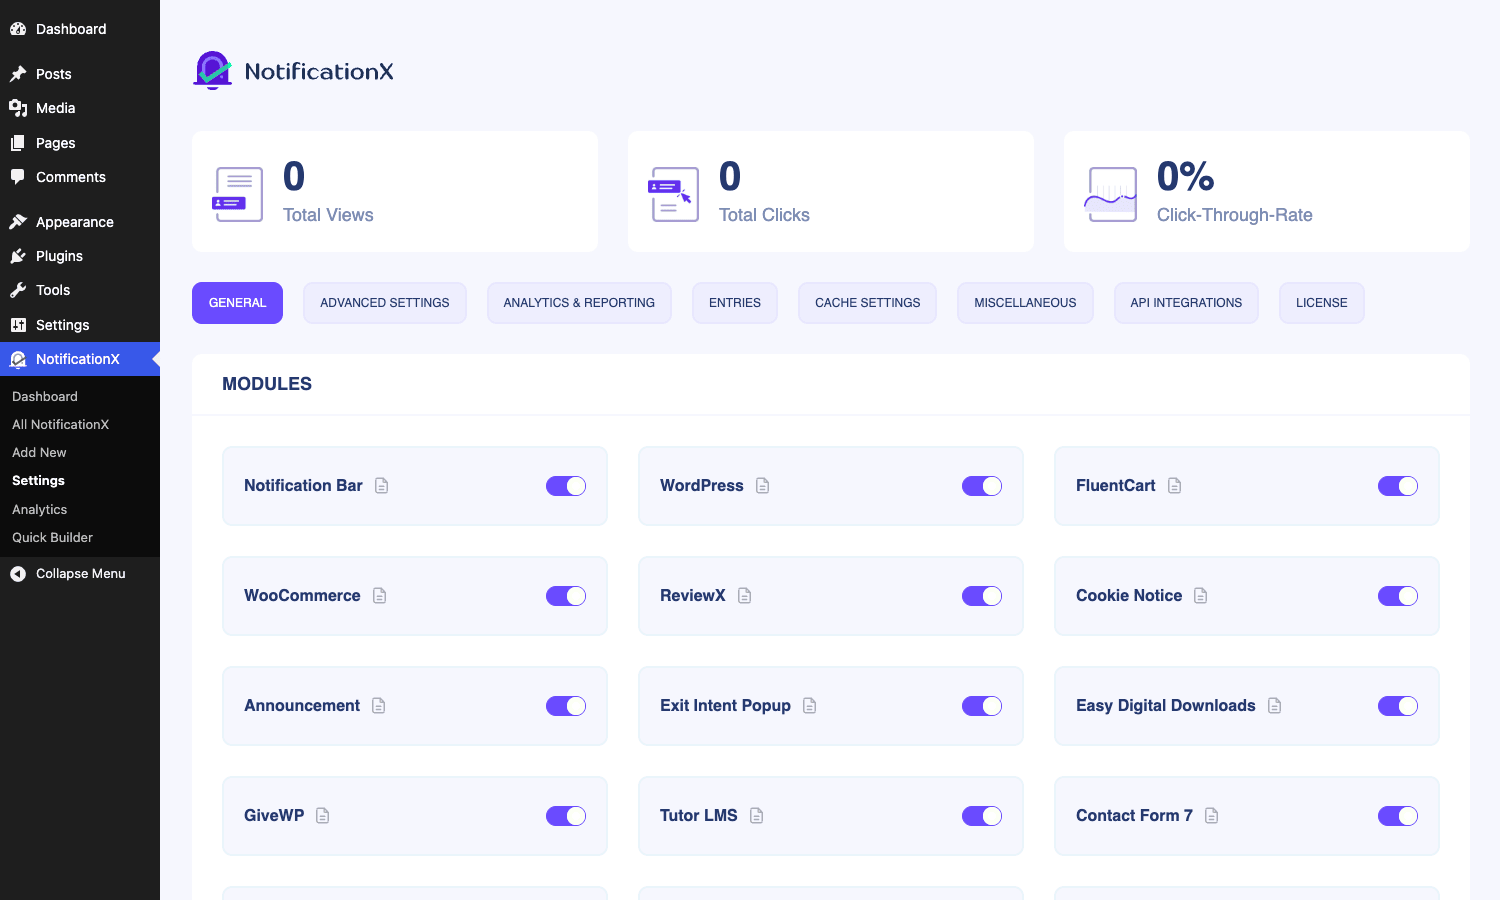
General is the big one. It has a Modules grid where you turn each integration on or off (WooCommerce, EDD, Mailchimp, etc.). Disabled modules do not load their JavaScript on the frontend, so leaving the ones you do not use turned off is good for performance.
Advanced Settings has options for Geolocation API selection (which IP-to-city service to use), notification queueing behavior, default frontend script load priority, and a global "asynchronous load" toggle.
Analytics & Reporting controls whether to track impressions and clicks at all, how long to keep the data, and whether to anonymize visitor IPs.
Entries controls how many notification entries to cache and how often to refresh source data (the WooCommerce orders feed, the Mailchimp subscribers feed, etc.).
Cache Settings controls integration with caching plugins. NotificationX runs a small piece of JavaScript on every page load and the engine knows how to play nicely with WP Rocket, W3 Total Cache, LiteSpeed Cache, and most others.
Miscellaneous is the catch-all: branding controls (the white-label toggle is here), GDPR options, debugging output, default fonts, and the "Disable Plugin Loading" master switch for emergency rollbacks.
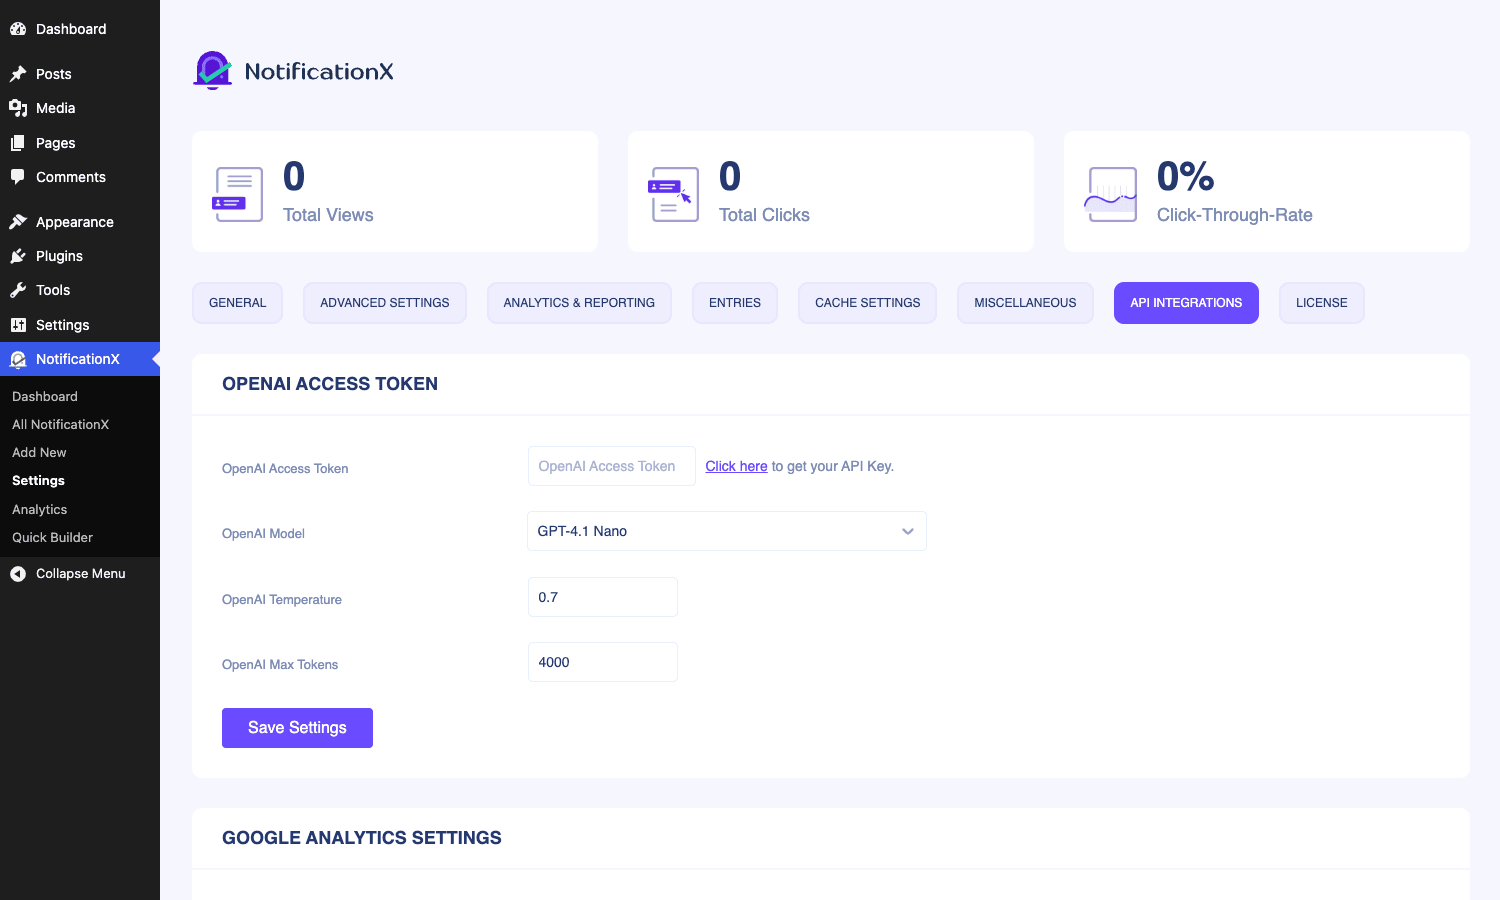
API Integrations is where you paste API tokens for the integrations that need them: OpenAI (for the AI-powered notification bar template generator), Google Analytics, Google Reviews (Places API key), Yelp, Trustpilot, Yotpo. Each integration has its own subsection with the fields it needs.
License is the standard activation tab. You paste your license key from your purchase email and click Activate. Pro features unlock the moment the key is verified.
Real-world use cases
Five concrete examples of what people actually do with NotificationX Pro.
1. WooCommerce store with cold product pages. Wire up a Sales Notification fed from WooCommerce orders, set Display For to Logged-out Users, set Show On to product pages, and tune the Reappearance to "show once per page visit". Visitors landing from Google ads see real recent orders. Conversion lifts in the 5-15% range are common in vendor case studies; expect lower numbers but a positive effect on most stores.
2. SaaS landing page with a free trial. Wire up an Email Subscription notification fed from your CRM (Mailchimp, ConvertKit, or FluentCRM), set Show On to the pricing page only, and set the layout to a Notification Bar at the top of the page. "143 people started a free trial this week" right above the hero pricing table moves the needle.
3. Online course or LMS site. Use the eLearning source against LearnDash, LearnPress, Tutor LMS, or LifterLMS. Show recent enrollments on the course landing pages, but hide them inside the lessons (where they would just distract). The Display rule "Only on Specific Pages" with the landing-page URLs is the right tool.
4. Donation campaign. GiveWP feeds a Donation notification that shows recent donor names and amounts. Pair with a Press Bar at the top of the page that counts down the campaign deadline. Both come from NotificationX Pro, no extra plugin needed.
5. Membership site. Use the membership source (Restrict Content Pro, MemberPress, Paid Memberships Pro). Combine a "Recent Members" toast with a Custom Notification that hand-promotes a specific upcoming live event. The mix of real and curated keeps the page feeling alive without being fake.
Developer reference
NotificationX exposes most of its pipeline through WordPress actions and filters under the nx_ namespace. Both the free engine and the Pro add-on use the same hook system, so anything you build hooks against the underlying NotificationX core class.
Filter: customize the data sent to the frontend script
Use this to add custom data or rewrite values right before they hit the browser.
add_filter( 'nx_frontend_localize_data', function( $data ) {
    $data['custom_greeting'] = 'Hey there!';
    if ( is_user_logged_in() ) {
        $user = wp_get_current_user();
        $data['first_name'] = $user->first_name ?: $user->display_name;
    }
    return $data;
}, 10, 1 );
Filter: gate a notification from showing
nx_can_enable runs before a notification enters the display queue. Return false to suppress it.
add_filter( 'nx_can_enable', function( $can, $type ) {
    // Hide all WooCommerce sales notifications on weekends.
    if ( $type === 'woocommerce_sales' ) {
        $day = (int) date( 'N' );
        if ( $day >= 6 ) {
            return false;
        }
    }
    return $can;
}, 10, 2 );
Filter: change the text of a single notification entry
nx_get_entry lets you rewrite a single entry before it is shown. Useful for masking buyer names beyond the built-in privacy options.
add_filter( 'nx_get_entry', function( $entry, $type ) {
    if ( ! empty( $entry['first_name'] ) ) {
        // Replace the last 3 chars with asterisks for extra privacy.
        $entry['first_name'] = substr( $entry['first_name'], 0, -3 ) . '***';
    }
    return $entry;
}, 10, 2 );
Filter: control the queue
nx_add_in_queue lets you skip an entry as it goes into the queue. You get the notification type and the full settings object.
add_filter( 'nx_add_in_queue', function( $type, $settings ) {
    // Only queue notifications whose source post has a meta flag.
    if ( isset( $settings->source_post_id ) ) {
        $allowed = get_post_meta( $settings->source_post_id, '_nx_allow', true );
        if ( ! $allowed ) {
            return false;
        }
    }
    return $type;
}, 10, 2 );
Filter: trim text length
nx_text_trim_length controls how many characters of a long title get shown. Default is around 30 characters; bump it for product names that need more room.
add_filter( 'nx_text_trim_length', function( $length ) {
    return 50;
} );
Filter: customize sound options
If you want to ship your own chime file as a selectable sound, add it to the nx_sound_options array.
add_filter( 'nx_sound_options', function( $sounds ) {
    $sounds['custom_brand'] = [
        'label' => 'Brand chime',
        'value' => get_template_directory_uri() . '/sounds/brand-ping.mp3',
    ];
    return $sounds;
} );
Action: hook into the inline notification render
The nx_inline action fires when an inline notification is rendered. Use it to wrap the notification in your own markup or add tracking.
add_action( 'nx_inline', function( $entry, $settings ) {
    error_log( 'Inline notification rendered: ' . print_r( $entry, true ) );
}, 10, 2 );
Shortcode
The shortcode is the easiest way to drop a notification anywhere in your post content, a widget, or a page builder block. The [notificationx] shortcode takes an id attribute pointing to the notification’s post ID.
[notificationx id=42]
You can find the ID on the All NotificationX page; it is the post ID of the notification’s CPT entry. Pair the shortcode with the "Use Only as Shortcode" Show On rule from the Display tab and you get a notification that only ever renders where you put the tag, not site-wide.
REST endpoints
The Pro plugin registers a few REST routes under the notificationx/v1 namespace. The most useful ones for custom integrations:
POST /notificationx/v1/csv-upload, used by the bulk-import UI.POST /notificationx/v1/store-ai-presets, saves AI-generated notification text templates.GET /notificationx/v1/get-ai-presets, fetches them.
The full CRUD for notification entries lives under the same namespace and is documented inside the plugin’s source.
Custom notification sources via webhook
If you want to fire a notification from something the plugin does not integrate with (your own SaaS app, a Zapier zap, a webhook from a custom event), the IFTTT and Zapier extensions accept a generic webhook. The webhook URL is generated in the notification settings, and any POST request with a JSON payload of name, title, time, and optional image fields creates a notification entry that gets surfaced to your visitors.
If you prefer rolling your own conversion-tracking pixel into the mix, Pixel Manager for WooCommerce Premium covers the Facebook / Google Ads side, while NotificationX handles the visible toast.
Performance, compatibility, and gotchas
NotificationX ships a single small JavaScript bundle on the frontend (under 30 KB gzipped at the time of writing) plus a tiny CSS file. The bundle is asynchronous, so it does not block the initial render. On a properly cached page the cost is negligible.
The big performance gotcha is image-heavy notification toasts on long-scrolling pages. If your notification shows a product image and you have 50 unique products feeding the notification queue, those 50 images will be fetched in the background. Set the image size in the Design step to a small thumbnail (around 60-80 pixels) so each fetch is small.
The plugin is compatible with most popular caching plugins: WP Rocket, W3 Total Cache, LiteSpeed Cache, WP Super Cache, FlyingPress, and Cache Enabler. The plugin reads its data via a small AJAX call that bypasses the page cache so notifications stay live, even when the page itself is served from cache.
Multilingual sites: NotificationX supports WPML and Polylang. Each notification entry can have a per-language version, and the plugin picks the right one based on the visitor’s current language. If you only run on one language, ignore this.
Compatibility with WooCommerce Subscriptions is solid: subscription renewals fire the same WooCommerce sales notification flow, so a renewing subscriber shows up as "Maria renewed her membership".
Two real gotchas worth flagging:
- Time zones. The relative time string (
{time}) is calculated against the server’s WordPress time zone, not the visitor’s local time. For a US-only store this is fine. For an international audience the difference is usually small enough to ignore. - Privacy. Names and locations are pulled from the order or signup record. Set the privacy options under Settings -> Miscellaneous (anonymize last names, mask city, etc.) before enabling notifications on a site that handles sensitive data.
NotificationX Pro vs WPfomify and TrustPulse
The two most common comparisons are with WPfomify (a direct WordPress competitor; we have a separate WPfomify walkthrough) and TrustPulse (a SaaS by Awesome Motive).
Against WPfomify: both plugins cover the same core ground, WooCommerce, EDD, form integrations, reviews, email signups. NotificationX is broader on email-list integrations (Mailchimp + ConvertKit + MailerLite + ActiveCampaign + FluentCRM + MailPoet + GetResponse vs WPfomify’s tighter list) and ships a stronger analytics dashboard. WPfomify has historically had cleaner Elementor and Astra integrations because of the Brainstorm Force ecosystem connections. The free version of WPfomify is more limited, so if you want to test the waters before paying, NotificationX’s free version goes further.
Against TrustPulse: TrustPulse is SaaS, billed monthly, with a hard cap on notifications and sessions. NotificationX is a self-hosted WordPress plugin with a one-time payment (or lifetime tier) and no caps on volume. TrustPulse has the better polish on signup-only customers and runs on a global CDN that NotificationX cannot match for raw performance, but at NotificationX’s price point and with WordPress’s native database backing the entries, it is a much cheaper long-term bet for any site already running WordPress.
Against ProveSource and Fomo: same SaaS-vs-self-hosted story. NotificationX wins on price and on the depth of WordPress-native integrations.
The bigger picture: if you are already on WordPress, the WordPress-native plugins (NotificationX Pro and WPfomify) almost always make more sense than a SaaS subscription, because the data lives on your own server, the integrations don’t break when the third-party API changes, and the cost is bounded.
While we are mentioning the WPDeveloper family, the rest of the suite is worth flagging too: BetterDocs Pro for knowledge bases, EmbedPress Pro for rich content embeds, and ReviewX Pro for WooCommerce product reviews. NotificationX Pro talks to all three out of the box, so they stack neatly on the same site.
Pricing and licensing
NotificationX Pro is sold in tiered annual plans on notificationx.com (Personal, Professional, Agency, and a Lifetime variant for each). The license unlocks the Pro feature set described above and ships with one year of plugin updates and support. After the year, the plugin keeps working, but updates and the support channel renew on a yearly basis.
NotificationX Pro is also available as a GPL-licensed copy in the GPL Times catalog at the NotificationX Pro product page, which is useful if you want to test the full Pro feature set on a staging or development site without committing to a vendor subscription up front.
Frequently asked questions
Does NotificationX Pro work with the free NotificationX plugin?
Yes. NotificationX Pro is an add-on, not a replacement. You need the free NotificationX plugin installed and active alongside Pro. The free plugin handles the core engine and Pro layers on the extra notification sources, the analytics dashboard, A/B testing, and the email-subscription integrations.
Will it slow down my site?
In normal use, no. The plugin’s JavaScript bundle is small and loaded asynchronously, and the notification data fetch uses a single AJAX call that runs after the page has rendered. If you turn on every module on every page, especially on a heavily-loaded server, you will see a slight overhead. The fix is to turn off the modules you don’t use under Settings -> General -> Modules.
Can I show notifications only on specific pages?
Yes. The Display step has Show On rules: include specific URLs, exclude specific URLs, restrict to a post type, restrict to a taxonomy, or use the notification only as a manual shortcode. You can stack these for fine-grained targeting.
Does it pull real customer data or use fake names?
It pulls real customer data from your actual store, form, or list. NotificationX does not ship fake-name datasets. You can turn on the anonymize options (first-name only, mask city, etc.) under Settings -> Miscellaneous if you want to protect customer privacy while keeping the social-proof effect.
Is it GDPR-compliant?
The plugin itself is GDPR-friendly out of the box: it does not store visitor data unless you turn analytics on, and you can mask names and locations. For a fully compliant rollout, surface the notification only after cookie consent, anonymize names under Settings, and review the data you are pulling against your own privacy policy.
Can I A/B test two notifications against each other?
Yes, in Pro. Create a notification with two variants under the same entry; the plugin splits traffic and the analytics dashboard tells you which one is winning over time.
What happens if I let my Pro license lapse?
The plugin keeps working. You stop receiving plugin updates and lose access to the support channel until the license is renewed. The notifications you have already built stay live.
Can it integrate with my custom CRM or app?
The Zapier and IFTTT extensions are the cleanest path: any webhook from any service can fire a NotificationX entry. For more direct integration, the REST endpoints under notificationx/v1 let you push entries straight from your own PHP or JavaScript code.
Final thoughts
NotificationX Pro is one of those WordPress plugins where the depth shows up the moment you start using it for real. The free version gets you in the door; the Pro version is what you reach for when the marketing team wants A/B testing, the analytics dashboard, and the list of email integrations that goes beyond Mailchimp.
The plugin is built well, the developer hooks are sensible, the admin UI is one of the more pleasant React-based settings panels in the WordPress ecosystem, and the underlying engine plays nicely with caching plugins, multilingual setups, and the WPDeveloper plugin family. Compared to the SaaS alternatives, NotificationX Pro is also simply cheaper over a multi-year horizon, with no per-session or per-notification cap.
The honest reasons not to use it are narrow. If your site is a static brochure with no orders and no signups, you have nothing to feed it. If your traffic is so low that "0 people viewed this page" is the realistic notification, social proof tools won’t fix the underlying problem. If your audience is hostile to popup-style UI in general (academic readers, certain B2B niches), even subtle toasts can hurt rather than help.
For most WordPress stores and lead-generation sites, though, this is the right tool. Plug it in, wire up the source you actually have data for, give it a week to collect a baseline in the analytics dashboard, and tune from there. Notifications that surface real activity earn their place on the page.