

Newsletters got a bad reputation around 2015 because every site forced a popup at you, and most of those popups led to a Mailchimp account that never sent anything useful again. But email is still the highest-conversion channel for most WordPress sites, especially e-commerce. The reason most site owners give up on newsletters isn’t that the channel doesn’t work, it’s that the standard workflow (export from WordPress, paste into Mailchimp, fight with Mailchimp’s editor, hope deliverability holds) takes the energy out of writing the actual email.
MailPoet Premium is the WordPress plugin that does the whole pipeline inside wp-admin. Drag-and-drop email designer, native subscriber lists, signup forms, automation workflows, WooCommerce-aware behavior emails, and the MailPoet Sending Service for actually delivering email reliably. The team behind it is part of Automattic (since 2021), the same group that owns WooCommerce, WordPress.com, Jetpack, and Tumblr. That ownership matters because MailPoet integrates more deeply with WooCommerce than any third-party tool can.
I’ll walk through setting up MailPoet Premium from a fresh install, configuring sender info and sending, designing a newsletter, building a signup form, setting up an automation, and the gotchas around deliverability.
Table of contents
- What MailPoet Premium actually does
- Step 1: Install MailPoet (free) and the Premium add-on
- Step 2: Run the sender info wizard
- Step 3: Configure how email actually gets sent
- Step 4: Import or add your first subscribers
- Step 5: Build a signup form
- Step 6: Design your first newsletter
- Step 7: Send or schedule the newsletter
- Step 8: Set up automation workflows
- Step 9: Connect with WooCommerce for purchase-aware emails
- Compared to Mailchimp, Brevo, ConvertKit, and FluentCRM
- Common gotchas
- Developer reference: hooks, REST, WP-CLI
- Pricing, licensing, and GPL availability
- Quick reference cheat sheet by site type
- Final thoughts
What MailPoet Premium actually does {#what-it-does}
MailPoet is an email marketing tool that lives entirely inside WordPress. Specifically:
- Newsletters, drag-and-drop designed emails sent to subscriber lists on demand or on a schedule
- Subscriber management, lists, segments, tags, custom fields, import/export, manual editing, all in wp-admin
- Signup forms, popups, fixed bars, slide-ins, embedded forms, all built with a visual editor and connected to subscriber lists
- Automations, workflow builder for welcome emails, abandoned cart, win-back, birthday, anniversary, post-purchase follow-up
- Latest Post Notifications, auto-emails subscribers every time you publish a new blog post (daily, weekly, monthly digest mode)
- Re-engagement emails, automatically email subscribers who haven’t opened anything in N months
- WooCommerce emails, replace WooCommerce’s plain transactional emails (order confirmations, shipping notifications) with MailPoet-designed ones, including upsell sections and abandoned cart recovery
- Statistics, opens, clicks, bounces, unsubscribes, revenue (with WooCommerce)
- MailPoet Sending Service (MSS), an SMTP-like service from MailPoet that handles deliverability so you don’t have to set up Amazon SES, SendGrid, or Postmark yourself
The Premium tier unlocks: unlimited subscribers (free tier is capped at 1,000), advanced segmentation, automation premium triggers, removal of the MailPoet branding from emails, A/B testing on newsletters, and priority support. The MailPoet Sending Service has its own pricing tiers based on subscriber count.
Step 1: Install MailPoet (free) and the Premium add-on {#step-1-install}
MailPoet works the way WP All Import does: a free base plugin from WordPress.org provides the email engine, and MailPoet Premium is a separate plugin that adds the Premium features. Both need to be active.
- Install MailPoet (free) from Plugins → Add New, search "MailPoet."
- Install MailPoet Premium by uploading the Premium zip via Plugins → Add New → Upload Plugin.
- Activate both.
Or via WP-CLI:
wp plugin install mailpoet --activate
wp plugin install /path/to/mailpoet-premium.zip --activate
After activation a new MailPoet menu item appears in the WordPress admin sidebar with sub-items: Homepage, Emails, Automations, Forms, Subscribers, Lists, Settings, Help.
On first run, MailPoet shows a marketing-style landing page with a Begin setup button. Click it.
Step 2: Run the sender info wizard {#step-2-wizard}
The setup wizard is two steps and takes about a minute.
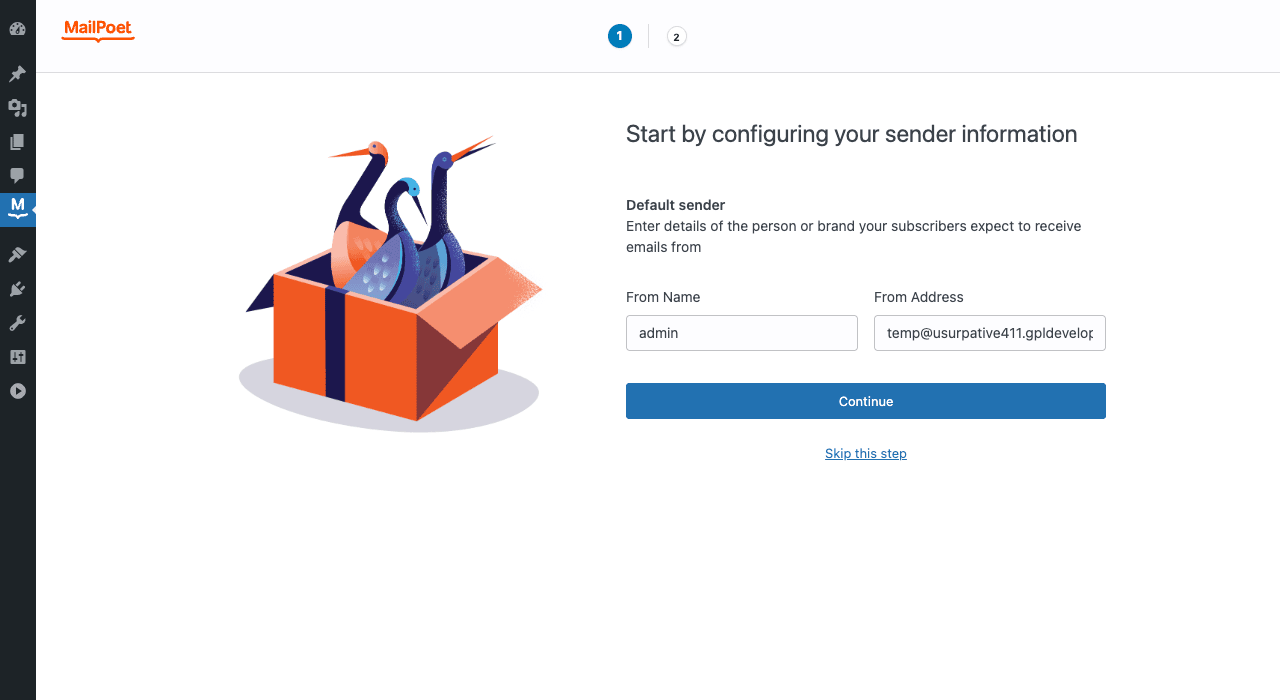
Step 1: Default sender, From Name and From Address. The From Address is what’s most important for deliverability:
- Use a real email address at your own domain (
newsletter@yoursite.com, NOTyou@gmail.com) - The domain must be SPF/DKIM verified or your emails go to spam
- If you don’t yet have proper DNS records, the wizard will warn you in step 3
Step 2: Privacy and data settings, two radio choices about whether MailPoet can collect anonymous usage data and whether subscribers must double-opt-in. Recommended defaults:
- Anonymous data collection: pick whichever you’re comfortable with; doesn’t affect functionality
- Double opt-in: Enable. When someone signs up, they get a confirmation email and must click it. Single opt-in (no confirmation) leads to spam complaints and damages deliverability. Always use double opt-in for real lists.
Click Continue. You land at the actual MailPoet dashboard.
Step 3: Configure how email actually gets sent {#step-3-sending}
This is the step most newsletters silently fail on. WordPress’s default wp_mail() uses your hosting’s PHP mail() function, which 90% of hosts will gladly use to send your email and 90% of inboxes will gladly send to spam.
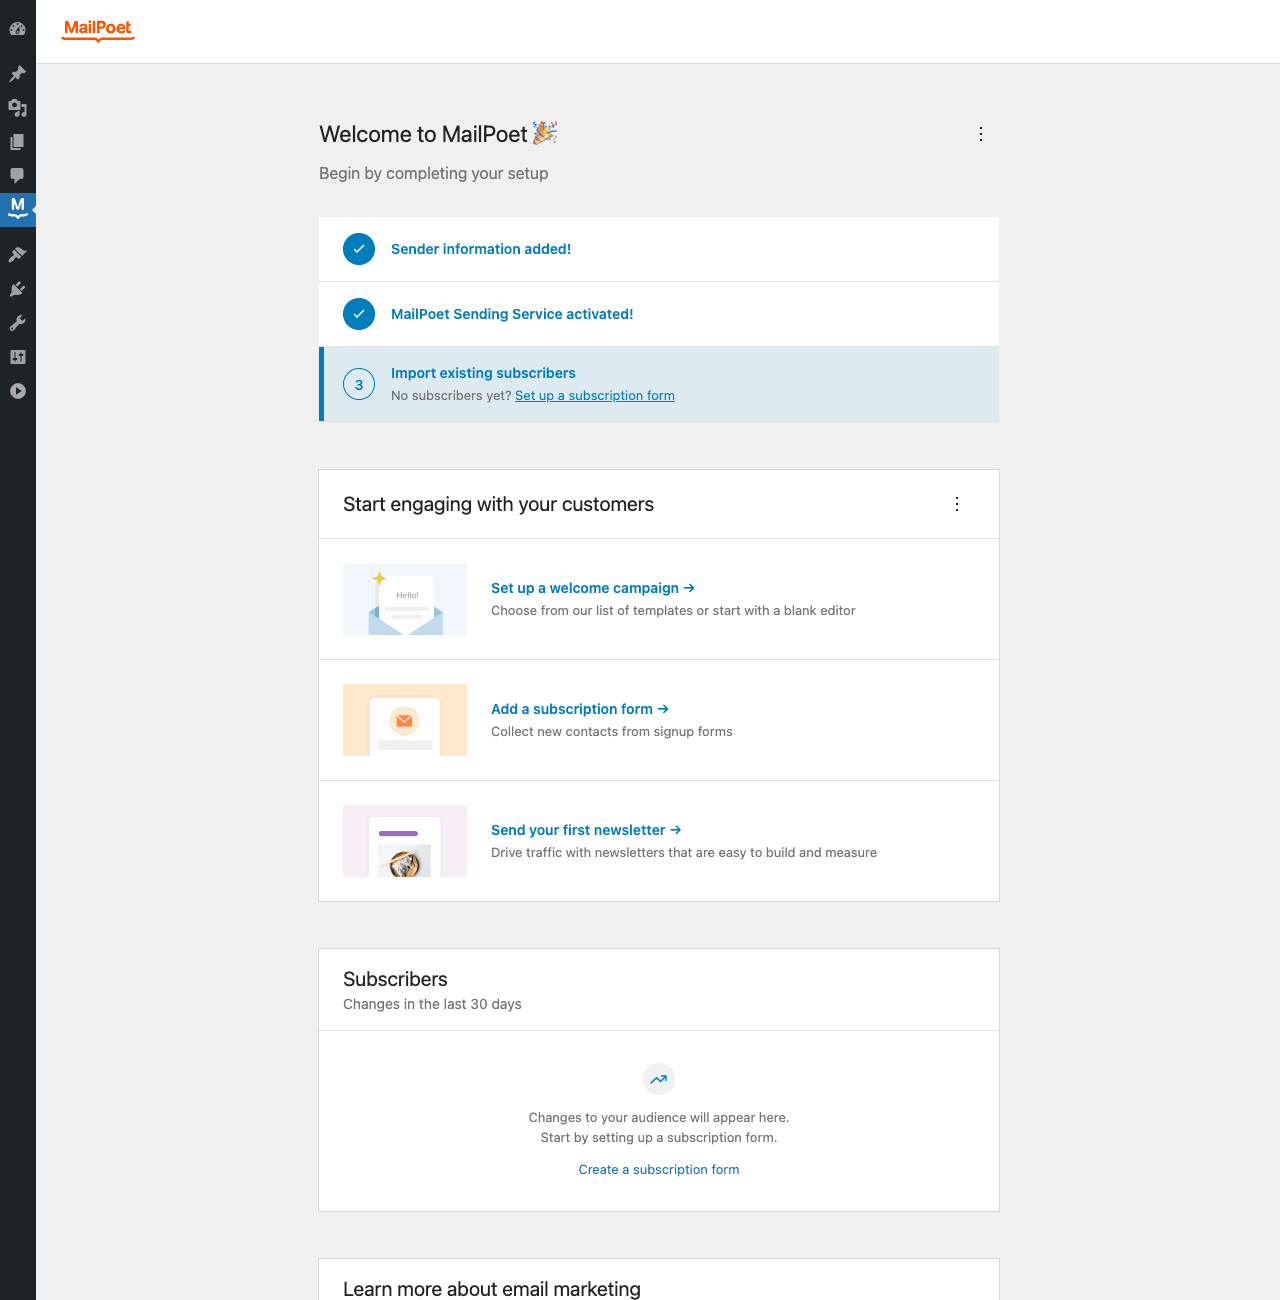
The MailPoet homepage dashboard shows a checklist at the top: Sender information added → MailPoet Sending Service activated → Import existing subscribers. Click on "MailPoet Sending Service" to set up real sending.
Three options:
- MailPoet Sending Service (MSS), MailPoet’s own paid SMTP service. Easiest setup: enter your API key, you’re done. Free tier covers up to 500 subscribers; paid tiers up to 100k+. Best deliverability of the three.
- Your own SMTP, point MailPoet at a third-party SMTP like Amazon SES, SendGrid, Postmark, or Brevo (formerly Sendinblue). Slightly more setup. Cheaper at scale.
- PHP mail (default), DON’T use for real sending. Fine for transactional emails to one or two people maybe, awful for newsletters.
If you have a separate SMTP plugin like WP Mail SMTP Pro installed, MailPoet can use those credentials too via the "Other SMTP" option.
Verify your domain. Whichever sending option you pick, you need DNS records:
- SPF, a TXT record at your root domain that lists which servers are allowed to send mail as you. Provider gives you the exact value
- DKIM, a cryptographic signature your provider generates that proves mail is really from you. Usually added as 2 CNAME records
- DMARC, a TXT record that tells receiving servers what to do when SPF/DKIM fails
MailPoet’s Settings → Advanced screen has a "Check DNS records" tool that validates whether your records are right. Run it. Without these, even with the best sending service, your emails will hit spam folders.
Step 4: Import or add your first subscribers {#step-4-subscribers}
Navigate to MailPoet → Subscribers.
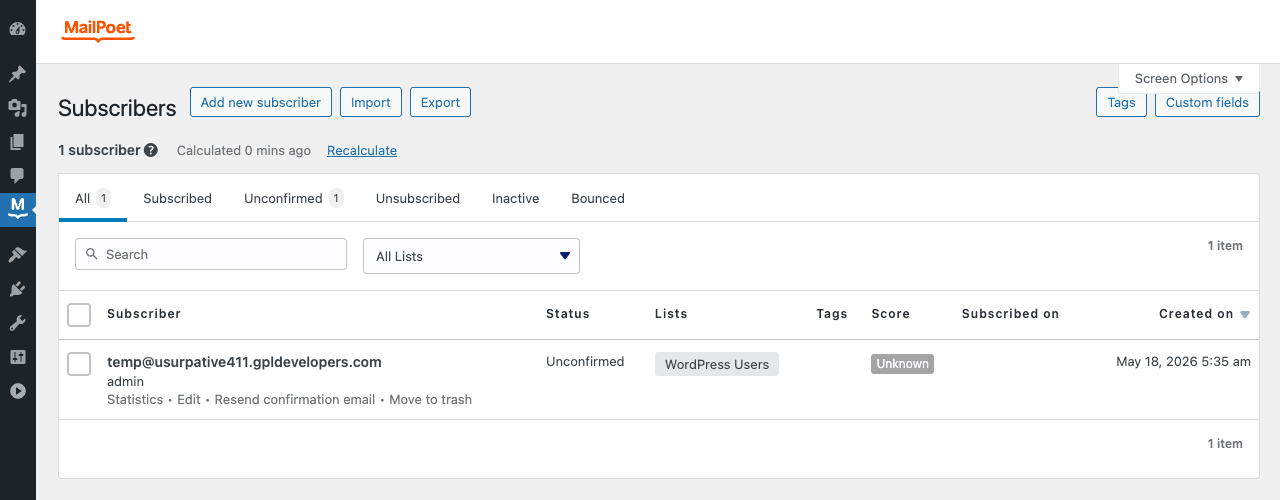
The subscribers screen has tabs: All, Subscribed, Unconfirmed, Unsubscribed, Inactive, Bounced. Add subscribers three ways:
- Add new subscriber, manual entry, one at a time. Useful for testing.
- Import, paste a CSV, upload a file, or import directly from another email service (Mailchimp, MailerLite, ActiveCampaign export formats). MailPoet maps columns to fields, you assign to lists, done.
- Forms, the recommended way for ongoing growth. Build a signup form (next step), embed it on your site, subscribers come in over time.
Each subscriber has:
- Email, required, unique
- First/Last Name, for personalization
- Lists, the email lists they’re on (e.g.,
Newsletter,Customers,Beta Testers) - Tags, looser labels for segmentation (
vip,bought-in-last-30-days,gave-feedback) - Custom fields, anything else: phone, company, address, custom date for renewal-based campaigns
- Status, Subscribed, Unconfirmed (sent double opt-in, awaiting confirm), Unsubscribed, Inactive (haven’t opened in 6+ months), Bounced
Lists vs Tags vs Segments:
- A List is a manually curated group. "All my newsletter readers." Subscribers join via a signup form or import.
- A Tag is a marker you can add to subscribers individually or in bulk. "Has bought a product." Tags are useful for filtering inside automations.
- A Segment is a dynamic filter: "subscribers who opened the last 3 emails AND are in the Newsletter list AND live in the US." Segments update automatically as subscriber state changes. Premium feature.
Most sites start with one or two lists ("Newsletter" + "Customers" if WooCommerce) and add tags as you build more sophisticated workflows.
Step 5: Build a signup form {#step-5-forms}
Navigate to MailPoet → Forms and click Add new form.
MailPoet asks what kind of form you want:
- Form Editor (popup, slide-in, fixed bar, below pages), visual editor with drag-and-drop blocks. Most flexible.
- Subscription form widget, a simple inline form to drop in a sidebar or any widget area.
For most sites, start with the Form Editor and pick a template (welcome popup, footer bar, sidebar inline). The editor uses Gutenberg blocks under the hood, so you get the familiar WordPress block experience.
Configure:
- Form fields, at minimum email. Add First Name if you want personalization. Don’t add 5 required fields, that kills conversion.
- Submit button, copy, style, color
- Confirmation, what to show after submission. "Check your email to confirm" message (double opt-in), or a redirect URL.
- Display rules, popup: trigger after X seconds, when scrolling N%, on exit intent. Fixed bar: top or bottom, when to show.
- Lists, which list(s) new signups are added to.
Save the form. MailPoet generates a shortcode like [mailpoet_form id="3"] you can drop into any page or post, or you can use the display rules to auto-show as a popup or bar site-wide.
A note on consent and GDPR: in the form settings there’s a Privacy checkbox option. Enable it. Add a link to your privacy policy. For EU subscribers, the double opt-in + privacy consent + record of consent (MailPoet logs this) is what keeps you GDPR-compliant.
Step 6: Design your first newsletter {#step-6-newsletter}
Navigate to MailPoet → Emails and click Add new email. You’ll see four email types:
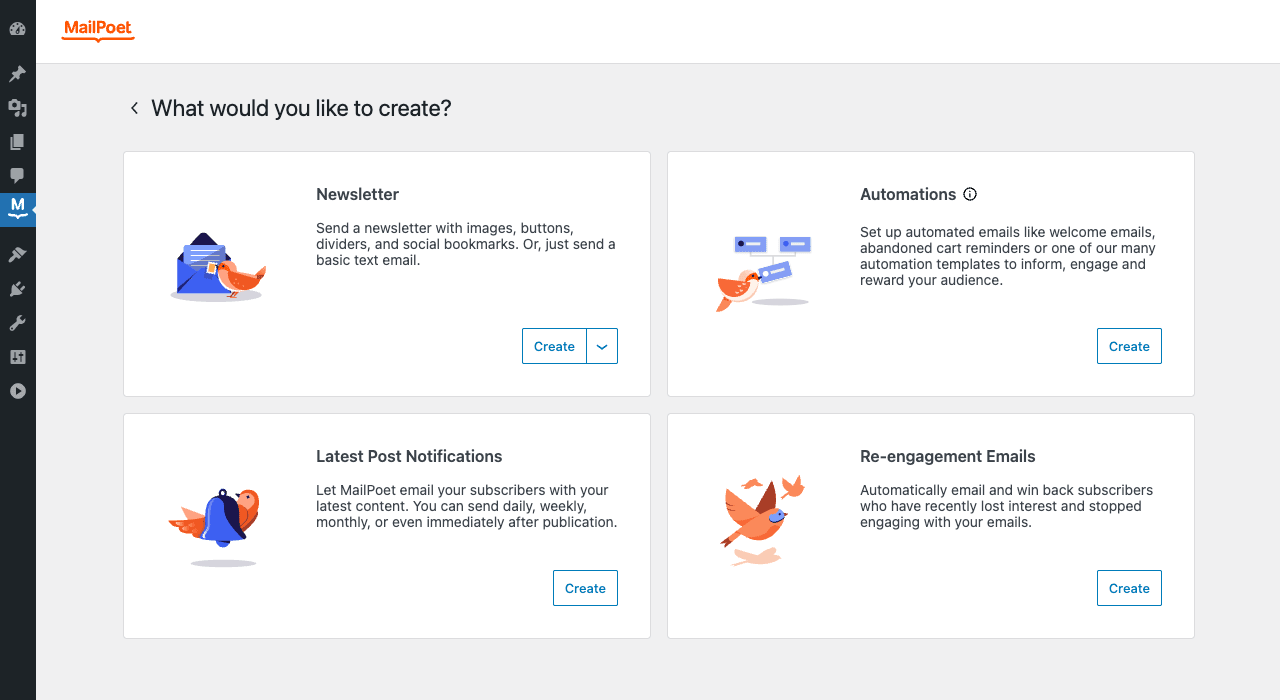
- Newsletter, a one-off email. Pick this for an announcement, holiday message, promo.
- Automations, workflow-triggered emails (see Step 8).
- Latest Post Notifications, auto-sends a digest of new blog posts on a schedule.
- Re-engagement Emails, automatically sends to subscribers who haven’t opened in N months.
Pick Newsletter → Create.
MailPoet asks you to pick a template. The library has roughly 70 pre-designed templates organized by category (Newsletter, E-commerce, Announcement, Welcome, etc.). Pick one close to what you want, or start blank. You can save your own as a template later for reuse.
The newsletter editor is drag-and-drop, similar to building a page in Gutenberg but with email-specific constraints:
- Layout columns, 1, 2, or 3 columns
- Content blocks, text, image, button, divider, social icons, footer, header
- Automatic content blocks, pull the latest 3 blog posts dynamically (great for digest emails), pull latest 4 WooCommerce products
- Personalization tags,
[subscriber:firstname]renders the subscriber’s first name; falls back to a default if missing
Editor tips:
- Keep emails 600px wide maximum. Wider than that and they break on mobile.
- Test text size 14-16px. Smaller is hard to read on mobile.
- Always include both an HTML version (the visual design) and a plain text version (MailPoet generates this automatically but you can edit).
- Add alt text on every image, many email clients block images by default.
- Don’t put critical info inside an image. The text version of your headline should be HTML, not an image.
After designing:
- Subject line, the most important field for open rate. Keep it under 60 chars, personalize when possible ("Hey Sarah, here’s what’s new").
- Preview text, the gray text after the subject in inbox views. ~90 chars. Don’t waste this. "Check out our new yoga mat range" is better than "View this email in your browser."
- From name and email, defaults to the sender from Step 2; override for specific campaigns.
Hit Preview to send yourself a test email. Check it in Gmail, Outlook, and your phone’s mail app. Anything off, fix.
Step 7: Send or schedule the newsletter {#step-7-send}
Click Next on the editor. You’ll see the send screen:
- Lists, which list(s) get this newsletter. Multi-select. Subscribers in multiple selected lists only get one copy.
- Segments, optional, filter the list further. "Only subscribers tagged ‘vip’."
- Exclude, optional, exclude certain lists or segments.
- Send time, "Now", "Schedule for later", "Send at the best time for each subscriber" (Premium feature that picks a per-subscriber send time based on past engagement).
For a first send, schedule for a time that makes sense for your audience (Tuesday morning for B2B, Saturday morning for B2C). Click Schedule.
MailPoet sends in batches in the background. Speed depends on your sending service: MSS handles ~5,000 emails/hour, third-party SMTPs vary. You can leave wp-admin; sending continues via WP-cron (or a real server cron if configured).
Monitor the send. MailPoet → Emails → click the newsletter → Statistics. Live updates show:
- Sent
- Opens (% of sent)
- Clicks (% of opened)
- Unsubscribes
- Bounces (hard vs soft)
- Revenue (if WooCommerce-linked)
Typical first-newsletter stats for a small, engaged list: 25-40% open rate, 3-8% click rate. If you’re below 15% opens or above 5% bounce rate, you have a deliverability problem; check spam reports and DNS records.
Step 8: Set up automation workflows {#step-8-automation}
Navigate to MailPoet → Automations and click New automation. Automations are workflows: a trigger fires, MailPoet sends an email (or several, spaced out over days/weeks) to the subscriber.
Built-in workflow templates:
- Welcome email, triggers when someone joins a list. Most common: a 3-email welcome series spread over a week.
- Abandoned cart, fires when a WooCommerce customer adds to cart, fills checkout, but doesn’t complete. Sends a "you left something in your cart" email 1 hour later, then a follow-up 1 day later.
- First purchase, fires after a customer’s first WooCommerce order. Could thank them, ask for a review, offer a related product.
- Repeat purchase, fires on Nth order (3rd, 5th, 10th). Loyalty trigger.
- Birthday/anniversary, fires on a date custom field. Send a coupon.
- Win-back, fires when a subscriber has been inactive for N days/months.
The automation editor is a vertical flowchart:
- Trigger, pick from a list of events (subscribed, tagged, ordered, abandoned cart, custom event)
- Optional condition, branch the workflow based on subscriber data
- Email, design or pick an existing template
- Delay, wait N hours/days
- Repeat steps 3-4 for multi-email series
Save and activate. The automation runs continuously: every time the trigger fires for a new subscriber, MailPoet queues their workflow.
Welcome series example:
Trigger: Subscriber joins "Newsletter" list
↓
Wait: 5 minutes
↓
Email 1: "Welcome! Here's what to expect."
↓
Wait: 2 days
↓
Email 2: "Our most popular guide" (link to top blog post)
↓
Wait: 5 days
↓
Email 3: "A small ask: hit reply with what you'd like to learn"
The third email asking for a reply does double duty: replies tell Gmail and other ISPs your list is engaged (improves deliverability), and you get real feedback for future content.
Step 9: Connect with WooCommerce for purchase-aware emails {#step-9-woocommerce}
If you run a WooCommerce store, this is where MailPoet really pulls ahead of generic email tools.
After activating MailPoet on a WooCommerce site, you get:
- Auto-subscription on purchase, customers who buy can be auto-subscribed to a list (Settings → WooCommerce). Make sure the checkbox is opt-in (asks customers explicitly), not silently checked. GDPR cares.
- Customer segments, automatic segments based on WooCommerce data: "spent over $100", "bought in last 30 days", "didn’t buy in last 6 months", "bought product X".
- WooCommerce transactional emails replaced, the default WC emails (order confirmation, shipping, etc.) get replaced with MailPoet-designed versions, which means consistent branding and the ability to add cross-sell sections at the bottom of receipts.
- Abandoned cart automation, already mentioned. The killer feature. A well-tuned abandoned cart sequence recovers 5-15% of abandoned carts depending on niche. Pays for the plugin in week one for most stores.
- Revenue attribution, newsletter stats show which sales came from which campaign. So you know if the Tuesday newsletter actually drove orders or just opens.
For a store with Subscriptions, you can also build a renewal-reminder automation that fires N days before a subscription renews, asking the customer to update their card if needed.
Compared to Mailchimp, Brevo, ConvertKit, and FluentCRM {#comparison}
Five tools with overlapping but distinct positioning:
MailPoet Premium, lives inside WordPress, deep WooCommerce integration, drag-drop newsletter editor. Best for WooCommerce stores up to medium size and content sites that want everything in wp-admin. Sending happens via MailPoet’s own service or your SMTP. Subscriber data lives in your WordPress database.
Mailchimp, the well-known SaaS. Lives outside WordPress. Decent free tier, prices scale aggressively. Has a WP plugin for capture forms but the editor and subscriber data are on Mailchimp’s side. Better automation features at higher tiers. Templates library is extensive. The pricing pain point: jumps fast above a few thousand subscribers.
Brevo (Sendinblue), another SaaS, generous free tier, transactional email included. Send-time pricing (per email) instead of subscriber-count pricing, which can be cheaper for low-frequency senders. SMS marketing baked in. WordPress plugin is competent but doesn’t go as deep as MailPoet.
ConvertKit, built for creators (writers, podcasters, course sellers). Tag-based subscriber model (no "lists"), strong on automation and sequences. Higher-end pricing. Not a great fit for e-commerce, but excellent for newsletters and digital products.
FluentCRM, also lives inside WordPress, also has tight WooCommerce integration. Newer than MailPoet, more "CRM" features (contact records, custom fields, automations, sales pipeline), less polished newsletter editor. Heavier database footprint. Good if you want CRM + email in one plugin instead of MailPoet’s tighter email-only focus.
Pick MailPoet if:
- Your site is in WordPress and you want one tool with no external account hopping
- You run WooCommerce and want abandoned cart + revenue attribution natively
- You don’t want to manage external SaaS subscriptions on top of your hosting
Pick Mailchimp/Brevo/ConvertKit if:
- You need to send from somewhere your WordPress site isn’t (e.g., from multiple sites against one list)
- You want SMS or transactional email in the same tool
- Your list is gigantic (250k+) and SaaS-scale sending matters more than integration depth
Pick FluentCRM if:
- You want CRM features alongside email, not just newsletters
- You’re already deep in the WPFluent (Forms, SMTP, CRM) ecosystem
Common gotchas {#common-gotchas}
-
Emails landing in spam. Single biggest cause: missing or broken SPF/DKIM/DMARC. Run MailPoet → Settings → Advanced → Check DNS Records. Fix anything that’s red. After fixing, test by sending yourself an email and checking the Show Original headers in Gmail; SPF, DKIM, and DMARC should all show
pass. -
Slow sending or sending appears stalled. WordPress’s pseudo-cron only fires when someone visits the site. For a low-traffic site, MailPoet may send 50 emails and then sit for hours. Set up a real server crontab:
*/5 * * * * curl -s https://yoursite.com/wp-cron.php?doing_wp_cron > /dev/null
Or use MailPoet’s "Linux Cron" mode in Settings → Advanced → Task Scheduler, which gives you a CLI command to put in cron directly.
-
Bounce rate climbing past 2%. Stale list. Run a re-engagement automation that emails inactive subscribers once and removes (or moves to a separate "inactive" list) anyone who doesn’t open it. High bounces signal ISPs that you’re spammy and tanks deliverability for engaged subscribers too.
-
MailPoet says "Sender doesn’t have a valid SPF record" after DNS changes. DNS propagation takes time. Wait an hour, re-check. Most providers propagate in 5-15 min but Cloudflare DNS can take up to 24h.
-
Subscribers not receiving the confirmation email. Double opt-in confirmations send like any other email. If they don’t arrive, sending isn’t configured correctly. Test by adding yourself manually, check inbox AND spam. If spam, fix sending.
-
Latest Post Notifications send the same post twice. Happens if the post is published, MailPoet picks it up, then it’s re-saved (updated) and MailPoet’s "include updates" setting is on. Turn off "Send when posts are updated."
-
WooCommerce order confirmation email is broken / blank. MailPoet replaces WC transactional templates. If your store uses a custom WC email plugin (like the YITH WooCommerce Email Templates extension), there’s a conflict. Either deactivate the custom plugin or tell MailPoet not to handle WC transactionals in Settings → WooCommerce.
-
Premium features still locked despite both plugins active. License not validated. Settings → Key Activation.
-
Form not appearing on the front-end after embedding. Check the form’s display rules. If "Show after 5 seconds" is set, you have to wait 5 seconds. If the form is set to display on specific pages only, verify URL matching. For shortcode placement, view source to confirm the shortcode rendered to HTML (not the literal
[mailpoet_form id="3"]text, which means a plugin or theme is stripping shortcodes). -
Newsletter editor crashes or freezes. Usually a browser issue with a very large email (lots of automated blocks pulling 20+ posts). Split into multiple shorter emails or upgrade to a faster machine. Also clear browser cache; the editor is a heavy React app.
Developer reference: hooks, REST, WP-CLI {#developer-reference}
MailPoet’s developer surface is more modest than typical WordPress plugins (it’s a heavily class-based modern codebase, fewer raw filter hooks). Some you can use:
Hook into a subscriber’s link click event (after they click a link in an email):
add_action( 'mailpoet_link_clicked', function( $click_data ) {
 if ( $click_data->getLink()->getUrl() === 'https://yoursite.com/special-page' ) {
 $subscriber_id = $click_data->getSubscriber()->getId();
 update_user_meta( $subscriber_id, 'special_link_clicked', current_time( 'mysql' ) );
 }
} );
Programmatic subscriber creation via the MailPoet API class:
if ( class_exists( '\\MailPoet\\API\\API' ) ) {
 $mailpoet_api = \MailPoet\API\API::MP( 'v1' );
 $subscriber = $mailpoet_api->addSubscriber(
 array(
 'email' => 'jane@example.com',
 'first_name' => 'Jane',
 ),
 array( 1 ),
 array( 'send_confirmation_email' => true )
 );
}
Trigger a custom event for automations (so your code can fire workflows on arbitrary site events):
do_action( 'mailpoet/automation/trigger/custom_event_x', array(
 'subscriber_email' => 'jane@example.com',
 'context' => array(
 'product_id' => 42,
 'event_at' => time(),
 ),
) );
Then in the automation builder, pick "Custom event" as the trigger and reference custom_event_x.
WP-CLI commands MailPoet exposes:
# create starter email templates
wp mailpoet:email-editor:create-templates

# run pending database migrations after a plugin update
wp mailpoet:migrations:run

# check migration status
wp mailpoet:migrations:status
The migration commands are critical after a major MailPoet version bump, they update the database schema. If a site stops working post-update, running wp mailpoet:migrations:run is the first thing to try.
REST API: MailPoet exposes endpoints at /wp-json/mailpoet/v1/ for subscriber management and form submissions. Documented in the plugin’s readme.txt and the official developer documentation. Use cases: a headless front-end submitting signups, a CRM syncing subscriber state, a Slack notifier listening to bounce events.
For most sites, the programmatic API class is more useful day-to-day than REST: it’s strongly typed, handles batching, and respects MailPoet’s internal validation.
Pricing, licensing, and GPL availability {#pricing}
MailPoet has two cost components:
- The Premium plugin itself: tiered by site count (1, 3, 10, unlimited). Renews yearly.
- The MailPoet Sending Service (MSS): tiered by subscriber count, separate billing. Optional if you want to use your own SMTP.
The plugin is GPL-licensed (mandatory for WordPress plugins), so the code is freely redistributable. The MSS sending service is a hosted SaaS and not GPL, you’d need a paid subscription for that specifically.
You can install on any number of sites. What that gets you:
- Trying it before committing to a yearly subscription
- Personal projects that don’t need vendor support
- Agencies with internal support that just need the code
- Development and staging sites where you don’t want to burn license seats
What it doesn’t get you:
- Official MailPoet support tickets
- MSS sending, you’ll need your own SMTP setup (Amazon SES, SendGrid, Postmark, Brevo, etc.), which is fine and often cheaper at scale anyway
Quick reference cheat sheet by site type {#cheat-sheet}
Blog / content site:
- 1 list: "Newsletter"
- Latest Post Notifications: weekly digest of new posts
- Welcome series: 3-email intro
- Signup form: footer bar + below-post inline form
- SMTP: Amazon SES (cheap) or MSS free tier
WooCommerce store (small):
- Lists: "Customers" (auto-subscribe at checkout, opt-in), "Newsletter" (manual via form)
- Abandoned cart automation: 1 hour after abandon + 24 hour follow-up
- Post-purchase: thank-you + review request 7 days later
- WooCommerce transactional emails: replace with MailPoet versions
- SMTP: MSS for ease, SendGrid for scale
WooCommerce store (larger, 10k+ orders/year):
- Add segments by product category bought, by total spent
- Win-back automation for customers who haven’t ordered in 90 days
- Birthday automation if you collect DOB
- Renewal automation for WooCommerce Subscriptions
- SMTP: Amazon SES (best $/email at scale)
Membership / course site:
- Lists by membership level
- Welcome series tied to each level
- Drip-feed course content via timed sequences
- Re-engagement for cancelled members
- SMTP: MSS or Postmark (best for transactional + marketing mix)
Multi-author blog / news site:
- Latest Post Notifications: daily for breaking news, weekly digest for everything else
- Per-author lists ("Sarah’s columns")
- Form on every author’s archive page
- SMTP: MSS or Amazon SES
B2B newsletter:
- Smaller, higher-engagement list
- Send Tuesday/Wednesday morning
- Personalization heavy: name, company, role
- Re-engagement after 90 days inactive
- SMTP: Postmark (best deliverability to corporate inboxes)
Final thoughts {#final-thoughts}
MailPoet is the right answer when "the email tool is part of the WordPress site" is what you want. You don’t bounce out to a SaaS. Your subscriber data lives in your database, in tables you can back up with UpdraftPlus or WP-Optimize. Your forms are in WordPress, your editor is in WordPress, your stats are in WordPress.
The trap is treating an email plugin as the strategy. The plugin is the delivery vehicle; the content is what makes a newsletter work. A well-tuned MailPoet with the wrong content sends spam. A blank Mailchimp with great content drives revenue. Spend more time on the email body than on the editor configuration.
The setup order for a new install:
- Install both MailPoet + MailPoet Premium and activate
- Run the sender info wizard
- Configure real sending (MSS or SMTP, with SPF/DKIM/DMARC verified)
- Set up your first list
- Build a signup form and embed it
- Import any existing subscribers (with explicit consent)
- Send a test newsletter to yourself, verify inbox placement
- Set up the welcome automation
- (WooCommerce) set up abandoned cart automation
- Send your first real newsletter
After that, every campaign is "Add new email → Newsletter → design → schedule." The infrastructure stays out of the way.
Just pair it with a real SMTP service for actual sending and verify your DNS records before going live.