

You know enough about something to teach it. Maybe you’re a developer who could teach React. Maybe you’re a yoga instructor with a 6-week beginner program. Maybe you bake sourdough and have a way of explaining hydration that everyone in your friend group asks for. You’ve thought "I should put this online and sell it" more than once.
The actual building of an online course on WordPress used to be a nightmare. You needed a separate course platform like Teachable or Thinkific (which take 5-10% of every sale forever). Or you cobbled together a custom WordPress setup with WooCommerce + a membership plugin + a video host + a quiz plugin + a certificate plugin and hoped they didn’t break when one of them updated. Or you bought LearnDash, the dominant WordPress LMS, but found its UI dated and its workflow heavier than you wanted.
Tutor LMS is a newer LMS plugin that takes a different approach: everything you need to build, sell, and run an online course is in one plugin with a modern interface that doesn’t feel like it was designed in 2012. Course Builder, video lessons, quizzes, assignments, certificates, gradebooks, drip content, multi-instructor support, native payments (no WooCommerce required), reporting, and a student-facing dashboard that looks like a real product. The free Tutor LMS on WordPress.org handles the basics. Tutor LMS Pro adds the features you actually need to run a real course business.
This is a step-by-step walkthrough. By the end you’ll have your first course built, your payment gateway connected, a student-facing course page live, and you’ll understand how to handle the day-to-day of running courses (new students, refunds, certificates, content drip, quizzes). The whole setup takes about 60-90 minutes for a first course; subsequent courses go much faster because you’ve learned the patterns.
I’ll use Tutor LMS Pro for this guide because the Pro features are what make this a real product rather than a hobby tool. The free version is fine for testing the editor, but you’ll want Pro before launching anything you care about.
What you’ll have when you’re done
- A working WordPress LMS with Tutor LMS Pro installed and configured.
- One complete course with lessons, video content, a quiz, and an assignment.
- A monetization layer where students pay you directly through Stripe or PayPal (no WooCommerce required if you don’t want it).
- A student-facing dashboard at
yoursite.com/dashboard/where enrolled students see their progress, completed lessons, certificates, and quiz scores. - An instructor dashboard where you (and any co-instructors) can manage courses, see student progress, and handle Q&A.
- Optional: drip content (lessons unlock over days/weeks), prerequisites (must complete Course A before enrolling in Course B), and certificates issued automatically on course completion.
Total time: about 60-90 minutes for your first course, depending on how much content you have ready. Most of that time is content prep (recording video, writing lessons), not Tutor configuration.
What Tutor LMS Pro actually does
Tutor LMS is a WordPress LMS plugin made by Themeum (a long-running WordPress theme and plugin company in Bangladesh). The plugin started in 2019 with a focus on a modern UI and an all-in-one philosophy, in contrast to LearnDash’s plugin-on-plugin-on-plugin architecture. By 2026 it has over 100,000 active installs and a steady release cadence.
At a technical level, the plugin creates these things in WordPress:
- Custom post types for courses, lessons, quizzes, assignments, course bundles, and certificate templates.
- A custom course builder UI that replaces the standard WordPress editor for courses. The builder is a step-by-step interface for adding lessons, quizzes, video content, downloadable resources, and chapter structure.
- A native monetization system with Stripe and PayPal gateways built in. You don’t need WooCommerce, EDD, or any separate cart for one-time course sales (though WooCommerce integration is available if you want subscription billing or coupon codes).
- A student-facing dashboard where enrolled students view their courses, track progress, see certificates, and message instructors. Replaces the typical "scattered pages" experience of LearnDash.
- An instructor dashboard for course creators to manage their content, see analytics, and respond to Q&A.
The "Pro" upgrade adds: Course Bundles (sell multiple courses as a package), Multi Instructor support (split revenue across teachers), Email notifications, Course Preview, Assignments, Course Attachments, Google Meet integration, advanced Reports, Email templates, Calendar, Notifications, Google Classroom Integration, Zoom Integration, Quiz Export/Import, Enrollment management, Certificate Builder, Gradebook, Prerequisites, BuddyPress integration, WooCommerce Subscriptions integration, and Paid Memberships Pro integration.
The free Tutor LMS handles the absolute basics: courses, lessons, quizzes, free enrollments. Anything that involves charging students, multiple instructors, certificates, advanced quizzes, drip content, or integration with payment plugins requires Pro.
Step 1: Install Tutor LMS Pro
The Pro plugin requires the free Tutor LMS core. Install both:
- Go to
Plugins → Add New, search for "Tutor LMS", install and activate the free core plugin. - Go to
Plugins → Add New → Upload Plugin, choose thetutor-pro.zipfile, click Install Now, then Activate Plugin.
A "Tutor LMS Pro" menu appears in the admin sidebar. Click it. You land on the Courses page:
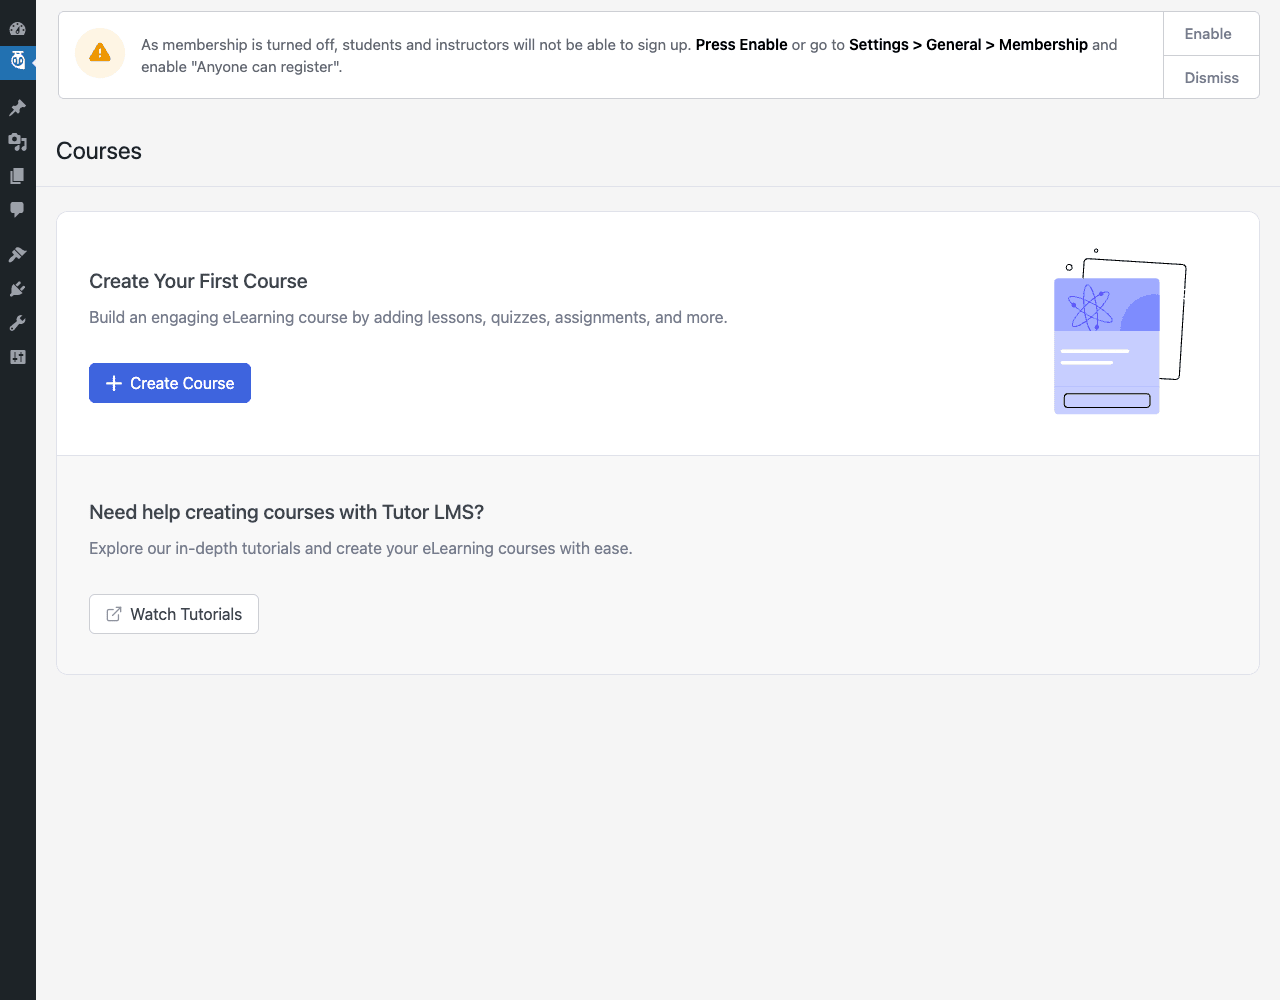
The membership banner at the top is the first thing to address. Click Enable to allow new users to register as students. Without this, anyone visiting your site can’t sign up for courses. This is the most common "why isn’t anyone enrolling?" mistake new Tutor LMS users make.
Once enabled, the banner disappears.
Step 2: Configure global settings
Before creating your first course, set the global plugin settings. Click Tutor LMS Pro → Settings. This is the most important configuration screen:
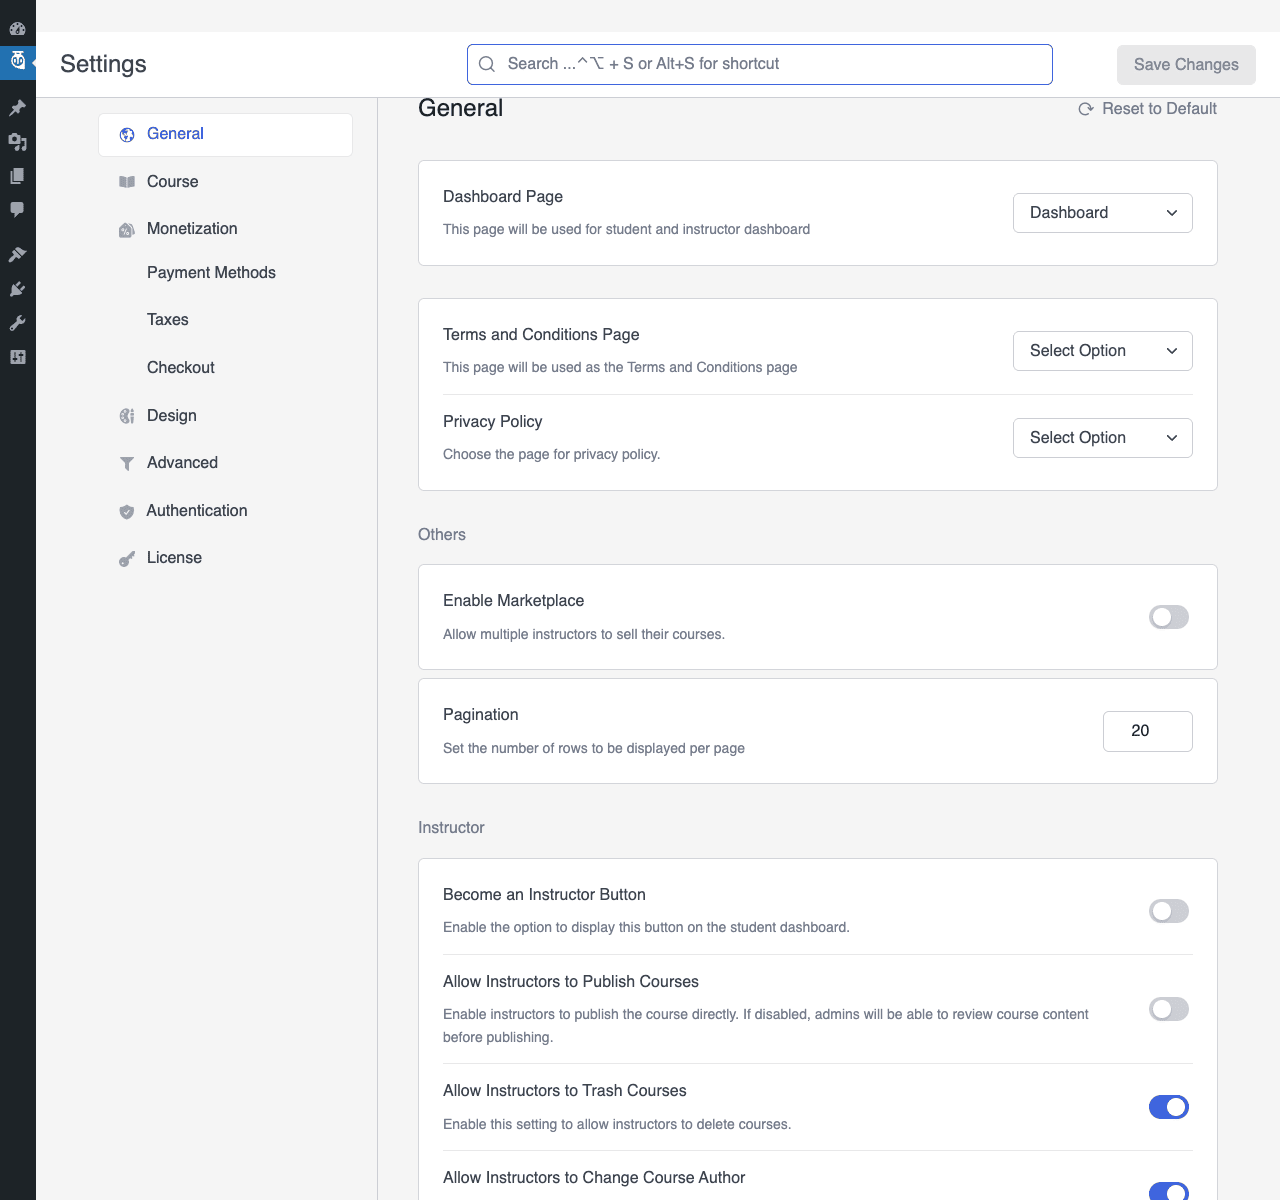
The left sidebar has these tabs (covering them in the order you should touch them):
General: Set your Dashboard Page (the page where students will land after login, usually Dashboard). Set your Terms and Conditions and Privacy Policy pages. Toggle "Enable Marketplace" if you want multiple instructors to sell their own courses on your site (like Udemy). Most single-instructor sites leave this OFF.
Course: Configure how courses look and behave by default. Course content access (Public, Login Required, or Enrolled Only). Lesson video player options. Allow students to retake completed courses or not. Default course thumbnail.
Monetization: This is where you choose how courses are paid for. Three options:
- Free only: All courses are free. Good for community sites or non-commercial use.
- Tutor (Pro): Use Tutor’s built-in monetization with Stripe and PayPal. No WooCommerce needed. This is what most new course creators want.
- WooCommerce: Route course purchases through WooCommerce. Use if you already run a WooCommerce store and want courses as a product type, OR if you want subscription billing via WooCommerce Subscriptions.
For this walkthrough, pick "Tutor". You’ll configure the actual payment methods next.
Payment Methods: Configure Stripe and PayPal credentials. For Stripe, you’ll need API keys from the Stripe dashboard. For PayPal, your business email and client ID/secret from the PayPal developer console. The plugin walks you through this step by step.
Taxes: If you sell to multiple countries, configure VAT/sales tax here. Required for EU compliance.
Checkout: Customize the checkout page (which appears between Add to Cart and Payment). Add a guest checkout option, choose which fields are required, set the Terms and Conditions checkbox behavior.
Design: Customize colors and typography to match your site’s brand. Most themes inherit from the parent theme, so you can usually skip this unless you want a custom palette.
Advanced: Cache compatibility settings, GDPR compliance, data export. Most sites leave these at defaults.
Authentication: Lets you customize the login/register pages, enable social login (Google, Facebook), and set up email verification for new accounts.
License: For activating the official Pro license key. The plugin works without one (all features are functional); the license only enables the official update channel from Tutor LMS.
Save changes after each tab. The plugin remembers everything separately.
Step 3: Create your first course
Click Tutor LMS Pro → Courses → Create Course. This opens the Course Builder, a multi-step wizard that walks you through the entire course creation flow.
Step A: Basic Info
- Course Title: Make it specific and search-friendly. "Yoga for Beginners" beats "My Yoga Course".
- Course Slug: Auto-generated from the title. Customizable.
- Description: 200-500 words. This is what visitors see on the course landing page. Include who the course is for, what they’ll learn, what they need to bring.
- Course Settings: Maximum students, difficulty level, duration estimate, language, who-is-this-for tags.
Step B: Curriculum (Lessons and Quizzes)
This is where most of your time goes. Click "Add Topic" to create a chapter (e.g., "Module 1: Foundations"). Inside each topic, click "Add Lesson" for content lessons or "Add Quiz" for knowledge checks.
For each lesson:
- Lesson Title: Numbered makes things easy ("Lesson 1.1: What is yoga?").
- Lesson Content: WordPress block editor. Write text, drop in images, embed videos.
- Video Source: HTML5, YouTube, Vimeo, Embedded, or self-hosted. For paid courses, use YouTube/Vimeo Pro (or Bunny/Cloudflare Stream) with link sharing disabled so students can’t easily share the URL.
- Video Duration: Manually enter or let the plugin auto-detect.
- Attachments: Add PDF worksheets, downloadable resources, supplementary files.
- Preview: Toggle whether non-enrolled students can preview this lesson (good for the first 1-2 lessons as a sales hook).
Quiz lessons have their own builder: Add Question → pick question type (Multiple Choice, True/False, Fill in the Blank, Short Answer, Matching, Image Answering, Image Matching, Open-Ended) → set correct answer(s) → set point value. Quizzes can have time limits, attempt limits, and a passing percentage.
Step C: Pricing
If you set Monetization to "Tutor" in Step 2:
- Course Type: Free or Paid.
- Price: Your selling price.
- Sale Price: Optional discounted price.
- Sale End Date: When the sale price reverts to regular.
For Free courses, students just click Enroll and get immediate access. For Paid courses, they hit a checkout flow with Stripe/PayPal.
Step D: Information (Optional but recommended)
- Course Benefits: Bullet list of what students will gain.
- Requirements: What students need before starting (skills, equipment, software).
- Target Audience: Who this course is for.
- Course Materials: What’s included (PDFs, videos, audio, etc.).
These show on the course landing page as a structured info box. They significantly improve conversion compared to just dumping everything into the description.
Step E: Additional Settings
- Course Prerequisites: Other courses that students must complete first.
- Course Content Drip: When lessons unlock (immediately, after X days, on specific dates, etc.).
- Certificates: Whether to issue a certificate on completion (templates configured separately).
- Instructors: Add co-instructors if applicable.
Click Save and Publish. Your course is now live at yoursite.com/courses/your-course-slug/.
Step 4: Set up payments
If you set Monetization to "Tutor" and want to actually sell courses, go to Tutor LMS Pro → Settings → Payment Methods.
Tutor LMS Pro includes Stripe and PayPal natively. The plugin’s Payment Addons let you add Authorize.Net, Razorpay (popular in India), Paystack, and a few others.
For Stripe (recommended for most US/EU sellers):
- Log into your Stripe account at dashboard.stripe.com.
- Go to Developers → API keys.
- Copy your Publishable Key and Secret Key.
- Paste both into Tutor’s Stripe settings.
- Set up a webhook endpoint at
yoursite.com/?tutor-webhook=stripe(the plugin will tell you the exact URL). - Save.
For PayPal:
- Go to developer.paypal.com.
- Create a new app under "My Apps & Credentials".
- Copy the Client ID and Secret.
- Paste both into Tutor’s PayPal settings.
- Save.
Test mode is on by default. Toggle to Live mode only after you’ve verified a test purchase works end to end. A common mistake: launching with test mode still enabled and receiving zero real payments because everything’s a sandbox transaction.
Make a test purchase yourself: visit your course in an incognito tab, click Enroll, go through the checkout flow with a test Stripe card (4242 4242 4242 4242, any future expiry, any CVC). Confirm the order appears in Tutor LMS Pro → Orders and the student account has access.
Step 5: Explore the Addons
Tutor LMS Pro includes 25+ addons that extend its functionality. Each one is a toggle you turn on or off in Tutor LMS Pro → Addons:
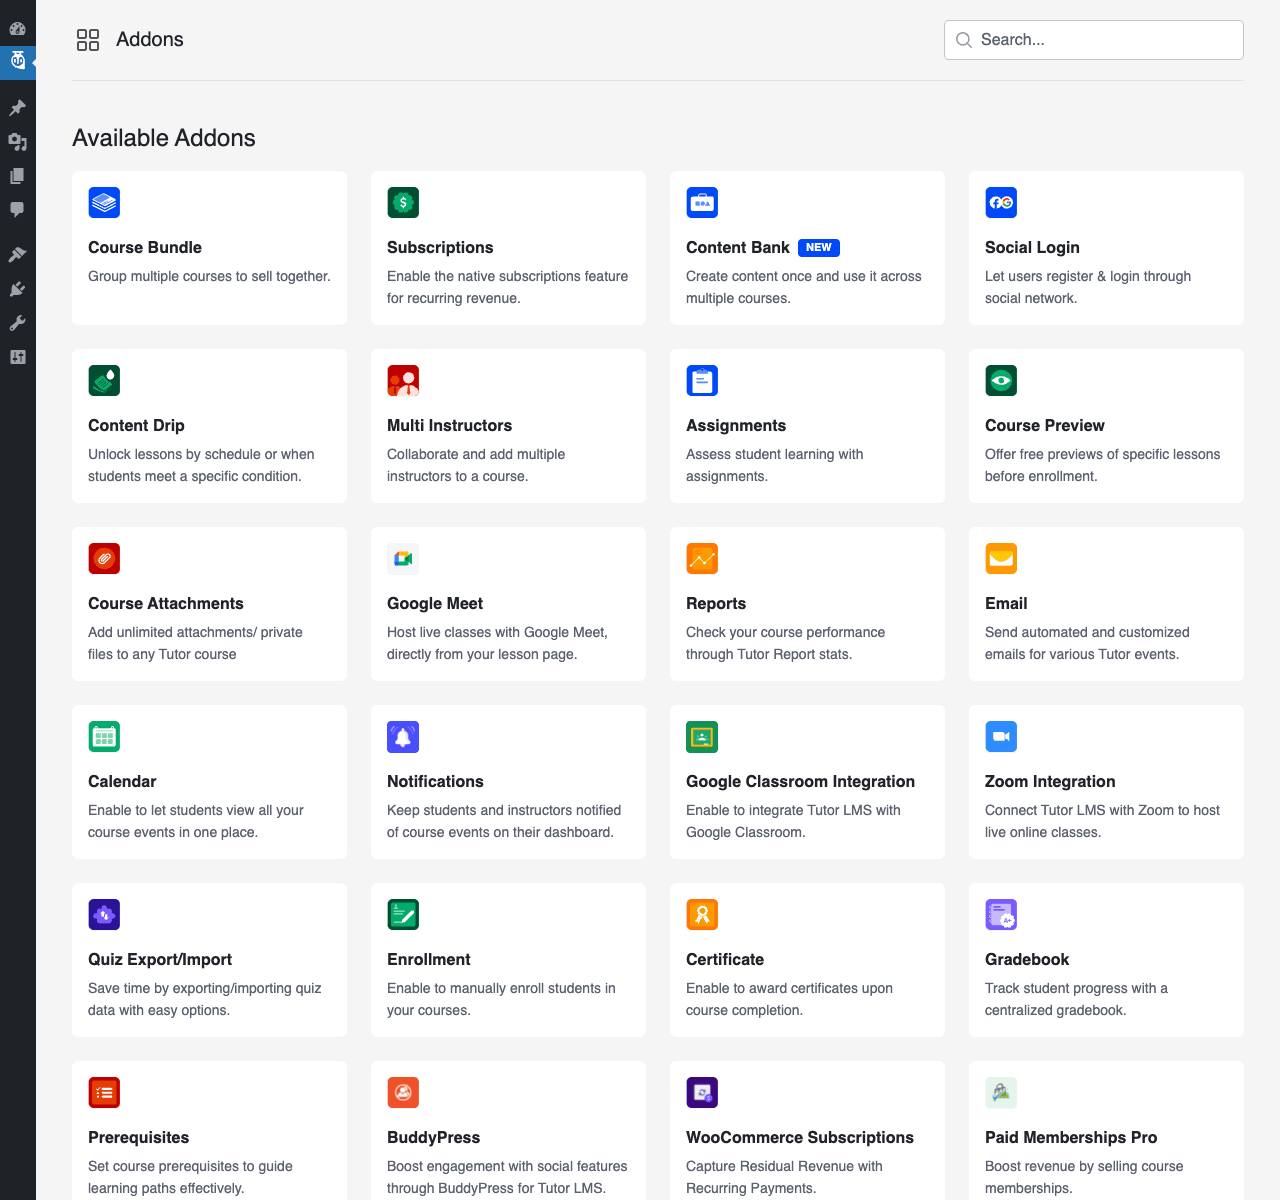
Turn on only the ones you need. Each addon you enable adds some PHP code path to every page load, so leave the unused ones off. The most useful for a starter course:
- Certificate: Issues completion certificates automatically. Customize the template (your logo, student name, course title, date) in the Certificate Builder. Almost every paid course should have this enabled.
- Assignments: Lets you add written-response or file-upload assignments to lessons. Instructors grade these manually.
- Course Preview: Lets you mark specific lessons as preview-able by non-enrolled visitors. Great for converting browsers to buyers.
- Content Drip: Releases lessons over time (e.g., one new module per week). Forces students to consume content at the pace you want.
- Notifications: In-app notification system for assignment grades, course updates, quiz results.
- Email: Customizable email templates for enrollment confirmation, lesson released, course completed, etc.
- Gradebook: Centralized view of all student grades across all lessons and assignments. Essential if you have multiple courses or 50+ students.
- Quiz Export/Import: Move quizzes between courses or sites. Useful for re-using quiz banks.
The integration addons (Zoom, Google Meet, Google Classroom, BuddyPress, Paid Memberships Pro, WooCommerce Subscriptions) connect Tutor to other systems. Enable only if you actually use those systems.
Step 6: Build your first quiz
Quizzes are how you check student understanding and gate course progression. From inside the Course Builder, in any topic, click "Add Quiz".
A new quiz builder opens:
- Quiz Title: e.g., "Module 1 Review".
- Time Limit: 0 for unlimited, or set in minutes. Tight limits make exams real; long limits make them practice.
- Attempts Allowed: How many times a student can take this quiz. 1 for exams, unlimited for self-quizzes.
- Passing Grade: Percentage required to pass.
- Max Questions Allowed: Useful if you have a question bank larger than the test (e.g., 50 questions in bank, 10 randomly chosen per attempt).
Then add questions. Tutor LMS Pro supports 10+ question types:
- Single Choice: One correct answer from multiple options.
- Multiple Choice: Several correct answers.
- True/False: Binary.
- Open-Ended/Short Answer: Free text, manual grading.
- Fill in the Blank: Auto-graded.
- Sortable Answer: Drag to reorder.
- Matching: Match pairs.
- Image Matching: Same as Matching but with images.
- Image Answering: Click on an image to answer.
- Ordering: Place steps in correct sequence.
For each question, set:
- Question text and image (optional).
- Question type.
- Points (1 by default).
- Correct answer (varies by type).
- Optional answer explanation (shown to students after they submit).
- Optional hint.
Save the quiz. Students see it in the course curriculum after the lesson it follows.
Step 7: Set up certificates
Open Tutor LMS Pro → Addons and enable Certificate. A new "Certificates" menu item appears.
Click Certificates → Templates. The plugin ships with several professional certificate designs. Pick one that fits your brand or create a custom template:
- Upload your background image (or use a built-in template).
- Add dynamic placeholders:
{course_name},{student_name},{instructor_name},{completion_date},{course_id}. - Position your logo and signature image.
- Save the template.
Then in each course, under "Additional Settings", enable "Show Certificate" and select your template. When a student completes 100% of the course, the certificate generates as a PDF they can download and share on LinkedIn.
This single feature is one of the biggest justifications for the Pro upgrade. Industry research consistently shows that paid courses with certificates have 30-50% higher completion rates than courses without.
Step 8: Set up content drip
If you sell a 6-week course, you usually don’t want a student to binge-watch all the content in one weekend. Drip releases the content over time so they actually consume it at the pace you intended.
Enable the Content Drip addon. Then in each course, under "Additional Settings", choose drip mode:
- Disabled: All lessons unlock immediately on enrollment.
- Schedule lessons after enrollment: Each lesson unlocks X days after the student enrolls.
- Schedule lessons after specified date: Each lesson has a specific calendar release date.
- Schedule lessons after prerequisites: Lessons unlock as students complete previous lessons.
- Schedule lessons after course start date: Cohort model. Course has a fixed start date; all students see lessons unlock on the same calendar schedule.
For most online courses, "Schedule lessons after enrollment" is the right model (Week 1 lessons immediately, Week 2 lessons after 7 days, etc.). Set the day count on each lesson in the Course Builder.
Step 9: View your front-end course page and dashboard
After publishing your course, visit it as a non-logged-in visitor (open an incognito tab). You should see:
- The course title and image.
- Your description.
- The benefits / requirements / audience / materials info boxes.
- The curriculum (topics and lesson titles, with previewable lessons marked as such).
- Instructor profile card.
- An Enroll Now button (or Buy Now for paid courses).
- Reviews section (empty initially).
- Q&A section.
Click Enroll Now. Go through the checkout flow if it’s paid. After enrollment, you land in the student dashboard.
The student dashboard at yoursite.com/dashboard/ has these tabs by default:
- Dashboard: Overview of enrolled courses, progress, recent activity.
- My Courses: All courses the student is enrolled in.
- Wishlist: Saved courses they haven’t bought yet.
- Reviews: Reviews they’ve written.
- My Quiz Attempts: All quiz scores.
- Order History: Their purchase history.
- Q&A: Their questions asked to instructors.
- Notifications: Plugin alerts and instructor messages.
- Calendar (if enabled): Upcoming scheduled lessons (drip dates) and live sessions.
- Certificates: All earned certificates.
- Settings: Their account info, password change, profile image.
This is the experience your students actually use. Make sure it works well by enrolling yourself in a test course and walking through it end-to-end before launching to real students.
Step 10: Manage students, orders, and reports
Once you have real students, your operational surfaces are:
-
Tutor LMS Pro → Students: Searchable list of all enrolled students. Click any student to see their course enrollments, progress, last activity, quiz scores, assignment submissions. -
Tutor LMS Pro → Orders: Every paid enrollment. Filter by status (Completed, Failed, Refunded, Pending). Refund a charge directly from this screen if needed (it pushes the refund back through Stripe/PayPal). -
Tutor LMS Pro → Quiz Attempts: Every quiz attempt across all students. Useful for spotting trends (e.g., 60% of students failed Question 4 in Module 3, maybe Question 4 is bad or maybe that concept needs more explanation in the lesson). -
Tutor LMS Pro → Reports(Pro addon): Revenue, enrollments, popular courses, top instructors, completion rates. Set the date range to compare months/quarters. -
Tutor LMS Pro → Coupons: Create discount codes for marketing campaigns. Percentage off or fixed amount. Limit to specific courses or apply to all. Set usage limits and expiration dates. -
Tutor LMS Pro → Announcements: Broadcast a message to all students in a specific course. Useful for "Lesson 5 will be delayed by 2 days" type updates.
What about LearnDash?
You’re probably comparing Tutor LMS to LearnDash LMS (the dominant WordPress LMS for the past decade). Both are good. They have different philosophies:
-
LearnDash is older, more mature, and has a deeper feature set in its core plugin, but you’ll often need to buy 3-5 add-ons (LearnDash Notifications, LearnDash Stripe, etc.) to get the same feature breadth Tutor LMS includes natively. UI feels older. Performance on huge sites (10,000+ students) is well-proven.
-
Tutor LMS is newer, has a more modern UI, ships almost everything in the Pro plugin (no per-addon purchases like LearnDash), includes native Stripe/PayPal so you don’t need WooCommerce, and has a more attractive student dashboard out of the box. The trade-off is less third-party theme/plugin ecosystem support compared to LearnDash, though the gap is closing every year.
If you’re starting fresh and you don’t have an existing LearnDash deployment to migrate from, Tutor LMS Pro is the easier "everything in one" choice. If you already have LearnDash and it works for you, there’s no urgent reason to switch. Both can build excellent courses.
Common gotchas
These are the issues I’ve seen people actually hit:
1. "Students can’t sign up." The membership banner you saw on the first dashboard visit is still showing. Click Enable, or go to Settings → General → Membership and toggle "Anyone can register" on.
2. "Course videos won’t play / are visible to non-students." Self-hosted MP4 is the easiest setup but means students can right-click and save the video file. For real courses, use Vimeo Pro with "link sharing disabled" or a video hosting service like Bunny Stream or Cloudflare Stream. Set the URL as the lesson video source.
3. "Certificate doesn’t generate when student completes course." Two checks: (a) Is the Certificate addon enabled under Addons? (b) On the course’s Additional Settings, did you enable "Show Certificate" AND assign a certificate template? Both are required.
4. "Drip schedule isn’t working." Content Drip addon must be enabled, AND course Additional Settings must have a drip mode selected, AND each lesson needs a "Drip Days" value set. All three. Missing any one breaks the schedule.
5. "Payments fail in production but worked in test mode." Check that you’ve toggled Stripe/PayPal credentials to LIVE keys, not TEST keys, AND that your webhook URL is configured in Stripe (Tutor needs Stripe to ping back about successful charges).
6. "Student says they completed the course but no certificate." Course completion requires 100% lesson completion. If a student skipped a lesson (sometimes hard to detect on long courses), they’re stuck at 90% and no certificate. Check progress under Students → [student] → [course].
7. "Site is slow on the courses page." The default course archive query can be heavy on sites with hundreds of courses. Install a caching plugin (we recommend WP Rocket) and exclude the student dashboard URLs from page cache.
8. "Instructor commission isn’t being calculated." Only applies if you enabled the Marketplace feature. Check Settings → Monetization → Earnings for the commission percentage and confirm each instructor has commission rates set on their profile.
9. "Stripe fees are eating my margin." Stripe charges 2.9% + 30¢ per transaction in the US (higher in EU). At $50 courses, you lose ~$1.75 per sale. At $500 courses, you lose ~$14.80. Some sellers move to ACH/SEPA for higher-ticket courses to reduce fees, or use Razorpay/Paystack if their market supports it.
10. "Quiz questions show in the wrong order." Tutor uses the order you added them by default. To randomize per attempt, go to the quiz settings and enable "Randomize Questions". Useful for preventing students from sharing answers.
A short note for developers
Tutor LMS exposes a useful hook surface. The most commonly useful hooks:
// Fires when a new student enrolls in a course (free or paid).
add_action( 'tutor_after_student_signup', function( $user_id ) {
 // Add the user to your mailing list, push to your CRM, etc.
 do_action( 'my_app_new_student', $user_id );
} );

// Fires when an assignment is submitted by a student.
add_action( 'tutor_assignment_created', function( $assignment_id ) {
 // Notify the instructor via Slack, etc.
} );

// Customize the list of payment gateways shown at checkout.
add_filter( 'tutor_pro_payment_gateways', function( $gateways ) {
 // Add or remove gateway options.
 return $gateways;
} );

// Customize the initial instructor status (default is 'pending' approval).
add_filter( 'tutor_initial_instructor_status', function( $status ) {
 return 'approved'; // auto-approve new instructors
} );

// Modify reset-password email body.
add_filter( 'tutor_reset_password_email_body', function( $body, $username, $reset_link ) {
 return $body; // your custom HTML
}, 10, 3 );

// Customize what shows in the email verification flow.
add_action( 'tutor_pro_before_send_verification_email', function( $user ) {
 // Log, add to queue, etc.
} );
For programmatic course enrollment (e.g., gifting a course based on another action):
if ( function_exists( 'tutor_utils' ) ) {
 $course_id = 123;
 $user_id = 45;
 tutor_utils()->do_enroll( $course_id, 0, $user_id ); // 0 = order_id (none for gift)
}
For querying enrolled students of a course:
$students = tutor_utils()->get_enrolled_users_by_course_id( $course_id );
foreach ( $students as $student ) {
 // $student is a WP_User. Has email, name, etc.
}
For checking if a user is enrolled in a course (useful in your theme):
if ( tutor_utils()->is_enrolled( $course_id, $user_id ) ) {
 // Show enrolled content.
}
WP-CLI commands aren’t built in, but you can call any of the above via wp eval for one-off scripts. For bulk operations, the plugin’s tutor_utils() and \TUTOR\Course classes expose most of what you need.
Pricing and where to get it
Tutor LMS Pro is sold by Themeum on an annual-license-per-site model. Tiers go up by site count: Individual (1 site), Business (10 sites), and Agency (unlimited sites). All tiers include the same feature set; only the site count and support level differ.
The plugin is GPL-licensed. The license sold by Themeum is a support and update license, not a use license. After install, you can use it on any number of sites; the license only gates support replies and the official update channel.
Because of GPL, the plugin file itself is legally redistributable.
For real course businesses where you’ve validated the model and have paying students, the official Themeum license is worth considering. The support team responds to LMS-specific questions that general WordPress support can’t help with, and you get the official update channel.
Quick reference: configuration cheat sheet by course type
Before wrapping up, here’s a one-paragraph setup for common course business models:
-
Single instructor selling individual courses for one-time payments: Monetization = Tutor, payments = Stripe + PayPal, Certificate addon ON, no Marketplace. The most common setup.
-
Course business with cohort-based courses (everyone starts together): Monetization = Tutor, Content Drip enabled with "Schedule lessons after course start date" mode. Set the start date in each course’s Additional Settings.
-
Subscription-based ongoing learning (Udemy/Skillshare model): Monetization = WooCommerce, install WooCommerce + WooCommerce Subscriptions, enable the WooCommerce Subscriptions addon in Tutor. Now courses are sold as recurring subscription products. Or use Tutor’s native Subscriptions addon if you want simpler subscription billing.
-
Multi-instructor marketplace (Udemy clone): Enable Marketplace under Settings → General. Configure commission rates under Settings → Monetization. Enable Multi Instructors addon. Each instructor gets their own dashboard.
-
Free educational community with paid premium tier: Set most courses to Free (so anyone can enroll), make a few "Premium" courses paid. Use Course Prerequisites to require certain free courses to be completed before the premium course unlocks.
-
Corporate training site (internal employees only): Disable "Anyone can register" under Settings → General → Membership. Pre-create accounts for employees. Use Course Categories to organize by department.
Final thoughts
Tutor LMS Pro is one of the most complete "everything you need to run an online course business" WordPress plugins available. The all-in-one approach (no separate WooCommerce, no separate certificate plugin, no separate quiz plugin) makes the initial setup dramatically easier than the LearnDash + add-ons stack. The modern admin UI and the polished student dashboard mean your students actually enjoy using your courses instead of fighting with a clunky interface.
For a beginner, the path is short. Install Tutor LMS + Tutor LMS Pro. Run the setup wizard. Build your first course. Enable Stripe. Publish. Total time: under 90 minutes if you have content ready. The pieces that take time aren’t the plugin; they’re recording the videos and writing the lessons.
For an instructor or course business that’s already running on another platform (Teachable, Thinkific, Kajabi), Tutor LMS Pro lets you bring everything in-house. No more 5-10% platform fees on every sale forever. Your data, your customers, your domain. The migration takes a weekend but pays back in months.
The places where Tutor LMS Pro might not be right: if you’re running a 100,000-student site that’s been on LearnDash for years and works fine, the migration cost outweighs the benefits. If you need extremely specific quiz mechanics (proctored exams, complex branching logic) that aren’t in Tutor’s question types, look at LearnDash + ProPanel + Notifications + Stripe. For everything else, especially the 90% of WordPress course creators who just need "I want to sell my course online", Tutor LMS Pro is the boring-good default.
Setup checklist:
- Install Tutor LMS (free) + Tutor LMS Pro.
- Enable membership so users can sign up.
- Configure Monetization to Tutor, set up Stripe/PayPal.
- Build your first course with at least 3 lessons and 1 quiz.
- Enable Certificate, Content Drip, and Notifications addons.
- Set up your certificate template.
- Test enroll yourself in incognito, go through checkout, confirm everything works.
- Once verified, switch Stripe/PayPal to Live mode.
- Promote your course. Share the URL. Watch enrollments come in.
- Use the Reports dashboard weekly to track progress.
Start with a staging install, build a small practice course, and once you understand the flow, deploy to your real site with confidence.
Useful external references:
- Tutor LMS official documentation covers every setting and addon in detail.
- Stripe documentation on connect/express for understanding how the payment flow works under the hood.
- WordPress LMS comparison guides on Google for additional opinions if you want a second perspective on which LMS to pick.