

You have probably seen the little card that slides up from the bottom-left corner of a sales page. "Sarah from Manchester just bought the Pro plan, 4 minutes ago." It is small, it disappears in eight seconds, and it does more for conversions than most of the hero copy that sits above it.
This article walks through what WPfomify does, how to set it up, what each of the four wizard tabs controls, the integrations it ships with, and how developers can plug into its hooks and REST endpoints to build their own notification feeds. Where it makes sense, we will look at the same situation from a non-technical owner’s view and a developer’s view, because the audience for a plugin like this is split right down the middle.
Table of Contents
- What WPfomify is
- Why social proof works (and when it does not)
- Notification types you can show
- The four-step notification wizard
- Installation and setup
- Integrations that ship in the core
- Add-on integrations (email marketing and Zapier)
- Visibility, targeting, and frequency capping
- Developer reference: hooks, filters, REST
- Performance, compatibility, and gotchas
- Pricing and licensing
- WPfomify vs the alternatives
- Common use cases
- Frequently asked questions
- Final thoughts
What WPfomify is
WPfomify is a WordPress plugin from IdeaBox Creations (the same team behind WPCharitable and a few other long-running products, see the official WPfomify site for the canonical docs) that pulls real activity from your site (or from a connected service) and displays it as a small notification card on the front end. The card can appear bottom-left, bottom-right, top-left, or top-right, animate in, hold for a few seconds, animate out, then cycle to the next entry in the queue.
The plugin registers a custom post type, ibx_wpfomo, where each "post" is one notification rule. A rule is the configuration that says "watch this data source, render it using this template, show it on these pages, with this position and timing." You can have any number of rules running on the same site, each pulling from a different source.
The data sources include the obvious ones (WooCommerce orders, Easy Digital Downloads sales, Mailchimp signups, Gravity Forms submissions) and a few that you do not see in most competitors, like LearnDash enrollments, LifterLMS purchases, GiveWP donations, Envato Market sales, Freemius purchases, Google Reviews, WordPress.org plugin install counts, and a manual entry mode where you just type a CSV of "Name, City, Title, Time" rows and have them rotate.
For the rest of this piece I will use "notification rule" to mean one entry in the ibx_wpfomo post type, and "notification card" to mean what the visitor sees on the page.
Why social proof works (and when it does not)
The short version: people decide faster when they see other people have already decided. The longer version, well documented by Nielsen Norman Group’s analysis of social proof in UX, is that real-time activity signals reduce the perceived risk of buying from a small or unfamiliar store. A visitor who is hesitant about a $79 plugin is reassured by seeing that 14 people bought it this week, that one of them was from a city near theirs, and that the most recent purchase was 23 minutes ago.
The flip side is that fake or exaggerated social proof does the opposite. If your site shows "James from London just bought the Enterprise plan" every 8 seconds when you have actually sold 3 plans this month, sharp visitors will notice the loop and bounce. WPfomify is structured to use real data from real integrations precisely because the fake stuff backfires.
Two cases where social proof helps less than you expect:
- Highly considered B2B sales where the visitor is doing weeks of research. They are not impulse-buying, and a popup of "5 people purchased" will not move them. Reviews and case studies serve better.
- Audiences that hate popups. Developer tools, accessibility products, and privacy-focused niches see social proof as noise. Test before you ship.
Where social proof shines: ecommerce checkout pages, lead magnets, course landing pages, SaaS pricing pages, online events, and anywhere the visitor is on the fence between "yes" and "later."
Notification types you can show
WPfomify ships with several notification "modes." Each one pulls a different kind of activity from your site or a connected service.
- Conversion notifications. Recent purchases, signups, downloads, donations, enrollments. The most common type. Connects to WooCommerce, EDD, FluentCRM Pro, GiveWP, LearnDash, LifterLMS, Freemius, Envato.
- Live visitor counter. "147 people are viewing this page right now." Uses a session-based counter, not a hosted analytics service, so the count is honest about who is actually on the site.
- Reviews. Rotates real reviews from Google Reviews (via Places API), Yotpo, WordPress.org plugin reviews, or a manual review list.
- Custom notifications. A manual list of entries you type yourself, or a CSV you upload. Useful for "we are 3,000+ subscribers strong" style messages, or rotating quotes.
- Form conversions. Pulls submissions from Gravity Forms, Custom Form, or any form you can map to the right fields.
- Email signups. From Mailchimp, ConvertKit, ActiveCampaign, Drip via the dedicated add-ons.
- WordPress.org activity. Plugin install counts, downloads, recent five-star reviews on your wordpress.org plugin page. Targeted at plugin authors who want to show "10,000 active installs" on their landing page.
- Notification bar. A separate component, a thin top-of-page or bottom-of-page bar with a CTA button and an optional countdown timer. Not a popup card, but configured from the same plugin.
You can run several of these at once. A common setup on an ecommerce store is one conversion rule (recent purchases), one live-visitor rule (only on product pages), and one review rule (rotating Yotpo or Google reviews on the homepage).
The four-step notification wizard
Every notification rule is created from a 4-step tabbed wizard. The tabs are Source, Content, Display, Customize.
Step 1: Source
This is where you pick what kind of data the notification pulls from.
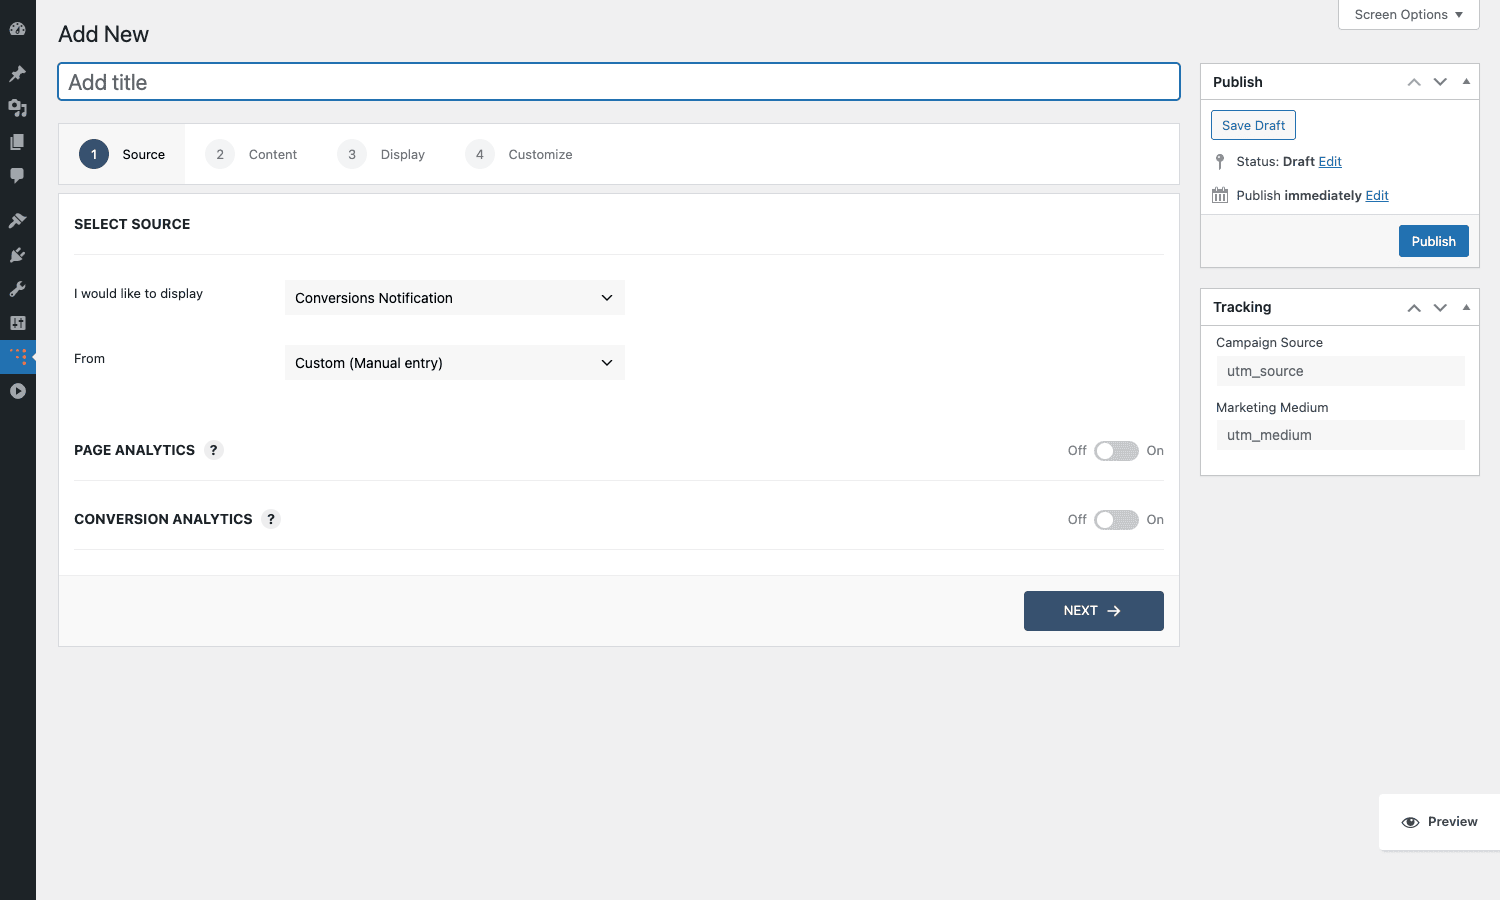
There are two top-level dropdowns. "I would like to display" picks the high-level type (Conversions Notification, Reviews, Custom). "From" picks the actual integration (WooCommerce, EDD, Mailchimp, Custom Manual entry, CSV, Google Reviews, Envato, Freemius, LearnDash, LifterLMS, GiveWP, WordPress.org, and so on, depending on which add-ons you have active).
Below those, two toggles let you enable Page Analytics (track impressions and clicks at the notification level) and Conversion Analytics (track whether a click on the notification led to a downstream conversion). Both default to off so the plugin is not adding tracking calls you did not ask for.
The right sidebar (Tracking) is where you add utm_source and utm_medium values that get appended to any link the notification card uses, so you can see WPfomify traffic separately in your analytics.
Step 2: Content
The Content tab is where the actual notification text is composed.
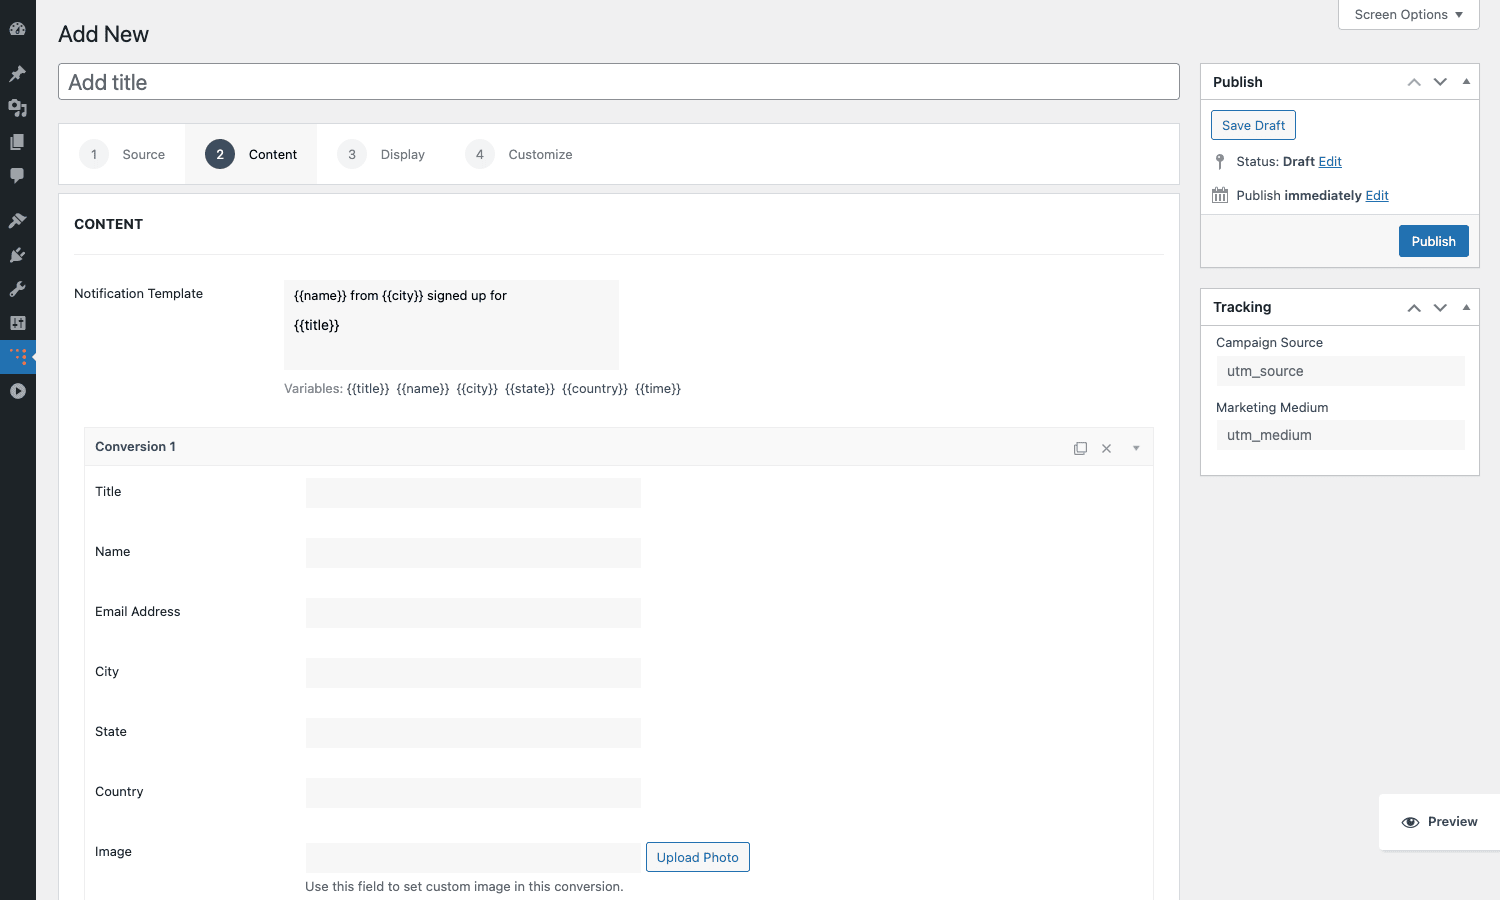
The big field is "Notification Template." You write the sentence you want visitors to see, using merge variables in double-curly braces. The variables WPfomify exposes by default are {{title}}, {{name}}, {{city}}, {{state}}, {{country}}, and {{time}}. A typical template looks like:
{{name}} from {{city}} signed up for {{title}}
At render time, WPfomify substitutes real values pulled from the source. For WooCommerce, {{title}} is the product name, {{name}} is the customer first name, {{city}} and {{state}} and {{country}} come from the billing address. {{time}} is rendered using the plugin’s time-ago helper ("3 minutes ago", "an hour ago", "yesterday"), which you can translate via the ibx_wpfomo_time_array filter.
If you picked Custom (Manual entry) as the source, the Content tab also shows a "Conversion 1, Conversion 2…" accordion where you type each row by hand. Title, Name, Email (for the gravatar), City, State, Country, and optionally a custom image. Hit "Add another" and you have as many rows as you want, all rotating.
Step 3: Display
Display covers two things: image and visibility.
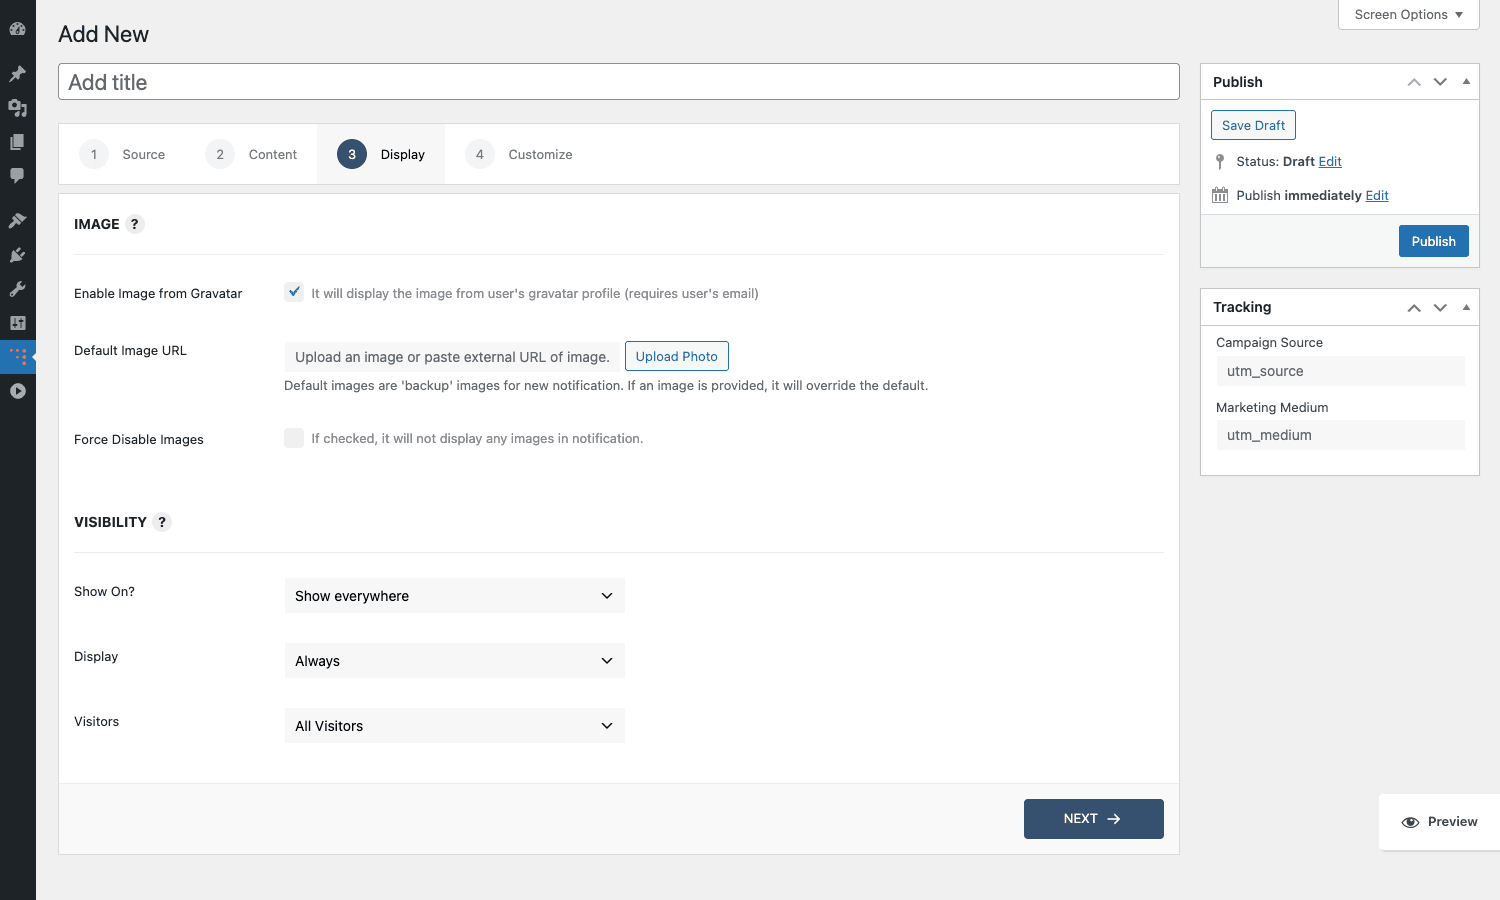
Under Image, "Enable Image from Gravatar" tells WPfomify to pull a Gravatar avatar for each entry based on the email address. If a customer has a Gravatar set up, their face appears in the card. If not, WPfomify falls back to "Default Image URL", a static image you upload (a brand mascot, a generic person silhouette, or the product image). "Force Disable Images" is the kill switch if you want a text-only card.
Visibility has three controls:
- Show On: Show Everywhere, Show only on selected pages, or Show everywhere except selected pages. The "selected pages" picker accepts URLs or URL patterns. So you can scope a WooCommerce purchase notification to only the cart and checkout pages, or only the product category pages.
- Display: Always, Once per session, Once per visitor, or Custom (with a cookie expiration). This is your frequency cap, the most important setting on this tab. Default is Always, which means the notification keeps cycling for as long as the visitor stays on the page.
- Visitors: All Visitors, Logged-in Users Only, or Logged-out Users Only. Useful if you have a members area where logged-in users do not need to see "buy now" social proof.
Step 4: Customize
The Customize tab is everything about how the card looks and behaves.
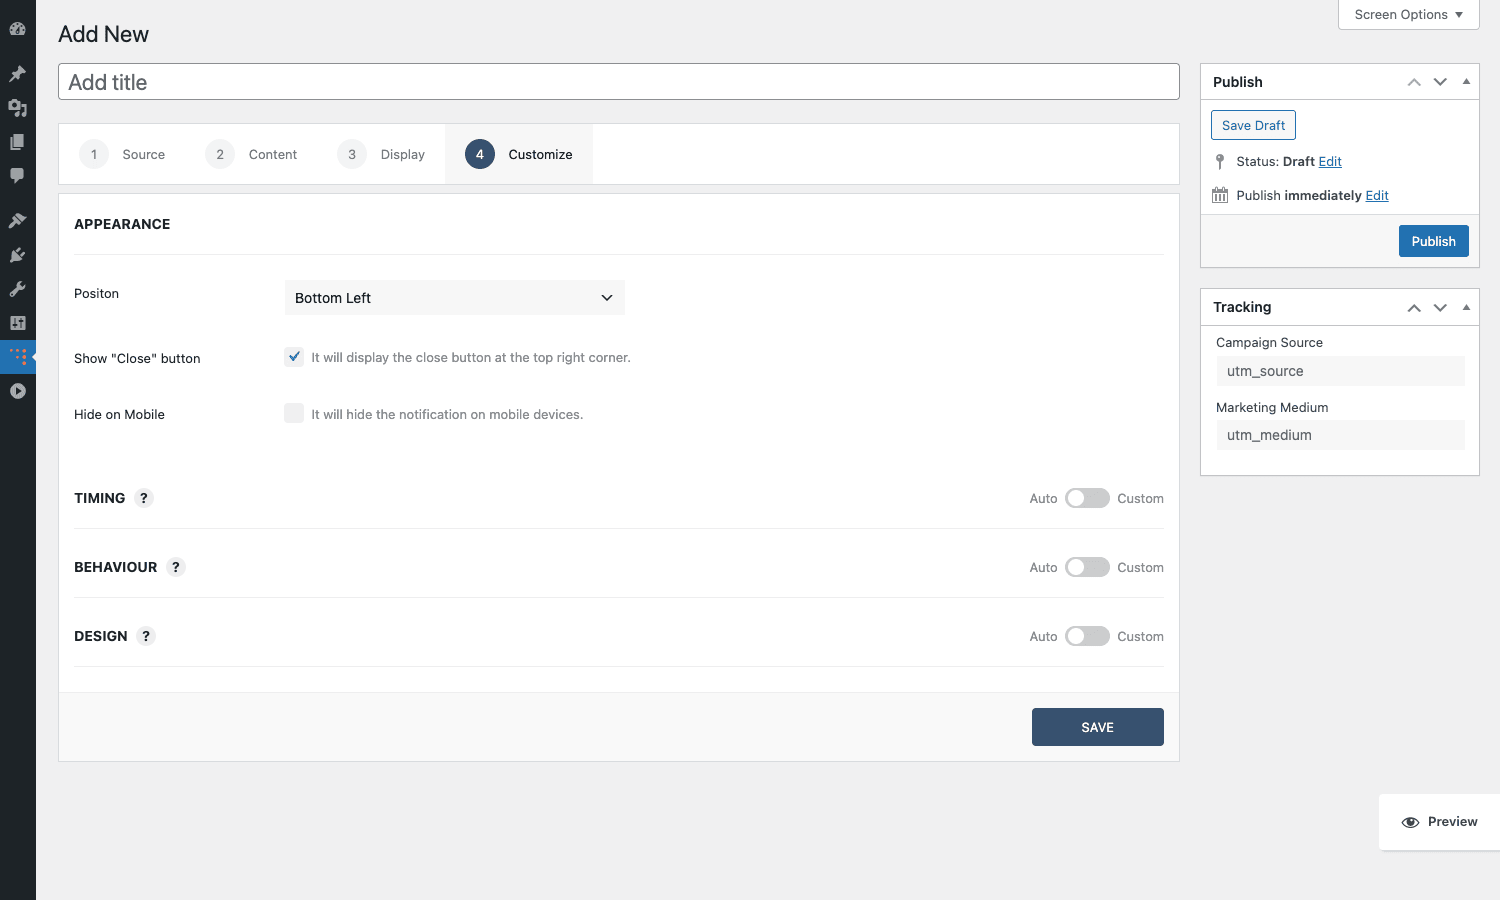
Appearance has Position (Bottom Left / Bottom Right / Top Left / Top Right), Show Close button (the little X on the card), and Hide on Mobile. Mobile is worth a comment: on small screens a notification card eats real estate aggressively, and on a product detail page a 90px-tall card overlapping the Add to Cart button is a conversion killer. If your traffic is mobile-heavy, either turn this on globally or scope the notification to desktop-only pages.
Below that are three Auto/Custom toggle blocks:
- Timing. When set to Custom you can adjust Initial Delay (how long after page load before the first card shows), Time on Screen (how long each card stays visible), and Gap Between Notifications (how long the screen is empty between cards). Defaults are sane (3s / 8s / 2s) and most sites never change them.
- Behaviour. Loop count, what happens on click, whether to pause when a card is hovered. Click behaviour defaults to "open product URL in same tab" but you can switch it to a custom URL or disable click-through entirely.
- Design. Card background colour, text colour, link colour, border radius, font size, typography. The defaults match a neutral light-grey card with the brand colour you set globally. The Custom panel exposes the same controls per-notification so a Black Friday rule can have a red border while the normal rules stay subtle.
Once you save, the rule appears in the WPfomify post list, with an on/off toggle next to each title.
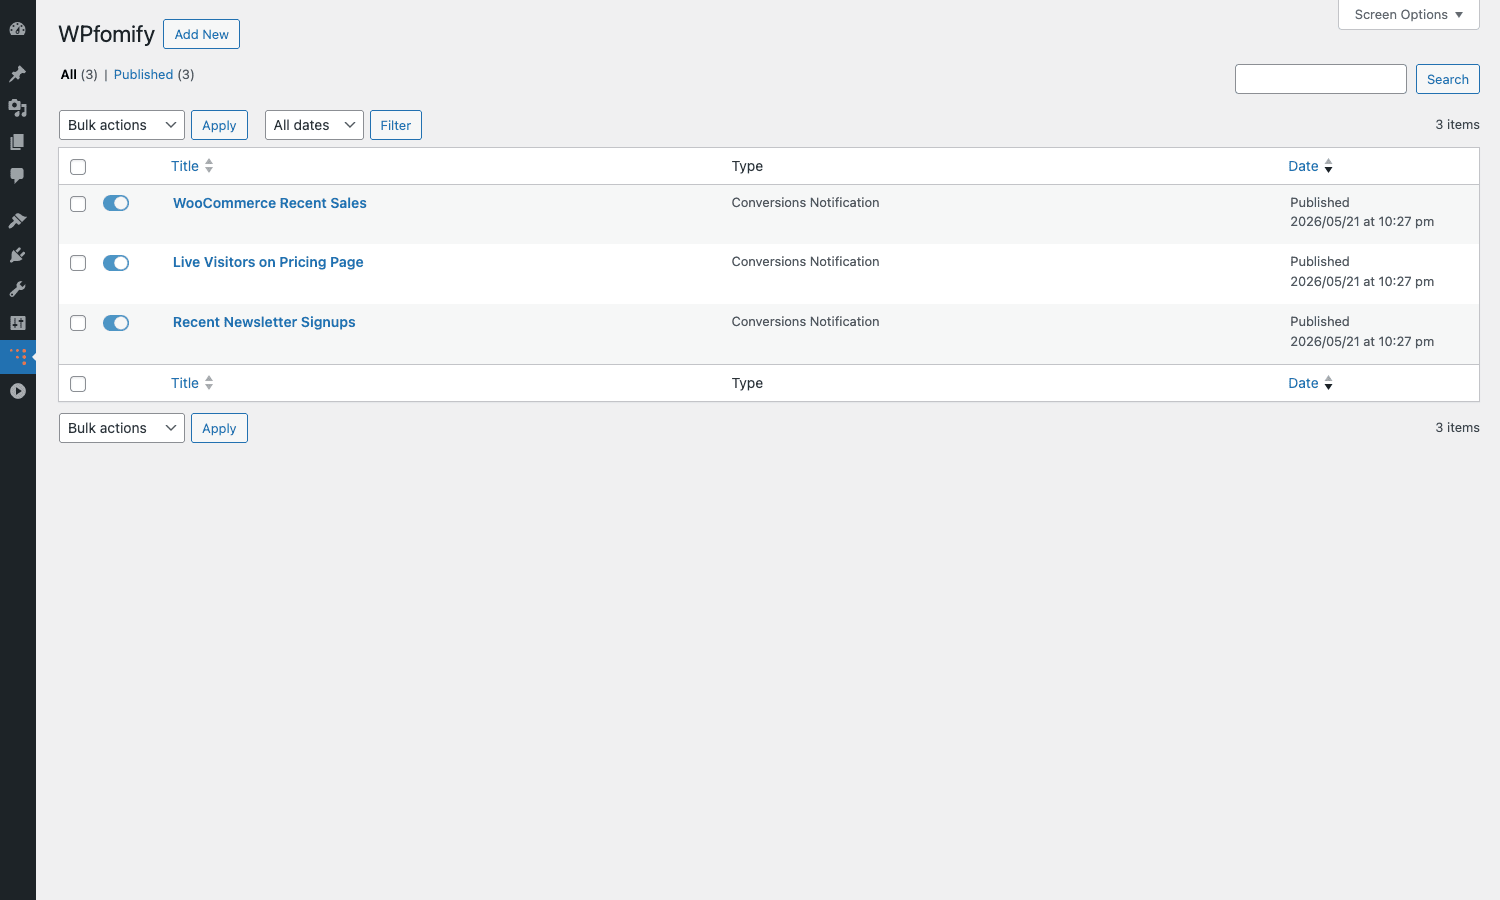
That toggle is the "active" flag, and it is the fastest way to test in production. If a notification is causing trouble, flip the toggle, no need to delete the rule.
Installation and setup
Installation is the standard WordPress drop-in. Upload the main WPfomify zip via Plugins -> Add New -> Upload, activate it, and you get a new top-level "WPfomify" menu in the admin sidebar.
Step-by-step:
- Upload the plugin. From
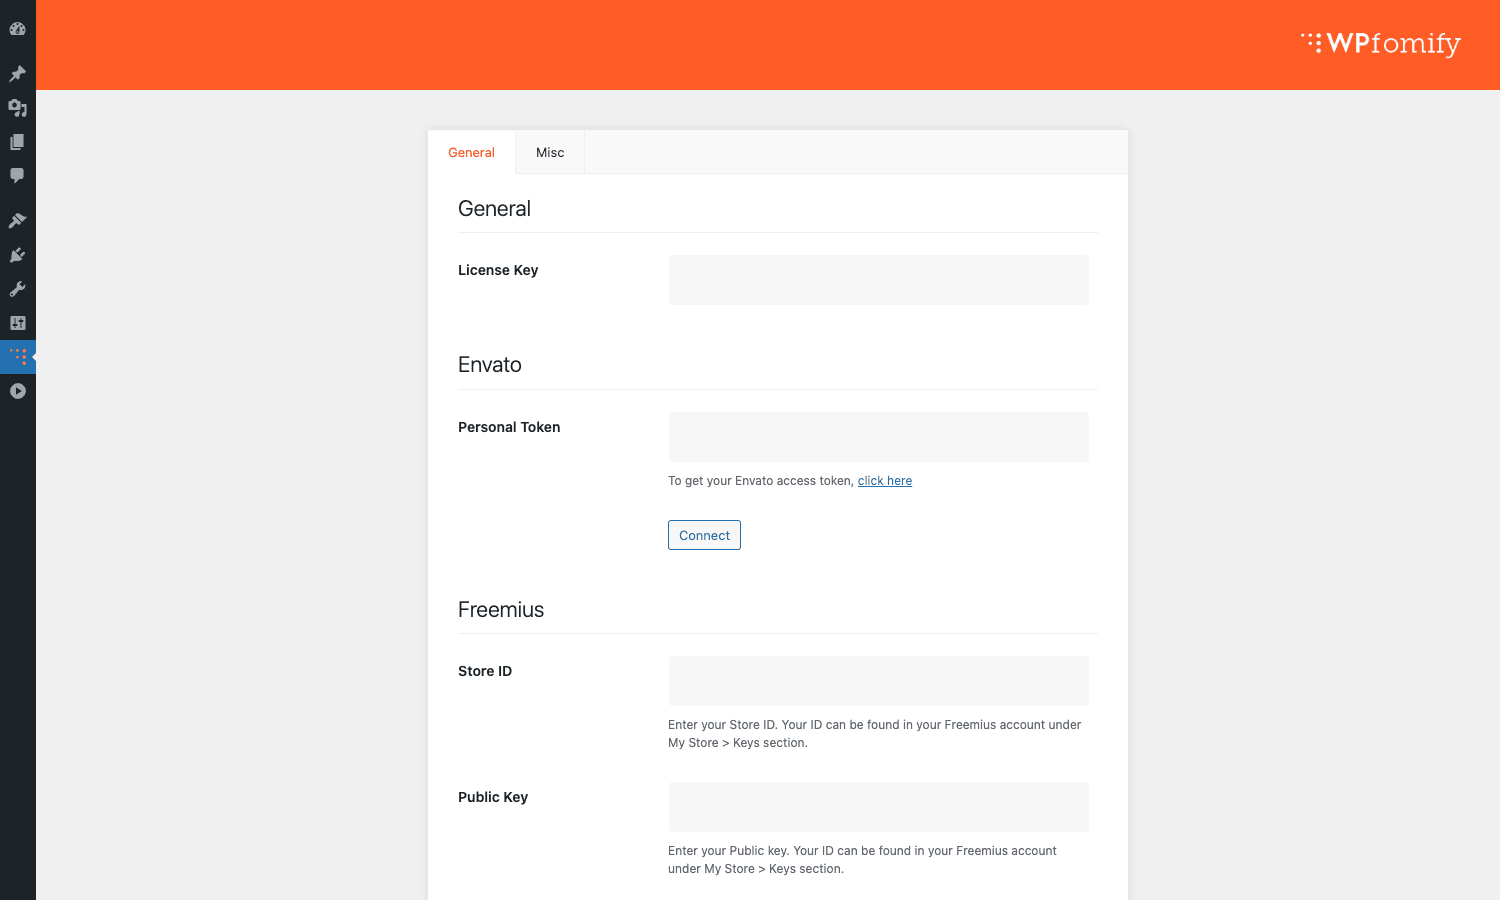
wp-admin/plugins.php, click Add New, then Upload Plugin. Pick thewpfomify.zipfile and activate. - Enter your license key. Go to WPfomify -> Settings -> General. Paste the license key into the License Key field. This unlocks updates from the official author server.
- Set up integration credentials. Still on the Settings page, scroll down. The General tab has fields for Envato Personal Token (only if you sell on Envato Market), Freemius Store ID and Public Key (only if you sell via Freemius), and Google Reviews API key (only if you want Google Reviews). You can skip whatever you do not use.
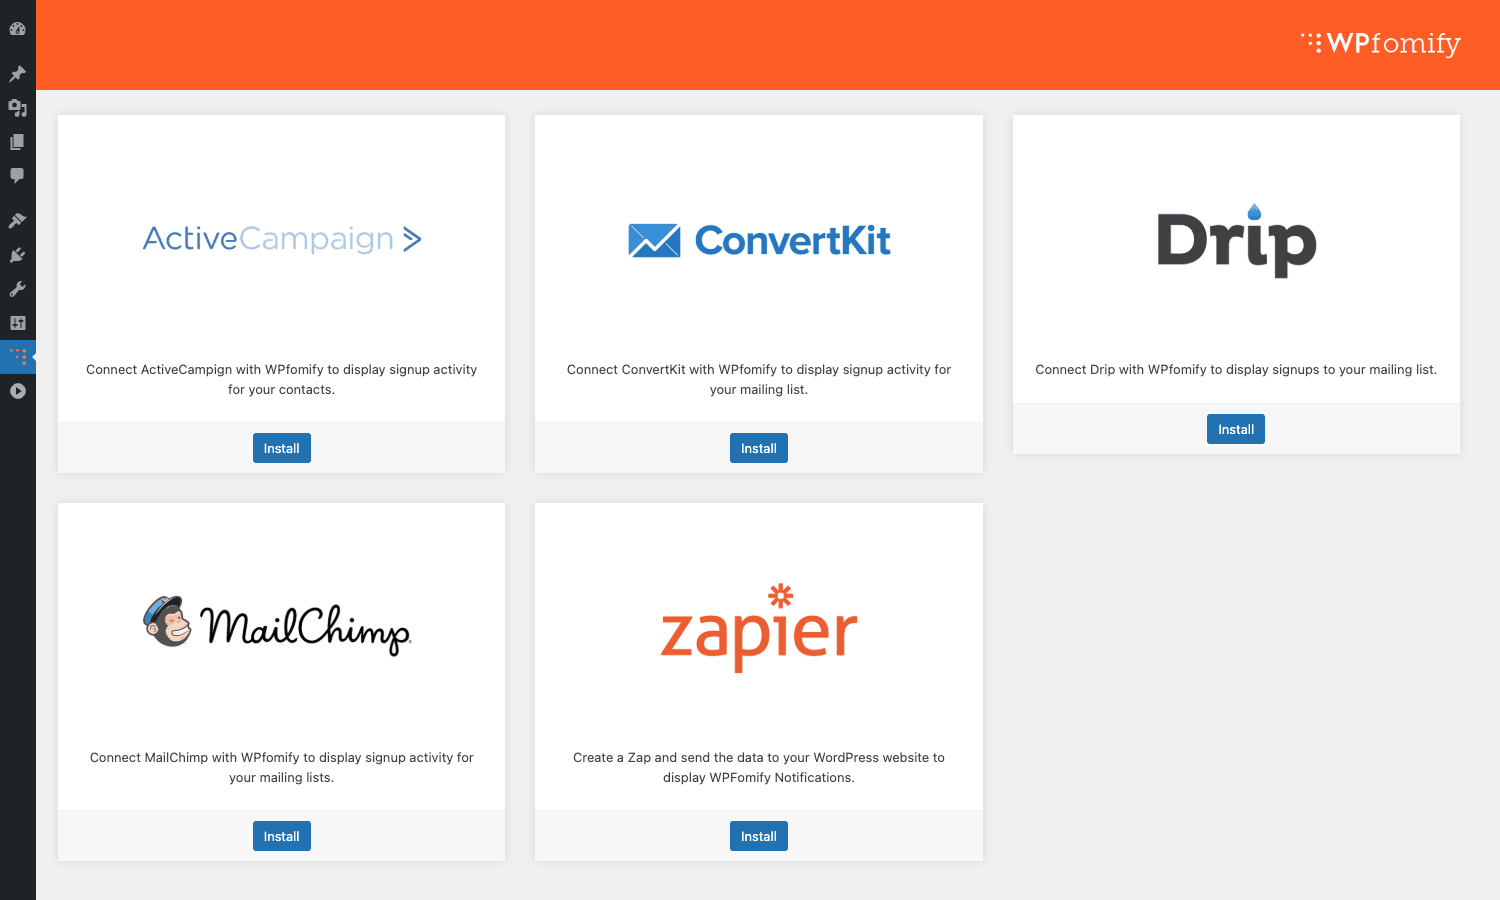
- Install the integration add-ons you want. Under WPfomify -> Add-ons you will see cards for ActiveCampaign, ConvertKit, Drip, MailChimp, and Zapier. Click Install on the ones you use. They install as small companion plugins.
- Create your first notification rule. WPfomify -> Add New. Walk through the four-step wizard described above. Save and Publish.
- Toggle the rule on. Back in the list view, the on/off toggle next to the title controls live display.
- Test on the front end. Open an incognito window and visit a page where the rule is supposed to fire. You should see the card slide in after the initial delay.
If nothing appears, the most common culprit is the "Show On" rule excluding the current page, or the Visitors gate (logged-in vs logged-out) excluding your test browser. Open the browser console and look for the ibx-wpfomo element being injected into the DOM. If you see the element but no card, it is a CSS issue (your theme is z-indexing something above it). If you do not see the element, it is a visibility-rule issue.
Integrations that ship in the core
Right out of the box, without installing any add-ons, WPfomify ships with integrations for:
- WooCommerce. Recent orders, with billing name, city, state, country, and product. Filter by order status (Completed, Processing, On Hold). The integration counts each line item separately, so a single 3-product order rotates 3 cards if you want. If you run Pixel Manager for WooCommerce Premium for analytics, WPfomify and Pixel Manager fire independently without conflict.
- Easy Digital Downloads. Recent downloads / sales. Pulls customer name and product, similar shape to the WooCommerce integration.
- Gravity Forms. Recent form submissions. Useful for showing "247 people requested the free guide this week" on a lead-magnet landing page. Supports the Gravity Forms Partial Entries add-on too, so even abandoned partial submissions can fire notifications.
- LearnDash. Course and lesson enrollments. Pulls the student name and course title. The card text might read "Aisha enrolled in Advanced JavaScript, 12 minutes ago."
- LifterLMS. Same idea as LearnDash but for the LifterLMS course platform.
- GiveWP. Donation notifications. Pulls donor name and amount and rotates them on charity / nonprofit landing pages. There is a flag to hide the actual donation amount if you only want to show the donor name.
- Custom Form. A catch-all integration that lets you map any frontend form to WPfomify by selecting field names. If your form plugin is not on the list, this is your escape hatch.
- CSV Import. Upload a CSV with columns for title / name / city / state / country / email / date. The plugin imports each row as a "fake" conversion that rotates like the real ones. Useful for seeding a new store with believable activity before real sales come in. Use this carefully and replace it with real data once you have it.
- WordPress.org. Plugin install counts, plugin downloads, plugin five-star reviews. Targeted at plugin authors who want to show "Used by 10,000+ sites" on their marketing page.
- Google Reviews. Pulls reviews via the Google Places API. You enter your Place ID and an API key, WPfomify caches the recent reviews and rotates them.
- Envato. Sales from your Envato author account, via the Envato API. Personal token goes in Settings.
- Freemius. Purchases from your Freemius account, via the Freemius API. Store ID and Public Key go in Settings.
- User Registration. New WordPress user signups, generic across any registration form.
A nice detail about these built-in integrations: they are all hooked through the same ibx_wpfomo_conversion_data filter, so you can rewrite or sanitize the data at one place rather than per-integration.
Add-on integrations (email marketing and Zapier)
Outside the core, five separate add-on zips are part of the bundle:
- ActiveCampaign. Pulls recent contacts from an ActiveCampaign list as signup notifications. "Sarah just subscribed to the newsletter, 4 minutes ago."
- ConvertKit. Same idea for ConvertKit subscribers. If you are running Convert Pro to build your opt-in forms, the two pair well, Convert Pro captures the email, ConvertKit stores it, WPfomify shows it as social proof.
- Drip. Recent Drip subscribers.
- MailChimp. Recent Mailchimp list signups. If you are not already on Mailchimp and want a WordPress-native alternative, MailPoet Premium plays nicely with WPfomify through a custom feed.
- Zapier. The universal escape hatch. Connect any Zapier trigger to a WPfomify webhook, push activity from any of Zapier’s 5,000+ apps into a notification card. This is how you handle services that do not have a dedicated WPfomify add-on (CRMs, payment processors, scheduling tools).
Each add-on installs as a small companion plugin. Once activated, a new "From" option appears in the Source tab of the notification wizard.
Visibility, targeting, and frequency capping
Three things matter for not annoying your visitors with notifications: where they show, who sees them, and how often.
Per-URL targeting
The "Show On" select on the Display tab is the workhorse. Options are:
- Show Everywhere. Every page on the site shows the rule.
- Show only on selected pages. You enter a list of URLs (or URL patterns with
*). Common patterns:/checkout,/cart,/product/*,/landing-page-a. - Show everywhere except selected pages. Inverse. Useful when you want broad coverage but want to suppress notifications on internal pages like
/accountor/loginor anything under/wp-admin.
URL patterns are matched against the request path (not the full URL), so /product/* matches any product URL regardless of which category it is in.
User role gating
Under Visibility: Visitors, three options:
- All Visitors. Default.
- Logged-in Users Only. For members-only social proof, like showing recent course completions inside a learning platform.
- Logged-out Users Only. For sales social proof targeted at prospects, hidden from your existing customers and team.
There is no per-WP-role gate in the UI (you cannot say "show only to subscribers but not contributors"), but the ibx_wpfomo_frontend_render_content action lets you check wp_get_current_user()->roles and short-circuit the render. We will see an example in the Developer Reference.
Frequency capping
This is the Display dropdown on the Display tab. Options:
- Always. Notifications cycle for as long as the visitor stays on the page.
- Once per session. First page load shows notifications. Once they close the browser tab, the count resets.
- Once per visitor. Hard-capped. Once a visitor sees the rotation, they will not see it again from this device/browser, regardless of session.
- Custom. You set the cookie expiration in days.
Frequency capping is what keeps WPfomify from feeling spammy. On a content site where the visitor reads several pages, "Always" can be too much. "Once per session" is usually the sweet spot, the visitor sees a few notifications on their first page, then the rotation stops and they read in peace.
Developer reference: hooks, filters, REST
WPfomify is reasonably well-instrumented for developers. The action and filter prefix is ibx_wpfomo_, and most extension work is done through the filters that wrap the conversion data, the admin settings, and the notification render.
REST API
The plugin registers two REST routes under the wpfomify/v2 namespace, registered the standard WordPress REST API custom endpoints way:
// GET /wp-json/wpfomify/v2/trigger/
// Generic webhook trigger - hit this URL to fetch and push the latest conversions.
register_rest_route( 'wpfomify/v2', '/trigger/', array(
 'methods' => 'GET',
 'callback' => array( $this, 'response' ),
 'permission_callback' => '__return_true',
) );

// POST /wp-json/wpfomify/v2/notification/(?P<id>\d+)
// Per-notification webhook (push a new conversion for notification ID).
register_rest_route( 'wpfomify/v2', '/notification/(?P<id>\d+)', array(
 'methods' => 'POST',
 'callback' => array( $this, 'response' ),
 'permission_callback' => '__return_true',
) );
Both endpoints use api_key query param verification inside the callback rather than a permission_callback, so you can hit them from anywhere (Zapier, an external CRM, a CLI script) as long as you pass the correct api_key.
Filter: customize the time-ago labels
The plugin renders timestamps as "5 minutes ago", "2 hours ago", "yesterday." The strings are split into an ordered array of segments, and you can reorder or translate them with the ibx_wpfomo_time_array filter:
add_filter( 'ibx_wpfomo_time_array', function( $time_array ) {
 // Example: drop the "ago" suffix entirely.
 return array_filter( $time_array, function( $part ) {
 return $part!== 'ago';
 });
});
This is the same filter you would use to localize the labels into a non-English language if your theme is not loading the plugin’s translation file.
Filter: rewrite conversion data before render
Before a conversion is rendered on the front end, it passes through ibx_wpfomo_conversion_data:
add_filter( 'ibx_wpfomo_conversion_data', function( $fields, $settings ) {
 // Mask the city for privacy on a specific notification.
 if ( isset( $settings->id ) && $settings->id === 42 ) {
 $fields['city'] = '';
 }
 // Replace first name with the initial only.
 if (! empty( $fields['name'] ) ) {
 $fields['name'] = substr( $fields['name'], 0, 1 ). '.';
 }
 return $fields;
}, 10, 2 );
This is how you handle the GDPR worry of showing full names. Strip down to a first initial, drop the city to the country level, and the notification still has social weight without leaking identity.
Filter: gate display by user role
There is no built-in per-role gate but the frontend render hook makes one easy to bolt on:
add_action( 'ibx_wpfomo_frontend_render_content', function( $type, $settings ) {
 if (! is_user_logged_in() ) {
 return;
 }
 $user = wp_get_current_user();
 if ( in_array( 'administrator', $user->roles, true ) ) {
 // Suppress entirely for admins so they can browse the site clean.
 return false;
 }
}, 10, 2 );
Site admins testing layout changes do not need to be distracted by their own notification cards. A small thing, but it adds up.
Filter: add a custom data source
You can register a new "From" option in the Source dropdown by hooking the conversion fetch:
add_filter( 'ibx_wpfomo_conversion_data', function( $fields, $settings ) {
 if ( $settings->source!== 'my_custom_source' ) {
 return $fields;
 }
 // Pull from your own table.
 global $wpdb;
 $rows = $wpdb->get_results( "
 SELECT first_name AS name, city, country, signup_date AS time, plan_name AS title
 FROM {$wpdb->prefix}custom_signups
 ORDER BY signup_date DESC
 LIMIT 30
 " );
 return $rows;
}, 10, 2 );
The shape $wpdb returns matches what the front end expects (objects with name, city, country, time, title), so no further normalization is needed.
Filter: rewrite the notification image URL
If you want all notifications to use a single brand image instead of Gravatar:
add_filter( 'ibx_wpfomo_notification_image_url', function( $img ) {
 return 'https://example.com/wp-content/uploads/brand-mark.png';
});
Use sparingly. The Gravatar image is part of what makes the notification feel human.
Action: log every notification render
If you want to track impressions in your own analytics rather than (or in addition to) the built-in analytics:
add_action( 'ibx_wpfomo_after_notification_markup', function( $settings, $classes, $sequence ) {
 // Push an event to your warehouse.
 if ( function_exists( 'wp_remote_post' ) ) {
 wp_remote_post( 'https://my-events.example.com/track', array(
 'body' => array(
 'event' => 'wpfomify_impression',
 'rule_id' => $settings->id?? null,
 'sequence' => $sequence,
 'timestamp' => time(),
 ),
 'blocking' => false, // Fire and forget.
 ) );
 }
}, 10, 3 );
If you are using MonsterInsights Pro for Google Analytics, you can wire WPfomify impressions to GA4 events via this hook in about 10 lines.
Filter: add an admin settings section
The settings page is composed from three filters: ibx_wpfomo_admin_general_settings, ibx_wpfomo_admin_misc_settings, ibx_wpfomo_admin_advanced_settings. To add a section to General:
add_filter( 'ibx_wpfomo_admin_general_settings', function( $settings ) {
 $settings['my_custom_section'] = array(
 'title' => 'My Custom Integration',
 'fields' => array(
 'my_api_key' => array(
 'label' => 'API key',
 'type' => 'text',
 ),
 ),
 );
 return $settings;
});
This is how the bundled integrations register their own settings sections without modifying the core file.
Programmatic conversion push via REST
If you have a process outside WordPress (a Lambda, a cron job, a webhook from a SaaS) and you want to push a new conversion into WPfomify, you POST it:
curl -X POST "https://example.com/wp-json/wpfomify/v2/notification/123" \
 --data-urlencode "api_key=YOUR_KEY" \
 --data-urlencode "name=Sarah" \
 --data-urlencode "city=Manchester" \
 --data-urlencode "country=UK" \
 --data-urlencode "title=Pro Plan"
Replace 123 with the post ID of the notification rule. The endpoint is permission-callback-public but verifies the api_key inside the response handler.
Performance, compatibility, and gotchas
A few practical notes about running WPfomify on a real site.
Performance footprint
The plugin loads a small JS file (~20KB unminified) and a small CSS file on the front end of pages where notifications are active. The JS fetches the conversion queue once on page load via the REST endpoint, then runs entirely client-side, so subsequent navigation does not re-fetch. The endpoint response is cached server-side via WordPress transients with a default 5-minute TTL.
For most sites the impact on PageSpeed is unmeasurable. On a heavily optimized landing page targeting a 95+ Lighthouse score it costs about 1-2 points, mostly from the extra JS file. If you are squeezing for every millisecond, you can defer the notification load by editing the ibx_wpfomo_frontend_render_content action to wait for requestIdleCallback.
Compatibility with caching
WPfomify is compatible with page caching plugins. The notification card is injected via JS at runtime, not at PHP-render time, so a cached HTML response does not pin a specific notification to a specific user. Cookies for frequency capping are set by the JS, not by PHP, so caching does not break "Once per session."
If you are running a CDN with full HTML caching, the same applies, as long as you do not cache the wp-json/wpfomify/v2/trigger endpoint. Most CDNs already exclude /wp-json by default.
Compatibility with privacy / consent plugins
The Gravatar lookup pulls an image from secure.gravatar.com per visitor, which is technically a third-party request. If your consent banner blocks third-party requests until consent, you should turn off "Enable Image from Gravatar" and use a default brand image instead. The card itself does not set any cross-site cookies.
Theme compatibility
The notification card is positioned fixed and uses a high z-index. On themes with sticky headers or sticky footers that also use high z-index, the card can sit behind the sticky element. Adjust by adding a CSS rule:
.ibx-wpfomo {
 z-index: 999999!important;
}
(or whatever value is higher than your sticky bar). Most modern themes are at z-index 1000-9999, so 999999 is safe.
Multi-site
The plugin works on a multisite network. Each site has its own settings and its own notification rules. License keys are per-site, not network-wide, so check the WPfomify pricing tier you bought before assuming network-wide activation.
What can go wrong
Three failure modes I have hit in the wild:
- No notifications appear, no errors in console. Check the Visibility settings on the rule. The "Show On" URL pattern often excludes the page you are testing on. Set it to Show Everywhere temporarily, confirm the card appears, then narrow back down.
- Notifications appear but with empty fields ("from signed up for "). Means the source data is missing the merge fields. For WooCommerce this usually means the order had no billing address. Add fallback strings in your template like
{{name}}defaults to "Someone" via theibx_wpfomo_conversion_datafilter. - REST endpoint returns 401 or 403. Means a security plugin (Wordfence, Loginizer, etc.) is blocking the request. Whitelist
/wp-json/wpfomify/v2/*or whitelist the calling IP.
Pricing and licensing
WPfomify is sold on the wpfomify.com site under several tiers (Personal, Plus, Agency, Lifetime), priced from around $79/year for a single site up to a one-off Lifetime fee for unlimited sites. The full integration list (Mailchimp, ConvertKit, Drip, ActiveCampaign, Zapier) is included on every tier, not gated to the higher tiers.
Like every other plugin on the GPL Times catalog, WPfomify is licensed GPL v2, which means you can re-distribute the code and run it on as many sites as you want.
The thing you do not get with a GPL re-distribution is the developer’s licensing-server updates and direct support. If you need either of those (and on a high-traffic store, you probably do), buy direct.
WPfomify vs the alternatives
A short comparison with the names you will see in the same shortlist.
- TrustPulse (Awesome Motive). SaaS, subscription, similar feature set, slightly cleaner UI. You give up self-hosting and your visitor data flows through their servers. Pricing starts around $5/month and goes up sharply with traffic. Good fit if you want zero WordPress install footprint.
- Fomo.com. SaaS, the original "social proof popup" product. Pricing from $19/month. Cross-platform (not WordPress-specific). Good if you also need notifications on Shopify or another non-WP site.
- ProveSource. SaaS, $18+/month. UI is similar to TrustPulse. Has a generous free tier that caps out around 1,000 monthly unique visitors.
- NotificationX (WPDeveloper). WordPress plugin, the closest direct competitor. Has a free version on wordpress.org and a Pro tier. Strong WooCommerce integration. UI is a bit denser than WPfomify, and the integration list is similar. If you are deciding between the two, the question is usually which dashboard feel you prefer, the underlying capability is roughly equivalent. NotificationX Pro is in the GPL Times catalog too, so you can put both on a staging install and pick.
- Nudgify. SaaS, $9+/month. Bigger focus on review-based social proof and trust signals. Worth a look if reviews are your main use case rather than purchases.
If your shortlist is WPfomify vs NotificationX, my read is: WPfomify has the cleaner notification wizard (the 4-step flow makes the configuration more discoverable), NotificationX has a slightly larger integration catalogue out of the box. For most sites the difference is rounding error. If you already use Astra Pro or Spectra Pro, WPfomify is the same ecosystem (Brainstorm Force / IdeaBox network), so updates and support patterns will feel familiar.
If your shortlist is "WordPress plugin vs SaaS" (WPfomify vs TrustPulse), the WordPress side wins when:
- You care about not piping visitor data through a third party.
- You have an existing WordPress operations team and prefer to keep the surface area small.
- You expect to need developer extensions (custom data sources, custom render logic) that a SaaS will not give you direct hooks for.
The SaaS side wins when:
- You want notifications across multiple platforms (WordPress plus Shopify plus a landing-page builder).
- You do not want to manage another plugin update cycle.
Common use cases
Concrete scenarios where I have seen WPfomify earn its keep.
1. WooCommerce store under 50 orders/day
Show recent purchases (bottom-left, "Once per session" frequency cap), filtered to Completed orders only. Skip the checkout page itself (so the visitor is not distracted while paying). On product pages, this lifts add-to-cart rate visibly. The visitor sees that other people have already bought this exact product, and the friction of being the first to buy goes away.
If you also run CartFlows Pro for your sales funnels, scope WPfomify notifications to the pre-checkout funnel steps and turn them off at the order bump and final checkout step.
2. SaaS pricing page
Two notifications. One conversion rule pulling from your billing system (via Zapier or the Freemius integration), showing "Aisha just upgraded to the Pro plan, 12 minutes ago." One live-visitor counter showing "47 people are looking at this page right now." Together they communicate two things: real people buy this, and your decision is not happening in a vacuum.
3. Lead magnet / free download page
One rule pulling from the Gravity Forms integration (or Convert Pro if you use it for opt-ins). "Sarah just downloaded the WordPress speed checklist, 3 minutes ago." Frequency cap to once per session. The card shows visitors that other people thought this lead magnet was worth their email address, which is exactly the question they are asking themselves.
4. Course launch / LMS
For a LearnDash or LifterLMS course launch week, run a rule that shows enrollments. As the launch progresses, the velocity of cards visually accelerates, which doubles as a momentum signal. After the launch week ends, switch the rule to "Once per visitor" so you are not still hammering visitors with a 2-week-old launch.
5. Plugin author homepage
WordPress.org integration + manual rotation. Show "Used by 10,000+ active installs" with the live count from wp.org, plus a rotating reviews block pulling real five-star reviews. This is the integration that almost no SaaS social-proof tool offers (because most of them have not built a wp.org scraper), and it is one of the strongest pieces of evidence for a plugin landing page.
6. Charity / nonprofit donations page
GiveWP integration, hide the donation amount, show only donor name and time. "Aisha just donated, 4 minutes ago." Frequency cap to once per session. The momentum signal is the same as a launch but framed around community rather than purchase.
Frequently asked questions
Does WPfomify show fake notifications?
No, not unless you manually upload a CSV of fake entries. The Conversion integrations all pull from real data on your site (WooCommerce orders, EDD sales, Mailchimp signups, etc.) so the notifications are real activity. If you want a "Custom" notification with hand-typed entries, that mode exists but it is clearly labeled and the entries are visible to you in the admin. Do not use it to fake activity, visitors notice.
Will it slow my site down?
It adds about 20KB of JS and a small REST call on page load. On most sites this is a 0-2 point Lighthouse impact. The notification rendering itself happens client-side after the page has finished painting, so it does not block Largest Contentful Paint. If you care about every millisecond, defer the script via the ibx_wpfomo_frontend_render_content hook.
Does WPfomify work with caching plugins?
Yes. The notification card is injected by JS at runtime, not by PHP at render time, so a cached HTML response does not break frequency capping or per-visitor logic. Tested against WP Rocket, WP-Optimize, LiteSpeed Cache, and the RunCloud full-page cache that the gpltimes.com site itself runs on.
Can I run multiple notifications at once?
Yes. Each notification rule is a row in the ibx_wpfomo post type. You can have a Conversion rule, a Live Visitor rule, and a Reviews rule all active at once. They will alternate in the same card slot (one at a time) or you can configure positions separately so they sit in different corners of the screen.
How does WPfomify handle GDPR / privacy?
Personal data in notifications (name, city) is shown only when your source has it. For sources you control (WooCommerce, custom forms), you can use the ibx_wpfomo_conversion_data filter to strip last names to an initial, broaden the location to the country, or remove any field. The Gravatar integration is opt-in. The plugin does not phone home to any third-party tracking service.
Does it support multiple languages?
Yes. The plugin is translatable via standard WordPress .po/.mo files. The time-ago labels go through the ibx_wpfomo_time_array filter so you can localize "5 minutes ago" into your visitor’s language. Notification templates are per-rule text, so you can have separate rules for English, French, German that target different URL patterns if you run a multilingual site.
Can WPfomify show notifications for events that happen outside WordPress?
Yes, via the Zapier add-on or via the REST endpoint directly. Hit /wp-json/wpfomify/v2/notification/<id> from any external service with a valid api_key, and the conversion will appear in the rotation. This is how you wire up Stripe, Calendly, ConvertKit, or any other off-site service that has a webhook.
What happens when my license expires?
The plugin continues to work. License expiration only affects automatic updates from the official author server.
Is there a free version?
There is no free tier on wordpress.org. WPfomify is sold as a paid plugin only. NotificationX is the alternative if you specifically want a free starting point.
Can I customize the notification card design beyond the Custom panel?
Yes. The card markup uses CSS classes prefixed ibx-wpfomo-. You can add custom CSS in your theme’s style.css (or via Appearance -> Customize -> Additional CSS) to override any visual detail. The Customize -> Design panel is the no-code path, custom CSS is the no-limit path.
Does WPfomify count as "ad tech" from a tracking perspective?
It depends on what you turn on. If you only use the built-in WordPress data sources (WooCommerce, Gravity Forms, etc.) and disable Gravatar, no external tracking happens. If you enable Page Analytics or Conversion Analytics, the plugin sends impression data to your own database, not to a third party. The only outbound calls are when you connect to an external service (Google Reviews, Mailchimp), and those are first-party-to-service calls under your control.
Can I show the notification only after a delay or scroll position?
Yes. Initial Delay in the Customize -> Timing panel sets how many seconds after page load before the first card shows. There is no built-in "after Nth scroll position" trigger, but you can wire one up via the ibx_wpfomo_frontend_render_content hook combined with a small custom JS listener.
Final thoughts
WPfomify is the kind of plugin that does one thing and does it well. There is nothing in here that you could not build yourself out of WordPress hooks and a couple of evenings, but the wizard saves you those evenings, and the integration list saves you the API code for ten different services. The 4-step Source / Content / Display / Customize wizard is the best part of the UI, it makes the configuration feel discoverable instead of buried.
If you are running an ecommerce store, a course platform, a SaaS pricing page, or a lead-magnet landing page, WPfomify is worth a week of testing on a staging install. Pick one rule, set the frequency cap to "Once per session" so visitors are not overwhelmed, point it at your real sales or signups, and watch the add-to-cart rate. If the lift is there, leave it on. If it is not, that is also useful information about your audience.
The GPL Times catalog has both WPfomify and its closest WordPress competitor, NotificationX Pro, so the cheapest A/B test is to install both side-by-side on staging, alternate them for a week each, and let your funnel data make the call. For most stores, the answer is "either one will work and the lift comes from having social proof at all, not from the specific plugin choice."
One more practical note: social proof is a force multiplier, not a fix. If your product page does not explain what the product does, no amount of notifications will sell it. WPfomify works best on a site that already converts and just needs to convert a bit harder. Make sure the rest of your funnel is solid first.