

There’s a moment most WordPress site owners hit around the time their list crosses 20,000 subscribers. The Mailchimp bill stops being a rounding error and starts being the second biggest line item on the SaaS budget, somewhere past $300 a month and climbing. Around 50,000 contacts you’re well into four figures a year. None of that buys you better deliverability than what a properly warmed sending IP through Amazon SES costs at roughly ten cents per thousand emails. It buys you a UI, a list view, and the assurance that the data lives somewhere else.
The Newsletter plugin (officially "The Newsletter Plugin", though everyone just calls it Newsletter) is the WordPress answer to that math. It’s been around since 2009, has over 300,000 active installs, and it does something the SaaS tools can’t: it keeps your subscribers, your campaigns, and your tracking data inside the same WordPress database that already runs your site. You bring your own SMTP, whether that’s Amazon SES, SendGrid, Brevo, or Postmark, and Newsletter does the rest.
Table of Contents
- What Newsletter actually is
- Why self-host an email list in the first place
- Key features at a glance
- Walking through the plugin
- The dashboard and onboarding checklist
- Settings: sender identity and the sending pipeline
- Building newsletters: the composer
- Subscription forms and the public page
- Lists, segmentation, and the subscriber profile page
- Sending: cron, chunks, and Amazon SES
- A real migration: 38k subscribers off Mailchimp
- Developer reference: hooks, shortcodes, database
- How Newsletter compares to MailPoet, Mailster, and FluentCRM
- Performance, deliverability, and honest limits
- Pricing and the add-on situation
- Final thoughts
What Newsletter actually is
Newsletter is a self-hosted email newsletter plugin for WordPress. That sentence is doing a lot of work, so let me unpack the difference from two other categories it gets confused with.
It is not a transactional SMTP plugin. WP Mail SMTP, Easy WP SMTP, Post SMTP, and Fluent SMTP are all about getting wp_mail() to deliver reliably (password resets, WooCommerce receipts, contact form notifications). Newsletter sits on top of that layer. You still need a working SMTP route. Newsletter calls into it to send bulk messages.
It is also not a SaaS email service with a WordPress connector. Mailchimp’s plugin, ConvertKit’s plugin, ActiveCampaign’s plugin, all sync data out of WordPress and into a third-party app, where the sending and the list management actually happen. Newsletter inverts that: the list and the campaigns live in your WordPress database, and only the actual mail handoff goes outside (to whatever SMTP relay you’ve configured).
The closest parallels are MailPoet (also WordPress-native), Mailster (a paid CodeCanyon plugin), and the newer FluentCRM. Among those, Newsletter is the oldest and has the broadest install base. It also has the most catalog of paid add-ons: a deep autoresponder for drip campaigns, dedicated Amazon SES and SendGrid sending integrations, WooCommerce hooks, Google Analytics tracking, popups, lock-content gates, and a WPML translator for multilingual lists.
Why self-host an email list in the first place
Three reasons keep coming up.
Cost at scale. Mailchimp’s tiered pricing climbs aggressively past 10,000 contacts. A list of 50,000 subscribers on the Standard plan is around $300 to $350 per month at the time of writing. Move that same volume through Amazon SES and you’re paying roughly $5 in delivery costs plus a small EC2/Lambda footprint if you bounce mail through one. The TCO math at scale is brutally one-sided once you’re past 20k.
Data residency and GDPR. When you use Mailchimp or ConvertKit, your subscriber list is processed in the US by a third-party data processor. That’s fine for most sites, but if you’re in a regulated industry (healthcare, finance, EU public sector), or your privacy policy genuinely says "we don’t share your data", you have a problem. Self-hosted Newsletter on a server you control means there’s no third-party processor in the chain at all. The email goes from your DB to your SMTP relay, which might still be US-based, but you’ve cut out a layer of profiling.
Owning your IP reputation. This one cuts both ways. On a shared SaaS, you ride the provider’s reputation. That’s good when you’re small. It can become a tax when your engagement is high and theirs is dragging the average down, or vice versa when a noisy neighbour on a shared pool gets your IP listed. With your own SES setup you warm and own a dedicated IP. You suffer for your own mistakes and benefit from your own good behaviour.
The flip side: self-hosting means you’re the SRE for your mail stack. Bounces, complaints, suppression lists, DNS records (SPF, DKIM, DMARC), warm-up schedule, all of that is on you. Newsletter helps but it isn’t magic.
Key features at a glance
The free core is meaningful. The pitch isn’t "you need to upgrade to do anything", it’s "here’s a working email tool, and these add-ons make it more powerful".
- Subscriber management. Add, edit, import via CSV, segment by list. Standard fields plus up to 21 custom fields (name, surname, plus 20 user-defined
profile_*slots). - Drag-and-drop composer. Block-based email builder with responsive layout, image, button, text, dynamic posts, and social blocks. Output is mobile-aware HTML.
- Subscription forms. Default
[newsletter]shortcode, custom HTML form builder, a Gutenberg block, and a widget. Popups need the Profile/Popup add-on. - Confirmation and welcome. Single or double opt-in. A welcome email fires after confirmation. The Autoresponder add-on extends that into a full drip sequence.
- Bounce handling. A POP3 bounce add-on logs into your bounce mailbox and quarantines hard-bouncers.
- Open and click tracking. Tracking pixel + redirector URLs that record clicks per subscriber.
- Preference center. A "Subscriber profile" page (rendered with
[newsletter_profile]) lets people update their own details, list memberships, and even export their data for GDPR. - WooCommerce. Auto-subscribe new customers with consent checkbox, segment by purchase history, fire campaigns on order events.
- Multilingual. WPML aware. Each subscriber has a language attribute. You can send the right translation to the right segment.
- Recurring and Series newsletters. Built into the free Newsletters tab: scheduled posts-digest emails and pre-built drip series (separate from the Pro Autoresponder add-on which goes further).
- A/B testing. Pro feature: split campaigns by subject line or content and pick the winner.
Walking through the plugin
The product page on GPL Times has a Try It Now button that spins up a sandbox WordPress with Newsletter already installed. Click through and you land on the plugin’s dashboard, which is the screenshot you’ll see below. It’s a useful way to poke at the UI without committing to an install.
The dashboard and onboarding checklist
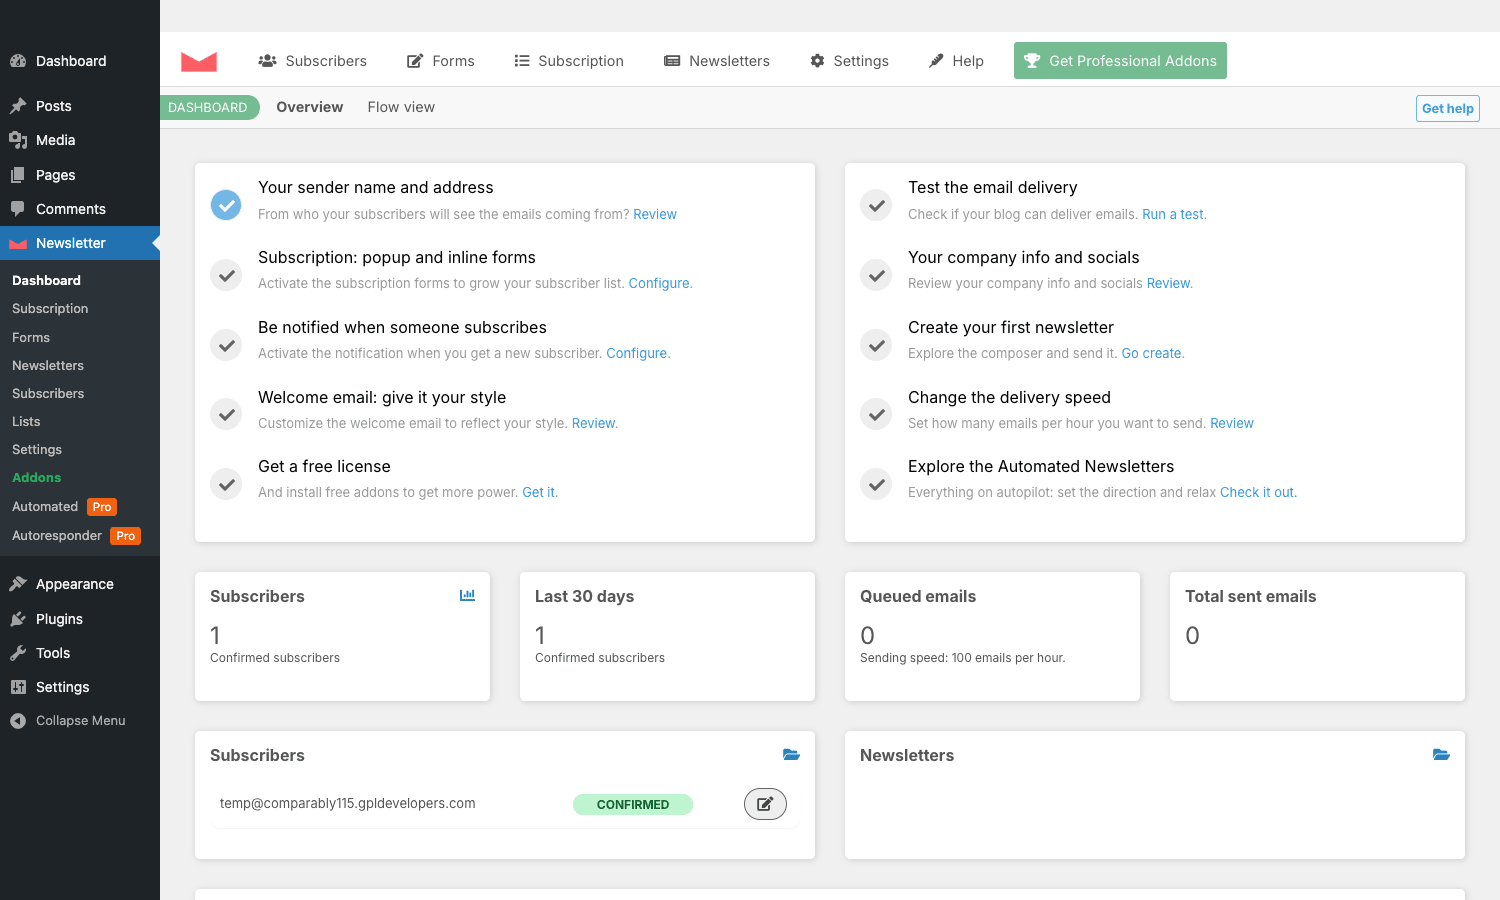
The dashboard does two things at once. The top is a horizontal icon-tab bar that becomes your main navigation: a red envelope logo on the left, then Subscribers, Forms, Subscription, Newsletters, Settings, Help, and a green "Get Professional Addons" button on the right. That bar follows you across every Newsletter page, which is nice once you get used to it but takes a minute. WordPress plugins more often hide secondary nav inside left-rail submenus, and Newsletter doing both (the left-rail Dashboard/Subscription/Forms/Newsletters/Subscribers/Lists/Settings/Addons list AND a top tab bar) does feel like a lot of chrome at first.
Underneath is the actual dashboard content. Two checklist columns (sender setup, subscription forms, notifications, welcome email, license on the left; test delivery, company info, first newsletter, delivery speed, automated newsletters on the right) walk you through every setting that you really should not skip. The right column ends with "Explore the Automated Newsletters", which is a soft prompt to upgrade to the Pro Autoresponder add-on.
The four stat cards below the checklist are the actual at-a-glance view: Subscribers (confirmed count), Last 30 days (new confirmed in window), Queued emails (with current sending speed as a subtitle, defaulted to 100 emails per hour, which is conservative), and Total sent emails. On a fresh install they’re all zeros and ones from the test subscriber you’ll add.
Two more panels sit at the bottom of the dashboard: a Subscribers card showing the most recent confirmed contacts with a green CONFIRMED pill, and a Newsletters card showing recent campaigns. They serve the "did anything happen lately" instinct without you having to switch tabs.
Settings: sender identity and the sending pipeline
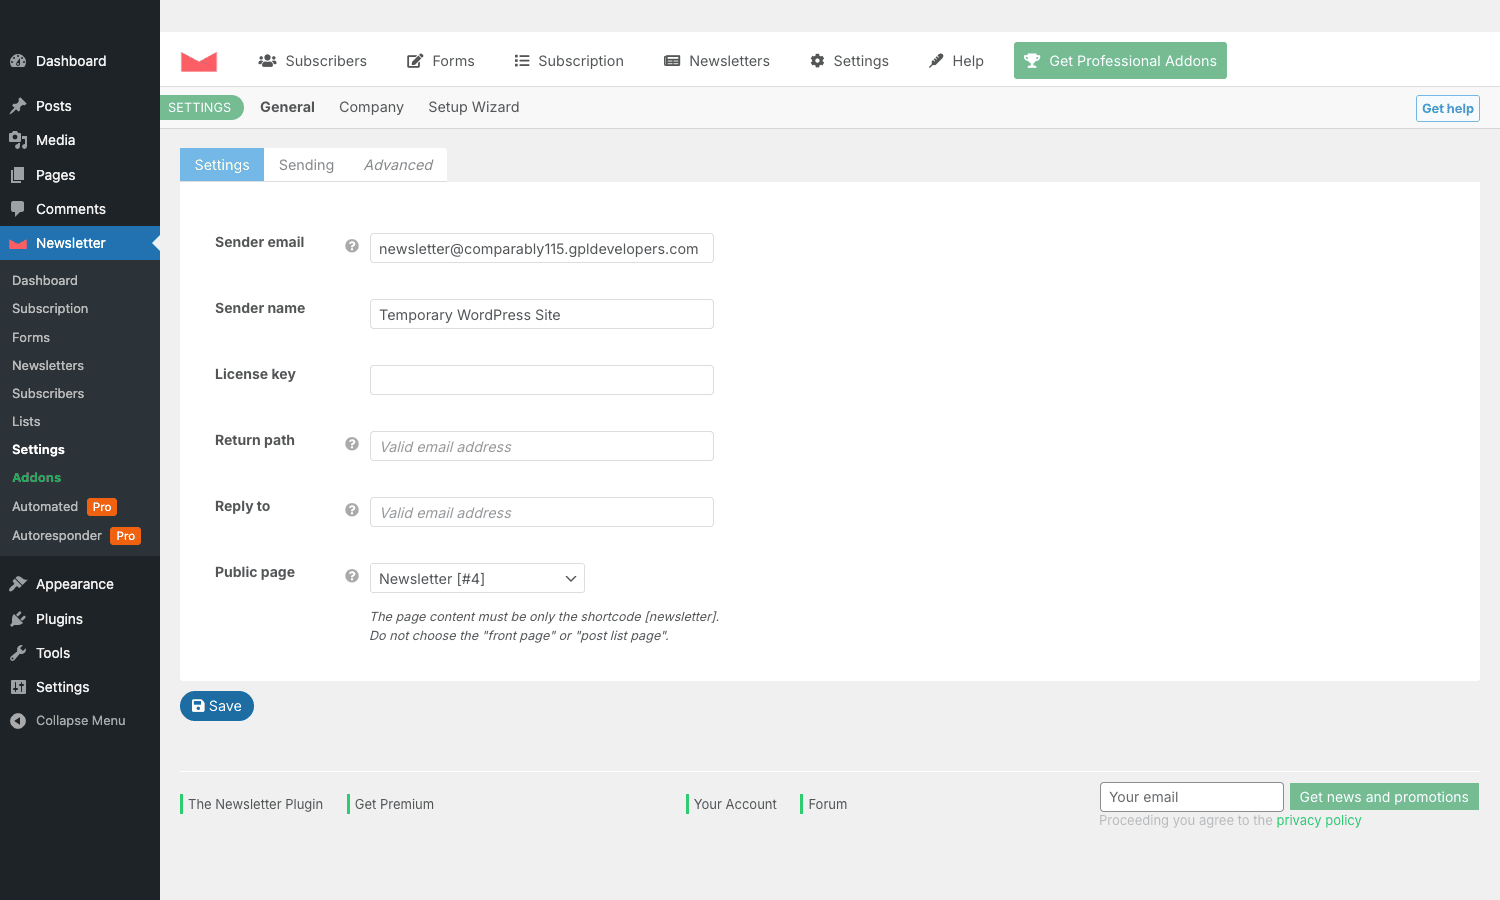
The settings page is where most of the day-one work happens. The top-level Settings menu has three sections (General, Company, Setup Wizard), and within General there are three sub-tabs (Settings, Sending, Advanced). The Settings sub-tab is the one in the screenshot above and it’s the bare minimum you have to fill in.
Sender email and sender name set the visible "from" identity on every email you send. The Return path is the bounces address, which is where Amazon SES (or any other relay) sends back hard-bounce notifications. Reply to is the address that gets filled in when a subscriber hits reply on a campaign. The Public page dropdown points at the WordPress page that holds the [newsletter] shortcode and serves as the subscription, confirmation, and unsubscribe surface for visitors.
That help text under Public page is worth re-reading: "The page content must be only the shortcode [newsletter]. Do not choose the ‘front page’ or ‘post list page’." Newsletter routes confirmation, subscription, unsubscribe, and the preference center all through different ?nm=... query parameters on this single public page. If you point it at your home page, the homepage HTML wraps every confirmation email view. It looks ugly, and it slows the page on confirmation links. Use a blank page that contains nothing but the shortcode.
The Sending sub-tab is where you configure who actually carries the mail. By default the plugin sends through wp_mail(), which on a fresh WordPress install means PHP mail(), which means almost nothing will reach Gmail. Install one of: the Amazon SES add-on, the SendGrid add-on, the Mailgun/Brevo/Postmark/SparkPost/Mailjet add-ons, or route through any external SMTP service via Fluent SMTP. Each add-on adds an extra tab here with its own credentials field.
The Advanced sub-tab is where you set chunk size (how many emails per cron tick, sane default 100) and the cron rate. Most relays let you push higher than 100 emails per hour once you’re warmed up, and we’ll come back to that in the Sending section.
Building newsletters: the composer
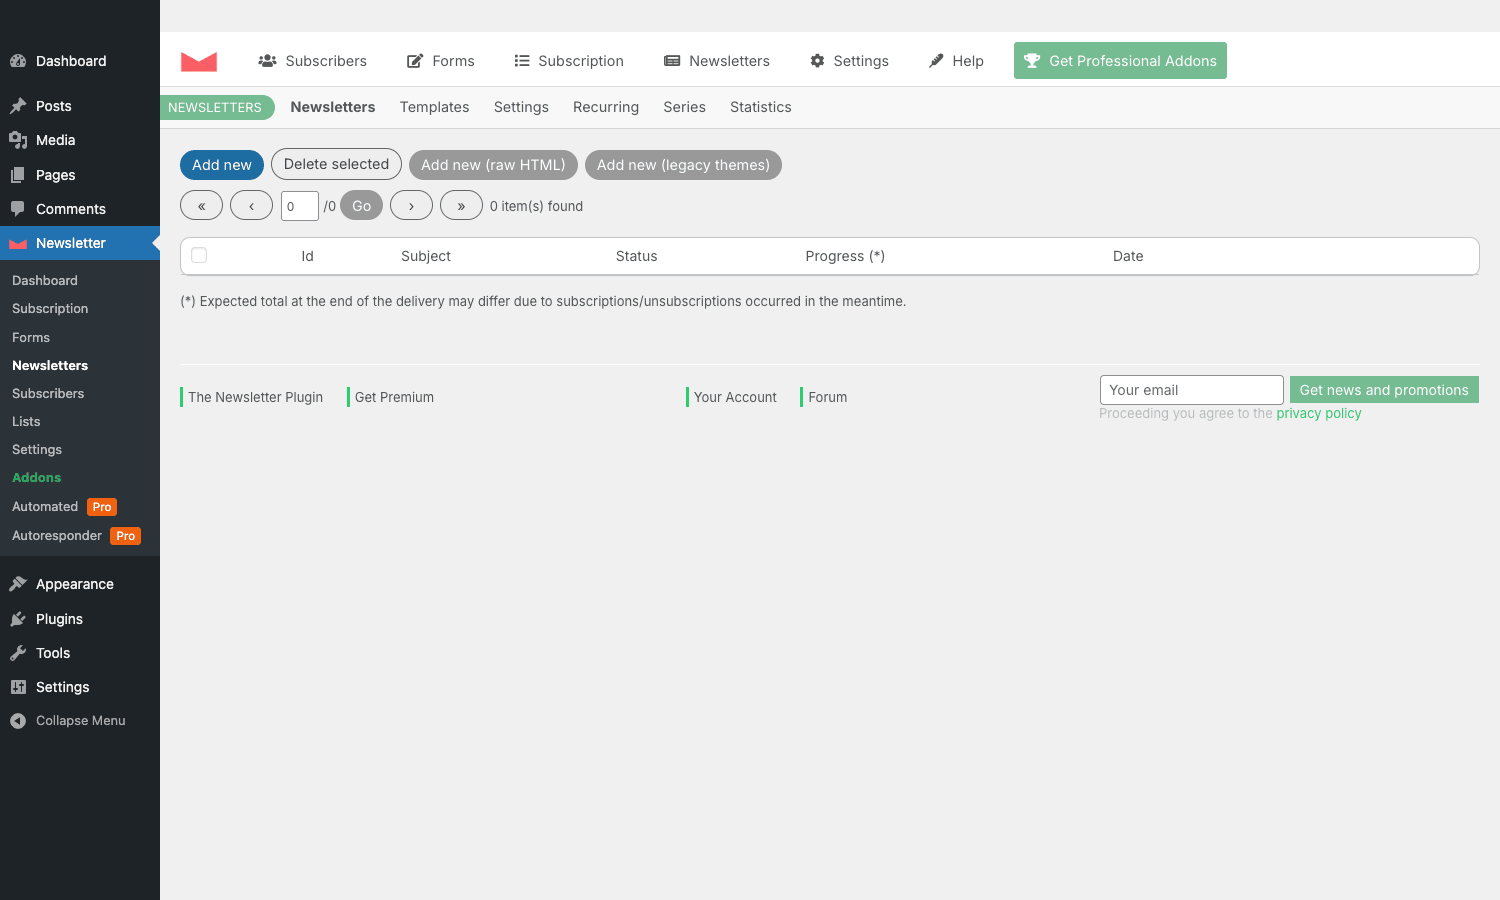
The Newsletters tab is where actual campaigns live. The header sub-tabs are Newsletters (the list, shown above), Templates (save block compositions for reuse), Settings (defaults for new campaigns), Recurring (scheduled posts-digest, like "every Friday send the week’s new posts"), Series (a built-in fixed-length drip), and Statistics (open/click aggregates).
Four buttons sit above the list: Add new (the standard block composer), Delete selected, Add new (raw HTML), and Add new (legacy themes). Most people will only ever use the first one. Raw HTML is for when you’ve already designed the email in something like Stripo, MJML, or Mailchimp’s HTML export, and you want to paste the rendered HTML directly. Legacy themes is the pre-composer template system from before the drag-and-drop builder was rewritten; it’s still supported because some long-time users have heavy templates they refuse to migrate.
The list columns are Id, Subject, Status (draft/sending/sent), Progress (with that asterisk-footnoted "expected total at end of delivery may differ" note, because subscriber counts shift while a campaign is mid-flight), and Date. Empty on first install, of course.
The composer itself, once you click Add new, is a standard block builder. Top toolbar with subject, preheader, sender override, lists targeting. Main canvas with blocks down the right rail: Heading, Text, Image, Button, Spacer, Divider, Social, Posts (auto-pulls recent posts), Products (WooCommerce), Footer. Each block has a settings panel for padding, color, alignment. It’s not as polished as Mailchimp’s email builder, and it’s a long way from a tool like Stripo, but it’s functional and the output renders correctly across Gmail, Apple Mail, Outlook (the rendering tests we ran on Litmus came back clean except for one CSS gradient issue on old Outlook for Windows, which is a Litmus-everywhere problem, not a Newsletter problem).
Subscription forms and the public page
There are three ways to put a subscription form on the site. The Forms tab in the Newsletter admin lets you build forms visually: pick which fields show, optional radio for list selection, custom labels, GDPR consent checkbox, button text, redirect URL. Each form gets an ID and a shortcode you can drop into any page or post.
The simpler default is the [newsletter] shortcode, which renders the default form (email field plus name if enabled, list checkboxes if any are public, GDPR consent if enabled). The third option is the Newsletter widget, which puts the default form into any sidebar or footer widget area in the classic widget UI. In the block widget editor (Gutenberg widgets), there’s a Newsletter Subscription block that does the same.
Popups, slide-ins, and lock-content gates are part of the Profile/Popup Pro add-on. Without that, you’re limited to inline forms.
Lists, segmentation, and the subscriber profile page
The Lists tab (left rail under Newsletter) is where audience segmentation lives. Lists are simple boolean attributes on subscribers: "is in list X, yes or no". You can have up to 40 of them. Each list has properties: name, public yes/no (does it show on subscription forms), forced yes/no (subscribers always get added on signup), and a checkbox for whether the list is GDPR-required for the form.
Segmentation for a campaign is "send to subscribers in list A AND list B AND NOT list C". Anything more complicated than that (engagement-based, behavior-based, recency-based) needs the Pro Autoresponder add-on or a custom query against the database.
The Subscriber profile page is rendered with [newsletter_profile]. It’s the preference center: subscribers click a link in any newsletter (the profile merge tag) and land on a page where they can update their email, name, custom fields, list memberships, and unsubscribe. The [newsletter_export_button] shortcode adds a GDPR data-export button on the same page so they can download a CSV of what you have on them.
Sending: cron, chunks, and Amazon SES
This is the section most people get wrong on first install, so it gets the most words.
Newsletter does not send emails synchronously. When you press Send on a campaign, the campaign is queued, and a WP-Cron event (newsletter event) runs every five minutes (default) and processes up to N emails per tick. N is the chunk size, defaulted to 100 per hour, which on an active list will visibly tick along.
That gets you blocked at three places:
- WP-Cron itself. WP-Cron is fired by visitors hitting the site, so a low-traffic site at 3am doesn’t fire it reliably. Switch to a real cron (
* * * * * curl -s https://yoursite.com/wp-cron.php?doing_wp_cron) the moment you’re sending to more than a few hundred contacts. Newsletter has a setting that increases the cron rate to once per minute. - Server execution time. PHP scripts get killed by the web server after
max_execution_timeseconds (often 30 to 60). Newsletter sends emails in a loop, so the chunk size has to fit inside that window. With Amazon SES API calls at roughly 100ms each, 100 emails per cron run is fine; 500 is fine; 2,000 is asking to be killed mid-run. Keep chunk size honest. If you want to send faster, increase cron frequency (run the cron event every minute) rather than chunk size. - Relay rate limits. Out-of-the-box Amazon SES gives you 14 emails per second and 200 per day. Both numbers go up when you request production access and your reputation improves. Until then, your chunk size and cron rate combine to a theoretical send rate, and you do not want that to exceed your relay’s quota.
The Amazon SES add-on integrates Newsletter’s queue directly with the SES SendEmail API using AWS Signature v4. You add your access key, secret, and region. From that point Newsletter sends through SES instead of wp_mail(). The first afternoon I migrated a Newsletter site I had the Bounce add-on working in fifteen minutes but I burned an afternoon on the Amazon SES return-path setup, because SES wanted a verified MAIL FROM domain, and once that was wrong every bounce went into a black hole until DNS propagated. Mark this paragraph and re-read it the day you set yours up: verify the MAIL FROM subdomain in SES, add the MX and TXT records for that subdomain, and only then point the Newsletter Return path at bounces@thatsubdomain.com.
SendGrid, Mailgun, Brevo, Postmark, SparkPost, Elastic Email, Mailjet all have similar add-ons. Each is its own API client. The user-visible difference is just the credentials field and the sending speed; the queue model is identical.
A real migration: 38k subscribers off Mailchimp
Worth a section because the dry-run mechanics matter.
A client of mine was paying about $290/month for a Mailchimp Essentials plan with 38,000 contacts and ~14k average opens per campaign. Engagement was solid (37% open rate, 4% click rate) so we knew the list was clean, which is the precondition for any migration: if the list is dirty (lots of role addresses, gmail-typos, dormant subs), moving it to your own infrastructure will tank your reputation immediately.
Migration steps:
- Export the Mailchimp audience CSV. Email, first name, last name, opt-in date, source.
- Set up Amazon SES in the same region as the production server (eu-west-1). Verify the sending domain (
mail.client.com) with DKIM and SPF. Request production access (took about 18 hours; AWS asks for your use case in writing). - Install Newsletter on the WordPress site. Install the Amazon SES add-on. Plug in keys, set sender email to
news@mail.client.com, set Return path tobounces@mail.client.com, configure DMARC at_dmarc.client.com(initiallyp=noneto monitor; tightened top=quarantineafter a fortnight). - Import the CSV into Newsletter (Subscribers > Import). Mapped email, first name, surname, plus a
profile_1custom field for the Mailchimp source string. Set the import status to "confirmed" (these are existing opt-ins; no need for double opt-in). - Warm the sending IP. SES gives you a dedicated IP if you want one for $24.95/month. We took the shared pool route at first, sending campaigns at a deliberately throttled rate (5,000 emails per day, scaling 50% week over week) for a month before going full-throttle.
- After 4 weeks: open rate was within 1.5 percentage points of the Mailchimp baseline. Click rate identical. Hard bounce rate dropped (we’d been carrying old bouncers Mailchimp wasn’t aggressively suppressing).
Cost after migration: SES at the 38k contacts × 4 campaigns/month = 152k emails/month = ~$15. Plus the dedicated IP if we’d taken one. Plus the GPL Times Newsletter license. So under $40/month for what used to be $290.
That’s not a generalisable result. A list that’s been on Mailchimp for ten years probably has dormant entries Mailchimp’s suppression is hiding; warming SES with that load could blow up your reputation. The point is: it can be done, the savings are real, and the work involved is mostly DNS and queue tuning, not actually using Newsletter.
Developer reference: hooks, shortcodes, database
This is the section that decides whether Newsletter fits your stack or doesn’t.
Hooks (all prefixed newsletter_)
The plugin exposes a meaningful surface of actions and filters. The ones you’ll actually use:
newsletter_action: fires on every public Newsletter action (subscribe, confirm, unsubscribe, profile-save). Lets you hook into the lifecycle.newsletter_api_subscribe: fires when a programmatic subscription comes in via the REST API. Useful for syncing into a CRM at signup time.newsletter_composer_actions: adds custom actions to the campaign composer toolbar.newsletter_composer_footer: inject a default footer block into every new campaign.newsletter_composer_subject: filter the campaign subject before save. Useful for forced prefixes ("[Weekly] Foo").newsletter_confirmation_url: filter the URL a subscriber is sent to after they confirm. Default is the Public page; you can redirect them to a custom thank-you.newsletter_current_language: filter the language attribute applied to a new subscriber. Plug WPML or Polylang detection in here.newsletter_current_user: filter the resolved subscriber for the current request (useful for impersonation tests).newsletter_action_dummy: placeholder fired in unit tests; safe to ignore in production code.newsletter_blocks_dir: filter the directory the composer scans for custom block definitions.
A concrete example: tagging every Newsletter subscriber into a separate CRM at the moment of confirmation.
add_action( 'newsletter_action', function ( $action, $user ) {
 // $action is one of: 's' (subscribe), 'c' (confirm), 'u' (unsubscribe), 'p' (profile save).
 if ( 'c'!== $action || empty( $user ) ) {
 return;
 }

 wp_remote_post( 'https://crm.example.com/api/contacts', [
 'headers' => [
 'Authorization' => 'Bearer '. CRM_API_TOKEN,
 'Content-Type' => 'application/json',
 ],
 'body' => wp_json_encode( [
 'email' => $user->email,
 'first_name' => $user->name,
 'last_name' => $user->surname,
 'tags' => [ 'newsletter-confirmed' ],
 ] ),
 'timeout' => 8,
 ] );
}, 10, 2 );
Forcing a subject-line prefix on every outgoing campaign:
add_filter( 'newsletter_composer_subject', function ( $subject, $email ) {
 if ( false === strpos( $subject, '[Weekly]' ) ) {
 return '[Weekly] '. $subject;
 }
 return $subject;
}, 10, 2 );
Redirecting confirmed subscribers to a custom thank-you page instead of the default Public page:
add_filter( 'newsletter_confirmation_url', function ( $url, $user ) {
 return home_url( '/welcome-to-the-list/?confirmed=1' );
}, 10, 2 );
Shortcodes
Used inside post content, page content, or in the Public page wrapper:
[newsletter]: the default subscription/confirmation/unsubscribe/profile router. Required on the Public page.[newsletter_form form="1"]: render a specific custom form by ID (built in Forms tab).[newsletter_field name="email"]: output a single subscription field. Used for fully custom HTML forms.[newsletter_profile]: render the preference-center on a profile page.[newsletter_profile_field name="email"]: render a single editable profile field.[newsletter_profile_button]: the Save button for the profile center.[newsletter_export_button]: a GDPR-compliant data-export button (CSV download of everything Newsletter knows about the current subscriber).[newsletter_replace]: runs merge-tag replacement on arbitrary content. Useful inside a post viewed via a personalised tracking URL.[newsletter_resubscribe_button]: for re-engagement flows: a one-click button that resubscribes a previously-unsubscribed contact.
Database
Four custom tables live under the WordPress prefix:
{prefix}newsletter: subscribers. The main table. Columns includeemail,name,surname,status(S/C/U/B for subscribed/confirmed/unsubscribed/bounced),created,language, plus 40list_*boolean columns and 21profile_*text columns for custom fields. Indexed on email.{prefix}newsletter_emails: sent campaigns. One row per newsletter, with subject, body (the rendered HTML), status, total counts, send timestamps.{prefix}newsletter_user_logs: open/click/bounce events. Append-only event log; grows linearly with engagement.{prefix}newsletter_stats: aggregate stats per campaign per subscriber (sent yes/no, opened yes/no, clicked yes/no). Materialised view-ish; used for the per-campaign stats page.
The newsletter_stats table can grow large quickly on heavy lists. On the 38k-subscriber site, after a year of weekly sends, it was about 120 MB. Worth indexing if you do custom analytics queries against it.
Programmatic subscribe via PHP
// Pull the plugin's main controller and add a confirmed subscriber.
$newsletter = Newsletter::instance();
$user = (object) [
 'email' => 'user@example.com',
 'name' => 'Pat',
 'status' => 'C', // C = Confirmed, skip double opt-in
 'list_1' => 1, // Add to list ID 1
];
$user = $newsletter->save_user( $user );

if ( is_wp_error( $user ) ) {
 error_log( 'Newsletter: '. $user->get_error_message() );
}
save_user() is the canonical way in. Don’t write directly to the table: there are language defaults, hash generation for unsubscribe links, and a wp_action() call you’d skip.
Programmatic subscribe via REST
Newsletter exposes a basic subscription endpoint at wp-json/newsletter/v1/subscribe once you’ve enabled the REST extension (under Settings > Advanced). The body takes JSON with at minimum email. Useful for headless setups where the WordPress backend is fronted by Next.js or Astro.
How Newsletter compares to MailPoet, Mailster, and FluentCRM
The three plugins it gets benchmarked against, with honest opinions:
vs MailPoet. MailPoet’s UI is more modern, the email composer feels slicker, and MailPoet has its own sending service (MailPoet Sending Service, free up to 1,000 subscribers, paid above). That last one is the real differentiator: MailPoet hides the SMTP/SES complexity for you. If you don’t want to deal with relays, MailPoet wins. If you want to own the IP reputation and pay relay prices, Newsletter wins. Both are GPL.
vs Mailster. Mailster (CodeCanyon, paid only, no free tier) has a more polished composer and a more visual campaign builder. The trade-off is install base and longevity: Newsletter has been around longer, has been audited by more developers, has more add-ons. Mailster is the prettier choice; Newsletter is the safer one. Pick Mailster if the look-and-feel of the admin matters to your team and someone else is paying the license.
vs FluentCRM. FluentCRM is newer, automation-first (it’s built around contact tagging, segments, and a visual automation builder), and pairs naturally with Fluent Forms and FluentCommunity. If you want behaviour-based drip ("send X when they buy Y but haven’t opened Z in 30 days"), FluentCRM is the cleaner tool. Newsletter’s Autoresponder add-on does drip too but the model is more linear. If you’re already in the Fluent ecosystem and you mostly care about automation, FluentCRM wins. If you’re an editorial site that mostly sends a weekly digest and a couple of one-offs, Newsletter is fine and simpler.
vs the SaaS tools (Mailchimp/ConvertKit/ActiveCampaign). SaaS still wins on three fronts: deliverability out of the box (their IPs are warmed), template designers, and automation depth. Newsletter wins on three fronts: cost at scale, data residency, and the fact that the entire system is in WordPress so it composes with everything else there.
For inline opt-ins specifically, you can also pair Newsletter with a dedicated opt-in plugin like Bloom: Bloom builds the popups and inline forms, Newsletter receives the subscribers and handles the campaigns. The Bloom newsletter integration lists Newsletter as one of the supported targets.
Performance, deliverability, and honest limits
Some of this is plugin-specific, some is general self-hosted-mail truths.
Page weight. Newsletter’s frontend assets (when the [newsletter] form is on a page) are minimal: about 8KB of CSS, no JS unless you use the AJAX form widget. Negligible. The plugin’s admin is heavier (lots of dependencies in the composer) but admin weight doesn’t affect visitors. If your blog post pages are heavy with other plugins, a tool like WP Rocket does more for you than anything Newsletter could do, since the Newsletter shortcode is unlikely to be your bottleneck.
Database overhead. The four custom tables grow with subscribers and engagement. A 50k subscriber list with weekly sends builds about 10 MB of new newsletter_user_logs rows per week (assuming average engagement). It’s healthy to add a maintenance job that prunes the logs table after 12 months unless you specifically use it for analytics. Newsletter has a "Maintenance" section under Advanced settings with a TRUNCATE log option for this.
Cron pressure. A newsletter cron event running every minute on a low-traffic site has zero impact. On a high-traffic site, the event is itself fast (it just dequeues N emails) but it does an SMTP/API call per email, and those calls block the PHP process. If you’re sending 5,000 emails an hour, you have 100 PHP requests an hour holding open SMTP sockets for a couple of hundred milliseconds each. Keep the cron rate honest; don’t over-tune chunk size.
Honest limits.
- The default composer is functional but not best-in-class. Visually, MailPoet and Mailster are nicer to use. The trade-off is you can drop in raw HTML in Newsletter, which the others also support but the workflow in Newsletter is cleaner once you’ve used it a few times.
- The settings UI feels dated in places. The Advanced tab in particular has fields with technical labels that aren’t always self-explanatory. The official docs at thenewsletterplugin.com fill the gap but you do need to consult them.
- No native visual automation builder. The Pro Autoresponder add-on gets you sequential drip campaigns, but if you want full branching automation (FluentCRM-style), Newsletter isn’t there.
- A/B testing is Pro-only. Some people consider that a paid-tier essential.
- Deliverability is your job. The plugin sends; it doesn’t warm an IP, doesn’t suppress complaints, doesn’t reshape segments based on engagement. Mailchimp does all of that invisibly. Be honest about whether you have the SRE bandwidth to own that work.
Pricing and the add-on situation
The free version on WordPress.org has a meaningful core: subscriber management, the composer, default forms, single/double opt-in, the welcome email, tracking, and the Public page. You can run a small list end-to-end on the free version with wp_mail() and a basic SMTP plugin.
The paid plans gate the add-ons:
- Newsletter Premium. Around $65/year. Unlocks the Autoresponder, Posts Notification, Reports, Bounce, Profile/Popup, and most other Pro add-ons. No sending integrations included.
- All Inclusive. Around $129/year. Premium plus the Amazon SES, SendGrid, and "extra senders" add-ons. The right choice if you’re going to use SES.
- Agency. Around $249/year. Use on unlimited client sites.
the GPL-licensed version through GPL Times pulls all the Pro add-ons in one download, including All Inclusive plus the agency-tier extras. You’ll still want a real license eventually for the auto-update channel and the support forum, but for spinning up a test or migrating an existing site, the GPL version saves the upfront cost.
Final thoughts
Newsletter is older than most WordPress plugins still being actively maintained. It went live in 2009, when Mailchimp was just a tool, ConvertKit didn’t exist, and self-hosted mail was the default rather than the niche. It’s still being shipped because there’s a real category of WordPress site owners (large lists, regulated industries, frugal indie publishers, anyone who’s tired of SaaS rent on data they generated themselves) for whom the math just works better when the list lives where the site lives.
It isn’t the prettiest WordPress email plugin. MailPoet’s admin is easier on the eyes, FluentCRM’s automation builder is more capable, and Mailchimp’s drag-and-drop will always feel a half-step ahead of anything you can run inside a wp-admin. But none of those let you point at a subscriber row in your own database and say "this is mine, here, this is my data, this is what I’ll do with it". Newsletter does.
The honest recommendation: if your list is small (under a thousand subscribers), use MailPoet or stay on whatever SaaS you’re on. If your list is large enough that the monthly Mailchimp bill makes you wince, or the words "data processor" make compliance ask you uncomfortable questions, install Newsletter, point it at Amazon SES, and start the warm-up. The first month is annoying; the years that follow are quiet.
External references worth bookmarking: the official plugin site, the WordPress.org listing for changelog and ratings, the Amazon SES product page when you’re sizing the math, and SendGrid’s docs if you’d rather pick a relay with a friendlier setup flow.