

Imagine running an electronics store on WooCommerce. You sell phones from Apple, Samsung, and Google. Headphones from Sony, Bose, and Sennheiser. Cameras from Canon, Nikon, and Sony. A customer walks in (digitally) and the first thing they want to know is "do you carry Sony?" Out of the box, WooCommerce gives you product categories and tags, but neither one is quite the right home for a brand. Categories are for product types (cameras, phones, headphones). Tags are for loose keywords. Where does the manufacturer name go?
WooCommerce Brands is the official Automattic extension that solves exactly that problem. It adds a dedicated product_brand taxonomy to your store, gives you brand archive pages, brand-aware coupons, and a handful of widgets and shortcodes for showing brands across the storefront. It is small, focused, and built to do one job well.
This review walks through what the plugin does, when you actually need it (it is not for every store), how to set it up, every shortcode and widget it ships, how brand coupons work, the developer hooks and filters, and the gotchas worth knowing about.
Table of contents
- What WooCommerce Brands does in one paragraph
- When you actually need this plugin
- Brands versus categories versus tags
- Installing and setting up
- Creating your first brands
- Assigning brands to products
- The brand archive page
- Shortcodes for displaying brands
- Widgets the plugin adds
- Coupons restricted by brand
- Permalinks and URL structure
- Theme integration
- Developer reference
- REST API endpoints
- Performance, SEO, and gotchas
- Pricing
- FAQ
- Final thoughts
What WooCommerce Brands does in one paragraph
It registers a new WordPress taxonomy called product_brand and attaches it to your WooCommerce product post type. Once active, the plugin adds a "Brands" menu under Products, a Brands column in the products list, a "Brand" meta box on each product editor, and brand archive pages at URLs like /brand/sony/. It also gives you five shortcodes, three widgets, and brand-aware coupons (so you can build "20% off all Apple products" promotions). Everything else is theme polish.
When you actually need this plugin
This is worth flagging upfront because the plugin is genuinely not necessary for every store.
You need it when:
- Your store sells products from multiple identifiable manufacturers. Electronics retailers, fashion multi-brand stores, supplement shops carrying multiple supplement brands, bookstores stocking multiple publishers.
- Customers actively shop by brand. A typical e-commerce question is "do you sell X brand?" If yes, brand pages give them a direct landing path.
- You run brand-specific promotions. A 10% off Apple sale or a "buy any Sony product, get a free case" coupon both need brand-level restriction.
- SEO matters and you can rank brand-name searches. A page like
/brand/sony/can rank for "sony products [your category]" if you have decent traffic and content.
You probably don’t need it when:
- Your store sells products you make yourself. A single-brand store doesn’t need a "Brand: Our Brand" filter; the brand IS your store.
- You have one or two brands. Two brands is just one category each. Skip the abstraction.
- You’re using categories where they should be brands. If your "categories" are already manufacturer names, you might be over-organizing. Brands sit in a separate axis from categories.
For the rest of this review, assume you sell at least five distinct brands and customers care which one a product belongs to.
Brands versus categories versus tags
WooCommerce ships with two taxonomies for products. Brands adds a third. Knowing when to use each prevents the "I have eight overlapping ways to group things" problem.
- Categories group by what the product is: T-shirts, headphones, laptops, baby clothes. Use these as your primary navigation. One product can belong to multiple categories but usually has a primary one. Hierarchical (Clothing > Tops > T-shirts).
- Tags group by attributes that don’t fit cleanly in categories: "new arrivals," "summer," "gift ideas." Flat, not hierarchical. Light-touch.
- Brands group by manufacturer: Sony, Apple, Nike. Hierarchical (you can have a parent brand and sub-brands). Each product has typically one brand, sometimes a parent + child relationship (Sony as parent, Sony Music as child).
The mental model that works: a product is a T-shirt (category) made by Nike (brand) tagged new arrivals (tag). All three coexist without overlap.
Installing and setting up
Easy. The plugin requires WooCommerce to be already active, and it only registers the taxonomy plus a few admin UI pieces, so there’s basically nothing to configure.
Plugins -> Add New -> Upload Plugin -> Install Now -> Activate. The plugin appears in the WordPress plugins list immediately. You’ll see a new "Brands" submenu under Products in the WP admin sidebar.
There is no settings page to configure. The plugin’s only configurable option (the brand URL slug) lives in Settings -> Permalinks rather than its own page, which is a sensible decision because it makes the option live alongside other taxonomy permalink configs.
Creating your first brands
Go to Products -> Brands. You’ll see the same UI WordPress uses for any hierarchical taxonomy: a name/slug/description form on the left, a list of existing brands on the right.
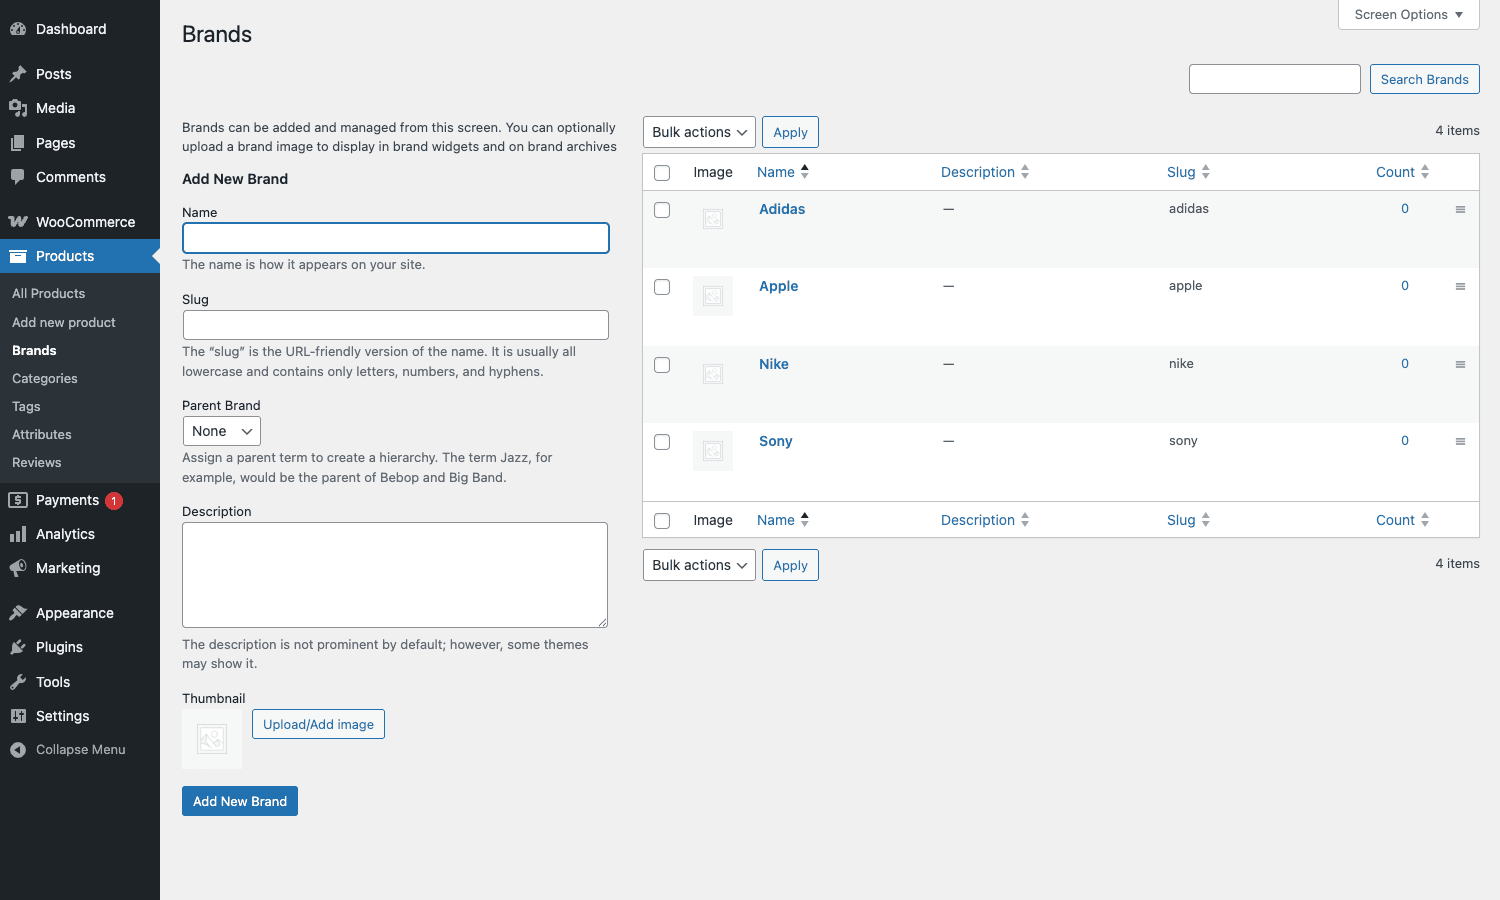
For each brand, you fill in:
- Name. "Apple" or "Sony" or whatever the brand is called.
- Slug. URL-friendly version. Auto-generated from the name unless you override it. So "Bang & Olufsen" becomes
bang-olufsenby default. - Parent Brand. If you have a parent/child hierarchy. For example, "Sony" might be a parent with "Sony Music" and "Sony Pictures" as children. Most stores leave this empty.
- Description. Free-form text that appears on the brand archive page. Use this for SEO-relevant intro copy: "Apple is a US-based electronics manufacturer founded in 1976, known for the iPhone, iPad, and Mac product lines." Search engines pick this up; customers may or may not read it depending on your theme.
- Thumbnail. A brand logo. The plugin adds a media uploader to the add/edit form specifically for this purpose. Recommended size: a square logo around 200×200 px. Higher resolutions get scaled down by WordPress’s image sizes automatically.
Click "Add New Brand" and the new term lands in the list on the right.
Editing an existing brand
Click on the brand name (or "Edit" hover link) in the brand list to open the full edit screen. Everything you set when creating it is editable, plus you get a Delete button.
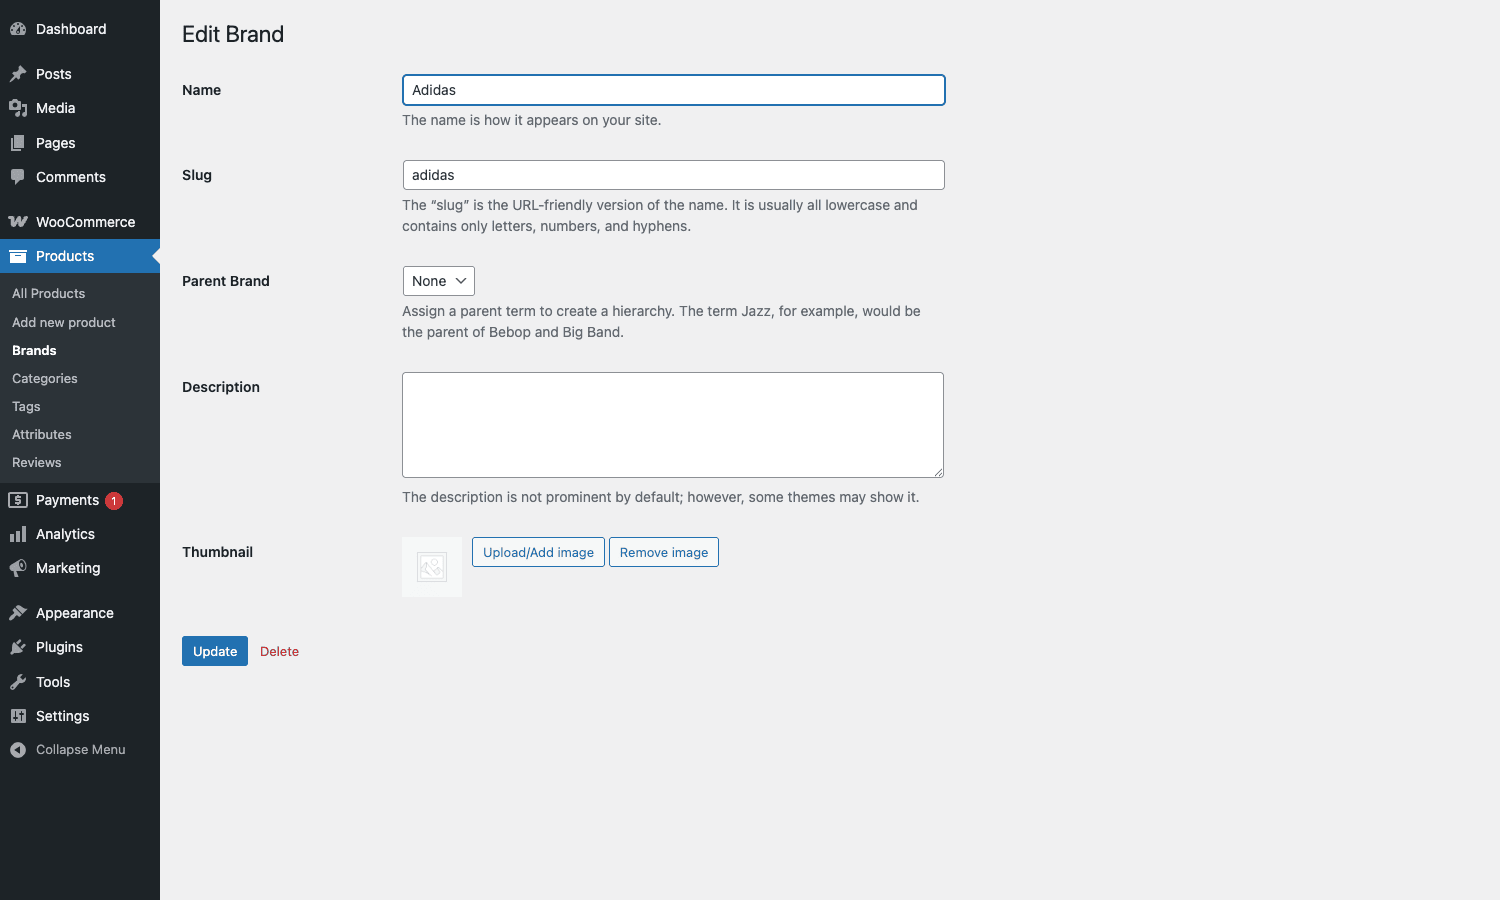
The Permalink field below the URL field is what most people miss. The slug controls the URL of the brand archive page (so /brand/apple/ versus /brand/apple-inc/). Changing the slug on a brand that has been live for a while is bad for SEO; pick the right slug upfront if you can.
Assigning brands to products
Once you have brands created, you can assign them to products. Open any product (Products -> All Products, click a product name). The product editor has a Brands meta box in the right sidebar, similar to the Tags and Categories boxes you already know.
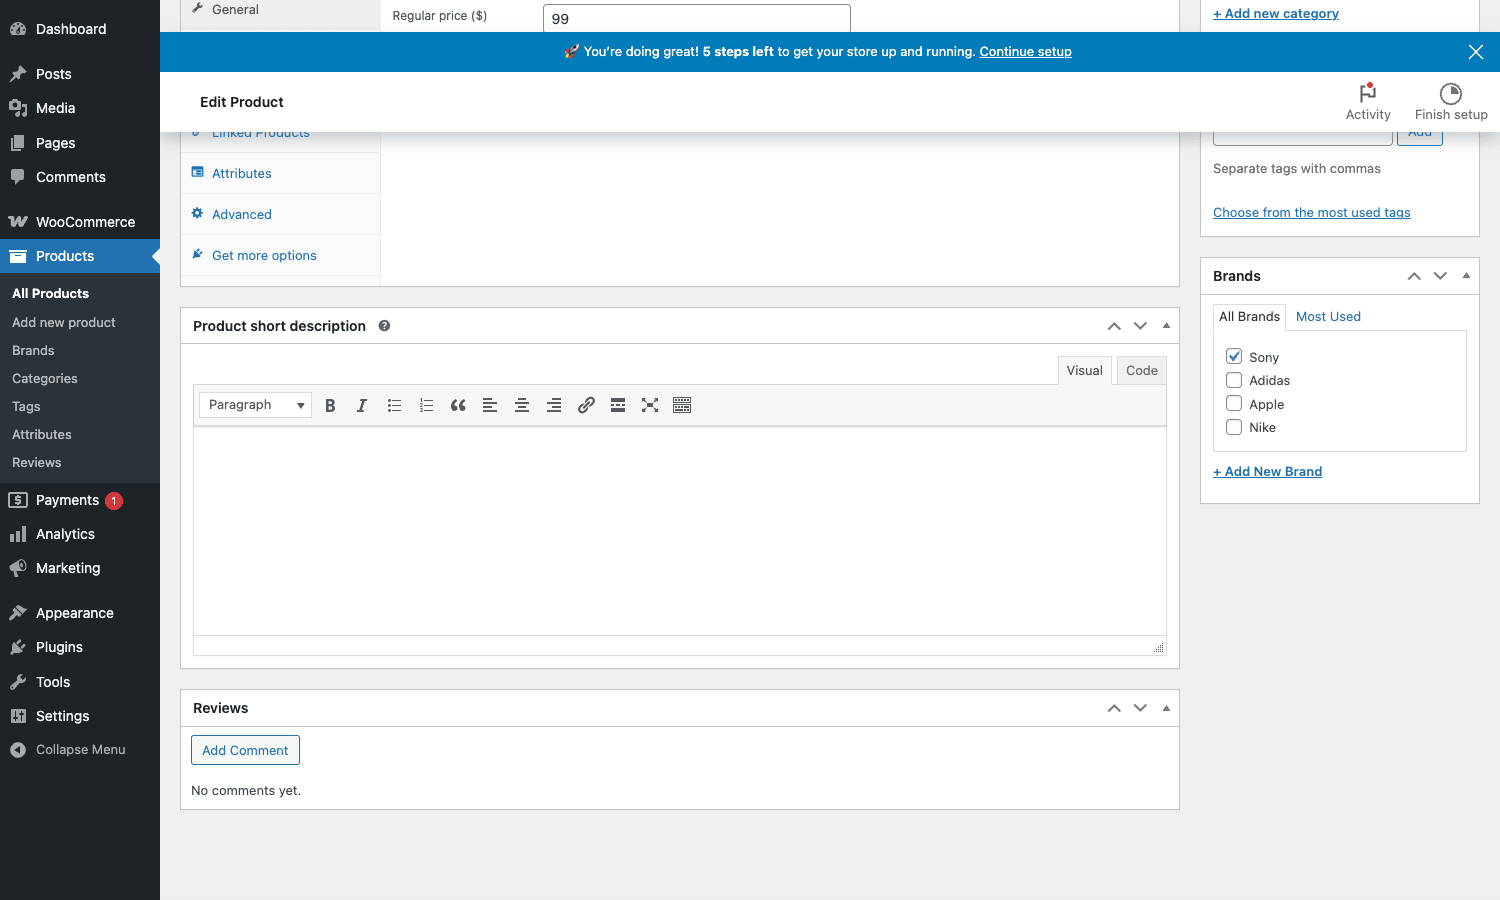
Tick the brand the product belongs to and save. The product is now tied to that brand. The brand archive (/brand/sony/) will start including this product automatically.
A product can have multiple brands. If you stock a co-branded product (a "Sony × Nike" sneaker, hypothetically), tick both. Most products will only have one.
The Brands column in the product list
Back in Products -> All Products, you’ll see a new "Brands" column. Each row shows the brand(s) assigned to that product, clickable to filter the list to only products from that brand.
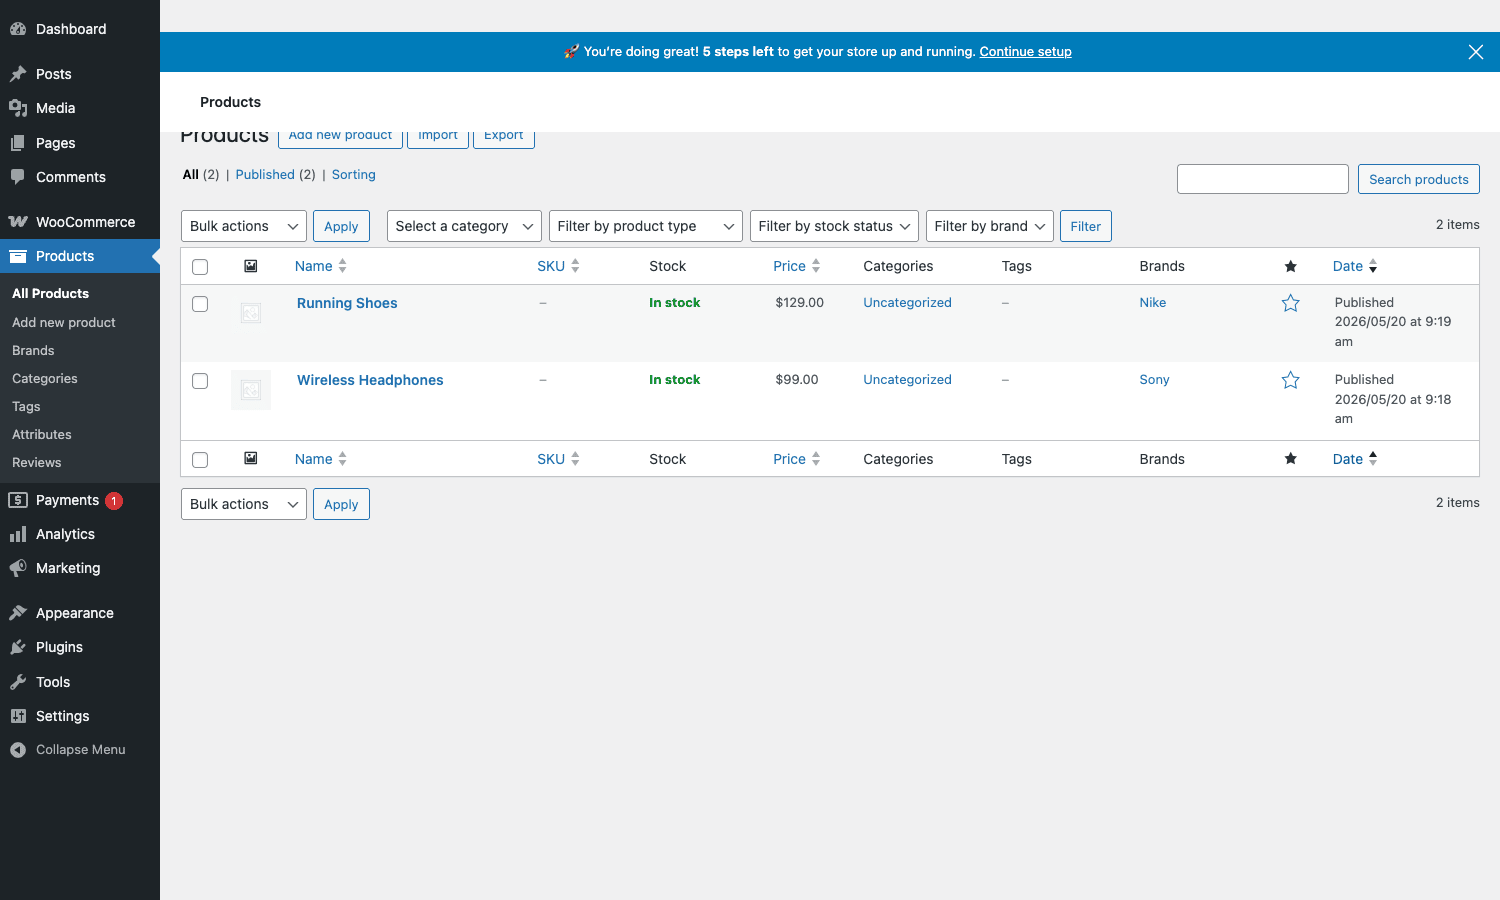
Above the table there’s also a "Filter by brand" dropdown alongside the existing category/stock filters. Useful for catalog management as your inventory grows. A merchandiser can pull up "all Sony products" in two clicks to bulk-edit pricing or stock.
The brand archive page
The most important user-facing feature. Every brand you create gets its own archive page at /brand/<slug>/ (the URL slug is configurable, see Permalinks below). The page lists every product assigned to that brand, using the same shop loop layout your theme uses for category archives.
What appears on the page:
- The brand name as a heading.
- The brand thumbnail (if uploaded).
- The brand description (if filled in).
- A standard WooCommerce product grid showing every product with this brand.
- WooCommerce pagination if there are more products than fit on one page.
- The same sorting and filtering options as your shop page.
This is essentially a free landing page for every brand search. Customers Googling "sony [your category] [your city]" can land directly on your /brand/sony/ page instead of going through your homepage and clicking around.
You don’t need to create these pages manually. The plugin handles them via the WordPress taxonomy archive system. Your theme’s archive-product.php template renders them. If you want a different layout, the next section explains how to override.
Shortcodes for displaying brands
The plugin ships five shortcodes. Drop any of them into a page, post, or text widget and the corresponding markup renders. Pasting one example next to each:
Shows a single brand’s thumbnail (the logo). Use this on a landing page where you want to call out a specific brand visually.
The id is the brand term ID. Find it in the Brands admin (hover the row to see the URL parameter tag_ID=42). The width and height are optional; defaults match the image size you uploaded.
A grid of every brand’s thumbnail. Useful for a "shop by brand" page or section. Each thumbnail links to that brand’s archive.
columns controls grid columns (default 4). hide_empty="1" hides brands with no products (otherwise an empty brand shows an empty thumbnail). orderby="name" (the default) sorts alphabetically; orderby="count" shows the most-stocked brands first.
Same as above but each thumbnail also shows the brand description below the logo. Useful for a more editorial "Brands we carry" page where each row has a logo + short paragraph + link.
- a
- b
- c
- d
- e
- f
- g
- h
- i
- j
- k
- l
- m
- n
- o
- p
- q
- r
- s
- t
- u
- v
- w
- x
- y
- z
- 0-9
- a
- b
- c
- d
- e
- f
- g
- h
- i
- j
- k
- l
- m
- n
- o
- p
- q
- r
- s
- t
- u
- v
- w
- x
- y
- z
- 0-9
An alphabetical A-Z brand directory, grouped by first letter. Like a phone book for brands.
- a
- b
- c
- d
- e
- f
- g
- h
- i
- j
- k
- l
- m
- n
- o
- p
- q
- r
- s
- t
- u
- v
- w
- x
- y
- z
- 0-9
Output renders something like:
A
Acme · Adidas · Apple

B
Bose · Brooks Brothers

N
Nike · Nintendo · Nokia
Each letter is a clickable anchor; the show_top_links="true" puts a "back to top" affordance after each section. Great for stores with 50+ brands. Overkill for a store with 8 brands.
Shows a product loop filtered to one or more specific brands. The Swiss army knife of the bunch.
Pass brand as a comma-separated list of slugs. Standard WooCommerce product loop attributes apply: per_page, columns, orderby (date, price, popularity, rating, menu_order), order (ASC/DESC). Use this on a landing page that should only show products from one specific brand, or on a "featured brand of the month" widget.
Widgets the plugin adds
The plugin ships three sidebar widgets. They all show up under Appearance -> Widgets (or in the block-widget editor if you’re on a block theme).
- Brand Description. When a customer is on a brand archive page, this widget shows that brand’s description in the sidebar. Useful if you want brand context as a sidebar callout rather than a top-of-page intro.
- Brand Nav. A layered-nav filter, like WooCommerce’s existing "Filter by attribute" widgets, but for brands. Lets shop-page visitors narrow products by brand with a checkbox list. Plays nicely with active product filters (a customer can pick "T-shirts" category + "Nike" brand and the widget reflects both).
- Brand Thumbnails. A grid of every brand’s logo in the sidebar. Cheap way to give every page of your store a "shop by brand" feel.
All three widgets respect the brand-specific options you set (the thumbnail, the description, the slug).
Coupons restricted by brand
Here’s the under-publicized feature that makes this plugin much more useful than "just a taxonomy." The plugin extends the WooCommerce coupon system with two new fields.
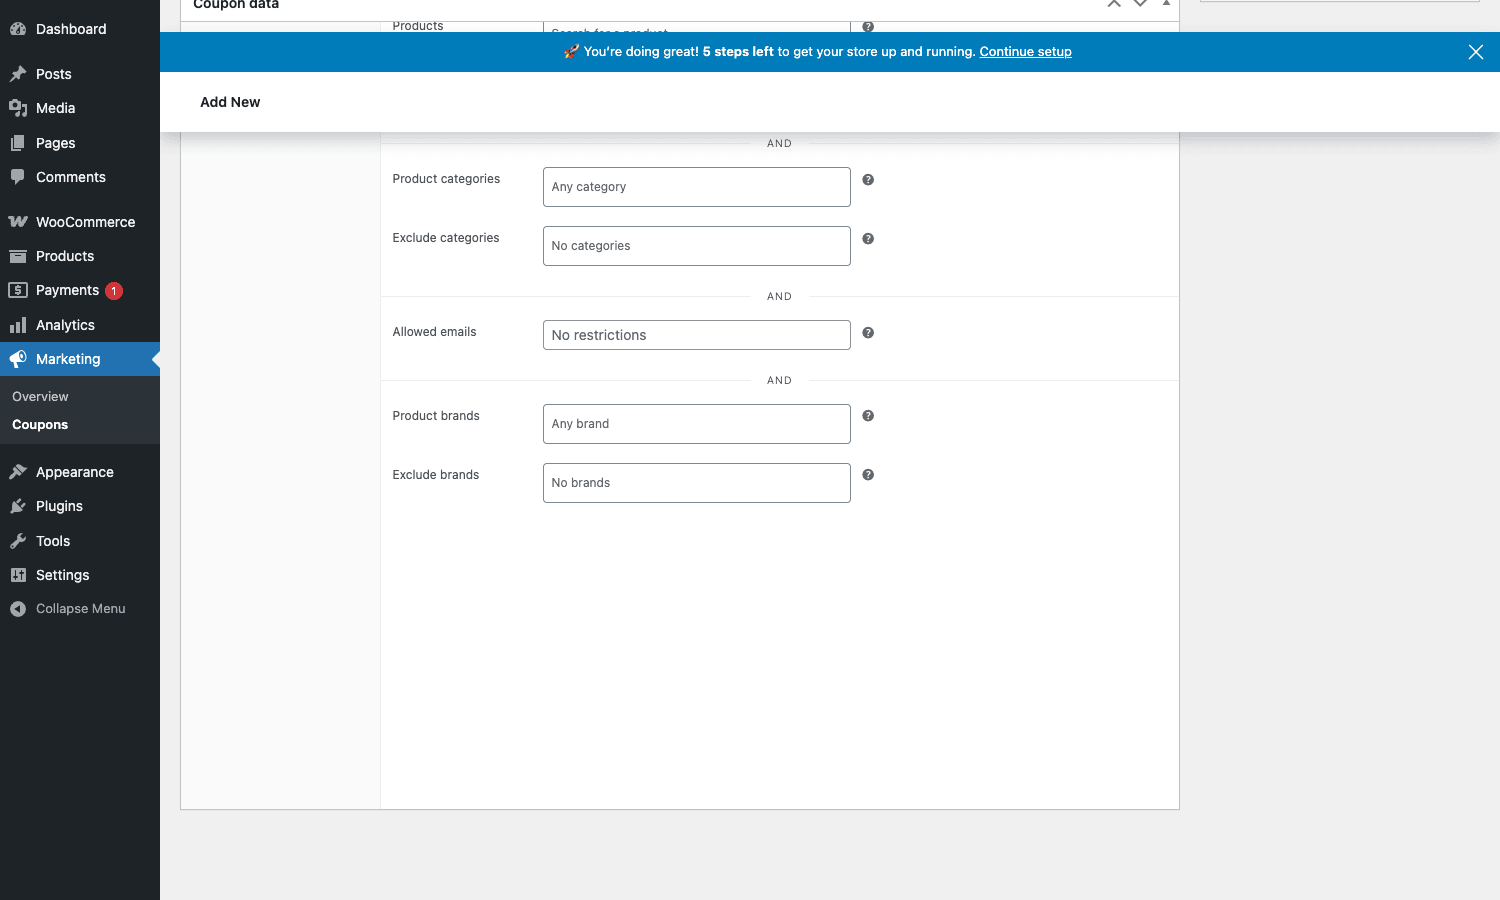
Edit any coupon (Marketing -> Coupons), click the "Usage restriction" tab, and scroll down. Two new selectors:
- Product brands. The coupon is only valid for items in the customer’s cart that belong to one of these brands.
- Exclude brands. The coupon never applies to items from these brands.
Real examples this enables:
- Brand-wide sale. "20% off all Apple products this weekend" – set the coupon to include only the Apple brand, and the discount applies to every Apple product without you having to list each SKU.
- Excluded brand-restricted coupon. "10% off everything except Apple products" (Apple often has anti-discounting clauses in their retailer contracts) – put Apple in Exclude brands.
- Combined restrictions. "BOGO on Nike, but only if the cart total is over $100" – combine Brand restriction with the existing Minimum spend field.
The validation logic respects both included and excluded brand lists, and you get clear error messages on the customer’s cart page when a coupon doesn’t apply because of brand restrictions. Custom error code 301 is reserved for "this coupon doesn’t apply because the item’s brand is excluded."
Permalinks and URL structure
The plugin’s only "configuration" is the URL slug for brand archives. By default, brand archives live at /brand/<slug>/. You can change brand to anything you like.
Go to Settings -> Permalinks and you’ll see a new field added by the plugin: Brand base. Common picks:
brand(the default; clean and obvious)manufacturer(more formal; matches existing "Manufacturer" sections on classic catalog sites)by-brand(more verbose; explicit)- empty (puts brand archives directly under root, e.g.
/sony/– usually not recommended because it collides with pages)
Pick one before going live. Changing it after launch creates 301 redirects you need to add manually (the plugin doesn’t auto-redirect old URLs to new ones).
Theme integration
For most themes, the plugin works without configuration. The brand archive uses your theme’s taxonomy-product_brand.php template if it exists, falls back to taxonomy.php, then to archive.php, then to index.php. WooCommerce-aware themes (Storefront, Astra Pro, GeneratePress with the Woo addon, Flatsome) all handle the brand archive cleanly.
If you want to customize the brand archive layout:
- Override the template. Copy
templates/taxonomy-product_brand.phpfrom the plugin intoyour-theme/woocommerce/and edit there. - Use the
aawp_template_stackequivalent. Theme-specific filters let you inject the brand on every product loop (e.g., showing the brand logo on each shop card). - For block themes (FSE). The plugin ships block templates for the brand archive page. They appear in the Site Editor under "Templates" once the plugin is active, and you can edit visually without touching code.
For FSE themes specifically (Twenty Twenty-Four, Twenty Twenty-Five, any theme that ships block templates), the brand archive uses block templates by default and you can customize the entire layout drag-and-drop.
Developer reference
The plugin is small and the developer surface is correspondingly compact, but every meaningful piece is filterable. Here are the hooks you’ll actually use.
Modify the taxonomy registration
register_taxonomy_product_brand filters the entire args array passed to register_taxonomy(). Use it to change capability requirements, REST exposure, admin column behavior, or labels.
add_filter( 'register_taxonomy_product_brand', function( $args ) {
 // Allow shop managers (not just admins) to manage brands
 $args['capabilities'] = [
 'manage_terms' => 'manage_woocommerce',
 'edit_terms' => 'manage_woocommerce',
 'delete_terms' => 'manage_woocommerce',
 'assign_terms' => 'edit_products',
 ];
 return $args;
} );
Change the brand thumbnail size
woocommerce_brand_thumbnail_size controls which registered image size is used when the plugin renders brand logos via shortcodes and widgets. Default is shop_catalog.
add_filter( 'woocommerce_brand_thumbnail_size', function() {
 return 'medium'; // or a custom size you've registered
} );
Customize the A-Z brand list
woocommerce_brands_list_alphabet controls the letters used in
add_filter( 'woocommerce_brands_list_alphabet', function() {
 // Add accented characters for a French-language store
 return array_merge( range( 'a', 'z' ), ['à','â','ç','é','è','ê','ë','î','ï','ô','ù','û','ü','ÿ'] );
} );
woocommerce_brands_list_locale sets the locale for sorting brand names. Default is en_US.UTF-8. Override for non-English stores so brand sort order respects local conventions.
add_filter( 'woocommerce_brands_list_locale', function() {
 return 'de_DE.UTF-8';
} );
Adjust the filter widget threshold
woocommerce_product_brand_filter_threshold controls how many brands the layered-nav filter widget will list before it switches to a more compact display. Default 100.
add_filter( 'woocommerce_product_brand_filter_threshold', function() {
 return 50; // your store has fewer brands; tighter threshold
} );
Add custom settings fields
woocommerce_brands_settings_fields lets you append custom fields to the Brands settings array. Useful if you’re extending the plugin with your own ancillary options.
add_filter( 'woocommerce_brands_settings_fields', function( $fields ) {
 $fields[] = [
 'name' => __( 'Show brand on single product', 'mytheme' ),
 'desc' => __( 'Add brand label above product title.', 'mytheme' ),
 'id' => 'mytheme_brand_show_on_product',
 'type' => 'checkbox',
 'default' => 'no',
 ];
 return $fields;
} );
Per-product custom display
If you want to show the brand on each product card (in the shop loop), the cleanest place is via WooCommerce’s woocommerce_after_shop_loop_item_title action. The brand taxonomy is just a normal WP taxonomy, so get_the_terms() reads it.
add_action( 'woocommerce_after_shop_loop_item_title', function() {
 global $post;
 $brands = get_the_terms( $post->ID, 'product_brand' );
 if ( ! empty( $brands ) && ! is_wp_error( $brands ) ) {
 $names = wp_list_pluck( $brands, 'name' );
 echo '<span class="product-brand">' . esc_html( implode( ', ', $names ) ) . '</span>';
 }
}, 5 );
This is a five-line addition that puts the brand name right above the price on every product card. Worth it if customers shop primarily by brand.
Adding the brand to product schema
For SEO, you probably want to include the brand in your product’s structured data (JSON-LD). If you also run a schema plugin like Schema Pro or rely on Rank Math, they typically pick up the brand taxonomy automatically. If not, add it manually:
add_filter( 'woocommerce_structured_data_product', function( $markup, $product ) {
 $brands = get_the_terms( $product->get_id(), 'product_brand' );
 if ( ! empty( $brands ) && ! is_wp_error( $brands ) ) {
 $markup['brand'] = [
 '@type' => 'Brand',
 'name' => $brands[0]->name,
 ];
 }
 return $markup;
}, 10, 2 );
This adds the brand to the product’s JSON-LD output, which Google uses for rich-result product cards in search.
REST API endpoints
The plugin exposes brand operations through both v1 and v2 of WooCommerce’s REST API. Useful for headless stores, mobile apps, or any external integration that needs to read/write brand data.
GET /wp-json/wp/v2/product_brand– list all brands (uses WP core REST since the taxonomy isshow_in_rest).GET /wp-json/wp/v2/product_brand/<id>– get one brand.POST /wp-json/wp/v2/product_brand– create a brand (requires authentication andmanage_product_termscapability).GET /wp-json/wc/v3/products/<product_id>?_fields=brands– get a product’s assigned brands.PUT /wp-json/wc/v3/products/<product_id>with{"brands": [42, 56]}body – update a product’s brand assignments.
All endpoints respect WP REST authentication. Use a WooCommerce REST API key (created in WooCommerce -> Settings -> Advanced -> REST API) or a logged-in admin cookie.
Performance, SEO, and gotchas
The plugin is light, but a few things are worth knowing before you launch.
Brand archive page caching
Brand archives are essentially category archives with a different taxonomy. They cache exactly the same way – if you’re using WP Rocket or any other page cache, brand archives are cached for the configured TTL. Adding/removing products from a brand doesn’t invalidate the brand archive cache automatically; you may need to purge.
The aawp_product_updated hook on cache plugins handles this for product changes; for taxonomy assignment changes specifically, hook set_object_terms instead:
add_action( 'set_object_terms', function( $object_id, $terms, $tt_ids, $taxonomy ) {
 if ( $taxonomy === 'product_brand' && function_exists( 'rocket_clean_post' ) ) {
 rocket_clean_post( $object_id );
 // Also clear the brand archive(s) affected
 foreach ( $tt_ids as $tt_id ) {
 $term = get_term_by( 'term_taxonomy_id', $tt_id, 'product_brand' );
 if ( $term && function_exists( 'rocket_clean_term' ) ) {
 rocket_clean_term( $term->term_id, $taxonomy );
 }
 }
 }
}, 10, 4 );
Brand SEO
Brand archive pages can rank for brand-name searches if you put effort in. What works:
- A unique description per brand (the Description field on each brand term). Search engines see this; copy-pasted boilerplate hurts.
- Internal links from product pages to the brand archive. Each product page should link to its brand. Use the developer hook above.
- A brand-rich-result schema (the JSON-LD snippet above). Tells Google the page is about a brand.
- Don’t noindex brand archives by accident. Some SEO plugins noindex taxonomy archives by default; check your settings.
URL collisions
If you pick a brand slug that matches an existing page slug, the page wins and the brand archive becomes inaccessible. Common collisions: a brand named "About" or "Contact" (rare but possible) competing with your About/Contact pages. Stick to actual brand names and you’ll never hit this.
Importing from a CSV
If you have brands set up in another system (Shopify, BigCommerce, a legacy DB), exporting them and importing into WooCommerce takes a bit of work. The plugin doesn’t include a dedicated brand importer. Options:
- WP All Import. Map a "Brand" column in your product CSV to the
product_brandtaxonomy. Works for tens of thousands of products. - WooCommerce’s built-in product importer. Supports custom taxonomies if you map the column to
Taxonomies > product_brandduring import. - WP-CLI.
wp wc product update <id> --brand=<slug>works for scripted bulk updates.
Conflict with other brand plugins
Don’t run two brand plugins at the same time. YITH WooCommerce Brands, Perfect WooCommerce Brands, and similar third-party plugins all register the same product_brand taxonomy (or a near-clone like pwb-brand). Activating two at once causes the brand sidebar to render twice, double-registered admin menus, and unpredictable shortcode behavior. Pick one, deactivate the other.
If you’re migrating from another brand plugin, the official Brands plugin’s taxonomy is named product_brand, which is the most common. Most third-party plugins use the same name (because it’s the WooCommerce-recommended convention). In that case, migrating is just a matter of deactivating the old plugin; the term data stays in the database and the new plugin picks it up.
Pricing
The plugin is free under GPL. The code is the same in both distributions. The difference is vendor support, which most stores can do without.
No transaction fees, no per-brand limits, no enterprise tier. It’s a simple plugin and the licensing matches.
FAQ
Do I need WooCommerce installed?
Yes. The plugin requires WooCommerce as a hard dependency. Activation fails with a clear error if WooCommerce isn’t active. There’s no standalone "brands without Woo" mode.
Does it work with the new block-based product editor?
Yes. The Brands meta box appears in both the classic and block-based product editors. The block editor renders it as a sidebar panel similar to Tags and Categories.
Will it slow down my store?
No measurable impact. The plugin adds one taxonomy registration, a few admin UI bits, and the shortcodes/widgets that only render where used. No frontend JavaScript loads unless you explicitly use a widget that requires it (the layered-nav filter does, but that’s a single small script).
Does it support WooCommerce HPOS (High-Performance Order Storage)?
The brand taxonomy is for products, not orders, so HPOS doesn’t affect it. Orders themselves continue to use whatever storage backend WooCommerce is configured for (HPOS or legacy posts). Brand restrictions on coupons work regardless of HPOS mode.
Can I show a brand logo on every product card?
Yes, but you need a small code snippet. See "Per-product custom display" in the Developer reference above. Five lines of PHP added to your child theme’s functions.php and you’re done.
Can a product belong to multiple brands?
Yes. Tick more than one brand checkbox in the product editor and the product will appear on every assigned brand’s archive page. Rare in practice but supported.
Can I have parent/child brand relationships?
Yes. The product_brand taxonomy is hierarchical, so you can set a Parent Brand on any brand. Useful for conglomerate situations: Sony as parent with Sony Music, Sony Pictures, and Sony Computer Entertainment as children. The brand archive at /brand/sony/ would include products from all sub-brands.
What happens to my brands if I deactivate the plugin?
The taxonomy terms remain in the database (in wp_terms and wp_term_taxonomy). The taxonomy itself becomes unregistered, so the admin UI and archive pages disappear. Reactivating the plugin restores everything. Uninstalling deletes the taxonomy registration but typically not the term data (so you can recover on reinstall).
Does it work with WooCommerce Subscriptions, Memberships, or other extensions?
Yes. The brand taxonomy is product-level, so any extension that operates on products inherits brand awareness for free. If you sell subscription products from multiple brands, a WooCommerce Subscriptions subscription will show its brand on the brand archive just like any other product. WooCommerce Memberships also works alongside it.
Can I restrict a coupon to multiple brands at once?
Yes. The Product brands selector in the coupon Usage restriction tab is multi-select. Hold cmd/ctrl and click to add multiple brands. The coupon is valid if the cart contains items from ANY of the selected brands.
Does it integrate with Google Merchant Center / Google Shopping?
Indirectly. Google Merchant Center needs a brand field in your product feed; the plugin makes the brand data available on each product, but you still need a feed-generation plugin to push it to Google. A dedicated product feed extension (Product Feed PRO for WooCommerce, or any of its alternatives) reads the product_brand taxonomy automatically.
Is the layered-nav brand filter mobile-friendly?
It uses the same markup as WooCommerce’s other layered-nav widgets. Mobile-friendliness depends on your theme’s responsive styles. The major Woo-friendly themes (Storefront, Astra, GeneratePress, Flatsome) all handle it cleanly on mobile.
Can I bulk-assign products to brands?
Yes, through the standard WooCommerce bulk-edit UI. Select multiple products in the list table, choose "Edit" from Bulk actions, and there’s a Brand multi-select in the bulk-edit form. Useful when first setting up brands on a store that already has products.
What about RTL languages?
The plugin’s frontend output is layout-neutral CSS. RTL languages render correctly because the styling is inherited from your theme. The brand list shortcode uses your configured locale for alphabetical sorting, so set woocommerce_brands_list_locale to your store’s locale if you need correct RTL sort order.
Final thoughts
WooCommerce Brands is the kind of plugin that does exactly what it says and stops there. It is not flashy. It is not feature-bloated. The whole codebase is under 100KB, it adds one taxonomy and a handful of supporting features, and that’s the entire scope.
But the value is real for any store with multiple manufacturers in its catalog. Customers shop by brand. Search engines reward brand-specific landing pages. Promotions benefit from brand-level restriction. Doing all of this without a brand-aware taxonomy means either misusing categories (which makes navigation worse), or shoehorning brand into tags (which doesn’t give you a proper archive page or coupon integration).
If you fit the profile (at least five brands, customers ask about brands, you want SEO for brand-name queries), install it on day one and grow into the features as needed. The setup cost is essentially zero and the upside grows with your catalog.
If you’re a single-brand store or you genuinely only carry two manufacturers, skip it. Categories will do the job.
For the rest, grab WooCommerce Brands from GPL Times, spend twenty minutes adding your brands, and you’ll have brand pages live the same afternoon.