


If you have a WordPress site, there will come a day when something breaks it. A bad plugin update. A theme conflict. A hosting outage. A typo in the code. A hacked admin password. Maybe just one wrong click in a settings panel. When that happens, the difference between a five-minute fix and a five-week rebuild comes down to one thing: did you have a backup?
UpdraftPlus is the WordPress plugin most people use for backups. It is genuinely the easiest tool on this list to set up, and the Premium version adds the features that turn it from "a backup plugin" into "a complete backup and migration system", automatic cloud uploads to Google Drive or Dropbox, incremental backups (only saves what changed since last time), site cloning, and one-click migrations between hosts.
This guide is written for someone who has never run a backup before. We will not assume you know what a database is, what SFTP means, or what "rsync" stands for. We will walk through every screen, every button, and every concept from zero, using a real example site. By the end, you will have a working automatic backup setup on your WordPress site and you will know how to restore from one if you ever need to.
Table of Contents
- What is a backup, really?
- What does UpdraftPlus actually do?
- Free vs Premium: what’s the difference?
- The five things to know before you start
- Step 1: Install UpdraftPlus
- Step 2: Run your first backup right now
- Step 3: Set up automatic backups on a schedule
- Step 4: Send backups to cloud storage (Google Drive walkthrough)
- Step 5: Decide what to back up
- Step 6: Test the restore process
- How to restore from a backup when things go wrong
- How to move a WordPress site to a new host (migration)
- Cloning a site for staging or testing
- Common problems and how to fix them
- How often should you back up?
- Real-world example backup setups
- Pricing and licensing
- FAQ
- Final thoughts
What is a backup, really?
A backup is a copy of your WordPress site that you keep somewhere safe, separate from your live site, in case the live one breaks. Think of it like the family-photo album you keep at your mum’s house, if your own house burns down, the album is still safe.
A WordPress site has two halves that both need to be backed up:
- The files: every image, every plugin folder, every theme file, every PDF in your media library. These live in the
wp-contentfolder on your hosting server. - The database: every blog post, every page, every comment, every WooCommerce order, every WordPress user, every plugin setting. The database is a separate piece of software (called MySQL) that stores all this "stuff" as rows in tables. You don’t usually see it; WordPress reads from it constantly behind the scenes.
If you only back up your files but not your database, you can restore your photos but lose every blog post you’ve ever written. If you only back up the database but not the files, you keep your posts but lose every image they reference. A real backup needs both halves.
Where do backups live? Two places, ideally:
- On your server (fast to make, fast to restore, but useless if the server itself dies)
- Off your server (Google Drive, Dropbox, Amazon S3, slower to make and restore, but survives a server disaster)
UpdraftPlus does both. We’ll cover both.
What does UpdraftPlus actually do?
UpdraftPlus is a WordPress plugin that runs inside your WordPress admin. Once you install it, it adds a new menu item under Settings → UpdraftPlus in the WordPress admin sidebar. From that one screen, you can:
- Click a button to make a backup right now.
- Set up a schedule so backups happen automatically (every day, every week, etc.).
- Connect a cloud storage service (Google Drive, Dropbox, Amazon S3, OneDrive, and many others) so your backups are saved off the server automatically.
- Click another button to restore any past backup with one click.
- Use the Migrate / Clone tab to copy a whole site to a different domain or different host.
That’s the whole plugin. Five things. Setup time, from zero to first backup running on a schedule, is about fifteen minutes.
The reason it’s the most popular backup plugin for WordPress (over 3 million active installs) is that it does these five things reliably, even on cheap shared hosting where heavier backup tools time out.
Free vs Premium: what’s the difference?
UpdraftPlus has a free version on the WordPress.org plugin directory. It does the basics: manual backups, scheduled backups (daily / weekly), Dropbox / Google Drive / S3 storage, one-click restore. For a simple personal blog, the free version is enough.
Premium adds the features that matter for production sites:
- Incremental backups: only saves what changed since the last backup. Smaller backups, faster runs.
- Hourly / 4-hourly / 2-hourly backup schedules: free version maxes out at daily.
- Premium storage backends: OneDrive, Azure, Google Cloud Storage, Backblaze B2, pCloud, encrypted private storage (UpdraftVault).
- Migrator: clone a site to a new domain or new host with URL rewriting handled automatically.
- UpdraftClone: temporary clone of your live site on UpdraftPlus’s servers for testing updates safely.
- Database encryption: encrypt the backup database before uploading to cloud storage.
- Search-and-replace tool: edit data inside the database (e.g. swap old URLs after migration).
- Email reports: gets an email when a backup runs, with details about what was backed up.
- Network multisite support: properly handles WordPress Multisite installations.
For a serious business site (e-commerce, membership, course), Premium is the right choice. For a personal blog, the free version handles 95% of what you need.
The rest of this guide covers Premium features as well as free ones. If you’re on free, just skip the Premium-only sections.
The five things to know before you start
Before you install the plugin, five concepts will help everything else make sense.
1. Backups take time and disk space. A backup of a 1 GB WordPress site (about average) takes 2-5 minutes to create and uses about 800 MB to 1 GB on your hosting disk and your cloud storage. If you’re on the cheapest shared hosting plan (5 GB disk), you can’t keep many backups locally. Use cloud storage.
2. Backups should be off your server. If your server crashes, your local backups crash with it. Always send backups to Google Drive, Dropbox, S3, or another off-server location. This is what UpdraftPlus calls "remote storage".
3. Test your backups. The single biggest mistake people make is setting up backups and never testing the restore. Half-broken backups are common, files corrupted during upload, missing database tables, expired cloud credentials. A backup you can’t restore is not a backup. Test the restore process on a staging site every couple of months.
4. Some hosts forbid certain backups. A few cheap hosts block plugins from running long processes (over a few minutes). UpdraftPlus handles this with "resumable" backups that pause and continue, but if your host is extremely restrictive, you’ll see errors. The fix is usually a slightly better hosting plan.
5. Backups don’t replace good hosting. A backup helps you recover when something breaks. It does not prevent things from breaking. Pair backups with good hosting, security plugins, and a caching plugin like WP Rocket for the full safety net.
OK, those are the basics. Now let’s set it up.
Step 1: Install UpdraftPlus
There are two ways to install the plugin. Pick whichever feels easier.
Way A: From your WordPress admin (works for the free version only).
- Log into your WordPress admin (usually
yoursite.com/wp-admin). - In the left sidebar, click Plugins → Add New.
- In the search box at the top right, type "UpdraftPlus" and press Enter.
- The first result should be "UpdraftPlus Backup/Restore" by UpdraftPlus.Com, DavidAnderson. Click Install Now, then click Activate when the install finishes.
Way B: Upload the Premium zip file (this is what you’ll do if you bought Premium from GPL Times or upstream).
- Download the UpdraftPlus Premium zip file to your computer.
- Log into your WordPress admin.
- Plugins → Add New.
- Click Upload Plugin at the top of the page.
- Click Choose File, select the zip file, click Install Now.
- When the install finishes, click Activate Plugin.
After activation, look at your WordPress admin sidebar. You should see a new entry: UpdraftPlus (or sometimes under Settings → UpdraftPlus). Click it. You should land on the UpdraftPlus Backup/Restore page.
That’s the install done. The whole thing should take under two minutes.
Step 2: Run your first backup right now
We’re going to make a manual backup before configuring anything else. Two reasons: it proves the plugin works on your site, and it gives you a known-good restore point in case something goes wrong during setup.
- Go to UpdraftPlus → Backup / Restore in the WordPress admin sidebar. (If your admin shows it under Settings, look there.)
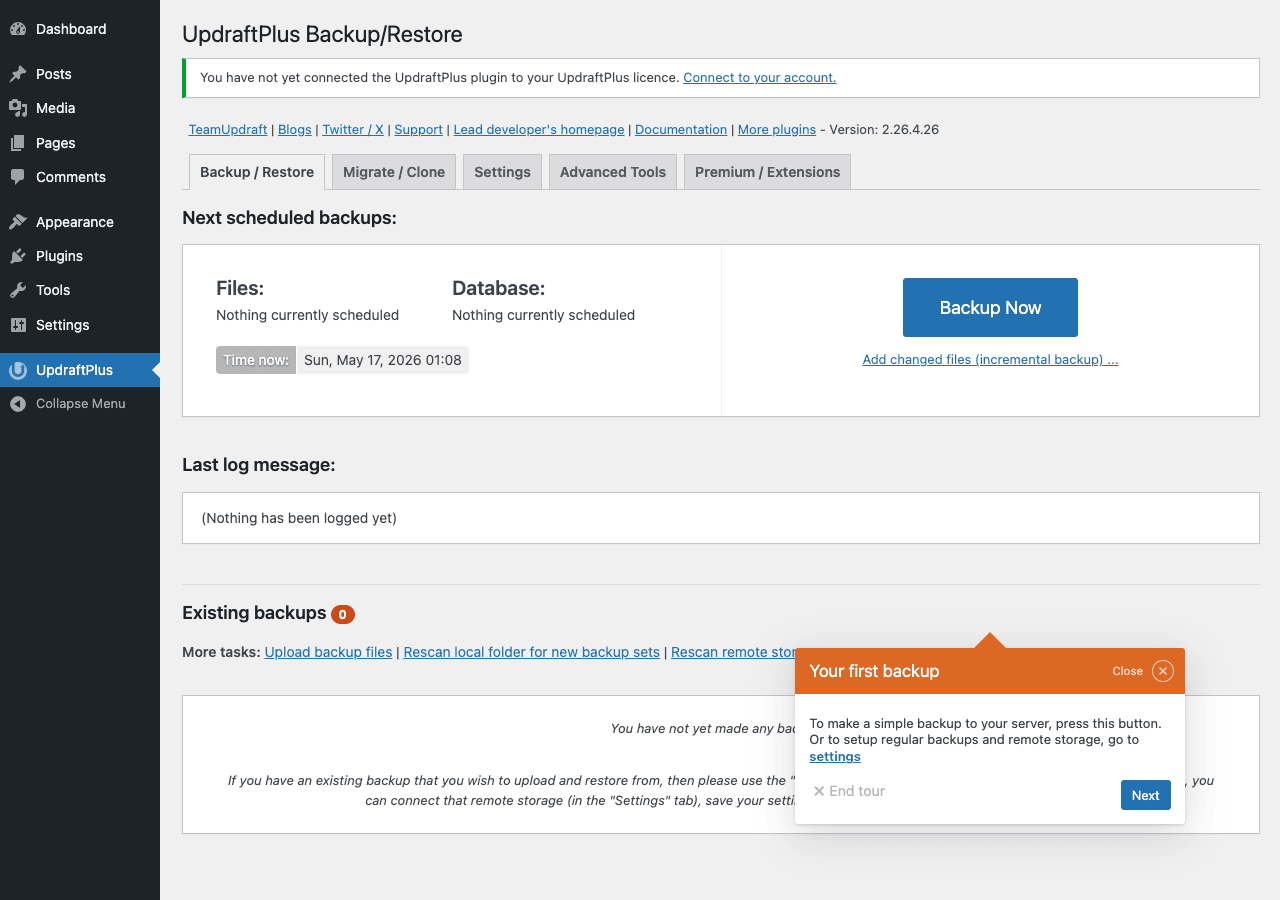
- You’ll see a big blue Backup Now button on the right side of the page.
- Click it.
- A small popup appears with a few checkboxes:
- Include your database in the backup (tick it, yes)
- Include any files in the backup (tick it, yes)
- Send this backup to remote storage (leave unticked for now, we’ll set that up in Step 4)
- Only allow this backup to be deleted manually (leave unticked)
- Click Backup Now at the bottom of the popup.
The page will show a progress bar. The backup runs in the background. Depending on your site size, this takes 1-10 minutes. Don’t close the browser tab during the first backup. Once you’ve confirmed it works, future backups can run while you do other things.
When it finishes, scroll down to the Existing backups section. You should see one row with today’s date, with file sizes for the Database, Plugins, Themes, Uploads, and Other files columns. Each one is a clickable download link, you can right-click and Save As to download the backup pieces to your computer (handy if you want a totally manual archive too).
Congratulations. You just made your first WordPress backup. The file lives in wp-content/updraft/ on your server, ready to be restored at any time.
Step 3: Set up automatic backups on a schedule
Manual backups are for one-time moments, before a big plugin update, or just to test. For ongoing protection, you want automatic backups on a schedule. UpdraftPlus calls this the "backup schedule".
- In UpdraftPlus, click the Settings tab.
- Scroll to the section titled Files backup schedule (this controls how often your files are backed up) and Database backup schedule (this controls how often your database is backed up).
- Each has two dropdown menus:
- The first dropdown is the frequency. Pick from: Manual / Every hour / Every 2 hours / Every 4 hours / Every 8 hours / Every 12 hours / Daily / Weekly / Fortnightly / Monthly.
- The second dropdown is the retention, how many backups to keep. If you make a backup daily and set retention to 14, UpdraftPlus keeps the most recent 14 daily backups (two weeks of history) and auto-deletes older ones.
Recommended starting settings for most sites:
- Files schedule: Weekly, retention 4 (keeps the last 4 weeks of file backups).
- Database schedule: Daily, retention 14 (keeps the last 14 days of database backups).
Why the different schedules? Files change rarely (you don’t upload new images every day). Database changes constantly (every comment, every WooCommerce order, every settings tweak is a database change). Backing up the database more often than the files keeps backups small and fast while still capturing real changes.
For e-commerce sites with daily orders, bump the database to Every 4 hours with retention of 30.
For a busy editorial site (lots of new posts daily), do the same.
Click Save Changes at the bottom of the Settings page. The schedule is now active. UpdraftPlus will run backups automatically at the configured frequency from now on.
Step 4: Send backups to cloud storage (Google Drive walkthrough)
Backups stored on your own server are vulnerable to the same disaster that takes the server down. If your hosting account gets suspended, hacked, or accidentally deleted, your backups go with it. To survive that, backups need to live somewhere else. UpdraftPlus calls this "remote storage".
The easiest option for most beginners is Google Drive (you probably already have a Google account). Let’s walk through that. Other options (Dropbox, Amazon S3, OneDrive, etc.) work similarly.
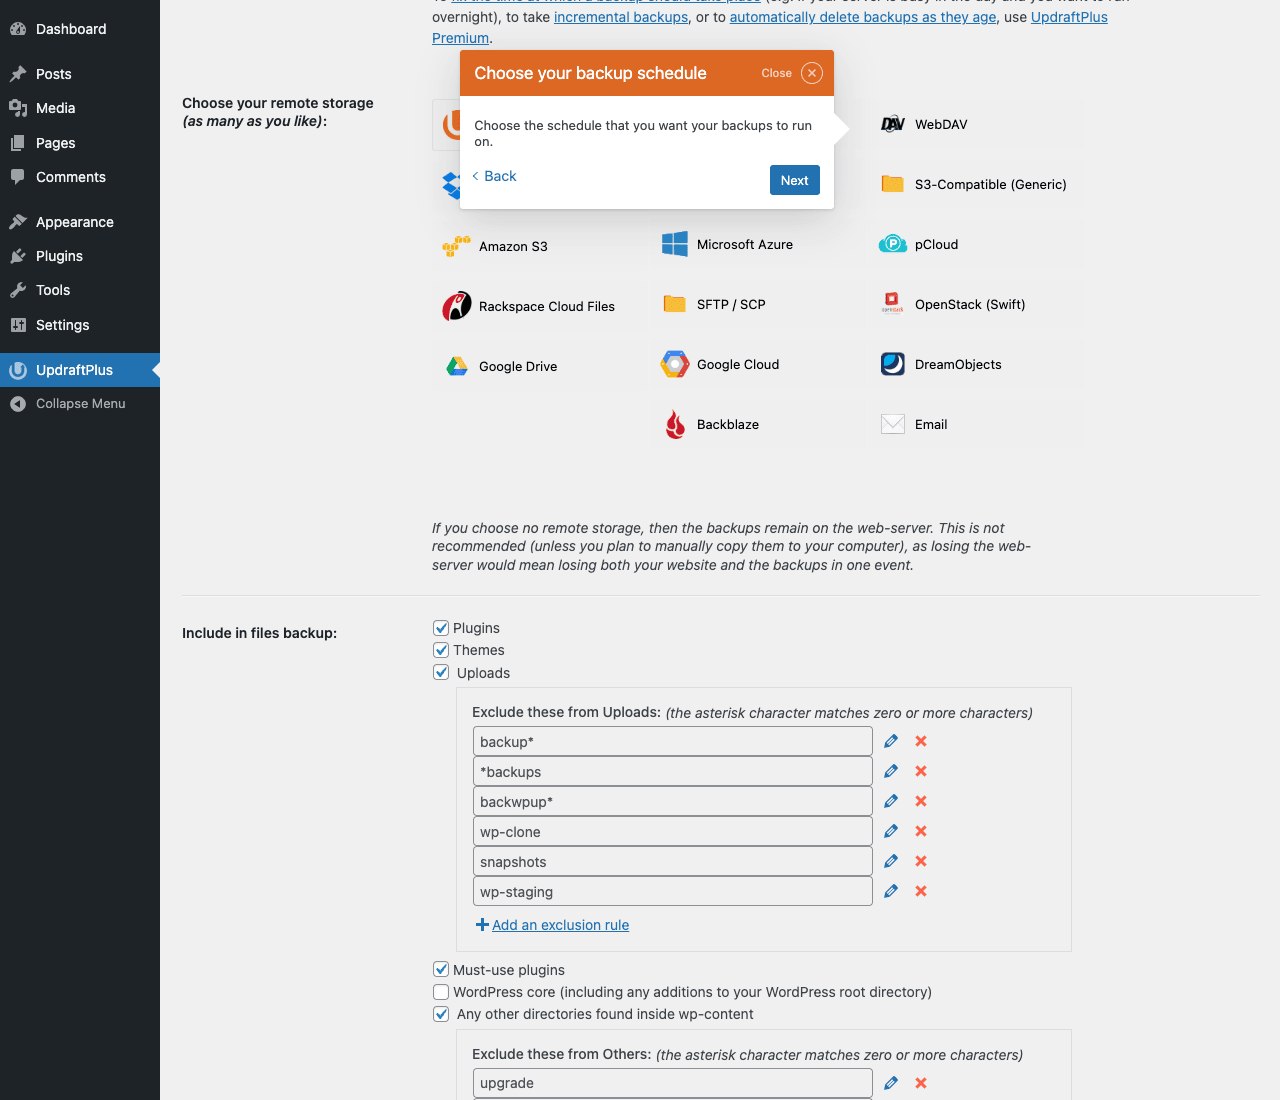
- Still in UpdraftPlus → Settings, scroll to the Choose your remote storage section.
- You’ll see a grid of cloud storage logos: Amazon S3, Microsoft Azure, pCloud, Rackspace, SFTP / SCP, OpenStack, Google Drive, Google Cloud, DreamObjects, Backblaze, Email, WebDAV, S3-Compatible (Generic). Pro users see extras like UpdraftVault and OneDrive.
- Click Google Drive. The logo gets a blue border to show it’s selected.
- Below the grid, click Save Changes.
- The page reloads and shows a banner: "Follow this link to authorize access to your Google Drive". Click the link.
- Google’s authentication page opens. Sign in if you’re not already, then click Continue / Allow to grant UpdraftPlus permission to upload files to a specific folder in your Google Drive.
- You’ll be redirected to a "Complete setup" page on the UpdraftPlus website. Click Complete setup.
- You’re sent back to your WordPress admin. You should see a green confirmation: "Success: We accessed Google Drive".
That’s the Google Drive connection done. Now every scheduled backup will upload to your Google Drive automatically. UpdraftPlus creates a folder called "UpdraftPlus" (or similar) in your Drive and puts backups there.
Test it: go back to Backup / Restore, click Backup Now, this time tick "Send this backup to remote storage" before confirming. Watch the log message at the bottom of the page during the run, you should see lines like "Cloud backup: Uploading file…" and finally "Success: We have completed the upload to Google Drive".
Check your Google Drive in a browser. You should see the new folder with backup files inside. Each file is a .zip (for plugins, themes, uploads, others) or a .gz (for the database).
Other cloud services follow the same pattern: pick the service, click Save, follow the OAuth / authentication flow specific to that service, test with a manual backup.
Important: if you’re on the free version, UpdraftPlus restricts you to one remote storage at a time. Premium lets you save the same backup to multiple destinations simultaneously (e.g. one copy to Google Drive AND one copy to Dropbox), so if one of them fails or your account gets revoked, the other copy is still safe.
Step 5: Decide what to back up
By default, UpdraftPlus backs up everything WordPress needs: database, plugins, themes, uploads (images and media files), and "other files" (anything else in wp-content). For most sites, this is exactly right and you don’t need to change anything.
Three situations where you might want to customize:
Skip large uploads to keep backups small. If your site has 50 GB of video files in wp-content/uploads/ that you back up separately (e.g. to a CDN), tick UpdraftPlus → Settings → Include in files backup → Uploads to OFF, or use the "Exclude these from Uploads" pattern field to skip specific subfolders.
Skip caching files. Plugins like WP Rocket generate cache files in wp-content/cache/. These are regenerable and don’t belong in backups. UpdraftPlus excludes them by default; just verify if you’ve installed an unusual cache plugin that writes elsewhere.
Skip log files. Some plugins write huge log files. The "Exclude these from Others" pattern lets you filter them out, e.g. add *.log to exclude all log files.
For e-commerce sites, always include the database without exclusions. WooCommerce orders, customer records, WooCommerce Subscriptions data, and WooCommerce Memberships records all live in the database. Skipping any of it means losing money on a restore.
For course sites (LearnDash, MemberPress), same rule, the database is non-negotiable.
Step 6: Test the restore process
This is the step most people skip. Don’t skip it. Most "backup failures" are actually "restore failures", the backup ran fine but turns out to be unrestorable. The only way to know your backup actually works is to restore from it.
You don’t have to restore on your live site (that would be reckless). Instead, set up a staging site (a copy of your live site that nobody sees) and practice restoring there.
The exact steps for testing a restore:
- Set up a staging site. Most hosts have a one-click "staging" feature, RunCloud, Cloudways, SiteGround, Kinsta all do. Or use UpdraftClone (Premium) to spin up a free temporary copy on UpdraftPlus’s servers.
- Install UpdraftPlus on the staging site (just the free version is fine for testing).
- Use the Upload backup files button on UpdraftPlus → Backup / Restore to upload the backup files you downloaded from your live site (or connect the same Google Drive and let UpdraftPlus pull them automatically).
- Once uploaded, the backup appears in the Existing backups list. Click the Restore button next to it.
- UpdraftPlus shows a popup: tick the parts of the backup you want to restore (database, plugins, themes, uploads, others, usually all of them). Click Restore.
- Wait. The restore takes 2-10 minutes for an average site.
- When it finishes, click Return to UpdraftPlus configuration. Browse your staging site. Everything from the live site (posts, pages, products, settings) should be there.
If anything is missing or broken, your backup has an issue, go investigate before you need to do a real-world restore.
Do this test once when you first set up UpdraftPlus, then again every 2-3 months. It’s the only way to be sure.
How to restore from a backup when things go wrong
Eventually something breaks and you need to restore. Here’s what to do.
If your site is still accessible (you can log into wp-admin):
- Go to UpdraftPlus → Backup / Restore.
- Scroll to Existing backups.
- Find the backup you want to restore from. If your latest backup is from before things broke, use that one. If the latest backup is from after things broke (i.e. it backed up the broken state), use the previous one.
- Click the Restore button on that row.
- Tick the parts to restore. If your problem is "my whole site is broken", tick everything. If your problem is "this one plugin broke", tick only Plugins.
- Click Restore. Wait.
- When the restore finishes, refresh your front-end. Verify the issue is fixed.
If your site is completely down (can’t log into wp-admin):
- Get the backup files from your remote storage (Google Drive, Dropbox, etc.). Download them to your computer.
- Get FTP / SFTP / file-manager access to your hosting account. (Your host provides this in their control panel.)
- Connect to your server and upload the backup zip files to
wp-content/updraft/on the server. - Try logging into wp-admin. If the database is fine but only files are broken, you should be able to log in.
- If you can log in, follow the "site still accessible" path above.
- If you can’t log in even after restoring files, the database is broken too. Use phpMyAdmin (your host’s database tool) to drop all the tables, then use UpdraftPlus or a manual SQL import to restore the database backup file.
This is where the Migrator add-on (Premium-only) shines. You can also use it on the destination server to import the backup as if it were a migration, which handles URL rewriting and serialized data correctly even when the source and destination URLs differ.
For really severe disasters, the Duplicator Pro plugin pairs well with UpdraftPlus, it builds a single self-extracting installer that you upload to a fresh server and run, restoring the entire site from a clean WordPress install. UpdraftPlus + Duplicator Pro is the standard "what if everything explodes" stack.
How to move a WordPress site to a new host (migration)
This is the second-biggest feature in UpdraftPlus Premium and the reason a lot of people pay for the upgrade. Moving a WordPress site between hosts (or between domains) is normally painful, files have to be copied, the database has to be dumped and imported, and URLs inside the database have to be search-replaced to point to the new domain. UpdraftPlus handles all of this in one flow.
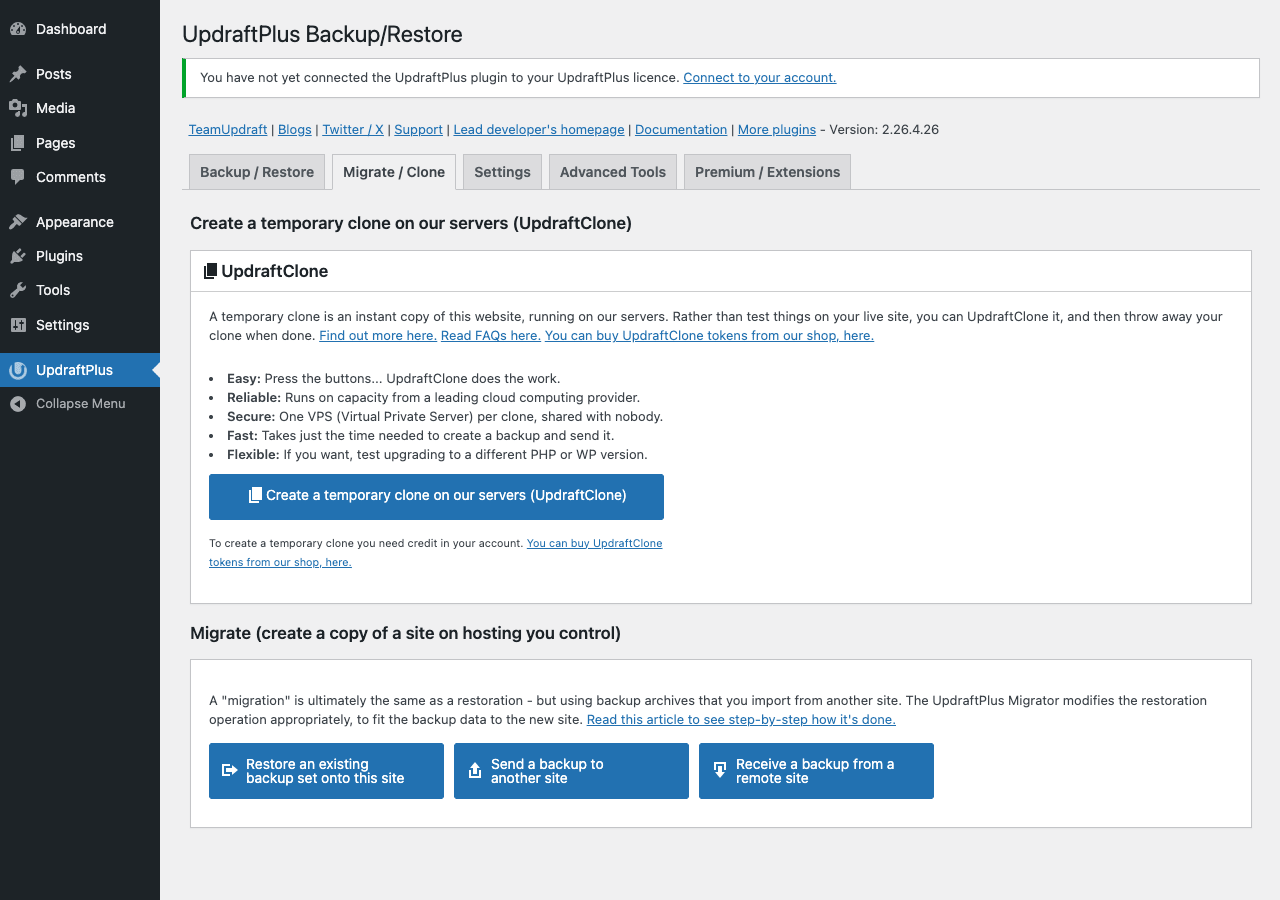
- On the source site (the one you’re moving from), make a fresh backup with the Migrate / Clone tab. There’s a "Send a backup to another site" button.
- Click Send a backup to another site.
- UpdraftPlus generates a long random key (looks like a 100-character string). Copy it.
- On the destination site (the new one, start with a fresh WordPress install at the new domain or new host), install UpdraftPlus and go to the same Migrate / Clone tab.
- Click Receive a backup from a remote site.
- Paste the key from step 3. The two sites are now linked.
- Back on the source site, click "Send" to push the backup files to the destination.
- On the destination, the backup appears in the Existing backups list. Click Restore.
- During restore, UpdraftPlus offers a "Migrator" option that rewrites old-domain URLs to new-domain URLs inside the database. Tick it.
- When the restore finishes, your site is live at the new domain / new host.
The Migrator handles the tricky parts: serialized data inside the database (PHP serializes arrays in a length-prefixed format that breaks with naive find-replace), themes-and-plugin-specific URL settings, WordPress core options.
Time for an average migration: 15-30 minutes from clicking the send button to the new site being fully live.
For very large sites (50+ GB), consider migrating files separately via SSH/SFTP and using UpdraftPlus only for the database migration. UpdraftPlus through the WordPress admin times out on extremely large file transfers.
Cloning a site for staging or testing
The UpdraftClone feature is one of the most underrated things in UpdraftPlus Premium. It creates a temporary copy of your live site on UpdraftPlus’s own servers, you pick a duration (a few hours to a few weeks), and the clone runs there as a fully-working WordPress site.
What’s it for?
- Test a major plugin update on a real copy of your site before applying it live. If the update breaks the clone, you’ve learned something cheap. Throw the clone away.
- Test a theme switch without risk to your live design.
- Try a PHP version upgrade on the clone first to see if any plugins break.
- Train a new admin on a real-data site without giving them access to live customer data (the clone is isolated).
The clone uses "UpdraftClone tokens", Premium ships with some tokens included, and you can buy more if you need long-running clones.
To start a clone:
- UpdraftPlus → Migrate / Clone tab.
- Click Create a temporary clone on our servers (UpdraftClone).
- Pick the duration (1 hour, 4 hours, 1 day, 1 week, etc.).
- Click Create.
A few minutes later, the clone is ready. UpdraftPlus emails you a URL. Visit the URL, you’re looking at an exact copy of your site, running on UpdraftPlus’s infrastructure, with admin login intact.
When you’re done, click "Destroy clone" or wait for it to expire automatically.
For sites with sensitive data (customer addresses, payment info), test on a host-provided staging site rather than UpdraftClone, since UpdraftClone runs on third-party infrastructure.
Common problems and how to fix them
Backups go wrong in predictable ways. The fixes:
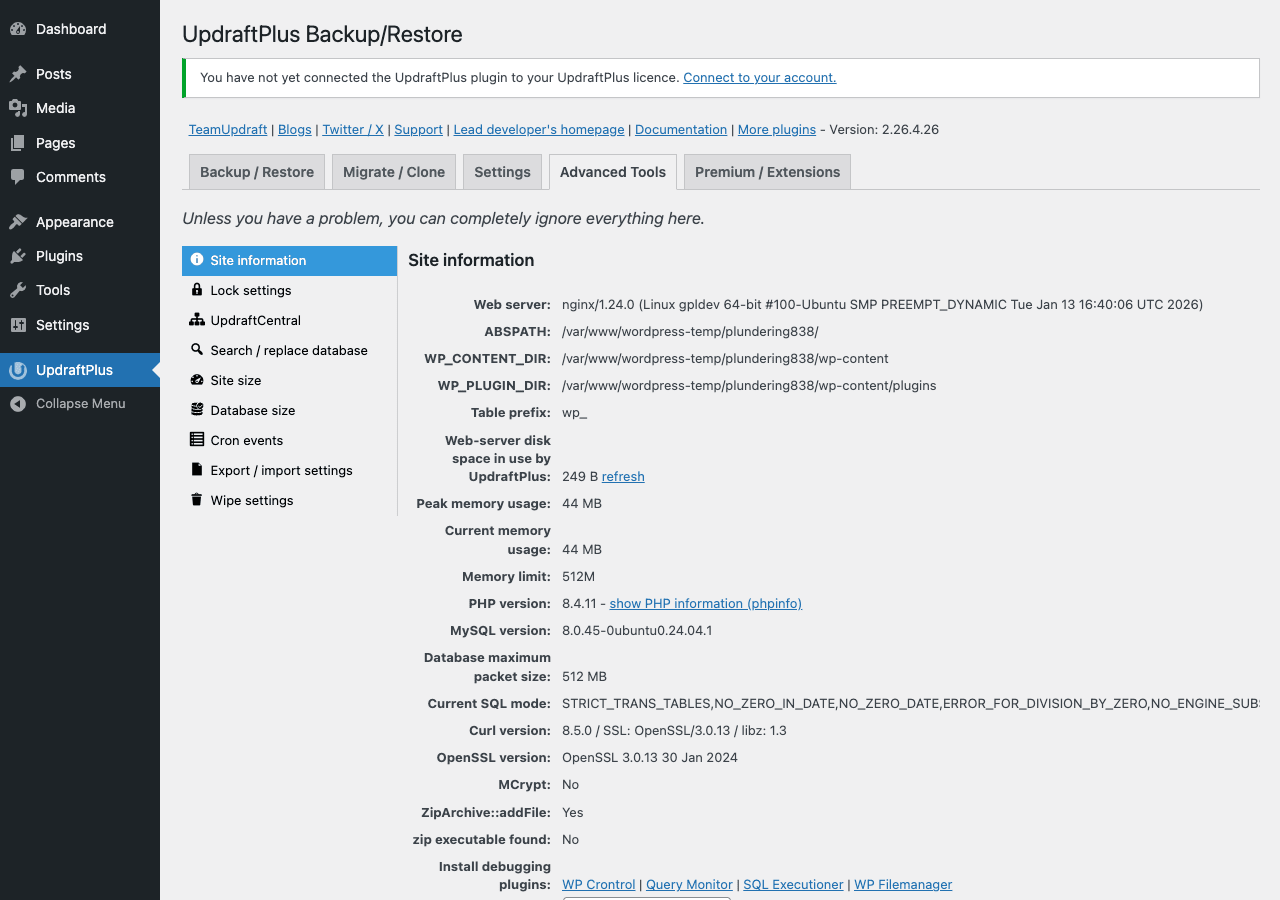
"Backup timed out / didn’t finish." Your hosting limits PHP execution time. Solution: contact your host and ask them to increase the max_execution_time to 300 seconds. Or, for a quick workaround, enable "split the backup into smaller archives" in UpdraftPlus → Settings → Expert settings. Set the split size to 100 MB. UpdraftPlus then writes many small zip files instead of one giant one, fitting within the time limit.
"Backup is too big to upload to Google Drive." Your free Google account has 15 GB total. If your backups are bigger, you’ll run out. Solutions: upgrade Google Drive storage, use a different backend (Amazon S3 scales to petabytes for cheap), or split the backup so only changed files upload (Premium incremental backups).
"Backup files exist but won’t restore." The backup may be corrupted. Try downloading the zip and opening it locally, if the zip is broken, the upload corrupted it. Re-run the backup. If multiple backups in a row are corrupted, it’s a server issue (out of memory during the zip creation). Increase PHP memory_limit in wp-config.php (define('WP_MEMORY_LIMIT', '512M');) and retry.
"Google Drive authentication keeps expiring." Google’s OAuth tokens for some account types expire after a few weeks. Re-authenticate. For an enterprise Google Workspace account, this is more stable. For free Gmail-based Drive accounts, it can be flaky, Amazon S3 is more reliable for very long-running sites.
"My multisite backups aren’t restoring correctly." Multisite restores are tricky. Use UpdraftPlus Premium’s network add-on, which handles per-subsite restores. The free version partially supports multisite but not fully.
"Restored backup but site is white-screened." Usually a plugin or theme conflict between the backup version and the current WordPress version. Rename the wp-content/plugins/ folder to wp-content/plugins.bak/ via FTP, this deactivates all plugins. Site should come back online. Re-activate plugins one by one to find the culprit.
"Email backups disable themselves randomly." Email backups can fail if the backup exceeds your email provider’s attachment size limit (usually 25 MB for free Gmail). Use a cloud storage option for sites larger than a basic blog.
How often should you back up?
The "right" frequency depends on how often your site changes and how much data loss you can tolerate. Some rules of thumb:
A personal blog with one post a week: weekly file + database backups, retention of 8 (two months of history). Backup size is small (under 500 MB usually). Cost is negligible.
A medium business site (services, portfolio, a few new posts a month): weekly files + daily database, retention of 4 weeks for files and 30 days for database.
A WooCommerce store doing 10+ orders a day: weekly files + every-4-hours database, retention of 4 weeks for files and 60 days for database. Losing 4 hours of orders is the worst case.
A high-volume site (news, busy SaaS, content publishing): daily files + hourly database, retention of 4 weeks for files and 14 days for database. The hourly database catches frequent content updates.
A membership / course site (MemberPress, LearnDash): weekly files + every-4-hours database. Members care a lot about not losing their progress, so frequent database backups protect their data.
The pattern: files change rarely, database changes constantly. Tune them separately.
Real-world example backup setups
Three full setups copy-pasted from real production sites.
The personal blog: weekly file backup at 2 AM Sunday, daily database backup at 3 AM, both uploaded to Dropbox, 8 weeks retention on files and 30 days on database. Email notifications on each backup with subject line "Backup complete – Mom’s Recipes". Manual restore tested every 3 months by spinning up a free Cloudways trial server. Total cost: free UpdraftPlus + 2 GB Dropbox.
The WooCommerce store: every-4-hours database backup, weekly file backup at midnight Sunday, both uploaded to Amazon S3 (cheapest cloud storage for high-volume sites). 60-day database retention, 8-week file retention. Email reports on failed backups only. Migrator add-on for occasional staging refreshes. Total cost: UpdraftPlus Premium + $2/month S3 for ~40 GB of backup storage.
The agency client setup: 30 client sites, each with the same backup recipe, weekly files Saturday night, daily database 4 AM, all uploaded to a shared Google Cloud Storage bucket under per-client folders. Centralized monitoring via the agency’s hosting dashboard. Premium add-on for the multi-site Network license. Total cost: UpdraftPlus Premium unlimited-site license + $40/month Google Cloud Storage for 200 GB total.
The common thread: backups don’t have to be complicated. A reasonable schedule, a good cloud destination, and quarterly restore tests covers the 95% case.
Pricing and licensing
The official UpdraftPlus pricing has three tiers:
- Personal: $70/year, 2 sites, includes all Premium features (Migrator, UpdraftClone, multi-storage, etc.).
- Business: $115/year, 10 sites, plus dedicated email support.
- Agency / Enterprise: $145-$195/year, 35-unlimited sites, priority support.
All tiers renew annually for updates and support. UpdraftClone tokens are sold separately (Premium ships with a starter pack).
GPL Times sells UpdraftPlus Premium as a GPL download. The code is identical to what TeamUpdraft / DavidAnderson ships, same updraftplus.php, same add-on files. The pricing is different: a one-time purchase for unlimited sites with no annual renewal. Updates come from GPL Times rather than from updraftplus.com. For an individual managing a personal blog, the math is roughly the same as the official Personal tier.
The trade-off: official ticket-based support from the UpdraftPlus team is gated to paying subscribers. If your site is mission-critical and you need urgent help when a backup fails at 2 AM on a Sunday, the official support is worth the subscription.
FAQ
Do I need a backup plugin if my web host says they back up my site automatically?
Yes, you still need one. Host backups are useful, but they’re outside your control, if your hosting account gets suspended, hacked, or accidentally deleted, the host backups go with it. Your own backups, stored on a separate cloud service, are the only ones you actually own. Use both: host backups for routine restores, your own backups as the disaster-recovery layer.
How is UpdraftPlus different from Duplicator Pro?
Duplicator is built primarily for migrations, packaging a site into a single installer file that you run on a fresh server. UpdraftPlus is built for scheduled backups and routine restore. Most agencies use both: Duplicator when moving a site to a new host once, UpdraftPlus for the ongoing backup schedule. The two coexist without conflict.
Will UpdraftPlus slow down my site?
While a backup is running, yes, making a backup involves zipping files and dumping the database, which uses CPU. Schedule backups to run at low-traffic hours (3 AM site-time is the classic choice). Outside of backup runs, the plugin sits idle and uses near-zero resources.
Can UpdraftPlus back up multiple sites to one Google Drive folder?
Yes. Each site uploads to its own subfolder inside the UpdraftPlus parent folder, so they don’t conflict. You can manage all of them from one Google Drive account, which is convenient for agencies.
Does it work with WordPress Multisite?
The Premium Network Backup add-on handles multisite properly. The free version is multisite-aware but doesn’t restore individual subsites cleanly. For multisite, use Premium.
Can I exclude specific files from a backup?
Yes. In Settings → Include in files backup, the exclusion pattern field accepts wildcards. *.log excludes all log files. cache/* excludes the cache subfolder. wp-content/uploads/2024/* excludes a specific year’s uploads.
What’s the difference between an incremental backup and a regular backup?
A regular backup copies every file every time, even files that haven’t changed. An incremental backup only copies files that have changed since the last backup, making it dramatically faster and smaller for sites that don’t change much. Premium-only feature. Most useful on large sites with infrequent changes (an image-heavy portfolio, for example).
Can I encrypt my backups?
Premium adds database encryption. The files are stored as standard zip files. For total encryption of the file zips too, use a remote storage provider that encrypts at rest (S3 with server-side encryption, Backblaze B2 with encryption, etc.).
What happens if I try to restore from a backup that’s much older than my current WordPress version?
WordPress is good at backward compatibility, restoring a 6-month-old backup onto a current WordPress install usually works. Restoring a 3-year-old backup onto a modern site sometimes hits compatibility issues with plugins that have changed their data schema. The fix: install older plugin versions matching the backup, then upgrade carefully.
Can I run multiple backups at the same time?
No, UpdraftPlus serializes its own backup operations. If a backup is already running when the scheduled time hits, the scheduled one waits. This is by design, concurrent backups on a single site would corrupt each other.
Does it work with All-in-One WP Migration?
You can use both, but for different jobs. All-in-One WP Migration is great for single-shot migrations (export site → import site → done). UpdraftPlus is the right tool for ongoing scheduled backups. Don’t try to use them both for backups; pick one as the routine and use the other only for ad-hoc migrations.
My site has 200 GB of images. Is UpdraftPlus the right tool?
For sites that large, yes for the database (always back up the database with UpdraftPlus), but consider offloading file backups to your hosting provider’s snapshot feature or to direct rsync. WordPress plugins struggle past about 30-50 GB of files because of execution time limits.
Final thoughts
A backup is the single highest-use thing you can set up on a WordPress site. It costs almost nothing (the time to install a plugin), it runs without you thinking about it, and it’s the only thing standing between a site crash and a complete rebuild.
Three recommendations if you’re starting:
One: install UpdraftPlus before your site has problems, not after. Backups can only protect what existed when the backup was taken, a site that breaks before its first backup is unrecoverable. Set it up on Day One of any new project.
Two: connect a cloud storage destination on Day Zero. Local-only backups die with the server. Google Drive, Dropbox, or Amazon S3 takes ten minutes to set up and protects against a class of disasters that local backups can’t survive.
Three: test the restore at least once before you need it. Spin up a staging site (your host’s staging feature or UpdraftClone), upload a recent backup, click Restore, browse the result. Confirm everything is there. Do this once when you set up, then every 2-3 months as maintenance. A backup you can’t restore is not a backup, it’s a comfortable illusion.
If you’re choosing between UpdraftPlus and the alternatives, the heuristic is simple: pick UpdraftPlus if you want a backup plugin that just works on virtually any WordPress host without configuration. Pick Duplicator Pro if your primary need is migrations rather than scheduled backups. For most sites, UpdraftPlus is the one. Set it up this afternoon and stop worrying about it.