


WordPress runs roughly 43% of the web. That means it’s also the most attacked piece of software on the internet. Every day, automated bots try millions of password combinations against random WordPress login pages, scan random WordPress sites for vulnerable plugins, and try to inject malicious code where they can. Most of these attempts fail because most sites have at least some protection. But some sites have no protection at all, and those are the ones that get hacked.
Wordfence is the WordPress plugin most people install to fix this. It does three things: blocks bad traffic before it reaches your site (firewall), scans your files for malware (scanner), and adds extra layers around the login form (login security). The free version of Wordfence covers the basics. The Premium version adds real-time malware signatures (so brand-new attacks get blocked immediately instead of waiting 30 days), country blocking, and a few other things we’ll cover.
This is a beginner’s guide. We will not assume you know what a "firewall" is, what "malware" means, or what "two-factor authentication" stands for. We’ll explain every term as it comes up, walk through the plugin click by click, and end with a working security setup on your WordPress site. If you’ve never thought about WordPress security before today, this is the right place to start.
Table of Contents
- What does "security" actually mean for a WordPress site?
- What is Wordfence?
- Free vs Premium: what do you actually need?
- Before you start: three things to set up first
- Step 1: Install Wordfence
- Step 2: Activate your license
- Step 3: Run your first scan
- Step 4: Turn on the firewall properly
- Step 5: Lock down the login page
- Step 6: Schedule scans and reports
- What the firewall actually blocks
- What to do if Wordfence finds a problem
- Common problems and how to fix them
- Real-world example: a small business site under attack
- Pricing and licensing
- FAQ
- Final thoughts
What does "security" actually mean for a WordPress site?
Security is the practice of making your site hard to attack. There are four common attack types every WordPress site faces:
1. Brute-force login attempts. A bot tries thousands of password guesses on your /wp-login.php page. If your password is "admin123" or "password" or "yoursitename2025", the bot eventually gets in. Once they’re in, they install spam plugins, redirect your visitors to gambling sites, or hold your site for ransom.
2. Plugin and theme vulnerabilities. Sometimes a plugin author makes a mistake (a typo in the code, a missed permission check) and creates an exploit. Until the plugin gets patched, attackers can use the exploit to hack any site running that plugin. Real example: in 2021, a vulnerability in a popular WordPress plugin let attackers take over admin accounts on millions of sites within hours of the bug being disclosed.
3. Malware injection. Once an attacker is inside your site (usually via a vulnerability or weak password), they inject malicious code into your theme files, your plugins, or even your database. The code stays hidden and does its work over weeks or months. Common goals: stealing credit-card numbers from your checkout, spamming search results with junk content, or turning your site into a botnet zombie.
4. SQL injection and cross-site scripting (XSS). Technical attacks against forms or URL parameters that try to read your database, modify content, or steal session cookies. Modern WordPress core is well-protected against these, but old plugins or custom code often isn’t.
A good security setup defends against all four. Wordfence does it by combining a firewall (blocks attack traffic before it reaches your site), a scanner (detects malware that snuck in), and login security (stops brute-force attacks at the login page).
You can’t make a site 100% unhackable. You can make it expensive enough to attack that the bots give up and move on to easier targets. That’s the goal.
What is Wordfence?
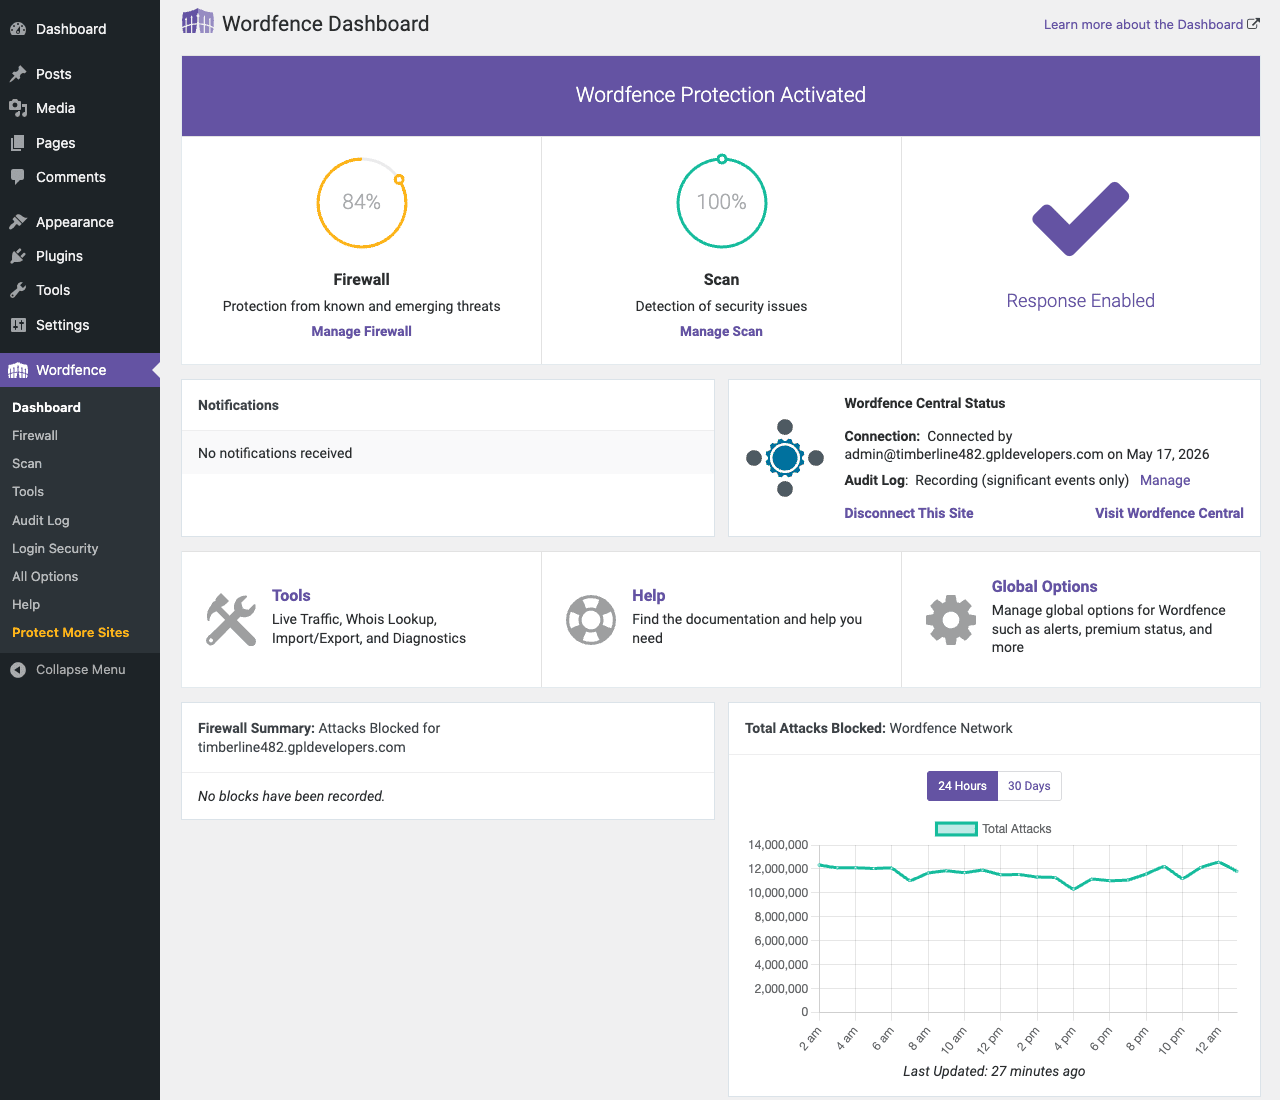
Wordfence is a WordPress plugin made by Defiant (formerly Wordfence Inc), used by over 5 million WordPress sites. Once installed, it adds a "Wordfence" menu in your WordPress admin sidebar. From that one menu, you can:
- See a real-time dashboard of attack activity on your site
- Configure the firewall (which blocks malicious traffic before it reaches WordPress)
- Run malware scans (which check every file on your site for known bad code)
- Configure login security (two-factor authentication, brute-force protection, CAPTCHA on login)
- Block specific IPs, countries, or bot user-agents
- View detailed attack logs and audit trails
- Receive email alerts when something needs your attention
That’s the whole plugin. Five main areas. The dashboard tells you everything at a glance; the rest is configuration.
Wordfence has been around since 2012 and is widely considered the most thorough WordPress security plugin available. The team that builds it also runs the Wordfence Threat Intelligence research team, which discovers and reports new WordPress vulnerabilities to the wider community. That research feeds directly into the firewall and scanner.
Free vs Premium: what do you actually need?
Wordfence has a free version on WordPress.org. It includes the firewall, the scanner, login security, and IP blocking. For a small personal site, the free version is genuinely enough.
The Premium version adds the features that matter for sites with real risk:
- Real-time malware signatures. The free version’s malware signatures are 30 days behind. Premium gets new signatures the moment they’re released. For a site under active attack, that 30-day gap is the difference between catching an infection in hour one versus week four.
- Real-time IP blocklist. Premium maintains a live database of known-malicious IPs. Free uses a static older list.
- Country blocking. Block traffic from specific countries (useful if you have no business reason to receive visitors from, say, North Korea or known-spammer regions). Free version doesn’t support this.
- Scheduled scans. Premium lets you schedule scans at specific times. Free runs them on a generic schedule.
- Two-factor authentication recovery codes. Slightly easier 2FA recovery flow in Premium.
- Premium support. Email support from the Wordfence team with much faster response times.
For an active business site (e-commerce, membership, lead gen), Premium is the right choice. For a personal blog with no payment data and no logged-in users, the free version covers the essentials.
This guide covers Premium features as well as free ones. If you’re on free, skip the Premium-only sections.
Before you start: three things to set up first
Before you install the plugin, three small bits of housekeeping make everything easier.
1. Make sure you have a working backup. Wordfence sometimes flags or quarantines files. Most of the time it’s right; occasionally it false-positives a legitimate theme file. Either way, you want a backup you can roll back to if something goes wrong. We covered backups in detail in our UpdraftPlus Premium guide. If you don’t have backups set up yet, do that first.
2. Note your admin email address. Wordfence will send alerts to this address. If it’s a personal address you check daily, that’s fine. If it’s a shared inbox or auto-forwarded to nowhere, set up a real address before installing. Missed Wordfence alerts mean missed attacks.
3. Have your hosting login ready. If Wordfence detects a serious infection and your site goes down because of it, you may need to log into your host’s file manager or FTP to remove malicious files. Don’t wait until 2am to find out you forgot your hosting password.
Done. Now let’s install.
Step 1: Install Wordfence
There are two ways to install the plugin.
Way A: From your WordPress admin (works for the free version):
- Log into your WordPress admin.
- Plugins, Add New.
- Search for "Wordfence".
- The first result is "Wordfence Security, Firewall, Malware Scan, and Login Security". Click Install Now, then Activate.
Way B: Upload the Premium zip (if you bought Premium from GPL Times or upstream):
- Download the zip to your computer.
- Plugins, Add New, Upload Plugin.
- Choose the zip, Install Now, then Activate.
After activation, the WordPress admin sidebar shows a new "Wordfence" menu item. Click it. You’ll land on the Wordfence onboarding screen, which asks for an email address (for alerts) and tells you about a few initial settings. Accept the defaults for now; we’ll tune things in the next steps.
Step 2: Activate your license
If you’re on Premium, you need to activate the license to unlock the Premium features.
- Go to Wordfence, Dashboard.
- Find the "Protect More Sites" or "Upgrade to Premium" link in the sidebar.
- The license activation prompt appears. Paste your license key.
- Click Activate.
If you’re on the free version, skip this step entirely. Premium is unlocked, and the dashboard will now show "Premium" badges next to features that are now active.
To verify Premium is active, check Wordfence, Firewall. The "Firewall Rules: Premium" card should say 100% with "Rules updated in real-time" below it. If it says "Community" instead of "Premium", the license didn’t take.
Step 3: Run your first scan
Scanning means Wordfence checks every file on your site against its database of known-malicious code. It’s the first thing to do after installing because it gives you a clean-or-dirty baseline.
- Go to Wordfence, Scan.
- You’ll see scan-related cards: Scan Type, Malware Signatures, Reputation Checks. The center has a big START NEW SCAN button.
- Click it.
The scan takes 5-30 minutes depending on site size. While it runs, you’ll see a progress bar showing what’s being checked: Posts and Comments, Themes and Plugins, Users, URLs, File integrity.
When it finishes, the Results Found section tells you whether anything was flagged. Typical results on a clean site: "No new issues have been found." Typical results on a freshly-attacked site: a list of suspicious files with severity ratings (Critical, High, Medium, Low) and recommended actions (Delete File, Restore from Original, etc.).
If your first scan turns up critical findings, jump straight to What to do if Wordfence finds a problem. Don’t ignore Critical or High alerts.
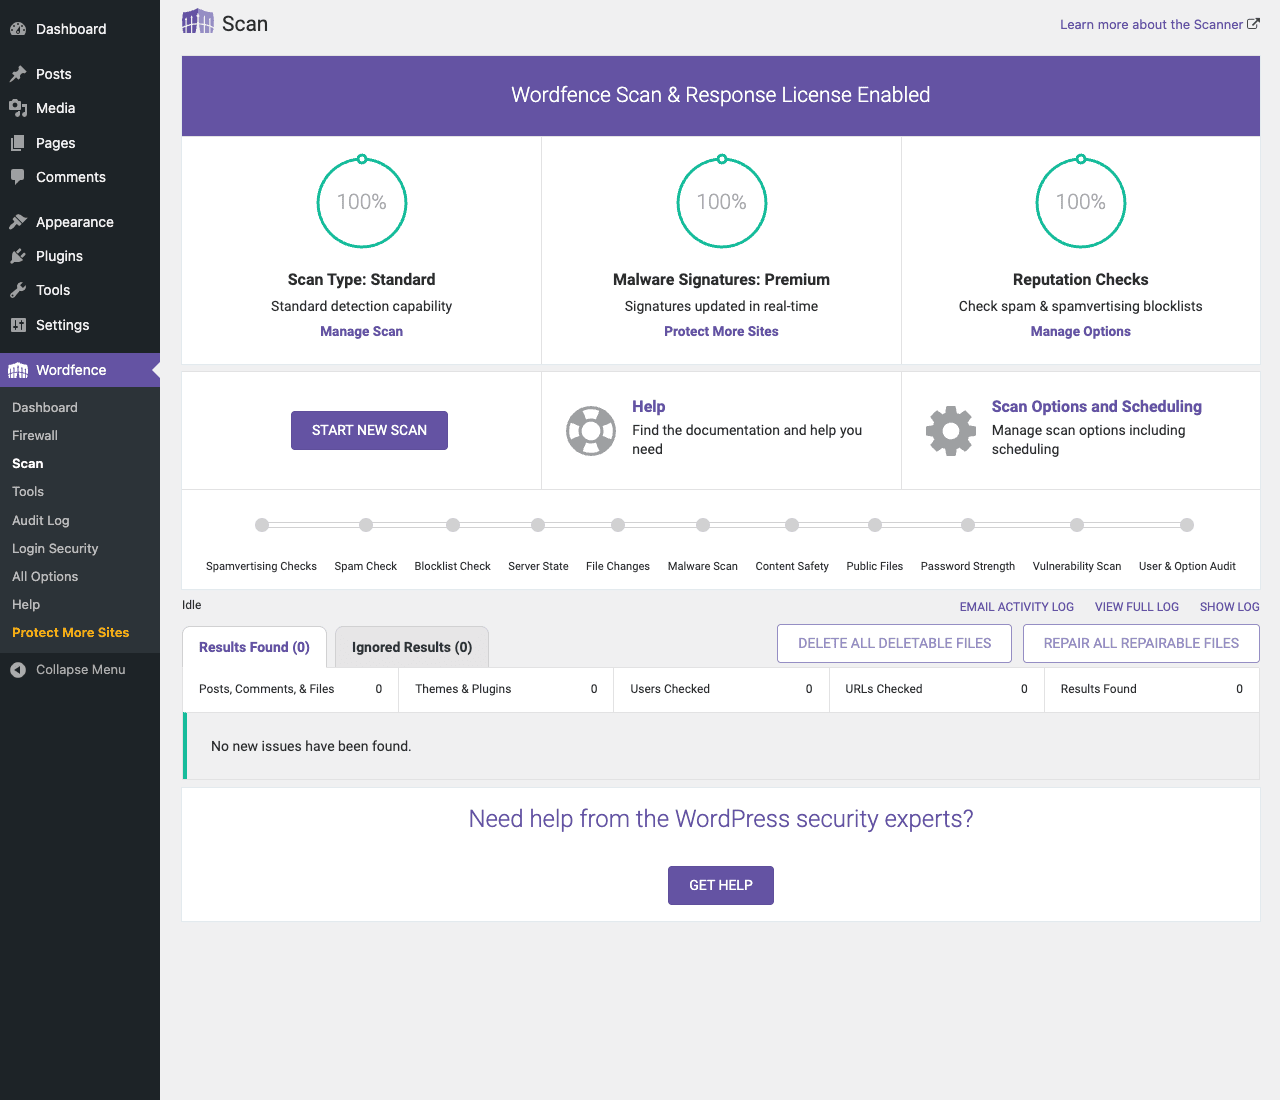
The free version runs basic scans. Premium adds advanced checks like reputation checks (whether your domain or admin email shows up on spam blocklists) and Vulnerability Scan (whether any of your installed plugins or themes has a known CVE).
Step 4: Turn on the firewall properly
The firewall is Wordfence’s most important feature. It sits between the internet and your WordPress site, inspecting every incoming request and blocking anything that looks like an attack.
By default, the firewall runs in "Learning Mode" for the first week. During this time it watches traffic to learn what normal looks like on your specific site, so it can be more accurate later. You don’t need to do anything during the learning period; the firewall is still blocking obvious attacks even in this mode.
- Go to Wordfence, Firewall.
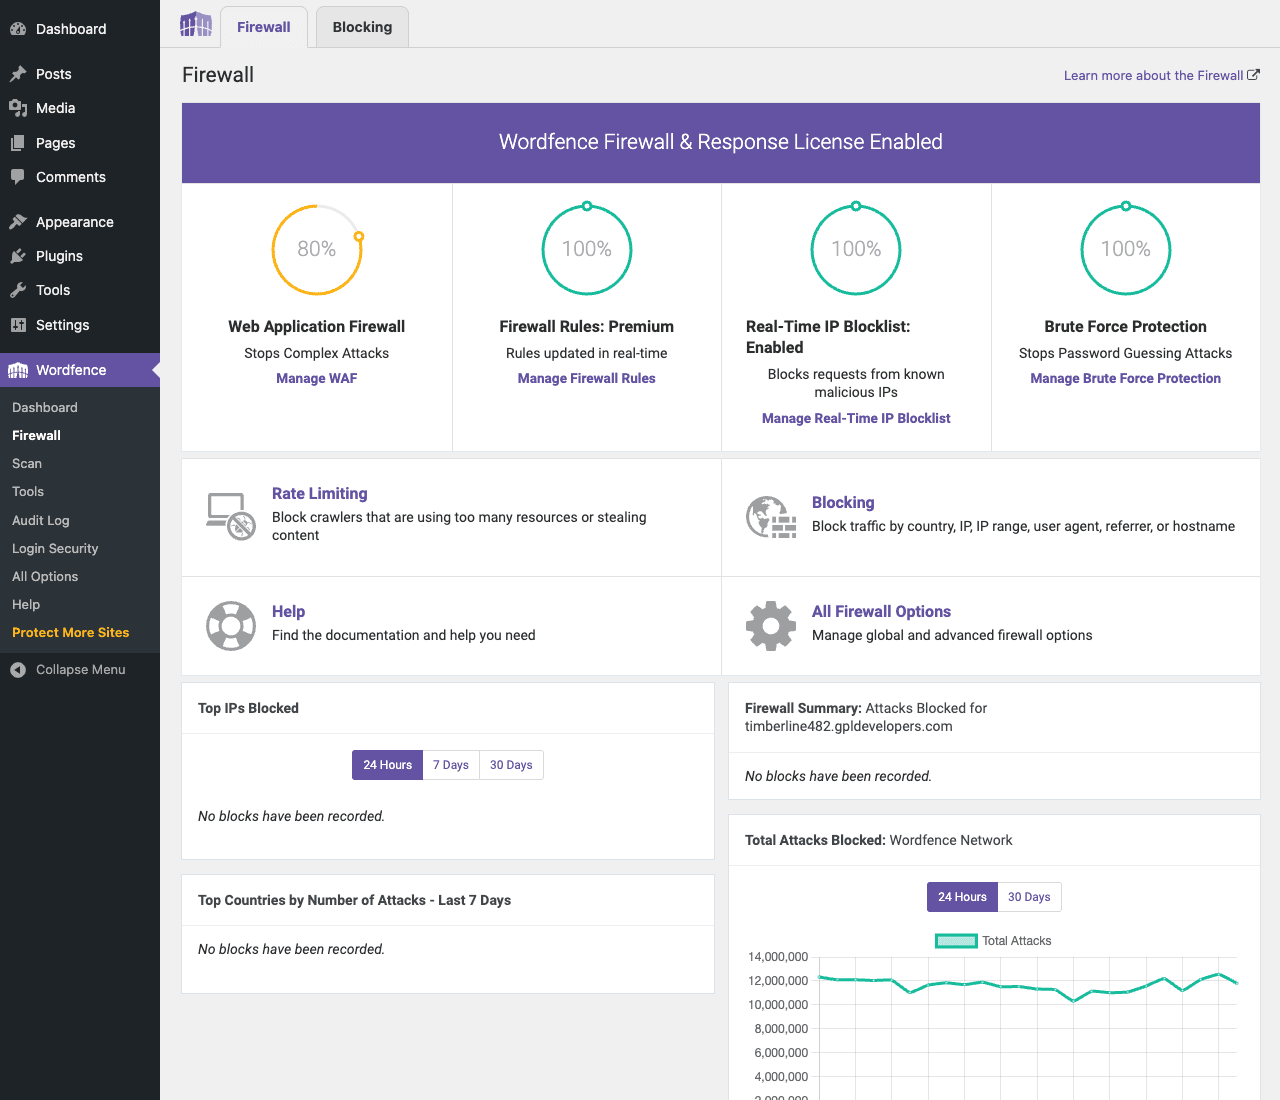
- The Firewall page shows four big metric circles: Web Application Firewall, Firewall Rules, Real-Time IP Blocklist, Brute Force Protection.
What each one means in plain English:
- Web Application Firewall (WAF): scans every incoming request for known attack patterns (SQL injection attempts, malicious file uploads, etc.). Default ON.
- Firewall Rules: a regularly-updated list of patterns Wordfence knows are malicious. Premium gets new rules instantly; free gets them after 30 days.
- Real-Time IP Blocklist: a list of known-bad IPs that Wordfence blocks at the door. Premium is real-time; free uses an older static list.
- Brute Force Protection: limits how many login attempts can come from a single IP. Default ON.
For most sites, leave all four ON with defaults. The settings to actually tune are below in the same page:
Rate Limiting: limits how many requests a single IP can make per minute. Default settings work for most sites. Increase the limits only if you have legitimate users hitting them (a developer doing bulk content imports, say).
Blocking: where you manually block specific IPs, countries, or user-agents. The "Block by Country" feature is Premium-only and useful if you have no business reason to allow traffic from certain regions. Many small US business sites block Russia, China, and North Korea here; it cuts attack volume by 60-80% with zero downside.
After the 7-day learning period ends, the dashboard will prompt you to move to "Enabled and Protecting" mode. Accept the prompt. The firewall is now fully active.
Step 5: Lock down the login page
The login page is the single most-attacked URL on a WordPress site. Bots hit /wp-login.php constantly trying password combinations. Locking it down is the single highest-use thing you can do.
Wordfence has a dedicated Login Security section. Three settings to configure:
- Two-factor authentication (2FA). Go to Wordfence, Login Security, Two-Factor Authentication. Click "Activate 2FA for an account". Pick your admin account. You’ll be shown a QR code; scan it with an authenticator app (Google Authenticator, Authy, 1Password, Microsoft Authenticator). Enter the 6-digit code from the app to confirm. Save your recovery codes somewhere safe.
Now your admin login requires the 6-digit code in addition to your password. Even if a bot guesses your password, they can’t log in without the code from your phone.
- CAPTCHA on the login form. Wordfence, Login Security, Settings, Enable reCAPTCHA on the login and registration pages. Tick it. You’ll need a Google reCAPTCHA v3 site key (free, takes 3 minutes to create at google.com/recaptcha). Paste the key.
This stops automated bots without bothering real visitors (reCAPTCHA v3 is invisible by default; the user doesn’t see anything unless they look suspicious).
- Brute force protection rate limits. Wordfence, Firewall, Brute Force Protection. Default settings are sensible. The key one: "Lock out after how many login failures" (default 20 attempts, drop to 5 for a small site you control). Combined with a few hours of automatic lockout, this stops brute-force attacks cold.
These three together (2FA + CAPTCHA + rate limit) eliminate roughly 99% of brute-force login attacks. Your login page is now harder to attack than your front door.
Step 6: Schedule scans and reports
Once everything is configured, you want it to run on autopilot.
- Wordfence, All Options, Scan Scheduling (Premium-only). Set scans to run weekly (e.g. 3 AM Sunday). Daily is overkill for most sites; weekly catches everything that matters.
- Wordfence, All Options, Email Alerts. Tick "Email me when an attack is detected" and "Email me weekly summary". You’ll get an email each Sunday with that week’s attack count, top blocked IPs, and any issues that need your attention.
- Wordfence, All Options, Notifications. Optional, but worth turning on "Show Wordfence in admin bar" so you have a quick-look indicator at the top of every admin page.
Done. Wordfence will now run in the background, blocking attacks, scanning weekly, and emailing you a summary. You can stop thinking about it most of the time.
What the firewall actually blocks
The Wordfence firewall blocks several categories of bad traffic. In plain English:
Known malicious IPs. Wordfence maintains a live list of IPs that have attacked Wordfence-protected sites recently. Those IPs get blocked at the door. This catches a huge portion of bot traffic with zero false positives.
Known attack patterns. Each incoming request gets matched against a library of attack signatures: SQL injection attempts, malicious file upload attempts, exploit attempts against known plugin vulnerabilities. Match found = blocked.
Brute-force login attempts. As covered above. Limits per-IP login attempts.
Bad bots. Known scraper / spam / spy bots are identified by their user-agent string and blocked.
Country traffic (Premium). If you’ve blocked countries, traffic from those countries gets a "your access has been blocked" page.
Rate-limited overconsumption. Single IPs hitting the site too fast get throttled or blocked.
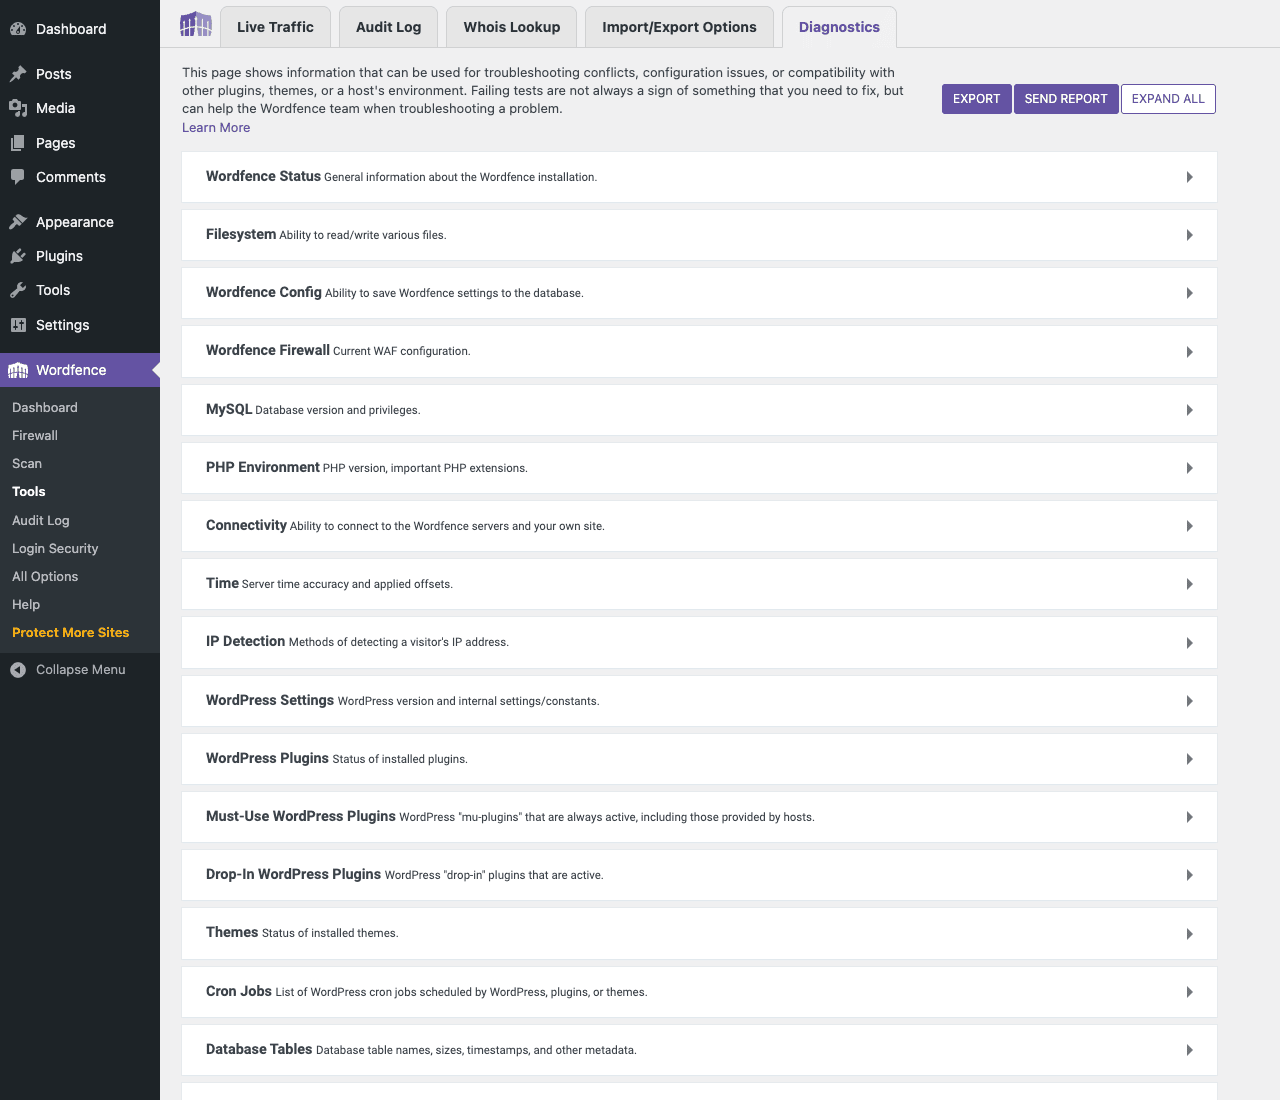
Wordfence keeps detailed logs of all blocks. Wordfence, Tools, Live Traffic shows attacks in real-time. Wordfence, Audit Log (Premium) shows changes to user accounts, content, and settings over time, which helps if you suspect an attacker has gotten in.
What to do if Wordfence finds a problem
A scan results page with red Critical findings is alarming, but most issues fall into three categories with predictable fixes.
Critical finding: "File appears to be malicious". Wordfence found code in a file that matches a known malware signature. Options:
- Click the result to see the file path and the matched signature. Most are obvious (
wp-content/plugins/some-plugin/evil.phpwith content likeeval($_POST['x'])). - If the file is in a plugin you don’t recognize, delete the plugin entirely.
- If the file is in a plugin you DO use, the plugin was probably hacked. Delete the plugin folder, then reinstall a clean copy from WordPress.org or from the vendor.
- If Wordfence offers "Repair" (restore from original), use it. That replaces the file with a clean copy from WordPress.org or the original plugin author.
High finding: "Plugin/theme has a known vulnerability". Wordfence is telling you a plugin you have installed has a published security vulnerability and needs to be updated. Options:
- Go to Plugins and update that plugin to the latest version.
- If no update is available (the author hasn’t fixed it yet), check whether Wordfence’s firewall has a rule to block exploitation of this specific vulnerability. Premium usually does, free might lag.
- If the plugin is abandoned (no updates for over a year) and has open vulnerabilities, replace it with a maintained alternative. Wordfence often suggests a replacement.
Medium / Low finding: "Suspicious file" or "Wrong file permissions". Less urgent. Read the description carefully, judge the risk, take action if needed.
A note on false positives: occasionally Wordfence flags a legitimate file. If you wrote the file yourself or it’s a known good file from a trusted plugin, click "Mark as Trusted" or "Add to Allowlist" to tell Wordfence to ignore it on future scans.
If you suspect your site is hacked but Wordfence finds nothing, two next steps:
- Restore from a clean backup taken before the suspected hack. UpdraftPlus makes this a one-click operation if you have backups set up.
- Run a deep scan with a separate tool. Sucuri SiteCheck (free at sitecheck.sucuri.net) often catches things Wordfence misses, especially client-side injections.
The combination of "Wordfence scan + occasional Sucuri check + a clean backup to fall back on" is the standard small-business security stack.
Common problems and how to fix them
Six issues every beginner hits.
"Wordfence is blocking my own IP."
Most common after a few too many failed login attempts (you forgot your password, say). Fix: from a different IP (your phone’s mobile data, a VPN, a friend’s network), log into wp-admin, go to Wordfence, Firewall, Blocking and unblock your IP. Or, via FTP, edit wp-content/wflogs/wfWAF-attack-data.php to clear the lockout (more advanced).
"My WAF is in Learning Mode and never switches to Enabled."
The learning mode is designed to auto-prompt after 7 days, but sometimes the prompt doesn’t appear. Go to Wordfence, Firewall, Web Application Firewall and manually click "Enabled and Protecting". Don’t leave it in Learning Mode forever.
"Wordfence is slowing down my site."
The Wordfence firewall adds a small amount of CPU overhead per request. On most hosting, it’s invisible. On the cheapest shared hosting, it can add 50-200ms per request. Mitigations: enable a caching plugin like WP Rocket, which serves cached pages without invoking PHP at all and bypasses Wordfence entirely for non-logged-in visitors. Or, if your host has a CDN-level WAF (Cloudflare, Sucuri), you may not need Wordfence’s WAF as well.
"Scans take forever / time out."
On large sites with many files, scans can take an hour or more. Go to Wordfence, Scan, Scan Options and Scheduling and reduce what’s being scanned. Skip "Scan files outside your WordPress installation" if it’s enabled. Schedule scans to run at the lowest-traffic time.
"Emails from Wordfence go to spam."
Wordfence sends from your WordPress site’s "from" address, which most hosts mark as not authenticated. Install an SMTP plugin (WP Mail SMTP, FluentSMTP) and connect a real transactional provider (Postmark, SendGrid, Mailgun). Wordfence emails will then have proper SPF/DKIM signing and land in the inbox.
"My login page is completely broken after enabling 2FA."
You enabled 2FA, but lost access to the authenticator app. Recovery: use a recovery code you saved during 2FA setup. If you didn’t save the codes, you’ll need FTP access to delete the Wordfence plugin folder (wp-content/plugins/wordfence), which disables 2FA, then re-enable Wordfence and reconfigure. ALWAYS save recovery codes during 2FA setup.
Real-world example: a small business site under attack
Walk-through of what an attack looks like in practice and how Wordfence handles it.
Sara runs an e-commerce site selling artisan honey. Three weeks ago, she installed Wordfence Premium after reading about a fellow shop owner getting hacked. She enabled the firewall, ran a scan (clean), set up 2FA on her admin account, and otherwise forgot about it.
Last Tuesday, she got an email at 3am: "Wordfence has detected 247 attack attempts in the last hour, blocked all of them." She woke up, checked, saw the dashboard: a single IP from Eastern Europe had tried 247 login attempts in 60 minutes. All were blocked because of the brute-force protection rate limit. The attacker’s IP got auto-blocked after the 20th attempt; the rest hit the wall and bounced off.
In the Live Traffic view, she saw what the bot was doing: trying usernames like "admin", "administrator", "sara", "honey", "shop", with common password lists. None worked because she’d renamed her admin user to a less guessable name and used a strong password generated by her password manager.
She added one extra protection: blocked the entire country the attack came from (her shop only sells in the US/UK, so blocking other regions costs nothing). The Premium country-blocking feature did this in one click.
The next 48 hours, attack volume dropped 90%. The bots that were targeting her IP moved on to easier targets. Sara went back to running her business.
The pattern: most attacks are automated, opportunistic, and stoppable by basic protection. Wordfence catches them automatically. You don’t need to do anything during an attack except occasionally check the email summary and refine your blocking rules. The cost (one plugin) is much smaller than the value (not getting hacked).
Pricing and licensing
The official Wordfence pricing has several tiers:
- Free: $0, basic firewall, basic scanner, basic login security. 30-day delayed signatures.
- Premium: $119/year for 1 site. Real-time signatures, country blocking, scheduled scans, premium support.
- Care: $590/year for 1 site. Everything in Premium plus a dedicated Wordfence engineer reviewing your site monthly and handling cleanup if you get hacked.
- Response: $1,950/year for 1 site. 1-hour emergency response from Wordfence’s security team if your site is hacked.
Most small business sites need Premium. Care and Response are for sites where downtime costs serious money.
GPL Times sells the Premium plugin as a GPL download. The code is identical to what Defiant ships, same wordfence.php, same firewall rules engine. The pricing is different: a one-time purchase for unlimited sites with no annual renewal. Updates come from GPL Times rather than from wordfence.com. For a single small site, the math is close to the official Premium tier in the first year.
The trade-off: official ticket-based support from Wordfence is gated to paying subscribers. The Wordfence team is genuinely good at security incident response, and if you ever get hacked, having a real support contract is worth the cost. For sites that are not yet making serious money, the GPL Times version is the better economics. If your site is mission-critical revenue, factor the official Care or Response tier into your budget for incident response coverage.
FAQ
Do I need a security plugin if my web host says they have security?
Yes. Hosting-level security (the firewall and antivirus your host runs at the server level) is a different layer from plugin-level security. They complement each other. Hosting catches network-level attacks; Wordfence catches WordPress-specific attacks (vulnerable plugins, weak passwords, malware in your files). Run both.
Will Wordfence slow down my site?
On modern hosting, less than 100ms per request, often invisible. On cheap shared hosting, can be more noticeable. Pair Wordfence with a caching plugin like WP Rocket so non-logged-in visitors get served cached pages and bypass the WAF entirely.
Can I use Wordfence with Cloudflare?
Yes, and it’s common. Cloudflare handles network-level threats and CDN, Wordfence handles WordPress-specific threats. Configure Wordfence to read the real visitor IP from Cloudflare’s headers (Wordfence has a built-in setting for this) so attack blocking is accurate.
What’s the difference between Wordfence and Sucuri?
Sucuri runs at the DNS/CDN level (their firewall sits in front of your site, like Cloudflare’s). Wordfence runs inside WordPress (the firewall lives in PHP code that runs before WordPress loads). DNS-level firewalls catch attacks before they reach your server; plugin-level firewalls catch attacks that bypass the DNS layer or come from inside (e.g., a compromised admin). Many high-security sites run both.
Does Wordfence work with WordPress Multisite?
Yes. Wordfence treats a multisite installation as one network and manages security network-wide.
Can Wordfence clean up a hacked site automatically?
The free and Premium tiers do detection and offer one-click repair for damaged WordPress core or plugin files. For full cleanup (removing malicious database entries, hidden backdoors, etc.) on a seriously hacked site, the Care or Response tier includes manual cleanup by Wordfence engineers. Or you can hire a one-off cleanup service like Sucuri or MalCare.
What’s the right setup for an e-commerce site running WooCommerce?
Wordfence Premium + 2FA on all admin/shop manager accounts + scheduled weekly scans + email alerts + Cloudflare CDN in front for network-level filtering. Backups via UpdraftPlus so you can roll back if anything gets through. Pair with WP Rocket for caching so the WAF overhead doesn’t impact checkout speed.
My site uses MemberPress or LearnDash. Anything different?
Logged-in user sites bypass page caches, so the firewall runs on every request for every logged-in user. Use the lightest Wordfence settings that meet your security needs, and consider Cloudflare in front to deflect attacks before they reach your server.
Should I block specific countries?
Yes, if you don’t have legitimate visitors from those countries. Country blocking (Premium) typically cuts attack volume by 60-80% for sites with a clear regional audience. For global sites, block selectively (just the worst-offending countries based on Wordfence’s blocked-IPs report).
How long does a malware scan take?
For a typical 1 GB WordPress site: 5-15 minutes. For a 10 GB e-commerce site: 30-60 minutes. Schedule them at low-traffic hours.
Will Wordfence email me if my site gets hacked?
Yes if you’ve enabled "Email me when an attack is detected" or "Email me when a critical security issue is found". You should turn both on.
Can I use Wordfence on a staging site?
Yes. The free version works on unlimited sites. Premium licenses are per-site; for staging, just install the free version. Wordfence has a "Disable scanning of this site" mode for staging environments where you don’t want full scans running.
Does Wordfence have a REST API?
A limited one for the Wordfence Central service. For day-to-day site management, you’d use the WordPress admin interface, not the REST API directly.
My site is in a niche country. Is Wordfence still relevant?
Yes. Most attacks are automated and don’t care about your location. The bot doesn’t know or care that your site is for a small audience in Latvia; it’ll try to hack it just the same.
Final thoughts
Security is one of those things you don’t think about until you wish you had. The cost of setting up Wordfence is one afternoon. The cost of recovering from a hack (lost trust, lost revenue, the recovery work itself) is days or weeks. The math is obvious.
Three recommendations if you’re starting:
One: install it on Day One of any new site, not "later when there’s traffic". A site without security is exposed from the moment it goes live. Wordfence catches the constant background noise of automated attacks immediately and saves you from being one of the easy targets.
Two: enable 2FA on the admin account on Day One. The single most effective security measure for a WordPress site. Even a stolen password becomes useless without the second factor.
Three: pair Wordfence with backups. Security catches attacks; backups recover from them when one slips through. We covered backups in detail in How to Back Up Your WordPress Site With UpdraftPlus Premium. The two together are the minimum viable safety net for any production site.
For a personal blog, Wordfence Free is enough. For anything making money, Premium is worth the cost. Either way, this is the cheapest, highest-use decision a small site can make. Set it up this afternoon and stop worrying about it.