

If your site is for a restaurant with a monthly wine tasting, a yoga studio with a weekly class schedule, a church with a Sunday service, a school with parent meetings, or a small business with regular workshops, you eventually need an events calendar on your website. The standard "blog post for each event" approach falls apart fast. You can’t easily show a month-grid view, can’t filter by category, can’t say "this event repeats every Tuesday for the next 12 weeks", and can’t let visitors add the event to their own Google Calendar with one click.
The Events Calendar Pro is the WordPress plugin most sites use to fix this. The free version (called simply "The Events Calendar") gives you the basic calendar; the Pro version adds recurring events, additional calendar views (week, photo, map), multiple venues per event, custom fields, and the features serious event sites need. Together they power something like a million WordPress sites.
This is a beginner’s guide. We will not assume you know what a "custom post type" is, what "iCal" stands for, or what makes one calendar view different from another. We will walk through every step from installing the free base plugin to publishing your first event, configuring recurring events, and getting visitors to subscribe to your calendar. By the end, you’ll have a working events calendar on your site that updates itself and gives visitors a clear answer to "what’s happening, when, and where?".
Table of Contents
- What is an events calendar plugin?
- Free vs Pro: what do you actually need?
- Before you start: three things to set up first
- Step 1: Install the free base plugin
- Step 2: Install Events Calendar Pro on top
- Step 3: Configure the basic settings
- Step 4: Create your first event
- Step 5: Set up a recurring event (Pro only)
- Step 6: Add the calendar to your menu
- The calendar views explained in plain English
- Venues and Organizers, in one paragraph
- Letting visitors subscribe to your calendar
- Importing events from Google Calendar, Eventbrite, or Meetup
- Selling tickets to your events
- Common problems and how to fix them
- Real-world example: a yoga studio site
- Pricing and licensing
- FAQ
- Final thoughts
What is an events calendar plugin?
An events calendar plugin adds a new content type to WordPress called "Events". Each event is its own piece of content (similar to how each blog post is its own piece of content), but with extra fields specific to events: a start date and time, an end date and time, a venue (where it happens), an organizer (who’s running it), and optional categories like "Workshop" or "Live Music".
The plugin then gives you views, ways to display all of your events together on one page so visitors can see what’s coming up. The most useful views are:
- List view: a chronological list of upcoming events, one after another. Best for short event lists.
- Month view: a traditional month-grid calendar with events shown on their dates. Best for sites where events span multiple categories and the visual context helps.
- Day view: today’s events. Useful as a "happening now" widget.
- Week view: events laid out across the days of the week. Best for sites with a regular weekly schedule (yoga classes, church services, restaurant specials).
When you build an event, you fill in the form (title, description, date, venue, etc.), publish it, and it shows up automatically in all the views. When the date passes, it moves to the "Past Events" archive. No manual cleanup needed.
That’s the whole concept. Without an events calendar plugin, you’d build all of this yourself as custom posts plus custom code, which usually takes weeks. The Events Calendar gives you the whole thing in about thirty minutes of setup.
Free vs Pro: what do you actually need?
The Events Calendar is split into two plugins:
The Events Calendar (free, on WordPress.org). The base plugin. Gives you:
- Event posts with date, venue, organizer
- Three calendar views (List, Day, Month)
- Event categories and tags
- A single venue and organizer per event
- Basic settings (date format, calendar URL, etc.)
Events Calendar Pro (paid add-on, requires the free plugin to also be installed). Adds:
- Recurring events (the single biggest reason most people upgrade)
- Three additional calendar views: Week, Photo (a visual grid with event images), Map (events plotted on a Google Map)
- Multiple venues and organizers per event
- Additional shortcodes and widgets
- Custom event fields (add a "Difficulty Level" field to your yoga classes, for example)
- Premium support
For a site with a handful of one-off events per year (a couple of workshops, an annual conference, occasional meetups), the free version is enough. For a site with regular weekly classes, recurring workshops, or anything more than a few events per month, Pro is essentially required because the free version cannot do recurring events.
This guide covers both. If you only need the free version, skip the Pro-only sections.
Before you start: three things to set up first
Three small bits of housekeeping make everything easier.
1. Set your WordPress site timezone correctly. Settings, General, Timezone. Pick your actual local timezone (not UTC, unless you really are in UTC). Every event you create will use this as the default timezone. If your site timezone is wrong, every event will be off by a few hours, and fixing it later means editing every event one by one.
2. Pick the slug for your calendar URL. By default, your events live at yoursite.com/events/. This is what visitors will see in the browser address bar when they view your calendar. The default is fine, but if you’d rather use /calendar/ or /upcoming/, decide now. We’ll set the slug in Step 3.
3. Decide on your category structure on paper. Categories help visitors filter events ("show me only workshops"). Common patterns: by topic (Workshops, Live Music, Tastings), by audience (Members Only, Public), by time of day (Morning, Evening). Two to five categories is usually right; ten is too many.
Done. Now let’s install.
Step 1: Install the free base plugin
The Pro version requires the free base plugin to also be installed. Install the free one first.
- Log into your WordPress admin.
- Plugins, Add New.
- Search for "The Events Calendar".
- The first result is "The Events Calendar" by The Events Calendar. Click Install Now, then Activate.
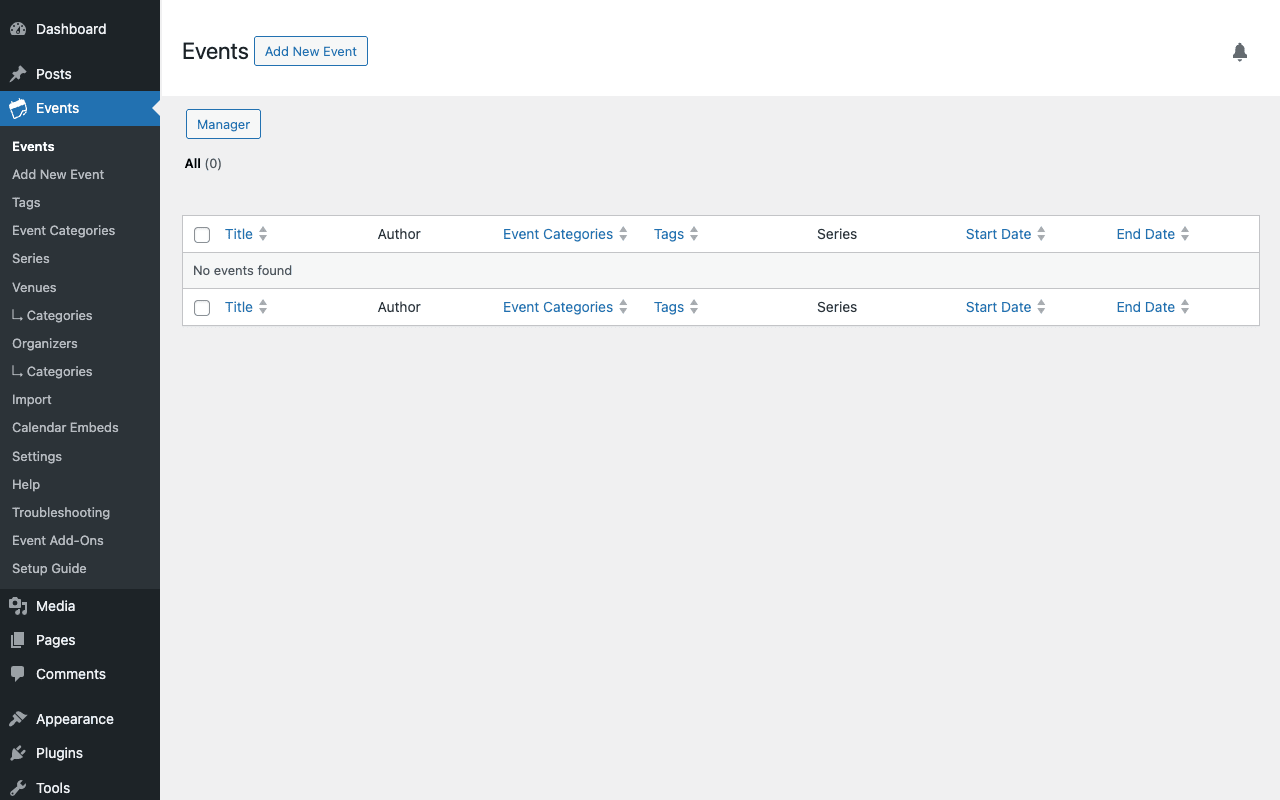
After activation, you’ll see a new menu item in the WordPress admin sidebar: Events. Click it. You’ll land on the Events admin page (empty, since you haven’t added any yet).
The plugin may offer to walk you through a Setup Wizard. Accept it for the guided tour, or skip it. We’ll cover the same ground manually in Step 3.
Step 2: Install Events Calendar Pro on top
Now layer the Pro add-on on top.
Way A: From the official site. If you bought Pro directly from theeventscalendar.com, you got a download link in your email. Download the zip.
Way B: From GPL Times. Download the zip from your GPL Times account.
Either way, the install path is the same:
- Still in your WordPress admin, go to Plugins, Add New, Upload Plugin.
- Choose the Events Calendar Pro zip file.
- Install Now, then Activate Plugin.
After activation, the Events admin menu in the sidebar now shows additional items: Series, Calendar Embeds, and (if installed) Event Add-Ons. Pro is unlocked, and recurring events, the extra calendar views, multiple venues per event, and custom fields are now available.
The settings page will gain new tabs as well, which we’ll explore in Step 3.
Step 3: Configure the basic settings
Before creating any events, configure the plugin’s defaults so all your events use the right format from the start.
Go to Events, Settings.
You’ll see several tabs at the top: General, Display, Default Content, Additional Fields, Licenses, Community, Integrations, Imports. The two that matter most for setup are General and Display.
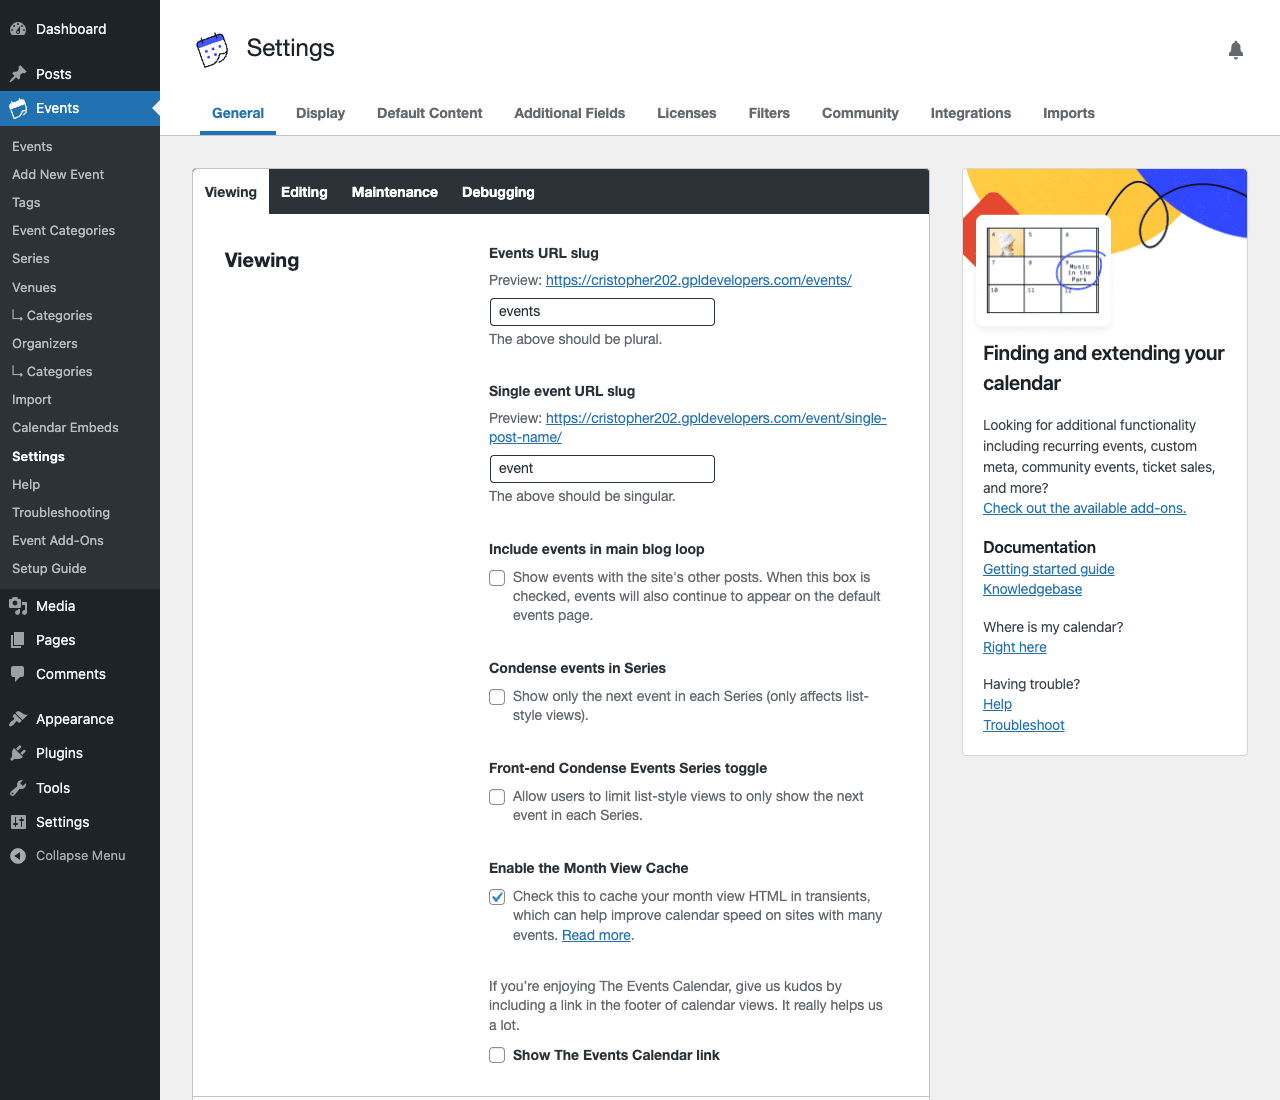
General tab settings worth changing:
- Events URL slug: defaults to
events. Change tocalendaror whatever you decided in step 3 of "Before you start". Save changes, then go to Settings, Permalinks and click Save to refresh URL routing (otherwise you might see 404s on the new URL). - Include events in main blog loop: tick this on if you want events to show on your homepage / blog roll mixed with regular posts. Most sites leave this off (events have their own dedicated calendar page).
- Show events in the main feed: similar question for RSS feeds. Most sites leave off.
Display tab settings worth changing:
- Default view: pick the calendar view visitors see first when they visit
/events/(or whatever your slug is). Month for visually-oriented sites, List for content-heavy sites with many short events. - Date format: pick how dates appear ("May 17, 2026" vs "17 May 2026" vs "5/17/2026"). Defaults to WordPress site setting; override here if you want event-specific formatting.
- Time format: 12-hour ("8:00 pm") or 24-hour ("20:00"). Match your audience.
Save changes on both tabs.
Step 4: Create your first event
This is the main workflow you’ll use forever after, so spend a moment getting it right.
- Events, Add New Event in the admin.
- Fill in:
- Title (top): the event name. Example: "Beginner Yoga Workshop".
- Body / description (the post editor): the full event description. Tell visitors what to expect, what to bring, any prerequisites. Treat it like a blog post.
- Scroll down to The Events Calendar meta box. This is where the event-specific fields live.
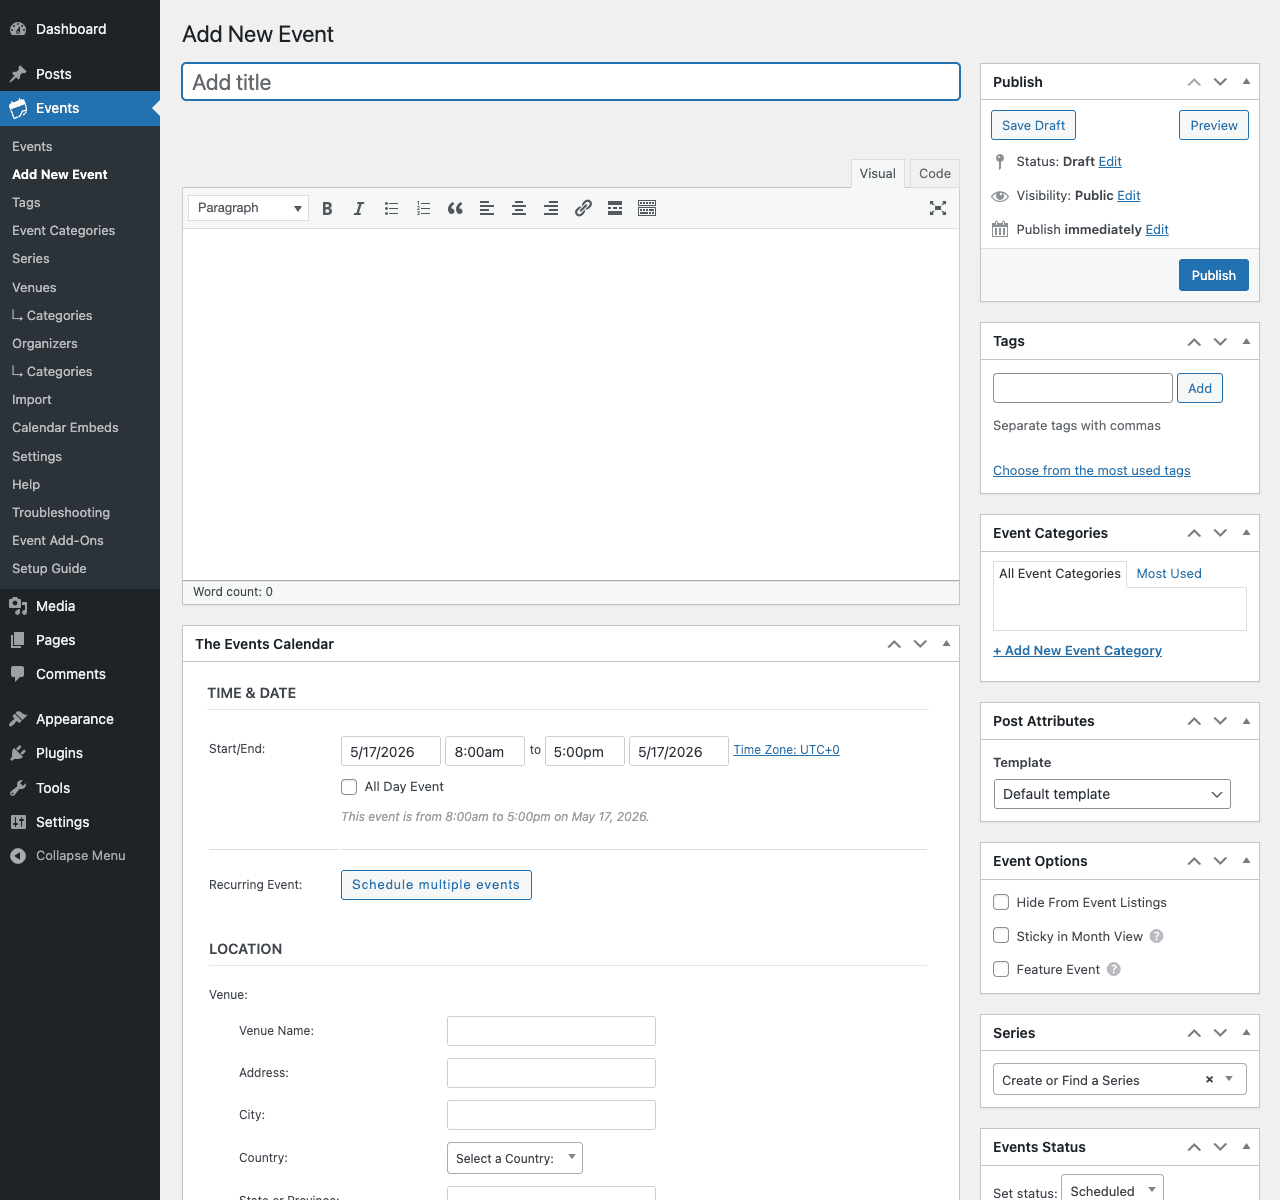
The Events Calendar meta box has four sections:
Time & Date. Pick the start date, start time, end date, end time. Tick "All Day Event" if it runs the entire day (no specific time).
Recurring Event (Pro only). Click "Schedule multiple events". A panel opens where you set the recurrence rule. We cover this in Step 5.
Location: pick a venue. If this is your first event, you’ll need to type the venue details inline (Venue Name, Address, City, Country, Province, etc.). On future events, you’ll be able to select existing venues from a dropdown.
Organizers: same idea, the person or organization running the event. Inline on the first event; selectable from a dropdown after.
Now the right sidebar:
- Publish: Save Draft to keep working on it; Publish when ready.
- Tags: free-form keywords.
- Event Categories: tick the categories you set up earlier (Workshops, Tastings, etc.).
- Event Options: three toggles. "Hide From Event Listings" keeps it hidden from the calendar view but accessible via direct URL (useful for private events). "Sticky in Month View" pins this event to the top of every month view. "Feature Event" gives it a featured-event styling treatment.
- Series: bundle this event into a series of related events (Pro feature, useful for a multi-part workshop).
Click Publish. Your event is live at yoursite.com/events/your-event-slug/ and appears in your calendar at yoursite.com/events/.
Visit the calendar page in another browser tab. The event shows up on its scheduled date. Click the event to see the full details page.
That’s the loop. Add Event → fill the form → Publish → it appears. Every future event is the same five steps.
Step 5: Set up a recurring event (Pro only)
This is the Pro-exclusive feature that justifies the upgrade for most sites.
When creating or editing an event, in the Time & Date section, click Schedule multiple events. A new panel opens with the recurrence options:
- Type: Single, Daily, Weekly, Monthly, Yearly, Custom.
- Every: how often. "Every 1 week" = weekly. "Every 2 weeks" = bi-weekly.
- On: which days of the week (for weekly). Tick Mon, Wed, Fri to repeat on those days.
- Ends: never, after N occurrences, or on a specific date.
Example: a Tuesday evening yoga class for 12 weeks.
- Start date: next Tuesday, 6:00pm to 7:30pm.
- Schedule multiple events: Weekly.
- Every: 1 week.
- On: Tuesday.
- Ends: After 12 occurrences.
When you publish, the plugin creates 12 events, one per Tuesday for the next 12 weeks. They all share the title, description, venue, categories, and tags, but each has its own date. You can edit one occurrence individually (cancel a single week, change the venue for just that date) without affecting the others.
The free version of The Events Calendar does NOT support recurring events. Every recurring event you create in the free version becomes 12 manual events, each maintained separately. This alone is why most sites with regular schedules upgrade to Pro.
Exclusion rules: in the same recurrence panel, you can specify dates to skip. Useful for skipping holidays without canceling the entire series.
Series: a group of related events. Different from recurring; a Series is a collection of distinct events around a common theme (e.g., a six-part lecture series with different speakers each week). Build a Series under Events, Series, then assign individual events to it.
Step 6: Add the calendar to your menu
You have events. Now visitors need to find them.
- Appearance, Menus.
- Pick your main menu (Primary Menu or whatever your theme calls it).
- In the Pages section on the left, look for "Events" or use the Custom Links section to add a link to
yoursite.com/events/(or your custom slug). - Add to menu, drag to position, save.
Your main site navigation now has an "Events" link. Visitors click it and see your calendar.
The plugin also creates a few shortcodes you can drop on any page:
[tribe_events], embeds the full calendar (you can override the view with[tribe_events view="month"]).[tribe_events_list limit="5"], shows the next 5 upcoming events as a list. Useful for sidebars and homepages.[tribe_event_inline id="123"], embeds a single event’s details.
For Gutenberg block users, the Events block is available in the block inserter under "The Events Calendar".
The calendar views explained in plain English
Visitors interact with your events through one of the views. Quick translation:
List view: events shown chronologically, one row per event. Best when you have few events and want each to get attention. Mobile-friendly by default.
Month view: a traditional month-grid calendar. Each day cell shows the events for that date. Visitors can navigate forward/back by month. Best for sites with many events where the visual structure helps people understand "what’s happening this Saturday".
Day view: just today’s events (and the next few hours). Useful as a homepage widget answering "what’s on right now".
Week view (Pro): seven days across the screen, events laid out on each. Best for sites with a regular weekly schedule (gym classes, restaurant specials).
Photo view (Pro): a visual grid where each event is shown as a tile with its featured image. Best for image-rich events (concerts, gallery openings, food events).
Map view (Pro): events plotted on a Google Map by their venue address. Best for sites where location matters and visitors might filter by area (city-wide festivals, multi-location workshops).
You can switch between views with the buttons at the top of the calendar page. Each visitor sees the view they pick (it’s stored in their browser).
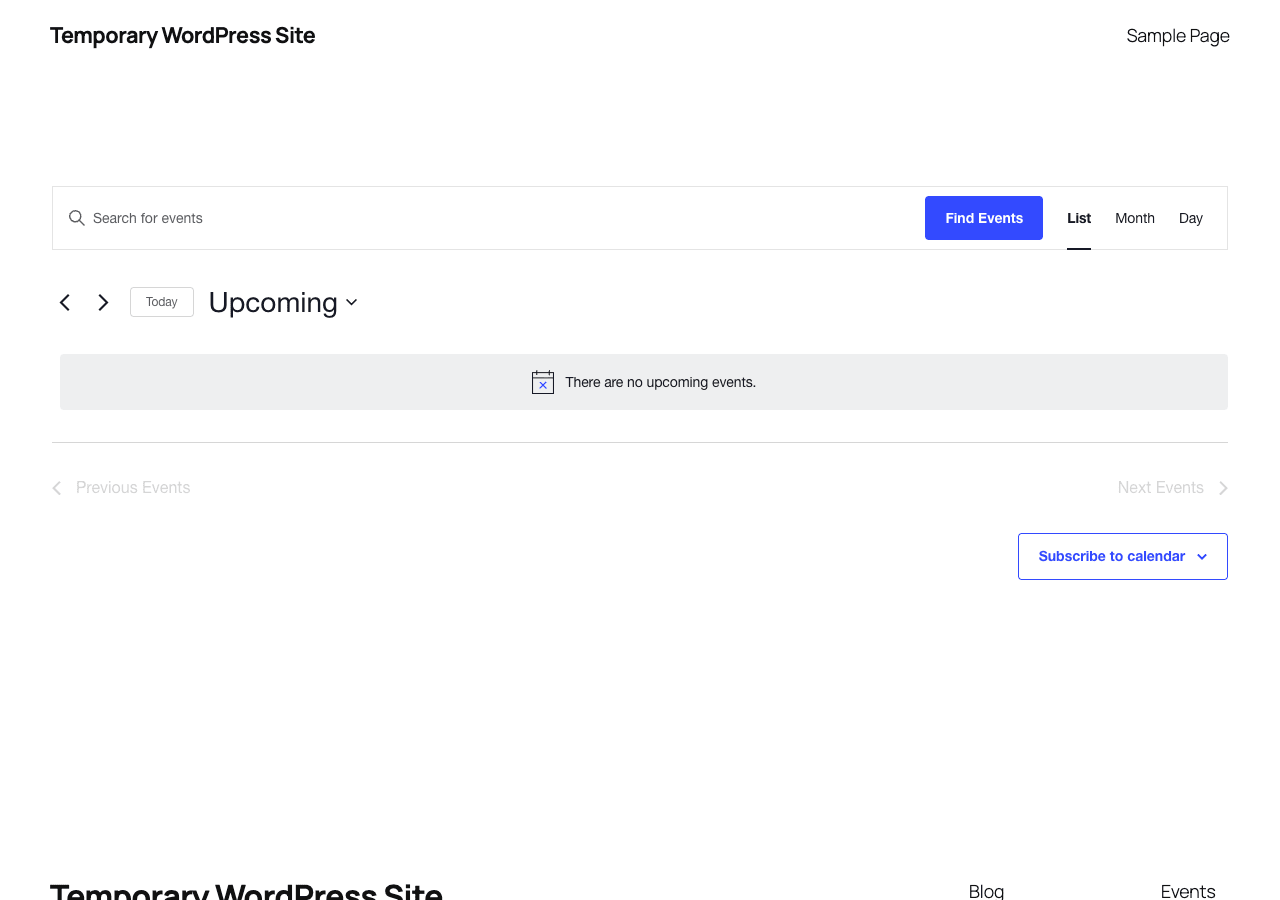
Venues and Organizers, in one paragraph
Each event needs a venue (where) and an organizer (who). On your first event you’ll type these inline. The plugin saves each new venue and organizer as its own record, so the second time you create an event at the same place, you just pick it from a dropdown.
To manage your saved venues, go to Events, Venues. Each venue has a name, address, contact info, and optional Google Maps integration (so the event page shows an embedded map). Same idea for Events, Organizers: name, email, phone, website.
For sites with one or two regular venues, you’ll create them once and reuse forever. For sites with many venues (a music festival with multiple stages), build out the venue list first, then create events selecting from the dropdown.
Pro adds multiple venues per event (a workshop that meets at three different studios for three sessions) and multiple organizers per event (co-hosted events).
Letting visitors subscribe to your calendar
This is one of the most-loved features of The Events Calendar.
At the bottom of every calendar view, there’s a Subscribe to Calendar dropdown. Visitors click it and choose:
- Google Calendar: opens Google with your events pre-loaded as a subscribed calendar.
- Outlook: same for Outlook.
- iCal: download an
.icsfile that imports into Apple Calendar / Fantastical / anything that speaks the iCal standard. - iCalendar URL: a feed URL that any calendar app can subscribe to and auto-refresh.
When you publish a new event, every subscriber’s calendar gets the update automatically within hours. This is the "stickiest" feature, once visitors subscribe, they see your events alongside their own daily schedule for years.
To make this feature more discoverable, add a "Subscribe to our calendar" link or button on your homepage or events page. The Subscribe dropdown shows up everywhere by default, but a dedicated CTA lifts subscriptions significantly.
Importing events from Google Calendar, Eventbrite, or Meetup
If your events live somewhere else and you want them on your WordPress site too, the Import feature pulls them in automatically.
Events, Import. You can import from:
- Google Calendar (via a public calendar URL or your Google account)
- Eventbrite (via your Eventbrite account)
- Meetup (via your Meetup account)
- iCalendar URL (any standard
.icsfeed) - CSV file (one-time bulk import)
Each import can be a one-time pull (sync these events now) or a scheduled sync (re-pull every hour / day / week to catch updates). Scheduled syncs are Pro-only.
For a yoga studio with a class schedule already in Google Calendar, the workflow is: create a public Google Calendar with all your classes, set up a daily import from that calendar’s iCal URL into WordPress, and you never duplicate work. Adding a class in Google Calendar automatically pushes it to your WordPress events calendar within 24 hours.
Selling tickets to your events
If you want to charge for attendance, The Events Calendar has two paid add-ons:
- Event Tickets (free version available): basic RSVP and free ticketing. Tracks who’s coming.
- Event Tickets Plus (paid): integrates with WooCommerce for paid tickets, real-time inventory tracking, attendee QR codes for door-scanning.
The basic ticket flow:
- Edit an event.
- Scroll to the Tickets section.
- Click "New Ticket".
- Set ticket name (e.g., "General Admission"), price, quantity, sale start/end dates.
- Publish.
Visitors clicking the event now see a "Tickets" section with a checkout button. With Event Tickets Plus + WooCommerce, the checkout uses your existing WooCommerce gateways (Stripe, PayPal). Without it, it’s free RSVPs only.
For sites running paid memberships in addition to events (MemberPress, WooCommerce Memberships), members-only events work by combining: a Members-only category in The Events Calendar + a content rule in your membership plugin that restricts that category.
Common problems and how to fix them
Five issues every beginner hits.
"My events show wrong times."
Almost always a timezone mismatch. Check Settings, General, Timezone. Set it to your actual timezone, not UTC. Then check each event’s individual timezone (it can be overridden per-event in the Time Zone link next to the date fields).
"The calendar page returns a 404."
You changed the Events URL slug but didn’t refresh WordPress permalinks. Go to Settings, Permalinks and click Save (don’t change anything, just save). This rebuilds URL routing.
"Recurring events are off by one day after Daylight Saving Time."
The Events Calendar handles DST automatically in most cases, but events created with a slightly wrong timezone setting can shift by an hour or fall on the wrong day. Edit the recurring event series and re-save to refresh the schedule.
"My calendar looks broken in my theme."
Most modern themes work fine. Some older or heavily-customized themes conflict with the plugin’s CSS. Quick test: switch temporarily to a default theme (Twenty Twenty-Four) and see if the calendar renders correctly. If yes, your theme has a conflict and you need to either tweak the theme CSS or contact your theme’s support.
"Caching plugin is showing yesterday’s events on today’s calendar."
The Events Calendar’s Month View has its own cache for performance. Events, Settings, Display, Enable the Month View Cache can be turned off to debug. Also make sure your caching plugin (WP Rocket, LiteSpeed) excludes /events/* URLs from cache so the calendar always shows fresh data.
Real-world example: a yoga studio site
Walk-through of a typical setup.
Maya runs a small yoga studio. She has:
- 4 regular weekly classes (Beginner Mon evenings, Vinyasa Tue/Thu mornings, Restorative Sat mornings)
- 1-2 monthly workshops
- The occasional weekend retreat
Week 1 setup:
Day 1, Maya installs The Events Calendar free + Pro. Configures timezone to America/Los_Angeles, picks /classes/ as the URL slug (more discoverable than /events/ for her audience).
Day 1, sets up two categories: "Classes" (the regular weekly ones) and "Workshops" (special events).
Day 1, creates her four weekly classes as recurring events with "Every 1 Week, Ends Never". Each one shows up on her calendar at /classes/ with the recurring pattern.
Day 1, sets up her venue ("Maya’s Yoga, 123 Main St") which is reused on every event.
Total time: about 90 minutes from plugin install to four weekly classes live on the calendar.
Ongoing:
When Maya plans a workshop, she creates a single (non-recurring) event in the Workshops category. Takes 5 minutes per workshop.
For her recurring classes, she occasionally edits individual occurrences: canceling a single week because she’s away, swapping the venue for a guest-teacher session, etc.
6 months later:
Maya’s calendar shows ~16 upcoming classes plus 2 workshops at any given time. She added a "Subscribe to Class Calendar" button on her homepage that links to the Subscribe dropdown. About 30% of her regular students have subscribed via Google Calendar and get automatic updates.
She paired The Events Calendar with MonsterInsights to see which classes get the most page views (Vinyasa Tue mornings is the surprise winner). That data drives her next round of class scheduling.
Cost: Pro license once + zero recurring fees. Compared to a hosted class-scheduling service (Acuity, Mindbody, $30-100/month forever), the math is dramatic over a 2-3 year horizon.
Pricing and licensing
The official Events Calendar Pro pricing:
- Personal (1 site): $99/year. Pro features, 1 year of updates and support.
- Business (5 sites): $279/year. Same as Personal plus 5-site license.
- Agency (25 sites): $499/year.
Tiers are subscription-based; renewal each year continues updates and support. Lapsed licenses keep working but stop getting updates.
GPL Times sells Events Calendar Pro as a GPL download. The code is byte-for-byte identical to what the upstream team ships. The pricing model is different: a one-time purchase for unlimited sites with no annual renewal. Updates come from GPL Times rather than from theeventscalendar.com. For a single small site, the math is close to the official Personal tier in year one. For an agency or anyone managing more than one events site, the GPL Times version saves hundreds per year.
The trade-off: official ticket-based support from The Events Calendar team is gated to paying subscribers. If your events are mission-critical revenue and you need a guaranteed response when something breaks, the official subscription is worth it.
FAQ
Do I need both the free and Pro plugins, or just Pro?
Both. Pro is an add-on that requires the free base plugin to also be installed. They work together: install the free first, then install Pro on top.
Can I use The Events Calendar with my existing theme?
Yes for almost any modern theme. The plugin styles its views to inherit your theme’s typography and colors. For pixel-perfect customization, override the template files in your theme’s tribe-events/ folder.
Does The Events Calendar work with Elementor or Beaver Builder?
Yes. The Events Calendar provides Elementor widgets out of the box (event lists, single event embeds, etc.) and works with Beaver Builder via standard shortcodes.
Can I make events members-only?
Yes, but you need a separate membership plugin. Tag events with a "Members Only" category, then use MemberPress or WooCommerce Memberships to restrict that category to active members. The Events Calendar handles display; the membership plugin handles access control.
How does it compare to Modern Events Calendar or Sugar Calendar?
The Events Calendar is the most-installed events plugin (over a million sites) and has the largest ecosystem of add-ons. Modern Events Calendar (MEC) is the popular budget alternative with more bundled features in its Pro version. Sugar Calendar is the lightweight modern option, less featureful but faster. The Events Calendar wins on ecosystem and stability; the others win on specific niche features.
Can I sell tickets directly through the plugin?
With the free Event Tickets add-on, yes for RSVPs and free tickets. For paid tickets, add Event Tickets Plus and integrate with WooCommerce Subscriptions (for recurring memberships with event access) or vanilla WooCommerce (for one-off paid tickets).
Does it work with Google Maps?
Yes. Each venue can have a Google Maps integration that embeds a map on the event page. Requires a Google Maps API key (free from Google), set under Events, Settings, Integrations.
Can I let visitors submit their own events?
With the Community Events add-on (paid), yes. Visitors fill out a front-end form, submit events, and you approve or reject them in admin. Great for community calendars where many people contribute.
Will The Events Calendar slow down my site?
The Month View has dynamic queries that can be slow on sites with hundreds of events. The Month View Cache (Pro feature, on by default) handles this transparently. For very-high-volume calendars (thousands of events), pair with WP Rocket for page caching at the URL level.
Can I import events from a Google Calendar?
Yes. Events, Import, Google Calendar. Connect your Google account or paste a public Google Calendar iCal URL, and events sync into WordPress on a schedule.
Does it support multilingual sites (WPML, Polylang)?
Yes. WPML and Polylang both have compatibility layers for The Events Calendar. Each event can be translated into multiple languages, with one entry per language.
Can I show only events from a specific category on a page?
Yes via shortcode: [tribe_events category="workshops"]. Useful for category-specific landing pages.
Will it back up to my UpdraftPlus backups?
Yes. Events are stored as standard WordPress posts (custom post type tribe_events), so any backup that backs up WordPress also backs up your events. No special configuration needed.
Can I customize the look of the calendar?
Yes. Three ways, in order of difficulty: (1) tweak the colors and date formats in Settings → Display; (2) add custom CSS via the Customizer; (3) override template files in your theme’s tribe-events/ folder for full control over markup.
Final thoughts
The Events Calendar is one of those plugins that does one job extremely well. If your site has events of any kind, this is the standard answer for displaying them. The free version handles small calendars; Pro is essentially required as soon as you have recurring events, which is most real-world event sites within a month.
Three recommendations if you’re starting:
One: configure your timezone correctly on Day Zero. Every event you ever create depends on this being right. Get it wrong, and you’ll spend a future weekend manually fixing dozens of events that are all off by hours.
Two: add a "Subscribe to Calendar" CTA to your homepage. Most visitors won’t notice the small Subscribe link at the bottom of the calendar by default. A dedicated button or banner that says "Get our event schedule on your phone" lifts subscriptions dramatically, and subscribed users are the most loyal segment of your audience.
Three: import events rather than re-typing them, if you already have them somewhere. Existing Google Calendar, Eventbrite listing, or Meetup group? Use the Import feature to pull them in, then maintain in one place going forward. Re-typing event details by hand is the #1 reason people give up on adding events to their site.
For a personal or hobby site with a few one-off events, the free version of The Events Calendar is enough. For a business, school, gym, or any site with a regular schedule, Pro.