

GeneratePress is one of those themes that site builders recommend quietly and enthusiastically at the same time. The free version is already lean, accessible, and developer-friendly. GeneratePress Premium is the companion plugin that turns it from a great blank canvas into a complete site-building system, without any of the bloat that usually comes with that territory.
This review covers the full plugin, not the theme alone. You will find a walkthrough of all 14 premium modules, a close look at the Elements system (the real reason developers choose this over heavier alternatives), and a full developer reference with filters, actions, and code examples drawn directly from the plugin source.
Table of Contents
- What is GeneratePress Premium?
- Key Features
- How It Works
- Installation and Setup
- The Elements System
- Real-World Use Cases
- Developer Reference
- Performance, Compatibility, and Gotchas
- Pricing and Licensing
- FAQ
- Final Thoughts
What is GeneratePress Premium?
GeneratePress is a free WordPress theme built by Tom Usborne. It ships with minimal markup, clean semantics, and a customizer that covers the basics. The premium counterpart is not a separate theme. It is a WordPress plugin that installs on top of the free theme and activates additional modules through the customizer.
The split is intentional. You do not pay for a theme upgrade you might not need. You pay for specific capabilities: full typography control, a second navigation menu, per-page custom headers, hooks, conditional content blocks, a local font library, WooCommerce enhancements, and access to the Site Library of pre-built starter sites.
GeneratePress has been around since 2014. It has around two million active installs on the free version alone. The premium plugin is among the most popular in the WordPress performance and minimalism space, often recommended alongside Astra Pro and Kadence Blocks Pro as a stack for fast, well-structured sites.
The plugin author’s philosophy is visible in the code: no unnecessary CSS is generated unless the matching option is active, output is clean HTML5, and the customizer previews update live without page reloads.
Key Features
- 14 modular add-ons in one plugin. Typography, colors, spacing, backgrounds, secondary nav, Menu Plus, blog customization, copyright, page headers, disable elements, sections, site library, WooCommerce enhancements, and the Elements system.
- Elements system. Create Hook Elements, Block Elements, Layout Elements, and Hero Elements, each with a condition engine that lets you target specific pages, post types, user roles, taxonomies, devices, and more.
- Site Library. One-click import of complete starter site designs including content, widgets, and customizer settings.
- Font Library. Upload custom or self-hosted fonts (WOFF2, TTF, OTF) and use them anywhere in the typography module.
- Menu Plus. Sticky navigation, off-canvas mobile menu drawer, navigation search integration, and a custom mobile header logo.
- Per-page control. The Disable Elements metabox lets you hide the header, navigation, page title, footer, sidebars, or featured image on any individual post or page without touching a single template file.
- Dynamic CSS generation. All design choices compile to CSS either inline (default) or written to an external file, with no inline style attributes scattered through the markup.
- WooCommerce module. Sticky add to cart bar, cart icon in any navigation menu, product gallery improvements, and a distraction-free checkout template.
- Smooth scroll. Site-wide smooth scrolling with controllable duration and offset, activated by a single checkbox.
- Secondary navigation. A fully independent second navigation menu with its own location, mobile behavior, and styling controls.
How It Works

The day-to-day experience with GeneratePress Premium is almost entirely inside the WordPress Customizer. When you open Appearance > Customize with the plugin active, you see new panels that were greyed out on the free theme: Typography, Colors, Backgrounds, Blog, Copyright, Spacing, Menu Plus, Secondary Navigation, Page Headers, and more.
Every change previews live in the right panel. Typography lets you set separate fonts, sizes, weights, line heights, and letter spacing for the body, headings (H1 through H6), navigation, buttons, and custom widget area. Colors lets you define a palette for every element of the page, from the background down to link hover states and button gradients. The Spacing panel controls the container width, header padding, navigation padding, content area padding, sidebar width, and more, all adjustable per device breakpoint.
None of this writes to your templates. All of it compiles into CSS, which means the moment you switch themes (or deactivate the plugin), your site’s markup is clean and unaffected.
The Customizer Workflow
When you are setting up a new site with GeneratePress Premium, you will typically work through the customizer panels in roughly this order:
- Layout (free) — container width, sidebar settings, global layout direction.
- Colors (premium) — set your brand palette once and it flows everywhere.
- Typography (premium) — fonts, sizes, and weights for each element.
- Header (free + premium) — logo, tagline, header layout.
- Navigation (free + premium) — primary menu, sticky settings, mobile menu style.
- Sidebar Widgets — add widgets once the layout is set.
- Footer (free + premium) — widget columns, copyright text.
- Blog (premium) — post layout, featured image behavior, columns, infinite scroll.
- WooCommerce (premium, if using WC) — sticky add to cart, cart menu item.
The Customizer imports and exports are handled through the GP Premium dashboard, which gives you a JSON file of all your settings. This is a significant time-saver when setting up multiple sites with the same design baseline.
Per-Page Metabox
Every post and page gets a GeneratePress metabox in the editor. From there you can override the global layout: disable the header, navigation, title, featured image, footer, sidebars, right sidebar only, or left sidebar. You can also set a custom page header for that specific page, or override the container type.
This sounds small, but it is one of the most practical features in the plugin. Landing pages that should look completely full-width do not need a custom page template. Contact pages that should have no sidebar, footer widget area, or page title can be configured in seconds from the post editor itself.
Installation and Setup
Prerequisites
GeneratePress Premium requires the free GeneratePress theme to be installed and active. The plugin will not function, and will show a notice, if the parent theme is not present or if a child theme is active without GeneratePress as the parent.
One thing worth noting before you install: GP Premium is a plugin, not a theme update. That distinction matters for multisite or managed hosting environments where themes and plugins are managed separately. You install it through Plugins > Add New, not Appearance > Themes. If your hosting panel distinguishes between plugin and theme uploads, make sure you are in the right place.
Minimum requirements are WordPress 6.1 and PHP 7.2, though running PHP 8.0 or higher is recommended.
Steps
- Install the free theme. Go to Appearance > Themes > Add New, search for "GeneratePress", install, and activate.
- Install GP Premium. Upload the plugin zip at Plugins > Add New > Upload Plugin, install, and activate.
- Activate your license. Go to Appearance > GeneratePress. Enter your license key and click Activate License. This enables automatic updates and access to the Site Library.
- Enable modules. On the same GeneratePress dashboard screen, you will see all available modules listed. Toggle on the ones you need. Each module adds its own Customizer panel or metabox. Unused modules add zero overhead.
- Open the Customizer. Go to Appearance > Customize. Start from the top-level panels and work down.
#
Module Activation
Module activation is worth mentioning specifically because it affects performance. If you never need the Sections builder, do not enable it. If you are not running WooCommerce, leave the WooCommerce module off. Each module loads additional JS and PHP only when enabled, so a minimal site that only uses Colors, Typography, and Menu Plus will have a lighter footprint than one with every module running.
Importing a Starter Site
If you want to start from a pre-built design instead of customizing from scratch:
- Enable the Site Library module in the GP dashboard.
- Open Appearance > GeneratePress > Site Library.
- Browse or search the library. Each site card shows the plugins it requires (some use Gutenberg blocks, some use Elementor or Beaver Builder).
- Click Preview on a site to see it in detail.
- Click Install and confirm. The importer fetches the design data (customizer settings, content, widgets) and applies it.
- After import, open the Customizer and adjust the details (brand colors, fonts, logo) to your specification.
The import is non-destructive in the sense that it imports over your existing customizer settings — it will overwrite them, so run this on a fresh install or a staging site unless you specifically want to replace your current design.
Typography and Colors in Depth
Two modules get used on practically every GeneratePress Premium site: Typography and Colors. They are worth a closer look because the level of control they offer is wider than the Customizer panels suggest.
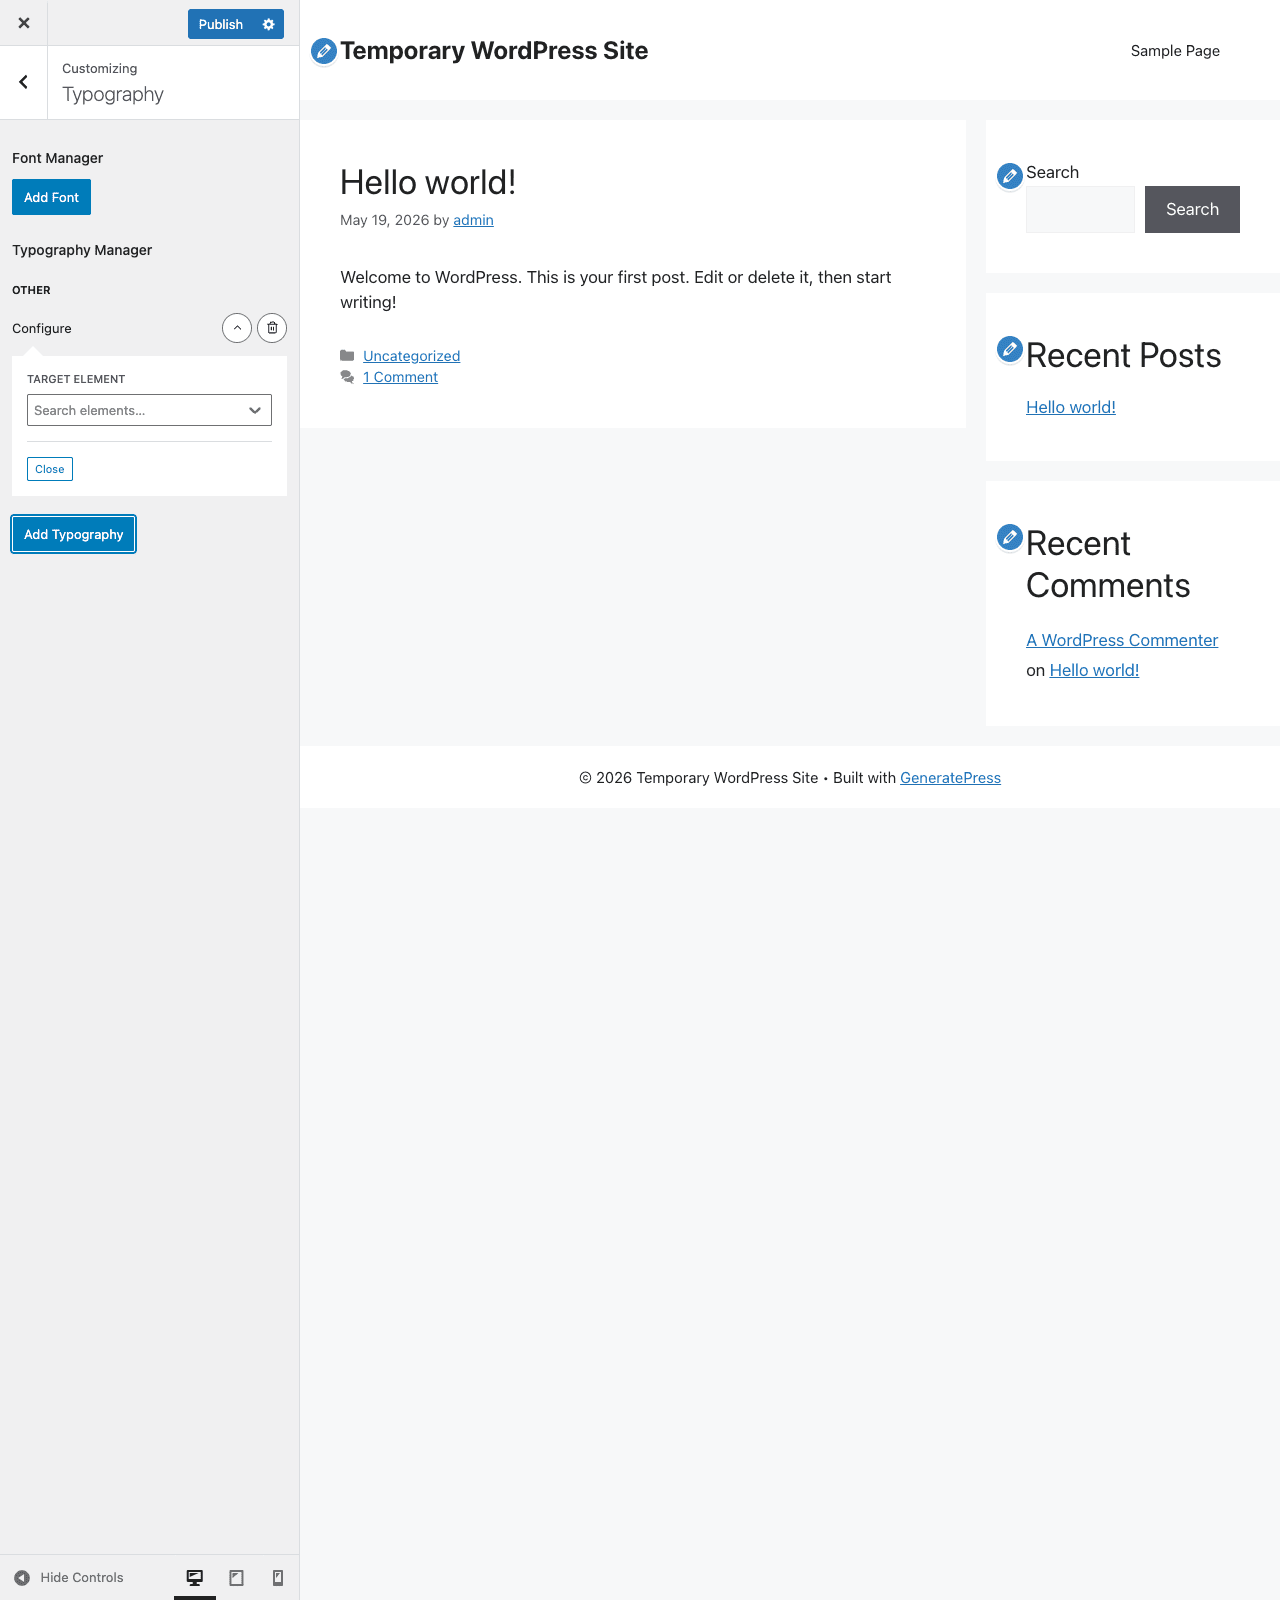
Typography
The Typography module adds controls for:
- Body font — family, variants (weight + style combinations), size, line height, letter spacing.
- Headings — separate controls for H1 through H6, and an option to inherit from a single heading setting or set each individually.
- Navigation fonts — size, weight, and transform (uppercase, capitalize, normal) for the primary and secondary nav items.
- Buttons — font family, size, weight, and transform for all
<button>elements and.buttonclass anchors. - Widgets — title and body font for the sidebar and footer widget areas.
- Footer — separate control for the footer bar text.
The Google Fonts list in the Customizer is loaded asynchronously and limited to 200 fonts by default (fastest load, covers the common choices). If you need a font that is not in the first 200, you can raise the limit:
add_filter( 'generate_number_of_fonts', function() {
 return 500;
} );
Or, if you are using a self-hosted font via the Font Library, it appears in the same dropdown alongside Google Fonts, so there is nothing to configure differently.
Colors
The Colors module replaces what would otherwise be twenty-plus individual customizer controls scattered under different panels. Everything is in one screen: background, text, links, link hover, site title, site tagline, navigation link colors (normal, hover, current), mobile navigation, navigation search, top bar, sidebar, widget title colors, footer top, footer bottom, and button colors.
All color values compile into the same dynamic CSS block as everything else. If you change a color, the Customizer preview updates immediately without a page reload, which is useful when you are trying to get a dark background + light text combination exactly right.
One detail worth knowing: the Colors module manages colors at the structural level (background, text, link, button). It does not give you a "make this specific heading on this specific page a different color" tool. For that, you would use a Block Element or direct CSS in the Customizer’s Additional CSS panel.
The Elements System
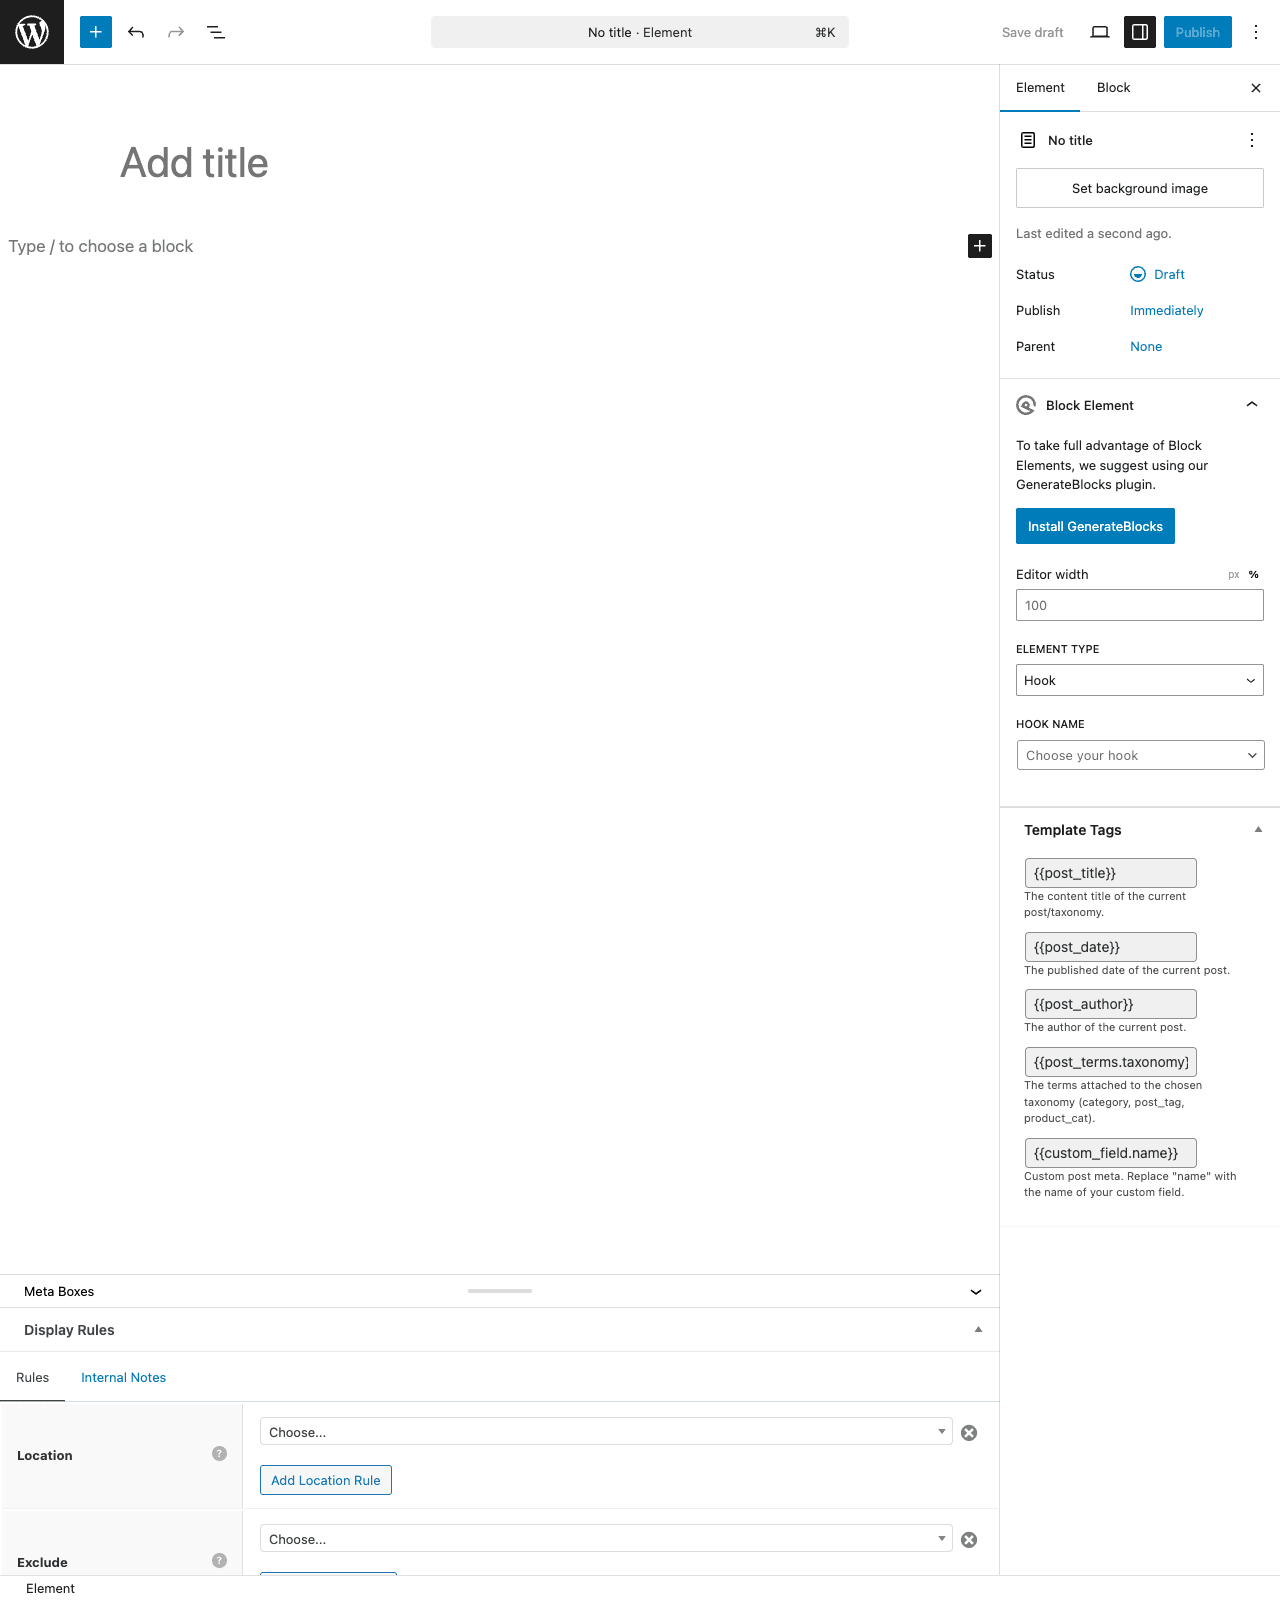
The Elements system is the feature that makes GeneratePress Premium interesting to developers and advanced site builders. Every Element is a custom post of type gp_elements. You create an element, choose its type, define where it should appear (conditions), and it inserts itself automatically into the matching pages.

There are four element types.
Hook Elements
A Hook Element injects arbitrary content (HTML, shortcodes, PHP) at any WordPress action hook location. You specify the hook name and priority. The element only fires when its conditions are matched.
This replaces a category of functions.php hacks that are otherwise annoying to maintain. Instead of writing a conditional function that checks is_page() or is_singular('product') and then hoots at wp_footer, you create a Hook Element with those conditions set in the UI and it manages itself.
Common uses: inject a custom banner above the content on all product pages, add a social sharing block inside the post loop using generate_after_entry_header, add a Google Analytics event snippet only on thank-you pages.
Block Elements
A Block Element is a reusable content block that can be inserted at any hook location or displayed conditionally anywhere. You write the content using the block editor, set conditions, and target a hook. Compared to Hook Elements (which accept raw HTML or PHP), Block Elements are better for editorial content that a site owner might need to edit later.
Layout Elements
A Layout Element does not inject content. It overrides layout settings for matching pages. You might use a Layout Element to force a full-width, no-sidebar layout on all pages in a specific category, or to set a wider container on portfolio pages, without touching the page templates.
This keeps layout exceptions completely separated from content and templates. A developer can manage the entire layout behavior of a site through the Elements list without writing template overrides.
Hero Elements
A Hero Element replaces the standard page header on matching pages with a custom full-width section. You configure a background (color, image, video, or parallax), overlay opacity, text alignment, and height. The hero can contain dynamic content tags like the post title, author, date, or custom fields.
The condition system supports: specific posts or pages by ID, post type, page template, taxonomy term, user role, logged-in or logged-out status, date archive, author archive, search page, 404, front page, posts page, and custom device types (desktop, tablet, mobile). Conditions can be combined with AND/OR logic and can also include "exclusion" rules that override inclusions.
The Condition Interface
Each element’s condition interface deserves its specific mention because it is genuinely flexible. You add condition groups. Within a group, conditions are AND. Between groups, the logic is OR. So "show on all single posts written by Author A OR on all pages in Category B" is straightforward to express, and the implementation handles the matching at wp and current_screen hooks.
The full condition list includes:
- Singular: any singular, specific post by ID, specific page by ID, all posts of a post type, all posts in a specific category or taxonomy term.
- Archive: taxonomy archives, date archives, author archives.
- Special pages: front page, posts page (blog index), search results, 404 page.
- User: logged in, logged out, specific user role.
- Device: desktop only, tablet only, mobile only (based on screen width).
- Custom: post meta key+value pairs (useful for ACF or custom field gates).
- Exclusion: exclude specific IDs or terms from a broader condition group.
The generate_elements_custom_args filter lets you modify the WP_Query that loads all elements, which matters on sites with large numbers of elements.
Working with Elements in Practice
Creating an element takes about three steps: choose type, set location (hook name for Hook/Block elements, or display mode for Layout/Hero), then add conditions. The editor for Hook Elements is a standard WordPress text area. For Block Elements, it is the full block editor.
A few things trip up new users. First, Hook Elements accept a hook name that must exist in the theme or plugins. If you type a hook that does not fire on the matched page, nothing appears. Second, the priority field defaults to 10. If you have multiple elements targeting the same hook and need them in a specific order, set the priority accordingly. Third, Hero Elements only render their hero if the native page header would have appeared. On pages where the standard page header is disabled, the Hero Element also will not render — use a Hook Element at generate_before_main_content or generate_after_header instead.
Menu Plus in Depth
Menu Plus gets its own section because it addresses a cluster of features that are often handled by separate plugins or custom JavaScript on other themes.
Sticky Navigation
Enable the sticky navigation option and the header (or navigation bar, depending on your theme layout) slides back into view when the user scrolls up. There is a "shrink sticky navigation" option that reduces the header height on scroll, giving a compact appearance without disappearing entirely.
You can combine sticky navigation with a custom mobile header logo. Some sites use a full-width banner logo at desktop size, then swap to a small icon version in the sticky bar. Menu Plus handles this natively: set the primary logo in the Customizer, and set a separate "sticky logo" for the header-in-sticky-state.
Off-Canvas Mobile Menu
Instead of the standard mobile menu dropdown, Menu Plus gives you a slide-in drawer from the right (or left) side of the viewport. The drawer contains the same navigation as the mobile menu, plus any widgets you assign to the "Off-Canvas" widget area.
This is a frequent request from clients who want a full navigation with a search field, social icons, and a CTA button in the mobile menu. With a standard dropdown mobile menu, fitting that much content in a good UX is difficult. With an off-canvas drawer, you have a full-width panel to work with.
Navigation Search
Menu Plus adds a search icon to the primary navigation. Clicking the icon expands a search field inline within the navigation bar. This is a clean pattern for sites where a visible search form in the header would eat too much space.
The behavior is fully CSS-based (reveal/hide via a toggle class), so it adds minimal JavaScript.
Real-World Use Cases
1. Performance-First Business Site
A small service business wants a fast, professional site. They pick GeneratePress as the theme for its 30 KB footprint, then use GP Premium to add their brand colors, set their preferred fonts (self-hosted via Font Library), and configure a sticky navigation. No page builder is involved. The Customizer gives them enough control. Total page weight under 100 KB for a static page is achievable.
2. Conditional Announcement Banner
An eCommerce store wants to show a free-shipping announcement banner above the header on all shop and product pages, but not on the checkout or cart page. They create a Hook Element targeting generate_before_header, set conditions to "Is WooCommerce Shop" OR "Is Singular Product", add an exclusion for Cart and Checkout pages, write the banner HTML in the element editor, and they are done. The hook runs on exactly the right pages with no PHP.
3. Per-Category Page Headers
A magazine site has multiple editorial sections: News, Reviews, Features. Each section should have a different hero image and accent color. They create a Hero Element per category taxonomy term, each with a different background image and overlay, so visitors immediately know which section they are in without looking at the navigation.
That said, GeneratePress asks you to assemble that magazine structure yourself. If you would rather start from a theme that ships those editorial layouts ready-made, our Soledad theme review covers a publishing-first option built for exactly this kind of site.
4. Developer Agency Workflow
An agency builds ten client sites a year on the same stack. They set up one "base" site with their standard typography, colors, and spacing, export the customizer settings via the GP Premium export feature, and import that JSON file into every new project. They maintain a master set of Block Elements for common components (cookie notice, GDPR banner, newsletter signup) and export/import those too. Site #10 has the same baseline as Site #1 and took 20 minutes to configure instead of two hours.
5. Knowledge Base or Documentation Site
A SaaS company wants a clean documentation site. They use GeneratePress with a sidebar layout. Every documentation article has the same page structure. They create a Layout Element that targets all posts in the "Docs" post type and applies a left-sidebar layout with a specific container width. The sidebar contains a widget with a custom navigation tree. The header on all doc pages has a custom hero pointing to the getting started guide, implemented as a Hero Element scoped to the docs archive and all singular doc pages. The whole setup took under an hour and involves zero custom PHP in functions.php.
6. WooCommerce Optimized Store
A product store uses the WooCommerce module to add a sticky add to cart bar on all single product pages (so the Add to Cart button is always visible without scrolling), adds a cart icon to the primary navigation, and switches the checkout page to a distraction-free template with no header navigation and no footer widget area. The last step is a 30-second Layout Element scoped to the checkout page, not a template override.
7. Membership Site with Role-Based Content
A membership site shows different sidebar content to free vs. paid members. They create two Block Elements: one targeting logged-out and free-member roles (showing an upgrade CTA), and one targeting paid-member roles (showing a premium resource list). Both elements are hooked at dynamic_sidebar_before in the sidebar widget area. The condition engine handles the role check at display time, so no PHP is needed to toggle between them.
Developer Reference
Dynamic CSS Print Method
By default, GeneratePress compiles all design settings into a <style> block in the document head. On large sites with many customizer options set, this inline block can grow. The alternative is to write the CSS to an external file (cached by the browser):
add_filter( 'generatepress_dynamic_css_print_method', function() {
 return 'file';
} );
The file is stored in wp-content/uploads/ and is automatically regenerated when customizer settings change. The inline method is faster on the first load (no extra HTTP request), while the file method is better for repeat visitors where cache hit rate is high.
Breakpoints
You can override GeneratePress’s built-in responsive breakpoints to match your design system:
add_filter( 'generate_desktop_media_query', function() {
 return '(min-width: 1200px)';
} );

add_filter( 'generate_tablet_media_query', function() {
 return '(min-width: 768px) and (max-width: 1199px)';
} );

add_filter( 'generate_mobile_media_query', function() {
 return '(max-width: 767px)';
} );
These filters affect the media queries baked into the dynamic CSS, the customizer device previews, and the mobile menu activation breakpoint.
The mobile menu specifically has its own filter so you can separate it from the general mobile breakpoint:
add_filter( 'generate_mobile_menu_media_query', function() {
 return '(max-width: 899px)';
} );
Controlling the Elements Query
On sites with dozens of Elements, you may want to limit which elements are loaded on which requests. The default loads up to 500 published Elements on every page load (the conditions system then filters down to what actually fires):
add_filter( 'generate_elements_custom_args', function( $args ) {
 // Reduce the ceiling if you have good tagging and few active elements
 $args['numberposts'] = 50;
 return $args;
} );
Customizer Import/Export
The export filter lets you include additional data in the exported JSON file. Useful if you have child theme options you want bundled with the GP settings:
add_filter( 'generate_export_data', function( $data, $export_type ) {
 if ( $export_type === 'customizer' ) {
 $data['my_child_theme_option'] = get_option( 'my_child_theme_option' );
 }
 return $data;
}, 10, 2 );
Extending the Sections Metabox
The Sections module (legacy content sections builder) is limited by default to posts and pages. To extend it to a custom post type:
add_filter( 'generate_sections_post_types', function( $post_types ) {
 $post_types[] = 'portfolio';
 return $post_types;
} );
WooCommerce Module Defaults
You can override the WooCommerce module default settings at the code level. This is useful if you are deploying the plugin on multiple sites and want the same WC behavior without customizer configuration each time:
add_filter( 'generate_woocommerce_defaults', function( $defaults ) {
 $defaults['cart_menu_item'] = true;
 $defaults['sticky_add_to_cart'] = true;
 $defaults['distraction_free_checkout'] = true;
 $defaults['columns'] = 4;
 return $defaults;
} );
Toggling the Top Bar Conditionally
The free theme’s Top Bar widget area can be shown or hidden via a filter, which gives you finer control than the customizer’s on/off toggle:
add_filter( 'generate_is_top_bar_active', function( $is_active ) {
 // Only show top bar on single posts
 if ( ! is_singular( 'post' ) ) {
 return false;
 }
 return $is_active;
} );
Smooth Scroll Duration and Offset
If you have a sticky header of known height, offset the smooth scroll destination so content is not hidden behind it:
add_filter( 'generate_smooth_scroll_duration', function() {
 return 600; // milliseconds
} );

add_filter( 'generate_smooth_scroll_offset', function() {
 return 80; // pixels -- match your sticky header height
} );
Blog Excerpt Length
add_filter( 'generate_excerpt_length', function( $length ) {
 return 30; // words
} );
Adding a Dashboard Tab
If you are building a child theme with its own options, you can add a tab to the GP Premium dashboard rather than creating a separate admin page:
add_filter( 'generate_dashboard_tabs', function( $tabs ) {
 $tabs['my_plugin'] = array(
 'title' => __( 'My Plugin', 'my-plugin' ),
 'callback' => 'my_plugin_render_dashboard_tab',
 );
 return $tabs;
} );

function my_plugin_render_dashboard_tab() {
 echo '<p>My custom settings here.</p>';
}
Restricting Per-Page Metabox Capability
By default, the per-page disable-elements metabox requires edit_theme_options. You might want to restrict it more tightly on multi-author sites:
add_filter( 'generate_metabox_capability', function() {
 return 'manage_options';
} );
Key Action Hooks
These are the action hooks exposed by GP Premium that are most useful for child theme and plugin developers:
// Inject content before the secondary navigation
add_action( 'generate_before_secondary_navigation', function() {
 echo '<div class="secondary-nav-notice">Announcement text</div>';
} );

// Inject content inside the secondary navigation container
add_action( 'generate_inside_secondary_navigation', function() {
 // Add a search form or custom element
 get_search_form();
} );

// Fire code before or after a Page Header element
add_action( 'generate_before_page_header', function() {
 // Custom breadcrumb, notification banner, etc.
} );

add_action( 'generate_after_page_header', function() {
 // Post meta bar, share buttons, etc.
} );
REST API Routes
GP Premium registers routes under the gp-premium/v1 namespace. These are used internally by the Customizer’s React components but are available for external tooling:
| Endpoint | Method | Purpose |
|---|---|---|
/gp-premium/v1/modules/ |
POST | Enable or disable individual modules |
/gp-premium/v1/export/ |
POST | Export customizer settings as JSON |
/gp-premium/v1/import/ |
POST | Import customizer settings from JSON |
/gp-premium/v1/reset/ |
POST | Reset all customizer settings |
/gp-premium/v1/license/ |
POST | Save or clear license key |
/gp-premium/v1/beta/ |
POST | Toggle beta tester mode |
/gp-premium/v1/font-library/ |
GET/POST/DELETE | Manage uploaded custom fonts |
/gp-premium/v1/site-library/ |
GET/POST | Browse and import starter sites |
All endpoints require manage_options capability.
Custom Font Library Integration
The Font Library module maintains a custom font registry that integrates with the Customizer’s typography dropdowns. Fonts you upload appear alongside Google Fonts in every font selector in the theme. The generatepress_font_css filter lets you post-process the generated font-face CSS:
add_filter( 'generatepress_font_css', function( $css, $fonts ) {
 // Append additional CSS after the font-face declarations
 $css .= '/* Custom override */';
 return $css;
}, 10, 2 );
Performance, Compatibility, and Gotchas
Site Library: What Is Actually in There
The Site Library (formerly called Demo Sites, earlier still called Starter Sites) is a collection of complete site designs you can import in one click. At the time of writing, there are over 70 starter sites available, organized by purpose: business, portfolio, blog, eCommerce, and niche verticals like restaurant, gym, and real estate.
Each starter site card shows which page builder (if any) it requires. Some are built purely with Gutenberg blocks (often using GenerateBlocks), some are Elementor-based, and some use Beaver Builder. If you want to stay page-builder-free, filter by "Block Editor" in the library.
Importing a site brings in: customizer settings (colors, typography, layout), dummy content (posts, pages, images), menu structure, and widgets. It is a genuine starting point, not just a CSS preset. The importer uses the WXR importer library bundled in the plugin, so you are not dependent on the default WordPress importer.
The Site Library requires an active license key. Without it, you can still do manual JSON export/import, just not cloud library browsing.
Performance, Compatibility, and Gotchas
Performance Baseline
GeneratePress is one of the lightest themes in the WordPress ecosystem. The free theme ships with under 10 KB of JavaScript and about 8 KB of CSS. GP Premium adds to that, but only for the modules you enable. A site using only Colors, Typography, and Menu Plus will have a noticeably smaller footprint than one with every module active.
The dynamic CSS compilation means there are no unused CSS rules loaded from a stylesheet. Everything generated corresponds to an option that is actually set. This makes it genuinely different from themes that ship a massive CSS file and override specific rules.
Performance-focused setups often pair GeneratePress with a caching plugin (like WP Rocket or a server-level cache like Redis or Nginx FastCGI) and an image optimization tool. The theme itself does not add to the render-blocking resource problem. There are no sliders, no hero video autoplay scripts, and no jQuery dependencies added by default.
Compatibility
GeneratePress works cleanly with the major page builders: Elementor Pro, Beaver Builder Pro, Bricks Builder, and the native block editor. GenerateBlocks (a separate Gutenberg block plugin from the same author, available at generateblocks.com) is particularly well-integrated, giving you a Flexbox-based grid system that matches GeneratePress’s layout model.
The WooCommerce module works with the standard WC templates and with most popular WC plugins. The distraction-free checkout template is not a custom template file — it achieves the effect through CSS and the Disable Elements system, which means it co-exists with WooCommerce extension templates correctly.
WPML and Polylang both work. The plugin includes a wpml-config.xml for automatic translation registration. The site-library importer has hooks that WPML can intercept.
Gotchas
License for the Site Library. The Site Library requires an active license key to browse and import sites. The JSON export/import of customizer settings works without a license, but the cloud library does not. If your license expires, existing sites work fine — you lose access to new starter sites and automatic updates.
Module conflicts. The Page Header and Elements (Hero) system can overlap if you have both a Page Header customizer setting and a Hero Element targeting the same page. The Elements system takes precedence. This is not a bug, but it can confuse you if you set up a page header in the customizer and then wonder why it is not showing.
Sections (legacy module). The Sections module is a pre-block-editor content builder from GeneratePress 2.x. It still works, but it is not being actively developed. New builds should use the block editor with GenerateBlocks instead of Sections. Enabling the Sections module does add CSS and some JS even on pages that do not use sections.
Child themes and CSS. If you are using a child theme that adds its own style.css, load order matters. GeneratePress enqueues its parent theme stylesheet first, then the child theme stylesheet, then the GP Premium dynamic CSS. Your child theme CSS loads between the parent and the dynamic CSS. Keep specificity in mind if overrides are not applying.
Disabling all header elements. The Disable Elements metabox lets you turn off the header and navigation independently. If you disable the header but leave the navigation enabled, there will be no visible navigation. This is intentional for landing pages but can confuse users who expect the navigation to appear on its own.
Font Library and CORS. Self-hosted fonts served from your WordPress installation will be on the same origin, so no CORS issues. If you use a CDN that serves wp-content/uploads/ from a different subdomain, you need to configure CORS on that domain for fonts to load correctly in Firefox and Safari.
Pricing and Licensing
GP Premium is sold with a per-site license model. A single license covers one site. A plus license covers three sites. An agency license covers unlimited sites. Each tier includes one year of updates and support, and the plugin continues to work after the license expires (you just stop receiving automatic updates and new starter site additions).
The official documentation at generatepress.com covers every module with step-by-step guides if you need reference material while setting things up.
The GeneratePress Premium plugin build is available on GPL Times, which is where you can install a working copy on a staging site and explore every module for yourself.
FAQ
Do I need GeneratePress Premium to use GeneratePress?
No. The free GeneratePress theme is fully functional for basic sites. GP Premium is a plugin that adds modules on top of the free theme. You only need it if you want the advanced features: typography control, the Elements system, the Site Library, Menu Plus, and so on.
Can I use GeneratePress Premium with a child theme?
Yes, and it is actually the recommended approach for sites where you are adding custom functions. GP Premium is a plugin, so it lives alongside the parent theme and any child theme. The child theme’s style.css and functions.php load as expected. GP Premium’s dynamic CSS runs on top of both.
What happens if I deactivate GP Premium?
Your site reverts to the base GeneratePress theme defaults. The customizer settings stored by GP Premium modules are not deleted — if you reactivate the plugin, they come back. The markup itself is clean, so there are no leftover shortcode strings or broken HTML from deactivation.
Can I use GP Premium without a page builder?
Absolutely. Many developers specifically choose GeneratePress because it works cleanly without Elementor or Beaver Builder. The Elements system covers most of the conditional layout needs that would otherwise push you toward a page builder. GenerateBlocks (a companion Gutenberg block plugin) covers the complex layout pieces. You can build a full professional site using the block editor + GenerateBlocks + GP Premium with no other builder.
Does GP Premium include a header builder like Astra Pro?
No. The Menu Plus module adds sticky header, off-canvas mobile menu, and navigation search. But the actual header layout (logo placement, phone number, social icons in the header, etc.) is handled through the free theme’s customizer controls and widget areas. It is less visual and drag-and-drop than Astra Pro’s header builder, but more predictable and less CSS-heavy. If you want that visual drag-and-drop header builder without leaving the lightweight-theme world, the Neve Pro header builder is the closest equivalent.
Is GP Premium compatible with WordPress Multisite?
Yes. The plugin can be network-activated or per-site activated. The Site Library works per-site. License key activation is per-site. There is no network-wide license dashboard.
Can I export and reuse settings across multiple client sites?
Yes. Use the Export function on the GP Premium dashboard to download a JSON of your customizer settings. On the next site, import that JSON. You can also export/import individual Element posts using the standard WordPress export (Tools > Export > Custom Post Types > gp_elements).
Does the Font Library support variable fonts?
The Font Library handles WOFF2, TTF, and OTF uploads. Variable fonts in WOFF2 format upload and work correctly if you set appropriate font-weight ranges in the typography module. The customizer does not have a special variable font selector — you just set the weight to the value along the variable axis.
Final Thoughts
GeneratePress Premium is the kind of tool that rewards thoughtful use. It does not try to be everything. There is no visual drag-and-drop layout builder baked in. There is no pop-up builder or scroll effects library or one-click "WOW factor" button. What it has is modularity, clean output, and a conditions engine in the Elements system that genuinely replaces a category of functions.php code that most theme developers have been writing manually for years.
If your priority is page speed, clean markup, and long-term maintainability over a drag-and-drop design experience, GeneratePress Premium is one of the strongest choices in the WordPress ecosystem. It is fast by default and stays fast as you add features, which is not something you can say about most premium themes.