

I’ve run marketing for four WooCommerce stores over the last few years. Two on Mailchimp for WooCommerce (one of them later moved to Klaviyo, which I’d describe as "powerful and exhausting"), one on Omnisend, and one held together with a Zapier zap that fired an email through SendGrid every time WooCommerce flipped an order to processing. They all worked, in a sense. None of them felt like they belonged inside WooCommerce.
That’s the gap AutomateWoo fills. It lives inside wp-admin, it knows about your products, your orders, your subscriptions, your reviews, your customers, and it lets you stitch them together with a Trigger > Rules > Actions model that ends up surprisingly close to what an "if this then that" automation tool feels like, only with the customer object already loaded.
This post is a long, honest walk through what AutomateWoo does, the 4 starter workflows you should turn on this week, where the admin UI feels older than its capabilities, and a developer reference for the hooks, filters, REST endpoints, and the giant {{ customer.* }} variable library it ships with. Whether you’re a store owner staring at a flat repeat-purchase rate, or a developer being asked to "set up the cart abandonment thing", by the end you’ll know exactly what this plugin is doing.
Table of Contents
- What is AutomateWoo?
- How automation in WooCommerce actually works
- Key features at a glance
- Installation and the first hour
- The Trigger, Rules, Actions model
- The 23 starter workflows you get out of the box
- The workflow editor in practice
- Variables: the merge tag library
- Real-world use cases
- Developer reference: hooks, filters, REST, shortcodes
- Performance, compatibility, and the gotchas
- Pricing and licensing
- FAQ
- Final thoughts
What is AutomateWoo?
AutomateWoo is a marketing-automation extension for WooCommerce, built by the WooCommerce team itself (the plugin header literally says Author: WooCommerce). It was originally built by an Australian shop called Prospress, the same team behind WooCommerce Subscriptions, and Automattic bought both products around 2019. So it’s a first-party WooCommerce extension now, in the same way the WooCommerce Subscriptions plugin is.
The pitch is simple. WooCommerce already knows your customers, your products, your carts, your orders, your subscriptions, and your reviews. AutomateWoo turns each of those into a trigger that can fire actions: send an email, send an SMS, add a customer to a Mailchimp list, generate a coupon, change an order status, write a log line. You don’t have to bolt a separate CRM onto the side of your store; you build the automation in the same admin you already use to ship orders.
It’s been around long enough that the surface area is real. The plugin extracts to about 1.3 MB zipped, ships 34 visible triggers in the dropdown (we’ll get to the rest in a second), 61 actions, 119 rules, 183 merge variables, and 23 starter "preset" workflows. The presets are what most stores will actually use on day one.
AutomateWoo on GPL Times is the same Pro zip Automattic ships from woocommerce.com, delivered through the GPL store. Same files. Same upgrade path.
How automation in WooCommerce actually works
Skip this section if you’ve shipped a cart-abandonment flow before. If you haven’t, the next 250 words will save you a week.
Marketing automation in WooCommerce is really four things stitched together.
- A trigger. Something happened: a cart sat untouched for 4 hours, an order moved to
completed, a customer hit their tenth order, a subscription renewed, a review got submitted. Triggers are the entry point. - A set of rules. Conditional logic that decides whether this particular event should actually fire the workflow. Customer must have ordered before. Cart total must be over $50. Customer tag must include
vip. Skip if the email contains@example.com. Rules are the safety net that stops you spamming your dev users. - One or more actions. The thing the workflow does. Almost always at least one Send Email action. Often a Generate Coupon, an Add Tag, a Subscribe to Mailchimp, an Update Customer Meta, a Send SMS via Twilio.
- A queue and runner. The thing that actually executes the actions on a schedule, retries when SMTP fails, and writes a log line you can audit later.
The hard one to get right by hand is #4. WooCommerce ships a thing called Action Scheduler that handles the queue, the retries, and the cron offloading. AutomateWoo sits on top of Action Scheduler, so all your queued workflows go through the same battle-tested queue your subscription renewals already use. That’s why a "send email 24 hours after order placed" workflow doesn’t fall over when your site has a busy weekend.
Once you’ve got that mental model, the AutomateWoo admin stops feeling cluttered. Every screen is one of those four things.
Key features at a glance
I’ll keep this list to what actually moves the needle on a real WooCommerce store.
- Visual workflow builder. Trigger > Rules > Actions, in a single edit screen. You pick a trigger, drop in rule groups, stack actions. No flowcharts. No "drag the arrow from this node to that node" canvas. It’s a form, and after the first 10 minutes you stop thinking about it.
- 23 preset workflows. Abandoned cart at 4 hours, at 12 hours, win-back at 30 days, win-back at 60, review reminder, thank-you for 5-star reviews, cross-sell related products, birthday coupon, repeat-customer reward, credit-card expiry reminder, wishlist reminder, and a few more. You can turn 4 of these on inside the first hour and have a real automation stack running by lunch.
- 34 triggers in the dropdown out of the box, with more if you install the bundled add-ons (Subscriptions, Memberships, Bookings, Sensei). You’ll probably use 8 of them. Cart abandonment, order completed, order status changed, review posted, customer win-back, subscription renewal, customer total spend reaches, and a manual trigger for one-off campaigns.
- 61 actions. Send Email is the obvious one. The interesting ones are Generate Coupon (creates a one-off, personalised coupon code per recipient and merges it into the email), Customer Add Tags, Mailchimp Subscribe / Update Tags, Order Add Note, Subscription Add Coupon, and Send SMS Twilio.
- 119 conditional rules. Customer order count, customer total spent, cart item categories, customer tags, customer country, customer email, customer purchased products, customer last review date, days since first order. You can stack them with AND/OR groupings.
- 183 merge variables. Every workflow gets a
{{ customer.first_name }}and a{{ shop.title }}, but it also gets things like{{ customer.generate_coupon | amount: '15%' | expires: '7 days' }}which generates a unique coupon inline. The variable library is the most under-sold part of this plugin. - Cart tracking. AutomateWoo writes a row to a custom table when a logged-in customer or guest with a captured email adds something to the cart, and updates it as they shop. That’s how the abandoned-cart trigger knows what was in the cart 12 hours ago.
- Conversion tracking. Every email gets a wrapper around outbound links, so AutomateWoo can attribute the next order back to the workflow that sent the email. The Reports view shows revenue per workflow.
- Refer-a-friend and Birthdays add-ons ship as separate modules inside the same plugin. Refer-a-friend gives each customer a unique referral URL and a coupon for whoever they refer. Birthdays sends a coupon on the customer’s birthday if you’ve captured one.
- SMS through Twilio. A second action type for time-sensitive flows. (More on the SMS situation later.)
- Built-in REST API. Endpoints for workflows, presets, logs, conversions, and a "manual workflow runner" so you can fire a workflow at a customer from outside the admin.
- Sits on Action Scheduler. Same queue WooCommerce uses for its own scheduled jobs. No custom cron.
- WooCommerce, Subscriptions, Memberships, Bookings, Sensei, AffiliateWP integration out of the box. Triggers and rules light up when those plugins are active.
A few of those (refer-a-friend, birthdays, Twilio SMS) are toggleable add-ons under AutomateWoo > Settings. Most of the core triggers/actions/rules are on by default.
Installation and the first hour
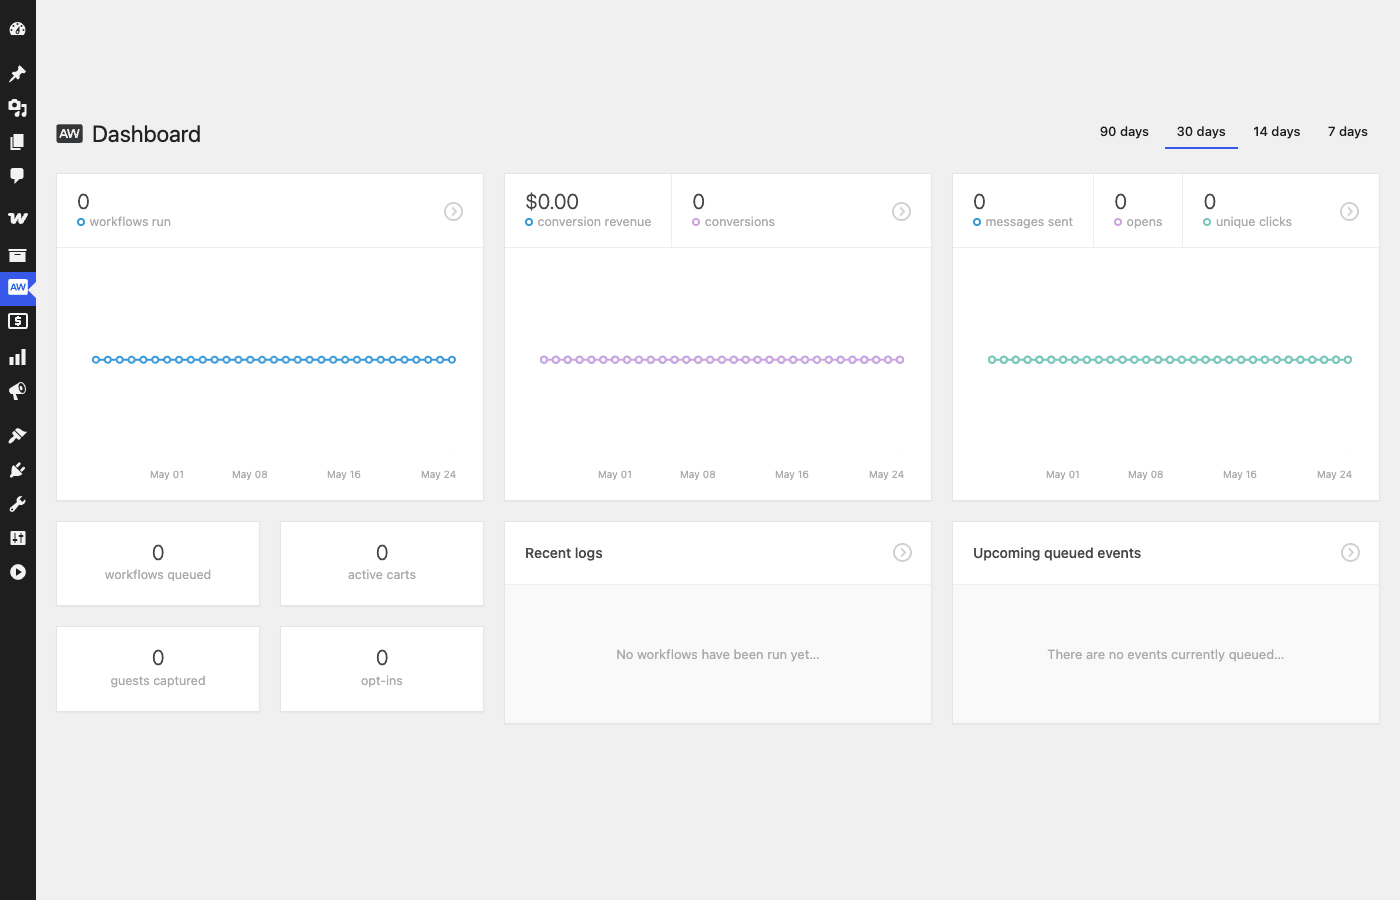
Drop the zip in Plugins > Add new > Upload, activate, and you’re done. The plugin needs WooCommerce active (it’ll refuse to load otherwise), at least PHP 7.4, and WordPress 6.8+. There’s no setup wizard. You land in AutomateWoo > Dashboard with a row of empty stat cards (workflows run, conversion revenue, messages sent) and zeros everywhere.
The first thing to do is not click "Add new workflow". Click Workflows > Browse presets instead. You’ll see a grid of 23 starter automations. Pick four:
- Abandoned cart (12 hours). Fires a follow-up email when a registered customer leaves stuff in their cart and doesn’t come back inside 12 hours.
- Reviews: Remind customers to leave a review. Fires 2 weeks after an order goes to
completed, only if the customer hasn’t already reviewed the products in that order. - Cross sell: Related products (with coupon). Fires an hour after
completed, suggests products in the same category, includes a one-time coupon. - Loyalty: Reward repeat customers (with coupon). Fires after a customer’s order count reaches a threshold you set (default 3), sends them a coupon.
Click Create workflow on each. The plugin clones the preset into a new workflow record, opens it for editing, and you can tweak the email subject, the heading, the delay, the rules. Switch the Status dropdown on the right to "Active", hit Save, done.
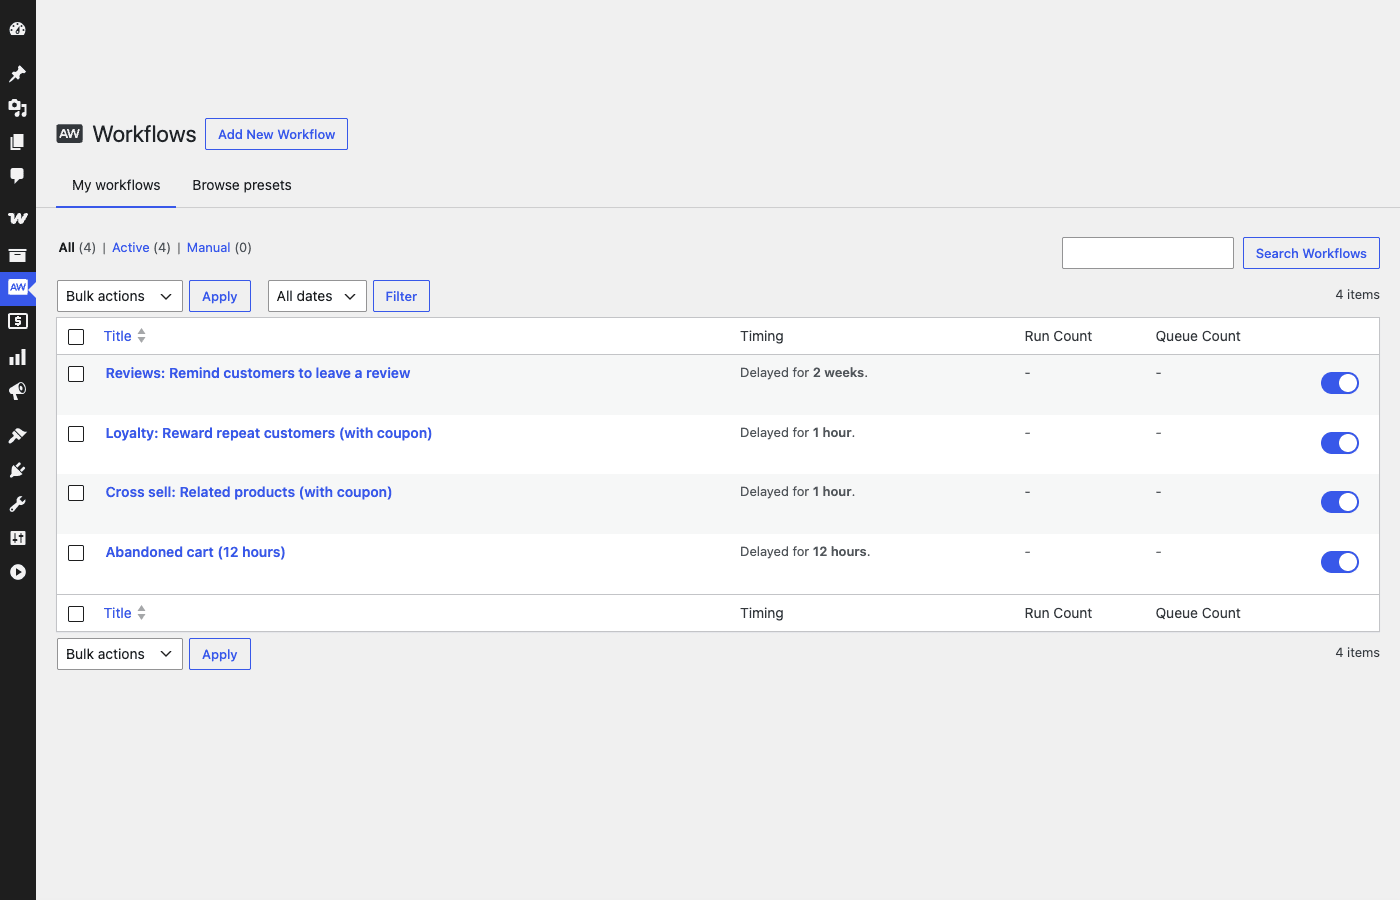
That’s the first hour. You now have a functioning automation stack running on top of your WooCommerce store. Cart abandonment is firing. Review reminders are firing. Loyalty coupons are firing.
The next thing to do, before you start building anything custom, is open AutomateWoo > Settings > General and decide on opt-in mode. The default is Opt-in (recommended), which means AutomateWoo will only send emails to customers who tick a marketing checkbox at checkout or in their account. If you change it to opt-out, every customer with an order gets emails until they unsubscribe.
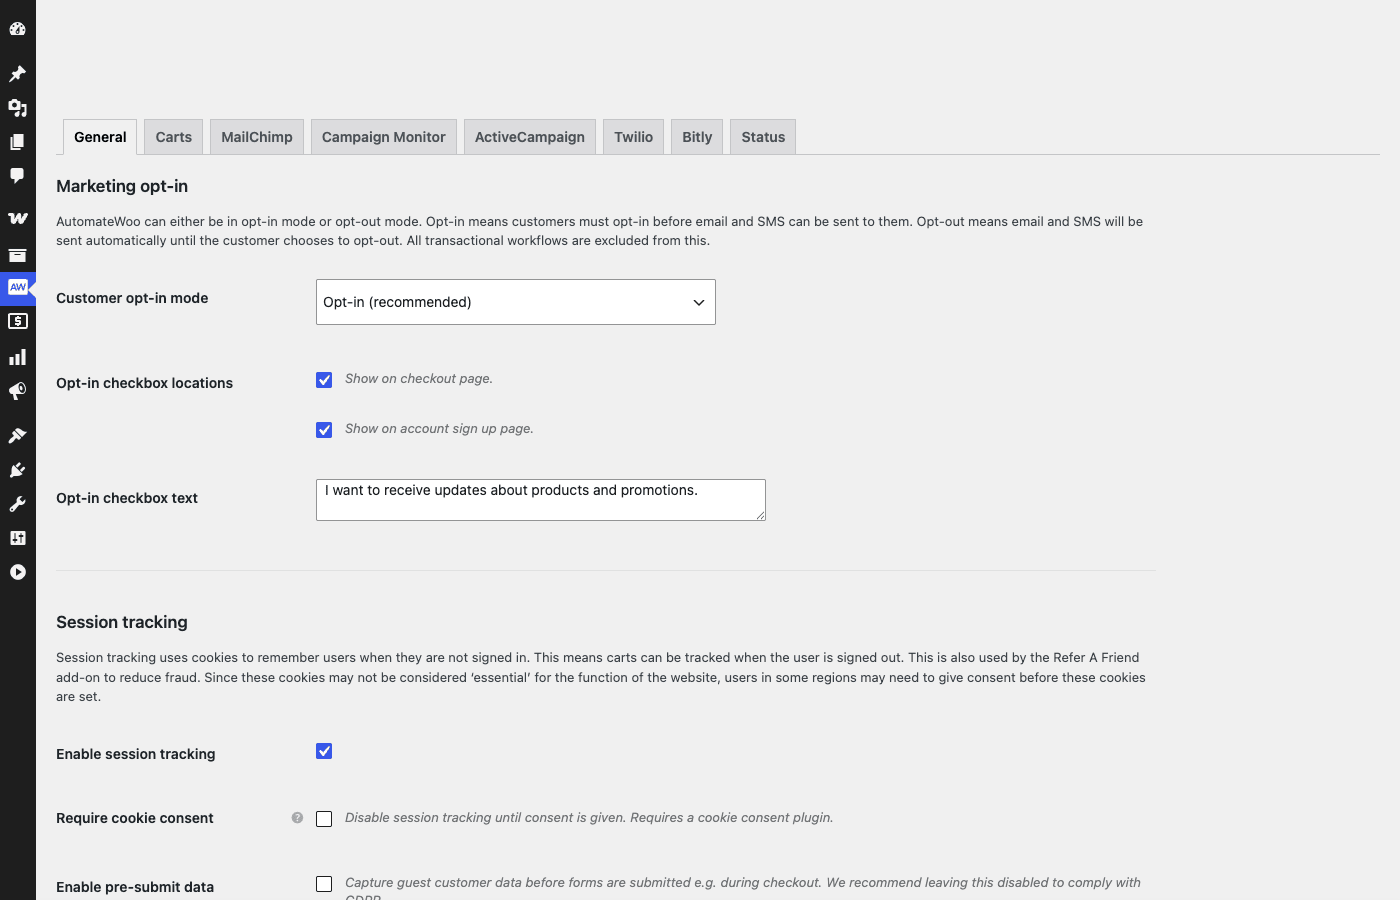
Don’t change it without thinking. Opt-in is the GDPR-safe default and the one the AutomateWoo documentation assumes. Opt-out is fine for transactional follow-ups (a review request after a completed order is arguably transactional), but the line is fuzzy. If you’re in the EU, leave opt-in on.
The Trigger, Rules, Actions model
Every workflow in AutomateWoo is the same shape. Here’s the Add New Workflow screen, untouched:
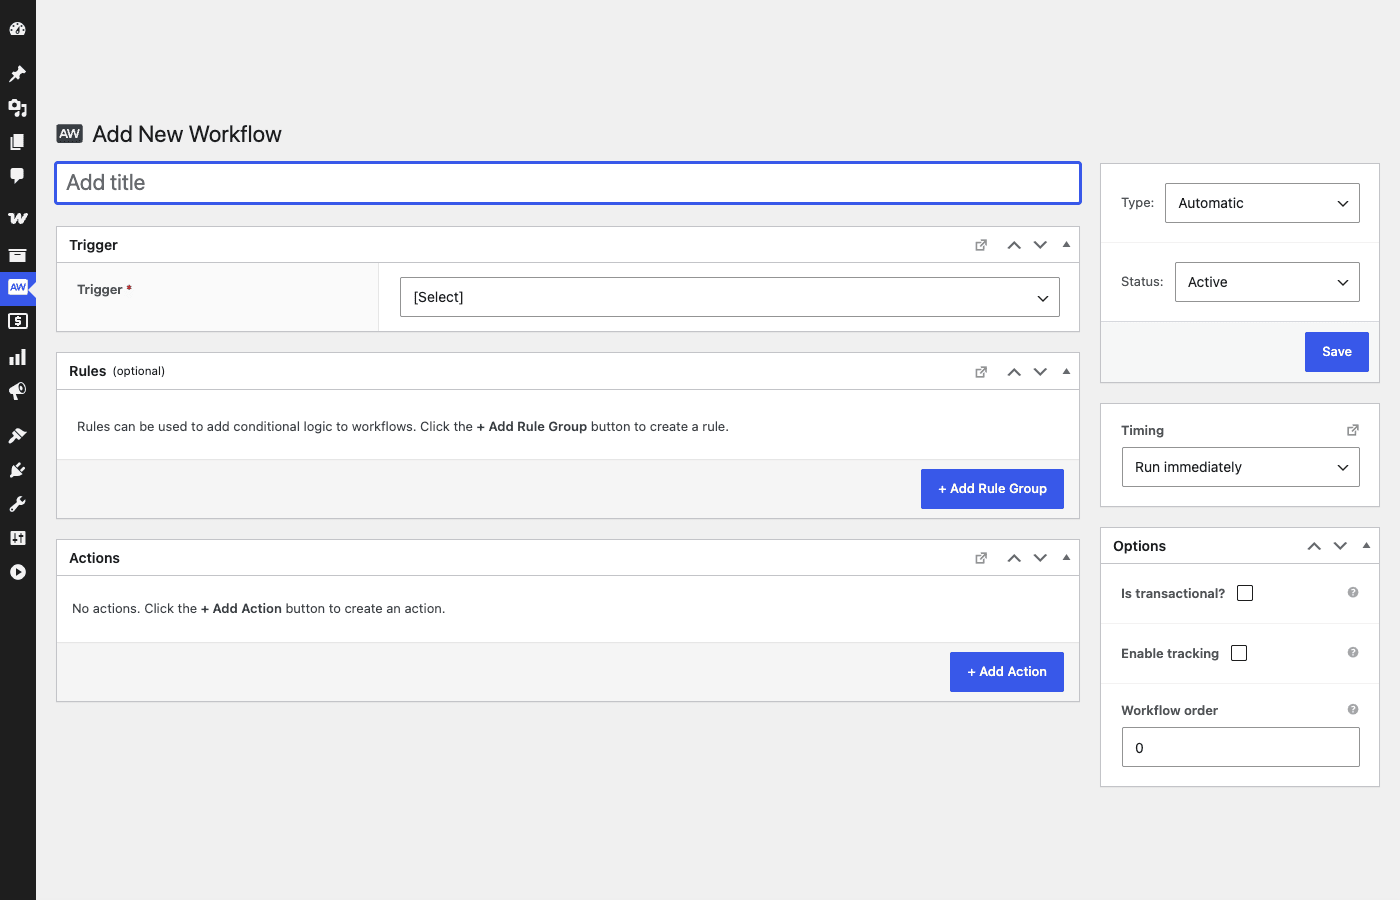
Three boxes, in order:
Trigger is the event. One per workflow. The dropdown groups them by source: Orders (Order Created, Order Completed, Order Paid, Order Status Changes, Order Cancelled, Order Refunded), Customers (Customer New Account, Customer Win Back, Customer Total Spend Reaches, Customer Order Count Reaches), Carts (Cart Abandoned, Guest Cart Abandoned), Reviews (Review Posted), Subscriptions, Memberships, Bookings, Sensei courses, Wishlists. The Manual triggers are special; they fire when you click a button in the admin or via a REST call, not when an event happens. Useful for one-off campaigns.
Rules are filters. They live in groups. Inside a group, the rules are AND’d together. Across groups, they’re OR’d. So "(customer.order_count >= 3 AND customer.country = US) OR (customer.tags contains vip)" is two rule groups. The rule library is genuinely deep: 119 rules covering customer state, cart state, order state, product state, subscription state, dates, meta fields. The 5 you’ll use 80 percent of the time are: Customer Order Count, Customer Total Spent, Customer Tags, Customer Country, Cart Item Categories.
Actions are what runs. You can stack as many as you want. Send Email is the default first action when you pick most triggers. Other useful ones: Send Email Plain Text (for transactional-looking emails that need to bypass the WooCommerce wrapper), Customer Add Tags / Customer Remove Tags (for segmenting), Order Add Note (for ops visibility), Send SMS Twilio (if you’ve got Twilio configured), Custom Function (which lets you call any PHP function on the workflow’s data layer; more on this in the developer section).
The Options sidebar on the right has two important fields. Timing controls when the workflow runs after the trigger fires: Run immediately, Delayed (12 hours, 2 weeks, whatever), Scheduled (every Monday at 9am), or Fixed (one-off at a specific date/time). Type is either Automatic (fires on the trigger) or Manual (fires when you click a button or hit the REST endpoint).
Once you’ve used the editor on three or four workflows it stops feeling like a form and starts feeling like a small programming environment.
The 23 starter workflows you get out of the box
This is the most underrated part of the plugin. Most people who buy AutomateWoo never build a workflow from scratch; they activate 3-5 presets and tweak the copy.
Here’s what ships in presets/, grouped by purpose:
Cart recovery (2). Abandoned cart at 4 hours. Abandoned cart at 12 hours. Both target registered customers (the guest version is configurable separately).
Reviews (4). Remind customers to leave a review (fires 2 weeks after completed). Thank-you for any review. Thank-you for a 5-star review with coupon. Thank-you for multiple reviews (rewards your loud-mouthed power users).
Cross-sell (6). Related products / first-time customers, no coupon and with coupon. Related products / repeat customers, no coupon and with coupon. Related products / generic, no coupon and with coupon.
Loyalty and win-back (5). Win-back customers showing recent products, with and without coupon. Reward high-spending customers. Reward repeat customers, with coupon and with custom offer. Birthday with coupon.
New customer welcome (2). With coupon and without.
Credit card expiry (2, requires Subscriptions). With coupon and without. Useful for stopping involuntary churn.
Wishlist reminder (1). For sites using the YITH Wishlist or TI Wishlist plugins.
Reviews thank-you with coupon rounds out the set.
The reason these matter: every preset is a complete, working example. It uses the right trigger, the right rules, sensible defaults, and a written email subject/heading/body. You can read the preset PHP file in presets/<name>.php to see exactly how the workflow is wired. If you’ve never built a workflow before, copy the closest preset and tweak.
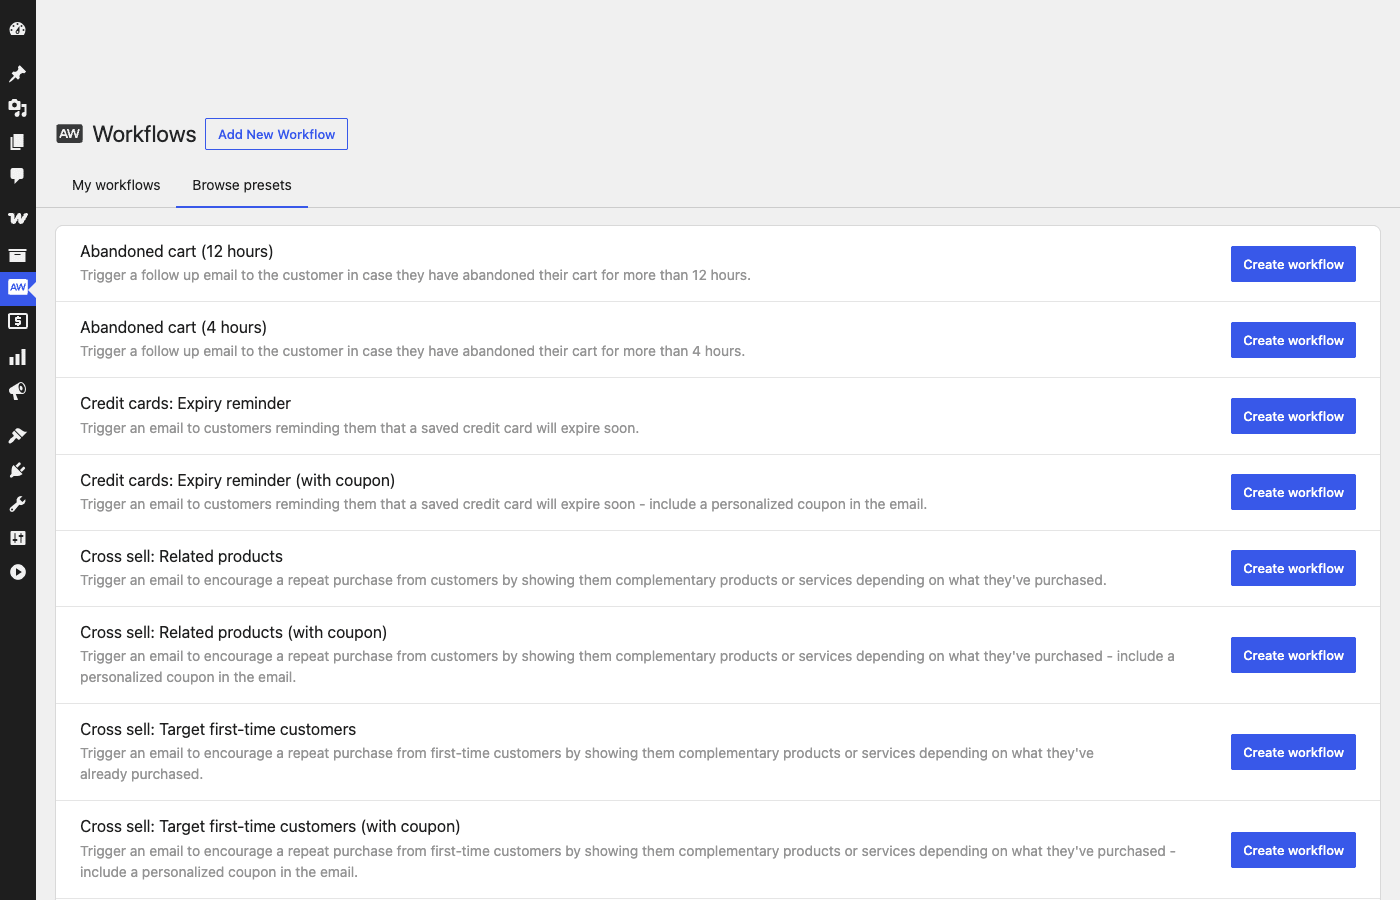
If you’ve never built an abandoned-cart flow before, skip this section to the workflow library. Activate the 12-hour version. You’re done.
The workflow editor in practice
Here’s one of the presets after I activated it, with the trigger, rules and email action all expanded:
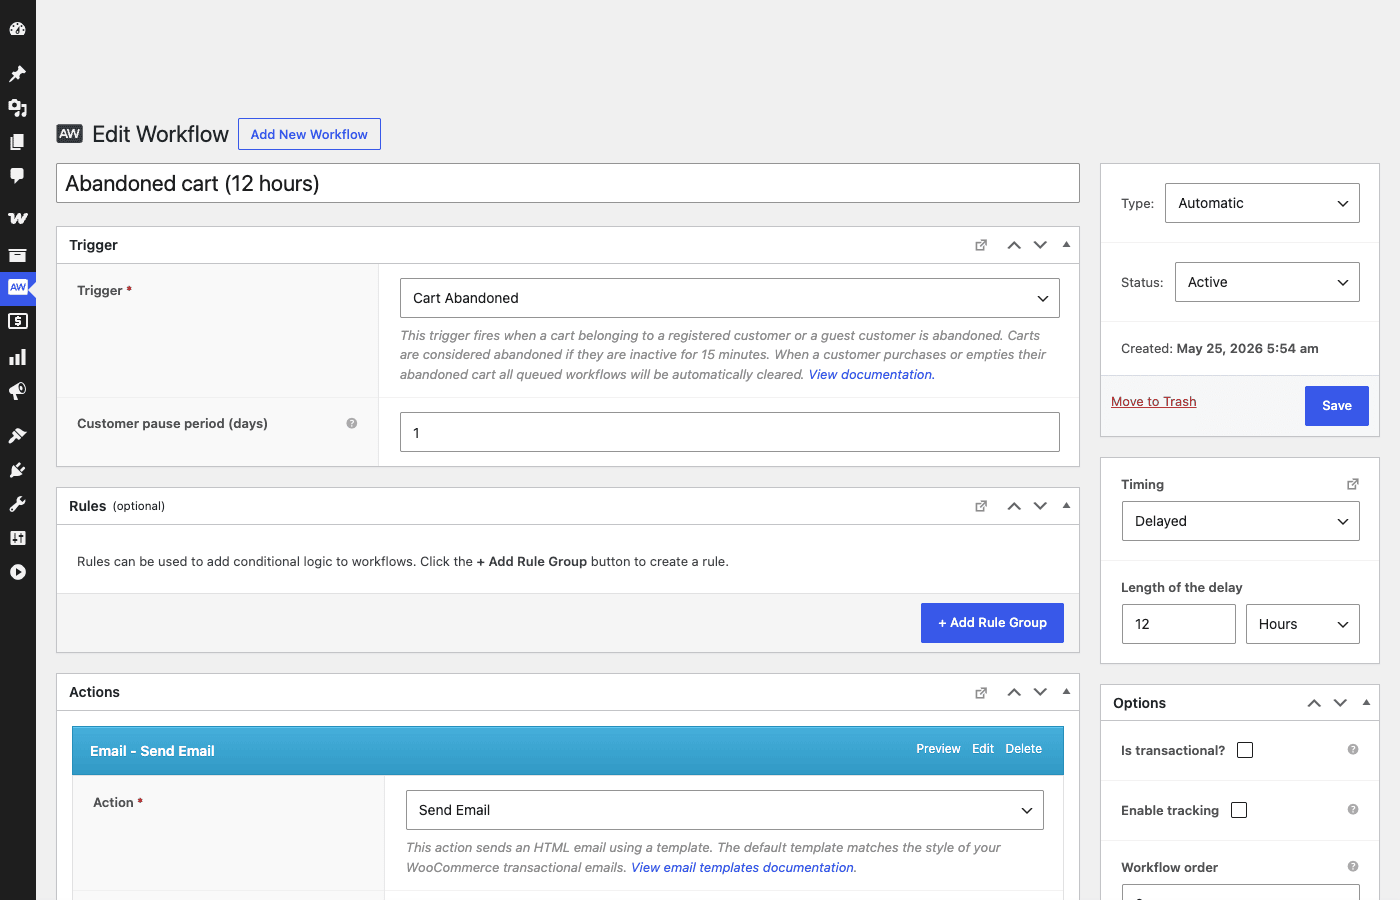
A few things to notice that aren’t obvious from the screenshot:
The trigger description block (the italic text under the Cart Abandoned trigger) is dynamic. Each trigger has a get_description() method that documents what it does, when it fires, what the data layer contains, and what its quirks are. For Cart Abandoned the description tells you carts are considered abandoned after 15 minutes of inactivity. Read those descriptions before configuring the trigger. They’ve saved me from at least one "why isn’t this firing" issue.
The "Customer pause period (days)" field is a per-trigger option. It stops AutomateWoo from re-triggering the same workflow on the same customer within N days. Default is 1. For abandoned cart it’s a sanity check against firing the same nudge email twice if the customer adds to cart, leaves, comes back, leaves again. For win-back you’d set it to 30 or 60. If abandoned-cart recovery is the only automation you actually need, a dedicated tool like YITH WooCommerce Recover Abandoned Cart does just that one job with a simpler setup than AutomateWoo’s general workflow engine.
The right-sidebar Timing field defaults to "Delayed" with 12 hours / Hours for this preset. If you switch it to "Scheduled" the field changes to a fixed daily time. If you switch it to "Fixed" you get a date and time picker. The form re-renders. Small touch, but it’s what makes the editor feel less like a settings page and more like a tool.
Now scroll down to the Send Email action:
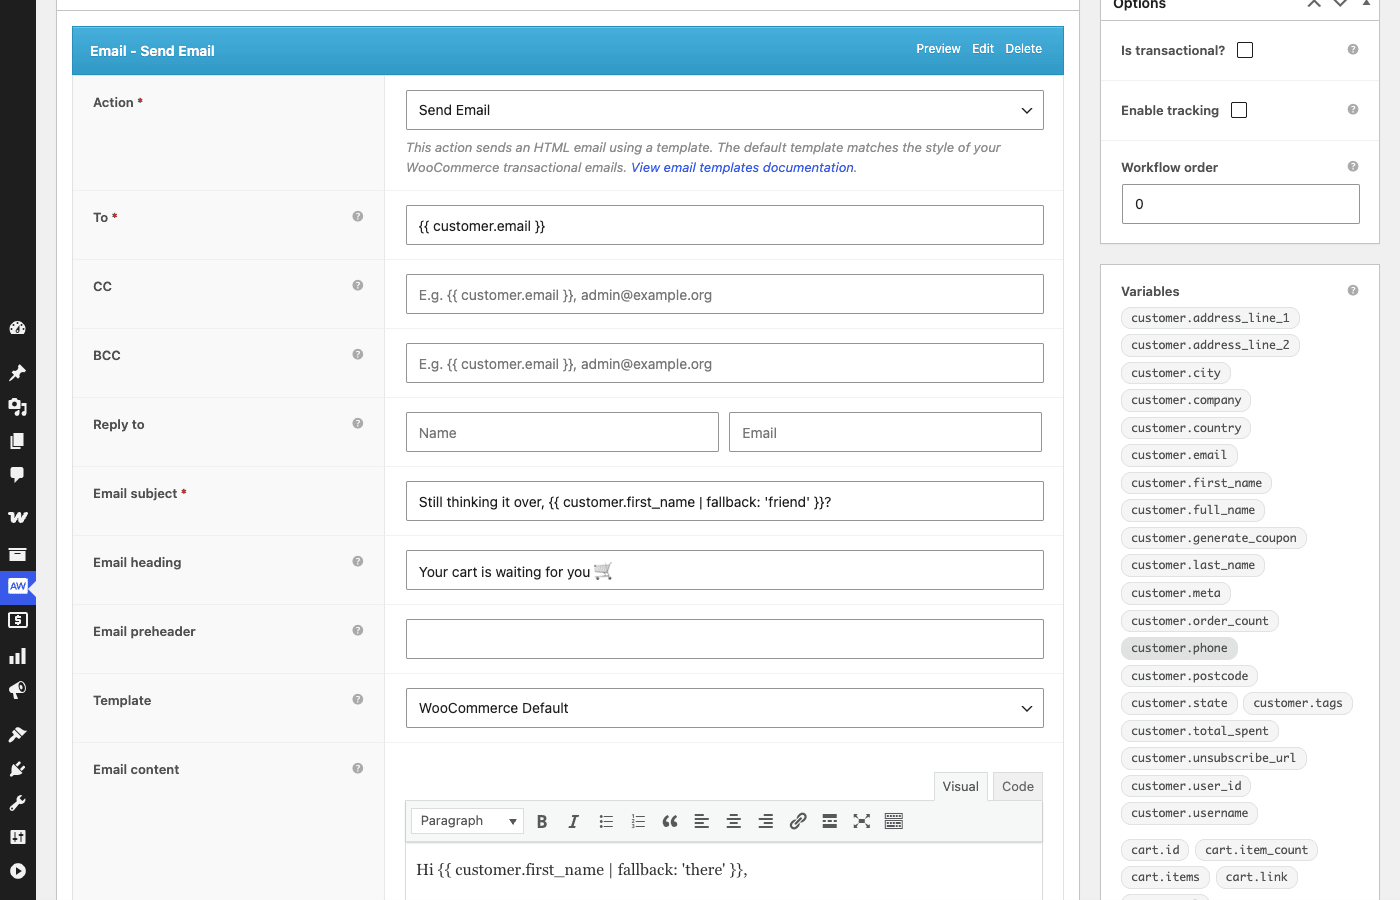
That right-hand Variables panel is the unsung hero. Every variable available to this trigger is listed there. You click one, it copies the merge tag into your clipboard ready to paste into the subject or body. The variable list is context-aware: a Cart Abandoned workflow shows cart.* variables, an Order Completed workflow shows order.* variables, a Subscription workflow shows subscription.* variables. You don’t have to remember the syntax.
The email content field is a standard WordPress visual / code editor. The template is whatever’s selected in the "Template" dropdown. WooCommerce Default wraps your content in WooCommerce’s transactional-email template so it matches the receipt emails the store already sends. Plain HTML is raw, no wrapper. You can register custom templates by dropping a file in wp-content/themes/yourtheme/automatewoo/emails/ and AutomateWoo picks it up.
A small but useful detail: hitting Preview on an email action opens a modal that renders the email with real data from a real customer of your choice. Not a Lorem-ipsum preview. You search for a customer, AutomateWoo loads their context, renders the merge tags against their actual data, and shows you the email exactly as it would arrive. That has caught a "{{ customer.first_name }} | fallback: ‘friend’ }}" syntax error in my drafts more than once.
Variables: the merge tag library
There are 183 variable PHP files in includes/variables/. They’re grouped by data object: customer, order, subscription, cart, product, booking, membership, shop.
The most-used ones, with their behaviour:
{{ customer.first_name }} # First name from billing address
{{ customer.first_name | fallback: 'friend' }} # Falls back if name is empty
{{ customer.email }} # Billing email
{{ customer.order_count }} # Lifetime order count
{{ customer.total_spent | format: 'currency' }}
{{ customer.generate_coupon | amount: '15%' | expires: '7 days' }}
{{ shop.title }}
{{ shop.url }}
{{ cart.items }} # Renders the cart as a styled HTML table
{{ cart.link }} # URL to recover the cart
{{ cart.total }}
{{ order.id }}
{{ order.items }} # Same as cart.items but for the order
{{ order.billing_address }}
{{ order.view_url }} # "View order" customer URL
{{ subscription.next_payment_date | format: 'date' }}
{{ product.title }}
{{ product.image }}
The two superpowers in that list are generate_coupon and cart.items / order.items.
generate_coupon creates a real WooCommerce coupon record at send time, with a unique code, the amount you specify, and an expiry. It’s stored against the customer so the same code never fires twice. You can pipe it through | amount: '15%' | expires: '7 days' | individual_use: true | minimum_amount: '50'. The HTML in the email shows the code as WELCOME-AB12CD34 or similar. Combined with a "Loyalty: Reward repeat customers" workflow this is the cleanest way I’ve seen to do personalised coupon emails in WooCommerce.
cart.items and order.items render a fully-styled HTML table of products with thumbnails, names, quantities, line totals, and a footer with subtotal. You don’t have to write the HTML. They respect the email template’s wrapper styling, so on the WooCommerce Default template they look like the receipt-email line items the customer already recognises.
Most of the 183 variables aren’t ones you’ll ever use directly. A handful matter a lot.
Real-world use cases
The four presets are a starting point, not the goal. Here are a few setups I’ve shipped on actual WooCommerce stores using AutomateWoo, each one a real workflow you can build inside an hour.
1. The "fence-sitter" abandonment series. Three workflows. First fires 4 hours after cart abandoned, no coupon, friendly nudge ("Forget something?"). Second fires at 24 hours, no coupon, social-proof ("Other people are reading this product page too"). Third fires at 72 hours, with a generate_coupon for 10% off, expires in 48 hours. The third workflow has a rule: skip if customer.total_spent > $200, since high-value customers don’t need a discount. Conversion rate on the third email is roughly 4x the first.
2. Review-driven UGC loop. Two workflows. First: 14 days after order completed, send the standard review reminder. Second: when a review with 5 stars is posted, send a thank-you email with a discount for the next order AND a link to share the review on social. The second workflow has a rule for review.rating = 5, an action that adds the customer to a "happy-customer" Mailchimp segment, and a second action that emails the customer their coupon. Quietly the best workflow on the store, because it builds the customer-tag database that feeds every other segment.
3. Win-back at 60 / 90 / 120 days. Three workflows on the Customer Win Back trigger, each at a different inactivity threshold. 60 days is "we miss you, here are some new arrivals". 90 days is "10% off if you come back this week". 120 days is "20% off plus free shipping". The Customer Last Order Date rule keeps each one from firing if a later workflow has already fired. Resurrects roughly 8% of inactive customers on a typical fashion store.
4. Subscriptions credit-card expiry. If you use WooCommerce Subscriptions, this is the single highest-ROI workflow you can build. AutomateWoo ships a preset that fires N days before a saved credit card expires, asking the subscriber to update their payment method before the next renewal. Without it, you lose subscribers to failed renewal payments and they never come back. With it, you lose roughly half as many. Read the WooCommerce Subscriptions walkthrough for context on why this matters more than people think.
5. Birthday coupons. The Birthdays add-on captures the customer’s birth date at checkout (or in their My Account page) and stores it on the customer object. The "Loyalty: Birthday with coupon" preset fires on the birthday with a generate_coupon for a percentage off. Open rate is roughly 2x normal marketing emails because, well, it’s their birthday.
6. Memberships welcome series. If you sell memberships through WooCommerce Memberships, AutomateWoo’s Membership Created trigger lets you build a multi-step onboarding series. Day 1: welcome email with a "what to do first" guide. Day 3: video tour. Day 7: invitation to join the members-only forum. Day 30: a satisfaction check-in. This is the kind of flow most membership-site owners pay $200/mo for in Klaviyo. You get it in the plugin you already own. See the WooCommerce Memberships review for the membership side of the setup.
7. Refer-a-friend. Built into AutomateWoo via the Refer A Friend add-on. Each customer gets a unique referral URL on their My Account page. When someone places an order through that URL, the referrer gets a coupon, the referee gets a discount. AutomateWoo manages the coupon generation, the email notifications, the tracking, and the leaderboard. You add three workflows (referee discount, referrer thank-you, monthly leaderboard email) and you’ve got the kind of growth loop people pay ReferralCandy for.
Don’t try to be clever with custom merge tags before you’ve got the basics running. Get cart abandonment, review reminders, and one coupon-bearing workflow live first. The interesting stuff comes after the basics are paying for themselves.
Developer reference: hooks, filters, REST, shortcodes
This is the bit most "marketing automation" tools skimp on. AutomateWoo doesn’t.
Action hooks worth knowing
// Fires when a workflow is created from the admin or the REST API.
add_action( 'automatewoo/workflow/created', function( $post_id ) {
 error_log( "New AutomateWoo workflow {$post_id}" );
} );

// Fires when an outbound email is about to be sent. Last chance to mutate.
add_action( 'automatewoo/email/before_send', function( $mailer ) {
 // $mailer is an AutomateWoo\Mailer instance.
 $mailer->set_from_email( 'newsletters@example.com' );
 $mailer->set_from_name( 'Example Store Newsletter' );
} );

// Fires when a customer opts in / opts out of marketing.
add_action( 'automatewoo/customer/opted_in', function( $customer ) {
 // Push to your data warehouse, your CDP, whatever.
 do_my_sync( $customer->get_email() );
} );

add_action( 'automatewoo/customer/opted_out', function( $customer ) {
 // Mirror the unsubscribe to your other systems.
} );

// Fires when AutomateWoo's stored cart updates (good for analytics).
add_action( 'automatewoo/stored_cart/updated_via_frontend', function( $stored_cart ) {
 // $stored_cart->get_total(), ->get_items(), ->get_user_id()
} );
Filters worth knowing
// Override the list of available triggers (good for white-labelling).
add_filter( 'automatewoo/triggers', function( $triggers ) {
 unset( $triggers['order_cancelled'] ); // Hide a trigger from the dropdown.
 return $triggers;
} );

// Override the list of available actions.
add_filter( 'automatewoo/actions', function( $actions ) {
 return $actions;
} );

// Override the list of available rules.
add_filter( 'automatewoo/rules/includes', function( $rules ) {
 return $rules;
} );

// Mutate the email content right before send.
add_filter( 'automatewoo_email_content', function( $content ) {
 return str_replace( '%%CURRENT_YEAR%%', date( 'Y' ), $content );
} );

// Mutate a variable's value before it's merged into the email.
add_filter( 'automatewoo/mailer/variable_value', function( $value, $mailer ) {
 // $value is the resolved variable string.
 return $value;
}, 10, 2 );

// Blacklist emails (e.g. anything @example.org for staging).
add_filter( 'automatewoo/mailer/blacklist', function( $blacklist ) {
 $blacklist[] = '/@example\.org$/';
 return $blacklist;
} );
Registering a custom trigger
Custom triggers are the killer dev feature. Say you’re firing a JavaScript event when a customer downloads a PDF guide, and you want a workflow to nudge them three days later. You write a Trigger class:
namespace MyStore\AutomateWoo;

class PDF_Downloaded_Trigger extends \AutomateWoo\Trigger {
 public $supplied_data_items = [ 'customer' ];

 public function init() {
 $this->title = __( 'PDF guide downloaded', 'my-store' );
 $this->group = __( 'My Store', 'my-store' );
 $this->description = __( 'Fires when a customer downloads a guide PDF.', 'my-store' );
 }

 public function register_hooks() {
 add_action( 'my_store/pdf_downloaded', [ $this, 'catch_event' ], 10, 1 );
 }

 public function catch_event( $customer_id ) {
 $customer = \AutomateWoo\Customer_Factory::get( $customer_id );
 if (! $customer ) {
 return;
 }
 $this->maybe_run( [ 'customer' => $customer ] );
 }
}

add_filter( 'automatewoo/triggers', function( $triggers ) {
 $triggers['pdf_downloaded'] = PDF_Downloaded_Trigger::class;
 return $triggers;
} );
That’s all you need. Your trigger now shows up in the workflow dropdown next to "Order Completed", with the same Rules/Actions UI underneath. AutomateWoo handles the queueing, the rules engine, the run logging.
REST API
AutomateWoo ships its own REST controllers under /wp-json/automatewoo/v1/:
GET /automatewoo/v1/workflows # List workflows
POST /automatewoo/v1/workflows # Create workflow
GET /automatewoo/v1/workflow-presets # List presets
POST /automatewoo/v1/workflow-presets # Create workflow from preset
GET /automatewoo/v1/logs # List log entries
GET /automatewoo/v1/conversions # List conversions (with revenue)
POST /automatewoo/v1/manual-workflow-runner/{id}/run # Fire a manual workflow against a customer
The manual-runner endpoint is the most useful for integrations. Combine it with a webhook from your CRM and you can fire personalised follow-up emails from any system that can call a REST endpoint.
curl -X POST https://example.com/wp-json/automatewoo/v1/manual-workflow-runner/123/run \
 -H "Content-Type: application/json" \
 -H "Authorization: Basic..." \
 -d '{ "customer_ids": [4567, 4568] }'
Shortcodes
There are two, both for the customer-facing communication preferences page:
[automatewoo_communication_preferences]
[automatewoo_communication_signup]
Drop the first one on a page like /my-preferences/ and your customers can manage which workflow categories they receive. Drop the second on a landing page and you’ve got an opt-in form for marketing-only mailings.
The custom_function action
Honourable mention: there’s a Send Email action and a Custom Function action. The Custom Function action lets you call any callable in PHP and pass it the workflow’s data layer (customer, order, cart, whatever). This is the escape hatch when "send email" isn’t enough.
add_action( 'init', function() {
 if (! class_exists( '\AutomateWoo\Actions' ) ) {
 return;
 }
 // Tell AutomateWoo your function exists.
 add_filter( 'automatewoo/actions/custom_function/allowed_callbacks', function( $cbs ) {
 $cbs[] = 'my_store_sync_to_crm';
 return $cbs;
 } );
} );

function my_store_sync_to_crm( $workflow ) {
 $customer = $workflow->data_layer()->get_customer();
 // Push to HubSpot / Pipedrive / wherever.
}
Add the Custom Function action to a workflow, pick your function from the dropdown, and that callback runs as one step of the workflow with retries via Action Scheduler. Combined with the Order Completed trigger and a couple of rules, this is how you bridge AutomateWoo to whatever CRM or warehouse your team already uses.
If you’d rather run the email side of your stack in a dedicated CRM, FluentCRM Pro is a solid pairing. AutomateWoo handles the WooCommerce-aware automations, FluentCRM handles the broadcast newsletters. The FluentCRM walkthrough covers that side.
Performance, compatibility, and the gotchas
This is the section every marketing-automation review I’ve ever read forgets to write. Five things worth knowing before you put this on a busy store.
Gotcha 1: AutomateWoo writes a lot to the database. Every workflow run creates a log row. Every queued event creates a row in Action Scheduler. Every tracked cart creates a row in the wp_automatewoo_carts table. On a store with 50k monthly orders and 10 active workflows, you’re looking at half a million extra rows a month, easily. Set up the cleanup options under AutomateWoo > Settings > Status (it can prune old logs / events on a schedule), or your DB will get fat. The plugin has a built-in cleaner; it’s just not on by default.
Gotcha 2: Conversion tracking adds a query parameter to outbound email links. Every URL in an AutomateWoo email gets rewritten with ?aw_track=<token> so the click can be attributed. If you use Google Analytics, this is fine. If you have aggressive URL rewriting at the CDN level (some Cloudflare Page Rules, some Bunny shield rules), the parameter might get stripped and your conversion tracking will go dark. Test before you ship.
Gotcha 3: The SMS add-on is afterthought-tier. Send SMS via Twilio is a single action with the bare minimum of options. No SMS templates, no per-message preview, no opt-out wrapper, no STOP keyword handling, no number-pool routing. If SMS is core to your strategy, AutomateWoo is not the right tool. Use Klaviyo SMS or Postscript, then fire AutomateWoo workflows for everything else.
Gotcha 4: A/B testing is anemic. AutomateWoo doesn’t have native split-testing for email subject lines or content. You can fake it with two parallel workflows and a custom rule, but compared to what Klaviyo, Drip or even ConvertKit do out of the box, this is a real gap. If split-testing your transactional emails is a KPI, expect to do it manually.
Gotcha 5: Reports are basic. The Reports view shows conversion revenue per workflow, message volume, opens and unique clicks. That’s it. No funnel view, no cohort analysis, no time-of-day heatmap. For most stores this is fine; for a data-driven marketing team it’ll feel thin. Pipe the data into your warehouse via the automatewoo/object/create action and analyse it elsewhere.
The admin UI itself, while we’re being honest, feels older than the plugin’s capabilities. There’s still a "Save" button in a meta box on the right rather than a Gutenberg-style top bar. The workflow editor uses classic WordPress meta-box styling. None of this affects what AutomateWoo does, but if you’ve come from a 2025-era SaaS automation tool, the UI will feel like a step back. It works. It’s just not pretty.
The good news on compatibility: this is a first-party WooCommerce plugin, so it’s compatible with every major payment gateway, with HPOS (High-Performance Order Storage) out of the box, with WooCommerce Subscriptions, with WooCommerce Memberships, with WPML, with Polylang, with Action Scheduler, with Follow-Up Emails (if you’re migrating). It speaks the same dialect the rest of the WooCommerce plugin family speaks.
Pricing and licensing
AutomateWoo is sold from woocommerce.com as a paid annual subscription. The price varies by site count. There is no free version on the WordPress.org repo.
Because the plugin is GPL (the license header in the main file explicitly says GPLv3), the same zip can be redistributed. That’s how AutomateWoo on GPL Times works: the GPL store buys a Pro license, redistributes the GPL files, and your purchase covers a year of access to the same upgrades.
You don’t get vendor support direct from WooCommerce when you install the GPL-licensed version, but the documentation at woocommerce.com/document/automatewoo/ is public and excellent, and the WooCommerce developer site hosts the API reference. For most setups, the docs plus the in-plugin help text are enough.
If you’ve never run AutomateWoo before and want to feel out whether it fits, this is the cleanest way to install it on a staging store, build a workflow or two, and decide.
FAQ
Does AutomateWoo replace Mailchimp / Klaviyo / Omnisend?
For the WooCommerce-aware automation part, yes. For the bulk newsletter / segmentation / SMS part, no, not really. Most stores I’ve worked with end up running AutomateWoo for behaviour-triggered emails (carts, reviews, win-back) and a dedicated newsletter tool (Mailchimp, FluentCRM, ConvertKit) for broadcasts. AutomateWoo’s Mailchimp action plugs them together.
Will it work with my SMTP plugin?
Yes. AutomateWoo uses wp_mail() under the hood, so any SMTP plugin (WP Mail SMTP, FluentSMTP, Post SMTP) that intercepts wp_mail will route AutomateWoo’s email the same way it routes your transactional WooCommerce emails. Use the same SMTP setup you already use for receipts.
Is the abandoned-cart trigger GDPR-safe?
It’s safe for logged-in customers (they have an account, they’ve given email consent at signup). It’s grey for guests; AutomateWoo only captures guest carts after the customer has entered an email at checkout, and only if you’ve enabled the pre-submit data setting. In the EU the safest path is: opt-in mode, abandoned-cart only for registered customers, guest abandonment off.
Can I trigger a workflow from a button on the front-end?
Yes, via the Manual trigger + the REST endpoint, or via a custom trigger you write yourself. The REST manual-workflow-runner/{id}/run endpoint takes a customer ID and fires the workflow against them.
Does it slow down the front-end?
Marginally. The cart-tracking JS adds about 8 KB to your page (it’s deferred and runs on cart change). The conversion-tracking URL rewriting happens server-side at email send time, so it doesn’t touch front-end performance at all. If you’re caching aggressively, you may need to exclude aw_track from your cache key rules.
Can I export workflows?
Yes, the REST endpoints return workflow JSON, and you can also use wp post export --post_type=aw_workflow on the CLI. Importing into another site is the same wp post import flow, then you re-link the action settings.
What happens when I deactivate the plugin?
Queued workflows stop firing. The tables stay in the database (so reactivating brings everything back). If you uninstall (not just deactivate), the tables are dropped only if you’ve explicitly set the option to remove data on uninstall in Settings > Status.
Does it work with HPOS (High-Performance Order Storage)?
Yes. The plugin header declares HPOS compatibility and the order triggers use the order CRUD API, not direct post-meta reads.
Final thoughts
AutomateWoo is one of those plugins that looks unfair once you’ve used it for a month. You can replace three to five $30-100/mo SaaS subscriptions with one annual WooCommerce extension, and the integration is tighter because the plugin lives inside the same admin as the data it’s automating against.
It’s not perfect. The admin UI is dated. SMS is afterthought-tier. Reports are basic. A/B testing isn’t really there. None of that changes the core argument: if you’re running a WooCommerce store and you’re not yet sending cart-recovery emails, review reminders, and a personalised coupon to repeat customers, you’re leaving real revenue on the table. AutomateWoo is the fastest path from "we have no automation" to "we have a working stack" without paying Klaviyo $400/mo.
Activate the 4 presets I called out at the start of this article. Watch the logs for a week. Tweak the copy. By the end of month one you’ll have a sense of which workflows pay rent and which ones don’t, and from there the deeper rule library and custom triggers are how you grow the stack.
If your store is on WooCommerce and you’ve been putting off "doing email properly", start AutomateWoo on a staging site tonight and have the cart-abandonment workflow live tomorrow. It’s a one-evening job.