

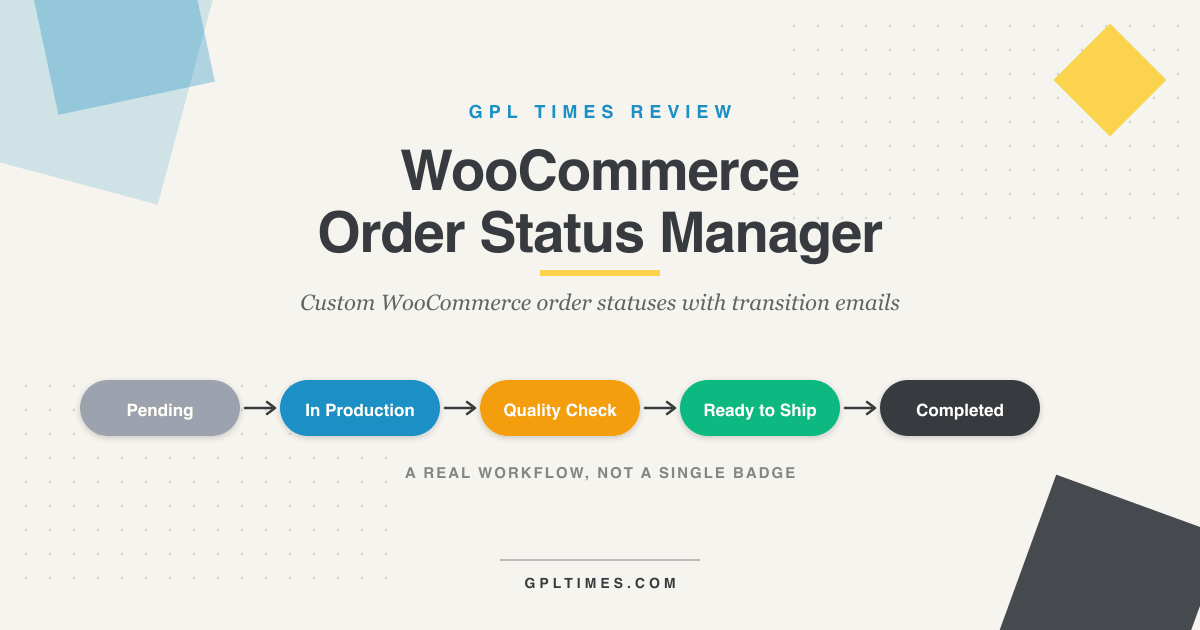
I’ve run three real WooCommerce stores in the last few years where the six default statuses (Pending, Processing, On Hold, Completed, Cancelled, Refunded, plus the half-step Failed) ran out of vocabulary by the second week. A custom-furniture maker who needed "In Production" and "Quality Check" and "Awaiting Shipment" between Processing and Completed. A small print shop where the team kept asking for "Proof Approved" and "On Press". A meal-kit subscription where orders had to walk through "Box Packed" before "Out for Delivery". In every one of those stores I tried the same three workarounds: CSS-hacking the default "Processing" badge to mean something else (confusing for the team within a week), adding a custom order note every time a clerk wanted to flag a step (fragile, unqueryable, and impossible to filter on), and writing my own register_post_status() calls in functions.php (worked, but each one needed its own email plumbing and stopped working the day a contractor touched the file).
WooCommerce Order Status Manager is the SkyVerge plugin that solves all three problems with one piece of code. You create custom statuses through the admin UI, each one is registered as a real WordPress post status with the wc- prefix, each can have its own customer email template that fires on transition, all of them appear in the orders-list filters, the bulk-edit dropdown, the REST API, and the reports module. It’s a workflow tool, not a settings panel. This walkthrough covers what it does well, the parts of the admin that feel like they were last rethought a decade ago, and the developer surface area (hooks, filters, custom email class) you’ll touch if you’re extending it.
If you’re a store owner and you’ve never set up a custom status in WooCommerce, the second half of this post explains every click. If you’re a developer who’s already shipped a workflow once and you want the filter list, the FAQ, the gotchas, and the comparison to other approaches, the second half is yours too. Either way: I’m not going to pretend the plugin is flawless, because it isn’t.
Table of Contents
- What WooCommerce Order Status Manager actually is
- Why the six default statuses run out
- Installation and the first 30 minutes
- Setting up a made-to-order workflow with 5 custom statuses end to end
- Email transitions: the feature that earns the plugin its price
- Custom statuses vs custom order notes: when each one is the right tool
- Order Status Manager vs YITH Custom Order Status vs free WC Custom Order Status: when each one wins
- The REST API exposure: querying orders by your custom status
- Don’t bulk-change 200 orders without first disabling the transition email
- Developer reference: hooks, filters, classes, post types
- What Order Status Manager doesn’t do (and when you reach for AutomateWoo)
- Performance, compatibility, and the small annoyances
- Pricing and licensing
- FAQ
- Final thoughts
What WooCommerce Order Status Manager actually is
Order Status Manager is a WooCommerce extension built by SkyVerge (now part of Automattic, the same company that owns WooCommerce and WordPress.com). It registers two custom post types in your WordPress install, wc_order_status and wc_order_email, and uses them to drive the entire custom-status feature set.
When you publish a wc_order_status post, the plugin hooks wc_order_statuses and merges your new status into the array WooCommerce shows everywhere: the order edit screen dropdown, the orders-list status filters, the bulk-edit menu, the order email recipient list, the reports filter, and the REST API’s status parameter. The plugin also calls register_post_status() under the hood so the status is a first-class WordPress post status, not a meta value tacked onto the side.
A custom status carries:
- A label ("In Production") and a URL-safe slug (
in-production). - A color for the admin badge.
- An icon (a Dashicons class string, e.g.
dashicons-hammer). - A list of valid "next status" slugs, which controls what the per-order shortcut buttons in the orders list offer.
- A "paid status" flag, which controls whether WooCommerce treats the order as paid (so stock is reduced, download permissions are granted, and reports include it).
- A "show in reports" flag, which controls whether the order’s revenue shows up in the WooCommerce Analytics module.
- A linked email template (optional but the whole point).
A wc_order_email post is the email template. It extends the standard WC_Email class, lives in the WooCommerce -> Settings -> Emails tab alongside the built-in templates, and supports the same merge tags ({order_number}, {customer_first_name}, {site_title}, etc.). When an order moves to its trigger status, the plugin fires the email through WooCommerce’s own mailer.
So far, so utilitarian. The real value is that you don’t have to write any of that PHP yourself. You click through the admin, save, and the workflow is in place.
Why the six default statuses run out
Skip this section if you’ve already shipped a WooCommerce custom-status setup. If you haven’t, here’s why this plugin exists.
WooCommerce ships with six built-in order statuses (seven if you count Failed, eight if you count Checkout Draft from newer versions). They’re designed for a generic "browse, pay, ship, done" flow:
- Pending payment, order created, payment not yet received.
- Processing, payment received, order being prepared.
- On hold, payment pending external action (manual bank transfer, etc.).
- Completed, fulfilled and shipped.
- Cancelled, voided before fulfillment.
- Refunded, money returned to customer.
- Failed, payment attempt errored.
That’s fine for a t-shirt shop selling stock items via Stripe. It falls apart the moment your fulfillment has internal steps that the customer cares about. A few real examples:
- A made-to-order furniture maker needs to tell the customer when their piece moves from "Processing" (paid) to "In Production" (the wood is on the bench) to "Quality Check" to "Ready to Ship". Four statuses, not one.
- A wedding photographer selling print packs needs "Proof Sent", "Customer Approval", "In Print Queue", "On Press", and only then Completed.
- A meal-kit subscription needs "Box Packed", "Out for Delivery", "Delivered" so the customer can stop refreshing their tracking page.
- A print-on-demand drop-shipper needs "Sent to Supplier", "Tracking Available", "In Transit", and "Delivered" because the actual fulfillment is on a partner’s clock.
If you collapse all four of those into "Processing", three things happen. Your customer support team gets the same ticket five times. Your customer thinks nothing has happened for two weeks. Your reports lose their meaning, "Processing" stops being a stage and starts being a graveyard.
Order Status Manager is the answer to that.
Installation and the first 30 minutes
Installation is unremarkable in the good sense.
- Get the plugin zip from your account at woocommerce.com, or grab the WooCommerce Order Status Manager
- In WordPress, go to Plugins -> Add New -> Upload Plugin, pick the zip, click Install Now, then Activate.
- The plugin requires WooCommerce 3.9.4 or higher, WordPress 5.6 or higher, and PHP 7.4 or higher. If you’re on a current site you’re fine.
- After activation, you’ll see two new menu items in the WordPress admin sidebar: Order Statuses (under WooCommerce) and the Emails tab inside WooCommerce -> Settings will gain a new section for custom emails.
There is no setup wizard. The plugin assumes you know what a custom order status is for. Within 30 minutes you should have at least one custom status published and one order moved into it for testing. The first one is the slowest because you’ll explore the admin. After that, creating a new status takes under a minute.
A note on existing orders. Installing the plugin does not migrate or rename any existing orders. Everything you have stays in its current default status. Only when you start moving orders into your new statuses (manually, via bulk-edit, or via REST) does the plugin start mattering for that order.
Setting up a made-to-order workflow with 5 custom statuses end to end
Let me walk through a concrete workflow. I set this up on a test store while writing this article. It’s the workshop flow you’d want for a custom-furniture or made-to-order business.
The five statuses, in order:
- In Production (blue,
dashicons-hammer), the maker has started building. - Quality Check (amber,
dashicons-search), finished piece is being inspected. - Customer Approval (purple,
dashicons-id), for pieces that need a sign-off photo before shipping. - Awaiting Materials (red,
dashicons-warning), paused because something is back-ordered. - Ready to Ship (green,
dashicons-yes-alt), packed, waiting on the carrier.
To create the first one:
- Go to WooCommerce -> Order Statuses in the admin.
- Click Add Order Status in the top bar.
- Fill in the Title field with "In Production". The slug auto-generates as
in-production. - Set the Color to
#3B82F6(a calm blue). - Pick the Icon as
dashicons-hammer. The plugin shows a Dashicons grid so you don’t have to memorize names. - Under Next Statuses, multi-select Quality Check, Awaiting Materials, and Customer Approval. These are the moves a clerk should be able to make from the orders list with one click.
- Set Show in Order Action Buttons so the status appears as a one-click move from the orders table.
- Tick Show in Reports so revenue tied to "In Production" orders is included in WooCommerce Analytics.
- Leave Marked as Paid on (since at "In Production" the customer has already paid).
- Click Publish.
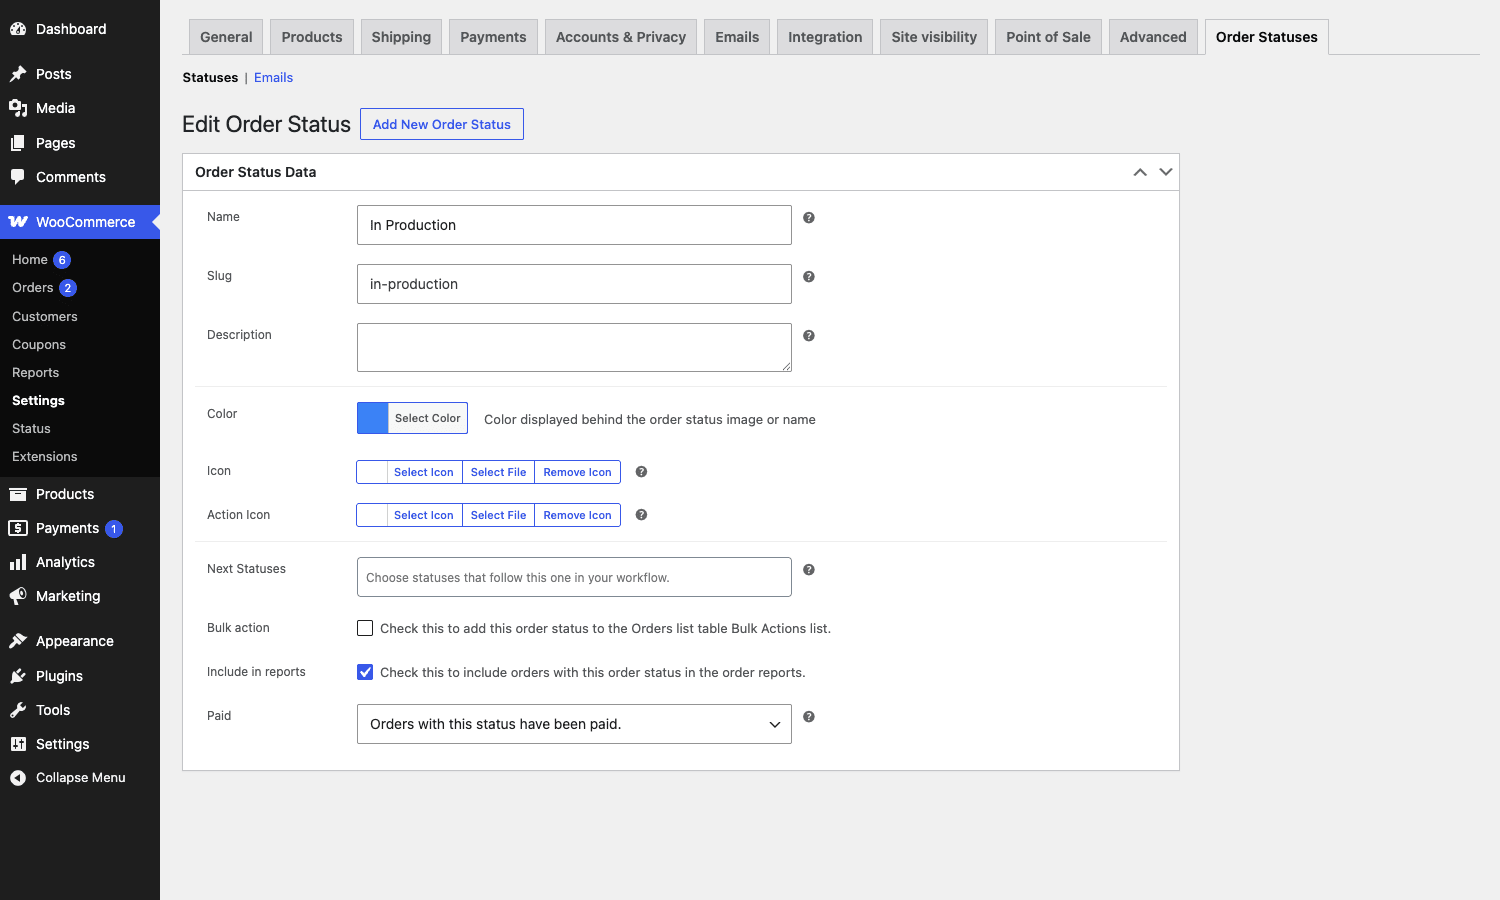
The status edit screen looks like this. Every field is on one page and the help-tip question marks explain what each one does without you having to leave the form.
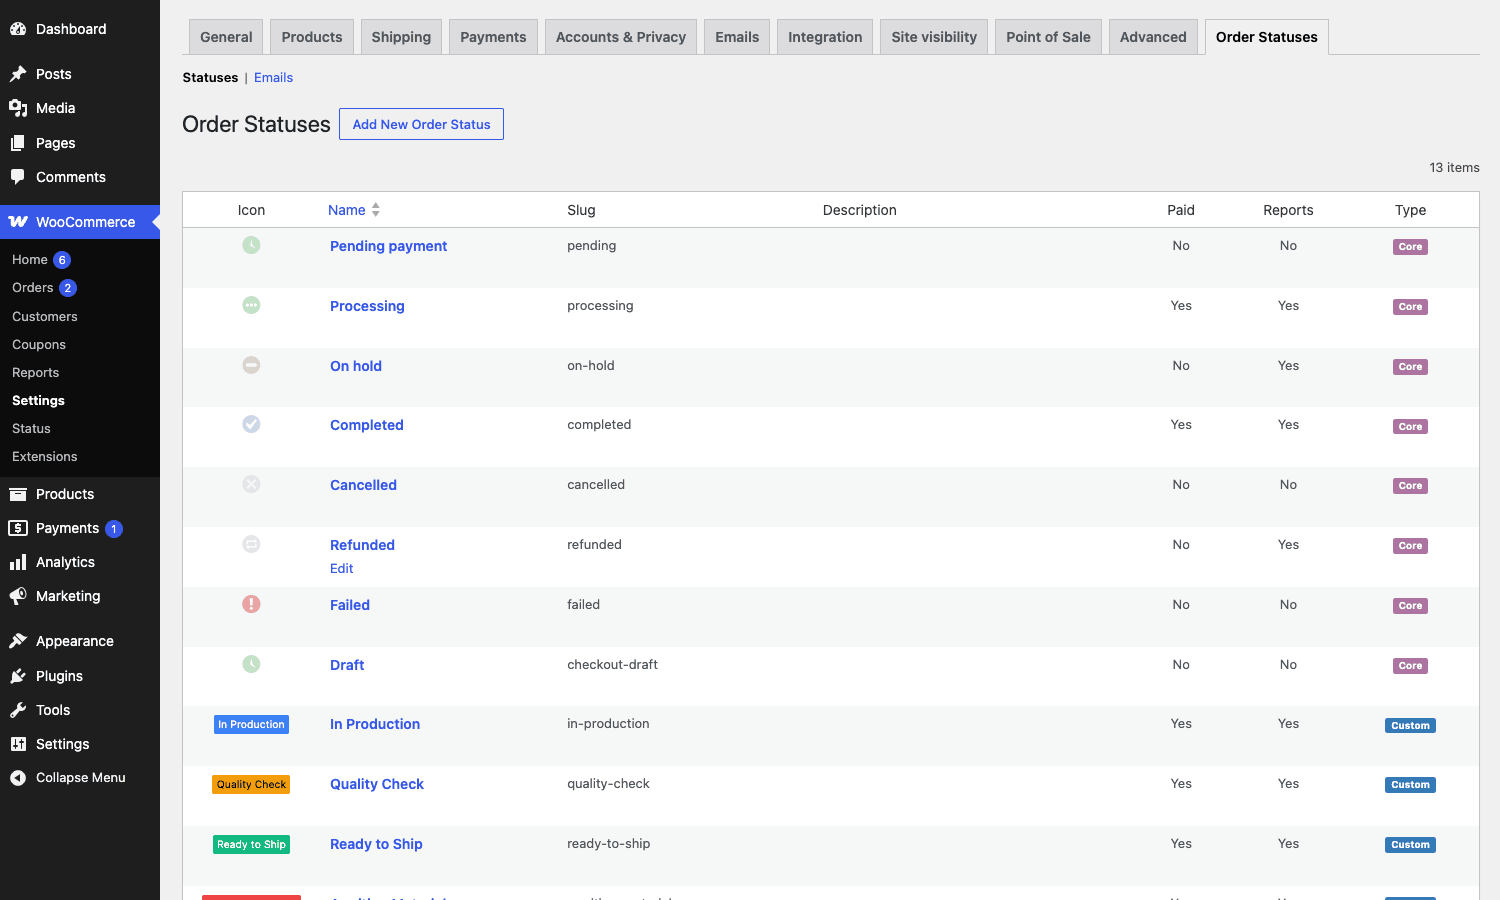
Repeat four times for the other statuses, picking sensible "next" relationships. After the fifth, your Order Statuses screen looks like the screenshot below.
The color and icon you pick aren’t cosmetic. They render in the Status column of the WooCommerce orders list, so a fulfillment manager scanning 50 orders in the morning can see at a glance which ones are stuck on materials (the red ones), which need QC sign-off (the amber ones), and which are queued for shipping (the green ones).
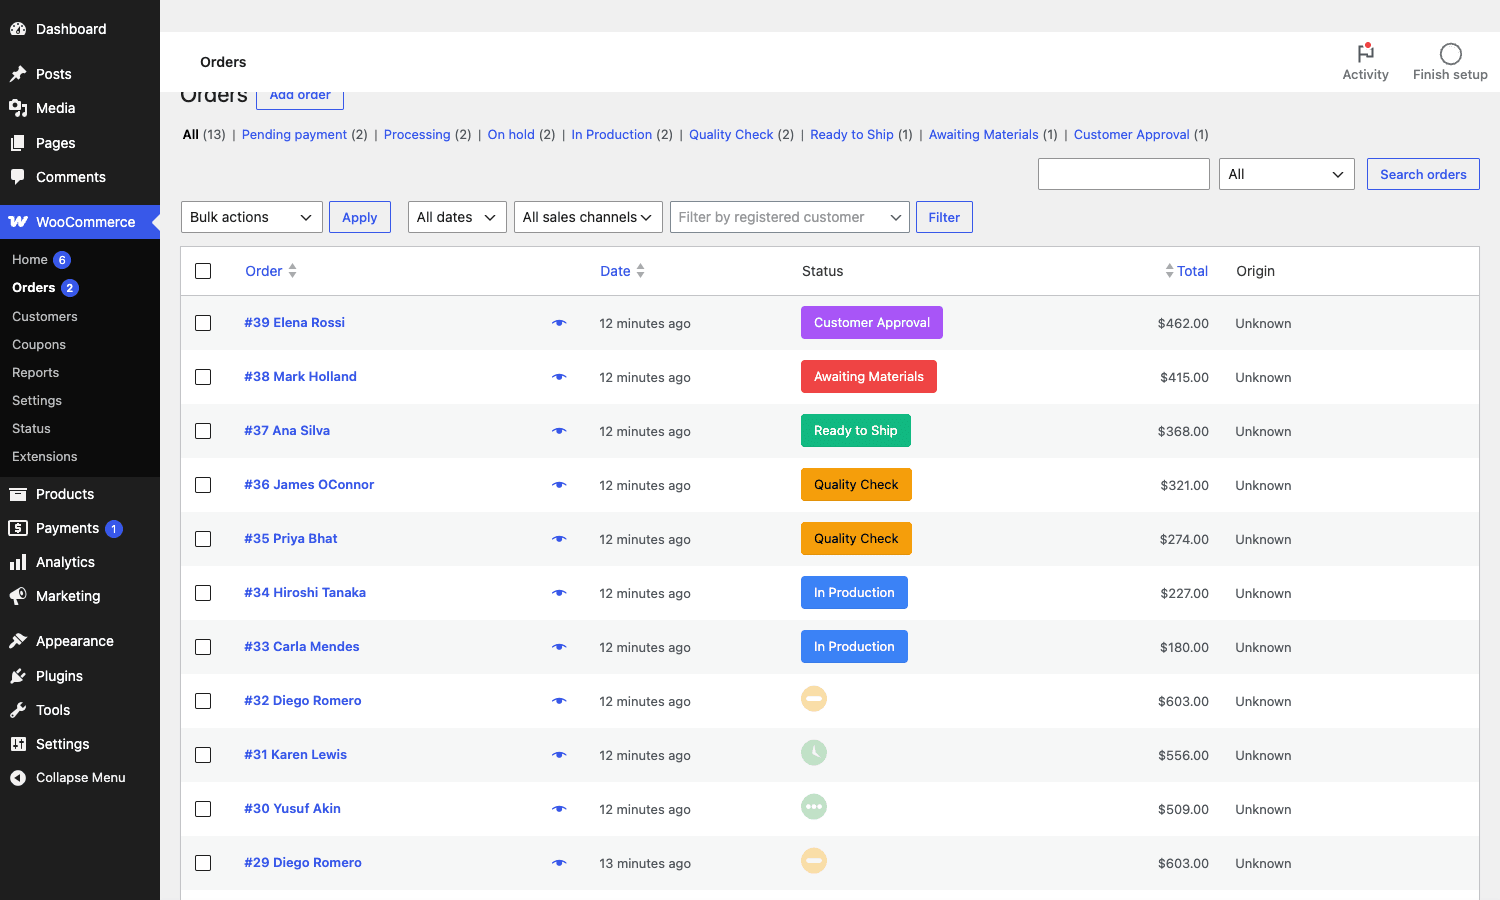
The amount of context a colored badge gives you at a glance is more valuable than it sounds. The first time you actually run a fulfillment standup with this in front of you, you’ll wonder how you ever did it with one beige "Processing" badge for everything.
The single-order detail view also picks up the new status. Open any order in the admin and the Status dropdown is your edit point; the customer’s billing/shipping info, line items, and order notes are all where WooCommerce normally puts them.
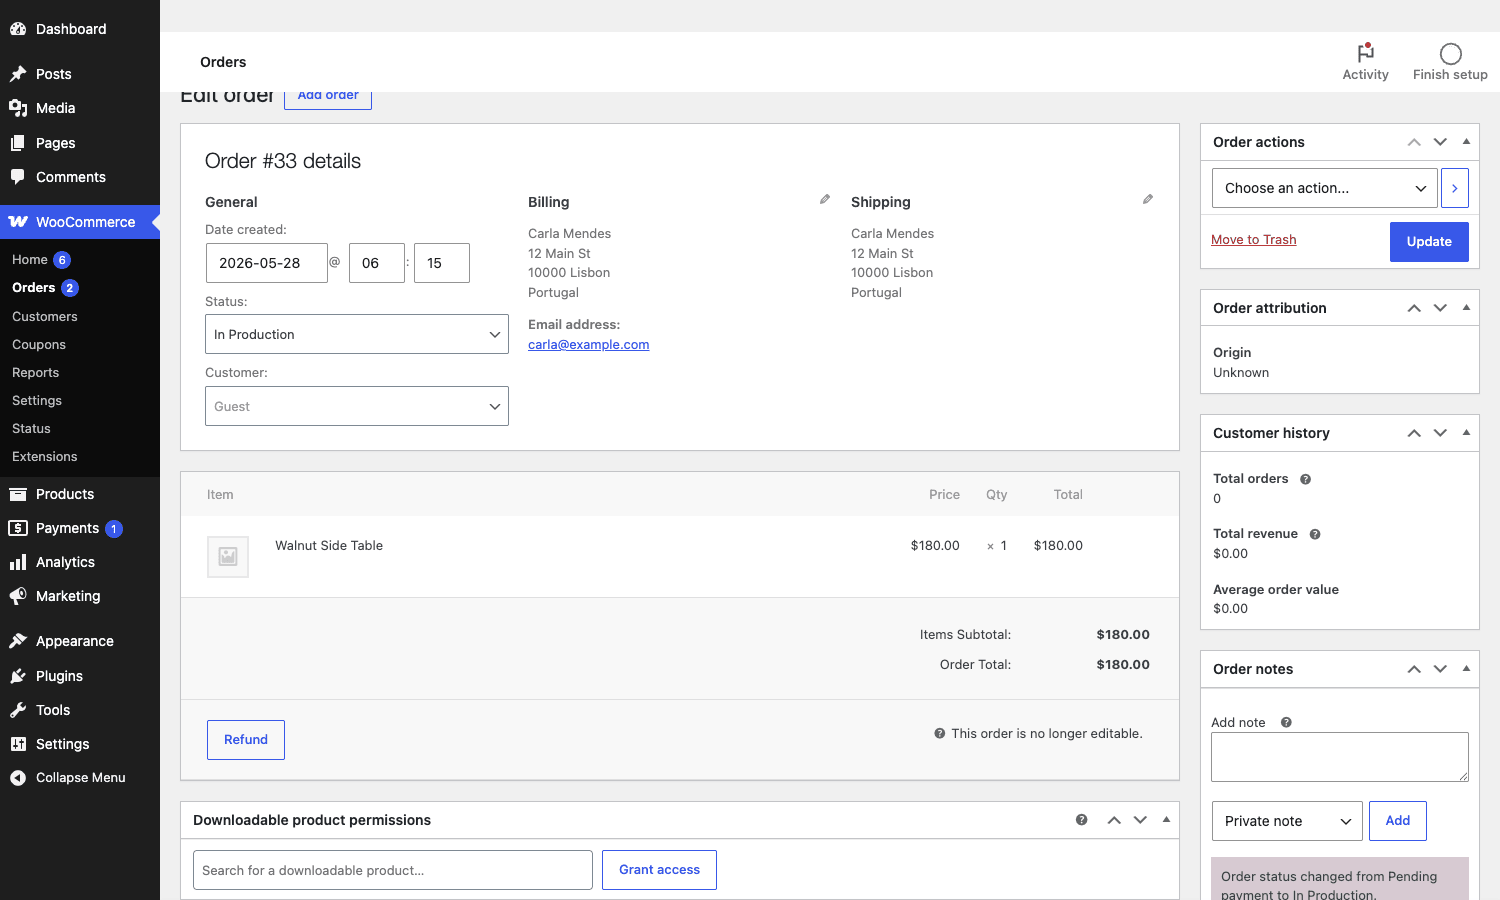
A practical hint. Pick contrasting colors for adjacent stages, not similar shades of blue. The point of color is to be glance-able. If "In Production" and "Quality Check" are both shades of blue, you’ve defeated the purpose. I use blue for production, amber for QC, green for ready-to-ship, red for blocked, purple for customer-action-required, and reuse those across every store I set up.
Email transitions: the feature that earns the plugin its price
This is where Order Status Manager.
Out of the box, WooCommerce sends an email on three status transitions: order placed (Processing), order on hold, and order completed. If you create a custom status with no plugin, no email fires. You have to write your own WC_Email subclass, register it, build the template, hook the transition action. Most stores skip this step, which is why most custom-status setups feel half-baked from the customer’s side.
Order Status Manager wires up the email side of that for you.
- Go to WooCommerce -> Order Status Emails in the admin.
- Click Add Order Status Email.
- Title: "In Production Notification".
- Email Type: Customer.
- Trigger Status: select "In Production" from the dropdown. (You can pick more than one, the email fires when any of them is reached.)
- Subject: "Your order is now in production".
- Heading: "Your order is now in production".
- Body: write the message in the editor. Use merge tags like
{customer_first_name},{order_number},{order_date},{site_title}. The plugin documents the available tags inline. - Publish.
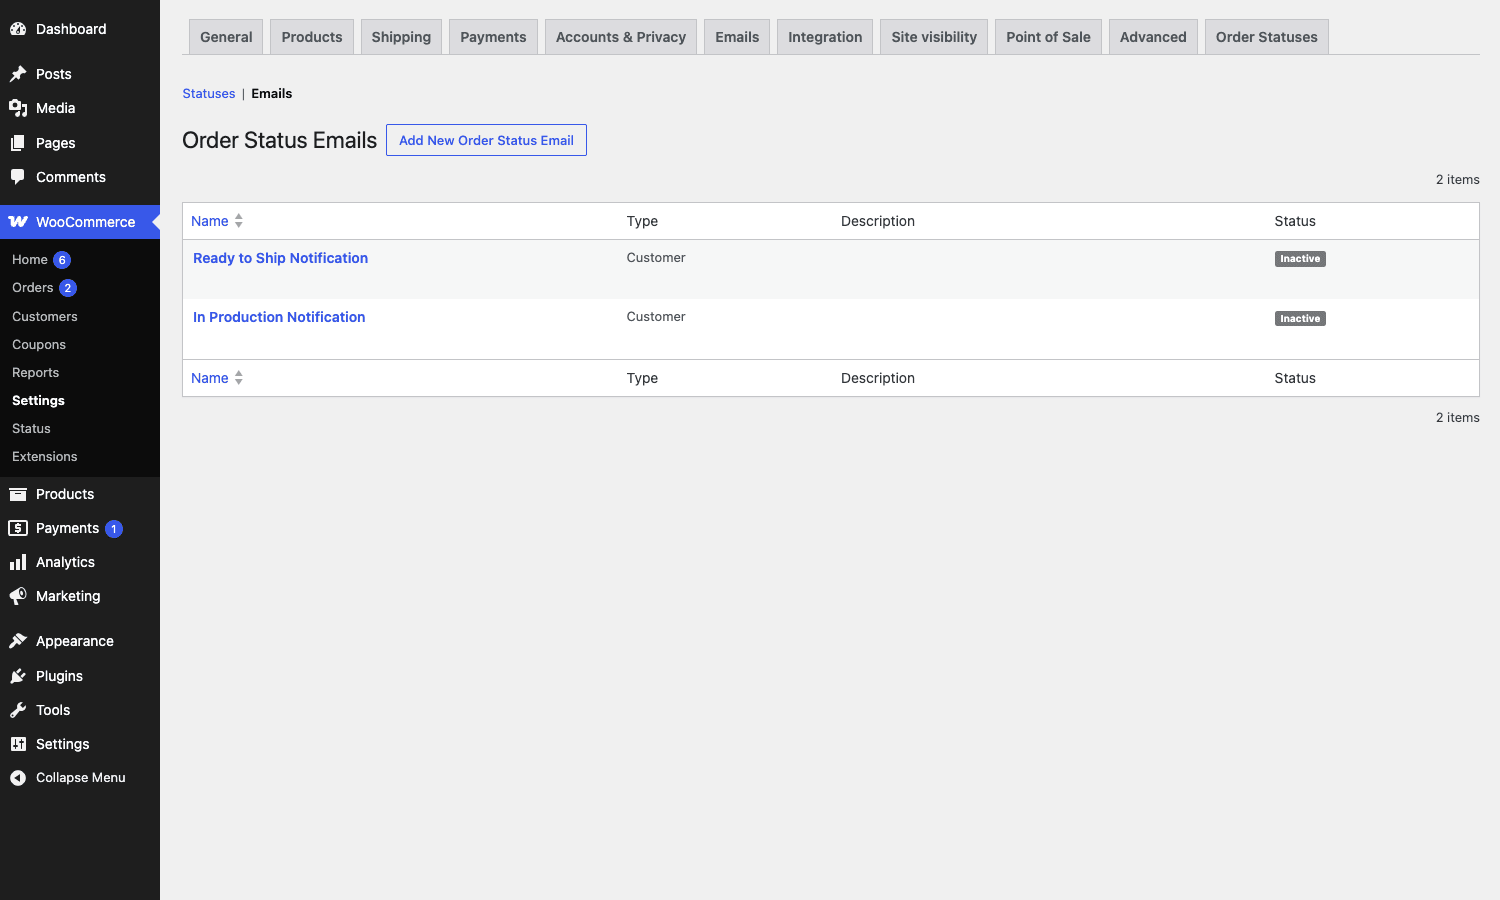
The email integrates with WooCommerce -> Settings -> Emails the same way the built-in templates do. That means it picks up your global email base template (header, footer, brand colors), it respects the global "From" name and address, and it can be re-sent from any order’s screen via the Order Actions dropdown ("Resend order email -> In Production Notification").
The one piece of polish this plugin does well that I genuinely appreciate. The "Resend" action works for custom emails, not just the built-in ones. If a customer says "I didn’t get your production-start email", you can pull up their order, pick the email from the dropdown, and click Update. It’s three clicks. Most homegrown setups can’t do that without code.
What this plugin doesn’t do, and you should know going in: it doesn’t have a "preview email with sample data" button. To preview, you publish the email, transition a test order, and check your inbox. WooCommerce’s built-in email preview tool (released in WC 9.7+) does include Order Status Manager templates in its dropdown, so if you’re on a recent WooCommerce, you can preview from there. But on older WC you’re stuck with a real send.
Custom statuses vs custom order notes: when each one is the right tool
A digression that’s worth 200 words because half the people I’ve shown this plugin to ask "wait, can’t I just add an order note that says ‘in production’ and filter on that?"
You can. You shouldn’t. Here’s why.
A custom order status is a real WordPress post status. It lives in the post_status column of the orders table (or the status column on the HPOS table). It’s indexed. WooCommerce’s orders list reads it. The status filter at the top of the orders list (All | Processing | In Production | Quality Check) is built off it. The bulk-edit dropdown uses it. The reports module reads it. The REST API exposes it as a first-class ?status=in-production query parameter. Webhooks fire on transitions. Other plugins that hook woocommerce_order_status_changed can react to it (AutomateWoo workflows, Shipment Tracking auto-fill, etc.). The customer’s My Account "Recent Orders" panel shows it.
A custom order note is a row in a separate comments table with comment_type = order_note. It’s invisible to every plugin that doesn’t explicitly read it. It can’t be filtered in the orders list. It can’t drive an email. It can’t be reported on. It’s a log entry.
Use order notes for human commentary ("Customer called, asked for express shipping, agreed +$15"). Use custom statuses for workflow stages. They’re not interchangeable, even though they both look like "tag the order with a label" from a UI perspective.
If you find yourself filtering on order notes by content, you’ve reached the point where you needed a status three months ago.
Order Status Manager vs YITH Custom Order Status vs free WC Custom Order Status: when each one wins
There are four reasonable ways to add custom WooCommerce order statuses. Here’s the honest measurable comparison.
Pricing
- WooCommerce Order Status Manager: $79/year for a single site on woocommerce.com, renewable.
- YITH WooCommerce Custom Order Status: $59.99/year for a single site on yithemes.com.
- WC Custom Order Status (free plugin by Tools for Wp): $0, available on wordpress.org.
- Hand-rolled
register_post_status()in your theme or a snippet plugin: $0, but your time.
Features
- Order Status Manager: custom statuses + per-status custom email templates + bulk-status-change support + REST API exposure + admin orders-list column + custom-paid-status flag + show-in-reports flag + next-status workflow hints + Order Actions dropdown integration.
- YITH Custom Order Status: custom statuses + colors + icons + bulk-status-change. Email templates are in YITH’s Premium-only tier (and even there are simpler than what Order Status Manager ships).
- Free WC Custom Order Status: bare-minimum status creation. No emails. No bulk edit menu integration. No paid-status flag. The orders-list filter does work.
- Hand-rolled: whatever you write. Out of the box, nothing.
Email support
- Order Status Manager: per-status email templates that extend
WC_Email, picked up by WC’s preview and resend tools, with merge tags and a subject/heading/body editor. - YITH: in Premium only. The templates support fewer merge tags and have no "Resend" integration.
- Free: nothing. You’d write your own email plugin alongside it.
- Hand-rolled: write your own
WC_Emailsubclass, register it viawoocommerce_email_classes, hook the transition action, build a template file. Around 200 lines of code per status, plus the template HTML.
REST and webhook exposure
- Order Status Manager: statuses are registered via the standard
wc_order_statusesfilter, so they appear automatically in RESTGET /wp-json/wc/v3/orders?status=in-productionand in webhook payloads. The orders REST endpoint validates thestatusparameter against the merged list, so a custom status is accepted as a value on POST/PUT. - YITH: similar mechanism but a separate filter that needs an extra add_filter to expose to REST in older versions.
- Free: usually exposes via REST because it uses the same filter, but no email or other side effects.
- Hand-rolled: you have to add the slug to
wc_order_statusesANDwc_is_order_statusAND the REST schema enum AND make sure it survives plugin updates.
Bulk edit
- Order Status Manager: custom statuses show up in the "Change status to…" bulk-edit dropdown automatically on both legacy and HPOS orders tables.
- YITH: same.
- Free: needs a small additional code snippet in some versions.
- Hand-rolled: extra
manage_edit-shop_order_bulk_actionsfilter to add the option per status.
If you only need labels and don’t care about emails, the free plugin or a hand-rolled snippet is fine. If you’re running an actual fulfillment workflow where the customer should hear when their order moves, Order Status Manager pays back its license within the first month in support tickets you don’t have to answer manually.
The REST API exposure: querying orders by your custom status
If you have a fulfillment dashboard, a Slack bot, a Zapier webhook, or any external system that needs to know about your orders, this section matters.
Because Order Status Manager hooks wc_order_statuses and wc_is_order_status, your custom slugs are first-class values on the WooCommerce REST endpoints:
# List all orders currently in production
curl -u $WC_KEY:$WC_SECRET \
 "https://example.com/wp-json/wc/v3/orders?status=in-production&per_page=100"

# Move an order forward
curl -X PUT -u $WC_KEY:$WC_SECRET \
 -H 'Content-Type: application/json' \
 -d '{"status":"quality-check"}' \
 "https://example.com/wp-json/wc/v3/orders/12345"
Both calls work without any extra plugin. The REST endpoint accepts the custom slug because it’s in the validated enum once the plugin’s status-merge filter fires.
Webhooks behave the same way. If you have a webhook configured for the order.updated topic, the payload contains "status": "in-production" instead of "processing". You can route on that in your downstream system (n8n, Make, Zapier, a homegrown Lambda).
One footnote. If you use the legacy WooCommerce REST endpoint at /wc/v2/ or earlier, the schema may cache the enum and reject your custom slug on POST until you clear it. Flush WP transients (wp transient delete --all via WP-CLI) and the issue goes away. The newer /wc/v3/ endpoint doesn’t have this problem.
Don’t bulk-change 200 orders without first disabling the transition email
This is the most expensive mistake you can make with this plugin, and it’s worth its own section.
Here’s the scenario. You’re cleaning up your orders table. You realize 200 orders that you imported from a previous platform are sitting in "Processing" but should be in your new "Awaiting Materials" status. You select all 200 in the orders list, pick Change status to: Awaiting Materials from the bulk-edit dropdown, click Apply.
The plugin does exactly what you told it to do. For every one of those 200 orders, it fires the woocommerce_order_status_changed action. Order Status Manager’s email handler catches each one and dispatches the "Awaiting Materials" notification email to the customer.
200 emails to customers who don’t know what your new status means. Half of them reply. Your support inbox is on fire by lunch.
The plugin has no debounce or "don’t email on bulk action" toggle in the bulk-edit UI. The email fires on every status transition, period.
How to do this safely:
- Before the bulk edit, go to WooCommerce -> Settings -> Emails, find the email associated with the target status, and toggle it off ("Enable this email notification" -> unchecked). Save.
- Run your bulk edit.
- Confirm the 200 orders are where you want them.
- Re-enable the email.
Or, in code if you’re scripting it:
// Disable a specific Order Status Manager email by ID before a bulk update
add_filter( 'woocommerce_email_enabled_wc_status_in_production_email', '__return_false', 99 );
//... your bulk update code...
remove_filter( 'woocommerce_email_enabled_wc_status_in_production_email', '__return_false', 99 );
The filter pattern is woocommerce_email_enabled_{email_id}, where email_id is the email’s saved ID (lowercase slug, prefixed). You can find the exact ID by inspecting the email post or the WC email settings page URL.
The lesson generalizes. Any time you do a programmatic or bulk status change, ask first: should this customer get the email for that transition? If no, gate it. Don’t trust yourself to remember after the fact.
Developer reference: hooks, filters, classes, post types
Everything below is verified against the current plugin source. Slugs and class names are exact.
Post types
The plugin registers two custom post types on init:
wc_order_status, a status record. Each row is the title (status label), slug (post_name), and meta keys_color,_icon,_action_icon,_next_statuses(serialized array),_is_paid,_include_in_reports,_bulk_action.wc_order_email, an email template. Meta keys include_email_type("customer" or "admin"),_email_dispatch_on_new_order, and the standardWC_Emailsettings (subject, heading, recipient).
You can query these like any other CPT. Useful when scripting bulk operations.
$statuses = get_posts( array(
 'post_type' => 'wc_order_status',
 'post_status' => 'publish',
 'posts_per_page' => -1,
) );
foreach ( $statuses as $s ) {
 $slug = $s->post_name; // 'in-production'
 $label = $s->post_title; // 'In Production'
 $color = get_post_meta( $s->ID, '_color', true );
 $next = get_post_meta( $s->ID, '_next_statuses', true ); // array
}
Filters
The plugin exposes these apply_filters calls. Hook them if you want to override values without editing core code.
wc_order_status_manager_order_status_name, change the displayed name of a status at runtime. Args:(string $name, string $slug).wc_order_status_manager_order_status_description, change the description.wc_order_status_manager_order_status_color, override the badge color for a status.wc_order_status_manager_order_status_icon, override the icon class.wc_order_status_manager_order_status_action_icon, override the icon shown in the Order Actions column.wc_order_status_manager_order_status_next_statuses, override the array of allowed next statuses.wc_order_status_manager_order_status_email_form_fields, modify the email settings form fields. Args:(array $form_fields, string $id, string $type).wc_order_status_manager_order_status_email_placeholders, add or override merge-tag placeholders on a custom email. Args:(array $placeholders, string $id, string $type, WC_Order $order).wc_order_status_manager_order_status_email_body_text_{$id}, change the body of a specific email. Args:(string $body, WC_Order $order, WC_Email $email).wc_order_status_manager_icon_options, change the list of Dashicons offered in the icon picker.wc_order_status_manager_deleted_status_replacement, set the replacement status when a custom status is deleted (defaults toprocessing).
Example: localize "In Production" to a different store language.
add_filter( 'wc_order_status_manager_order_status_name', function ( $name, $slug ) {
 if ( $slug === 'in-production' && get_locale() === 'es_ES' ) {
 return 'En Producción';
 }
 return $name;
}, 10, 2 );
Actions
wc_order_status_manager_order_status_change_notification(fired by the email class), dispatched right before a status-change email is sent. Args:array( 'order_id', 'from_status', 'to_status', 'order' ). Hook this to log every status transition or to push to an external service.wc_order_status_manager_order_status_actions_startandwc_order_status_manager_order_status_actions_end, render hooks inside the per-status Publish metabox. Use to add a custom button.wc_order_status_manager_order_status_email_actions_startandwc_order_status_manager_order_status_email_actions_end, same, for the email metabox.wc_order_status_manager_process_{$post->post_type}_meta, fired after the plugin saves a status or email’s meta on update. Args:($post_id, $post). Hook this if you store extra meta alongside a status.
Custom email class
WC_Order_Status_Manager_Order_Status_Email extends WC_Email. If you need to subclass it for a specific status (e.g. to add custom attachments), you can:
class My_Production_Started_Email extends WC_Order_Status_Manager_Order_Status_Email {
 public function get_attachments() {
 $atts = parent::get_attachments();
 // Attach a "what to expect" PDF
 $atts[] = WP_CONTENT_DIR. '/uploads/what-to-expect.pdf';
 return $atts;
 }
}
// Register your subclass via woocommerce_email_classes
add_filter( 'woocommerce_email_classes', function ( $emails ) {
 if ( isset( $emails['wc_status_in_production_email'] ) ) {
 $original = $emails['wc_status_in_production_email'];
 $emails['wc_status_in_production_email'] = new My_Production_Started_Email(
 $original->id,
 array( 'post_id' => $original->post_id, 'type' => $original->type,
 'title' => $original->title, 'dispatch_conditions' => $original->dispatch_conditions,
 'dispatch_on_new_order' => $original->dispatch_on_new_order )
 );
 }
 return $emails;
} );
Truncation of slugs over 17 characters
A quirk worth knowing about. WordPress allows post statuses up to 20 characters. WooCommerce adds the wc- prefix, so the maximum custom slug length is effectively 17. The plugin enforces this by hooking wp_unique_post_slug and truncating anything longer.
This is why "Awaiting Materials" in my walkthrough above became awaiting-material (one character short of "materials"). If you want a precise slug, set the post name field manually under the title and keep it at or under 17 characters. Otherwise the truncation can produce slightly awkward slugs.
REST endpoint behavior
The plugin uses the SkyVerge plugin framework’s settings REST controller for its own admin AJAX, but the user-facing REST surface is just the standard WooCommerce orders endpoint. Your custom slug is a value, not a separate route.
If you’re building a fulfillment dashboard, the call pattern is:
// Fetch all open production orders
const r = await fetch('/wp-json/wc/v3/orders?status=in-production&per_page=100', {
 headers: { 'X-WP-Nonce': wpApiSettings.nonce }
});
The merged status list is cached per-request but not persistently, so you don’t need to clear transients after publishing a new status.
What Order Status Manager doesn’t do (and when you reach for AutomateWoo)
It’s a focused plugin. That’s a feature. But here are the things it explicitly doesn’t do, so you don’t expect them.
It doesn’t run conditional logic on transitions. If you want "send the email only if order total is over $500" or "send a Slack message only on weekdays", you need a workflow engine. AutomateWoo is the obvious one. Its triggers include "Order status changed" with conditional rules, so you’d set the trigger to the Order Status Manager slug and add a condition. The plugins compose cleanly.
It doesn’t enforce a workflow. There’s a "next statuses" field that suggests where an order can go, but it’s a hint, not a constraint. A clerk with manage_woocommerce capability can move any order to any status from the dropdown. If you need hard rules ("orders cannot skip Quality Check"), you have to hook woocommerce_order_status_changed and reject invalid transitions yourself.
It doesn’t auto-trigger transitions based on time or events. No "after 7 days in Awaiting Materials, auto-cancel." Again, AutomateWoo for the workflow or a custom WP-Cron job hooked into your domain logic.
It doesn’t add a customer-facing status timeline on the My Account page. WooCommerce shows the current order status on the customer’s order detail page, but not the full history. If you want a "Your order is at step 3 of 5" UI, you’ll need to render it yourself by reading the order notes (status changes do get logged there).
It doesn’t migrate existing orders into a custom status. Installing the plugin doesn’t touch your data. If you want to retroactively move all orders currently in "Processing" that are older than 14 days into "Awaiting Materials", you run a one-time WP-CLI script or use the bulk-edit dropdown (see the anti-pattern section above about disabling the email first).
It doesn’t handle order-status-specific stock behavior beyond the paid flag. WooCommerce’s "reduce stock at status X" logic is governed by which statuses are marked paid. Order Status Manager respects this. If you need finer rules ("reduce stock when status hits In Production, not at Processing"), you’ll write that logic with woocommerce_order_status_changed.
The plugin’s job ends at "let you define and fire a status, and email the customer about it." Anything beyond that is your workflow engine’s problem.
Performance, compatibility, and the small annoyances
A handful of things to know before you ship this on a real store.
HPOS compatibility. The plugin declares HPOS (High-Performance Order Storage) compatibility in recent versions. The order statuses still drive the orders list, bulk edit, and REST in HPOS mode. If you’re on an older WC build with the legacy posts-based orders table, the plugin works fine there too.
Performance footprint. The plugin runs a get_posts() on the wc_order_status post type on every admin and front-end request to merge custom statuses into wc_order_statuses. The result is cached in-memory per request (wp_cache_get keyed by the args). On a site with no persistent object cache (no Redis, no Memcached), this is one extra query per request. It’s negligible. If you have 30+ custom statuses, you might notice it on admin pages that render the status filter repeatedly; in that case, add Redis.
The admin UI feels dated. I’m being honest. The order-status list is a WordPress posts-table view. The reorder is drag-and-drop, but there’s no visual flow diagram that shows you which status leads to which. If you have eight statuses with complex "next status" rules, you have to keep the diagram in your head. A modern equivalent would render this as a node graph in the admin. Order Status Manager doesn’t.
The Dashicons icon picker is showing its age. Dashicons hasn’t grown meaningfully since 2018. If you want a modern icon (a delivery truck, a paint bucket, a specific industry symbol), you’re often left with an approximation. You can override the icon with custom CSS targeting the status’s mark element, but that’s CSS hackery, not configuration.
Slug truncation is silent. As noted above, slugs over 17 characters get truncated when you click Publish. The UI doesn’t warn you. The first time you write "Quality Check Stage Two" expecting a slug like quality-check-stage-two, you’ll instead get quality-check-sta. Check your slug field after publishing.
No conditional emails. As noted in the previous section, every status change fires the email. There’s no "only if cart total > X" or "only on weekdays". Hook with AutomateWoo if you need this.
Custom statuses in WC Analytics. WooCommerce Analytics (the React-based reports module) does include custom statuses in its filter dropdown if you tick "Show in Reports" on the status. Older WC reports (Reports tab) also respect it. The only gotcha is that revenue numbers are based on the "paid status" set; an order in a custom status that isn’t marked paid won’t appear in revenue charts.
Pricing and licensing
Order Status Manager is sold at woocommerce.com as part of the official extensions catalog. Pricing is $79/year for a single site, $99/year for up to 5 sites, $149/year for up to 25 sites. The license entitles you to updates and email support from the WooCommerce/Automattic team.
The plugin is GPL-licensed. That’s what makes the GPL Times distribution possible: you can install the same code from a GPL store, get the same admin features, and just lose the official update channel and email support. For a staging site, a sandbox, or a one-off test environment, that’s a non-issue. For a production store where you’d want updates pushed automatically by the vendor, paying the official license keeps that flow.
If you want to spin up a workshop-style fulfillment flow without filling in a card, WooCommerce Order Status Manager on the GPL Times store installs in two clicks and exposes the same statuses, emails, and bulk-edit hooks the licensed plugin does.
FAQ
Why isn’t my custom status email sending?
Three common causes. First, check that the email’s Trigger Status matches the slug you transitioned the order to (slugs are case-sensitive and may have been truncated; see the truncation note above). Second, check WooCommerce -> Settings -> Emails and confirm the email is marked Enabled. Third, check your site’s outgoing mail, if your server doesn’t have a working SMTP setup, the email is generated but never reaches the inbox. Test with WP Mail SMTP or a similar plugin’s test-email feature. The plugin itself doesn’t fail silently; if the email is enabled and the trigger fired, the email left the building.
Can I export orders filtered by a custom status?
Yes. The orders-list status filter at the top of the page accepts custom slugs, and from there you can use the "Export" button (Tools -> Export in WC, or the orders-list bulk action depending on your version) to dump the filtered set. Programmatically, wc_get_orders( array( 'status' => 'in-production' ) ) returns the order list as WC_Order objects. Trade-off: WC’s built-in export is CSV with a fixed column set; if you need custom columns, WooCommerce Customer/Order/Coupon Export or a similar export plugin is what you want.
Does WooCommerce Analytics include orders in custom statuses?
Only if you tick Show in Reports when creating the status, AND if the status is marked as paid. Analytics reads from the order stats table that WooCommerce maintains, and that table is populated based on paid-status transitions. A status that isn’t marked paid won’t appear in revenue numbers regardless of the "Show in Reports" toggle. Trade-off: this is intentional on WooCommerce’s part to keep revenue accurate, but it surprises people the first time. If you want a status like "Quality Check" to contribute to revenue, mark it paid.
Does it work with WooCommerce Subscriptions renewals?
Yes, but with one nuance. A renewal order is just a new order created by WooCommerce Subscriptions, so your custom statuses are available on it the same way they are on a regular order. Your transition emails fire on it the same way. The nuance: Subscriptions has its own internal subscription status concept (Active, On Hold, Pending Cancel, Expired) which is separate from order status. Custom order statuses don’t bleed into the subscription record. If you want to add custom subscription statuses, you’d write that separately.
How do I migrate existing orders to a new custom status?
The safe way: use the orders-list bulk-edit dropdown. Filter to the source status, select all, pick "Change status to…" -> your new status, click Apply. Before you do, disable the transition email on your custom status (see the anti-pattern section) unless you actually want every affected customer to receive a notification. For larger migrations (10,000+ orders), use WP-CLI: wp wc shop_order list --status=processing --format=ids | xargs -I{} wp wc shop_order update {} --status=in-production (adjust for your wpcli-wc version). Trade-off: WP-CLI bypasses the WP admin’s UI, but the wc_order_status_changed action still fires per order, so emails still go out unless you disable them first.
Can I hide a custom status from the customer’s My Account page?
The customer’s My Account "Orders" tab shows the order’s current status label. If you want certain internal statuses ("Quality Check", "In Print") to display as something else to the customer, hook wc_order_status_manager_order_status_name with a context check. Or, simpler: set the status’s label to be customer-friendly ("Being Prepared" instead of "Quality Check"). There’s no "internal-only" flag on a status. Trade-off: this is a real gap; if you need a clean internal vs. customer-visible distinction, you’ll write a small filter.
Can I trigger the transition email on a programmatic status change (not just admin UI)?
Yes. The email handler hooks woocommerce_order_status_changed, which fires from anywhere the status changes: REST API, WP-CLI, WC_Order::update_status(), the admin UI, AutomateWoo workflows. The handler doesn’t care how the change happened. This is also why the bulk-edit anti-pattern is so easy to fall into.
Does the plugin add any database tables?
No. The data lives in wp_posts (for the status and email post types) and wp_postmeta (for the colors, icons, next-status lists, paid flag, etc.). Uninstalling the plugin leaves the data behind. If you want a clean uninstall, you’d delete the wc_order_status and wc_order_email posts before deactivating.
Final thoughts
Order Status Manager is the plugin I reach for first when a WooCommerce store needs more than the default six statuses. It does one specific job, register custom WC statuses with email templates and the right integration points, and it does it without me having to write a WC_Email subclass or a register_post_status boilerplate.
The bits I’d improve if I were the product manager: a visual flow editor for the "next status" graph, a "preview email with sample data" button, a hard-enforcement toggle on next-status rules, and a modern icon picker that goes beyond Dashicons. The bits that are already good: the email integration, the REST API exposure for free, the HPOS compatibility, the bulk-edit support, the Resend Order Email action working for custom emails.
If you’re running a store where fulfillment has internal steps the customer cares about, made-to-order, print-on-demand, multi-supplier drop-ship, meal-kit subscription, custom services, this is the cleanest path I’ve found to a workflow that holds together under load. Pair it with AutomateWoo if you need conditional logic on transitions, Shipment Tracking for the carrier handoff, and WooCommerce PDF Invoices for the document side, and you have a real fulfillment stack instead of one badge labeled "Processing" doing the work of six.