

If you want to put a price tag on WordPress content, you basically have two paths. You can stitch together WooCommerce plus a thicket of extensions and hope the gating works, or you can install a purpose-built membership plugin and skip the duct tape. WishList Member is the older end of that second path. It launched in 2008, and it is still being actively built and sold today, which is unusual longevity in a market where most "lifetime" plugins die after three years.
This article is a working tour of WishList Member: what it does, how the admin UI is laid out, what it costs to run, and what hooks and filters you have if you want to glue it into the rest of your stack.
Table of contents
- What is WishList Member?
- Key features
- How memberships actually work for end users
- Installation and first-run setup
- Touring the admin UI
- Real-world use cases
- Developer reference: hooks, filters, REST, and DB
- Performance, compatibility, and gotchas
- Pricing and licensing
- FAQ
- Final thoughts
What is WishList Member?
WishList Member is a WordPress membership plugin. It turns a regular WordPress site into a membership site, which is a fancy way of saying it lets you put paywalls on content and ship people through a checkout. The plugin handles everything between the user clicking "buy" and them seeing the article, course module, or download they paid for: registration, payment, level assignment, content protection, login redirect, expiry, renewal, and the cleanup when their access ends.
The plugin originally launched in 2008, built by Stu McLaren and Tracy Childers, and was one of the first paid membership plugins for WordPress. It has been continuously developed since then, and is now part of the broader ThriveCart family. The official product site lives at wishlistmember.com if you want to dig through their own documentation. The "X" in WishList Member X is the major architectural rewrite the team shipped a few years back, which moved the admin UI from a sprawling tabbed thing to a single-page Vue app with side navigation. If you remember WishList Member from a decade ago and bounced off it then, the modern build is worth another look.
What WishList Member specifically does:
- Restricts content (posts, pages, custom post types, files, categories, RSS) to members of specific levels.
- Sells access to that content through one or more payment gateways.
- Manages renewals, expiries, refunds, and account changes.
- Hooks into thirty-plus third-party services for email marketing, CRM, automation, course platforms, webinars, and forums.
- Provides a developer surface (hooks, filters, REST API, shortcodes) so you can extend behaviour without touching plugin files.
It competes with MemberPress, Paid Memberships Pro, Restrict Content Pro, MemberMouse, and Memberium. We’ll compare them later in the article.
Key features
Here is what you actually get when you install WishList Member, broken down so you can match each feature to a real-world need.
- Unlimited membership levels. A level is a named bucket of access rights. You can create as many as you want, and a single user can belong to multiple levels at once. Useful for "free + paid + premium" tiers or for one-off course purchases that stack on top of a base subscription.
- Drip content. Schedule a post or lesson to unlock N days after a member joins. Drip is configured per post per level, so the same lesson can drip on day 7 to one level and be available immediately to another.
- Sequential content. A more rigid form of drip. Each lesson unlocks only after the previous one is consumed. Pairs well with online courses where order matters.
- Pay-per-post. Sell access to a single post or page outside of any membership level. The user buys, gets access to that one URL, and never sees the rest of your gated content unless they buy more.
- Custom registration forms per level. Each level gets its own registration page, its own field set, and its own thank-you redirect. So your "Gold" tier can collect a phone number while "Silver" only takes an email.
- Login redirects per level. When a member logs in, send them somewhere appropriate. Course buyers land on the course dashboard; community members land on the forum; free signups land on a welcome page.
- Sneak peek. Show the first N words or a custom excerpt of a protected post to non-members, then cut to a "join to read the rest" call-to-action. This is one of the better conversion tools the plugin ships with, because the visitor sees real content rather than an opaque "please log in" wall.
- Drip + sequential together. You can combine the two so lesson 3 unlocks on day 14 but only if lessons 1 and 2 are marked complete.
- Trial periods. Free trial, paid trial, or a discounted intro period before the regular subscription kicks in.
- Coupons and discount codes. Apply at the registration or checkout step. Supports fixed amount, percentage, expiry, and per-level restrictions.
- Member directory. Optional public-facing directory of members, useful for community-style sites.
- Custom field manager. Add any custom field to the registration form, store it on the user, and surface it via shortcode or REST.
- WooCommerce integration. Link a WooCommerce product to a membership level, so buying the product grants access. Lets you keep using WooCommerce as your cart for physical goods plus memberships.
- Member migration tools. Import members from CSV, including legacy data from other membership plugins.
How memberships actually work for end users
Before we get into setup, it helps to walk through what a paying member actually experiences end-to-end. Imagine a site selling a single membership level called "Pro" for $19/month.
A visitor lands on the homepage. They click an article that looks interesting. The article body is gated, so they see the title, a short sneak-peek excerpt, and a call-to-action that says "Join Pro to keep reading." They click. WishList Member sends them to the registration page configured for the Pro level. They fill in their email, name, and password. Then they’re redirected to the payment provider (Stripe, PayPal, etc.) where they enter their card. The gateway charges them, calls back to WishList Member with a success, and WishList Member assigns them the Pro level. They are now redirected to a "Welcome to Pro" page. From there, they can navigate back to the article they were trying to read, and this time it loads in full.
Behind the scenes, WishList Member is doing a handful of things in sequence:
- Creating a WordPress user account with the role the level is configured to use (usually
subscriberor a custom role). - Inserting a row into the
wlm_userlevelstable that maps that user ID to the Pro level ID, with timestamps for start and (if recurring) next billing. - Writing a row into
wlm_transactionswith the gateway, transaction ID, amount, and status, so you can audit payments later. - Setting a long-lived cookie on the user’s browser so they stay logged in across sessions.
- Firing
wishlistmember_after_registrationso any of your custom code or third-party integrations (Mailchimp, ActiveCampaign, Slack, Zapier) get a chance to react.
A month later, the gateway sends another webhook for the renewal charge. WishList Member writes another transaction row and bumps the next-billing date. If the card fails, the plugin tries again on a schedule, then suspends the level if all attempts fail. When the member cancels, the level can either expire immediately or stay active until the end of the paid period, depending on how you configured it.
If you write the article yourself, this is roughly the experience your visitors will have. The only deviation comes when you start using pay-per-post, drip, or trial flows, but the core sequence above is the same.
Installation and first-run setup
WishList Member is a normal WordPress plugin: a zip you upload, activate, and configure.
- Upload the zip. From the WordPress admin, go to
Plugins -> Add New -> Upload Plugin, pick the zip, and click Install Now. - Activate. WordPress will prompt you, click Activate. The plugin adds a top-level WishList Member item to the WP admin sidebar.
- Run the setup wizard. Clicking the new menu item drops you into a guided wizard. The first step is the welcome screen. The wizard walks you through entering a license key, creating your first membership level, picking integrations (Stripe, ActiveCampaign, etc.), and choosing system pages (the login, registration, after-registration, and thank-you pages WordPress will route members through).
- Or skip the wizard. Every step has a Skip link in the bottom left. If you’d rather configure things manually, hit Skip until you land on the Dashboard.
After install, the WishList Member admin looks like this:
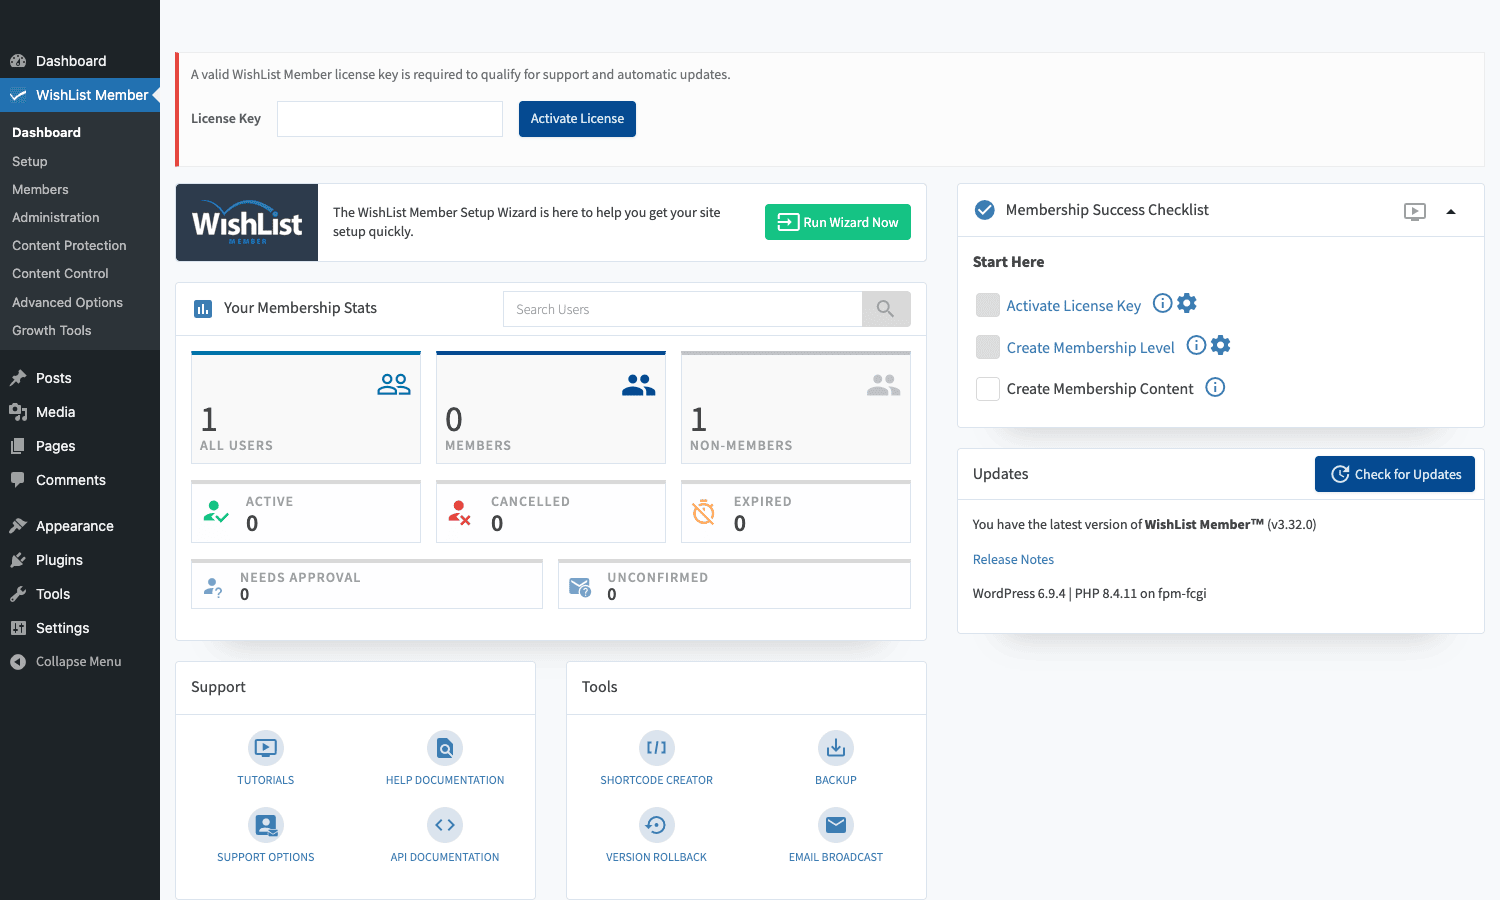
The top banner asks for a license key, which is required for the official auto-updates and direct support from WishList Member, but the plugin itself works fully without it. The left sidebar shows the eight main areas: Dashboard, Setup, Members, Administration, Content Protection, Content Control, Advanced Options, and Growth Tools. The dashboard itself has three cards: your membership stats (active, cancelled, expired, needs approval, unconfirmed), a Membership Success Checklist that walks you through the next setup tasks, and a tools row for Shortcode Creator, Backup, Version Rollback, and Email Broadcast.
If you’re following along on a staging WordPress, the rough order of setup is:
- Create at least one level. Setup -> Levels -> Add Level. Give it a name, a price, a billing frequency, and an expiry rule.
- Configure a payment integration. Setup -> Integrations -> Payment Providers. Pick at least one (Stripe is the most common) and paste your API keys.
- Choose your system pages. The wizard does this automatically, but you can override later. Each level can use its own registration/login/thank-you pages.
- Protect some content. Content Protection -> Posts -> set existing posts or whole categories to require the level you just created.
- Test a signup end-to-end. Use a private browser window. Register, pay (use Stripe’s
4242 4242 4242 4242test card), confirm you can access the protected post.
If everything works, you have a functioning membership site.
Touring the admin UI
The Vue-based admin in WishList Member X has a consistent layout across every section: a secondary side-nav on the left that lists the sub-features of the current area, and the actual settings on the right. Once you learn that pattern, every page feels familiar.
Members
Members -> Manage is the main user-facing table. It lists every WordPress user on the site, who has access to what, and a status indicator.
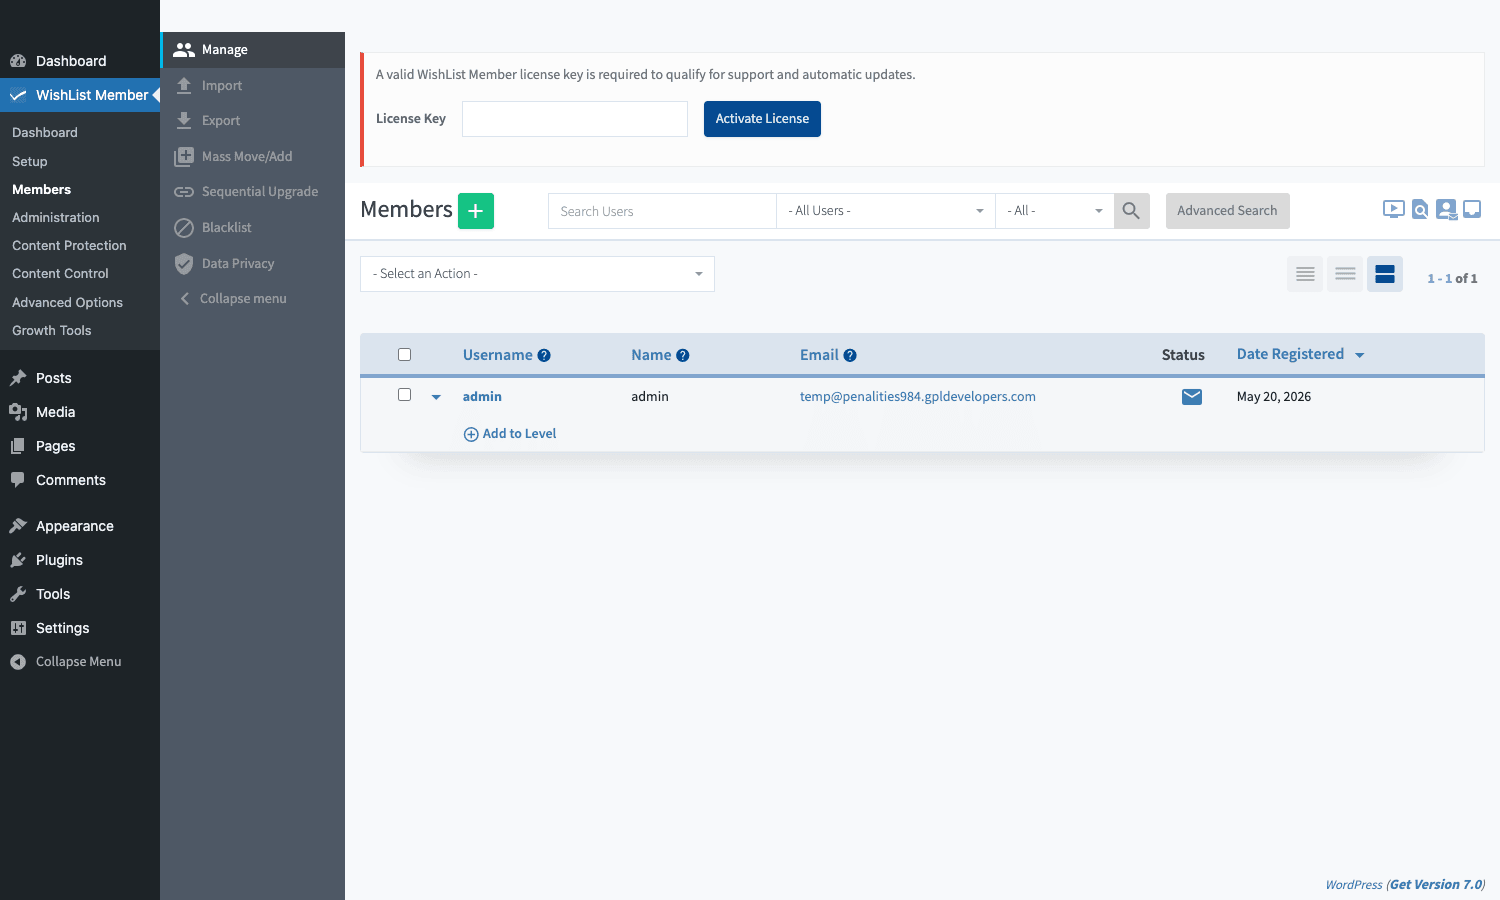
The left sub-nav has Manage, Import, Export, Mass Move/Add, Sequential Upgrade, Blacklist, and Data Privacy. You can search by username, name, or email; filter by level and by status; and take bulk actions on the visible set ("add to level X", "remove from level Y", "send broadcast", etc.). Sequential Upgrade is the one most people miss: it lets you automatically promote a user from one level to another after N days, which is the engine behind "join the free tier, get auto-upgraded to paid in 30 days" flows.
The Blacklist tab is small but useful. If you want to ban an email address from ever registering (refund abuse, chargeback fraud, support drain), drop it in here.
Data Privacy is your GDPR helper. It surfaces a member’s full record on demand and lets you export or erase, which is the regulatory thing you have to do anyway.
Setup -> Levels
Each membership level is created and edited here. The form has six logical sections:
- Access: which posts, pages, categories, files, and downloads this level can see.
- Registrations: which registration form the level uses, what custom fields are required, what the redirect after signup is.
- Requirements: prerequisites (e.g. user must already be a member of "Free" before they can buy "Pro").
- Additional Settings: expiry rules, multi-tier rules, role mapping.
- Email Notifications: which emails the member receives (welcome, expiry warning, cancellation, etc.).
- Actions: what happens on signup, cancellation, and expiry (move to level X, send to URL Y, fire webhook Z).
This is where the plugin earns its "complete" reputation. There are easily a hundred toggles across these tabs, and you can leave 95% of them at defaults. But when you need that one quirky rule ("after Pro expires, downgrade them to Free instead of locking them out"), it’s almost always already a checkbox somewhere.
Setup -> Integrations
This is one of WishList Member’s stronger selling points: a long list of paid services that work out of the box.
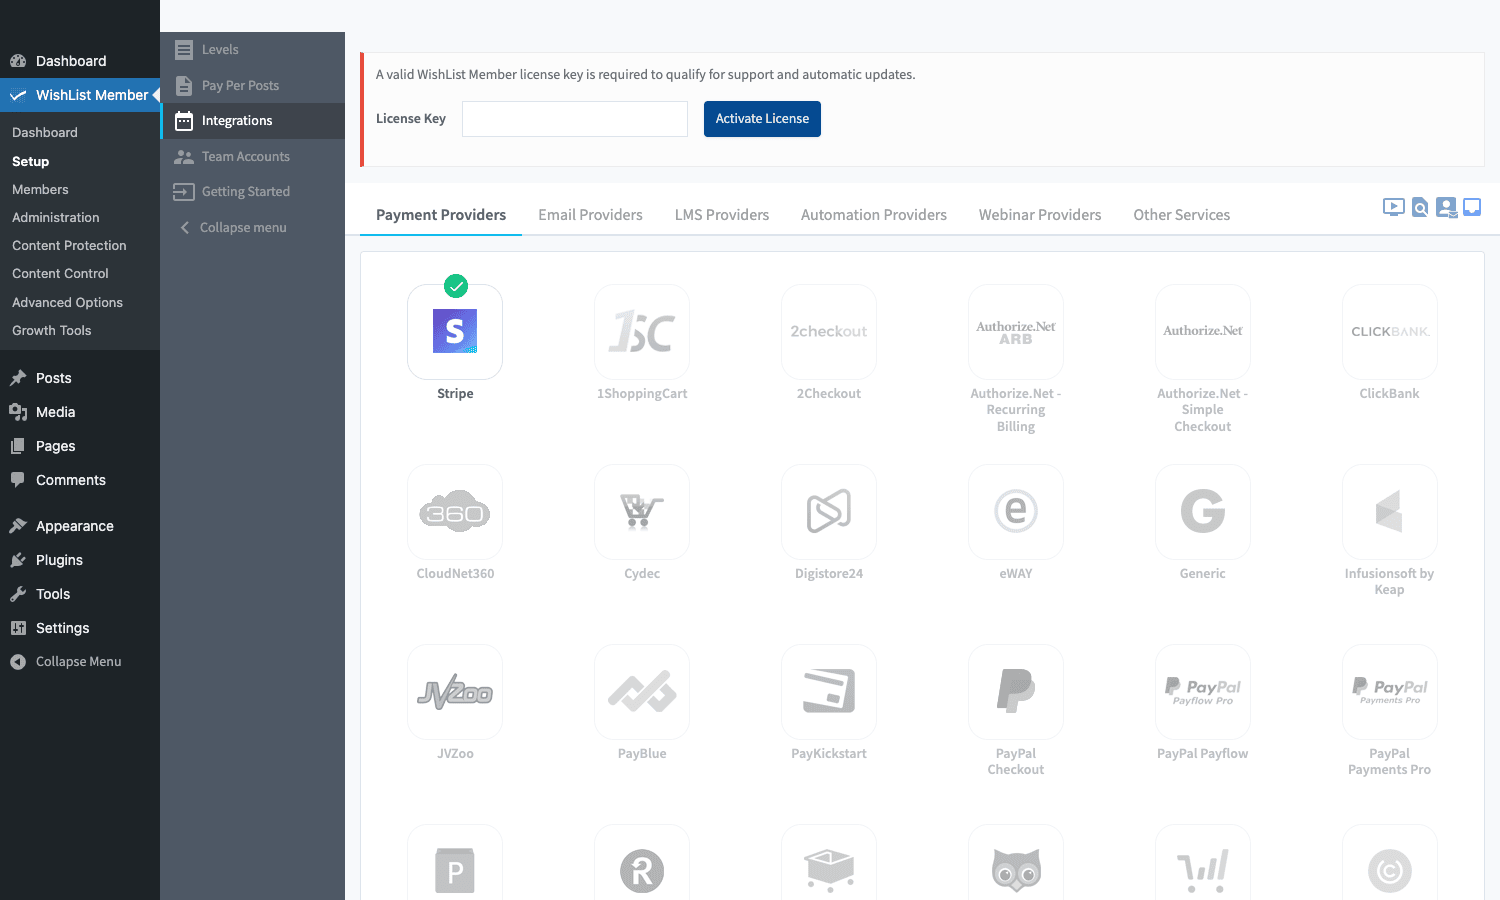
The Payment Providers tab is the busiest. You get Stripe, PayPal (Standard, Checkout, Payflow, Payments Pro), 2Checkout, Authorize.Net (both ARB recurring and Simple Checkout), ClickBank, CloudNet360, Cydec, Digistore24, eWAY, Infusionsoft by Keap, JVZoo, PayBlue, PayKickstart, and a Generic provider that lets you wire up anything else with webhooks. The Email Providers tab covers Mailchimp, ActiveCampaign, ConvertKit, Drip, AWeber, GetResponse, MailerLite, and a few others. There are also LMS Providers (LearnDash, LifterLMS, Tutor LMS), Automation Providers (Zapier, Make/Integromat, Pabbly), and Webinar Providers (Zoom, GoToWebinar, WebinarJam, EverWebinar).
Each integration tile clicks through to a settings panel where you paste API keys and map your levels to lists/tags/groups in the third-party service. The most common pattern I see in real sites: Stripe + Mailchimp + Zapier, which covers payments, email marketing, and arbitrary glue.
If you sell courses, the LearnDash integration is worth a serious look. LearnDash is the dominant WordPress LMS and pairs cleanly with WishList Member: WishList handles the membership, payments, and access; LearnDash handles the lessons, quizzes, and progress tracking.
Content Protection
This is where you tell WishList Member which existing content is gated, and to which levels.
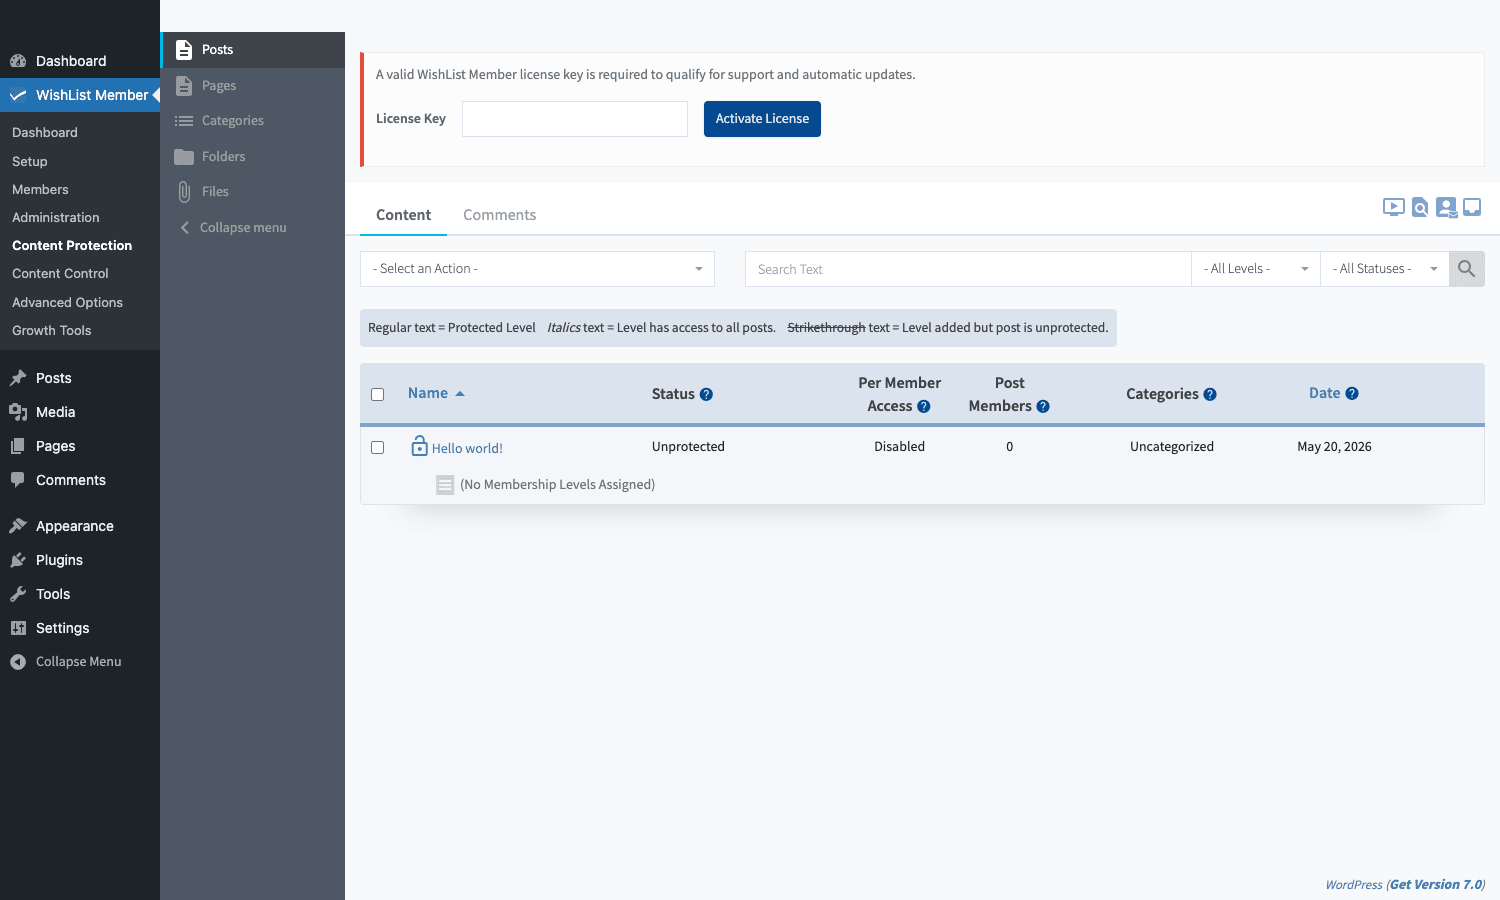
The sub-nav splits content by type: Posts, Pages, Categories, Folders (custom taxonomies), Files (uploads), and Comments. For each item in the list you can mark it Unprotected, Protected (with a level multi-select), or Inherited (if it’s a child of a protected parent, inherit the parent’s rules). There’s a useful legend: regular text means "protected by level X", italic means "level X has access to all posts", strikethrough means "level X is added but the post itself is not protected" (a common misconfiguration WishList helps you spot).
The shortcut hidden here: if you bulk-select a category and protect it, every post in that category is gated by inheritance. So for most sites, you’re picking a small number of categories rather than going post-by-post.
Advanced Options
Site-wide defaults live here.
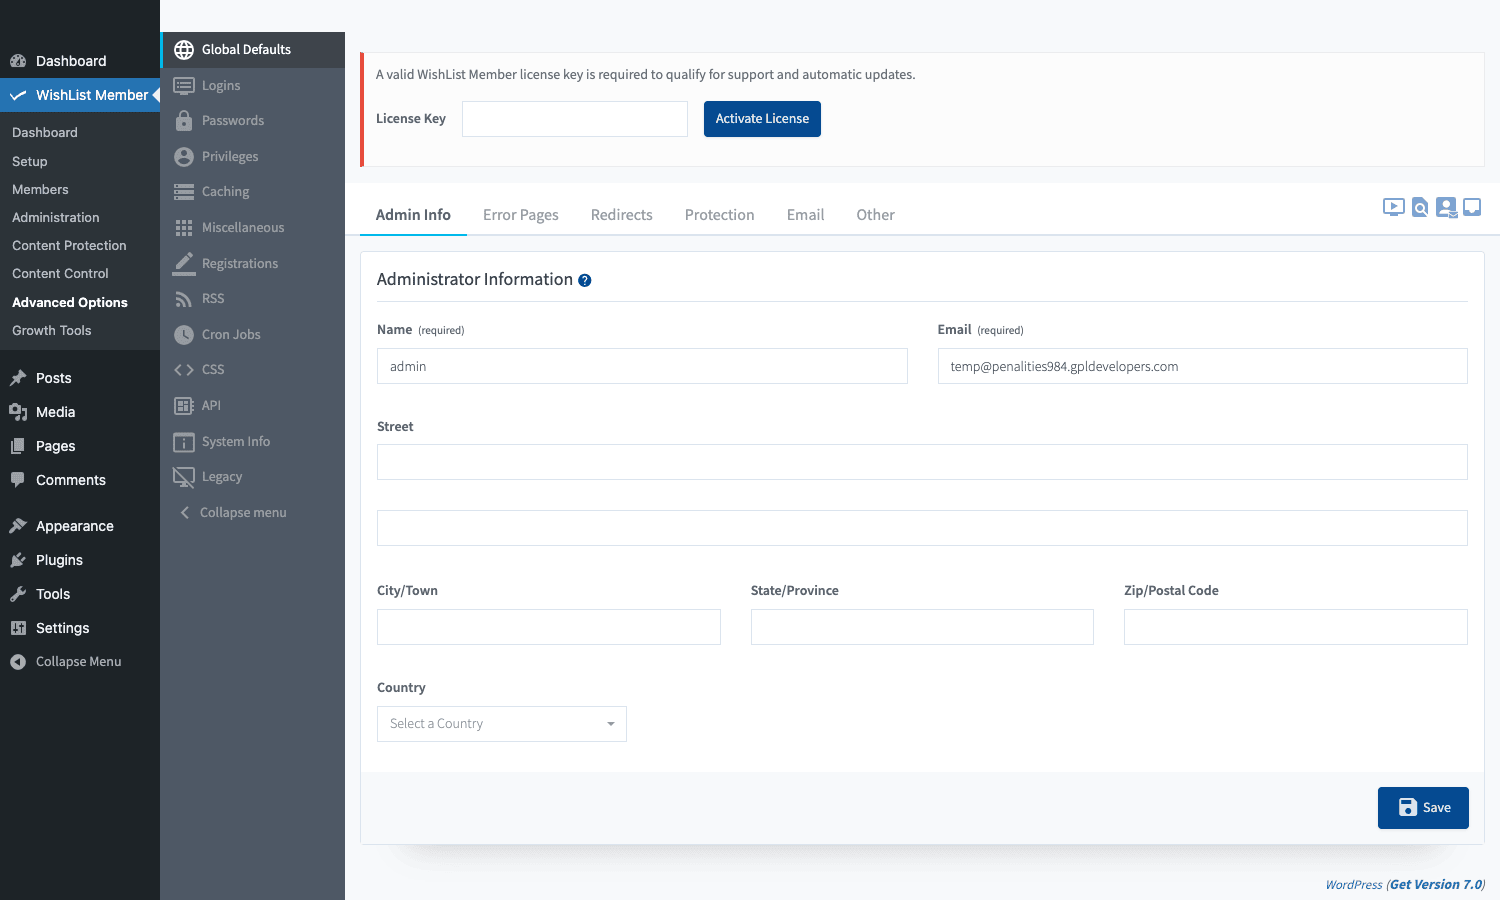
The left sub-nav covers Global Defaults, Logins, Passwords, Privileges, Caching, Miscellaneous, Registrations, RSS, Cron Jobs, CSS, API, System Info, and Legacy. Some highlights:
- Logins: force unique sessions, lock out members after N failed attempts, send "you were locked out" emails.
- Passwords: minimum length, strength requirements, expiry interval (force a reset every 90 days).
- Privileges: which capabilities WishList grants vs. takes away from members. Defaults are sensible; rarely needs tweaking.
- Cron Jobs: WP-Cron tasks for expiry checks, drip unlocks, and webhook retries. You can pause or run-on-demand here.
- CSS: inject custom CSS for the sneak peek wrapper, login form, registration form, etc. Spares you from a child theme tweak.
- API: rotate API keys for the REST endpoints. We’ll dig into the REST API later.
- System Info: a one-page summary of PHP version, WordPress version, plugin version, active integrations, and recent error logs. Hand this to support if you ever open a ticket.
Per-post meta box
When you edit any post or page, WishList Member adds a meta box below the content area:
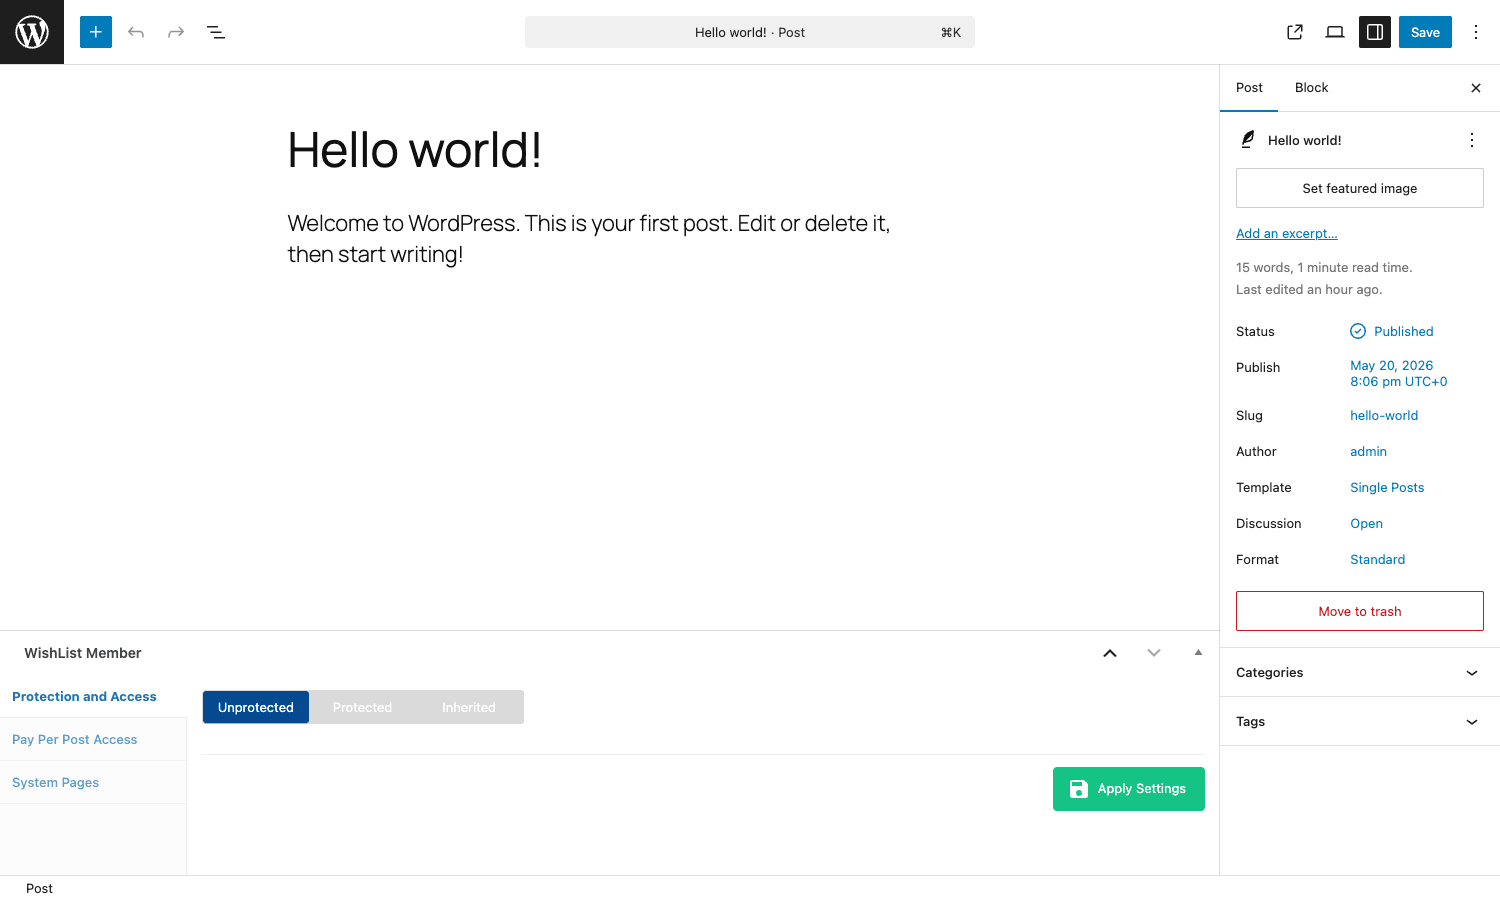
It has three tabs: Protection and Access (the main toggle), Pay Per Post Access (mark this post for individual sale, set its price), and System Pages (mark this post as the registration / login / thank-you page for a specific level).
Most of your day-to-day will be in the Protection and Access tab. Toggle between Unprotected (anyone can read), Protected (pick which levels can read), and Inherited (use the parent’s setting).
Real-world use cases
WishList Member is general enough that "build a membership site" covers thousands of different builds. A few that I’ve seen work well:
Online course sites. WishList Member + LearnDash is the classic pairing. WishList handles the membership tier (a "Photography Bundle" level that includes three courses), LearnDash handles the lesson delivery and quizzes. Drip the lessons through WishList so a new buyer gets one module per week, which both spreads delivery cost and dramatically improves completion rates.
Premium news/analysis sites. Sneak peek is the killer feature here. Show every visitor the first 200 words of every article. Members get the rest. The Financial Times has been running this pattern for two decades; WishList lets you do the same on WordPress without bespoke development. Pair it with Yoast SEO Premium so Google still indexes the full content while end users hit the paywall.
Community sites with paid tiers. Use the WordPress comments system (or bbPress) plus WishList Member to gate the discussion. Free members get to read; paid members get to post. The Privileges panel in Advanced Options is exactly what you use to flip the comment capability per level.
Coaching businesses. One coach, ten clients, monthly recurring fee per client, private content per client. WishList Member can do per-user content protection (not just per-level), but the cleaner build is one level per client tier, then drip out coaching materials over the engagement.
SaaS-style content libraries. Sell a recurring subscription that unlocks a library of templates, downloads, or assets. WishList Member’s Files protection makes this almost trivial: drop your assets in wp-content/uploads/protected/, attach them to a level, and the plugin handles authenticated downloads.
Corporate intranet. A surprising number of small companies use WordPress as their internal portal. WishList Member as the gate, plus the rest of WordPress (posts, pages, plugins) as the content. Privileges control which departments see which pages.
Paid newsletter front-end. If you run a paid Substack-style newsletter, WordPress can be the public archive, the upsell page, and the member-only article reader, all in one. WishList Member handles the access control; you push the email itself through ConvertKit or ActiveCampaign via the integration.
Developer reference: hooks, filters, REST, and DB
Most of the WishList Member admin UI is built on the same do_action / apply_filters surface that any third-party developer can hook. The plugin is built to be extended, which is part of why it has outlasted most of its 2010-era competitors.
Hooks (do_action)
The hooks you’ll reach for most often:
// Fired right after a new user is registered through any WishList flow.
// $user_id is the WP user ID, $level_id is the WishList level they joined.
add_action( 'wishlistmember_after_registration', function( $user_id, $level_id ) {
 // Push to your CRM, send a Slack notification, etc.
 error_log( "WLM: user $user_id joined level $level_id" );
}, 10, 2 );

// Fired when a level is added to an existing user (renewal, upgrade, manual add).
add_action( 'wishlistmember_add_user_levels', function( $user_id, $level_ids ) {
 foreach ( (array) $level_ids as $lid ) {
 do_something( $user_id, $lid );
 }
}, 10, 2 );

// Fired when a level is removed (cancellation, expiry, manual remove).
add_action( 'wishlistmember_remove_user_levels', function( $user_id, $level_ids ) {
 // Revoke external access, send win-back email, etc.
}, 10, 2 );

// Fired on every successful login of a member.
add_action( 'wishlistmember_after_login', function( $user_id ) {
 update_user_meta( $user_id, '_last_member_login', time() );
} );
The full list of actions runs into the hundreds. A grep against the plugin source turns up wishlistmember_after_*, wishlistmember_before_*, wishlistmember_admin_*, wishlistmember_addon_*, and wishlistmember_settings_* families. If you want to instrument anything that happens in the plugin, there is almost certainly an action for it.
Filters (apply_filters)
Filters let you change values mid-flight. Two of the most useful:
// Add custom fields to the registration form for level 5 only.
add_filter( 'wishlist_member_custom_fields', function( $fields, $level_id ) {
 if ( 5 == $level_id ) {
 $fields[] = [
 'name' => 'company_name',
 'label' => 'Company name',
 'type' => 'text',
 'required' => true,
 ];
 }
 return $fields;
}, 10, 2 );

// Mutate the after-registration redirect URL on the fly.
add_filter( 'wishlistmember_after_registration_page', function( $url, $user_id, $level_id ) {
 if ( 5 == $level_id ) {
 return home_url( '/welcome-to-pro/?u='. $user_id );
 }
 return $url;
}, 10, 3 );
For everything else, search the plugin source for apply_filters and you’ll find the filter you need:
grep -rEn "apply_filters\(\s*['\"]" wp-content/plugins/wishlist-member/
Shortcodes
WishList Member ships with around forty shortcodes for conditionally displaying content, building registration forms, and surfacing member info. Some examples (shown as literals so they don’t execute here):
[wlm_private LEVEL=5]...content visible only to level 5...[/wlm_private][wlm_nonmembers]...content shown to non-members...[/wlm_nonmembers][wlm_memberinfo type=first_name]outputs the logged-in member’s first name.[wlm_loginform]renders the configured login form.[wlm_register_form level=5]renders the level-5 registration form.[wlm_paymentbutton level=5]renders the Stripe/PayPal pay button for level 5.
Open the Shortcode Creator (Dashboard -> Tools -> Shortcode Creator) for a visual builder if you don’t want to remember attribute names.
REST API
WishList Member exposes a small REST API for member management. Endpoints are under /wp-json/wlm/v1/ and use the API key from Advanced Options -> API.
# List members
curl -H "X-API-KEY: $WLM_KEY" https://yoursite.com/wp-json/wlm/v1/members

# Get a single member
curl -H "X-API-KEY: $WLM_KEY" https://yoursite.com/wp-json/wlm/v1/members/42

# Add a level to a member
curl -X POST -H "X-API-KEY: $WLM_KEY" \
 -d '{"level_id": 5}' \
 https://yoursite.com/wp-json/wlm/v1/members/42/levels

# Remove a level
curl -X DELETE -H "X-API-KEY: $WLM_KEY" \
 https://yoursite.com/wp-json/wlm/v1/members/42/levels/5
This is what you’d use if you’re building a mobile app or a separate front-end that needs to read or modify WishList membership state.
Database tables
WishList Member adds five custom tables to the WordPress database, all prefixed with wlm_:
wlm_options: plugin-wide settings (key-value).wlm_levels: one row per membership level, with name, price, billing config, and rules.wlm_userlevels: many-to-many join between WP users and WLM levels. Each row has the user_id, level_id, start date, expiry date, and status. This is the table you’d query if you needed to answer "which users have level X right now?".wlm_transactions: payment ledger. Every successful gateway charge, refund, or webhook gets a row. Columns include user_id, level_id, gateway, gateway_transaction_id, amount, currency, and status.wlm_payperposts: tracks individual pay-per-post purchases (user_id, post_id, purchase date, expiry).
A useful query for figuring out who’s active:
SELECT u.ID, u.user_email, l.name AS level, ul.start_date, ul.expire_date
FROM wp_users u
JOIN wp_wlm_userlevels ul ON u.ID = ul.user_id
JOIN wp_wlm_levels l ON ul.level_id = l.id
WHERE ul.status = 'active'
 AND (ul.expire_date IS NULL OR ul.expire_date > NOW())
ORDER BY ul.start_date DESC;
Performance, compatibility, and gotchas
A few things worth knowing before you bet a business on WishList Member.
Cache compatibility. Membership plugins and page caches are natural enemies, because if you cache a page once, every visitor sees the same version, which defeats the gate. WishList Member is well-behaved here: it sets a member cookie, and you tell your cache to skip any request that has it. With WP Rocket it’s automatic, WP Rocket has a built-in WishList Member detection. With other caches you may need to add wlm_loggedin_session (or similar) to the cookie exclusion list. The WishList docs have per-cache-plugin instructions.
The "log everyone in at once" pitfall. WishList Member uses a long-lived cookie to keep members logged in across browsers and sessions. If you change the cookie secret (or migrate the site to a new domain and the cookie domain shifts), every logged-in member is silently logged out. This isn’t a bug, it’s the cookie spec, but if you do a domain migration, plan for a one-time mass-logout event and tell your members in advance.
WP-Cron reliance. Expiries, drip unlocks, and webhook retries all rely on WP-Cron. If your site has very low traffic, WP-Cron may not run often enough and you’ll see drip lessons unlock a day late. Fix: disable WP-Cron in wp-config.php (define('DISABLE_WP_CRON', true);) and run a real Linux cron every minute. WishList Member’s Advanced Options -> Cron Jobs page has the exact command.
Large member counts. I’ve seen WishList Member run cleanly with 50,000+ active members. Past that, the queries against wlm_userlevels start showing up in slow query logs. The fix is more indexes (you can add them safely; the plugin doesn’t complain) and a sensibly tuned MySQL. The plugin does ship reasonable default indexes, but if you’ve migrated from a competitor and have a million rows in wlm_userlevels, take a look.
Versioning the database. WishList Member’s table schema changes between major versions. Always test upgrades on staging first. The plugin handles the migration automatically on activation, but it’s not always fast on large tables.
Email deliverability. The plugin sends a lot of transactional email: welcome, password reset, expiry warning, cancellation, payment failure. Use a real SMTP plugin (WP Mail SMTP, Post SMTP, FluentSMTP) and point it at a transactional sender (Postmark, SendGrid, SES). Don’t rely on PHP mail.
Multisite. WishList Member runs on WordPress multisite but each subsite has its own levels, members, and tables. If you want shared membership across subsites, you need a custom build; WishList Member doesn’t do it out of the box.
Pricing and licensing
WishList Member is paid software, but it’s GPL-licensed (because every WordPress plugin must be), which means redistribution is legal and the version on GPL Times is the same code you’d get from the official site, minus the official update channel and the bundled support contract.
The official pricing tiers, current at the time of writing:
- Single Site: $147 one-time + $97/year for updates and support, covering one production WordPress install.
- Multi Site: $297 one-time + $147/year, three sites.
- Developer: $497 one-time + $247/year, unlimited sites plus access to all premium add-ons.
WishList Member is also bundled into the ThriveCart "Learn+" tier as part of the ThriveCart family of products.
When you’re ready to run a real business on it, the official license is worth buying for the support and the auto-updates, both of which matter for a plugin that handles your customers’ money.
FAQ
Is WishList Member still being developed? Yes. The ThriveCart team is actively shipping updates. The "X" major version was a significant rewrite, and minor releases keep coming.
Does WishList Member work with Gutenberg / block themes? Yes. The protection rules work at the post/page level, so block themes don’t change anything. The per-post meta box appears below the block editor.
Can I use WishList Member without a payment gateway? Yes. You can run a free-only membership site or a manually-approved membership site (the admin approves each registration). No gateway needed.
Will WishList Member slow down my site? Not noticeably for most sites. It does run a check on every page load to decide if the current visitor should see the content, but that check is cheap and easily cached. Where it can get expensive is on category pages with hundreds of mixed protected/unprotected posts; in that case, profile and add indexes if needed.
Can I move existing WordPress users into WishList Member? Yes. Members -> Mass Move/Add lets you select existing WP users and assign them to a level in bulk. There’s also a CSV importer for bulk migrations from other plugins.
How does it compare to MemberPress? MemberPress has a more modern admin UI out of the box and tighter Stripe integration. WishList Member is more flexible on per-content rules (sneak peek, drip, sequential) and has more third-party integrations. If you need a slick UI, MemberPress; if you need the gnarly use case to be supported, WishList Member.
How does it compare to Paid Memberships Pro? Paid Memberships Pro is free with paid add-ons. The free core is more limited than WishList Member’s paid core, but if your needs are simple, PMP can work. WishList Member is the better choice if you want everything bundled.
Can I sell physical products alongside memberships? Yes, with the WooCommerce integration. Use WooCommerce as your cart, link a WooCommerce product to a WishList level, and WooCommerce handles checkout while WishList grants access.
Final thoughts
There are newer, slicker WordPress membership plugins on the market. MemberPress, in particular, has a smoother first-time setup. But WishList Member has two things that newer competitors can’t match: the depth of features that comes from eighteen years of customer requests, and the muscle memory of every WordPress developer who’s been around since 2010.
If you’re starting a brand new membership site and you want a clean modern UI, MemberPress is a fine choice. If you’re doing anything beyond the basics, sneak peek paywalls, sequential courses, multi-level upgrades, integrations with the long tail of marketing tools, WishList Member tends to already have a checkbox for it. The flip side is that the admin can feel busy until you get used to it. The sub-nav-per-area pattern helps; once you’ve poked at it for a day, you stop bouncing.
The other quiet advantage is the data model. WishList Member’s database schema is well documented and stable, so building reports, custom dashboards, or migrations against it is straightforward. That matters more than people think. The reason businesses get stuck on a membership plugin for ten years isn’t usually feature parity; it’s that nobody wants to migrate 20,000 active members to a new system.
Twenty minutes from zip to a working membership site is a reasonable expectation.