

A retail client called me last spring because their menu had thirty-one top-level items. Thirty-one. By the time you got to "Shop", you’d already scrolled past three rows of micro-categories on a 1440px laptop. The fix was not a new theme. It was a mega menu, the kind of dropdown that opens into a full-width panel with columns, featured product cards, and a single CTA on the right. The plugin we picked was JetMenu, because the rest of the site was already running JetEngine and JetSmartFilters, and bringing in a fourth navigation tool would have meant babysitting another set of styles.
JetMenu is Crocoblock’s take on the mega-menu problem, and its angle is simple. Each dropdown panel is a regular Elementor template. You build it the way you build any landing page, with the same widgets, the same global styles, the same responsive controls. Then you attach it to a nav menu item. That is the whole pitch, and it is a good one, but it only really pays off if Elementor (or Bricks) is already your editor of choice. On a plain Gutenberg site, it is overkill. The rest of this article walks through what JetMenu actually does in the admin, where it shines, where it pinches, and how to extend it if you write code.
Table of contents
- What JetMenu actually is
- Key features
- Where it lives in the WP admin
- Building your first mega menu
- The settings that actually matter
- A real navigation rebuild, start to finish
- Developer reference: hooks and extending JetMenu
- Performance, caching, and the FSE caveat
- JetMenu vs Max Mega Menu, UberMenu, and friends
- Pricing and how to get a working copy
- Closing thoughts
What JetMenu actually is
JetMenu is a navigation plugin that swaps WordPress’s regular dropdown rendering for a mega-menu engine. It hooks into the native nav menu editor (the one at Appearance > Menus if you are still using a classic theme), adds a per-item "Edit JetMenu" panel, and lets you drop in either a quick block layout or a full Elementor template as the dropdown content. On the front end, the menu still uses wp_nav_menu(), so it inherits your theme’s location and walker, but the children are now rendered through JetMenu’s own template.
It is built by Crocoblock, the same Lithuanian/Ukrainian team behind JetEngine, JetSmartFilters, JetBooking, and the rest of the Jet family. That matters because JetMenu is not really sold as a standalone product anymore. Most people on it bought the Crocoblock All-Inclusive bundle for JetEngine and just happen to use the menu plugin too. If you are picking a mega-menu plugin in isolation and you do not use any other Jet plugin, JetMenu is still fine, but the value math is different.
There are three things to know about its scope before you install it:
- It needs a builder. Elementor free is enough for most mega-menu layouts. Bricks Builder is the other supported editor. Block Editor / Gutenberg has limited support, more on that below.
- It is per-nav-menu, not per-page. You build one mega menu and attach it to one or more theme locations. The menu does not know what page it is on, so contextual menus need extra work.
- The Main Menu and Mobile Render tabs in settings only work in classic themes. If you are on a block theme (FSE), those panels are visible but inert. JetMenu will tell you so right at the top of the page. This is a real limitation, not a marketing footnote.
Key features
Here is what JetMenu adds on top of the stock WordPress nav menu, in plain terms:
- Mega dropdown panels. Any top-level nav item can open into a full-width or container-width panel instead of a tiny vertical dropdown.
- Elementor template per panel. Each panel can be a full Elementor template. Drop in image widgets, product loops, posts grid, forms, anything Elementor or its third-party widgets support.
- Bricks Builder support. Same idea on the Bricks side. The Bricks template assigned to a nav item replaces the default dropdown.
- Per-item icons and badges. Add an icon next to a menu item’s label, plus an optional badge ("New", "Sale") above it.
- Trigger choice. Hover, click, or "on tap" (which forces tap behaviour even on hover-capable devices, useful on hybrid touchscreens).
- Vertical mega menu mode. Run the whole menu sideways as a left-rail navigation, common on documentation sites and online stores with deep taxonomies.
- Off-canvas mobile menu. The mobile rendering is a separate panel you can style independently. Animation, overlay color, close icon, the works.
- Image-backed panels. Set a background image on the panel itself, including darkening and parallax for the brave.
- Open animations. Fade, slide-down, slide-from-side, zoom. Pick per location.
- Sticky menus. Stick the nav to the top of the viewport on scroll, with a separate sticky style.
- Per-location settings. Multi-location themes can run a different mega-menu config per theme location.
- WPML and Polylang compatibility. If you translate menu items in a multilingual setup, the JetMenu metadata follows along.
- Reusable preset manager. Export a settings preset, drop it into the next site, done.
That is the surface area. The plugin’s character emerges when you actually sit in the admin for a while.
Where it lives in the WP admin
JetMenu installs two main admin entry points. There is no top-level menu called "JetMenu" on the sidebar. Instead it tucks under Crocoblock > JetPlugins Settings > JetMenu, which is the configuration side, and Appearance > Jet Menus, which is the menu-builder side.
The Jet Menus screen under Appearance is the simpler of the two. It is a thin wrapper that lets you create a mega menu and assign content to its items. You start with a "Select menu…" dropdown, a Create new menu button, and a yellow callout that politely tells you nothing is selected yet.
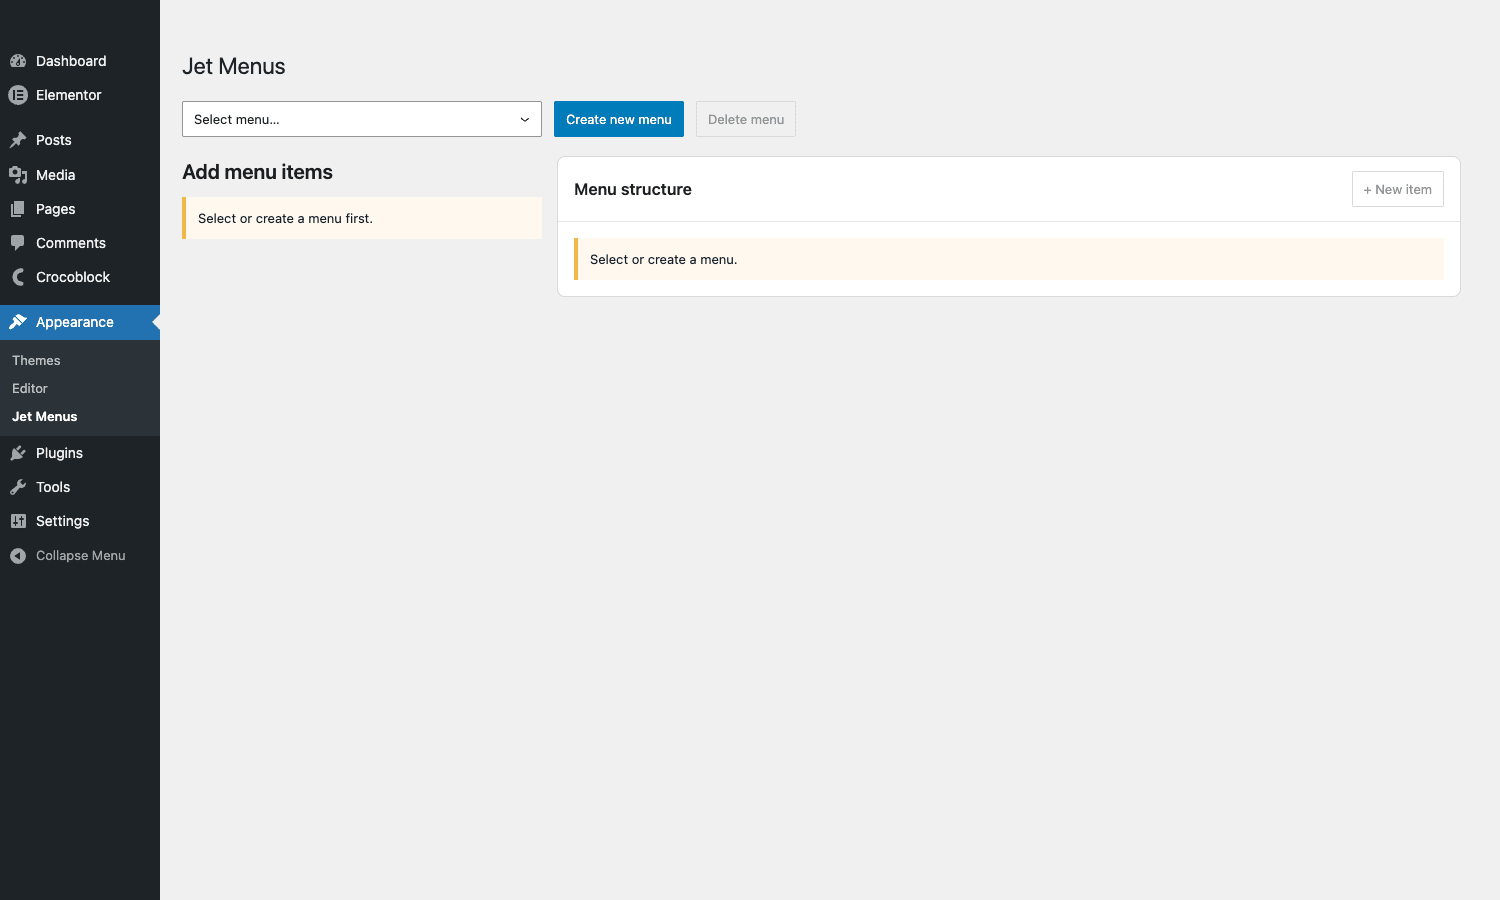
Once you create or pick a menu, the right pane fills with the menu structure (the list of top-level items, drag-to-reorder), and each item gets an "Edit JetMenu" or similar control to attach an Elementor template. The flow is intentionally close to the native nav menu editor, which is nice if you have a habit of going to Appearance for menu work.
The bigger surface area is Crocoblock > JetPlugins Settings > JetMenu. The left sub-nav shows three tabs: General Settings, Main Menu, and Mobile Render. There are also four buttons at the top of every tab: Preset Manager, Export Options, Import Options, and Reset Options. Preset Manager is the underrated one. If you build a JetMenu config you like, save it as a preset and you can drop it onto every future site without re-doing twenty toggles.
General Settings is short and useful. You get an SVG images upload toggle (which lets the WordPress media library accept SVG files, useful for crisp menu icons but also a security trade-off, more on that under Performance below). A Template Content Cache toggle which is on by default, with a Cache Expiration dropdown and a Clear Template Cache button right next to it. And finally a Cache menu CSS toggle, which is off by default. If you have a busy production site, flipping that on cuts down on inline-CSS bloat per request.
The Main Menu tab is where most of the layout decisions happen for classic themes. The header on this tab is honest. It says, in so many words, "These settings apply only to menu locations in classic themes. They are not used in block themes (FSE), so the Main Menu and Mobile Render options on this page will not be applied." If you read past that, you get the layout controls: Layout (Horizontal or Vertical), Sub Position (Right or Left, controls which side child sub-menus open), Sub Animation (Fade, Slide, Zoom and so on), Sub Trigger (Hover, Click, or On Tap), Sub Target (Item or Arrow, which controls whether the whole label or just the chevron triggers the dropdown), Mega Container Width Type (Container, Full Width, or Custom), Breakpoint in pixels, and Menu RollUp.
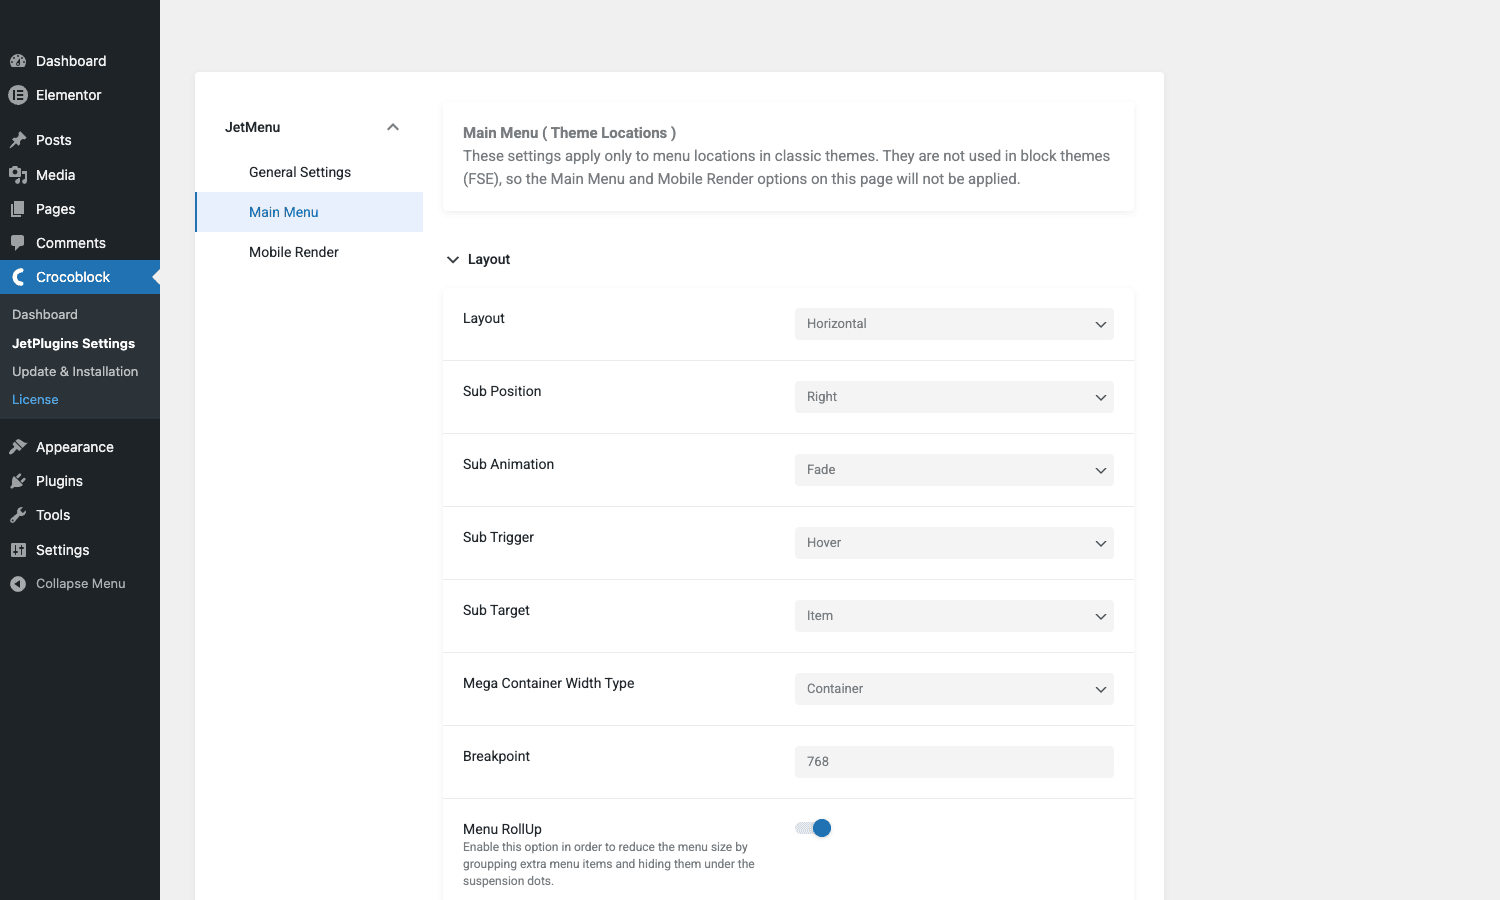
Menu RollUp is the feature. When the menu would overflow horizontally, JetMenu hides the extras under a suspension-dots icon. Same behaviour you see in the Office ribbon. It saves you from wrapping the menu onto two rows on a 1200px laptop.
Below the Layout group there are several more sections in the Main Menu tab (Container, Items Container, Items, Sub Menu, Sub Item, and so on) that mostly handle visual styling. You can usually leave them at defaults and override at the per-menu level inside the Elementor menu widget, which is the recommended workflow on Elementor sites. The settings page exists for people running classic themes without Elementor in the header.
The Mobile Render tab is the third one, and it controls how the menu collapses at the breakpoint you set. You pick a trigger button position, the off-canvas panel direction (slide from left, right, top), animation, and the background and text colors of the mobile drawer.
Building your first mega menu
Coming in clean, here is the order of operations that does not waste your time:
- Install Elementor (free is fine) or Bricks. JetMenu’s main value comes through the visual editor. Skipping the builder means you fall back to the JetMenu Blocks UI, which works, but it does not give you the same drag-drop freedom.
- Activate JetMenu. On activation, the Crocoblock menu appears, plus the Jet Menus screen under Appearance.
- Go to Appearance > Menus first. Build the regular WordPress nav menu the way you always have. Top-level items, child items, theme locations, all of it. This is the foundation. JetMenu does not replace this step.
- Hover any top-level item in the menu editor. You will see a JetMenu button (it is labeled "Edit JetMenu Content" or similar, depending on the version). Click it. You get a modal with two options for the dropdown source: the JetMenu Blocks editor (a basic visual builder), or "Use Elementor template".
- Pick Use Elementor template. Create a new template. JetMenu opens the standard Elementor editor with the template type set to "Mega Menu Content". The canvas is constrained to the panel width you set in the Mega Container Width Type setting.
- Build the panel. Drop in columns. Add an Icon List for a category section. Add a Posts widget for a featured-articles block. Add an Image widget on the right for a promo card. Save the template.
- Back in the WP menu editor, the item now has a "Mega menu enabled" badge. Save the menu.
- Load the front end. Hover (or tap, depending on Sub Trigger) the item. The panel slides in.
Notice the workflow leans on the native WP menu builder. JetMenu does not try to be its own world. If you already know how to edit wp_nav_menu() in WordPress, the muscle memory carries.
There are two more useful things you can do from here:
- Add an icon or badge to the menu item. Inside Appearance > Menus, expand the item. JetMenu adds an Icon picker (Font Awesome by default) and a Badge text field. The badge sits above the label as a small tag. Good for marking new sections.
- Set a different mega menu per theme location. If your theme has both a Primary Menu and a Footer Menu, you can attach different JetMenu templates to each, and the per-location settings let you, for example, use hover triggers in the header but click triggers in a docs sidebar.
The settings that actually matter
Most of the JetMenu admin you can leave alone for a quick deploy. Three settings are worth paying attention to up front.
Breakpoint controls the pixel width at which JetMenu switches from the horizontal desktop menu to the off-canvas mobile drawer. The default is 768. That is fine for content sites. For e-commerce with five or six top-level categories plus a search bar plus a cart icon, 768 is too low. You will see the mega menu hover open on a 900px tablet in landscape, and child columns will overflow. Bump the breakpoint to 1024 or 1100 for stores, then tune the off-canvas to look more like an app drawer.
The first JetMenu site I set up, I spent twenty minutes wondering why the dropdown wouldn’t open on mobile, then realized I’d left the breakpoint at 768 but the design called for 1024. The breakpoint is the single most common cause of "JetMenu is broken on iPad" support tickets. Always set it explicitly.
Sub Trigger is the second one. Hover is the default and it works for desktop users with a mouse. On a touch device, hover does not exist, so JetMenu opens the panel on first tap and follows the link on the second tap. That double-tap pattern is the standard, but it confuses users on hybrid Windows tablets where the input switches mid-session. If most of your traffic is touch, set Sub Trigger to "On Tap" and the menu will use tap-to-open everywhere, including on a mouse. That is more consistent but takes desktop users an extra second to find. Click trigger is a third option, good for documentation sites where users dwell on the page.
Template Content Cache is on by default and you should leave it on. The cache stores the rendered HTML of each mega-menu panel so subsequent page loads do not re-render the Elementor template every time. The expiration drop-down lets you set a TTL. For a marketing site that changes weekly, 1 day is fine. For a docs site that changes monthly, 1 week is fine. If you change a panel and the front end still shows the old version, hit the Clear Template Cache button on the same screen. It is the JetMenu equivalent of a CDN purge.
Cache menu CSS is off by default and most sites benefit from turning it on. With it off, JetMenu injects the per-menu CSS inline on every page load. With it on, the CSS gets written to a file and served like any other stylesheet. The browser caches it across pages, the initial HTML payload drops, and Core Web Vitals look slightly better.
Menu RollUp is the fifth one I always check. If your menu has more than six top-level items, turn this on. It saves your header from line-wrapping at common laptop widths. The "extra" items collapse into a three-dots overflow menu which expands inline when clicked.
A real navigation rebuild, start to finish
Concrete is better than abstract. Take the retail client from the intro. They sold home goods through WooCommerce, with thirty-one top-level menu items because Marketing wanted every product category visible. Here is what we did.
We started in Appearance > Menus. The thirty-one items got collapsed into five mega-menu top-level items: Furniture, Lighting, Decor, Outdoor, and Sale. Each of the original categories became a child item under one of those five. The menu structure suddenly looked clean.
Each of the five top-level items got its own JetMenu Elementor template. Furniture’s template had four columns: Sofas, Beds, Tables, Storage. Each column held an Icon List with seven category links. To the right of the columns was a fifth column with two product cards (a hand-picked "Editor’s pick" and a "Best seller this month"), pulled in via the JetEngine listings widget. At the very bottom, a single line: "Free delivery on orders over $200" in the brand orange. The whole panel rendered in under 80ms once the template cache warmed.
Lighting’s panel was different. Lighting was thinner taxonomically, so it ran two columns of categories plus one large hero image with a quote from a designer they had partnered with. That image was a JPEG, not an SVG, because we did not want the SVG-upload toggle on for this site (the editorial team did not need it, and turning it off reduces the surface area for malicious SVG uploads).
Mobile, predictably, was the tricky part. We set the breakpoint to 1024 because the brand’s analytics showed iPads were a meaningful traffic segment. On the off-canvas drawer, we used JetMenu’s "slide from right" mode to mirror the iOS pattern. The five top-level items were rendered as accordions. Tapping one expanded its children inline. We turned off the mega-menu panel rendering inside the mobile drawer (each item just became a list of sub-categories), because trying to render a four-column Elementor template inside a 320px-wide drawer is a recipe for layout chaos.
Performance was the bit I expected to be worse. With template caching on and "Cache menu CSS" enabled, the menu added about 8KB of CSS to the initial paint and roughly 12KB of HTML for the cached panels. Time-to-interactive went up by maybe 30ms. Compared to the pile of nested submenus they had before (which was rendered server-side by their theme’s walker and was actually heavier), the rebuild was slightly faster, not slower.
The thing that surprised me most was how often the team used the JetMenu admin after launch. They did not. Once the templates were set up, the only ongoing maintenance was swapping the "Best seller this month" product card in the Furniture and Lighting panels, which the marketing team did directly in Elementor without ever touching the JetMenu UI. That is the right outcome.
Developer reference: hooks and extending JetMenu
JetMenu uses Crocoblock’s "/" style hook names. This is unusual in the WordPress world (most plugins use underscores), and it can trip you up if you grep your codebase for hook usage. Here are the hooks worth knowing.
Common hooks
JetMenu exposes a focused set of action and filter hooks, mostly under the jet-menu/ namespace:
jet-menu/admin/content-type-optionsjet-menu/admin/nav-item-settings/sanitize-callbacksjet-menu/admin/nav-settings-configjet-menu/admin/settings-page-configjet-menu/arrow-iconsjet-menu/assets/admin-styles-dependenciesjet-menu/assets/elementor/public-scripts-dependenciesjet-menu/assets/public-script-dependenciesjet-menu/assets/public-styles-dependenciesjet-menu/blank-page/after-contentjet-menu/blank-page/before-contentjet-menu/block-manager/blocks-list
JetMenu also inherits the jet-dashboard hooks family (compatibility manager, view loader, license API), which is shared across the Crocoblock stack.
Add a custom arrow icon to the icon picker
The jet-menu/arrow-icons filter lets you extend the list of arrow icons available in the menu settings. Useful if your brand uses a non-Font-Awesome icon set.
add_filter( 'jet-menu/arrow-icons', function ( $icons ) {
 $icons['custom-chevron'] = array(
 'label' => __( 'Brand chevron', 'mytheme' ),
 'icon' => '<svg viewBox="0 0 16 16"><path d="M4 6l4 4 4-4" stroke="currentColor" fill="none" stroke-width="2"/></svg>',
 );
 return $icons;
} );
After this snippet, the Sub Menu trigger icon picker in JetMenu shows "Brand chevron" as an option.
Add a new admin sub-menu nav-setting
jet-menu/admin/nav-settings-config lets you add your own settings tab inside Crocoblock > JetPlugins Settings > JetMenu. Handy if you wrap JetMenu in a starter site and want to ship pre-configured menu presets.
add_filter( 'jet-menu/admin/nav-settings-config', function ( $config ) {
 $config['mytheme-presets'] = array(
 'slug' => 'mytheme-presets',
 'name' => __( 'My Theme Presets', 'mytheme' ),
 'cb' => 'JetMenuMyThemePresets',
 );
 return $config;
} );
The cb value points to a Vue component name registered in the JetMenu admin app. This is power-user territory and requires building a small JS bundle that compiles against JetMenu’s exposed Vue runtime, but it is the official extension point.
Register custom sanitize callbacks for nav-item settings
If you add a custom field to JetMenu’s per-item editor, use jet-menu/admin/nav-item-settings/sanitize-callbacks to declare how the field gets cleaned before storage.
add_filter( 'jet-menu/admin/nav-item-settings/sanitize-callbacks', function ( $callbacks ) {
 $callbacks['my_custom_url'] = 'esc_url_raw';
 $callbacks['my_custom_html'] = 'wp_kses_post';
 return $callbacks;
} );
This is the same pattern JetMenu uses internally for its own fields. Keep custom callbacks here so you do not need to bolt on a separate sanitize_meta filter.
Inject content before/after the JetMenu blank admin page
If you build a custom JetMenu admin screen with its own URL, you can wire content before and after the JetMenu chrome.
add_action( 'jet-menu/blank-page/before-content', function () {
 echo '<div class="mytheme-banner">Custom banner before JetMenu admin content.</div>';
} );

add_action( 'jet-menu/blank-page/after-content', function () {
 echo '<footer class="mytheme-footer">Custom footer after JetMenu admin content.</footer>';
} );
Programmatically rebuild a menu through wp_nav_menu
JetMenu does not change wp_nav_menu‘s signature, which means existing developer skills carry over. If your theme renders the menu in a header.php like this:
<?php
wp_nav_menu( array(
 'theme_location' => 'primary',
 'menu_class' => 'site-nav',
 'container' => 'nav',
 'depth' => 2,
) );?>
JetMenu just decorates that output with mega-panel markup. You can keep your existing walker, your existing classes, and your existing accessibility tweaks. JetMenu hooks wp_get_nav_menu_items to add metadata and uses wp_footer to render the panel HTML out of band. See the official wp_nav_menu reference for the full set of args you can pass through.
Disable JetMenu on specific pages
JetMenu loads its public scripts on every front-end request by default. If you have a checkout page where you want zero menu JS, you can dequeue using the public-script-dependencies hook:
add_action( 'wp_enqueue_scripts', function () {
 if ( is_checkout() ) {
 wp_dequeue_script( 'jet-menu-public' );
 wp_dequeue_style( 'jet-menu-public' );
 }
}, 100 );
This trims a few KB off checkout pages, which is the one place every milligram of JS matters.
Performance, caching, and the FSE caveat
JetMenu is not heavy by mega-menu-plugin standards, but it is not weightless either. The plugin ships its own JS bundle that handles the open/close logic, animations, and mobile rendering, plus a CSS file for the layout. With template caching on, the menu adds something in the order of 30 to 50KB of compressed transfer per page. That is meaningful on a marketing site with five mega panels, less meaningful on a content site with one. The cache settings under General Settings (Template Content Cache + Cache menu CSS) are the two biggest performance levers. Both should be on in production.
The FSE caveat needs underscoring because it is easy to miss. If your site uses a block theme (the Twenty Twenty-Four kind, or a custom block theme built with Site Editor), JetMenu’s Main Menu (Theme Locations) and Mobile Render tabs do nothing. The notice on the Main Menu tab spells this out. What still works in block themes is the per-item JetMenu editor and the Elementor templates attached to nav items, but only if you render the menu through a JetMenu block or through a classic-theme location bridged by the Classic Editor / Classic Themes plugin combo. In practice, if you are going all-in on Site Editor, JetMenu is not your best choice. Pick a navigation block from a block-theme-native plugin like Spectra or Greenshift instead.
A second performance consideration is the SVG images upload toggle in General Settings. Turning it on lets the WP media library accept .svg files, which is useful for crisp icons inside mega-menu panels. Crocoblock sanitises SVG content on upload, but SVGs can still carry script payloads. If your site has multiple authors, keep the toggle off and use the Font Awesome / Iconify pickers JetMenu provides for icons instead.
Finally, JetMenu plays well with most page caching plugins (WP Rocket, LiteSpeed Cache, W3 Total Cache, Object Cache Pro). The Elementor template HTML gets cached at the page level, so a hit on the page cache also means a hit on the menu. Where it gets tricky is fragment caching tools that try to selectively cache the menu separately from the rest of the page. Avoid that, because JetMenu’s mobile rendering inserts the panel HTML at the page-level wp_footer hook, and fragment-cached menus tend to lose those panels.
JetMenu vs Max Mega Menu, UberMenu, and friends
JetMenu is not the only mega-menu plugin worth your time. Here is how it compares to the popular alternatives, briefly and honestly.
Max Mega Menu (free + Pro). The closest competitor by feature scope. MMM is theme-agnostic. It does not require Elementor. Its admin UI is simpler. Pro adds icons, badges, and Custom Item types (HTML, widget, content from a page). If you do not use Elementor or Bricks, MMM is the better choice. JetMenu wins on the Elementor side, because every Pro feature in MMM (badges, icons, custom content) is built natively into Elementor in JetMenu, so you get them with no extra license cost as long as you already pay for Crocoblock.
UberMenu (CodeCanyon). The old king. UberMenu is fifteen years old and shows it in the UI. It is universally compatible with every WP theme out there, has the deepest taxonomy-rendering options, and is the safest pick if you have a wild legacy theme. But the editor feels dated, and the styling controls are more limited than what you get inside Elementor. UberMenu makes sense for "I have an old theme and I want a mega menu without changing my page builder."
Hero Menu / WP Mega Menu / Themify Mega Menu. Niche choices. Hero Menu has a slick visual builder but a smaller community. WP Mega Menu (Themeisle) is simpler and free. Themify Mega Menu really only. None of these have the active Crocoblock stack ecosystem behind them, which matters more than features for long-term support.
If you are picking between JetMenu and Max Mega Menu specifically, ask one question: are you Elementor-first? If yes, JetMenu. If no, Max Mega Menu.
Pricing and how to get a working copy
Crocoblock sells JetMenu as a single-plugin license (around $43 per year for one site) or as part of the All-Inclusive bundle that includes JetEngine, JetSmartFilters, JetBooking, and a dozen other Jet plugins (around $199 per year for unlimited sites, with a $899 lifetime option). The math only really works in JetMenu’s favour if you are buying the All-Inclusive bundle. Single-license JetMenu at $43 is more expensive than Max Mega Menu Pro and offers a narrower workflow advantage unless you are committed to Elementor.
Combined with Elementor Pro from GPL Times, you can spin up a full Crocoblock-style stack on a staging environment in under an hour.
Closing thoughts
JetMenu is at its best when it disappears. When a non-technical content team can edit a "Best seller this month" card in a mega-menu panel without ever opening the JetMenu admin, when a designer can ship a new dropdown layout by duplicating an Elementor template, when the rebuild of a thirty-one-item menu into five clean panels takes one afternoon and not three days. That is the point of the Elementor-template-per-panel model. The plugin gets out of the way and lets the page builder do the work.
It is not the right pick for every site. A pure block-theme site loses half the settings, a site running plain Gutenberg has nothing to gain over a vanilla nav menu, and a single-site license is overpriced against Max Mega Menu Pro. But on a Crocoblock stack site, where JetEngine is already powering custom post types and JetSmartFilters is already running the listings page, adding JetMenu means the navigation stops being a separate engineering problem and starts being part of the same design system as the rest of the site. That is the actual reason the Jet ecosystem is sticky. JetMenu is the navigation piece of that stack, and it earns its place there.
The honest summary: if you already pay Crocoblock, JetMenu is a free win. If you do not, the question is whether the rest of the Jet plugins are useful to you, because that is where the value compounds. Either way, the Elementor-template-per-panel approach is the cleanest mega-menu workflow on WordPress today, even if it took five years for the rest of the market to admit it.