

There’s a moment in every WordPress project where the default Post/Page model stops being enough. Maybe you’re building a property listing site and "post" doesn’t capture an apartment that has bedrooms, bathrooms, square footage, location, photos, and a related agent. Maybe it’s a directory where each entry has working hours, services, ratings, and reviews. Maybe it’s a portfolio where each project links to the people who worked on it, the technologies used, and the client.
The traditional WordPress answer is: write PHP. Register a custom post type. Add a meta box plugin. Add another plugin for relationships. Add a third for displaying the data. Stitch them together with template files. Pay an agency to do it.
JetEngine is the Crocoblock plugin that lets you do the whole thing through the WordPress admin UI, no PHP required for 95% of cases. Custom post types, meta fields, taxonomies, relations between content types, custom database tables, dynamic listings, REST endpoints, conditional visibility, query loops. It pairs naturally with Elementor Pro (where most users come from) but works equally well with Bricks Builder and Gutenberg.
I’ll walk through installing JetEngine, building a real custom content structure (a property listings site), connecting it with relations, displaying it with dynamic content, and the developer hooks that let you extend behavior.
Table of contents
- What JetEngine actually does
- Step 1: Install JetEngine and enable modules
- Step 2: Create a custom post type
- Step 3: Add meta fields to the CPT
- Step 4: Create a custom taxonomy
- Step 5: Set up a relation between content types
- Step 6: Build a dynamic listing template
- Step 7: Display the listing on a page
- Step 8: Use Dynamic Visibility and Conditional Logic
- Step 9: Expose data via the REST API
- JetEngine vs ACF Pro vs Pods vs MetaBox
- Common gotchas
- Developer reference: hooks, filters, glossaries
- Pricing, licensing, and GPL availability
- Quick reference cheat sheet by site type
- Final thoughts
What JetEngine actually does {#what-it-does}
JetEngine is a content modeling plugin for WordPress. Rather than locking you into Post and Page, it lets you define your own content types with whatever fields, relations, and behavior your site actually needs.
Specifically:
- Custom Post Types (CPTs), register your own types like
property,agent,course,event. UI for labels, slug, supports, hierarchy, REST API, admin columns - Meta Fields, attach any number of fields to a CPT or taxonomy: text, number, date, image, gallery, repeater, checkboxes, radio, posts/users/taxonomy selector
- Taxonomies, register custom taxonomies (
property_type,bedroom_count) the same way - Custom Content Types (CCT), store records in your own custom DB table, not in
wp_posts, for high-volume data (50,000+ records) where the regular post table would be a bottleneck - Relations, link any two content types together with one-to-one, one-to-many, or many-to-many relationships, with admin UI on both sides
- Listing Templates, design how a single item from a CPT renders (card, table row, list item), then loop over it in Listing Grid widgets
- Dynamic Tags / Dynamic Field widget, pull any meta value into Elementor, Bricks, or Gutenberg widgets
- Forms (Booking Forms), front-end forms that create posts, send emails, or update meta from user input
- Dynamic Visibility, show/hide elements based on user role, meta value, query state, time of day, etc.
- Query Builder, build complex WP_Query / WP_User_Query / WP_Term_Query setups visually
- Profile Builder, front-end profile pages for users with edit forms and dashboards
- REST API Listings, expose any listing as a REST endpoint
- Glossaries, central place to manage option lists used across the site (e.g., a "country" list referenced by multiple fields)
The Pro version is the only version (no free tier on WordPress.org), though Crocoblock does offer a free demo trial. Pro unlocks everything in one bundle. The plugin also has a sibling family (JetSmartFilters, JetBlocks, JetSearch, JetReviews, etc.) that integrate with JetEngine for additional UI widgets.
Step 1: Install JetEngine and enable modules {#step-1-install}
Standard WordPress plugin install:
- Plugins → Add New → Upload Plugin, pick
jet-engine.zip, click Install, then Activate. - Or via WP-CLI:
wp plugin install /path/to/jet-engine.zip --activate
After activation a new JetEngine menu item appears in the WordPress admin sidebar with sub-items: Dashboard, Post Types, Taxonomies, Meta Boxes, Relations, Profile Builder, Listings/Components, Forms, Query Builder, Macros Generator, Glossaries, and more depending on which modules you turn on.
Open JetEngine → Dashboard first.
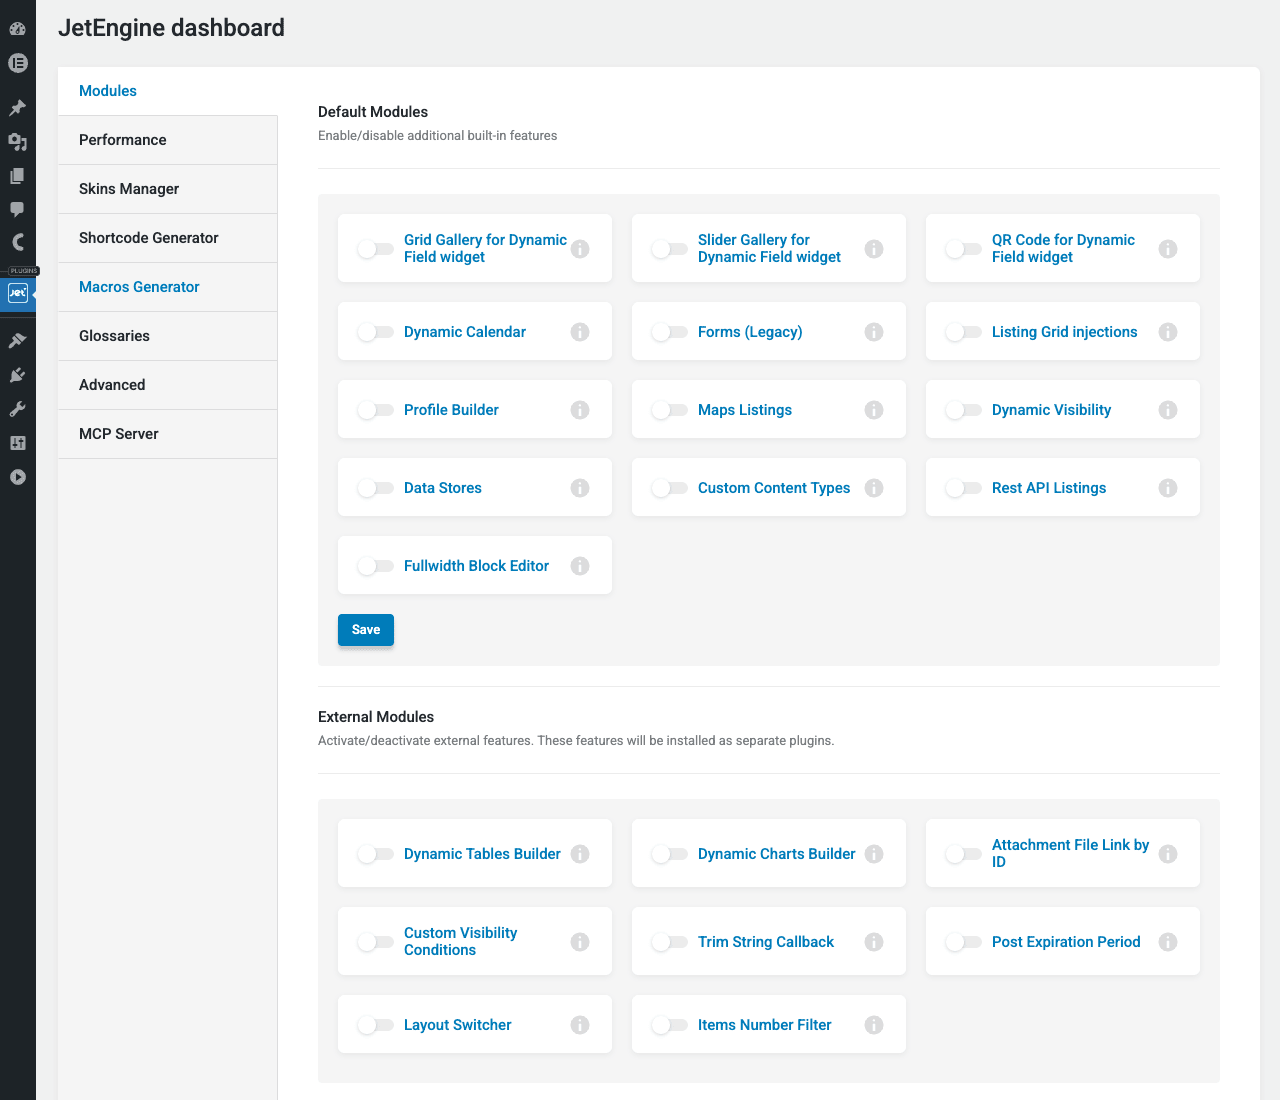
The Dashboard is JetEngine’s mission control. The Modules tab on the left shows two sections:
- Default Modules, features bundled inside JetEngine that you enable as needed. Off by default to keep memory and admin queries minimal. Grid Gallery, Slider Gallery, QR Code, Dynamic Calendar, Forms (Legacy), Listing Grid injections, Profile Builder, Maps Listings, Dynamic Visibility, Data Stores, Custom Content Types, Rest API Listings, Fullwidth Block Editor.
- External Modules, additional features installed as separate plugins: Dynamic Tables Builder, Dynamic Charts Builder, Attachment File Link by ID, Custom Visibility Conditions, Trim String Callback, Post Expiration Period, Layout Switcher, Items Number Filter.
Turn on only what you need. Enabling everything costs admin page load time. For a property listings site I’d enable: Custom Content Types, Rest API Listings, Maps Listings, and Dynamic Visibility. Save Changes.
Other tabs in the Dashboard:
- Performance, caching options for the Listing Grid (page-cache friendly), performance recommendations
- Skins Manager, saved style presets you can reuse across listings
- Shortcode Generator, build a JetEngine shortcode from a UI instead of hand-writing one
- Macros Generator, same for JetEngine’s dynamic-content macros
- Glossaries, central option lists referenced by select/radio fields
- Advanced, license key, debug mode, clean up on uninstall, AI integration settings
- MCP Server, newer feature that exposes your JetEngine data over MCP so AI assistants can query it (cool for AI agent use cases)
Step 2: Create a custom post type {#step-2-cpt}
Time for a real example. Let’s build a property-listing structure: a property CPT with location, bedrooms, price, and an associated agent CPT.
Navigate to JetEngine → Post Types and click Add New.
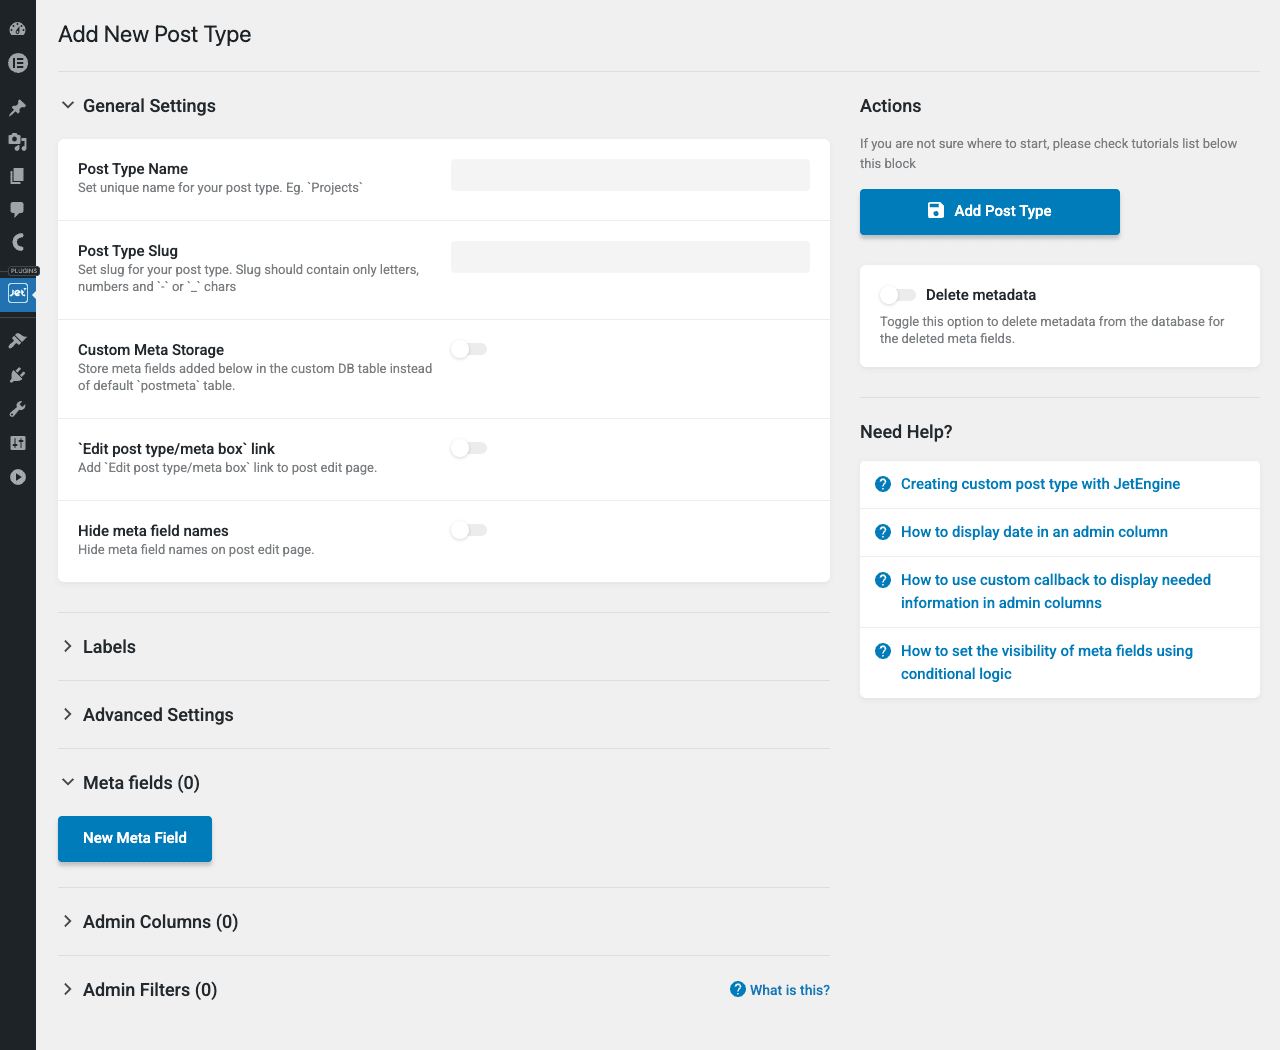
The CPT builder is a long page broken into collapsible sections.
General Settings (open by default):
- Post Type Name,
Properties(the human-readable label) - Post Type Slug,
property(the URL slug and internal key) - Custom Meta Storage, toggle ON if you’ll add many meta fields and want them stored in a dedicated table for faster queries. Off uses standard
wp_postmeta(fine for under a few hundred fields) - Edit post type/meta box link, adds a quick link from each post’s edit screen to the CPT builder. Useful for developers
- Hide meta field names, cleans up the post edit screen by hiding the raw key names
Labels, auto-generated from the Name but you can override every label ("Add New Property" instead of "Add New"). Worth filling in for the menu and admin UI polish.
Advanced Settings, the meat of CPT registration:
- Public, Has Archive, Show in Menu, Show in Admin Bar, standard WP CPT settings
- Supports, title, editor, thumbnail, excerpt, comments, custom-fields, etc. Check what you need
- Hierarchical, like pages with parent/child relationships, or flat like posts
- Rewrite Slug, URL prefix (
properties/<slug>) - Show in REST, required if you want Gutenberg editing or REST API access
- Capability Type, defaults to
post, override for fine-grained role permissions - Menu Icon, pick a Dashicon for the admin sidebar
- Menu Position, number for sidebar ordering
Meta fields, defined inline (next step).
Admin Columns, choose which fields appear as columns on the wp-admin list table. For Properties I’d add price, bedrooms, agent. The result: the Properties admin list shows those columns alongside Title and Date, with sorting and filtering.
Admin Filters, adds dropdowns above the admin list for filtering posts by meta value (e.g., filter properties by bedroom count).
Fill in the basics, then save with Add Post Type in the Actions panel on the right.
Step 3: Add meta fields to the CPT {#step-3-meta-fields}
Scroll down on the CPT edit screen to the Meta fields section and click New Meta Field.
For each field, you set:
- Label, what the editor sees on the post edit screen ("Price")
- Name/ID, internal meta key (
property_price) - Field Type, text, textarea, number, date, time, datetime, switcher (boolean), checkbox, radio, select, gallery, media, repeater, posts, terms, users, html, color picker, icon picker, advanced color picker
- Description, helper text shown to editors
- Default value, Required, Placeholder, standard form options
- Show in REST, required for Gutenberg/REST consumption
- Conditional Logic, show this field only when another field has a specific value
For the Properties CPT example, I’d create:
property_price, Number type, integer, with$placeholderproperty_bedrooms, Number type, integerproperty_bathrooms, Number type, decimal allowedproperty_sqft, Number typeproperty_address, Text typeproperty_photos, Gallery type for multiple imagesproperty_status, Select type with optionsfor-sale,pending,soldproperty_features, Checkbox type with options likepool,garage,garden
After saving, every property post in WordPress now gets these fields in the editor. JetEngine renders them as native-looking WordPress UI, not a separate "meta box" panel.
A quick note on repeater fields: repeaters are JetEngine’s killer feature. They let you add multiple instances of a field group (e.g., multiple "rooms" inside a single property, each with name, size, and photo). You define the repeater once, the editor adds rows. Repeaters are stored as serialized arrays in postmeta by default, or as JSON in the custom meta storage table if enabled. Both are fine for display.
Step 4: Create a custom taxonomy {#step-4-taxonomy}
Go to JetEngine → Taxonomies and click Add New. Similar to CPT but simpler:
- Taxonomy Name,
Property Types - Slug,
property_type - Post Types, link to
property(the CPT we created in step 2) - Hierarchical, yes (acts like categories, with parent/child) or flat (acts like tags)
- Meta fields, yes, taxonomies can have their own meta fields too (e.g., a description, an icon)
- Show in REST
Save. Now when you edit a property, you can assign it to one or more property types: "Apartment", "House", "Condo", "Land". Each property type has its own archive URL (/property_type/apartment/) that lists all properties in that type.
Step 5: Set up a relation between content types {#step-5-relations}
This is where JetEngine starts pulling away from simpler alternatives like Dynamic Content for Elementor, which reads relations from ACF or Meta Box rather than registering them itself. Relations let you formally link a property to an agent without storing the agent’s ID in a meta field and praying it stays in sync.
Navigate to JetEngine → Relations → Add New.
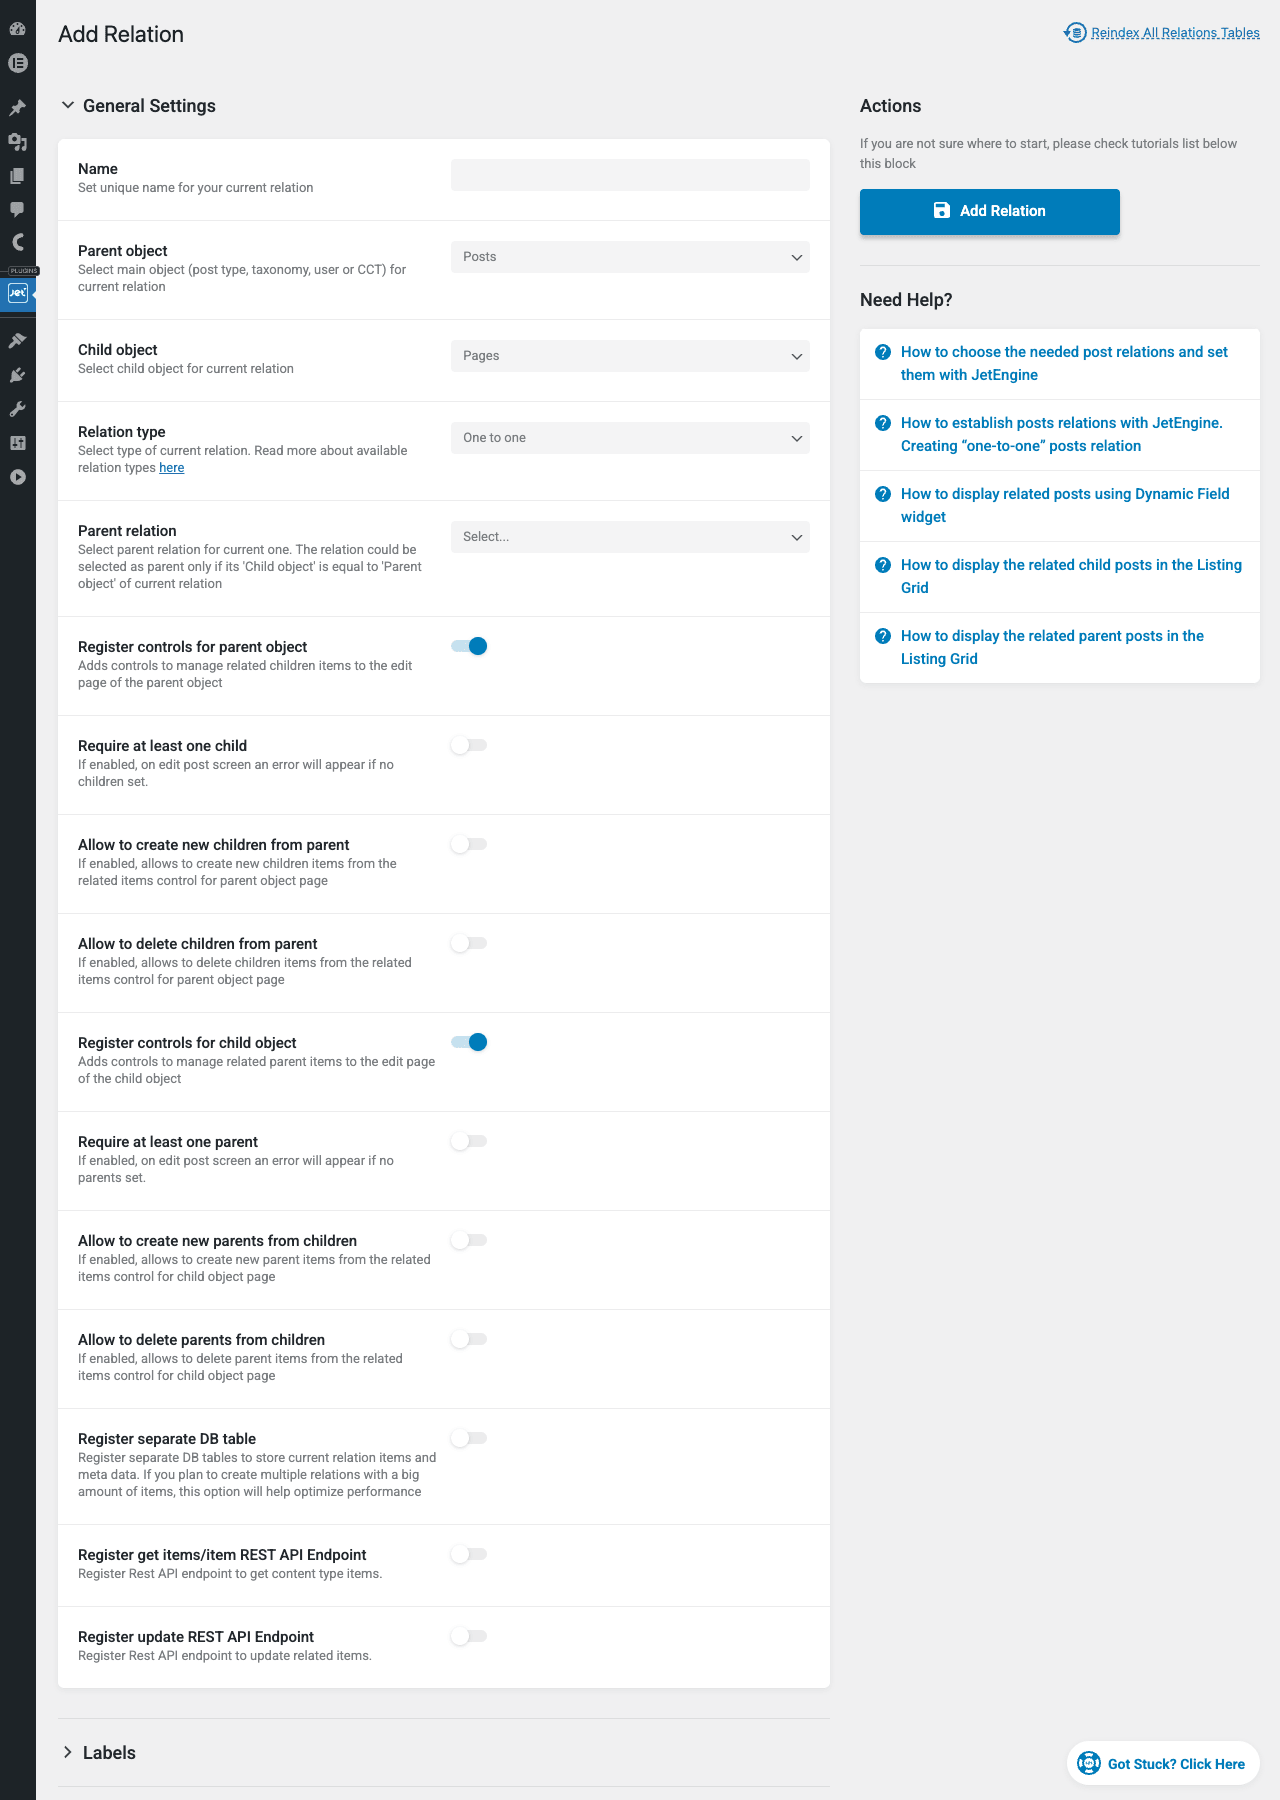
The relation builder is a long form with rich options:
- Name,
Property to Agent - Parent object, pick the type, post type / taxonomy / user / CCT. For our example, set Parent to Posts of type
agent - Child object, Posts of type
property(an agent has multiple properties) - Relation type,
One to one,One to many,Many to many. For agent → properties, One to many - Parent relation, leave empty unless this relation is a child of another relation (nested relations are advanced)
- Register controls for parent object, adds a metabox on the parent’s edit screen (the agent’s post) showing all related properties with the ability to attach/detach
- Require at least one child, for relations where the parent must always have at least one child (rare)
- Allow to create new children from parent, quick-add a new property from the agent’s edit screen without leaving the page
- Allow to delete children from parent, same but for unlink/delete
- Register controls for child object, adds a metabox on each property’s edit screen showing its agent
- Require at least one parent, Allow create/delete parents from children, mirror options for the property side
- Register separate DB table, store relation records in a dedicated table. Recommended for many-to-many and high-volume relations (saves space and speeds queries). Slight setup cost for retrieval
- Register get items/item REST API Endpoint, exposes the relation over REST so a JS frontend can fetch related items
- Register update REST API Endpoint, exposes write access too
After saving, both content types get a "Related items" panel in their post edit screens. The editor can attach existing items, create new ones inline (if allowed), or detach. JetEngine handles the underlying storage; you query the relation in templates with dynamic content widgets or the Query Builder.
Step 6: Build a dynamic listing template {#step-6-listings}
Listings are how you display a single property (or any CPT item) in a reusable template. Once defined, you can drop that template anywhere with the Listing Grid widget and it loops over results.
Navigate to JetEngine → Listings/Components → Add New Item.
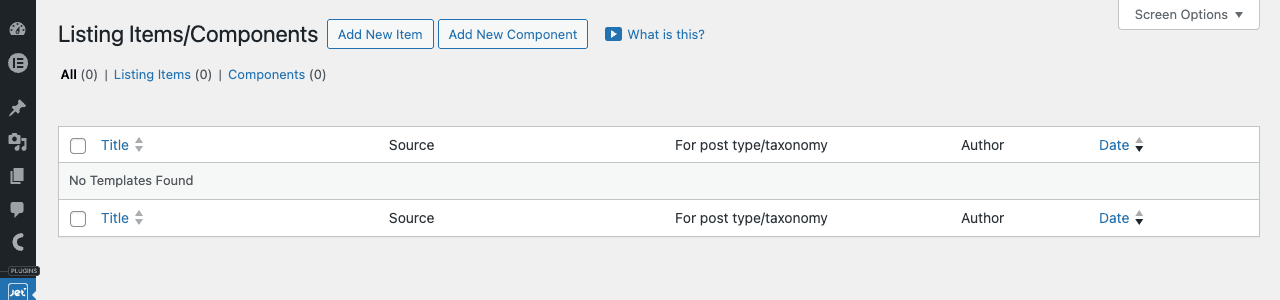
A modal opens asking what kind of listing this is for:
- Source, Posts (any post type), Terms (any taxonomy), Users, Repeater Field, CCT items, Query Builder result, REST API endpoint
- From, pick the specific post type or taxonomy
- Listing item name,
Property Card - Listing view, pick the editor: Elementor, Bricks, Blocks (Gutenberg), or Twig (raw template). Elementor is the most common.
Click Create Listing Item. You’re now in the chosen editor, designing the template for one property as if it were a single post.
In the editor, you’ll see JetEngine widgets in the sidebar:
- Dynamic Field, pulls a meta field value (
{{property_price}}) - Dynamic Image, pulls an image meta field
- Dynamic Link, generates a link to the post or a custom URL
- Dynamic Terms, outputs the taxonomy terms attached to the post
- Dynamic Meta, formatted output of a meta field with prefix/suffix
- Dynamic Repeater, loops over a repeater field
- Listing Grid, yes, you can nest a listing inside a listing (for related items)
Design the card: featured image at top, title below, price prominent, bedrooms/bathrooms/square-feet as small icons with values, a "View details" button linking to the property. Style it with whatever the underlying page builder offers.
Save when done. The Listing is now reusable.
Step 7: Display the listing on a page {#step-7-display}
Edit any page (or create a "Properties" page) in your page builder of choice. Add a Listing Grid widget. Configure:
- Listing source, pick the listing template you just made (
Property Card) - Columns, 3 on desktop, 2 on tablet, 1 on mobile
- Posts per page, 12
- Order by, Date or a meta field like
property_price - Loading mode, pagination, load more, or infinite scroll
- Query, filter which properties show. Defaults to all of the post type, but you can narrow by category, meta value, custom Query Builder query
Publish the page. Visit the front-end. You see a responsive grid of property cards. Click any to see the single-property view (which uses whatever single template you configured).
For filtered/searchable listings, install JetSmartFilters (another Crocoblock plugin in the family). It integrates with the Listing Grid to add search bars, dropdowns, checkboxes, range sliders, all updating the grid via AJAX. A real estate site typically pairs JetEngine + JetSmartFilters for the full result.
Step 8: Use Dynamic Visibility and Conditional Logic {#step-8-visibility}
Once the Dynamic Visibility module is enabled (Dashboard → Modules), every widget in your page builder gets a Dynamic Visibility tab with options like:
- Hide this widget if user is not logged in
- Show this only to users with role X
- Hide if the property’s
statusmeta issold - Show only during business hours
- Show only if the visitor matches a custom condition (your own PHP check)
For a property card you might hide the "Make Offer" button when the status is sold, replace it with a "Similar Properties" link via two widgets with opposite visibility rules.
For more complex logic, JetEngine’s Custom Visibility Conditions module lets you define reusable visibility rules in the admin: "is_premium_member", "is_owner_of_post", "stock_available". Refer to them across the site instead of recreating the same condition everywhere.
Step 9: Expose data via the REST API {#step-9-rest-api}
If your front-end is headless (React, Next.js, mobile app) or you want to feed data to another system, JetEngine has two REST options:
Per-listing REST endpoints, if you enabled "Rest API Listings" in Dashboard modules, every Listing automatically gets a REST endpoint at /wp-json/jet-rest/v1/listing/<listing_id>. Hit it and you get a JSON array of items rendered through the listing template.
Per-relation REST endpoints, toggled on the Relation builder (step 5). Endpoints at /wp-json/jet-engine/v1/relations/<relation_id> for read, with separate update endpoints for write. Useful for letting a front-end JS app fetch "all properties for agent X" or attach/detach relations.
CCT REST endpoints, Custom Content Types get full CRUD endpoints under /wp-json/jet-cct/v1/<cct_slug>/. Use them as a no-code data API.
All endpoints respect WordPress nonces and authentication. Use Application Passwords for headless production sites.
JetEngine vs ACF Pro vs Pods vs MetaBox {#comparison}
Four serious WordPress content modeling plugins, honest differences:
JetEngine is the most feature-complete of the bunch but also the heaviest. It’s not just a meta fields plugin, it’s also CPT registration, taxonomies, relations, listings, dynamic content, forms, REST, profile pages. If you need most of those, JetEngine ends up cheaper than buying separate plugins. Best paired with Elementor or Bricks. Memory and admin query load is higher than alternatives; turn off unused modules. Tight integration with the rest of the Crocoblock plugin family.
Advanced Custom Fields Pro (ACF) is the gold standard for just meta fields. Best field UI, best ecosystem, lightest weight, deeply documented. But by itself it doesn’t register CPTs (it does now in newer versions, but not as fully featured as JetEngine), doesn’t do relations natively (you use post object fields, which lack admin UI on the related side), doesn’t do listings. You’d pair ACF with separate plugins for CPTs and display, or write PHP. If your need is "add 5 custom fields to existing posts," ACF is the right answer.
Pods is the open-source content modeling veteran. Free, GPL’d, no Pro tier required. Does CPTs, taxonomies, meta fields, custom tables, relations. The UI is dated. Strong if you specifically want a free option and don’t mind the rougher edges. Lighter than JetEngine but less polished.
MetaBox is closer to ACF but with a stronger extensions ecosystem (paid add-ons). It does most of what JetEngine does, modularly, you pay for the modules you need. Slightly more developer-friendly with cleaner code APIs. If you build sites with raw PHP rather than Elementor, MetaBox is a natural fit.
When to pick which:
- Building with Elementor or Bricks and need rich UI without coding → JetEngine
- Adding a few fields to existing posts in a developer-built site → ACF
- Free, open source, you don’t mind the rough UI → Pods
- Pro WordPress developer building from PHP without a page builder → MetaBox
For a site that needs a lot of dynamic display work (real estate, directories, learning sites, marketplaces), JetEngine usually wins because the dynamic-display widgets are bundled. You won’t have to glue together ACF + a separate display plugin.
Common gotchas {#common-gotchas}
-
JetEngine is heavy. Every module you enable adds queries, scripts, and admin overhead. The "enable everything to see what’s available" pattern hurts performance. Audit your Dashboard → Modules list and disable what you don’t actually use.
-
CPT slug collisions with WordPress reserved names. Don’t name a CPT
attachment,revision,nav_menu_item,user,category. WordPress reserves these. The CPT builder usually warns you, but not always. -
Custom Content Types (CCT) aren’t full WordPress posts. They live in their own table, not
wp_posts. So they don’t have a built-in admin edit screen the way CPTs do (CCT UI is via the JetEngine admin), they don’t appear in WP_Query, they don’t have URLs by default. Great for big datasets but check that none of your plugins (SEO, sitemaps, search) assume content lives inwp_posts. -
Listing Grid is not magically cached. Each Listing Grid runs a fresh WP_Query on every page load unless you’ve enabled a page cache like WP Rocket or WP-Optimize. For a properties grid on the homepage with 50 properties, you’ll want page caching enabled on production.
-
Repeater data is serialized. Reading a repeater from raw
wp_postmetagives you a PHP-serialized string. Usejet_engine()->meta_boxes->get_meta_value()or the JetEngine API rather than rawget_post_meta()when the data is structured. Inside listings, dynamic widgets handle the unserialization automatically. -
Conditional logic on meta fields runs in JavaScript on the edit screen, not server-side. A "show this field only if X" rule in the CPT builder hides the field in the editor UI, but the field’s data isn’t actually deleted. Editors who circumvent the UI (with an old browser, with the WP REST API) can still set the field. Don’t rely on JetEngine conditional logic for security; it’s a UX convenience.
-
REST endpoints aren’t paginated by default the way you might expect. A
/wp-json/jet-rest/v1/listing/Xreturns everything matching the listing query. For 10,000 items this is a problem. Set up a Query Builder with proper paging, or query at the WordPress REST API level (/wp-json/wp/v2/property?per_page=100&page=2) and design your listing query to honor pagination params. -
Relations don’t enforce referential integrity at the DB level. If you delete an agent, the relation rows stay, pointing to a dead parent ID. JetEngine has a cleanup option but it’s not automatic. After bulk content deletions, run the "Reindex All Relations Tables" link at the top of the Relations page.
-
Profile Builder pages use WordPress rewrite rules. If pretty permalinks aren’t working (rewrite rules out of sync), profile pages 404. Fix by flushing rewrite rules: Settings → Permalinks, click Save Changes once.
-
Booking Forms (legacy module) is being phased out in favor of the newer Forms (JetFormBuilder) plugin. If you’re starting fresh today, install JetFormBuilder rather than enabling JetEngine’s legacy Forms module. Existing legacy forms keep working but new development should go to JetFormBuilder.
Developer reference: hooks, filters, glossaries {#developer-reference}
JetEngine exposes hundreds of hooks since it’s a sprawling plugin. The ones I reach for most often:
Modify the value of a meta field on output:
add_filter( 'jet-engine/listings/dynamic-field/field-value', function( $value, $field_settings ) {
 if ( $field_settings['dynamic_field_post_meta'] === 'property_price' ) {
 return '$'. number_format( (float) $value );
 }
 return $value;
}, 10, 2 );
Modify the query that a Listing Grid runs:
add_filter( 'jet-engine/query-builder/query/posts-args', function( $args, $query ) {
 if ( $query->id === 42 ) {
 $args['meta_query'][] = array(
 'key' => 'property_status',
 'value' => 'for-sale',
 );
 }
 return $args;
}, 10, 2 );
Register a custom dynamic-content callback so editors can use your PHP function in dynamic-field widgets:
add_filter( 'jet-engine/listings/allowed-callbacks', function( $callbacks ) {
 $callbacks['my_format_distance'] = __( 'Format Distance', 'mytheme' );
 return $callbacks;
} );

function my_format_distance( $meters ) {
 return round( $meters / 1609.34, 1 ). ' mi';
}
Add a custom field type to the meta field builder:
add_filter( 'jet-engine/meta-fields/field-types', function( $types ) {
 $types['my_color_picker'] = __( 'My Color Picker', 'mytheme' );
 return $types;
} );
Hook a relation update (fires when a related item is attached or detached):
add_action( 'jet-engine/relations/update-related-items', function( $relation_id, $parent_id, $children_ids ) {
 if ( $relation_id === 1 ) {
 update_post_meta( $parent_id, '_last_relation_update', current_time( 'mysql' ) );
 }
}, 10, 3 );
Customize the REST listing response:
add_filter( 'jet-engine/rest-api/listings/response', function( $items, $listing_id, $request ) {
 foreach ( $items as &$item ) {
 $item['custom_label'] = 'Featured';
 }
 return $items;
}, 10, 3 );
Glossaries are JetEngine’s central option-list manager. Define a list of options once (e.g., a list of US states, currencies, languages) under JetEngine → Glossaries, then reference it from any select / radio / checkbox field. Editing the glossary updates every field that uses it. Useful when an option list is repeated across multiple CPTs.
The Macros Generator lets you define custom dynamic macros like %current_user_property_count% that resolve to PHP-computed values at render time. Build a macro in the admin, expose it in dynamic-content widgets.
WP-CLI: JetEngine doesn’t add its own commands, but it works alongside wp post create, wp post meta update, and the standard WP-CLI tools. For bulk imports into JetEngine CPTs, the workflow pairs nicely with WP All Import Pro.
Pricing, licensing, and GPL availability {#pricing}
JetEngine is sold on Crocoblock’s site (crocoblock.com) under a few tiers: single plugin (JetEngine only), Plugins Set (the whole Jet family), and All-Inclusive (Jet family + templates + theme). Annual or lifetime options. The plugin is GPL-licensed (required for WordPress plugins), so redistribution is allowed.
JetEngine at GPL Times includes the full Pro plugin with every module unlocked. Spinning it up gets you:
- Trying it before paying, install on a staging site, configure a real content structure, see if the workflow fits your project before buying a Crocoblock subscription
- Personal projects where Crocoblock support tickets aren’t needed
- Agency dev sites that have their own support process
- Internal tooling for shops that just need the code
What you don’t get: official Crocoblock support, priority bug fixes, MCP Server licensing access (a newer hosted feature with its own auth), or access to the Crocoblock template library service (which is a separate SaaS).
Quick reference cheat sheet by site type {#cheat-sheet}
Real estate / property listings:
- CPT:
property, taxonomy:property_type - Meta fields: price, bedrooms, bathrooms, square footage, address, gallery, status
- Relation:
agent(One-to-many: agent → properties) - Listing template with property card, used in a Listing Grid with JetSmartFilters for search
Job board / directory:
- CPT:
job, taxonomy:job_category,location - Meta fields: company name, salary range, employment type, application URL
- CCT: candidate applications (high volume, stored separately)
- Profile Builder for company dashboards
Online learning / course catalog:
- CPT:
course, taxonomy:course_topic,difficulty_level - Meta fields: duration, instructor (via relation), curriculum repeater, prerequisites
- Relation:
instructortocourse, many-to-many - Listing Grid for course catalog with progress meters via Dynamic Field widgets
Restaurant / multi-location business:
- CPT:
location, taxonomy:cuisine_type - Meta fields: address, phone, hours (repeater for day → open/close), menu (gallery), Google Maps coords
- Maps Listings module for an interactive map view
- Dynamic Visibility to show "Open Now" or "Closed" based on current time
Marketplace with vendors:
- CPT:
product(or use WooCommerce),vendor - Relation:
vendortoproduct, one-to-many - Profile Builder for vendor accounts
- REST endpoints exposed for mobile app integration
SaaS knowledge base:
- CCT:
article(custom table for high volume) - Taxonomy:
topic,version - Relation:
articletotutorial_videofor related videos - REST API for the in-app search
Final thoughts {#final-thoughts}
JetEngine is a content-modeling power tool. It’s worth picking up when:
- Your site has a "thing" that isn’t a post or a page (property, vendor, course, listing, profile, candidate, recipe, location, event)
- You build with Elementor or Bricks and want to keep the no-code workflow
- You need relations between content types and want admin UI on both sides
- You’d otherwise be cobbling together ACF + a CPT plugin + a display plugin + a relations plugin
It’s the wrong choice if:
- You only need a few text/image meta fields on existing posts (use ACF, lighter)
- You build sites in raw PHP without a page builder (use MetaBox or write your own)
- Performance is the absolute top priority and the site has a complex content structure (write your own with
register_post_typeand direct meta queries)
Setup order for a new JetEngine project:
- Install + activate, configure license
- Dashboard → Modules: enable only what you need (start minimal, add more as needed)
- Build CPTs first, with their meta fields and admin columns
- Build taxonomies and link them to the CPTs
- Build relations between CPTs
- Build a listing template per content type you’ll display
- Drop Listing Grid widgets into pages
- Enable Dynamic Visibility and add conditional logic where it makes sense
- Expose REST endpoints if a JS frontend or external system needs them
After that, every new feature is a configuration change, not a code change. New field on properties? Add it to the CPT, drop a Dynamic Field widget into the listing. New filter? Configure JetSmartFilters. New page layout? New listing template.