

You want to build a community site. Not a blog, not a shop, but a real community: where people register, get profile pages with avatars and bios, browse a directory of other members, send private messages, and access content reserved for logged-in users. WordPress can do this, but only after you bolt on a serious member management plugin.
Ultimate Member is the free WordPress plugin that has dominated this space for nearly a decade. 200,000+ active installs, 5-star average rating, and an ecosystem of 20+ official extensions covering everything from bbPress integration to Stripe payments. It’s the plugin you reach for when "I need user registration with profile pages" is the project, and you’d rather not spend a month building it custom.
This is a complete, end-to-end walkthrough. We’ll cover every admin screen, what each setting does, how forms work, how roles are configured, what the member directory actually renders, the email notification system, and the developer hook layer. Everything you need to take an empty WordPress install and ship a working community site in one afternoon.
Heads up: this article is long because Ultimate Member is deep. You can use the Table of Contents below to jump straight to the section you need.
Quick decision guide: is Ultimate Member right for you?
Use Ultimate Member if you:
- Need front-end user registration (users sign up without seeing wp-admin)
- Want profile pages with avatars, cover photos, custom fields, and tabs
- Need a member directory where users can browse and search other members
- Want a way to gate content for logged-in users only (or specific user roles)
- Plan to build a moderately complex community site without a huge custom dev budget
- Like working with a free core plus paid extensions (only pay for what you need)
Use BuddyBoss Platform instead if you:
- Need activity feeds, real-time notifications, and social-network features
- Want a mobile app companion
- Are building an LMS site that needs LearnDash integration with a community
- Have budget for the paid BuddyBoss Platform Pro
Use MemberPress Pro instead if you:
- Are running a paid subscription / membership business
- Want drip content and member dashboards more than profile pages
- Need a CRM-style member management with subscriptions
Use built-in WordPress users if you:
- Only need basic registration with no profile customization
- Don’t care about a member directory
- Are happy with users editing their profile via wp-admin
Table of contents
- What Ultimate Member actually does (the 60-second version)
- Free vs Pro: what extensions cost
- Step 1: Install and let the plugin set itself up
- Step 2: Tour the dashboard
- Step 3: Understand the three core forms
- Step 4: Customize the registration form with drag-drop
- Step 5: Configure General settings (pages, users, account)
- Step 6: Lock down access (content restriction)
- Step 7: Configure email notifications
- Step 8: Style the appearance (templates, profile photo, cover photo)
- Step 9: Master User Roles and permissions
- Step 10: Build a Member Directory
- Step 11: Add custom fields
- Step 12: Publishing the pages and testing the full flow
- The official extensions you should know about
- Real-world recipes (3 complete site setups)
- Performance impact
- Ultimate Member vs BuddyBoss vs MemberPress
- 15 common gotchas
- Developer reference: hooks, filters, shortcodes, CLI
- FAQ
- Final thoughts
What Ultimate Member actually does (the 60-second version) {#what-it-does}
Ultimate Member ships three things WordPress doesn’t have out of the box:
-
Front-end registration, login, and profile editing. Users never see wp-admin. For sites where those users also need to submit content, WP User Frontend brings the same no-wp-admin idea to front-end posting. They sign up, log in, and edit their profile on themed front-end pages that match your site design.
-
A profile system. Every user gets a profile URL (e.g.
yoursite.com/user/jane-doe/) with avatar, cover photo, bio, custom fields, and tabs for organizing the layout. Profiles can be public, members-only, or fully private. -
A member directory. A browsable, filterable, searchable grid of all members on your site. Sortable by recent activity, alphabetical, custom criteria. Different directories can show different roles or filter by different fields.
On top of that core, Ultimate Member adds:
- Custom user fields (text, dropdown, radio, file upload, image, country, date, etc).
- User roles with detailed permissions (who can edit profiles, who can view what, who can sign up, etc).
- Content restriction (gate posts, pages, custom post types, or entire site sections by role).
- Email notifications (welcome, approval pending, account approved, password reset, etc).
- Privacy controls (let users make their own profile private, let admins approve registrations).
- Roles & capabilities (custom roles that map to WP capabilities).
- Conditional logic on form fields (show/hide fields based on other answers).
- GDPR tools (data export, account deletion, terms acceptance).
That’s the surface. Behind it is a deeply integrated set of admin screens that we’ll walk through next.
Free vs Pro: what extensions cost {#pricing}
Ultimate Member is unusual in that the core plugin is 100% free and feature-complete for most use cases. There’s no "Pro" version of the core. Instead, the company sells individual extensions that bolt on specific features.
The free core gives you:
- Registration, Login, Profile forms
- Profile pages with cover photo
- Member directory (1 directory included)
- Custom fields (15+ field types)
- User roles
- Content restriction
- Email notifications
- Member account page
- Password reset
- Privacy settings
Paid extensions (each sold separately) include:
- bbPress ($79) – integrate forums with profiles
- Followers ($79) – follow/unfollow other members
- Friends ($79) – friendship system with requests
- Google reCAPTCHA ($79) – anti-spam on forms
- Groups ($79) – public/private member groups
- Instagram ($79) – show Instagram feeds on profiles
- MailChimp ($79) – add new users to Mailchimp lists
- myCRED ($79) – points-based gamification
- Notices ($79) – admin announcements to members
- Private Content ($79) – lock specific content blocks
- Private Messages ($79) – member-to-member messaging
- Profile Completeness ($79) – progress bar for filling profile
- Real-time Notifications ($79) – live notifications without page reload
- Social Activity ($79) – activity stream on profiles
- Terms & Conditions ($79) – per-form T&C acceptance
- User Photos ($79) – photo gallery on profiles
- User Reviews ($79) – rate/review other members
- User Tags ($79) – tag yourself with interests
There’s also a "All Access" bundle for $249/year that includes every extension. Individual extensions are $79/year each.
On the GPL Times store, Ultimate Member core is included in the GPL membership along with every extension. If you’re already a member you can install whichever combination you need.
What you don’t get on the GPL-licensed version: automatic updates from the Ultimate Member team and direct support tickets. The community Slack and GitHub issues fill most of that gap.
Step 1: Install and let the plugin set itself up {#step-1-install}
Install path: WP Admin -> Plugins -> Add New -> Upload Plugin -> upload ultimate-member.zip -> Activate.
On activation, Ultimate Member runs a setup wizard that:
- Creates 7 WordPress pages with the right shortcodes already embedded:
- User (
/user/) – profile page with the[ultimatemember]shortcode - Login (
/login/) - Register (
/register/) - Members (
/members/) – directory page - Logout (
/logout/) - Account (
/account/) – user’s account settings - Password Reset (
/password-reset/)
-
Creates 3 default forms (Registration, Login, Profile).
-
Creates 1 default Member Directory.
-
Configures sane defaults for everything.
If for some reason the pages don’t get created on activation (this happens if you deactivated/reactivated, or if auto_create_post_default is off), you’ll see a "Create Pages" notice at the top of the admin with a one-click button to recreate them.
Step 2: Tour the dashboard {#step-2-dashboard}
Click the Ultimate Member menu item in your WP admin sidebar. You’ll land on the dashboard.
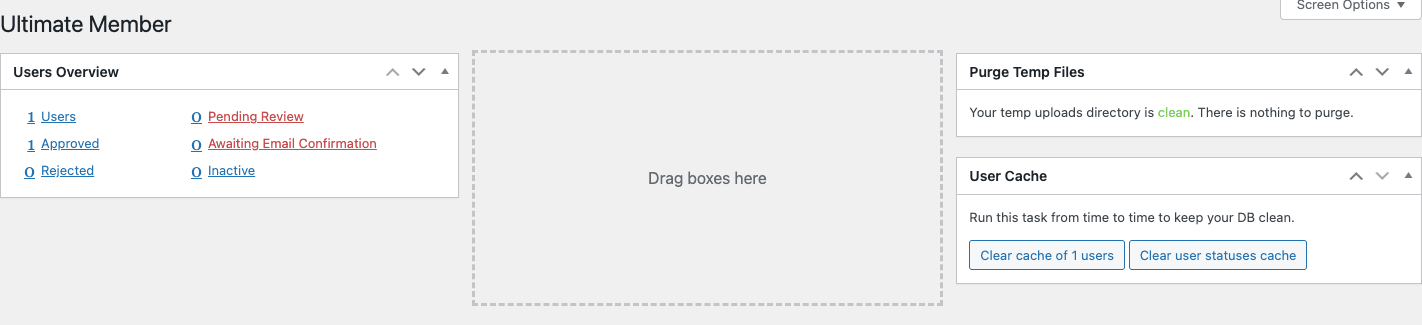
The dashboard widgets are draggable (drag to rearrange) and show:
- Users Overview – quick counts of total Users, Approved, Pending Review, Awaiting Email Confirmation, Rejected, Inactive. Each is a clickable link that takes you to the filtered users list.
- Purge Temp Files – Ultimate Member sometimes leaves orphaned files in
wp-content/uploads/ultimatemember/after rejected uploads. This widget cleans them. - User Cache – Ultimate Member caches user status checks. Click "Clear cache of N users" or "Clear user statuses cache" if you’ve made bulk changes to roles or statuses.
The dashboard is intentionally minimal. Most of what you’ll spend time on is in the Forms, Settings, User Roles, and Member Directories sub-menus.
Step 3: Understand the three core forms {#step-3-forms}
Ultimate Member’s central concept is forms. There are three form types, and the plugin auto-creates one default of each on activation.
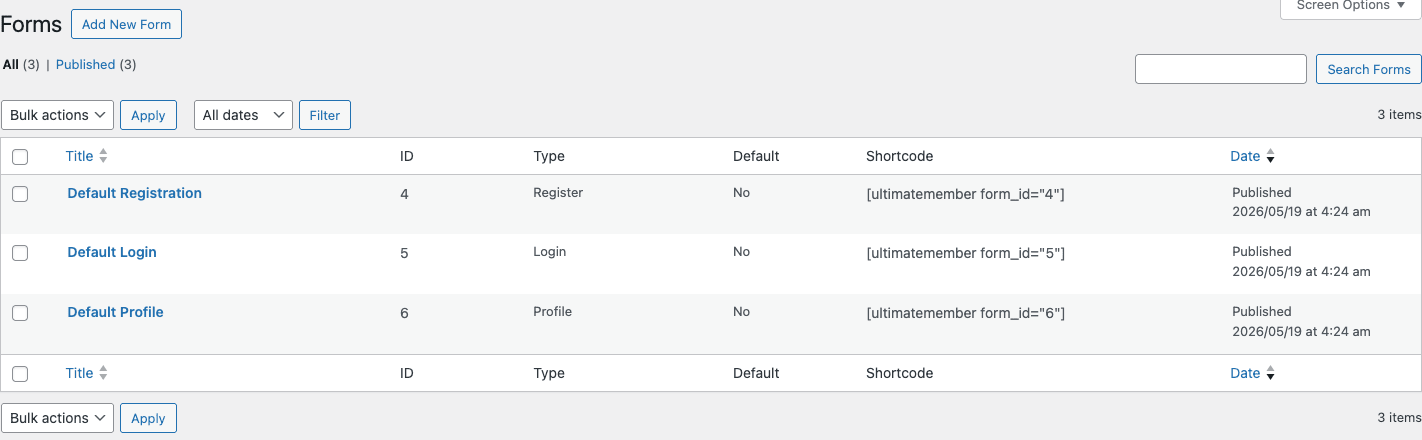
The three form types:
- Registration – what new users see at
/register/. Builds the user’s account, captures their initial info. - Login – the login form at
/login/. Username/email + password + remember me + lost password link. - Profile – the "edit your profile" form users see when they click Edit Profile on their own profile page.
Important things to understand:
- Each form has a unique shortcode (e.g.
[ultimatemember form_id="4"]). The shortcode is what makes the form appear on a page. - You can have multiple forms of each type. For example: one Registration form for general signups, another for "Apply to be a Vendor" with extra fields. Two forms, two pages, two shortcodes.
- Forms have settings AND fields. Fields are what the user sees; Settings control behavior like "what role does this form assign?" and "is approval required?"
Click Add New Form at the top to create a new one, or click an existing form’s title to edit it.
Step 4: Customize the registration form with drag-drop {#step-4-form-editor}
Click Default Registration to open the form editor. This is the screen where most of your time goes.
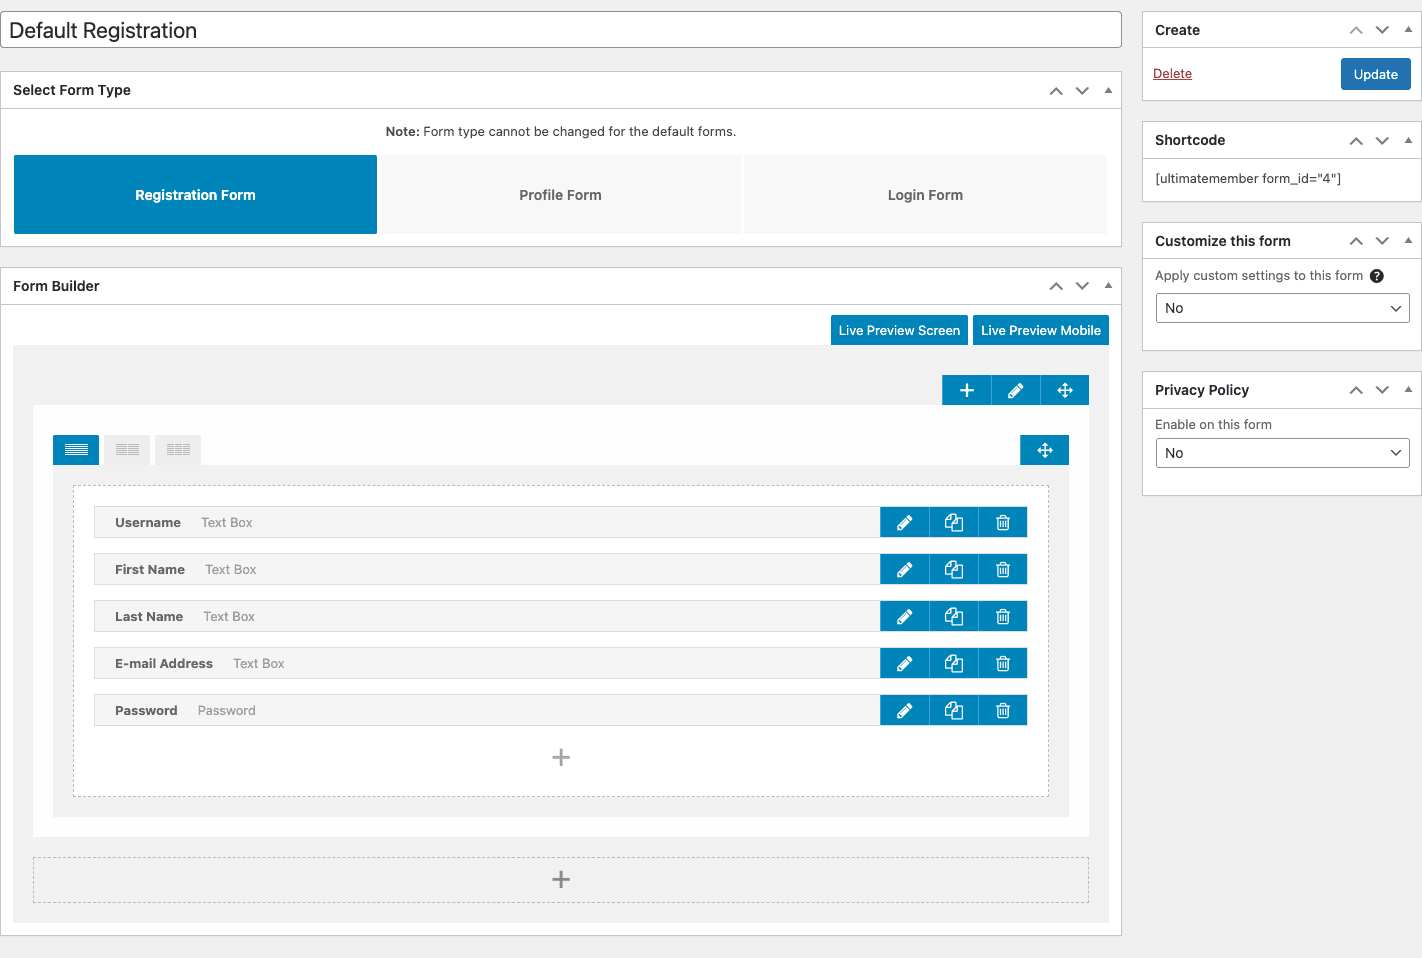
The screen has three main sections:
Section 1: Form Type tabs (top). For non-default forms, you can choose Registration / Profile / Login. Default forms have this locked because they’re tied to specific shortcodes.
Section 2: Form Builder (center). This is the drag-drop canvas. The default registration form has:
- Username
- First Name
- Last Name
- E-mail Address
- Password
Each row is a field. Hover over a row to reveal three icons:
- Pencil (edit) – opens the field config modal (label, placeholder, validation, conditional logic, etc).
- Copy – duplicate the field.
- Trash – delete the field.
Click the + icon below the last field to insert a new one. A modal opens with available field types:
Predefined fields (these match WordPress user fields):
- First Name, Last Name, Display Name, Nickname
- E-mail Address, Username, Password
- Website URL, Biographical Info
- Languages (dropdown)
Custom fields (you define):
- Text Box, Text Area, URL, Number, Date Picker, Time Picker
- Select (Dropdown), Multi-Select, Radio, Checkbox
- Image Upload, File Upload
- HTML, Spacer/Divider, Custom Block
- User Tag (Pro extension)
- Group (visual grouping)
Special fields:
- reCAPTCHA (with extension)
- Privacy Policy / Terms & Conditions
- Honeypot (anti-spam, automatically inserted)
Click any field in the modal to add it to the form. The new field appears at the bottom of the canvas; drag it where you want.
Section 3: Sidebar (right). Has four panels:
- Create – Update / Delete the form.
- Shortcode – copy the
[ultimatemember form_id="X"]shortcode. - Customize this form – if Yes, the form gets its own settings panel (override globals like "require approval" just for this form). If No, it uses global settings.
- Privacy Policy – toggle to add a Privacy Policy acceptance checkbox.
Two preview buttons at the top of the canvas: Live Preview Screen opens a desktop preview in a new tab; Live Preview Mobile simulates mobile. Useful for catching responsive issues before publishing.
The form editor is intentionally simple. There’s no Salesforce-grade form logic, but it covers 95% of community-site needs.
Step 5: Configure General settings (pages, users, account) {#step-5-general-settings}
Navigate to Ultimate Member -> Settings in the sidebar. The Settings screen has six top tabs: General, Access, Emails, Appearance, Advanced, System info.
The General tab has four sub-tabs: Pages, Users, Account, Uploads. Let’s walk each.
General > Pages
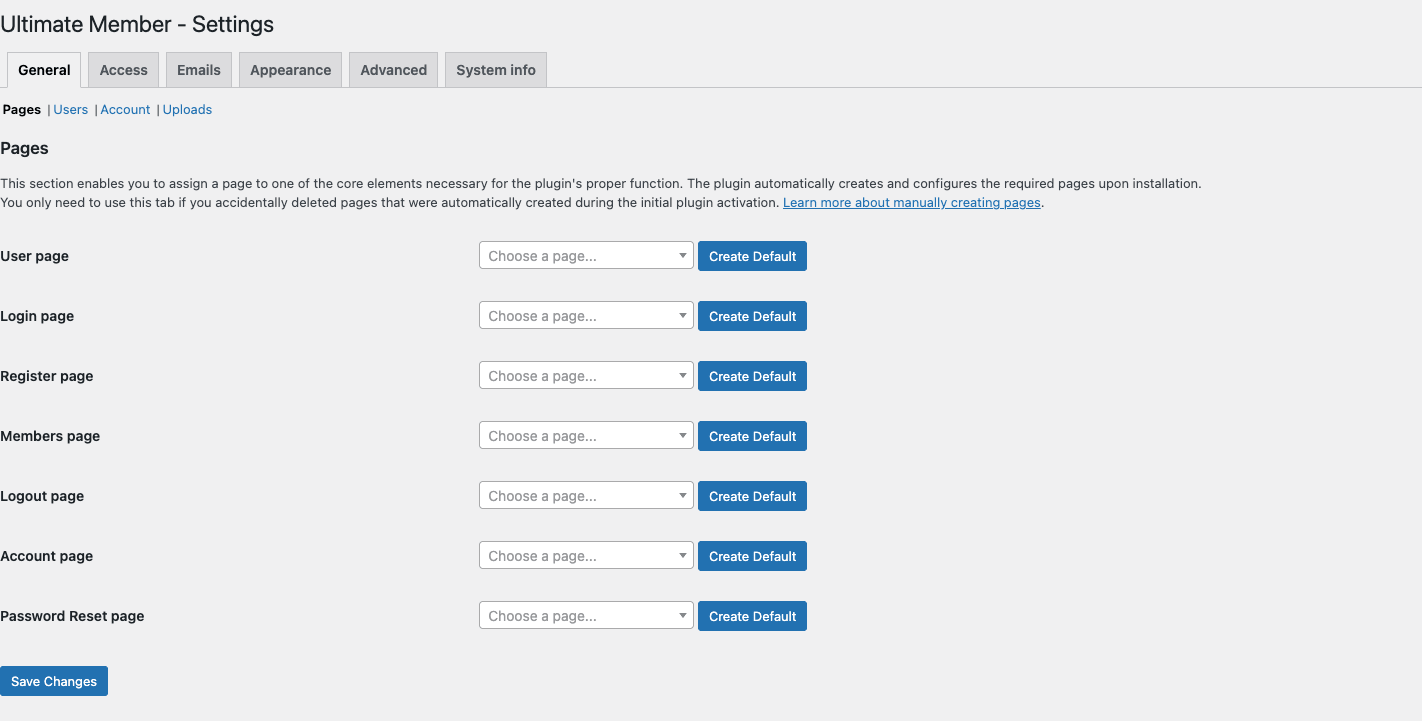
This is where Ultimate Member maps its functionality to WordPress pages. On activation the wizard auto-created these pages and assigned them here. You’d only touch this screen if:
- You accidentally deleted one of the auto-created pages and need to recreate it.
- You want to point a custom page at one of the UM functions (e.g. use your existing /signup/ page as the Register page).
Each row has a page picker dropdown and a Create Default button that creates a fresh page with the right shortcode if you don’t have one assigned. Useful for first-time setup or recovery.
General > Users
This is the deepest sub-tab and the one you’ll actually tune.
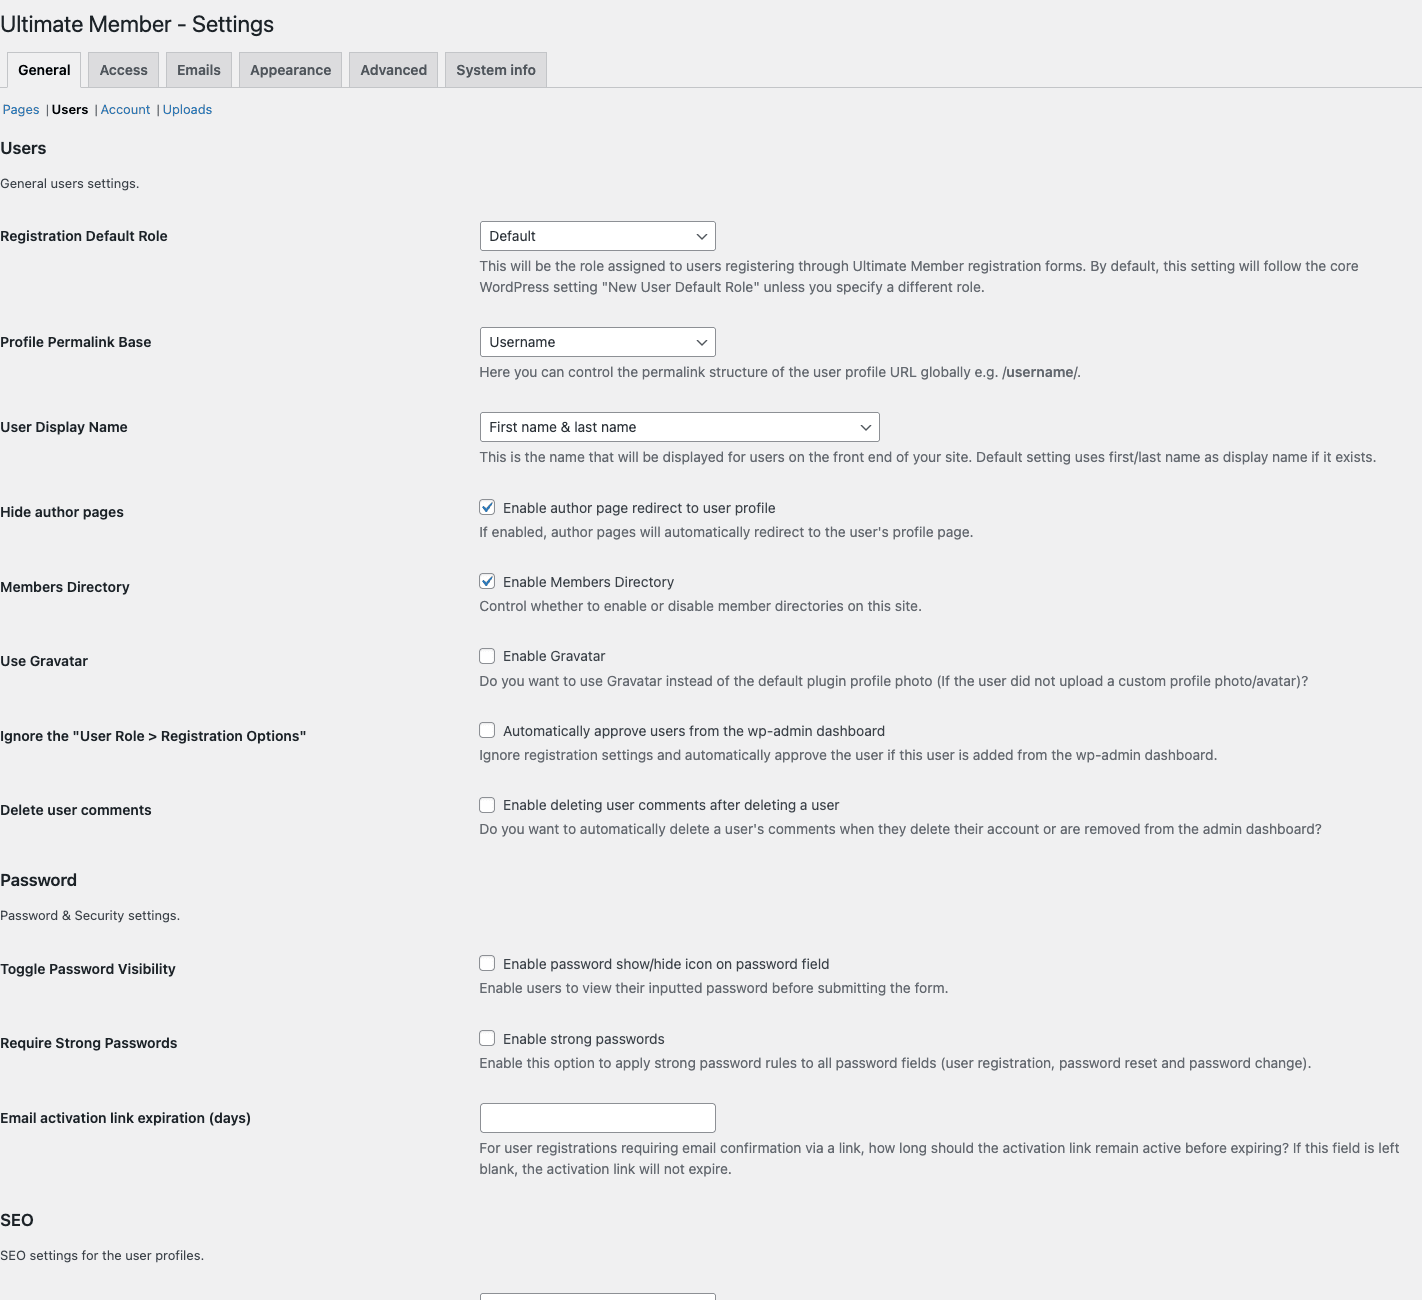
The key settings, top to bottom:
-
Registration Default Role: which WordPress role new users get on signup. Default: Subscriber. For a public community, you might create a custom UM role (see Step 9) called "Member" with limited capabilities.
-
Profile Permalink Base: how Ultimate Member builds the profile URL. Options:
-
user_login(default):/user/jane-doe/ -
ID:/user/123/ -
first_name + last_name:/user/jane-doe/ -
Custom field: lets you pick any field as the slug source.
-
Set this BEFORE users register. Changing it later means breaking existing profile URLs.
-
User Display Name: which field shows in member listings. Default: First name & last name. Options include username, display_name, or a custom field.
-
Hide author pages: redirects WP’s
/author/jane/to the UM profile/user/jane/. Always enable so you don’t have duplicate URLs. Major SEO win. -
Members Directory (toggle): enables the Members directory page.
-
Use Gravatar: lets UM fall back to Gravatar for profile photos if the user hasn’t uploaded one.
-
Enable Gravatar: explicit toggle. Off by default if you want users to upload their own photos exclusively.
-
Ignore "User Role > Registration Options": advanced, leave off.
-
Automatically approve users from the wp-admin dashboard: when admins create users in wp-admin, should those be auto-approved? Default: Yes.
-
Enable members can comment: lets logged-in users comment.
-
Delete user comments: when a user is deleted, also delete their comments. Default: off (orphan the comments).
-
Password section:
-
Toggle Password Visibility: adds an eye icon to password fields.
-
Require Strong Passwords: enforces strength.
-
Email activation link expiration (days): how long account activation links remain valid. Default: 1.
-
SEO section: includes "SEO settings for profiles" – control noindex behavior on profile pages. Best practice: noindex for profiles by default (especially for thin/empty profiles), let approved popular profiles get indexed.
General > Account
Controls what tabs appear on the user’s /account/ page. Default tabs: General, Password, Privacy, Notifications, Export, Delete. Toggle on/off to hide tabs from end users.
General > Uploads
File upload limits for profile photos, cover photos, and file fields. Defaults are reasonable (3-5 MB max). Lower for tight hosting, higher if you want users to upload résumés or portfolios.
Step 6: Lock down access (content restriction) {#step-6-access}
The Access tab handles content restriction: gating posts/pages by user role or login status.
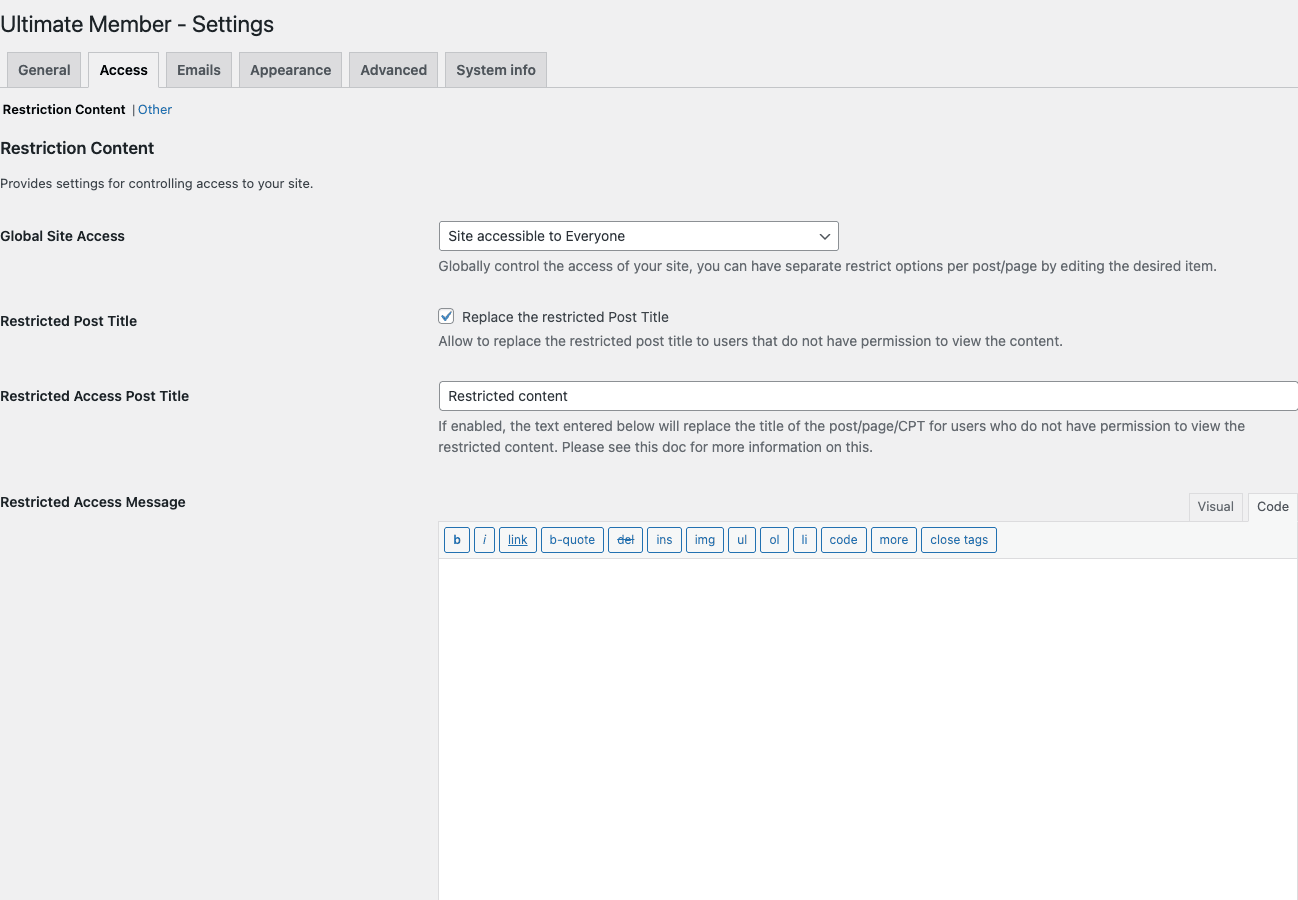
The Restriction Content sub-tab has:
-
Global Site Access: dropdown with three options:
-
Site accessible to Everyone (default): no global restriction. Each post/page can be individually restricted via metabox.
-
Site accessible to Logged-in Users: anyone not logged in gets redirected to the login page.
-
Site accessible to specific role(s): restrict to chosen role(s).
-
Restricted Post Title: when restricted content appears in lists (e.g. blog archive), should the title also be hidden? If on, you can:
-
Restricted Access Post Title: set a replacement title like "Restricted content" or "Members only".
-
Restricted Access Message: rich text editor for the message shown when a user hits restricted content. Default: "Sorry, you do not have permission to view this page." Customize with HTML and merge tags.
The Other sub-tab has:
- Hide site notice in admin: hide UM’s reminder banners.
- Avoid restricted content showing in REST API: critical if you’re running a headless front-end with WP REST.
- Avoid restricted content showing in search: hides restricted pages from WP search results.
- Avoid restricted content showing in feeds: removes from RSS.
Per-post restriction: when editing any post, page, or custom post type, you’ll see a new metabox "UM Content Restriction" where you can override globals: restrict to specific roles, hide from search, etc. This is where you’d lock specific premium articles.
Step 7: Configure email notifications {#step-7-emails}
The Emails tab lists all 14 system emails the plugin sends.
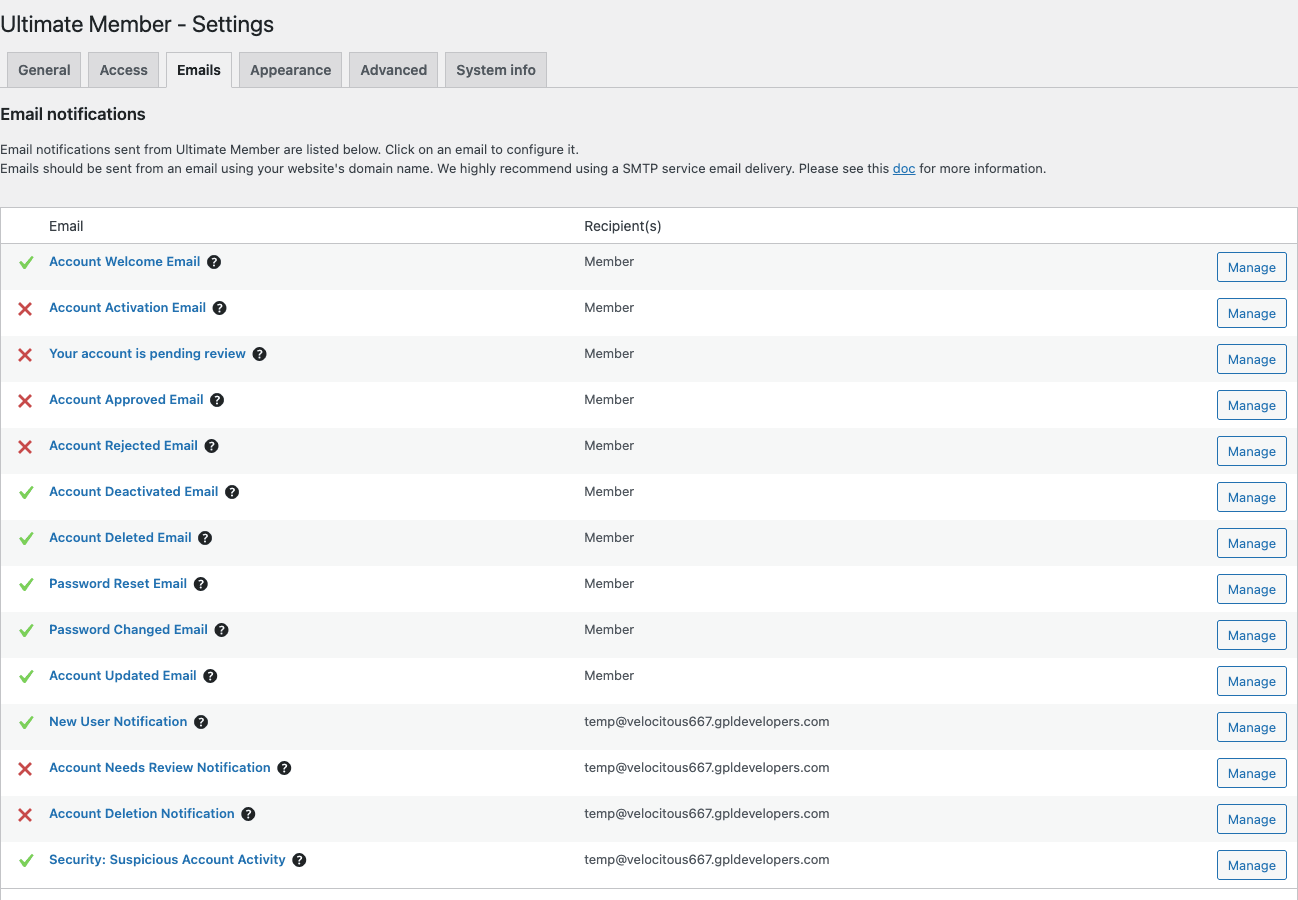
The 14 email types:
Member-facing emails (sent to the user):
- Account Welcome Email – sent on successful registration.
- Account Activation Email – sent if email confirmation is required.
- Your account is pending review – sent if admin approval required.
- Account Approved Email – sent when admin approves the account.
- Account Rejected Email – sent when admin rejects.
- Account Deactivated Email – sent when admin deactivates.
- Account Deleted Email – sent when account is deleted.
- Password Reset Email – sent on password reset request.
- Password Changed Email – sent after password change.
- Account Updated Email – sent when admin updates a user’s account.
Admin notifications (sent to site admin):
- New User Notification – admin notified of new signup.
- Account Needs Review Notification – admin notified that an account needs approval.
- Account Deletion Notification – admin notified that a user deleted their account.
- Security: Suspicious Account Activity – admin notified of suspicious login patterns.
The green checkmark = email is enabled; red X = disabled. Default: all enabled.
Click Manage on any email to edit:
- Subject (with merge tags like
{site_name},{display_name}) - Body (rich text editor, HTML and merge tags supported)
- Send From (admin email by default)
- Reply-To
Available merge tags include: {display_name}, {username}, {email}, {site_name}, {site_url}, {login_url}, {password}, {activation_link}, {password_reset_link}, {user_profile_link}, plus any custom field by its slug.
Critical setup tip: Ultimate Member’s email delivery depends entirely on WordPress’s wp_mail() function. On shared hosting that’s often unreliable. Always pair with WP Mail SMTP to route through Mailgun/Sendgrid/SES/etc. Without SMTP, registration confirmation emails will land in spam or never arrive.
Step 8: Style the appearance (templates, profile photo, cover photo) {#step-8-appearance}
The Appearance tab controls visual rendering. Has four sub-tabs: Profile, Profile Menu, Registration Form, Login Form.
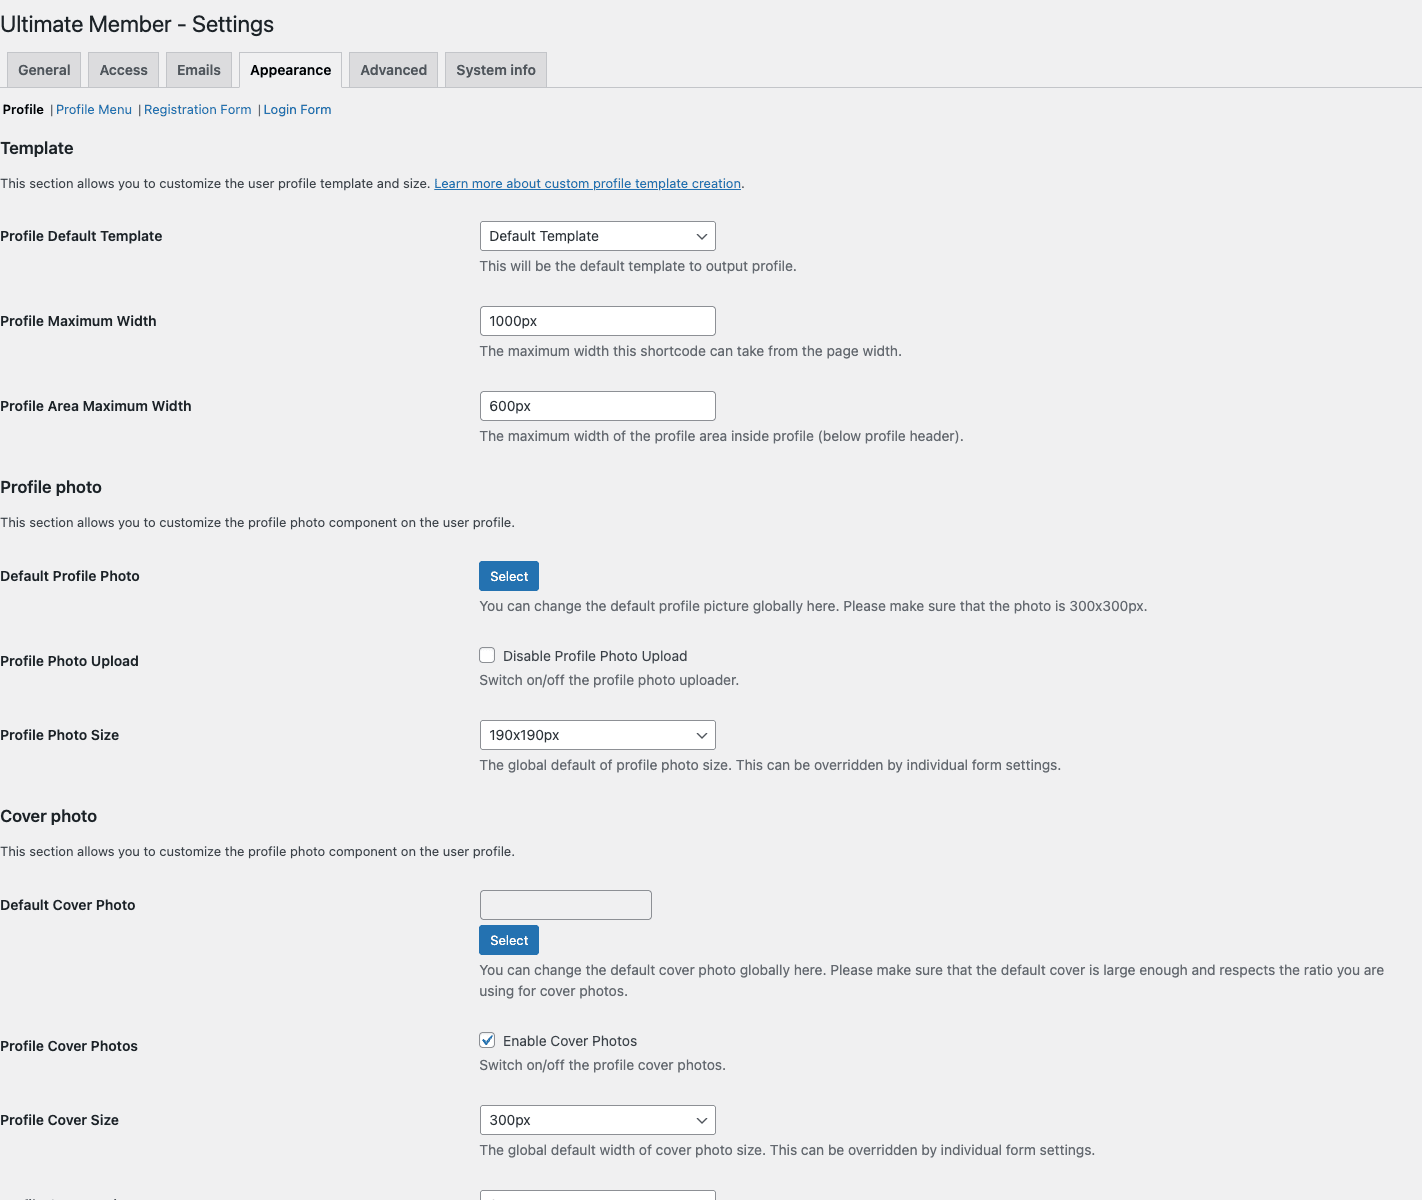
Appearance > Profile
- Profile Default Template: which PHP template renders profiles. Default Template is standard; you can install custom templates from extensions or your theme’s
ultimate-member/profile/directory. - Profile Maximum Width: total width of the profile shortcode area. Default 1000px.
- Profile Area Maximum Width: width of the content area inside the profile (below the header). Default 600px.
Appearance > Profile > Profile photo
- Default Profile Photo: image used when user hasn’t uploaded one. Recommended size: 300x300px.
- Profile Photo Upload: master toggle. Off to force the default photo, on to let users upload.
- Profile Photo Size: rendered size on the profile. Default 190x190px. Affects only display, not stored file.
Appearance > Profile > Cover photo
- Default Cover Photo: image used as fallback.
- Profile Cover Photos (toggle): show cover photos at all? Off hides them globally.
- Profile Cover Size: height of the cover photo strip on profile pages. Default 300px.
Appearance > Profile Menu
Controls the tab menu on profile pages (Main, Posts, Comments, etc). You can:
- Enable/disable the menu globally.
- Choose tab style (default, modern, minimal).
- Position the menu above or below the cover photo.
- Enable icons on tabs.
- Set tab ordering.
Appearance > Registration Form
Per-form rendering:
- Width (in px or %).
- Heading text (e.g. "Create an account").
- Heading background color, Heading text color.
- Icon (Font Awesome icon shown beside the heading).
- Style (default, modern, minimal).
- Default avatar (for users who haven’t uploaded one yet).
- Show Logged-in icon (whether to show user’s avatar after login).
- Show after a user has registered (rich text editor for the post-signup message).
Appearance > Login Form
Same options as Registration but for the login form. Plus:
- Login Form’s primary button text ("Log In", "Sign In", etc).
- After login redirect (URL or option to redirect to profile).
Step 9: Master User Roles and permissions {#step-9-roles}
Navigate to Ultimate Member -> User Roles. This is where you set up the permission tiers that drive everything else.
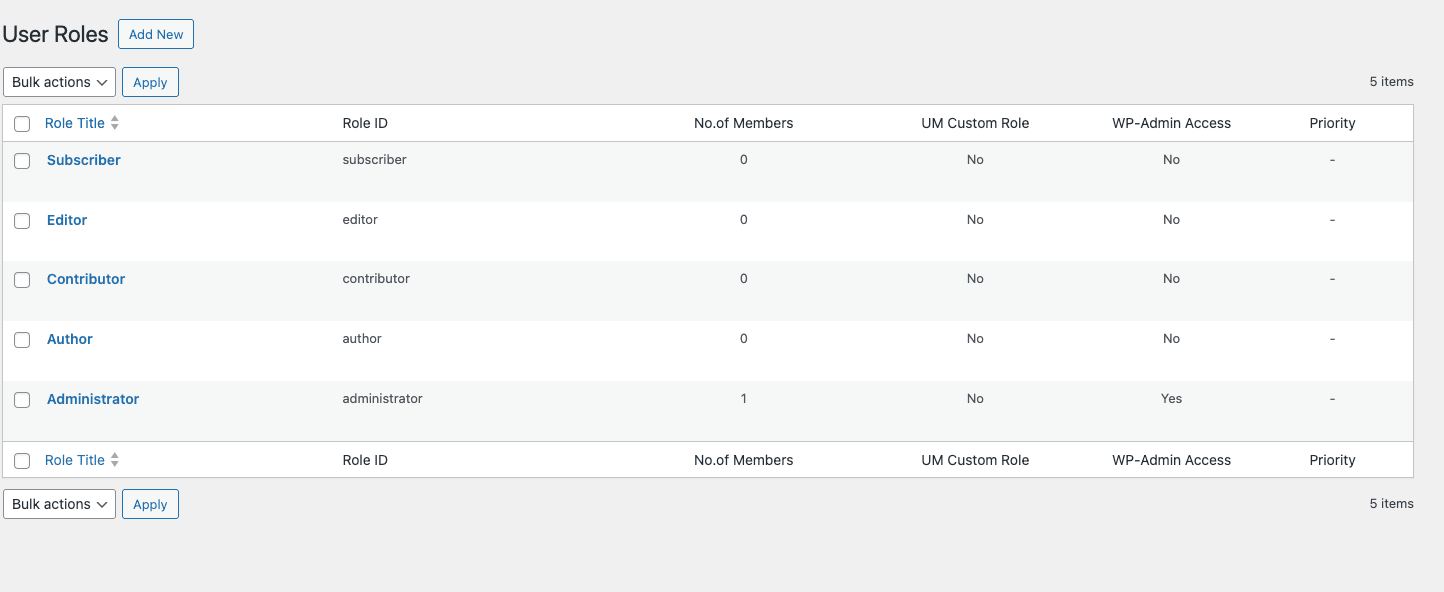
Out of the box you’ll see all WordPress roles (Subscriber, Editor, Contributor, Author, Administrator). Each can be extended with Ultimate Member’s additional permissions. You can also create custom roles by clicking Add New in the top.
Click any role’s title to open the role editor. There’s a lot here, so I’ll walk through it.
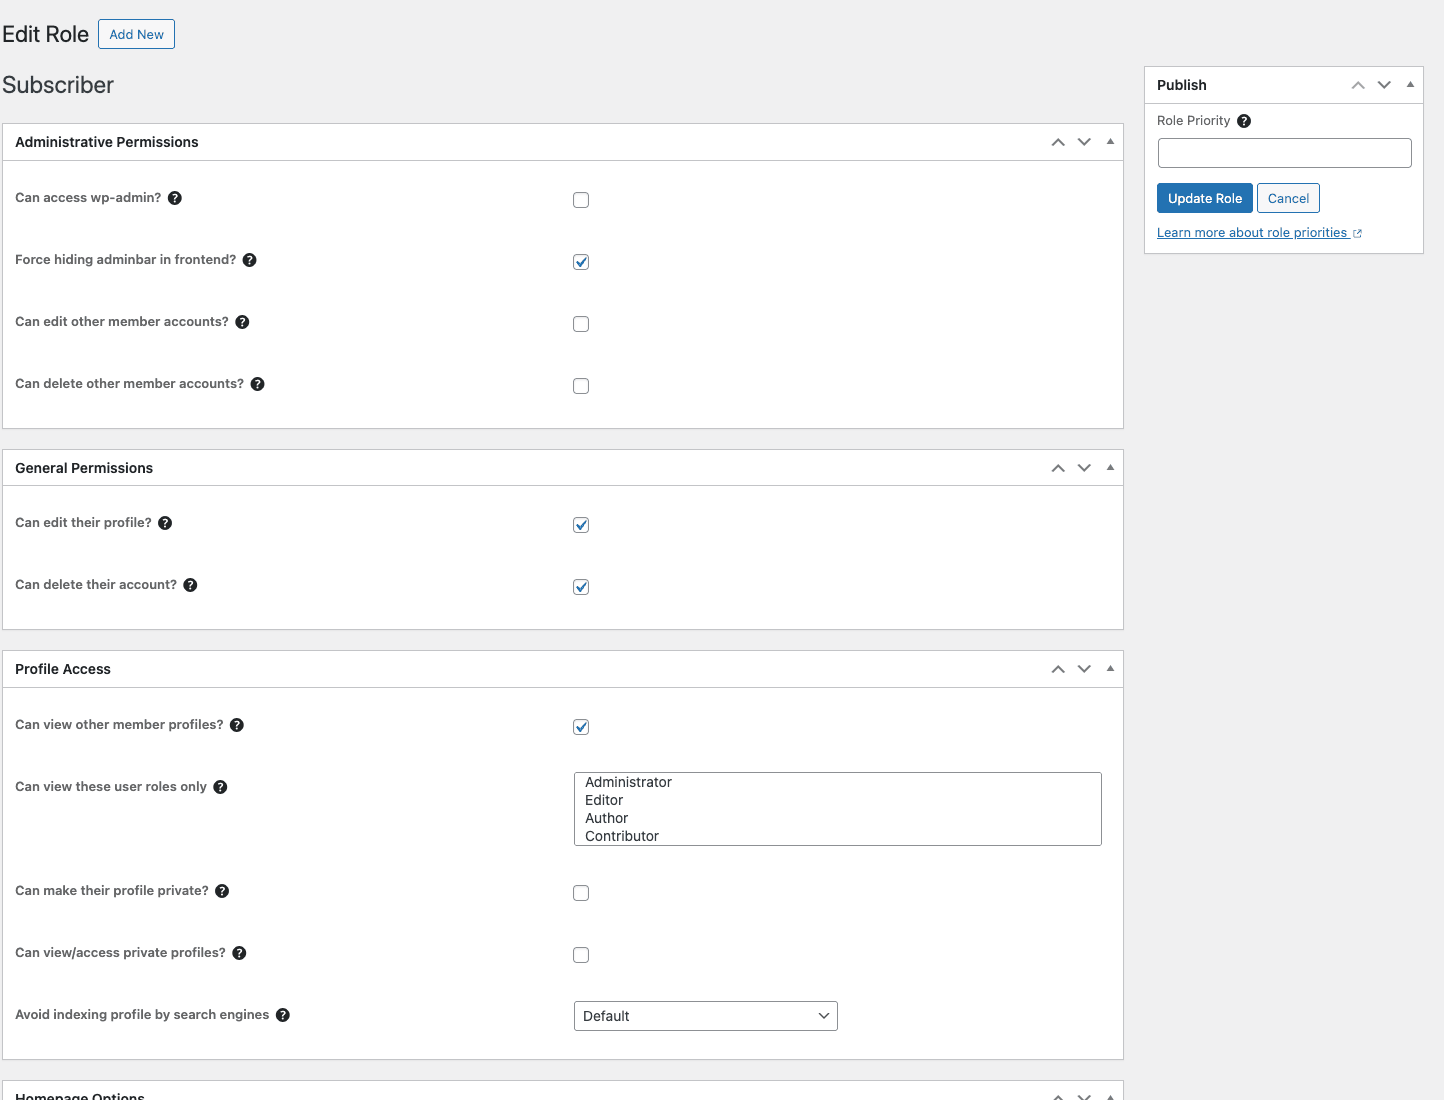
The role editor has multiple panels, each collapsible:
Administrative Permissions
- Can access wp-admin? Off for community members; they shouldn’t see the WordPress backend.
- Force hiding adminbar in frontend? Hides the gray WP admin bar on the front-end. Almost always on for non-admin roles.
- Can edit other member accounts? If yes, this role can edit other users’ profiles. Use carefully (only for moderator roles).
- Can delete other member accounts? Same caveat.
General Permissions
- Can edit their profile? Default yes; users should be able to edit their own info.
- Can delete their account? GDPR right-to-be-forgotten support.
Profile Access
- Can view other member profiles? Yes for most community sites.
- Can view these user roles only? Multi-select. Lets you build hierarchies: "Editors can view Authors but Authors can’t view Editors."
- Can make their profile private? Let users opt out of being visible.
- Can view/access private profiles? Override for moderators.
- Avoid indexing profile by search engines? Sets noindex on this role’s profiles. Default: blocked from search.
Homepage Options
- Custom Homepage: redirect this role to a specific URL on login (e.g. "Premium members go to /premium-dashboard/").
Roles that can View this Role
A reciprocal: limit which OTHER roles can see members of this role. Useful for private member tiers.
Profile Menu
Per-role override of which profile tabs show.
Delete Account Options
- Account Delete Custom Redirect URL: where users go after deleting their account.
Publish
The right sidebar has:
- Role Priority: numeric priority used when a user has multiple roles. Higher priority wins.
- Update Role / Cancel buttons.
Pro tip: don’t edit the built-in Administrator role. Create custom UM roles (Add New) for community-specific tiers like "Verified Member", "Premium Member", "Moderator", "Pending". Assign these via the Registration form’s role setting or via approval workflow.
Step 10: Build a Member Directory {#step-10-directories}
Navigate to Ultimate Member -> Member Directories. The default directory is already created.
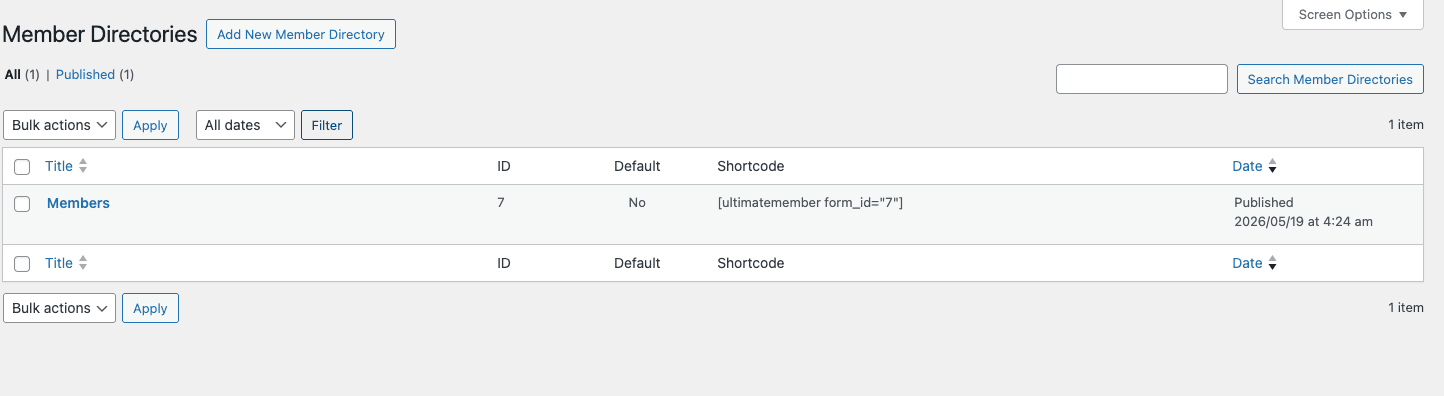
Click Members to open the directory editor. This is one of the most-configured screens in Ultimate Member.
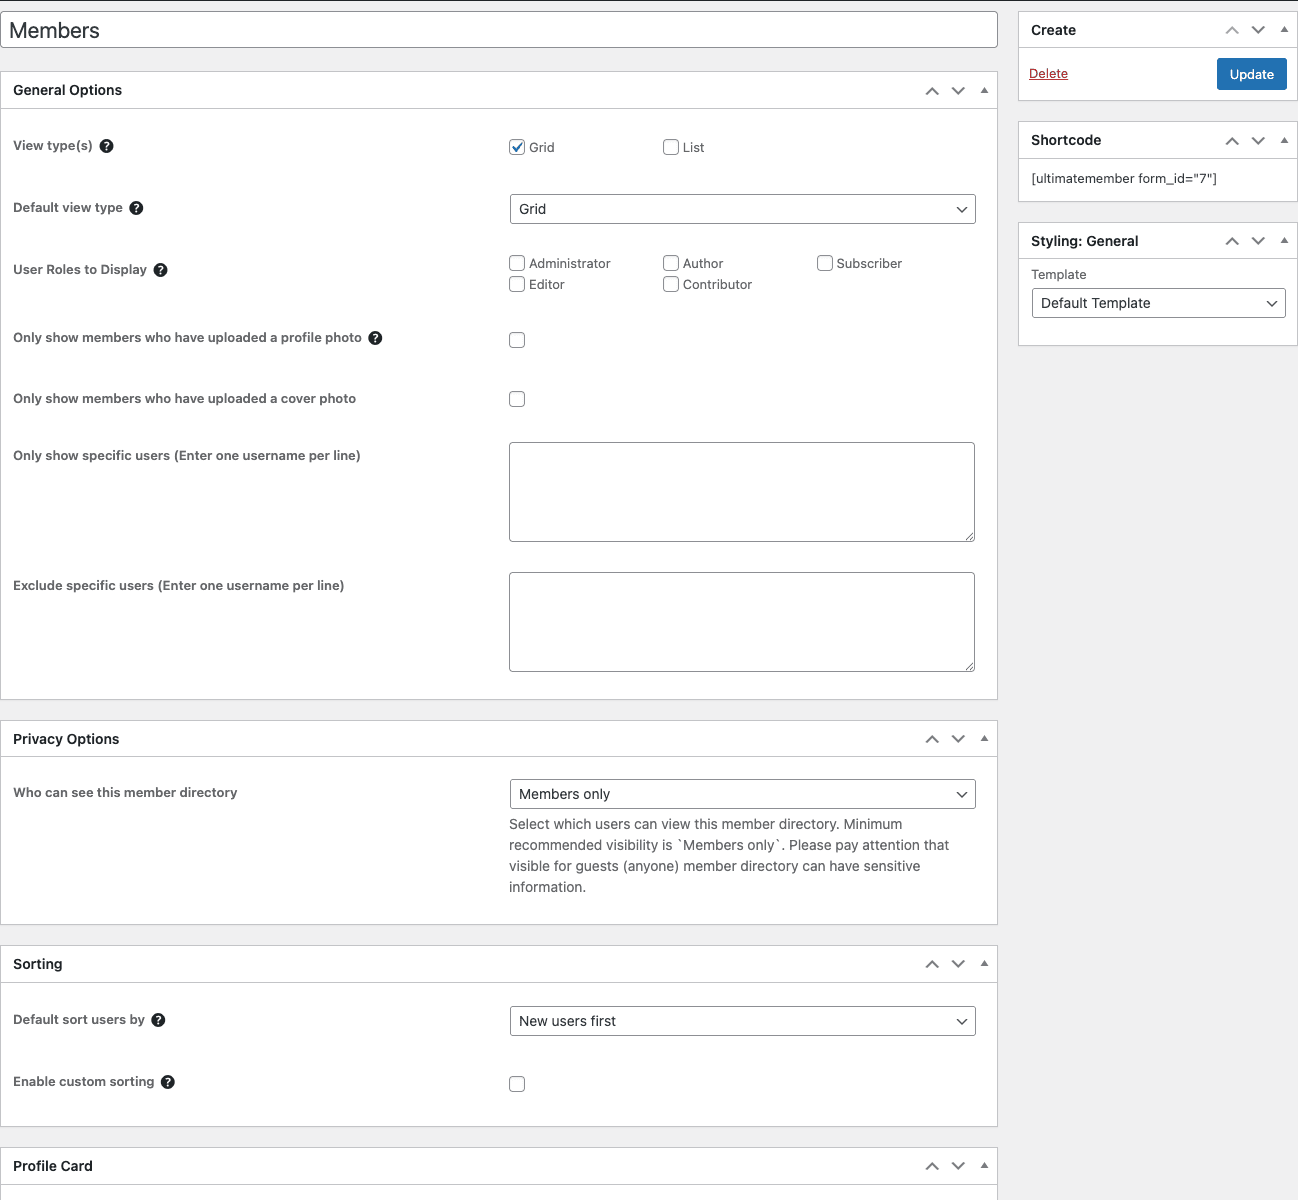
The directory config is organized into ~10 sections:
General Options
- View type(s): Grid and/or List. Two view modes the user can switch between.
- Default view type: Grid or List (initial state).
- User Roles to Display: which roles appear in this directory. Leave all checked for "everyone", or limit to one role like "Vendor" for a vendor directory.
- Only show members who have uploaded a profile photo: cleaner directories.
- Only show members who have uploaded a cover photo: stricter cleaner directories.
- Only show specific users: usernames (one per line) for a manual allowlist.
- Exclude specific users: usernames to omit (e.g. exclude staff from the public directory).
Privacy Options
- Who can see this member directory: Everyone, Logged-in users, Members only (with role filtering), or Specific roles.
Sorting
- Default sort users by: New users first, Old users first, Display name asc/desc, First name asc/desc, Last login, Random, or custom field.
- Enable custom sorting: lets end users choose their own sort.
- Sorting options: multi-select of which sort options to expose to the user.
Profile Card
The "card" is the visual unit shown for each member in the grid.
- Profile Card Hover Animation: how the card behaves on hover (zoom, lift, etc).
- Roles to display in profile card: show role labels on the card.
- Show profile photo in directory: toggle the avatar.
- Show cover photo in directory: toggle the cover image.
- Show display name in directory: toggle the name.
- Show tagline in directory: which fields to show as tagline (configurable below).
- Tagline in directory: multi-select up to 4 fields to show as taglines (e.g. Bio, Location, Job Title).
- Show extra user information: more meta below the tagline.
- Show social links: any social fields you’ve configured.
- Show user description: bio text.
- Profile Card Length: short / medium / tall.
Search Options
- Enable Search: master toggle.
- Search Filter Fields: multi-select of which fields users can filter by (Username, Email, Bio, custom fields, etc).
- Maximum Search Filter Fields: limit how many filters appear at once.
- Show Search Results Count: "Showing 24 of 156 members".
Results & Pagination
- Profiles per page: default 12.
- Profiles per row: default 4.
- First page profiles: optional "load more" pattern.
- Show Pagination: toggle.
Other settings
- Show user info menu: 3-dot menu for actions (send message, view profile, etc).
- Custom search button text.
Once configured, save. The shortcode is in the right sidebar. Place it on any page (default: /members/).
Step 11: Add custom fields {#step-11-custom-fields}
Custom fields are added inside the form editor (not as a global thing). Click Forms -> Edit form (Registration, Profile, or Login), then click the + icon in the form builder, then choose a field type.
Common custom fields and when to use each:
- Text Box – single-line text. Good for "Job Title", "Company", "City".
- Text Area – multi-line. Good for "About Me", "Bio extended".
- Number – numeric only. Good for "Years of Experience".
- Date Picker – calendar widget. Good for "Date of Birth".
- Select (Dropdown) – pick one from a list. Good for "Country", "Industry".
- Multi-Select – pick multiple. Good for "Interests", "Skills".
- Radio – one-of-many with all options visible.
- Checkbox – boolean (single) or many-of-many (multi).
- URL – validated URL. Good for "Website", "Twitter URL".
- Image Upload – profile pic, portfolio image.
- File Upload – résumé, portfolio PDF, document.
- HTML – custom HTML block (informational text in the form).
- Spacer / Divider – visual.
Each custom field has standard config:
- Label, Placeholder, Description / Help text
- Required toggle
- Public visibility: Everyone, Logged in users, Same role only, Owner only, Specific roles, Admin only.
- Editability: Editable / View only / Hidden on registration.
- Conditional Logic (Pro feature): show/hide based on other field values.
- Validation (for Text Box / Number): regex, min/max length, unique, email format.
Custom fields are stored in wp_usermeta and accessible via standard WordPress functions (get_user_meta($user_id, 'field_slug', true)).
Field types that come with extensions:
- User Tag (User Tags extension)
- Profile completeness bar (Profile Completeness extension)
- Photo gallery (User Photos extension)
Step 12: Publishing the pages and testing the full flow {#step-12-publishing}
After all the config, you need to verify the user-facing flow works. Test in incognito (logged-out) browser:
- Visit
/register/– registration form should render. Try filling it out and submitting. - Check email – did the welcome email arrive?
- Visit
/login/– log in as the new user. - Visit
/user/your-username/– your profile should render. - Click Edit Profile – the profile form should let you change your data.
- Visit
/members/– the directory should show your new account. - Visit
/account/– account settings page should render. - Click Logout – should return you to a logged-out state.
If any of these fail, the most common culprits:
- Page not assigned in Settings -> Pages: re-check the page assignments.
- Email not arriving: install WP Mail SMTP and configure.
- Form not rendering: check the page contains the right shortcode.
- 404 on profile URL: visit Settings -> Permalinks and click Save Changes to flush rewrite rules.
- Empty members directory: check that Members Directory toggle is on in General > Users, and roles allowed to display include the test user’s role.
The official extensions you should know about {#extensions}
Once the core works, you’ll want to layer on functionality. Here are the extensions worth knowing in priority order:
Tier 1 (most useful):
- Private Messages ($79) – member-to-member DMs. The #1 most-installed extension after core. Required for any real community.
- Followers ($79) – follow/unfollow other members. Builds engagement.
- Profile Completeness ($79) – progress bar nudging users to fill profile fields. Significantly boosts completion rate.
- Notices ($79) – admin announcements visible to specific roles. Replaces awkward "newsletter" workflows.
- Real-time Notifications ($79) – browser-based live notifications without page reload.
Tier 2 (powerful for specific needs):
- Groups ($79) – create public/private member groups. Essential if you want sub-communities.
- bbPress ($79) – integrate forums tightly with profiles.
- Friends ($79) – friend requests + acceptance. Heavier than Followers.
- MailChimp ($79) – auto-add registered users to Mailchimp lists by role.
- User Reviews ($79) – rate/review other members. Useful for marketplaces and service directories.
- Social Activity ($79) – activity stream on profile pages.
Tier 3 (niche):
- myCRED ($79) – gamification with points.
- User Photos ($79) – photo galleries on profiles.
- Instagram ($79) – embed Instagram feeds.
- User Tags ($79) – tag yourself with interests.
- Google reCAPTCHA ($79) – if you don’t want to use a third-party form spam plugin.
- Terms & Conditions ($79) – per-form T&C tracking.
- Private Content ($79) – inline content blocks gated by role.
Tier 4 (rarely needed unless specific):
- WooCommerce integration – auto-create UM profiles from WC customers. The bridge plugin.
Real-world recipes (3 complete site setups) {#recipes}
Three real configurations I’ve shipped:
Recipe 1: Free community forum site
Goal: Anyone can sign up, get a profile, browse other members, post in forums.
Stack:
- Ultimate Member core
- bbPress (free, from WP.org)
- Ultimate Member bbPress extension
- WP Mail SMTP
Setup:
- Install everything. Run UM’s auto-page creator.
- Settings -> General -> Users: Registration Default Role = Subscriber.
- Settings -> Access: Global Site Access = Everyone (forums are public).
- Custom Field: Add "Bio" textarea to the Profile form.
- bbPress: create one or two forums.
- UM bbPress extension: enable forum stats on profile pages.
Time: 2 hours from zero to launch.
Recipe 2: Private members-only directory (paid, manual approval)
Goal: A vendor directory where vendors pay annually, get a profile and member listing, but only logged-in approved users see them.
Stack:
- Ultimate Member core
- Custom UM role "Vendor"
- MemberPress for payment + role assignment
- Ultimate Member Profile Completeness extension
- WP Mail SMTP
Setup:
- Install UM and MemberPress.
- UM Roles: create custom role "Vendor" with
_um_can_edit_profiletrue,_um_view_userslimited to other Vendors. - MemberPress: create "Vendor Membership" priced at $99/year. Use the "Add Role on Membership" feature to auto-assign Vendor role on payment.
- UM Member Directories: create "Vendor Directory" filtered to Vendor role only, privacy = "Vendors only".
- UM Registration Form: customize for Vendor signup (no direct registration; MemberPress drives it post-payment).
- UM Settings -> Users: Registration Default Role = Pending (so even paid signups need admin review).
- UM Email: customize "Account Approved Email" to mention vendor benefits.
Time: One full day, including testing.
Recipe 3: LinkedIn-style professional network
Goal: Members register, fill out detailed profiles (job title, company, skills, location), can follow each other, message, and search.
Stack:
- Ultimate Member core
- Ultimate Member Followers
- Ultimate Member Private Messages
- Ultimate Member Profile Completeness
- Ultimate Member Real-time Notifications
- WP Mail SMTP
- FacetWP for advanced member search
Setup:
- UM core + extensions installed.
- UM Profile Form: add custom fields – Job Title (text), Company (text), Industry (dropdown), Location (text), Skills (multi-select), LinkedIn URL, Bio (textarea), Years of Experience (number), Resume Upload (file).
- UM Member Directory: enable Search with all custom fields as searchable, profile card shows photo + name + Job Title + Company + Location.
- FacetWP: build facets for Industry, Location, Skills (the custom fields are indexable).
- UM Roles: 3 roles – Pending, Verified, Premium. Verified by manual admin approval, Premium gated by payment.
- UM Private Messages: configure who can message whom (any verified can message any verified, etc).
- UM Followers: enable on profile.
- UM Profile Completeness: set threshold at 70% for "active" status badge.
Time: A week, mostly testing user flows.
Performance impact {#performance}
Honest numbers from real sites.
Site 1: Small community, 600 members, lightweight theme
- Without Ultimate Member: TTFB 280ms, page weight 480KB
- With Ultimate Member core only: TTFB 320ms, page weight 580KB
- With UM + Private Messages + Followers + Profile Completeness: TTFB 380ms, page weight 720KB
Site 2: Medium community, 8,500 members, member directory page
- Default WordPress users archive: TTFB 1200ms
- UM Member Directory (default): TTFB 950ms
- UM Member Directory + FacetWP for advanced search: TTFB 480ms (FacetWP’s indexer wins again)
Site 3: Large community, 50,000 members
- The members archive becomes the bottleneck. Solution: pair UM with FacetWP for index-backed member search.
- Profile pages remain fast (single-user query, indexed by user_id).
Memory impact: Core UM adds ~14MB PHP memory per request. Each Pro extension adds 2-5MB. A typical "full community" stack uses ~35MB extra.
Page weight: Core UM ships ~120KB of CSS+JS on every page where a UM shortcode is rendered. Pages without UM shortcodes don’t load the assets. Use Perfmatters’ Script Manager to confirm UM assets only load where needed.
The bigger your member count, the more the database queries dominate. UM stores user meta in wp_usermeta. Heavy use of custom fields means more meta rows. Always run OPTIMIZE TABLE wp_usermeta periodically and consider Redis object caching for sites over 10K members.
Ultimate Member vs BuddyBoss vs MemberPress {#comparison}
If a full social network is where you’re headed rather than just profiles, our walkthrough of BuddyBoss covers the community platform in depth.
Honest comparison.
| Feature | Ultimate Member | BuddyBoss Platform | MemberPress Pro |
|---|---|---|---|
| Front-end registration | Yes | Yes | Yes (via add-ons) |
| Profile pages | Yes (rich) | Yes (very rich) | Limited (account-style) |
| Member directory | Yes | Yes | No native |
| Custom user fields | Yes (15+ types) | Yes | Limited (3-5 types) |
| Activity feeds | Via extension | Yes (core) | No |
| Private messaging | Via extension | Yes (core) | Via add-on |
| Followers / Friends | Via extension | Yes (core) | No |
| Groups | Via extension ($79) | Yes (core) | No |
| LearnDash integration | Limited | Yes (deep) | Yes |
| Content restriction | Yes (built-in) | Yes | Best in class |
| Subscription billing | No (use MP/WC) | No (use MP/WC) | Yes (core) |
| Drip content | No | No | Yes (core) |
| Mobile app | No | Yes (BuddyBoss App) | No |
| WP-CLI | Limited | Limited | Yes |
| Annual price (core) | Free | Free (Platform) / $228 Pro | $179 |
| Annual price (full stack) | $249 (all extensions) | $228 (Platform Pro) | $399 (Plus) |
Pick Ultimate Member if you need free core + pay-per-extension flexibility AND profile-centric community features.
Pick BuddyBoss if you need a fully social community with feeds and mobile app, AND don’t mind paying for the full platform.
Pick MemberPress if your primary need is paid memberships with drip content, AND you don’t need rich profiles.
These three can also be combined: many sites run MemberPress for billing + Ultimate Member for profiles + BuddyBoss for activity feeds. It works but adds complexity.
15 common gotchas {#gotchas}
-
Email delivery is the #1 cause of broken UM setups. WordPress’s default
wp_mail()is unreliable on shared hosting. Install WP Mail SMTP on day one. -
Profile permalinks break if you change Profile Permalink Base after users exist. Change this BEFORE you have any registered users, or accept that old URLs will 404.
-
The default Subscriber role can access wp-admin. Edit the Subscriber role in UM Roles and turn off "Can access wp-admin" or your community users will land in wp-admin and panic.
-
Custom fields don’t apply to the Registration form unless added there. A custom field added to the Profile form won’t appear at registration. Each form has its own field set. Add the field to all relevant forms.
-
Photo uploads use server temp space. If your hosting has tight
/tmpquotas, upload failures look mysterious. The dashboard’s "Purge Temp Files" widget helps but doesn’t prevent the issue. -
Member directory caches aggressively. After adding fields to profile cards, click "Clear user statuses cache" on the dashboard or new fields won’t appear.
-
The honeypot anti-spam field works against legit users who paste passwords. If you get reports of failed registrations, check that "URL" (UM’s honeypot) is hidden via CSS and not pre-filled by password managers.
-
REST API exposes user data by default. WordPress’s
/wp-json/wp/v2/usersendpoint lists all users including hidden custom fields. Set Access -> Other -> "Avoid restricted content showing in REST API" or use a security plugin to restrict. -
Conditional fields require Pro extensions. The free core doesn’t have field-level conditional logic. For show/hide based on other fields you need the Conditional Fields extension or custom code.
-
The login form doesn’t redirect to wp-admin by default. Login redirects to the user’s profile page. Confused admins can change this in Appearance -> Login Form -> After login redirect.
-
Caching plugins can serve stale member directories. Configure WP Rocket / WP-Optimize / etc to exclude
/members/and/user/from cache. Otherwise users see outdated profile cards. -
GDPR account deletion doesn’t delete the user’s posts/comments. It only deletes the WP user account. To wipe their content too, set Settings -> General -> Users -> "Delete user comments" = Yes and use WordPress’s built-in Erase Personal Data tool.
-
Profile photo upload fails silently on Cloudflare proxied sites with strict security. The XHR upload hits CF security rules. Whitelist your domain or set CF to "Configuration Rules -> Skip Cache" for upload endpoints.
-
The "Bio" field overlap with WP’s biographical_info. UM’s default Bio field uses WordPress’s built-in
descriptionmeta. If you have other plugins readingdescription(like author boxes), they’ll pull the UM Bio. Usually fine, occasionally surprising. -
Member counts in the dashboard include unapproved users. "Users: 1247" counts everyone including pending. Visit Users in wp-admin and filter by status to see actual approved count.
Developer reference: hooks, filters, shortcodes, CLI {#developer-reference}
UM exposes hundreds of hooks. Here are the most useful ones with real-world examples.
Run code after a user registers
add_action('um_after_user_is_inserted', function($user_id) {
 update_user_meta($user_id, 'registered_at_unix', time());
 // Or hand off to an external CRM
 wp_remote_post('https://crm.example.com/api/lead', [
 'body' => json_encode([
 'email' => get_userdata($user_id)->user_email,
 'source' => 'wp_signup',
 ]),
 ]);
});
Force-approve users on registration (skip pending state)
add_action('um_after_user_is_inserted', function($user_id) {
 UM()->user()->approve($user_id);
});
Customize the welcome email body programmatically
add_filter('um_email_template_body', function($body, $template, $args) {
 if ($template === 'welcome_email') {
 $body = '<h1>Welcome to The Community</h1>'. $body;
 }
 return $body;
}, 10, 3);
Add a custom validation to a field
add_action('um_submit_form_errors_hook__registration', function($args) {
 if (isset($args['user_email'])) {
 if (strpos($args['user_email'], '@tempmail.com')!== false) {
 UM()->form()->add_error('user_email', 'Please use a permanent email address.');
 }
 }
});
Redirect specific roles to specific URLs on login
add_filter('um_login_redirect_url', function($redirect, $user) {
 if (in_array('vendor', (array) $user->roles)) {
 return '/vendor-dashboard/';
 }
 if (in_array('premium', (array) $user->roles)) {
 return '/premium-content/';
 }
 return $redirect;
}, 10, 2);
Hide a custom field from the public
add_filter('um_user_pre_updating_files_array', function($value, $key, $user_id) {
 if ($key === 'phone_number') {
 // Only show to admins
 if (!current_user_can('manage_options')) {
 return '';
 }
 }
 return $value;
}, 10, 3);
Programmatically create a user via UM (correct way)
$user_id = wp_create_user('janedoe', 'temppass123', 'jane@example.com');
update_user_meta($user_id, 'first_name', 'Jane');
update_user_meta($user_id, 'last_name', 'Doe');
update_user_meta($user_id, 'custom_field', 'value');
UM()->user()->set_registration_status($user_id);
UM()->user()->set_role($user_id, 'subscriber');
do_action('um_after_user_is_inserted', $user_id);
Shortcodes
UM ships these shortcodes:
[ultimatemember form_id="4"] // Render a form (registration/login/profile)
[ultimatemember_login] // Render the default login form
[ultimatemember_directory] // Render the default member directory
[ultimatemember_account] // Render the user account page
[ultimatemember_password] // Render the password reset form
[um_loggedin]Content for logged-in users[/um_loggedin]
[um_loggedout]Content for logged-out users[/um_loggedout]
[um_show_content roles="admin,editor"]Visible to selected roles[/um_show_content]
The [um_show_content] shortcode is incredibly useful for inline gating without restricting the entire page.
WP-CLI
UM has limited WP-CLI but useful:
# Approve a pending user
wp eval 'UM()->user()->approve(123);'

# Reject a pending user
wp eval 'UM()->user()->reject(123);'

# Get user status
wp user meta get 123 account_status
For bulk operations, write a custom script using the PHP API above.
REST API integration
UM doesn’t ship custom REST routes (uses WordPress’s default /wp/v2/users). For headless front-ends:
# Get all members (requires authentication if site is restricted)
curl https://yoursite.com/wp-json/wp/v2/users

# Get specific user
curl https://yoursite.com/wp-json/wp/v2/users/123

# Update user meta (requires authentication)
curl -X POST https://yoursite.com/wp-json/wp/v2/users/123 -d '{"meta":{"job_title":"Designer"}}'
To expose custom fields to the REST response, register them via register_meta() with show_in_rest => true.
FAQ {#faq}
Is Ultimate Member free?
Yes, the core plugin is 100% free. Paid extensions add specific features. Most community sites can launch on free core.
Can I use Ultimate Member without paying anything?
Absolutely. The free core handles registration, login, profiles, custom fields, member directory, content restriction, and email notifications. Many sites never need a paid extension.
Does Ultimate Member work with WooCommerce?
Yes, there’s a free integration that lets WooCommerce customer accounts share data with UM profiles. WC checkout still uses WC’s flow, but the user’s profile page is UM-powered.
Can I use Ultimate Member as a membership plugin (selling subscriptions)?
Not by itself. UM handles user accounts and profiles; it doesn’t handle billing. Pair with MemberPress for billing or WooCommerce Subscriptions for product subscriptions.
Does Ultimate Member support multilingual sites?
Yes, WPML and Polylang are both compatible. Forms, emails, and front-end labels are translatable via the standard __() and _e() functions.
Can I migrate users from BuddyPress or BuddyBoss to Ultimate Member?
Partially. WordPress user accounts (wp_users, wp_usermeta) carry over since UM uses standard WP tables. BuddyPress-specific data (activity, groups, friends) does not migrate without custom scripting.
Does Ultimate Member slow down my site?
Adds ~14MB PHP memory and ~120KB CSS+JS on pages where shortcodes render. On pages without UM shortcodes, no impact. Use Perfmatters Script Manager to be sure.
Can users edit their email address?
By default yes via the Profile form. To prevent it, edit the Profile form, click the Email field’s pencil icon, and set Editable = "View only" or Hidden.
Does Ultimate Member work with Gutenberg?
Yes. The shortcodes render in both Classic and Gutenberg blocks. There are also UM Gutenberg blocks for inline restrictions and form embeds.
What’s the difference between approval and email confirmation?
Email confirmation = user clicks a link in their welcome email to verify their email address. Approval = admin manually approves the account. They’re independent. You can require email confirmation only, approval only, or both.
Can I have multiple member directories with different filters?
Yes. Create as many directories as you want; each gets its own shortcode. Place each on a different page with different role filters.
Is Ultimate Member GDPR-compliant?
The plugin itself is. It stores user data (email, custom fields) in WP’s standard tables. Users can export and delete their data via WordPress’s built-in Privacy tools. Adding the Terms & Conditions extension lets you record per-form consent.
Does it work on WordPress multisite?
Yes. Each subsite has its own UM config. Network-wide member directories aren’t supported out of the box but can be built with custom code.
Can I add a "ghost mode" where admins can browse as a member?
Not natively. Install User Switching plugin (free) to switch user roles temporarily without logging out.
Will Ultimate Member’s emails land in spam?
By default, yes, because they’re sent from wordpress@yoursite.com which fails SPF/DKIM. Pair with WP Mail SMTP and configure proper authentication. Critical for any production community site.
Can I customize the URL structure for profiles?
Yes. Settings -> General -> Users -> Profile Permalink Base. Choose from user_login, ID, first_name + last_name, or any custom field. Set before users register.
Does UM support OAuth / social login?
The free Social Login extension (or third-party plugins like Nextend Social Login) add OAuth for Google, Facebook, Twitter, Apple, etc.
Final thoughts {#final-thoughts}
Ultimate Member is the WordPress community plugin to install when you want a profile-centric, directory-driven member site without paying upfront. The free core covers 80% of what most projects need. The paid extensions ($79 each) cover the remaining 20% selectively, you pay only for the features you actually use.
It’s not the right plugin if you need a deeply social, activity-feed-driven experience, that’s BuddyBoss Platform. It’s not the right plugin if your business model is paid subscriptions, that’s MemberPress Pro. It’s not the right plugin if you only need to gate content by user role, that’s overkill (use a basic restriction plugin).
But for "I want users to register, fill out a profile, browse other members, and message each other," Ultimate Member is the answer. The depth of customization in the form builder, the granular role permissions, the directory configuration, and the email notification system together give you a real platform, not just a registration form.
Pair Ultimate Member with WP Mail SMTP (essential for email reliability), FacetWP (for fast member search at scale), Perfmatters (to keep front-end performance sharp), and a security plugin like Solid Security Pro (a community site is a juicy target for spam registrations). That stack is what powers most well-built UM sites I’ve seen.