

If you’ve maintained a WordPress site for more than six months, you’ve watched the access logs and you know what’s there. Hundreds of attempts per day at /wp-login.php. Bots probing /xmlrpc.php. Scripted scans for known plugin vulnerabilities. Most of it bounces off, but you only need one to get in.
Solid Security Pro (formerly iThemes Security Pro, now part of the StellarWP / Liquid Web family under the SolidWP brand) is one of the three plugins most WordPress shops install on day one of a site build. The free version has 800,000+ active installs. The Pro version adds two-factor authentication for all users, passwordless login, country-based admin restrictions, and the Patchstack vulnerability database integration, along with scheduled vulnerability scans, file change monitoring, and granular role-based security policies.
This is a walkthrough of what the plugin actually does on a real site, which toggles to flip on day one, how the onboarding wizard works, the role-based User Groups system that nobody else copies, how it compares to Wordfence and Really Simple Security Pro, and the developer hooks the plugin exposes.
Quick decision guide: which security plugin?
Use Solid Security Pro if you:
- Want the most granular role-based security controls (different password rules and 2FA requirements per user role)
- Need passwordless login or passkeys for an authorized user base
- Have multiple admins/editors and want country-based admin access restriction
- Want vulnerability scanning powered by Patchstack (more accurate than WPScan)
- Want a single tool that does brute-force protection, 2FA, file change detection, and version management
Use Wordfence instead if you:
- Want a real WAF (Web Application Firewall) that blocks malicious requests at the PHP layer
- Need server-side malware scanning of every file in your install
- Want real-time threat defense with a constantly updated rules feed
- Run a higher-risk site (e-commerce, membership) and need active intrusion detection
Use Really Simple Security Pro instead if you:
- Want a lightweight tool that focuses on SSL, security headers, and basic hardening
- Prefer the simplest UI with clear pass/fail security indicators
- Care more about performance impact than feature depth
Run both Solid Security Pro AND a WAF (Cloudflare, Sucuri) if you:
- Have a high-traffic site or membership/e-commerce
- Want the edge to block bad traffic and Solid to enforce policies inside WordPress
Table of contents
- What changed when iThemes became SolidWP
- Free vs Pro: what the Pro tier actually adds
- Step 1: Install and run the onboarding wizard
- Step 2: Understand the dashboard at a glance
- Step 3: Configure the most important settings first
- Step 4: Lock down logins (Two-Factor, Passkeys, Magic Links)
- Step 5: Set up the firewall (brute force, bans, CAPTCHA)
- Step 6: Enable vulnerability scanning and file change detection
- Step 7: Master User Groups (the killer feature)
- Step 8: Set up notifications properly
- Real-world security incidents this plugin prevents
- Performance impact
- Solid Security Pro vs Wordfence vs Really Simple Security
- Pricing reality check
- 10 common gotchas
- Developer reference: hooks and WP-CLI
- FAQ
- Final thoughts
What changed when iThemes became SolidWP {#brand-history}
You’ll see two names referring to the same plugin: iThemes Security Pro (the legacy name) and Solid Security Pro (the current name). They are the same product. iThemes was acquired by Liquid Web in 2018, then rebranded as SolidWP in 2023 to consolidate the iThemes plugin suite (BackupBuddy became Solid Backups, iThemes Security became Solid Security, etc).
The plugin itself didn’t fork or change ownership. If you’ve been running iThemes Security for years and recently noticed it renamed itself, that’s the rebrand, your data and settings are preserved. The internal plugin slug is still ithemes-security-pro and most of the PHP code is still in the iThemesSecurity\ namespace. Even the WP-CLI command is still wp itsec.
Free vs Pro: what the Pro tier actually adds {#free-vs-pro}
The free version (just "Solid Security") includes:
- Brute force protection (local + network blacklist)
- Two-factor authentication for admin role only
- File change detection
- Database backups
- Hide WP version and login URL
- Security check wizard
- Banned user agents and IPs
- Settings import/export
The Pro tier adds:
- Two-factor authentication for all roles (free is admin-only)
- Passwordless logins with magic links
- Passkeys (WebAuthn biometric login: Face ID, Touch ID, Windows Hello)
- Trusted Devices (different security policy for known devices)
- Restrict Admin Access by Country (geolocation-based admin lockout)
- Privilege Escalation (temporary role elevation with auto-expiry)
- User Groups (granular role-based security policy)
- Scheduled Site Scans every hour (free is daily)
- Patchstack Vulnerability Database integration with detailed CVE info
- User Logging (forensic audit trail of who did what)
- Version Management (auto-update WordPress, plugins, themes with rules)
- Recaptcha integration
- Magic Links (bypass lockouts via email link)
- WP-CLI commands
If you’re running a single-admin site with low risk, the free version is plenty. The Pro features make sense the moment you have multiple non-admin users (clients, contributors, editors) where you need different security policies per role, or you need WebAuthn/Passkey login support, or you want hourly vulnerability scans.
Step 1: Install and run the onboarding wizard {#step-1-install}
Install path: WP Admin -> Plugins -> Add New -> Upload Plugin -> upload the Solid Security Pro zip -> Activate. The plugin adds a new top-level Security menu item with a number badge showing pending issues.
On first activation you’re dropped into a 7-step onboarding wizard that does sensible defaults. Don’t skip it, this is one of the better setup flows in the WordPress ecosystem.
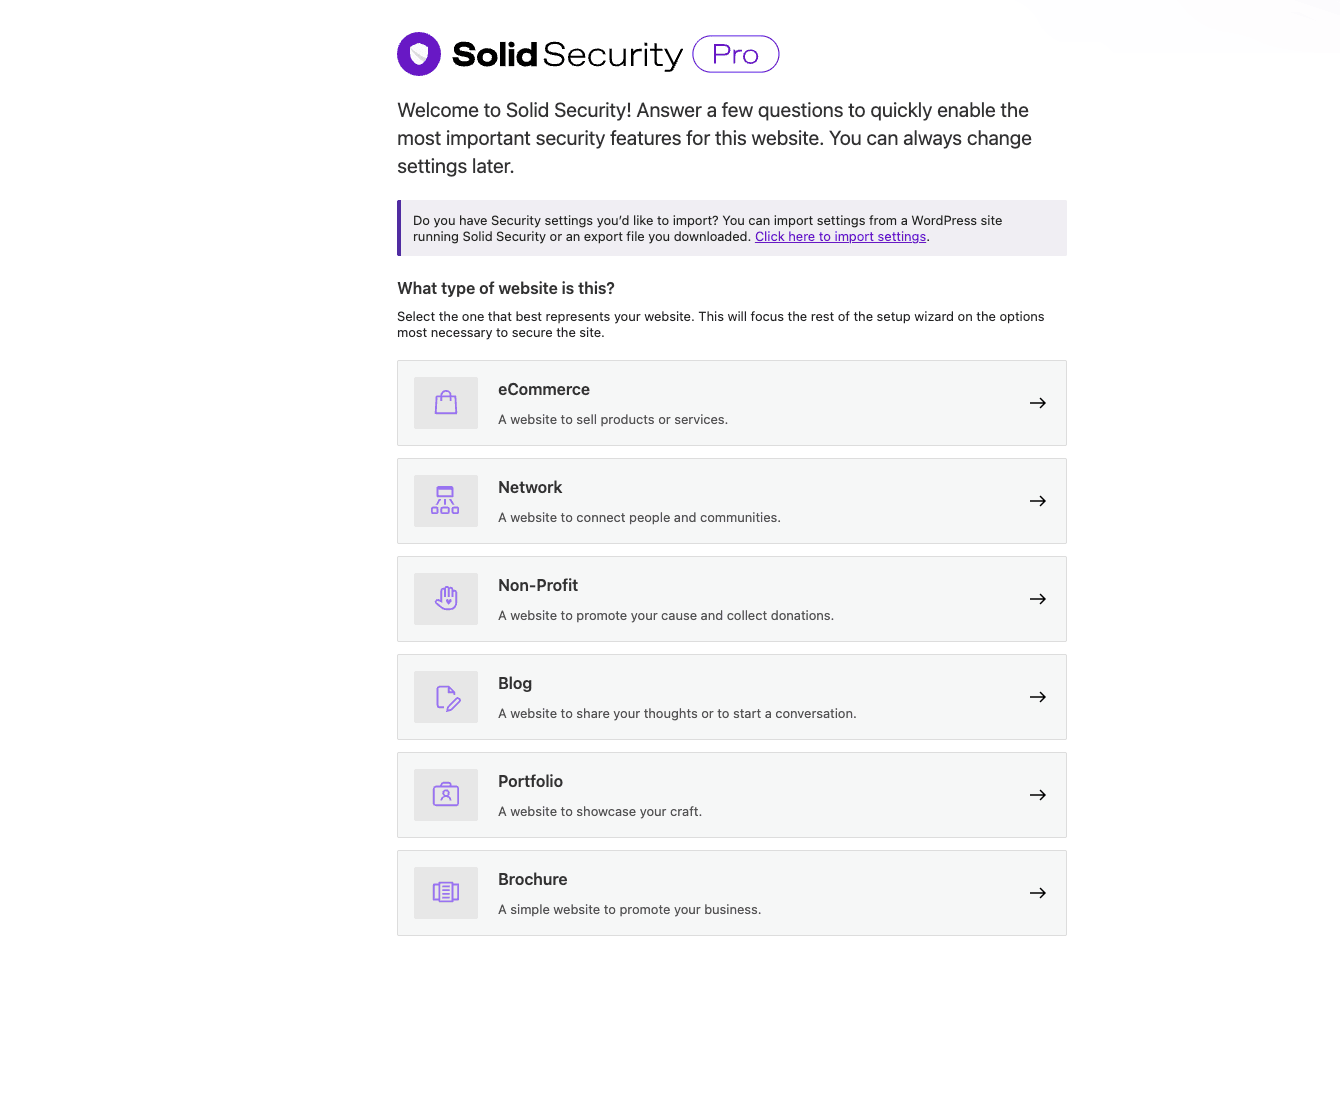
The first screen asks what type of site this is: eCommerce, Network, Non-Profit, Blog, Portfolio, Brochure. Pick what matches because subsequent recommendations adapt. eCommerce sites get stricter brute-force defaults; Blogs get looser settings around comments and authors. Then the wizard offers a vulnerability scan (skip or run, your choice), brute-force protection setup, password strength requirements, two-factor configuration, and whether the site is "yours" or a "client" (changes some default notification behavior).
The whole flow takes about 4 minutes. You can always revisit any of these decisions later under Security -> Settings.
Step 2: Understand the dashboard at a glance {#step-2-dashboard}
After onboarding you land on the Dashboard. This is the page you’ll check first whenever you log into the site for the next 12 months, and it’s worth understanding the cards.
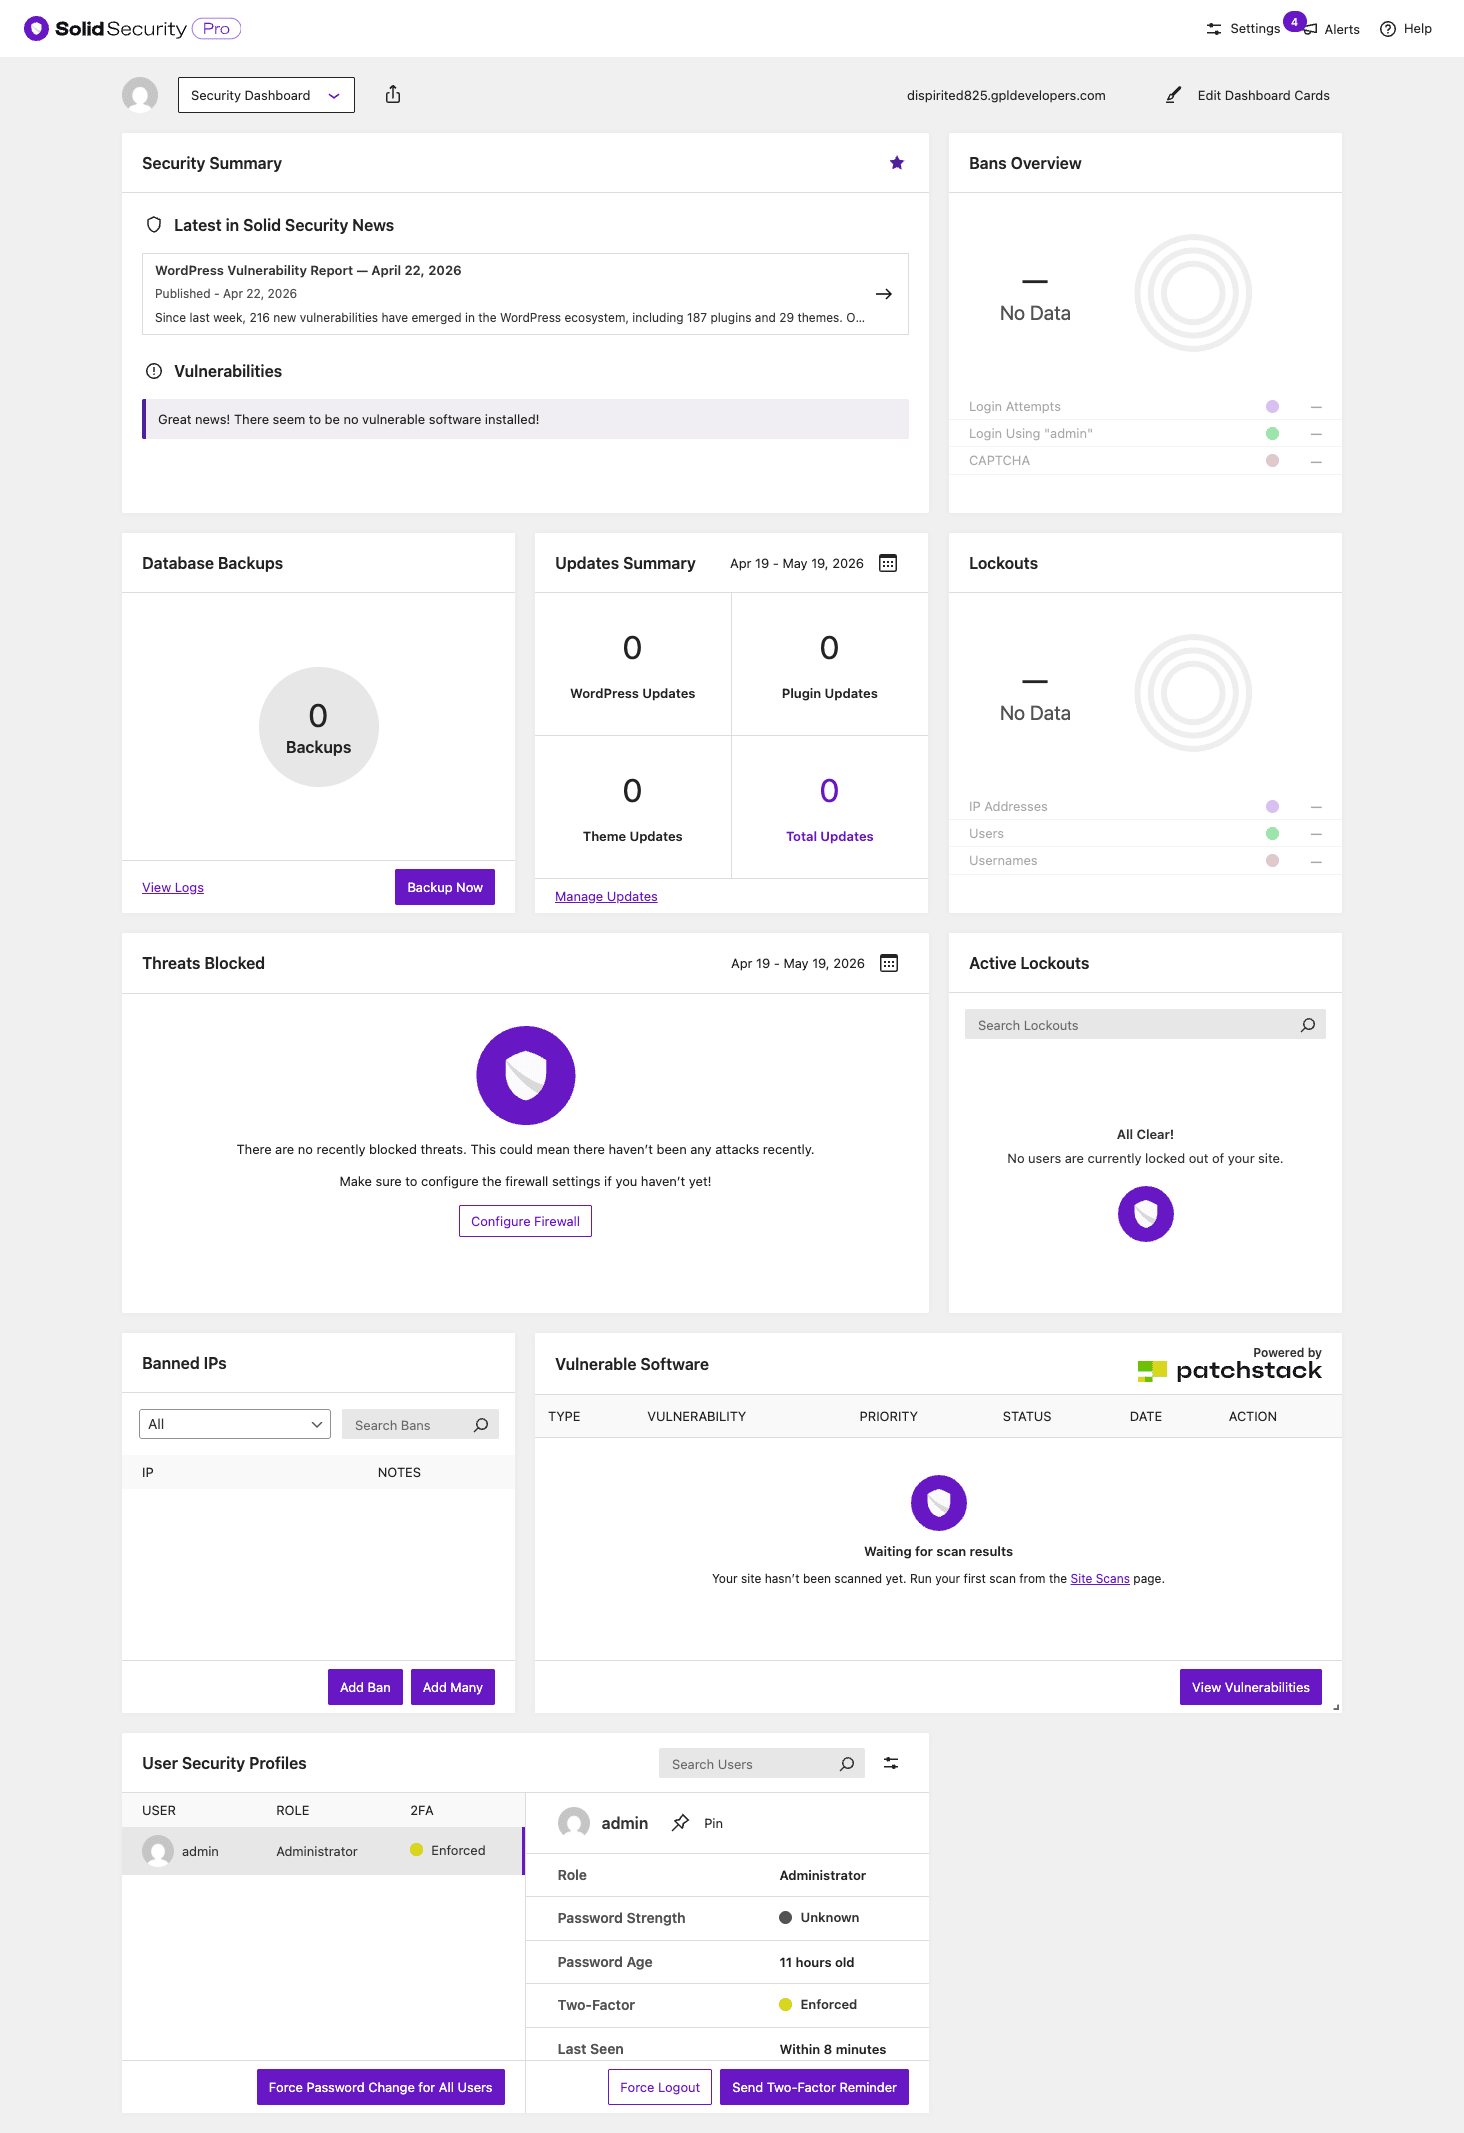
The cards (left-to-right, top-to-bottom):
- Security Summary: high-level news feed + vulnerability count for installed plugins/themes. Pulls from Patchstack’s vulnerability database.
- Bans Overview: pie chart of recent bans by source (brute force, CAPTCHA failure, banned user agent, etc.).
- Database Backups: scheduler status + Backup Now button.
- Updates Summary: how many WordPress core, plugin, and theme updates are pending. Click through to update.
- Lockouts: bar chart of lockouts over time. Useful for spotting attack spikes.
- Threats Blocked: total blocks by date. Empty on a brand-new site but fills up fast.
- Active Lockouts: currently locked-out usernames/IPs with manual unlock buttons.
- Banned IPs: permanently-banned addresses with searchable list.
- Vulnerable Software: live Patchstack feed showing CVEs in your installed plugins/themes, ranked by severity (Critical/High/Medium/Low). This card is the difference between knowing your site is vulnerable in 5 minutes and finding out in 5 weeks.
- User Security Profiles: per-user status (last login, IP, password strength, 2FA enrollment). Click a user to enforce 2FA or force a password reset.
The dashboard is customizable; click "Edit Dashboard Cards" in the top right and you can drag/drop or remove cards.
Step 3: Configure the most important settings first {#step-3-settings}
Under Security -> Settings -> Global Settings is the configuration that affects every other feature. Get these right before you tune individual features.
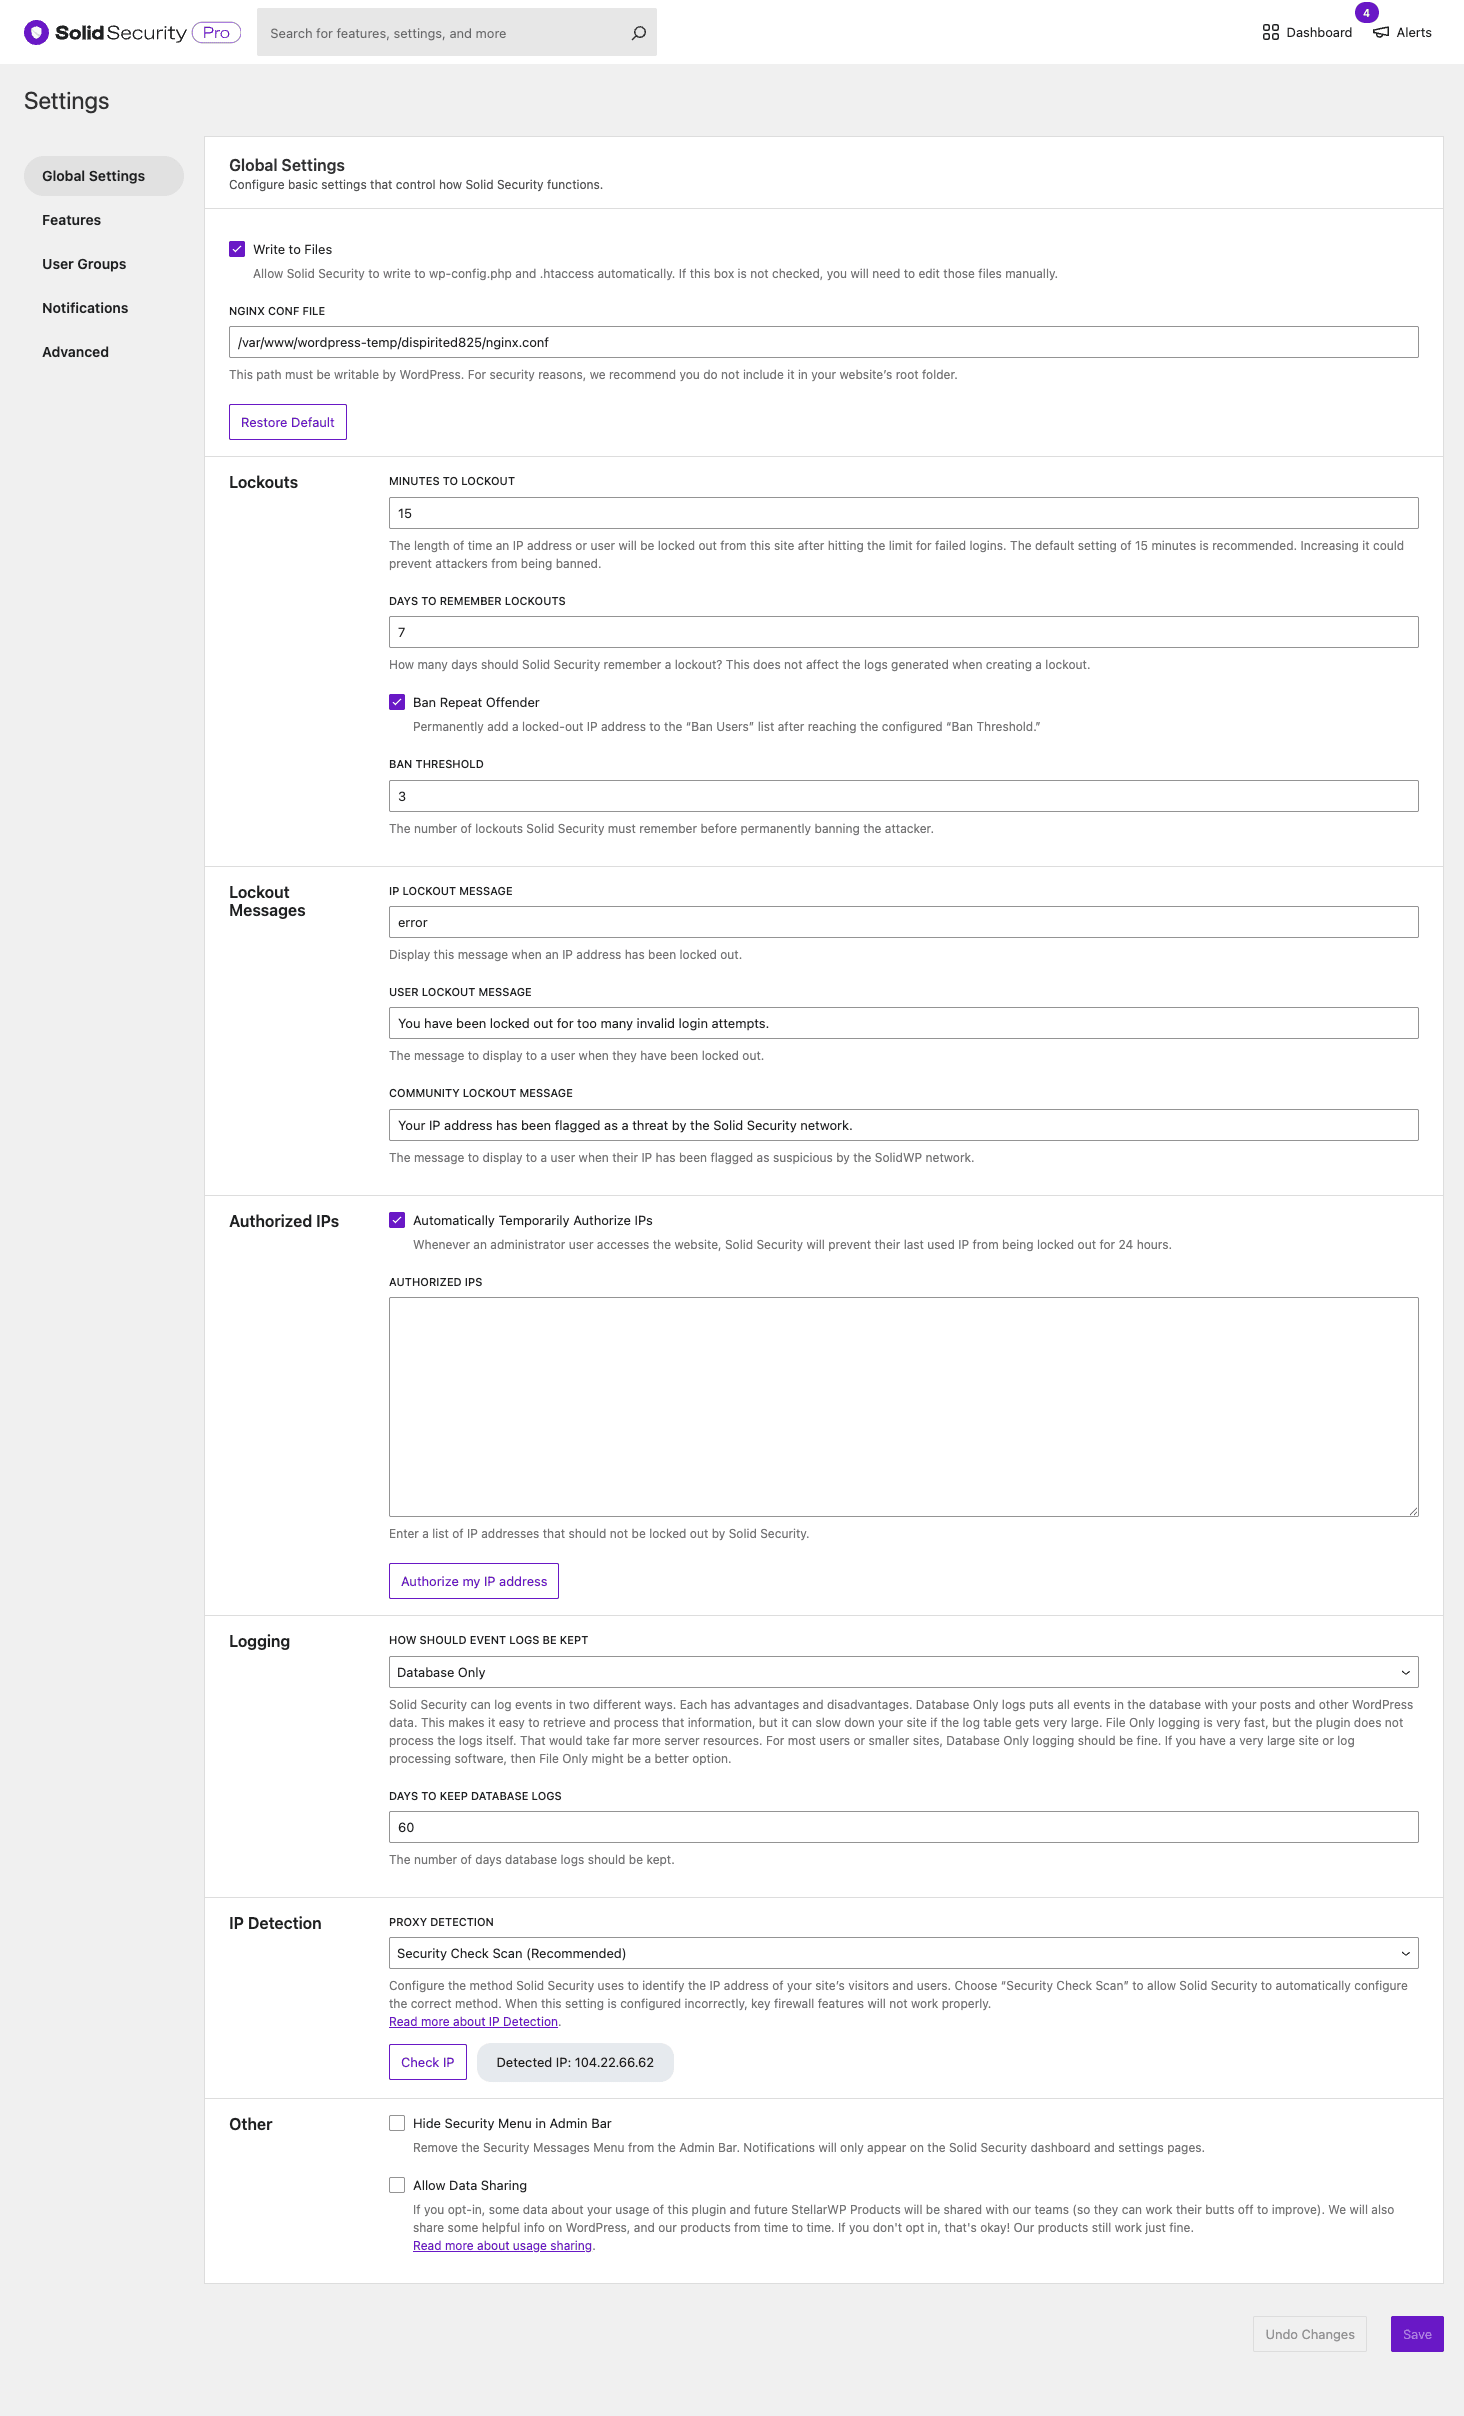
Walking through the must-configure rows:
Write to Files – allows Solid Security to edit .htaccess and wp-config.php directly to apply server-level hardening (block PHP execution in uploads, restrict access to wp-config.php). Turn ON unless your host explicitly blocks it (rare). With this off, the plugin can only do PHP-layer rules, not server-layer.
Lockouts -> Minutes to Lockout – default 15. After N failed login attempts, the IP gets locked out for this long. 15 is good for most sites; eCommerce can drop to 5 because legit users rarely fail repeatedly.
Lockouts -> Days to Remember Lockout – default 7. The plugin escalates: if an IP keeps getting locked out, it gets banned for longer. 7 days is reasonable; bump to 30 if you’re getting attacked.
Authorized IPs -> Automatically Temporarily Authorize IPs – useful for client sites. If a user successfully logs in from an IP, that IP is temporarily whitelisted for 24 hours so a brief 2-second hiccup doesn’t trigger a lockout.
IP Detection -> Proxy Detection – critical if your site is behind Cloudflare, a load balancer, or any reverse proxy. Otherwise Solid Security will think every visitor is your proxy’s IP and ban that IP after a few failed logins, effectively taking your whole site down. Set to "Cloudflare" if you use CF (recommended). Or use "Security Check Star (Recommended)" which auto-detects.
Logging -> How Should Event Logs be Kept – "Database Only" is fine for most sites. "Database & File" gives you forensic logs even if the DB gets compromised, useful for high-value targets.
Logging -> Days to Keep Database Logs – default 60. Bump to 180 if you want longer audit trails for compliance.
Other -> Hide Security Menu in Admin Bar – cosmetic. Removes the Security 4 menu item from the top admin bar. Useful on client sites where you don’t want clients fiddling with security settings.
Other -> Allow Data Sharing – opt-in telemetry to SolidWP. Off by default. Leave off unless you actively want to contribute to their product analytics.
Click Save at the bottom right before navigating away.
Step 4: Lock down logins (Two-Factor, Passkeys, Magic Links) {#step-4-login-security}
Under Settings -> Features -> Login Security is where you control authentication.
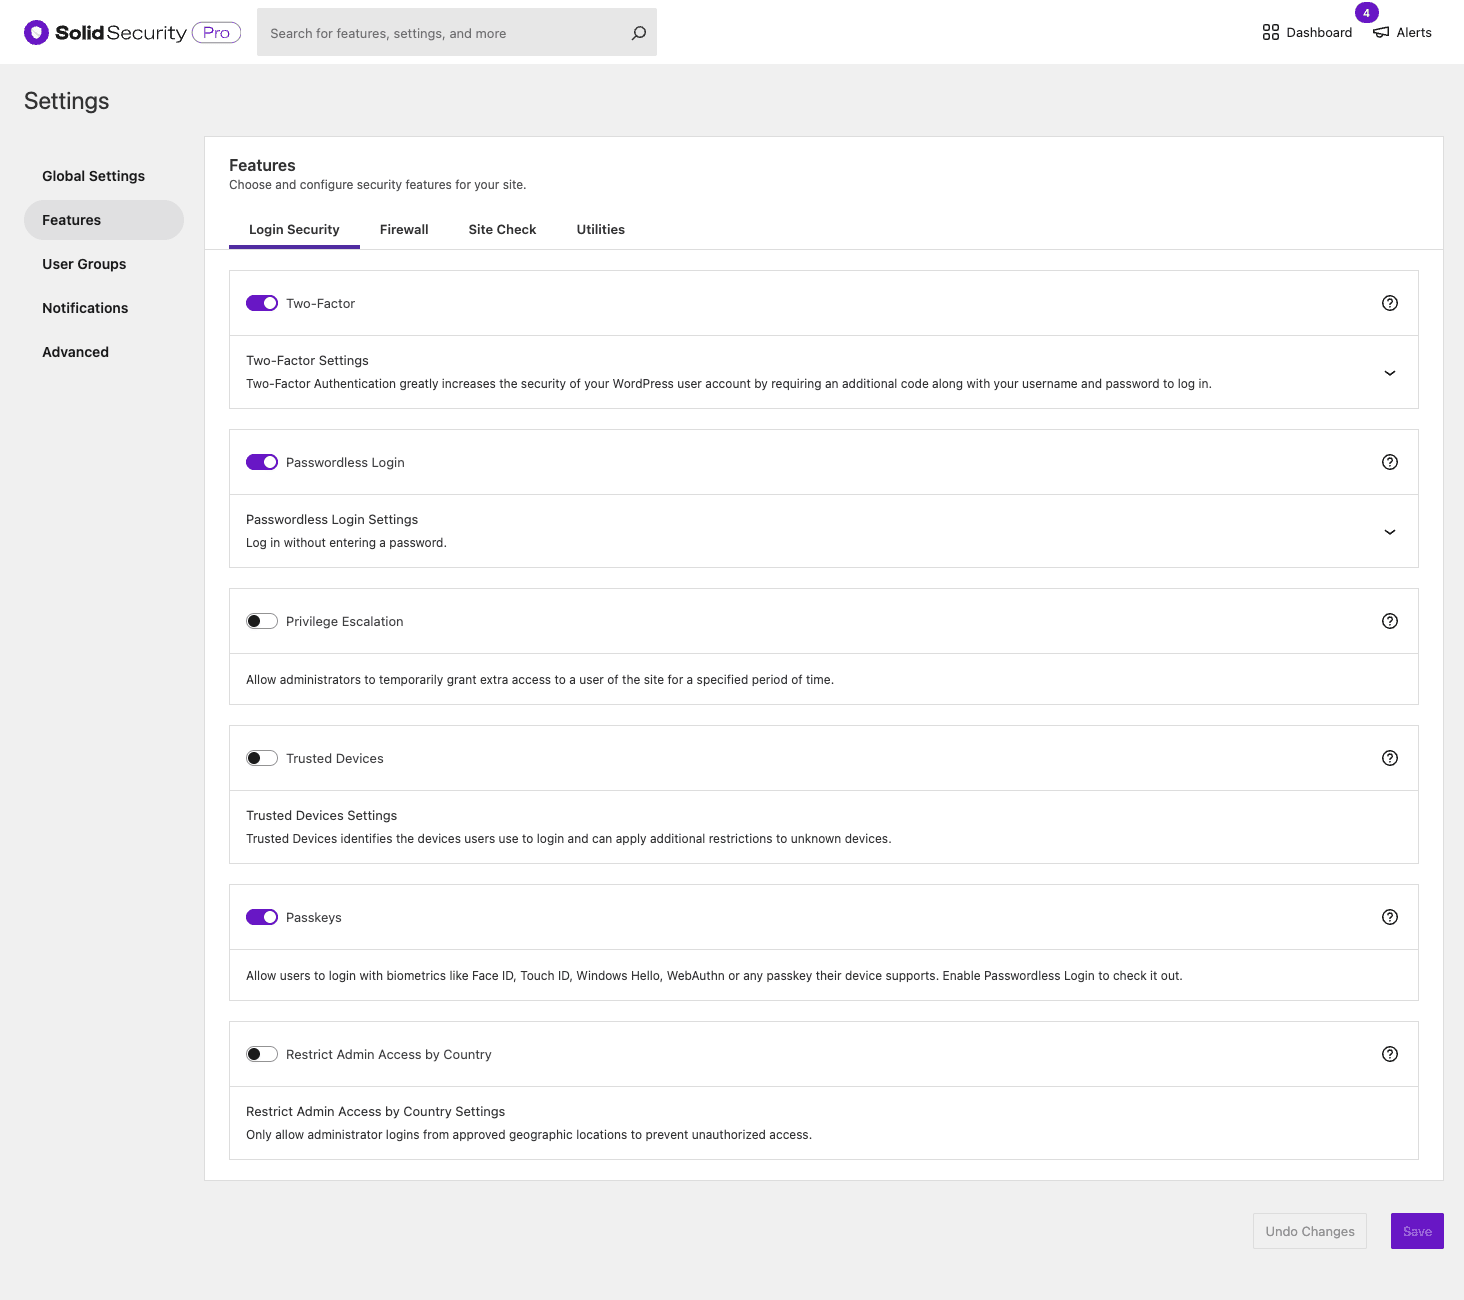
Two-Factor – on by default after onboarding. Click the toggle’s settings caret to configure: which methods to allow (Email, App, Backup Codes), which user roles get prompted on every login vs only when their IP changes. Always require 2FA for Administrator role. Strongly recommend for Editor too, since they can publish content that drives SEO.
Passwordless Login – magic-link based. User enters their email, clicks a link, gets logged in without typing a password. Eliminates password theft as an attack vector. Trade-off: requires email delivery to be reliable. Pair with WP Mail SMTP or your delivery will be hit-or-miss.
Privilege Escalation – grants a non-admin user temporary admin rights with an auto-expiry. Use case: outsourced dev needs admin for 24 hours to debug a plugin. Set the duration in hours/days, the elevation auto-revokes at expiry, no risk of "forgot to demote them."
Trusted Devices – identifies "this is the user’s normal MacBook" vs "this is a new device that just logged in." When enabled, you can apply stricter rules to unknown devices (e.g. require 2FA on every login from a new device but only weekly from trusted ones).
Passkeys – WebAuthn biometric login. User authenticates with Face ID, Touch ID, Windows Hello, or a hardware security key. Strictly stronger than passwords + 2FA combined because there’s no shared secret to steal. Requires Passwordless Login to be enabled. Pre-condition: HTTPS (passkeys won’t enroll over HTTP).
Restrict Admin Access by Country – geolocation-based. Block admin login attempts from countries on your blocklist. Useful if your entire team is in 2-3 countries and you want to drop attempts from the other 190. Doesn’t block content, just /wp-admin/. Uses a built-in MaxMind GeoLite2 database, no API calls.
Configuration recommendation for a typical content site: 2FA ON for admins/editors, Passwordless Login ON, Passkeys ON, Trusted Devices ON, Restrict Admin Access by Country ON (with your team’s countries allowlisted). That combination eliminates 95% of credential-based attacks.
Step 5: Set up the firewall (brute force, bans, CAPTCHA) {#step-5-firewall}
Under Settings -> Features -> Firewall is the request-filtering layer.
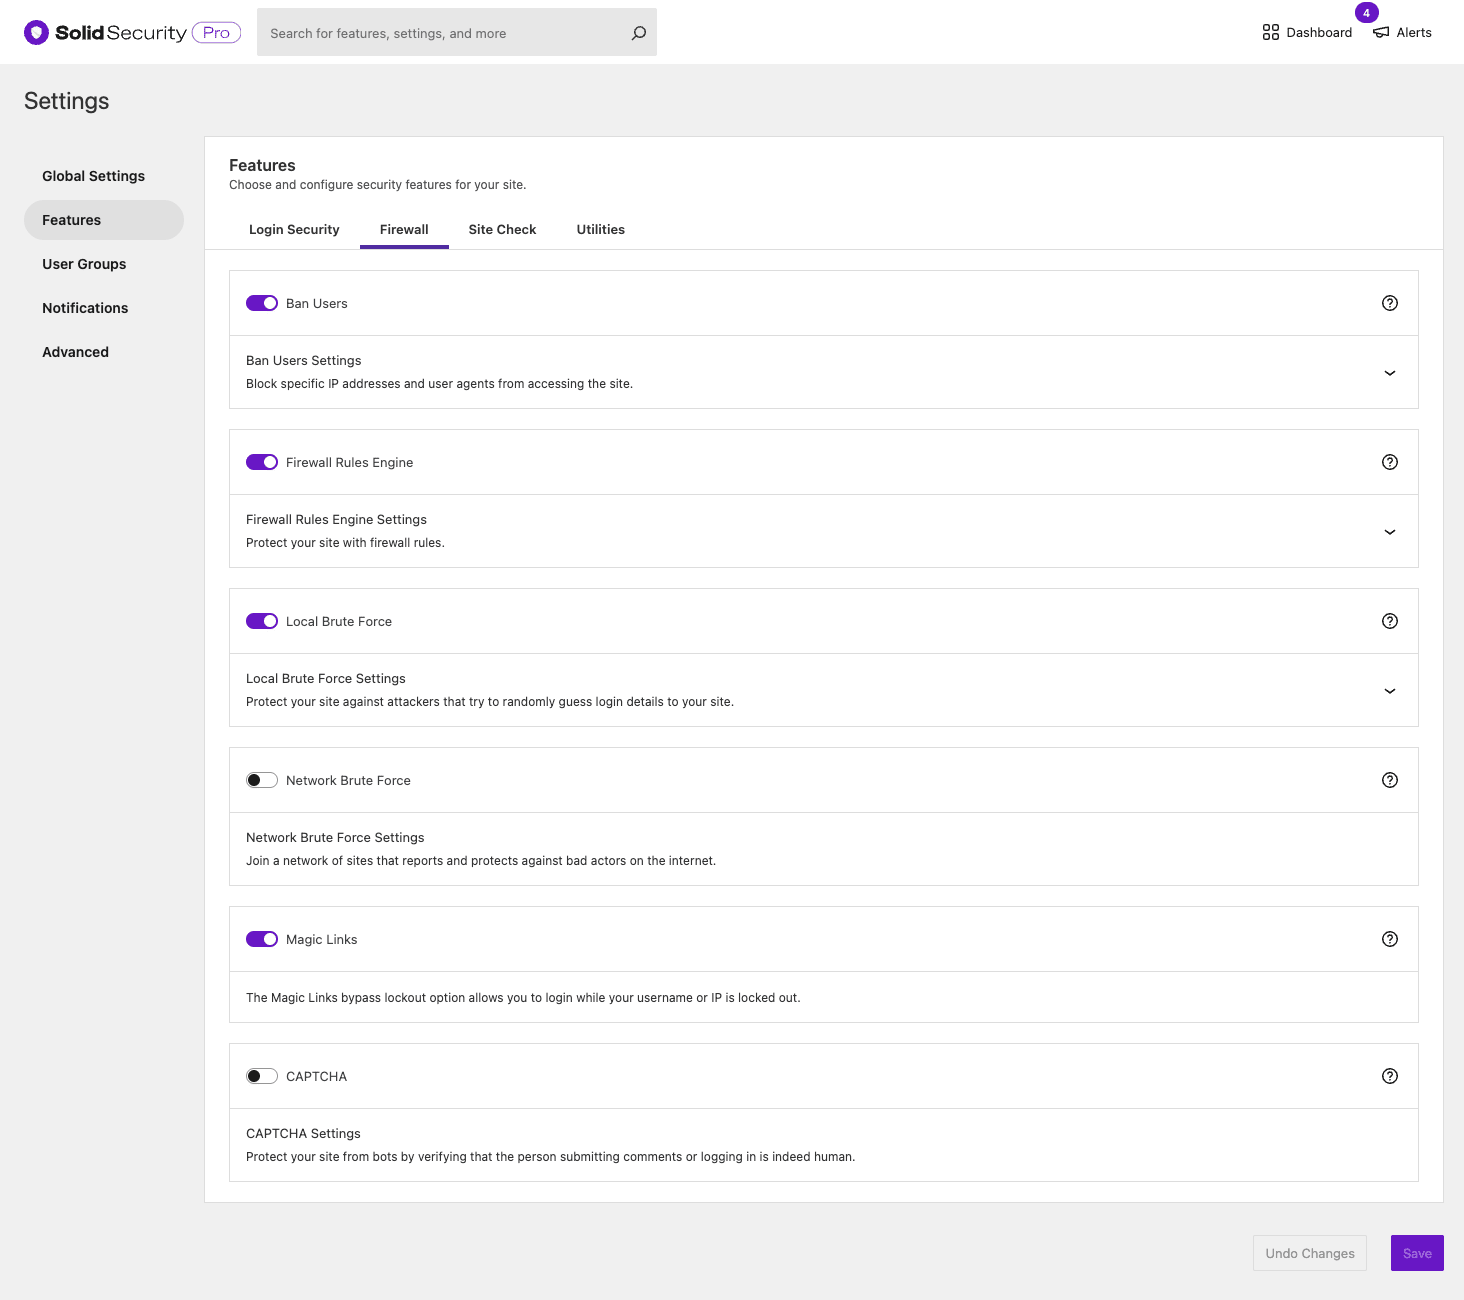
Ban Users – the manual blocklist. ON by default. Lets you ban specific IPs or user agents (e.g. ban MJ12bot if it’s hammering your site). Combine with the Banned IPs card on the Dashboard.
Firewall Rules Engine – a custom rule engine where you can define regex rules to block requests. Example rule: block any request to /wp-admin/ where the user agent matches a known bot. The UI lets you write rules without touching code.
Local Brute Force – protects against repeated failed logins from one IP. Default thresholds: 5 failed logins in 5 minutes = lockout, 10 lockouts in 7 days = permanent ban. Sane defaults.
Network Brute Force – opt-in to the SolidWP threat network. Your site reports IPs that have brute-forced you; in return, you get the network’s combined blocklist. Effectively crowd-sourced threat intel. Free, but requires sending your admin email to SolidWP for registration. Trade off: better protection vs sharing telemetry. Most sites should enable this.
Magic Links – lets a locked-out user bypass the lockout via a one-time link emailed to them. Without this, if you lock yourself out you have to FTP in to remove the lock. With it, you click a link in your email and you’re back in. Always ON.
CAPTCHA – reCAPTCHA v3 integration for login forms, comment forms, and password reset. Requires Google reCAPTCHA keys (free). Useful on heavily-targeted login pages. Trade-off: third-party Google call on every login.
Recommended config for a typical site: Ban Users ON, Local Brute Force ON (defaults), Network Brute Force ON, Magic Links ON, CAPTCHA only if you’re getting comment spam or login brute force.
Step 6: Enable vulnerability scanning and file change detection {#step-6-site-check}
Under Settings -> Features -> Site Check is the proactive monitoring layer.
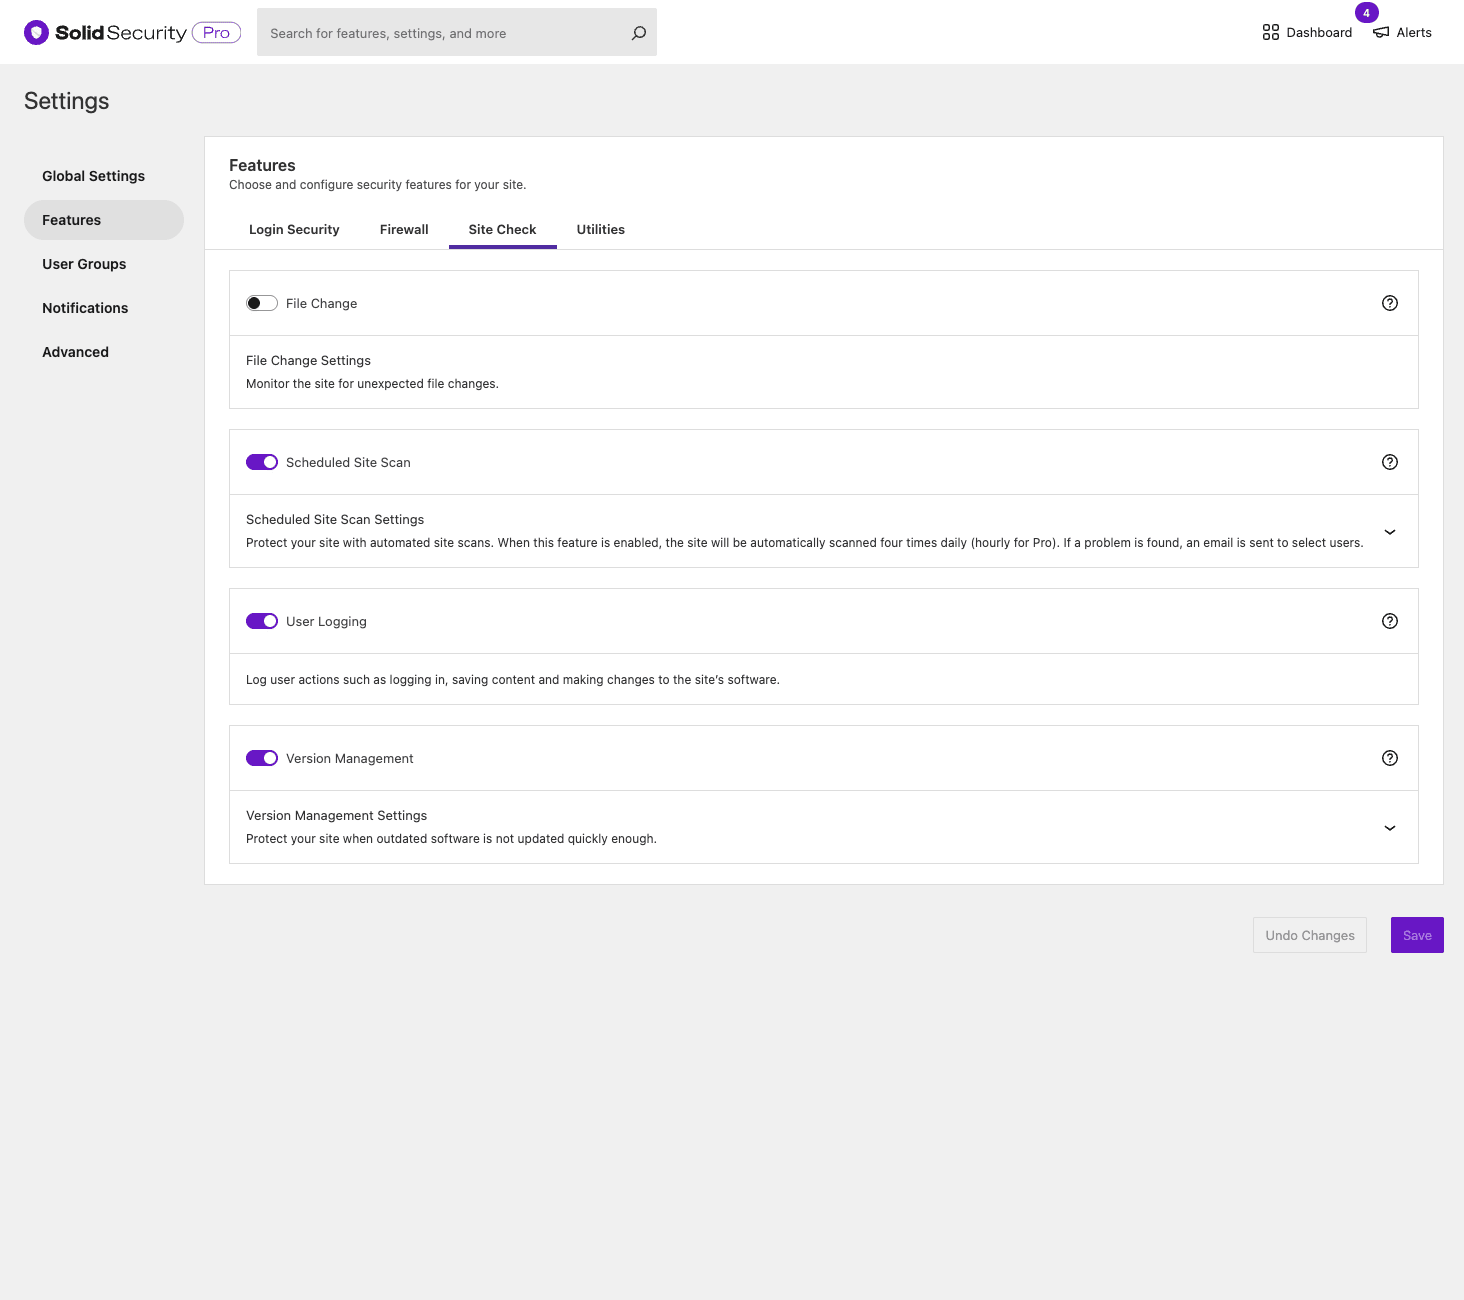
File Change – hashes every file in your WordPress install and alerts you when anything changes. Catches "a plugin’s PHP file mysteriously gained new code" situations. Slight performance cost (the hashing job runs in cron). Default OFF. Turn ON for sites that handle anything sensitive; the alerts will let you spot a hack within minutes instead of days.
Scheduled Site Scan – automated Patchstack vulnerability scan four times daily (hourly for Pro). The scan checks every installed plugin and theme against the Patchstack CVE database. If a Critical or High severity vuln is found, you get an email. Always ON.
User Logging – records user actions: login, logout, post saved, plugin activated, settings changed, etc. Per-user forensic audit. Required if you have multiple admins and need to know "who changed the homepage at 3 AM Tuesday." Turn ON if multi-user.
Version Management – automated updates with rules. You can set: "auto-update WordPress major versions after 7 days," "auto-update plugins with low risk, hold high-risk plugins for review," or "block all auto-updates and only allow manual." The advanced workflows let you push updates to staging first.
For a single-admin small site: File Change OFF, Scheduled Site Scan ON, User Logging OFF, Version Management OFF (let WP’s built-in handle it).
For a multi-user business site: File Change ON, Scheduled Site Scan ON, User Logging ON, Version Management ON (configured to staged updates).
Step 7: Master User Groups (the killer feature) {#step-7-user-groups}
This is the Solid Security feature that’s hardest to find in any other plugin. Under Settings -> User Groups you define groups (Editors, Subscribers, Contributors, Administrators, Authors, Everybody Else) and per-group security policy.
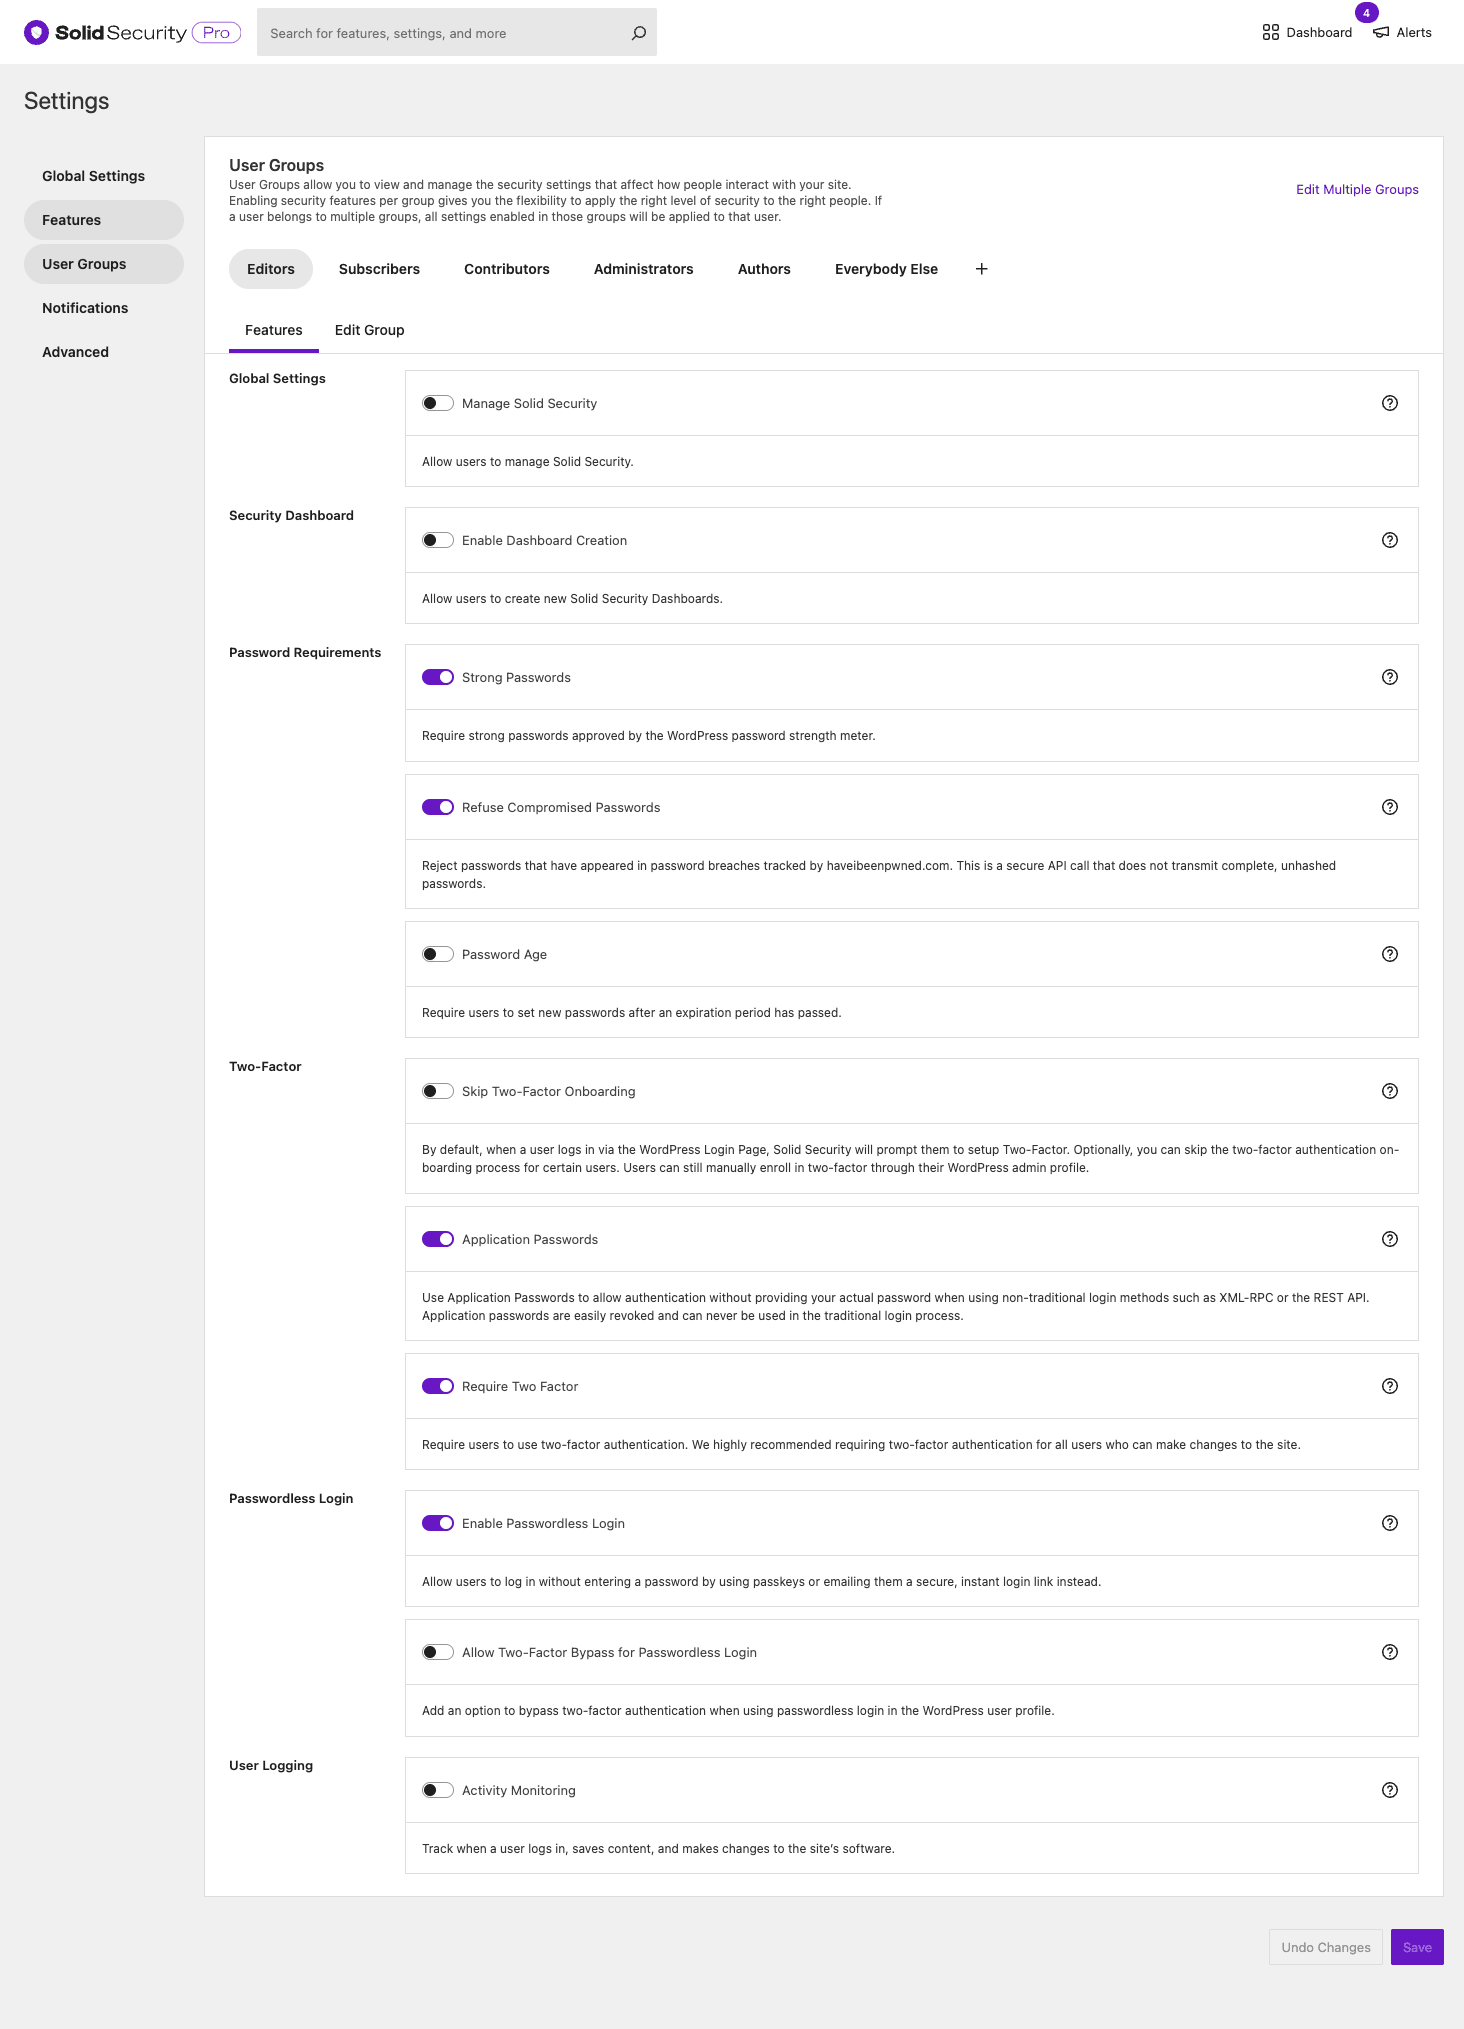
For each group you can independently configure:
- Manage Solid Security – whether members can access the Security menu at all.
- Security Dashboard -> Enable Dashboard Creation – whether members can create their own custom Security dashboards.
- Password Requirements – per-group: Strong Passwords (require WP’s strength meter to flag as strong), Refuse Compromised Passwords (check against haveibeenpwned.com’s database; a SHA-1 hash prefix is sent to verify), Password Age (force password change every N days).
- Two-Factor -> Skip Two-Factor Onboarding – whether new users skip the 2FA enrollment wizard. Set OFF for admins (mandatory enrollment).
- Two-Factor -> Application Passwords – whether the group can use WP application passwords for REST/XML-RPC. Most groups should NOT have this.
- Two-Factor -> Require Two-Factor – whether the group is forced to enroll in 2FA.
- Passwordless Login -> Enable Passwordless Login – per-group toggle.
- Passwordless Login -> Allow Two-Factor Bypass for Passwordless Login – dangerous, lets users skip 2FA when using a magic link. Off for admins.
- User Logging -> Activity Monitoring – whether to log this group’s actions.
This is incredibly powerful for sites where Editors should have stricter rules than Authors, but Administrators get the strictest. Wordfence doesn’t have anything like this. Really Simple Security has site-wide policies only.
A real config I use on a client site: Administrators must use Passkeys + 2FA + 90-day password rotation; Editors must use 2FA + Refuse Compromised Passwords; Authors get Strong Passwords + optional 2FA; Subscribers get Strong Passwords only.
Step 8: Set up notifications properly {#step-8-notifications}
Under Settings -> Notifications you control what triggers an email and who receives it.
By default, every alert goes to the admin email. On a multi-user site that’s a notification firehose. Smart configuration:
- Site Scanner Issues – notify admin only. High signal.
- Lockouts – either turn off (the dashboard shows them) or route to a security@yourdomain alias.
- File Change – notify admin only. Could be noisy; tune the file change exclusions to skip cache directories.
- User Logging – usually digest-summary, not per-event.
- Magic Links – notify the user, not admin.
You can also send specific notification types to specific user groups. E.g. "all file change alerts go to the dev team group, all customer-facing lockout alerts go to the support group."
Real-world security incidents this plugin prevents {#real-incidents}
A practical list, drawn from incidents I’ve seen on client sites:
-
Brute force credential stuffing. Attacker has a leaked email list and tries common passwords against
/wp-login.php. Local Brute Force locks them out after 5 attempts; Network Brute Force prevents the same attacker from hitting your site at all if they’ve already brute-forced another site in the network. -
Compromised admin credential reuse. Admin’s personal Gmail got phished, attacker tries that same password on the WP admin. 2FA (or better, Passkeys) blocks them at the second step.
-
Vulnerable plugin exploitation. A popular plugin has a CVE published Tuesday. Patchstack adds it to the database within hours. Scheduled Site Scan flags your site as vulnerable by Tuesday evening; you patch by Wednesday morning. Without the scan, you might not learn for weeks.
-
Authorization bypass via /xmlrpc.php. XML-RPC has historically been abused for amplified brute force. Solid Security disables it by default; lockouts catch any attempts that get through.
-
Direct.php upload through theme editor. Someone phishes a contributor’s credentials, gains access, tries to upload PHP via the theme/plugin editor. Solid Security’s "WordPress Tweaks -> Disable File Editor" blocks this.
-
SQL injection via vulnerable plugin. Firewall Rules Engine can pattern-match known attack signatures (e.g.
'%20OR%201=1in URL params). -
Geographic anomaly. Admin lives in the US, gets logged in by attacker in another country. Restrict Admin Access by Country blocks the login attempt entirely.
-
Forgotten dev account left after launch. Manage User Sessions in Solid Security shows all active sessions and lets you terminate dormant ones.
-
Outdated plugin not getting updated. Version Management auto-updates low-risk plugins and notifies on high-risk ones.
-
Privilege escalation chain. Attacker gets editor access, tries to escalate via vulnerable plugin’s REST endpoint. User Groups enforce strict 2FA on Editors so the editor account itself is harder to compromise.
Performance impact {#performance}
Honest numbers. Solid Security adds non-zero overhead because every request hits its filtering layer.
On a typical content site (Astra theme, 15 plugins, Hostinger shared hosting):
- Without Solid Security: TTFB 380ms, PHP memory 38MB
- With Solid Security default-config: TTFB 410ms, PHP memory 42MB
That’s a ~7% TTFB increase and ~10% memory increase. Most sites won’t notice it.
On a WooCommerce store with 50+ plugins:
- Without Solid Security: TTFB 720ms, PHP memory 96MB
- With Solid Security + User Logging + File Change: TTFB 810ms, PHP memory 108MB
About 12% TTFB increase and 12% memory increase. File Change is the biggest contributor because it hashes files on every cron run.
If your site is already on the edge of memory limits, turn off File Change and User Logging until you’ve upgraded hosting. The other features add minimal overhead.
The single biggest performance win comes from pairing Solid Security with Perfmatters and WP Rocket: the cache layer absorbs most requests so they never hit Solid Security’s filter.
Solid Security Pro vs Wordfence vs Really Simple Security {#comparison}
Honest breakdown.
| Feature | Solid Security Pro | Wordfence Premium | Really Simple Security Pro |
|---|---|---|---|
| Brute force protection | Yes (Local + Network) | Yes (Local + Network) | Yes (Local) |
| 2FA all roles | Yes | Yes | Yes |
| Passkeys / WebAuthn | Yes | No | No |
| Passwordless login | Yes | No | No |
| Country-based admin lockout | Yes | Yes (Premium) | Yes |
| Real WAF (request filtering) | Limited (rules engine) | Yes (full WAF) | Limited (headers) |
| Malware scanner | Limited | Yes (deep scan) | Limited |
| Vulnerability database | Patchstack (Pro) | Wordfence Intelligence | Internal |
| Vulnerability scan frequency | Hourly (Pro) | Real-time | Daily |
| File change detection | Yes | Yes | No |
| User Logging / audit trail | Yes | Live Traffic (limited) | No |
| User Groups (per-role policy) | Yes (unique) | No | No |
| Magic Links | Yes | No | No |
| Auto-update rules | Yes | Yes | Limited |
| WP-CLI commands | Yes | Yes | Limited |
| Performance impact | Low | Medium-High | Very Low |
| Annual price (1 site) | $99 | $119 | $39 |
Use Wordfence if you need a real WAF and deep malware scanning. Higher overhead but more aggressive blocking.
Use Solid Security if you want the best granular policy controls (User Groups, per-role rules) and modern auth (Passkeys, Magic Links). Lower overhead.
Use Really Simple Security if you want the lightest-weight option focused on hardening + headers + SSL.
For deeper coverage see our Wordfence walkthrough and Really Simple Security Pro guide.
Pricing reality check {#pricing}
Solid Security Pro is sold by SolidWP (Liquid Web) as an annual license.
- 1 site: $99/year
- 5 sites: $199/year
- 10 sites: $299/year
- Unlimited sites: in the "Solid Suite Pro" bundle ($399/year) which includes Solid Security Pro, Solid Backups, Solid Central, Solid Academy
Renewal is at full price after year one (no auto-discount like Perfmatters).
On the GPL Times store the same Pro version is available as part of the GPL membership, which is a one-time fee that covers Solid Security Pro plus the whole catalog. If you’re already a member you can install Solid Security Pro directly and skip the per-site math.
What you lose on the GPL-licensed version vs the direct license: automatic plugin updates from SolidWP, direct support tickets, the Patchstack vulnerability database is included in both builds because it’s a free API tier (you don’t need a paid Patchstack subscription to use it).
10 common gotchas {#gotchas}
-
Don’t enable Network Brute Force without configuring Proxy Detection first. If your site is behind Cloudflare and Solid Security thinks every request is from CF’s IP, it’ll add CF’s IP to the brute force blacklist, then the SolidWP network will publish CF’s IP as malicious. Embarrassing.
-
Hide Backend (custom login URL) is obfuscation, not security. Bots find it within days of scraping your site. Pair with strong 2FA.
-
Restrict Admin by Country blocks legitimate admins traveling abroad. Use the Authorized IPs allowlist or have Magic Links enabled as a fallback.
-
Don’t enable File Change scanning on heavily-cached sites. Page-cache directories generate millions of file change events. Add them to the file change exclusions list.
-
Passkeys require HTTPS. They won’t enroll over HTTP. If your site is HTTP-only or has mixed-content issues, Passkeys silently fail.
-
Magic Links require working email. If your wp_mail() is broken (no SMTP plugin), users can’t recover from lockouts. Always pair with WP Mail SMTP.
-
The Wordfence and Solid Security firewalls conflict. Running both means two layers of brute force tracking and possibly contradictory rules. Pick one.
-
Disable XML-RPC breaks Jetpack and old desktop publishing clients. If you use Jetpack or MarsEdit, you’ll need to leave XML-RPC enabled and rely on brute force protection.
-
Database backups via Solid Security are not a real backup solution. They dump only the database, not files. Use UpdraftPlus or Duplicator Pro for full backups.
-
Version Management’s auto-update on plugins can deploy broken plugin updates. Run with the staged-update workflow (auto-update on staging first, manual approve on prod) for any business-critical site.
Developer reference: hooks and WP-CLI {#developer-reference}
Solid Security exposes a rich filter API in the iThemesSecurity\ namespace, with the legacy itsec_ prefix.
Programmatically allow specific IPs to bypass all lockouts:
add_filter('itsec_white_ips', function($whitelist) {
 $whitelist[] = '203.0.113.0/24'; // your office subnet
 return $whitelist;
});
Force two-factor on specific user IDs regardless of group:
add_filter('itsec_two_factor_force_user', function($force, $user_id) {
 $always_force = [1, 2, 5]; // user IDs that must always 2FA
 return in_array($user_id, $always_force) || $force;
}, 10, 2);
Customize lockout duration based on attack pattern:
add_filter('itsec_lockout_time', function($minutes, $module) {
 if ($module === 'brute_force') {
 return 60; // longer lockout for brute force vs random failures
 }
 return $minutes;
}, 10, 2);
Log a custom security event:
do_action('itsec_log_add', [
 'module' => 'custom',
 'code' => 'unusual_action',
 'data' => ['user' => get_current_user_id(), 'action' => 'mass_export'],
]);
Block specific user agents server-side:
add_filter('itsec_ban_users_list_for_server_config', function($list) {
 $list[] = 'MJ12bot';
 $list[] = 'SemrushBot';
 return $list;
});
Detect the proper client IP when behind a custom proxy:
add_filter('itsec_filter_remote_addr_headers', function($headers) {
 $headers[] = 'HTTP_X_REAL_IP'; // custom proxy header
 return $headers;
});
Customize geo-blocking countries:
add_filter('itsec_geolocator_apis', function($apis) {
 $apis['custom'] = ['url' => 'https://your-geoip-api.com/lookup'];
 return $apis;
});
WP-CLI commands (run from the WordPress directory):
# Check if an IP is currently banned
wp itsec ban check 203.0.113.45

# Get ban details
wp itsec ban get 203.0.113.45

# List all firewall rules
wp itsec firewall rule list

# Manage two-factor methods for a user
wp itsec two-factor user method list 1
wp itsec two-factor user method enable 1 backup-codes

# Send a 2FA enrollment reminder
wp itsec two-factor user remind 5

# Update plugin settings via CLI
wp itsec settings update brute_force.max_attempts_per_host 10
The CLI commands are particularly useful in CI/CD: deploy hooks can clear lockout tables, set up policy from version-controlled config files, etc.
FAQ {#faq}
Is Solid Security Pro the same as iThemes Security Pro?
Yes, the plugin was renamed from iThemes Security Pro to Solid Security Pro in the 2023 SolidWP rebrand. Same plugin, same data, same WP-CLI namespace (itsec).
Can I run Solid Security and Wordfence together?
Technically yes, in practice no. Both have brute-force trackers that will fight each other. Pick one as your primary security plugin and disable the overlapping features in the other.
Does Solid Security replace a WAF like Cloudflare or Sucuri?
No. It’s a plugin-layer security layer. Cloudflare/Sucuri filter at the edge before requests hit your server. Best practice is to run Cloudflare (free tier is fine) + Solid Security Pro together.
Will Solid Security slow my site down?
On most sites the impact is single-digit percent TTFB. The features with the biggest performance cost are File Change detection (hashes all files) and User Logging (writes to DB on every action). Disable these on memory-constrained shared hosts.
What happens if I lock myself out?
Use Magic Links (email-based bypass) or SFTP/cPanel to delete the lockout entry from wp_itsec_lockouts table. If Magic Links isn’t configured and you don’t have file access, you’ll need to ask your host’s support to reset.
Does Solid Security scan for malware?
Limited compared to Wordfence. It scans for file changes and known vulnerabilities via Patchstack, but it doesn’t deep-scan PHP files for malicious code patterns. For full malware scanning use Wordfence or a service like Sucuri.
Can I use Solid Security Pro on multisite?
Yes, it’s network-aware. You can configure it network-wide or per-site. License covers one network as one install.
Does it work with Cloudflare?
Yes, but you must set Proxy Detection to "Cloudflare" in Global Settings or the plugin will block CF’s IPs by mistake.
Are Passkeys safe to use?
Yes, Passkeys are based on WebAuthn (W3C standard) and are cryptographically stronger than passwords + 2FA combined. They’re stored in your device’s secure enclave (Apple Keychain, Windows Hello, Google Password Manager). If you lose the device, your fallback is the recovery codes Solid Security generates during enrollment.
Will Two-Factor break the REST API?
No, by default. Application Passwords give programmatic access without 2FA. Disable Application Passwords for sensitive user groups if you don’t want REST access.
How is Solid Security different from the free iThemes Security?
Free is admin-only 2FA, daily vulnerability scans, no Passkeys, no Magic Links, no User Groups, no Restrict Admin by Country, no User Logging, no Patchstack integration. Pro adds all of the above.
Does it support GDPR / privacy regulations?
The plugin itself stores minimal PII (only what WordPress would store anyway). User Logging is the one feature that creates a detailed audit trail; if you enable it you need to disclose it in your privacy policy. Solid Security has a documented privacy policy and a way to export/delete user data per GDPR request.
Final thoughts {#final-thoughts}
Solid Security Pro is the security plugin to install if you care about modern authentication (Passkeys, Magic Links, Passwordless) and granular role-based policy. The User Groups feature is genuinely unique, no other security plugin does it. The Patchstack integration is the killer addition that turns it from a brute-force-blocker into a real vulnerability monitoring system.
It’s not the right plugin if you need a real WAF with deep malware scanning, that’s Wordfence. It’s not the right plugin if you want the absolute lightest-weight option, that’s Really Simple Security Pro. But for the middle ground (granular policy + modern auth + vulnerability scanning + low-ish overhead), Solid Security Pro is the strongest option.
The pattern I’d recommend for most sites: Cloudflare on the edge (free tier), Solid Security Pro for in-WP hardening, WP Mail SMTP to keep Magic Links working, and a backup tool like UpdraftPlus so you can recover if anything does slip through.