

A customer wants their name engraved on a leather wallet. Another wants gift wrapping, a handwritten note, and rush shipping. A third is ordering a 3-foot banner and needs to type in the exact width. Plain WooCommerce can’t ask any of those questions. It sells a fixed thing at a fixed price, and that’s where the conversation ends.
WooCommerce Extra Product Options is the plugin that reopens that conversation. It bolts a small form onto the product page, text fields, checkboxes, swatches, file uploads, date pickers, each one able to change the price, so a single product can be configured a hundred different ways before it ever hits the cart. I spent a week building option sets with it on a sandbox store, and this is the honest write-up: where it’s genuinely clever, where it’ll bite you, and the exact settings and hooks I wish I’d known about on day one.
Table of Contents
- What is WooCommerce Extra Product Options?
- How custom product options actually work
- The field types you can add
- How pricing works: fees, formulas, and lookup tables
- Building your first option set
- Global forms or per-product options
- Conditional logic: the right fields at the right time
- Who this is for: five stores that need it
- Don’t price options by guessing
- Extra Product Options vs the alternatives
- Developer reference: hooks, filters, shortcodes
- Performance, compatibility, and gotchas
- Pricing and licensing
- FAQ
- Final thoughts
What is WooCommerce Extra Product Options?
WooCommerce Extra Product Options is a premium WooCommerce plugin from ThemeComplete that lets you add custom input fields, often called product add-ons, to any product in your store. Instead of one product with one price, you get a product that asks the customer questions: pick a size, type a monogram, upload a logo, choose gift wrapping. Each answer can add to the price, and the running total updates live as the customer clicks.
It has been one of the best-selling WooCommerce plugins on CodeCanyon for years, and the reason is simple. The moment your products stop being one-size-fits-all, you need this category of tool. Print shops, food orders, furniture with finishes, event tickets with meal choices, anything personalized, all of it hits the same wall in stock WooCommerce.
The plugin is fully self-contained. The only thing it needs is WooCommerce itself, which makes sense, it’s an extension of the cart and checkout you already run. There’s no separate free base plugin to install alongside it, so once you activate it you get the full option builder right away.
One thing I appreciated early: it does not try to be a page builder or a theme. It does one job, attaching configurable fields to products, and it goes deep on that one job rather than wide on ten. You can grab WooCommerce Extra Product Options from GPL Times and have the option builder live on a product in about ten minutes.
How custom product options actually work
Skip this section if you’ve used a product add-ons plugin before. If you haven’t, the next two minutes will save you from a few wrong assumptions.
Stock WooCommerce gives you two ways to vary a product. Variations (size: small/medium/large) create separate stock-managed combinations, each a real SKU. They’re great for inventory, terrible for open-ended input. You can’t make a customer type "Happy 40th, Dad" into a variation dropdown.
Extra Product Options works at a different layer. It doesn’t create new SKUs. It captures extra data alongside the product and stores that data on the cart item and the order. Think of it as a form that travels with the product from the product page, into the cart, onto the order, and into the confirmation email.
Here’s the chain, because understanding it explains every quirk later:
- The customer fills in your fields on the product page.
- The plugin calculates a price for the chosen options and shows a live total.
- On Add to cart, the option data and the calculated price are saved to that cart line.
- The cart and checkout show the selected options and their costs.
- The order stores everything, so you (and your fulfilment team) see exactly what was ordered.
That fifth step is the one people forget about, and it’s the most important. An option that looks great on the product page but doesn’t carry through to the order is worse than useless, because you’ll ship the wrong thing. The good news is Extra Product Options handles all five steps. The thing you have to get right is the pricing logic in step two, which is where most of this review lives.
The field types you can add
When you click Add element in the builder, you get a palette of every field type the plugin supports. This single screen is the best summary of what the plugin can do, so here it is:
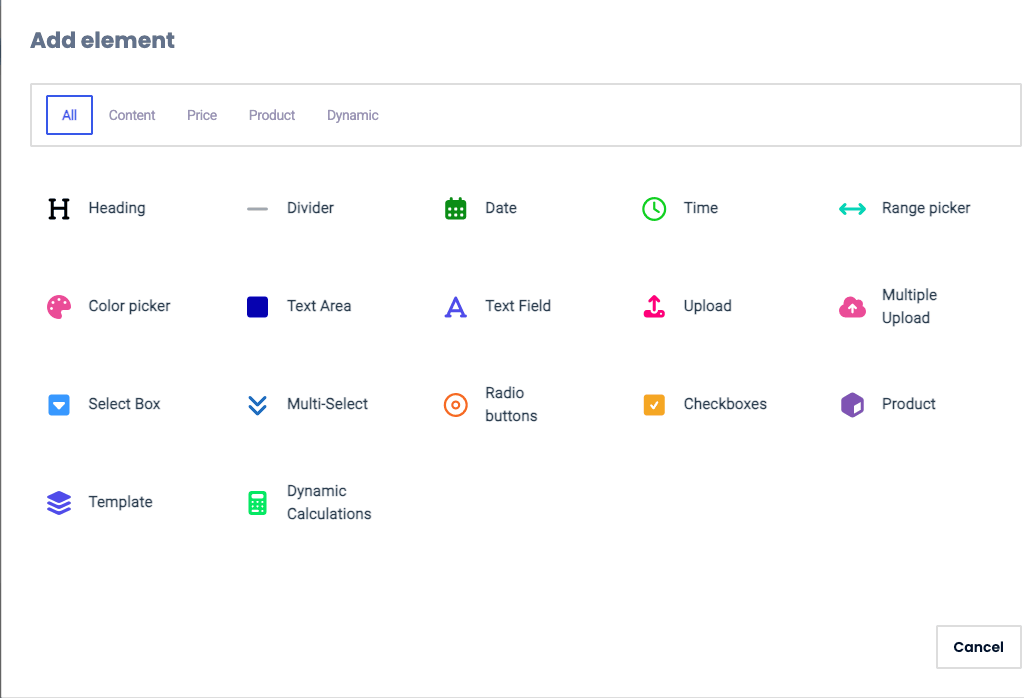
That’s seventeen element types, grouped under tabs for All, Content, Price, Product, and Dynamic. Here’s what each one is genuinely for, not just what it’s called:
- Text Field and Text Area. Free-text input for names, monograms, special instructions, dedications. You can cap the character count and charge per character, which matters for engraving.
- Checkboxes. Multiple add-ons a customer can stack: gift wrap, extra battery, priority handling. Each checkbox can carry its own fee.
- Radio buttons and Select Box. Pick exactly one from a list. Radios show every option (good for three or four choices), the select box collapses them into a dropdown (good for a long list).
- Multi-Select. One dropdown, several picks. Useful for "choose up to five toppings".
- Color picker. A real swatch grid. Pair it with images and you get a visual finish selector, the kind furniture and apparel stores need. (If you want swatches on actual WooCommerce variations rather than add-on fields, that’s a different job for a plugin like Variation Swatches for WooCommerce Pro.)
- Date and Time. Pickers for delivery dates, appointment slots, event times. You can block past dates and set ranges.
- Range picker. A slider for a numeric value, quantity, length, donation amount, that can feed straight into a price formula.
- Upload and Multiple Upload. Let customers attach a file: a logo to print, artwork, a photo for a custom mug. The multiple version takes several files at once.
- Product. Link another WooCommerce product as an option, so choosing it adds that product’s price (and stock handling) to the order. This is how you sell "add a matching belt" without rebuilding the belt as a fee.
- Heading and Divider. Layout elements to break a long form into readable chunks. Not glamorous, but a 20-field form without them is a wall.
- Template. Drop in a reusable saved set of fields so you don’t rebuild the same five fields on every product.
- Dynamic Calculations. A live formula display, show the customer a computed value (area, volume, total weight) based on their other inputs.
Tip: resist the urge to use every type on one product. The best option forms I built had three to five fields. The worst had twelve and a 40% cart-abandon feel to them. More fields is not more sales.
How pricing works: fees, formulas, and lookup tables
This is the section that separates Extra Product Options from the lightweight add-on plugins, and it’s the part I’d read twice if I were you. Every option can change the price, but how it changes the price has several modes, and picking the wrong one quietly costs you money.
Here are the pricing modes the plugin supports, in plain terms:
| Pricing mode | What it does | Use it for |
|---|---|---|
| Fixed fee | Adds a flat amount, regardless of quantity | Gift wrap (+$5), rush handling (+$10) |
| Percentage of product | Adds a % of the base product price | Premium finish (+15%), insurance (+5%) |
| Percentage of cart total | Adds a % of the running cart total | A blanket service charge |
| Quantity / step based | Price scales with a quantity the customer enters | Per-foot, per-unit, per-guest pricing |
| Formula (math) | A custom math expression using field values | Width x height x rate for banners and glass |
The formula mode is the headline. You write an expression like {width} * {height} * 12 and the customer’s typed dimensions feed straight into the price. For anyone selling things measured by area or volume, signage, fabric, worktops, fencing, this is the entire reason to buy the plugin. I built a banner product priced at width times height times a per-square-foot rate, and watching the total recalculate as I dragged a range slider felt like the demo a stock WooCommerce store can never give you.
Lookup tables are the other power feature, and they’re easy to miss. Instead of one formula, you upload a matrix: rows for one variable, columns for another, a price in each cell. A 60-by-90 cm print is one cell, a 100-by-150 is another. When the math isn’t a clean formula (printing rarely is, because of paper sizes and waste), a lookup table is how you price it accurately. It’s stored as its own content type behind the scenes, so you can reuse the same table across products.
Heads-up: the difference between "fixed fee" and "quantity based" is where new users lose real money. A flat $3 engraving fee on an order of one is fine. The same flat $3 on an order of fifty engraved items, when each one actually costs you labor, means you just engraved fifty things for the price of one. If the cost scales with quantity, the price mode has to scale too. I’ll come back to this in the anti-pattern section because it’s the single most expensive mistake here.
One more thing worth knowing: option prices can be made tax-aware and they flow into WooCommerce’s normal totals, so VAT and tax classes behave the way the rest of your store does. If you sell internationally and run a multicurrency setup with something like the WooCommerce Currency Switcher, the plugin hooks into the conversion so option fees convert too, rather than staying stuck in your base currency.
Building your first option set
Setup is the easy part. Once the plugin is active (upload the zip under Plugins » Add New » Upload Plugin, activate, done, there’s no wizard to sit through), every product gains an Extra Product Options tab inside the Product Data box. Here’s where it lives:
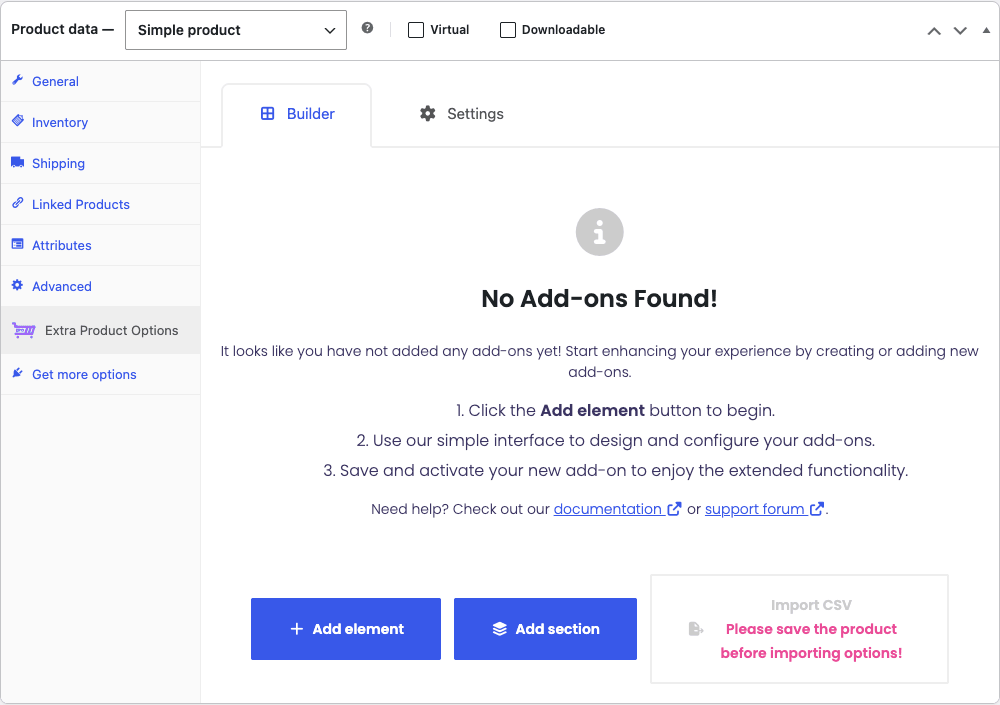
To add your first option, here’s the full shape of the workflow:
- Open the product you want to customize and scroll to the Product Data box. Click the Extra Product Options tab on the left. You’ll land on the Builder.
- Click Add element and pick a type from the palette. The element drops into the form below.
- Configure the element. Give it a label ("Choose a finish"), add your choices, and set a price on each one. This is where you choose the pricing mode from the previous section.
- Set whether it’s required. A required field blocks Add to cart until the customer fills it in, which is exactly what you want for "upload your artwork".
- Save the product. Open the front-end product page and you’ll see your fields, with the price total updating as you click.
That last step is non-negotiable: always test on the real front-end before you call it done. The builder preview is close, but your theme’s styling, your currency, and your tax setup only show up on the live page. I’ve shipped a form that looked perfect in admin and rendered with a broken total on the front-end because of a theme conflict, two minutes of testing would have caught it.
Note: the plugin shows a "Please save the product before importing options" prompt for a reason. A few features, including CSV import of options, only switch on after the product has been saved once. If a button looks greyed out, save first.
Global forms or per-product options
This is the decision that trips up almost everyone, and getting it right early saves hours later.
You can build options in two places. Per-product options live on a single product, in that Extra Product Options tab. Global forms are built separately, then applied to many products at once, by category, by tag, or to your whole catalog. You manage them under Products » Global Forms.
Here’s how I’d choose between them:
| Per-product options | Global forms | |
|---|---|---|
| Lives on | One product | Many products at once |
| Best for | A unique field set for one product | The same add-ons across a category |
| Editing later | Edit each product | Edit once, applies everywhere |
| Example | A bespoke wedding-cake builder | "Add gift wrap" on every gift product |
The rule I settled on: if you’d copy-paste the same field onto more than three products, make it a global form. Gift wrapping, a "leave a note" field, priority shipping, those belong in a global form applied to a category, so you change them in one place. A genuinely one-off configurator (the cake, the custom PC builder) belongs on the product itself.
Global forms also have a priority setting, which controls the order when more than one form applies to the same product. If you have a store-wide "gift options" form and a category-level "apparel sizing" form both landing on a t-shirt, priority decides which renders first. It sounds fiddly. In practice you set it once and forget it.
There’s also a Templates feature, which is different from global forms in a subtle but useful way. A template is a saved chunk of fields you can drop into any builder as a starting point, it’s a copy, not a live link. Global forms stay linked (edit once, update everywhere). Templates are for "give me those five fields again so I can tweak them here". Use global forms for shared logic, templates for shared starting points.
Conditional logic: the right fields at the right time
A long form is a conversion killer. Conditional logic is the plugin’s answer, and it’s where a cluttered product page becomes a smart one.
Conditional logic means a field only appears when another field has a certain value. Choose "Yes" to gift wrapping, and then a "gift message" text area appears. Pick "Engraving" from a dropdown, and then the "engraving text" field and its per-character price show up. The customer never sees a field that doesn’t apply to them.
You set it per element: pick the controlling field, the condition (is / is not / greater than), and the value. You can chain several conditions together with AND/OR logic, so "show this field only if finish is matte AND size is large" is a couple of clicks.
This matters more than it sounds. I rebuilt a 14-field furniture configurator so that only the relevant fields showed based on the chosen material, and the visible form dropped to about five fields at any moment. Same capability, far less intimidation. Where this shines: any product where the questions branch, custom furniture, print jobs, build-your-own bundles, services with optional extras.
You might be wondering whether all this client-side logic slows the page down. In my testing it didn’t, the logic runs in the browser and the fields are already in the DOM, just hidden, so toggling them is instant. The cost is page weight if you go overboard with fields, not the conditional logic itself.
Who this is for: five stores that need it
Rather than a generic feature list, here’s where I’d actually reach for this plugin, framed as the stores that keep needing it:
- If you run a print shop: business cards, banners, stickers. You need formula pricing (size times rate), file uploads for artwork, and quantity-based costs. This plugin was practically built for you.
- If you sell personalized gifts: engraving, monograms, custom messages. Text fields with per-character pricing, plus conditional logic so the message box only appears when the customer wants it.
- If you run a bakery or food store: cake size, flavor, a written message, a delivery date. The date picker plus required fields keeps orders complete.
- If you sell furniture or made-to-order goods: material, finish, dimensions. Color/image swatches for finishes, a lookup table or formula for size-based pricing. And if those pieces are high-ticket, let buyers pay a deposit with WooCommerce Deposits.
- For a B2B or trade store: add-on services, setup fees, custom quantities. Percentage fees for handling, quantity steps for bulk. If your pricing is more about wholesale tiers than per-item options, pair it with a dedicated WooCommerce dynamic pricing setup instead, the two solve different problems.
A quick boundary, because it saves disappointment: this is an options plugin, not a bundles plugin. If you want to sell a fixed kit of several products together at a set price, that’s a job for WooCommerce Product Bundles, not extra options. Extra Product Options shines when the customer is configuring one product, not assembling several.
Don’t price options by guessing
Here’s the section I wish every new user read first, because these mistakes cost real money and real trust.
Don’t use a flat fee when the cost scales with quantity. This is the big one. A flat $4 "engraving" fee looks fine until someone orders 100 engraved tags. You charged $4 total; your engraver charged you for 100. Use quantity-based or per-unit pricing whenever the work scales with the count. Test it by adding a high quantity to the cart and checking the math before you launch, not after a painful order.
Don’t skip file-upload limits. A "upload your design" field with no size cap is an open door. A customer drops a 200 MB raw photo, the upload fails or times out, and you’ve lost the sale without ever knowing. Set a sensible max file size and allowed file types, and tell the customer in the field description. A failed upload at checkout is an abandoned cart you’ll never see.
Don’t forget the formula edge cases. A width-times-height formula is fine until someone enters 0, or leaves a field blank. Set minimums on numeric fields and mark them required, or you’ll get zero-priced orders you’re obligated to fulfil. I once watched a test order arrive at $0 because an empty dimension field multiplied the whole formula to nothing.
Don’t assume the option reaches your fulfilment team. Place a full test order and look at the actual order screen and the confirmation email. If the engraving text isn’t on the order, your team ships a blank wallet. The data should carry through, but a theme or email plugin can interfere, so verify it once per store.
Every one of these is a money or trust problem, not cosmetic. Five minutes of test orders is the cheapest insurance there is.
Extra Product Options vs the alternatives
There are three names that come up whenever custom options are discussed, so here’s an honest comparison with real numbers rather than hand-waving.
WooCommerce Extra Product Options (ThemeComplete) ships around 17 field types, full formula and lookup-table pricing, and deep conditional logic. On CodeCanyon it’s sold as a one-time purchase (regular license around $39) rather than an annual subscription, which over three years is dramatically cheaper than the renew-every-year competitors. Its weak spot is the admin: the builder is powerful but dense, and the settings panel has well over a hundred toggles.
WooCommerce Product Add-Ons (the official extension) is the safe, first-party choice at roughly $49 per year. It’s simpler and cleaner, but that simplicity is the catch: there’s no formula or lookup-table pricing and far fewer field types (closer to 10), so anything measured by area or a price matrix is off the table. It’s the right pick if your needs are "add gift wrap and a text note" and nothing more.
PPOM (Product Options Manager) has a free version on WordPress.org and a Pro tier around $49 per year. It’s a genuine middle ground, more capable than the official add-on, lighter than ThemeComplete’s. But its conditional logic and formula pricing are less mature, and the free version’s field set is limited enough that most real stores end up on Pro anyway.
The short version: if you need formula pricing, lookup tables, or 15-plus field types, Extra Product Options is the most capable of the three and the only one with a one-time price. If you want the simplest possible "add a fee" tool with first-party support, the official WooCommerce add-on is fine and costs about $49 a year. The 17-versus-10 field-type gap and the presence of math-based pricing are what justify picking the heavier plugin.
Developer reference: hooks, filters, shortcodes
This is where Extra Product Options quietly shows its age and its depth at the same time. The plugin exposes well over 300 filters and around 70 WordPress action hooks, almost all prefixed wc_epo_ or tm_. You will not need most of them. Here are the ones that actually come up when you’re customizing a real store, with accurate signatures pulled from the source.
Validate options before add-to-cart. Use tm_add_to_cart_validation to block the cart when an option combination isn’t allowed, for example, refusing an engraving longer than your machine can handle:
add_filter( 'tm_add_to_cart_validation', function ( $passed ) {
    if ( isset( $_POST['tmcp_textfield_0'] ) && strlen( $_POST['tmcp_textfield_0'] ) > 20 ) {
        wc_add_notice( 'Engraving must be 20 characters or fewer.', 'error' );
        return false;
    }
    return $passed;
} );
Adjust the calculated option price. The wc_epo_adjust_price filter decides whether the plugin adjusts a cart item’s price at all. Return false to leave the base price untouched for a specific item:
add_filter( 'wc_epo_adjust_price', function ( $adjust, $cart_item ) {
    // Don't apply option fees to items already on sale.
    if ( ! empty( $cart_item['data'] ) && $cart_item['data']->is_on_sale() ) {
        return false;
    }
    return $adjust;
}, 10, 2 );
Guard against zero-priced products. Remember the empty-formula trap from the anti-pattern section? tm_epo_no_zero_priced_products is your safety net, it lets you inspect the computed price and stop a $0 line from being treated as valid:
add_filter( 'tm_epo_no_zero_priced_products', function ( $price, $cart_item ) {
    // Log suspicious zero totals so you can chase the cause.
    if ( floatval( $price ) === 0.0 ) {
        error_log( 'EPO produced a zero-priced configured product.' );
    }
    return $price;
}, 10, 2 );
Alter the data saved to the cart line. wc_epo_add_cart_item_data gives you the array of option meta before it’s attached to the cart item, handy for adding a computed value your fulfilment system expects:
add_filter( 'wc_epo_add_cart_item_data', function ( $cart_item_meta ) {
    $cart_item_meta['tm_internal_ref'] = 'JOB-' . wp_generate_password( 6, false );
    return $cart_item_meta;
} );
Render extra markup around the options block. The action wc_epo_after_product_element fires right after the options render on the product page, a clean place to inject a reassurance line or a custom upsell:
add_action( 'wc_epo_after_product_element', function () {
    echo '<p class="epo-note">All custom items ship in 5 to 7 business days.</p>';
} );
Register your own element type. Serious customizers can hook tm_epo_register_addons to add a bespoke field element to the builder palette. It fires with no arguments, you register your add-on class against the plugin’s API inside it. This is how agencies build a one-off field type a client needs without forking the plugin.
On top of the hooks, there are six shortcodes for placing options and totals outside the default product layout: [tc_epo], [tc_epo_show], [tc_epo_action], [tc_current_epo], [tc_current_epo_totals], and [tc_epo_totals]. The totals shortcodes are the useful ones, they let you drop the live price box wherever your custom template needs it. (If you write these into a page, wrap them in code so your theme doesn’t execute them by accident.)
Finally, the plugin registers four custom post types you may bump into when querying: tm_global_cp (global forms), tm_product_cp (per-product option storage), tm_template_cp (templates), and tm_lookuptable_cp (lookup tables). If you ever export option data or write a migration, those are the post types to target.
Performance, compatibility, and gotchas
A few honest notes after living with it for a week.
It only loads where it should. Out of the box the plugin scopes its assets to WooCommerce pages, and there’s a setting (under Plugin Loading Areas in the control panel) to widen or narrow that. Don’t switch on "load everywhere" unless you genuinely place options on non-WooCommerce pages; it’s an unnecessary front-end weight otherwise.
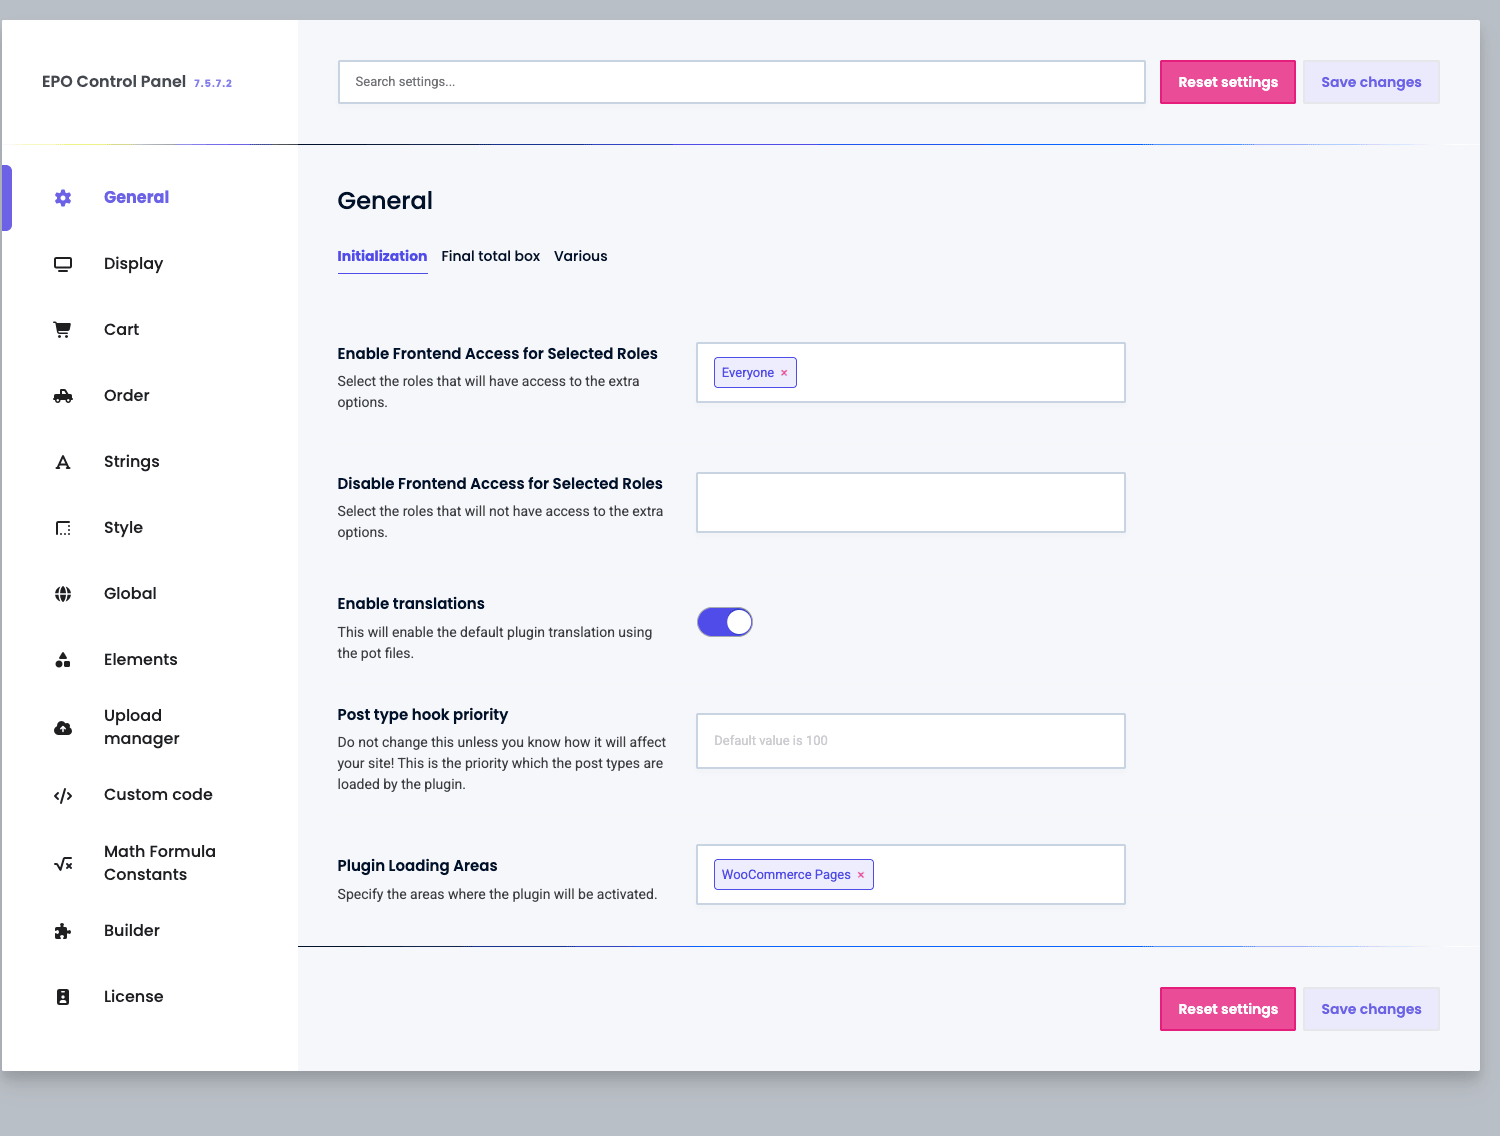
The settings panel is huge. There are sub-sections for General, Display, Cart, Order, Strings, Style, Global, Elements, Upload manager, Custom code, Math Formula Constants, Builder, and License. It’s thorough, but the first time you open it, it’s a lot. My advice: ignore all of it on day one except the Display tab, which controls where your options appear and whether the floating totals box shows.
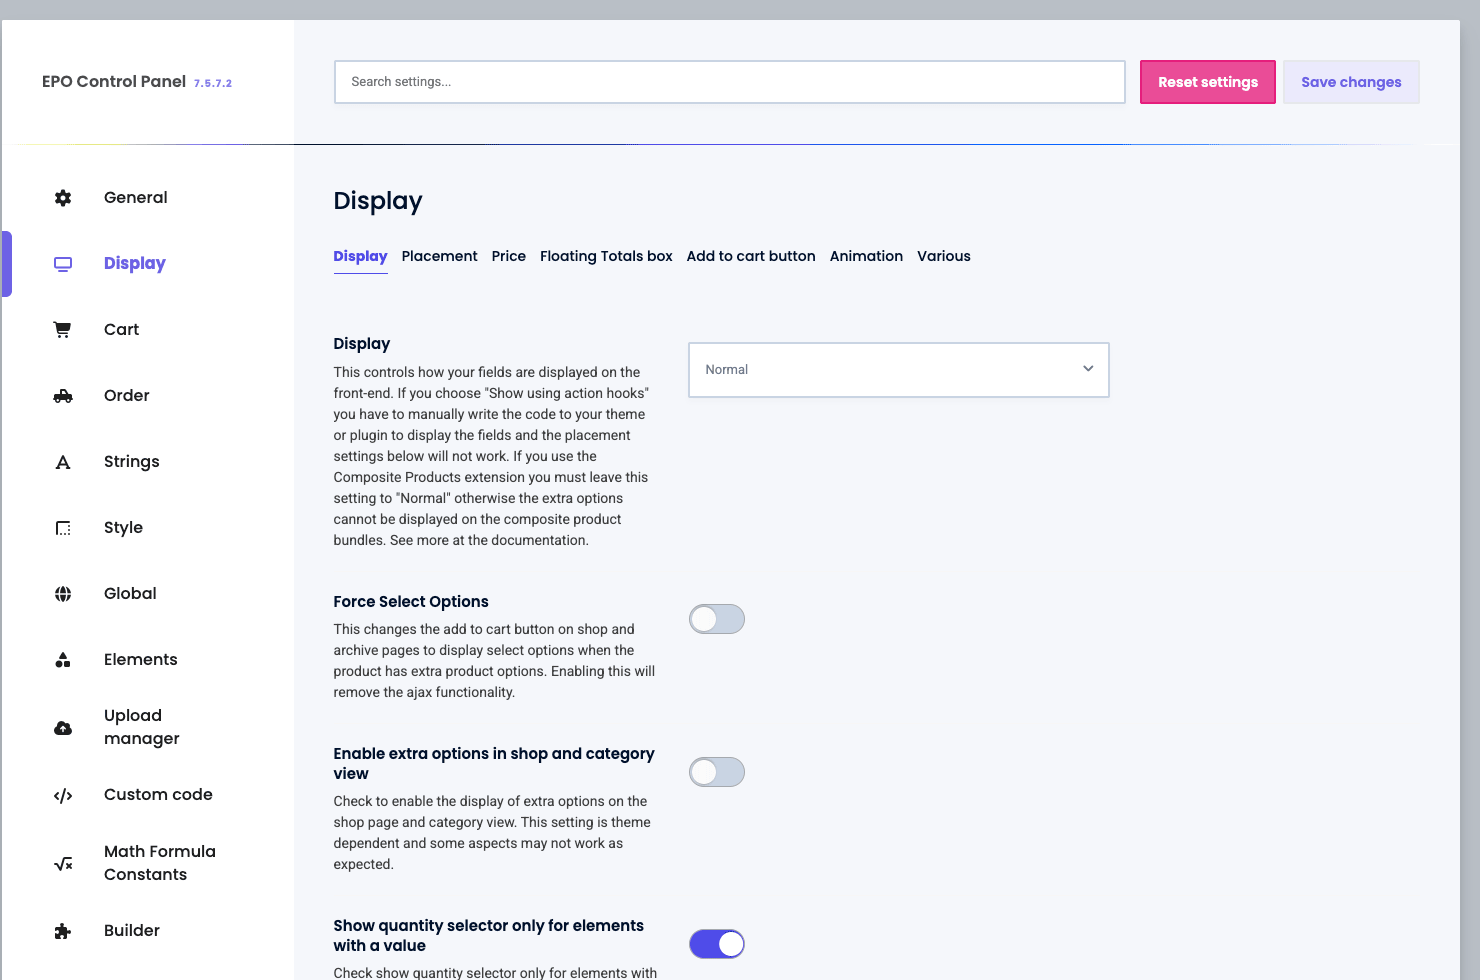
Caching needs a glance. Because the price is calculated live and the options post with the form, aggressive page caching is usually fine (the calculation is client-side), but if you use full-page caching with a CDN, test the Add to cart flow once. The cart fragments are the part to watch.
Theme conflicts happen on the totals box. The floating totals box is positioned with CSS, and a handful of themes fight it. If your total renders in a weird spot, the Style and Display tabs have placement controls before you reach for custom CSS.
Compatibility is broad. It plays well with multilingual setups (it ships translation config for WPML), multicurrency switchers, and the common page builders. It needs a reasonably modern PHP version, which any decent host runs now. Multisite works, you activate and configure per-site.
The learning curve is real. This is the recurring theme. The plugin is more capable than its rivals, and you pay for that in admin density. Budget an afternoon to get comfortable, not ten minutes.
Pricing and licensing
ThemeComplete sells Extra Product Options on CodeCanyon as a one-time purchase with six months of included support (extendable), rather than the annual subscription model most WooCommerce extensions use. The regular license sits around the $39 mark, which, compared to roughly $49 a year for the official add-on, works out cheaper inside the first year if you’d otherwise be renewing annually.
A CodeCanyon license covers use on a single end product (one store). Updates are downloaded from your Envato account. That model is fine for a single store, but it’s worth knowing the support window is finite unless you extend it.
This is also where the GPL route is worth a mention. The WooCommerce Extra Product Options download on GPL Times is the same plugin, delivered under the GPL with the documentation intact, which is the quickest way to get a working copy onto a staging store and try the formula pricing and conditional logic on real products before you commit to a workflow. Test it against your actual catalog, the math fields especially, because that’s where the plugin earns its place or doesn’t.
FAQ
Does Extra Product Options work with WooCommerce variations?
Yes, and this confuses people. Variations and extra options are separate layers. You can have a variable t-shirt (size and color as variations) and add an "add a name on the back" text field as an extra option on the same product. The plugin even has a Variations element so option fields can react to the chosen variation. They coexist; they don’t replace each other.
Can customers upload files like logos or artwork?
Yes, there are single and multiple file-upload fields. The important part is configuring them: set a maximum file size and allowed file types, and write a clear instruction in the field. An uncapped upload field is the most common cause of silent failed orders, so this is a setup step, not an afterthought.
Will the option prices show up correctly in the cart, order, and emails?
They should, the data is saved to the cart line and carried to the order and confirmation email. But "should" isn’t "verified". Place one real test order per store and confirm the options appear on the order screen and in the email, because a theme or email plugin can occasionally strip the meta.
Is there formula or calculated pricing?
Yes, and it’s the main reason to pick this plugin over lighter ones. You can write math expressions using field values ({width} * {height} * rate), use quantity-based steps, or upload a lookup table for price matrices. If you sell anything by size, area, or weight, this is the feature you came for.
How is this different from the official WooCommerce Product Add-Ons?
The official add-on is simpler, first-party, and about $49 a year. Extra Product Options has more field types (around 17 versus 10), formula and lookup-table pricing the official one lacks, deeper conditional logic, and a one-time price. The trade-off is a denser admin. Choose by whether you need math pricing; if you don’t, the official one is genuinely fine.
Does it slow down my store?
The option logic runs in the browser, so conditional logic and live totals don’t add server load. The real performance variable is how many fields you add and how widely you scope the plugin’s assets. Keep forms lean and leave the loading scope on WooCommerce pages only, and the impact is small.
Can I reuse the same options across many products?
Yes, two ways. Global forms apply one option set to a category, tag, or your whole catalog and stay linked (edit once, update everywhere). Templates give you a reusable starting set you can drop in and tweak per product. Use global forms for shared logic, templates for shared starting points.
Does it support multiple languages and currencies?
It ships translation configuration for WPML and hooks into popular multicurrency switchers, so option labels can be translated and option fees convert with the rest of your prices. If you run a multilingual store, translate the option strings, the Strings tab in the settings exists exactly for that.
Is it developer-friendly?
Very, if you’re comfortable with WordPress hooks. There are 300-plus filters and around 70 actions, six shortcodes, and an API for registering your own element types. The naming is consistent (wc_epo_ and tm_ prefixes), so once you learn the pattern, finding the right hook is straightforward.
Do I have to buy it every year?
No. It’s a one-time CodeCanyon purchase, not a subscription. Support is included for a window and can be extended, but the plugin keeps working regardless. That pricing model is a genuine point in its favor against the annual-renewal alternatives.
Final thoughts
WooCommerce Extra Product Options is the plugin you reach for when "one product, one price" stops describing what you actually sell. It is the most capable tool in its category, the formula pricing and lookup tables alone put it ahead of the lighter options, and the one-time price makes it the sensible long-term pick for any store that’s serious about selling configured products.
It is not the friendliest. The builder rewards patience and the settings panel is genuinely overwhelming on first open. But that density is the cost of doing things the simpler plugins can’t, and once your option sets are built, customers never see any of that complexity, they just see a product page that finally asks the right questions.
If your store sells anything personalized, measured, or made-to-order, build one real configured product with it on a staging site, formula field and all, and run a test order through to the confirmation email. That ten-minute exercise will tell you more than any review, including this one, about whether it fits your catalog.