

Here’s an uncomfortable truth about selling anything expensive online: the price tag is where most carts quietly die. A shopper loves your $1,200 dining table, gets to the checkout, sees the full amount due today, and closes the tab. They weren’t saying no to the table. They were saying no to paying for all of it right now.
WooCommerce Deposits fixes exactly that. It lets a customer pay a deposit today and the rest later, either as a single balance payment or as a scheduled payment plan. I spent a day setting it up on a sandbox store, taking a fake order through deposit to balance, and this is the honest walkthrough: how the three deposit types differ, how the balance actually gets collected, and the gotchas that can bite you (and your cash flow) if you skip the testing.
Table of Contents
- What is WooCommerce Deposits?
- How deposits actually work in WooCommerce
- The three deposit types
- Setting up your first deposit
- Building a payment plan
- What the customer sees
- Collecting the balance: scheduled orders and reminders
- Who should use deposits: real scenarios
- Don’t do this: deposit mistakes that cost money
- WooCommerce Deposits vs the alternatives
- Developer reference: hooks, filters, and order types
- Performance, compatibility, and gotchas
- Pricing and licensing
- FAQ
- Final thoughts
What is WooCommerce Deposits?
WooCommerce Deposits is an official WooCommerce extension that lets customers pay for a product in parts instead of all at once. They put down a deposit at checkout, and the remaining balance is collected later, either as one follow-up payment or spread across a payment plan you define.
It’s built and maintained by WooCommerce themselves, so it hooks into the cart, checkout, and order system the way a first-party plugin should, rather than fighting them. That matters for a feature this close to the money: you want the deposit, the balance, and the order status to all stay in sync without surprises.
The plugin is a standalone premium extension. The only thing it needs is WooCommerce, which you already run, so there’s no separate base plugin to install alongside it.
Here’s the simplest way to think about it. A normal WooCommerce order is "pay the full amount, done". WooCommerce Deposits turns that single payment into two (or more) payments against the same order: a deposit now, and a balance you collect on your schedule. You can grab WooCommerce Deposits from GPL Times and have a deposit product live on a staging store in about ten minutes.
How deposits actually work in WooCommerce
Skip this section if you’ve run deposit orders before. If you haven’t, the next two minutes explain every quirk you’ll hit later, so it’s worth reading.
When a customer chooses to pay a deposit, the plugin does something clever with the order:
- The customer picks "Pay Deposit" on the product page and adds it to the cart.
- At checkout they pay only the deposit amount (say 50% of $1,200, so $600).
- WooCommerce creates the order, marks the deposit as paid, and records the remaining balance as still owed.
- Later, the balance is collected through a separate follow-up order (internally a "scheduled-payment" order) linked back to the original.
- Once the balance is paid, the parent order’s status flips to completed.
That fourth step is the one people underestimate. The balance is its own order. It can be paid by the customer from their My Account area, or you can send them an invoice for it, and the plugin can email reminders before it’s due. The original order isn’t "complete" until that balance lands.
Why does this design matter to you? Because it means cash flow and fulfilment hinge on the balance actually getting paid. A deposit order is a promise, not a completed sale. Most of this guide is really about making that promise reliable: choosing a deposit type that fits, setting up reminders, and making sure your payment gateway can actually take the second payment. Get those right and deposits are a quiet conversion machine. Get them wrong and you’ve shipped a $1,200 table for a $600 payment that never finished.
The three deposit types
WooCommerce Deposits gives you three ways to define what "a deposit" means. Picking the right one per product is the single most important decision here, so here’s each in plain terms:
| Deposit type | What the customer pays now | Best for |
|---|---|---|
| Percentage | A % of the price (e.g. 30% of $1,200 = $360) | Most stores; scales with price automatically |
| Fixed amount | A flat figure (e.g. $100 down, any product) | Reservations, "hold it for $X" offers |
| Payment plan | Several scheduled instalments you define | High-ticket items, layaway, pre-orders |
Percentage is the one most stores want. Set 30% and every product asks for 30% up front, whether it’s a $200 chair or a $2,000 sofa. It scales on its own, so you set it once.
Fixed amount asks for the same flat figure regardless of price. This is the "reserve it for $100" model, useful for bookings, made-to-order slots, or holding stock. The catch: a flat $100 deposit on a $2,000 item is 5%, and on a $150 item it’s 67%, so fixed amounts only make sense when the products are roughly the same price.
Payment plan is the powerful one. Instead of "deposit now, balance later", you define a full schedule: 50% now, 50% in a month, or 25% now and three monthly instalments, or any split that sums to 100%. This is layaway and instalment selling built into WooCommerce. We’ll build one in a minute.
Tip: you can set a storewide default deposit type and then override it per product. Use percentage as your default, and only switch individual high-ticket products to a payment plan. That keeps the admin sane.
Setting up your first deposit
Setup is quick. After you upload and activate the plugin (Plugins » Add New » Upload Plugin, then activate, there’s no wizard), deposits are configured in two places: a storewide default, and a per-product override.
The storewide defaults live under WooCommerce » Settings » Products » Deposits. Here’s that screen:
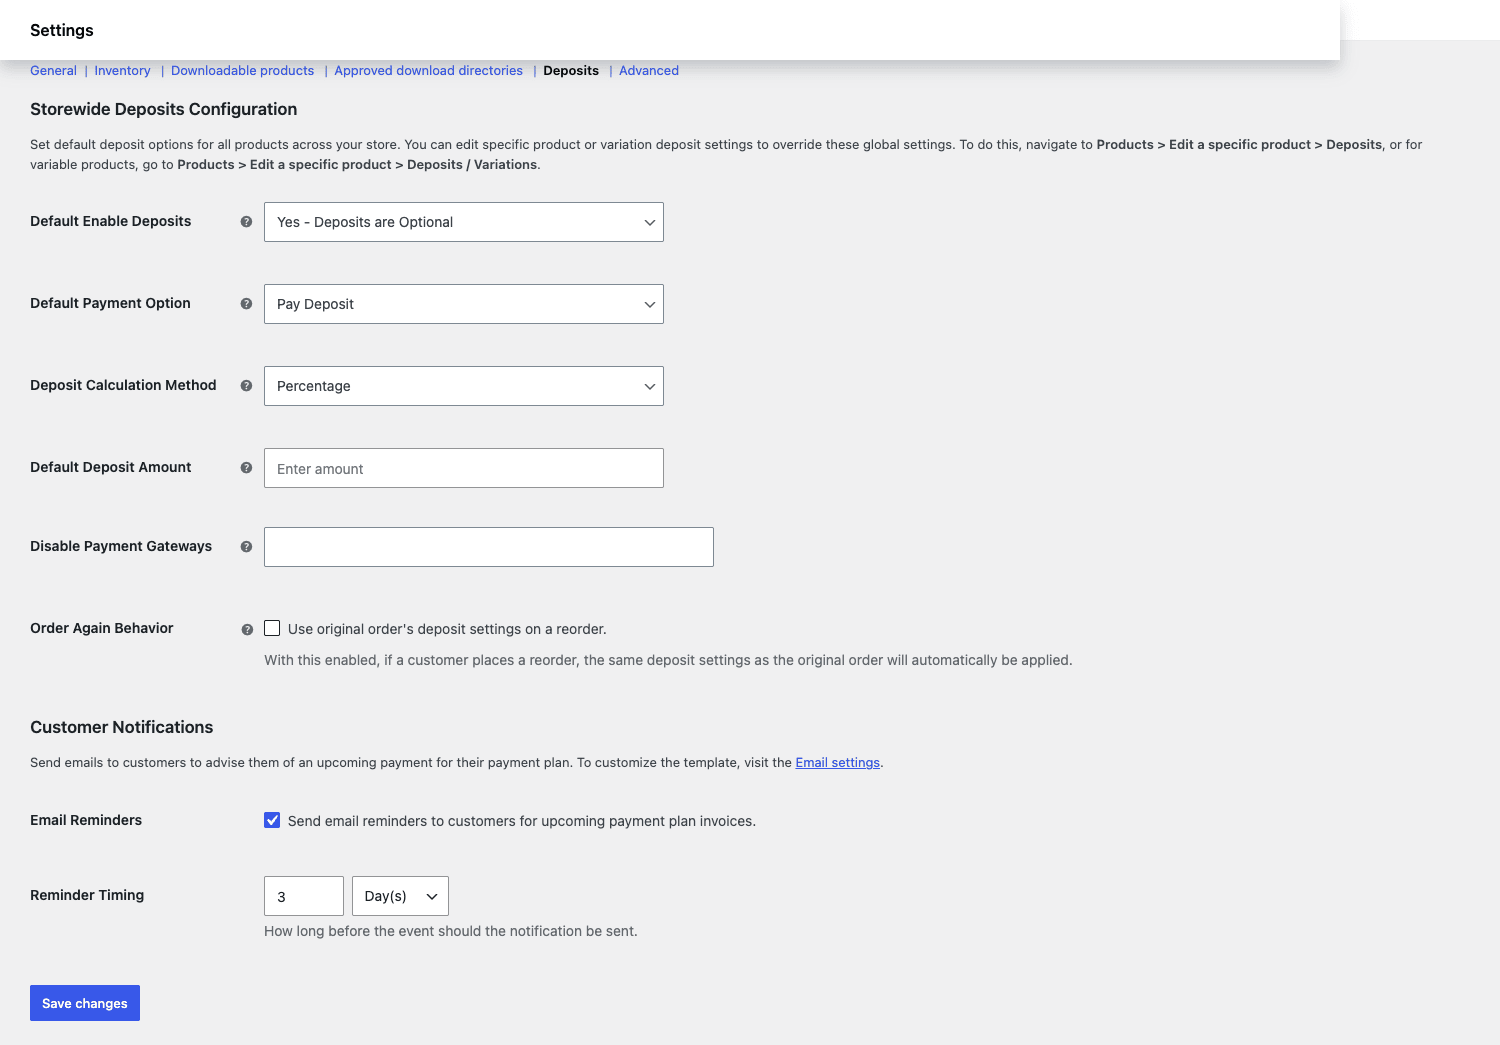
Walking through what each setting does:
- Default Enable Deposits has three states. No turns deposits off everywhere. Optional lets the customer choose deposit or full payment. Required forces a deposit. Start with Optional, customers like the choice.
- Default Payment Option decides which choice is pre-selected on the product page, Pay Deposit or Pay in Full.
- Deposit Calculation Method is your default type: percentage or fixed amount.
- Default Deposit Amount is the number that goes with it (30 for 30%, or a flat figure).
- Disable Payment Gateways lets you block gateways that can’t handle deposits cleanly. More on that in the gotchas.
- Order Again Behavior decides whether a reorder reuses the original deposit settings.
- Email Reminders and Reminder Timing control the nudge customers get before a payment-plan instalment is due (the default is three days before).
To override the default on a single product, edit the product and open the Deposits tab in the Product Data box:
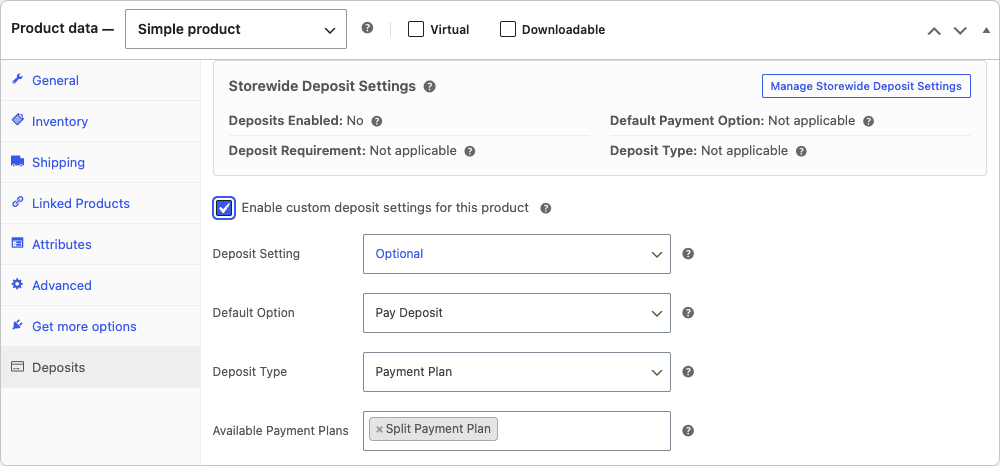
Tick Enable custom deposit settings for this product, and the per-product fields appear: the deposit setting (Disabled / Optional / Required), the default option, the deposit type, and, if you choose Payment Plan, which plans to offer. This override is how you run percentage deposits storewide but a bespoke instalment plan on your flagship product.
Note: the product panel shows a read-only summary of your storewide settings at the top, so you can see what a product inherits before you decide to override it. Handy for not second-guessing yourself.
Building a payment plan
Payment plans are managed in their own screen under Products » Payment Plans. A plan is just a named schedule of instalments, each a percentage of the total and an interval after the previous one.
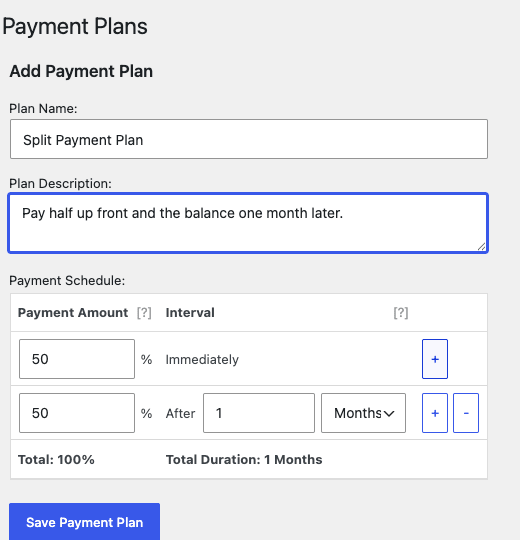
Building one is straightforward:
- Name the plan something the customer will understand on the product page ("Split Payment Plan", "3-Month Layaway").
- Write a short description. This shows to the customer, so say what they’re agreeing to: "Pay half up front and the balance one month later."
- Add schedule rows. The first row is always due Immediately (that’s the deposit). Each row after it is a percentage and an interval ("50% after 1 month").
- Watch the running total. The editor shows Total and Total Duration live. Your percentages must add up to 100%, the plugin won’t let you save a plan that doesn’t.
- Save, then assign the plan to any product whose deposit type is set to Payment Plan.
A plan summing to exactly 100% is the rule that trips people up. A "50% now, 50% later" plan is 100%. A "25% now, then three payments" plan needs those three payments to total 75%. The live total is there precisely so you don’t ship a plan that under- or over-charges.
Heads-up: payment plans are where you’re effectively offering credit, the customer takes the goods (or the slot) before they’ve paid in full. Only offer instalments on products where you can absorb a non-payment, or on made-to-order items you don’t ship until the final payment clears.
What the customer sees
All of that admin produces something refreshingly simple on the storefront. On a deposit-enabled product, the customer gets a clear choice before they add to cart:
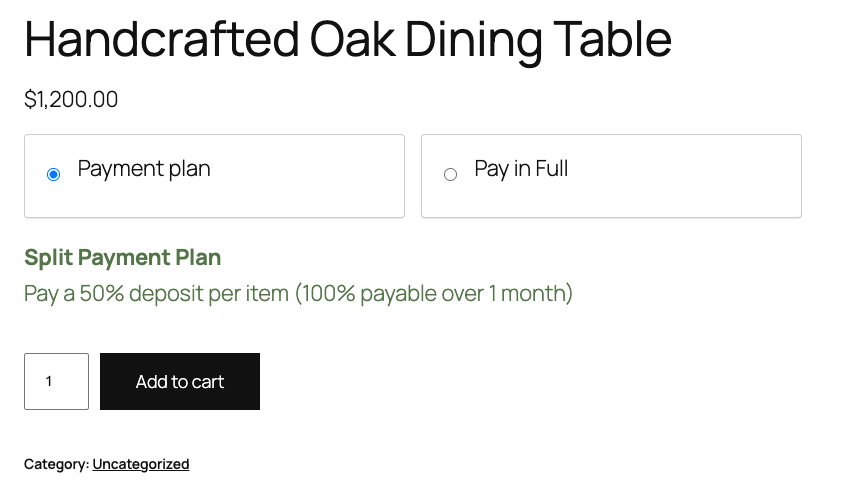
Two cards, "Payment plan" and "Pay in Full", and underneath the selected plan, a plain-English breakdown: "Pay a 50% deposit per item (100% payable over 1 month)". The customer knows exactly what leaves their account today and what’s coming later. No fine print, no surprises at checkout.
That clarity is the whole point. You might be wondering whether adding this choice complicates the buying decision. In my testing it does the opposite, it removes the single biggest objection (the full price today) and replaces it with a smaller, friendlier number. The shopper who bounced at $1,200 will often commit to $600 now.
When they check out, they pay only the deposit. The order appears in your dashboard as partially paid, with the balance recorded and waiting. Which brings us to the part that actually matters.
Collecting the balance: scheduled orders and reminders
This is the operational heart of the plugin, and the part worth getting right before you launch.
When a deposit is paid, the outstanding balance becomes its own follow-up order. There are two ways it gets settled:
- The customer pays it themselves. Their My Account area gains a Scheduled Orders / upcoming payments view where they can see and pay outstanding balances. This is the cleanest path, the customer is in control and re-enters their payment details.
- You send them the balance invoice. You can email the customer the follow-up order so they can pay it with one click.
To keep balances from being forgotten, the plugin sends reminder emails before a payment-plan instalment is due. You enable these in the Deposits settings and set how many days ahead the nudge goes out (three by default). Reminders are sent in batches by a scheduled task, so a store with hundreds of open plans won’t try to email everyone in one burst.
The honest caveat: WooCommerce Deposits does not automatically charge a saved card for the balance the way a true subscription does. The balance is a new order the customer completes. That’s a deliberate, safer design (no storing and re-charging cards you don’t have explicit authority for), but it means collection depends on the customer acting on a reminder. If you want fully automatic recurring billing instead, that’s a different tool, WooCommerce Subscriptions, and I’ll cover when to use which below.
So your real job is making the balance easy and obvious to pay: good reminder timing, a clear plan description, and a gateway the customer can re-use. Do that and the completion rate is high. Ignore it and you’ll accumulate half-paid orders.
Who should use deposits: real scenarios
Deposits earn their place in specific kinds of stores. Here’s where I’d reach for this plugin, framed as the businesses that keep needing it:
- If you sell furniture or high-ticket goods: a 30% percentage deposit turns a scary price into an approachable one and dramatically lifts conversions on items over a few hundred dollars.
- If you run a made-to-order or custom shop: take a deposit to start the work, collect the balance before you ship. You’re never out of pocket for materials. If those products are also configurable, you can pair deposits with custom options using WooCommerce Extra Product Options so the customer configures and reserves in one step.
- If you take bookings or reservations: a fixed-amount deposit ("reserve your slot for $50") holds the booking and reduces no-shows, because the customer has skin in the game.
- If you sell events or pre-orders: a payment plan lets buyers spread the cost of an expensive ticket or a not-yet-released product over the weeks leading up to it.
- For a layaway-style store: the classic "pay it off in instalments, collect it when it’s paid" model is exactly what payment plans deliver, without bolting on a separate financing service.
The common thread: deposits shine when the price is a barrier and you can afford to wait for the rest. They’re a poor fit for cheap, ship-immediately products, where the admin overhead of a balance isn’t worth it.
Don’t do this: deposit mistakes that cost money
Here’s the section I wish every store owner read first, because each of these costs money or trust.
Don’t assume your gateway can take the balance. Some payment gateways handle the follow-up balance order smoothly; others make the customer re-enter card details, and a few don’t play nicely at all. Test a full deposit-to-balance cycle on your actual gateway, and use the Disable Payment Gateways setting to switch off any that fail. A customer who can’t pay the balance is a stuck order.
Don’t ship before the balance clears on payment plans. A payment plan means the customer is paying over time. If you ship a $1,200 table after a $600 deposit and the second payment never lands, you’re out the difference. For physical goods, fulfil on final payment, not on the deposit, unless you can genuinely absorb the loss.
Don’t ignore refunds and chargebacks. Refunding a partially-paid order is fiddlier than a normal one, you have to account for what was actually collected versus what’s owed. Decide your deposit-refund policy up front (are deposits refundable?), state it on the product, and test a refund on a deposit order so you know how the numbers behave.
Don’t forget tax and revenue timing. A deposit is money received against a future sale, which has tax and accounting implications in many places. Talk to whoever does your books before you turn deposits on at scale, especially for plans that span tax periods.
Don’t set reminders and walk away. The reminder email is your collection engine. If it’s off, or the timing is wrong, balances get forgotten. Turn reminders on, set a sensible lead time, and open the email to check it reads clearly.
Five test orders and one honest conversation about refunds will save you a month of cleanup.
WooCommerce Deposits vs the alternatives
A few tools overlap with this one, so here’s an honest comparison with real numbers instead of hand-waving.
WooCommerce Deposits (official) costs around $79 a year and gives you all three deposit types, payment plans, reminder emails, and first-party support. Its strength is that it’s built by WooCommerce, so it stays compatible with new releases, HPOS, and block checkout. Its limit is that it doesn’t auto-charge the balance; the customer completes the follow-up order.
YITH WooCommerce Deposits & Down Payments runs about €100 a year (roughly $110). It’s capable and has a polished admin, with similar fixed and percentage deposits plus instalments. The practical difference is fit: if you already run other YITH plugins, it slots in; if you run a stock WooCommerce stack, the official extension is the lower-friction choice.
WooCommerce Subscriptions is a different animal at around $239 a year. It does automatically charge a saved card on a recurring schedule, which Deposits intentionally does not. But Subscriptions is built for ongoing memberships and recurring products, not "pay off this one item in three parts". Using it for instalments means contorting a subscription into a fixed-length plan, which is more setup and more cost.
The short version: for "let customers pay for one item in parts", WooCommerce Deposits is the right tool at the lowest price (around $79 a year versus roughly $110 for YITH and $239 for Subscriptions), with 3 deposit types covering every common case. Only reach for Subscriptions if you genuinely need automatic recurring charges rather than customer-completed balances.
Developer reference: hooks, filters, and order types
WooCommerce Deposits is leaner on the developer surface than some plugins, around 21 filters and a handful of actions, but the ones it exposes are the ones you actually need. All signatures below are pulled straight from the plugin source.
Change the calculated deposit amount. The woocommerce_deposits_get_deposit_amount filter hands you the deposit for a cart item and the product, so you can adjust it with your own logic (for example, a bigger deposit for high-value items):
add_filter( 'woocommerce_deposits_get_deposit_amount', function ( $amount, $product ) {
    if ( $product && $product->get_price() > 1000 ) {
        return $product->get_price() * 0.4; // 40% deposit on items over $1000
    }
    return $amount;
}, 10, 2 );
Relabel the add-to-cart button. Deposit products show a "Select options" style button by default. woocommerce_deposits_add_to_cart_text lets you reword it:
add_filter( 'woocommerce_deposits_add_to_cart_text', function ( $text ) {
    return __( 'Reserve with a deposit', 'your-textdomain' );
} );
Control the parent order status when the balance is paid. By default the original order moves to completed once the balance lands. Use woocommerce_deposits_parent_status_on_payment to send it somewhere else (say processing, if you still need to ship):
add_filter( 'woocommerce_deposits_parent_status_on_payment', function ( $status ) {
    return 'processing';
} );
Tune reminder batching. Reminder emails are sent in batches by a scheduled task. wc_deposits_notification_batch_size controls how many go out per run, lower it on a constrained host:
add_filter( 'wc_deposits_notification_batch_size', function ( $size ) {
    return 50; // default is 100
} );
React when a balance order is created. The woocommerce_deposits_create_order action fires when a follow-up balance order is generated, a good place to sync the balance to an external system:
add_action( 'woocommerce_deposits_create_order', function ( $order_id ) {
    // e.g. push the new balance order to your accounting tool
    my_accounting_sync_order( $order_id );
} );
Hook the reminder send. woocommerce_deposits_upcoming_payment_reminder runs with the order id and order object whenever a reminder is dispatched, useful for logging or a parallel SMS nudge:
add_action( 'woocommerce_deposits_upcoming_payment_reminder', function ( $order_id, $order ) {
    my_sms_reminder( $order->get_billing_phone(), $order_id );
}, 10, 2 );
A couple of architectural notes worth knowing if you’re building on top of this (the WooCommerce developer docs are the reference for the wider order and HPOS APIs these hooks sit on). Payment plans are stored in two custom database tables (wc_deposits_payment_plans and wc_deposits_payment_plans_schedule), not as a custom post type, so query them directly rather than with WP_Query. And the balance order is a distinct order type (internally scheduled-payment) linked to its parent, which is why a balance shows up as its own order in your reports. The plugin is HPOS-aware and ships block-checkout compatibility, so it works on both classic and modern WooCommerce stores.
Performance, compatibility, and gotchas
A few honest notes after taking an order through the full cycle.
Gateways are the main variable. As covered above, the customer-completed balance order leans on your payment gateway. Stripe and PayPal handle it well; some regional or older gateways are clumsy. This is the one thing to test before launch, not after.
It’s modern-WooCommerce ready. The plugin is HPOS-compatible and works with the block-based cart and checkout, so you’re not forced back onto the legacy shortcode checkout to use it. That wasn’t always true of deposit plugins, and it’s a real point in the official extension’s favor.
Reports show balance orders separately. Because the balance is its own order, your sales reports include both the deposit order and the balance order. It’s accurate, but if you’re eyeballing order counts, remember one sale can be two order rows.
Caching is mostly fine. The deposit selector and totals are rendered server-side per product, so page caching works normally. As always, exclude the cart and checkout from full-page caching, which you should be doing regardless.
Variable products need per-variation thought. Deposits can apply to variable products, but think through whether every variation should offer the same deposit. The product panel has a Deposits/Variations area for this; don’t assume one setting fits all variations.
Subscriptions overlap. If you also sell true subscriptions, be deliberate about which plugin owns which products. Deposits and Subscriptions can coexist, but a product shouldn’t be trying to be both a deposit item and a subscription.
Pricing and licensing
WooCommerce Deposits is sold as an official WooCommerce extension on an annual licence, around $79 a year, which includes updates and support for the term. That’s mid-range for a WooCommerce extension and cheaper than the recurring-billing alternatives if all you need is partial payments.
A licence covers a single site and unlocks automatic updates from your WooCommerce.com account (the official documentation covers every setting in depth). As with any annual extension, the plugin keeps working if you let the licence lapse, you just stop getting updates and support, which for a payment-adjacent plugin you do want to keep current.
This is also where the GPL route is worth a mention. The WooCommerce Deposits download on GPL Times is the same official extension under the GPL, which is the fastest way to put it on a staging store and run a real deposit-to-balance order through your own gateway before you commit. Test the part that matters, the balance collection, against your actual payment setup, because that’s where deposits either work beautifully or quietly leak money.
FAQ
Does the customer’s card get charged automatically for the balance?
No, and this is the most important thing to understand. WooCommerce Deposits records the balance as a follow-up order that the customer completes themselves (from My Account or via an emailed invoice). It does not store and auto-charge their card. If you need automatic recurring charges, you want WooCommerce Subscriptions instead. The trade-off is safety: no re-charging cards without the customer actively paying.
What happens if a customer never pays the balance?
The original order stays partially paid and the balance order stays open. Nothing auto-cancels. That’s why reminder emails and a clear refund/cancellation policy matter, and why you shouldn’t ship physical goods on a payment plan until the final payment clears. You decide how long to chase a balance before cancelling.
Can I require a deposit instead of making it optional?
Yes. The deposit setting has three modes: Disabled, Optional (customer chooses), and Required (deposit is forced). You can set this storewide or per product. Optional converts best because customers like the choice, but Required is there for products you only ever sell on deposit.
Does it work with the new block-based checkout and HPOS?
Yes. The plugin is HPOS-aware (the modern high-performance order storage) and ships compatibility for the block-based cart and checkout. You don’t have to revert to the legacy shortcode checkout to use deposits, which was a real limitation of some older deposit plugins.
Can I use percentage deposits on most products but a payment plan on a few?
Absolutely, and this is the recommended setup. Set a storewide default (percentage is the sane choice), then tick "Enable custom deposit settings" on individual high-ticket products and switch them to a payment plan. The override keeps your admin manageable.
Will deposits mess up my sales reports?
Not exactly mess up, but be aware: because the balance is a separate order, one sale can appear as two order rows (the deposit order and the balance order). The revenue is accurate; just don’t double-count when you’re reading order volume.
Does it support variable products?
Yes, deposits can apply to variable products, and there’s a Deposits/Variations area in the product editor. The thing to decide is whether every variation should offer the same deposit terms; don’t assume one setting fits all of them.
Can customers pay the balance early?
Yes. From their My Account scheduled-orders view they can pay an outstanding balance whenever they like, they don’t have to wait for the reminder or the due date. That flexibility tends to improve completion rates.
How do reminder emails work?
When email reminders are enabled, the plugin emails customers a set number of days (three by default) before a payment-plan instalment is due. Reminders are sent in batches by a scheduled task, so a large store won’t try to send them all at once. You can customise the email template in WooCommerce’s email settings.
Is it a one-time purchase?
No, it’s an annual WooCommerce extension licence (around $79 a year) covering updates and support. The plugin continues to function after the term, but for anything touching payments you’ll want to keep updates flowing.
Final thoughts
WooCommerce Deposits solves a specific, expensive problem: the full price today is what kills high-ticket carts. Letting customers pay a deposit, or spread the cost over a plan, removes that barrier and turns browsers into buyers on exactly the products where margins are best.
It’s not magic, and it’s honest about that. The balance is the customer’s to complete, not an automatic charge, so your job is to make paying it easy: a clear plan, good reminders, and a gateway that cooperates. Get that right and deposits are one of the highest-impact changes you can make to a store that sells anything pricey.
If you sell furniture, custom work, bookings, or events, put it on a staging store, build one percentage deposit and one payment plan, and run a real order all the way through to the balance. That single test order will tell you everything about whether deposits fit your store and your gateway, before a real customer ever relies on it.