

A regular WooCommerce store sells your products. A multi-vendor marketplace lets other people sell on your store and takes a cut of every sale. WC Vendors Pro is the plugin that bolts that whole second mode onto WooCommerce: vendor signup, a frontend dashboard where sellers add their own products and watch their own orders, commission rules, and PayPal or Stripe payouts.
This is a long walkthrough, so settle in. We’re going to look at what WC Vendors Pro actually does, how it differs from the free WC Vendors base plugin, the admin screens you’ll spend time in, every hook that matters if you’re a developer, and the rough edges no one mentions on the sales page.
Table of contents
- What is WC Vendors Pro?
- Free vs Pro: what you actually get for the upgrade
- Key features at a glance
- How a marketplace works for vendors and shoppers
- Installation and first run
- The admin settings, tab by tab
- Vendor management, commissions, and payouts
- The frontend vendor dashboard up close
- Real-world marketplace scenarios
- Developer reference: hooks, filters, templates
- Performance, compatibility, and gotchas
- How WC Vendors Pro compares to Dokan and WCFM
- Pricing and licensing
- Frequently asked questions
- Final thoughts
What is WC Vendors Pro?
WC Vendors Pro is a paid extension that turns a single-seller WooCommerce store into a multi-vendor marketplace. The free base plugin (WC Vendors Marketplace) gives you the bare minimum: a user role called "vendor", a commission rate per vendor, and an admin-only workflow where the marketplace owner edits everything on each vendor’s behalf. The Pro plugin is what makes the marketplace usable in practice. It adds a fully featured frontend dashboard where vendors register, add their own products (simple, variable, virtual, downloadable), manage their stock and attributes, handle their orders, talk to customers, see reports, and request payouts. The marketplace owner stays in wp-admin. Vendors never have to.
The plugin has been around for a long time. WC Vendors as a company predates Dokan and WCFM (the other two big marketplace stacks), and the codebase shows that age in both the good and bad senses. The hook surface is enormous. The PHP is straightforward. The UI is plain. The plugin does not try to be a SaaS platform with a glossy onboarding wizard. It does try to be the most surgical, customizable marketplace base for a WordPress developer who is willing to write code.
WC Vendors Pro requires two free plugins on top of WooCommerce: WC Vendors Marketplace (the open-source base) and WooCommerce itself. WC Vendors Pro hooks into both. You install all three together and configure once.
Free vs Pro: what you actually get for the upgrade
The free WC Vendors plugin is enough to prove a concept. It is not enough to run a real marketplace. Here is what changes when you add Pro on top:
- Frontend vendor dashboard. With the free plugin, vendors edit products inside
wp-admin, which means they see the full WordPress admin sidebar and learn WordPress in order to sell. With Pro, vendors get a single frontend page (driven by the shortcode[wcv_pro_dashboard]) that has its own nav, tabs for orders, products, coupons, settings, reports, and a vendor-side feedback inbox. Most marketplace owners flip the "Access to wp-admin" capability off so vendors can only see the frontend. - A real product editor. Free WC Vendors lets vendors add simple products via the WP admin product editor. Pro adds a frontend product form with proper UI for variations, downloadable files, attributes, gallery images, stock management, and product-level shipping. Variations actually work. Downloadable files actually work. You can add or remove fields with a filter.
- Commission rules beyond a global %. Free uses a single global percentage. Pro lets you set commission per vendor, per product, per category, per user role, or by tiers (e.g. 60% under $1,000 of monthly sales, 70% above). Combine them however you like and the controller picks the most specific rule.
- Vendor coupons. Vendors create coupons restricted to their own products. The free plugin has no coupon UI for vendors at all.
- Vendor ratings and reviews. Customers leave a rating per order on the vendor (not just the product). The vendor sees an inbox of feedback, can reply, and the marketplace owner can moderate.
- CSV import and export for products and orders. Important when a vendor is migrating a catalogue from another platform.
- Reports. Per-vendor charts (Chart.js), top products, top categories, and a sales breakdown. Free has none of this on the frontend.
If you only need vendors to upload SKUs and you’ll handle everything else manually in wp-admin, free WC Vendors is enough. If you want vendors to self-serve, Pro is the version you want.
Key features at a glance
- Vendor application and approval workflow. New users apply through the WooCommerce "My Account" page or a signup form you place anywhere. Owner sees a "Pending approval" queue. Approve once and the user becomes a vendor.
- Frontend dashboard. A single page on your site (configurable) hosts the entire vendor experience. Sub-pages live as nested routes under that page.
- Per-vendor stores. Each vendor gets a public store page at
/yourstore.com/<store-slug>/<vendor-slug>/with a logo, banner, about text, opening hours, social links, and a paginated product grid. - Commission engine. Default %, plus per-vendor, per-product, per-category, per-role, and tiered commission rules. Recalculate historical commissions from the admin.
- Payouts. Built-in PayPal Payouts (Mass Pay), CSV export for manual payouts, and a Stripe Connect add-on for split payments at checkout.
- Granular capabilities. 25+ on/off toggles for what a vendor can do (publish without approval, edit live products, manage own coupons, see others’ products, etc).
- Vendor coupons. Frontend coupon editor scoped to the vendor’s own products, with usage limits and exclusions.
- Reviews and ratings. Per-vendor ratings independent of WooCommerce product reviews.
- Email notifications. New vendor signup, order placed, product approved, withdrawal requested, and more. All customizable as WooCommerce emails.
- Bulk CSV import/export. Vendors can upload a CSV of products with attributes, variations, downloads, and images. Owner can export all commissions for a date range.
- Add-ons. Pro Shipping (per-vendor table rate), Stripe Connect, Tax module, Membership tiers, Bookings, Subscriptions, Simple Auctions.
How a marketplace works for vendors and shoppers
Walk through it from the customer side first. A shopper lands on your homepage. They browse products and see, alongside the title and price, a vendor name with a link. Click the link and you land on the vendor’s store page, which is just like a category page except every product on it is by one seller. Add a product to the cart and check out. The order processes normally through WooCommerce.
Behind the scenes, WC Vendors hooks into the order on creation. For every line item, it looks up which vendor owns the product, splits the order total minus shipping minus tax minus the marketplace’s cut, and writes a row to its commission table. That row sits in "Due" status until either you trigger a PayPal Payouts batch or you mark it paid manually. If you use Stripe Connect, the split happens at checkout instead and the vendor’s share lands directly in their connected Stripe account.
For the vendor, the flow is just as direct. They register through a signup form, fill in store name and tax info, wait for approval if the owner has manual approval on, and then log into the dashboard page. They see four big tiles on the home view: lifetime sales, this-month sales, orders, and a quick chart. They click "Products", hit "Add product", fill in the form (title, description, price, gallery, attributes, variations, downloadable files if any, stock, tax class), and save. The product either publishes immediately or goes into a "pending" queue, depending on the capability you’ve set. Orders arrive in the "Orders" tab as customers buy. The vendor clicks an order, sees the shipping address, adds a tracking number, marks it shipped. The customer gets an email.
Everything else (refunds, payouts, settling disputes, suspending a vendor) sits on the marketplace owner’s side in wp-admin.
Installation and first run
Steps the first time:
- Install and activate WooCommerce if it isn’t already.
- Install and activate the free WC Vendors Marketplace plugin from the WordPress.org repo.
- Install and activate WC Vendors Pro. On activation it runs a small setup wizard that creates the Vendor Dashboard page (containing
[wcv_pro_dashboard]), the Vendors page (containing[wcv_pro_vendorslist]), and a basic Terms page. - Go to "WC Vendors -> Settings" and walk through the tabs once. Commission % first, capabilities second, pages third.
- Set up payouts. Either drop in PayPal Payouts API credentials, choose manual, or install the Stripe Connect add-on and connect your Stripe account.
- Test the flow with a fake vendor account. Use a different email and an incognito window, apply, approve from admin, add a product, place an order with another user, then pay it out.
If you want to skip the bundled pages and build your own, you can. The dashboard is just a shortcode. The vendor list is just a shortcode. You can place them on any page or even inside a block layout. The "Pages" sub-tab under Display tells the plugin which pages hold which shortcodes so the breadcrumbs and dashboard links work correctly.
The admin settings, tab by tab
WP admin -> WC Vendors -> Settings. The plugin uses tabs instead of nested menu items, and the URL is admin.php?page=wcv-settings&tab=<name>. Here are the ones that matter, in the order I think about them.
General
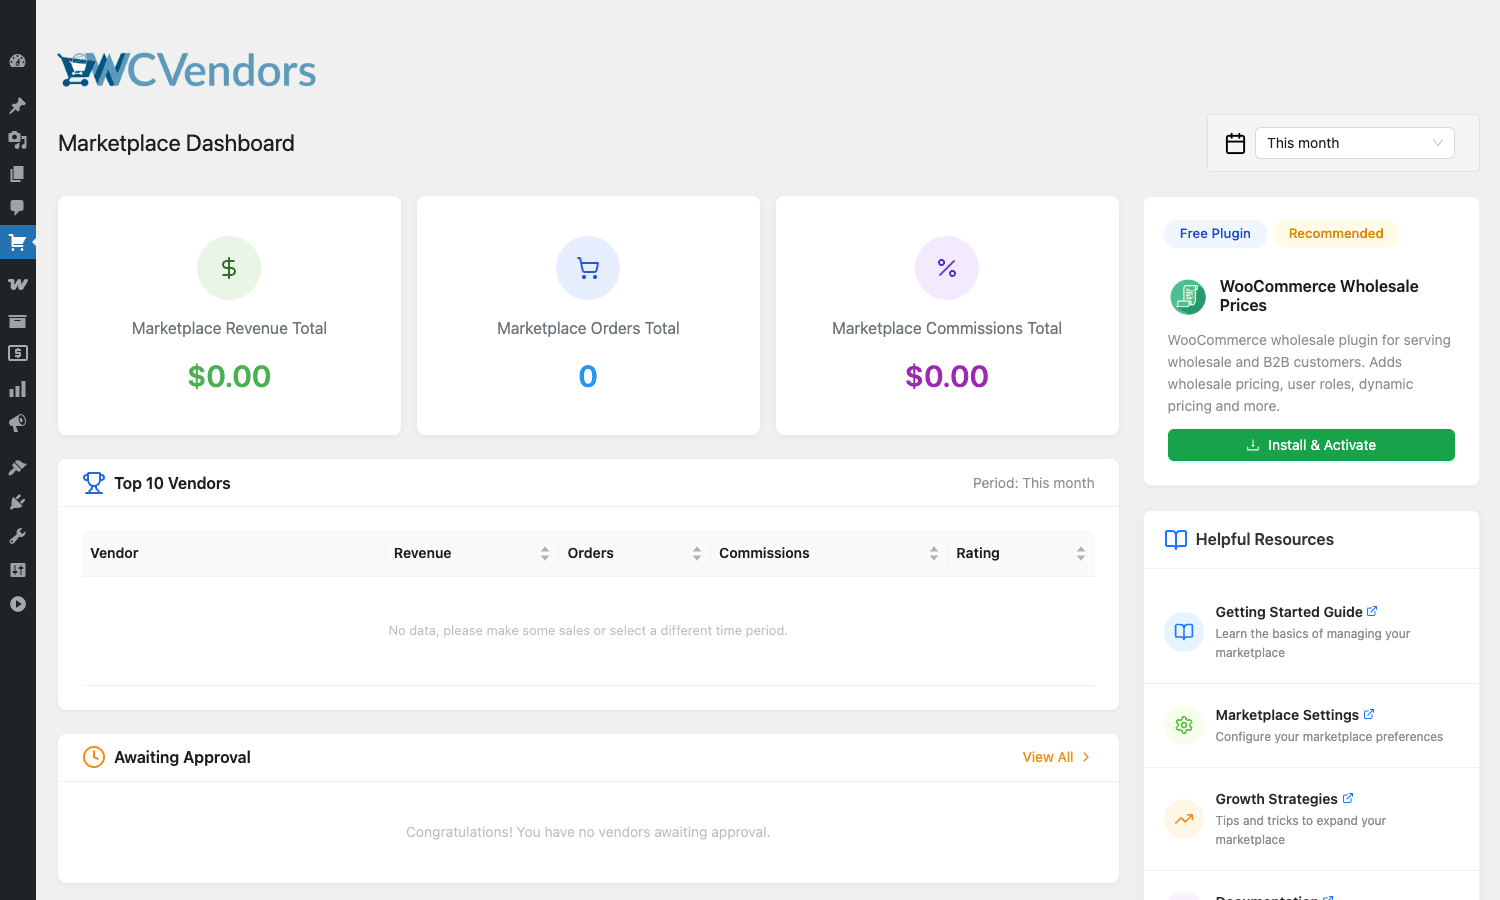
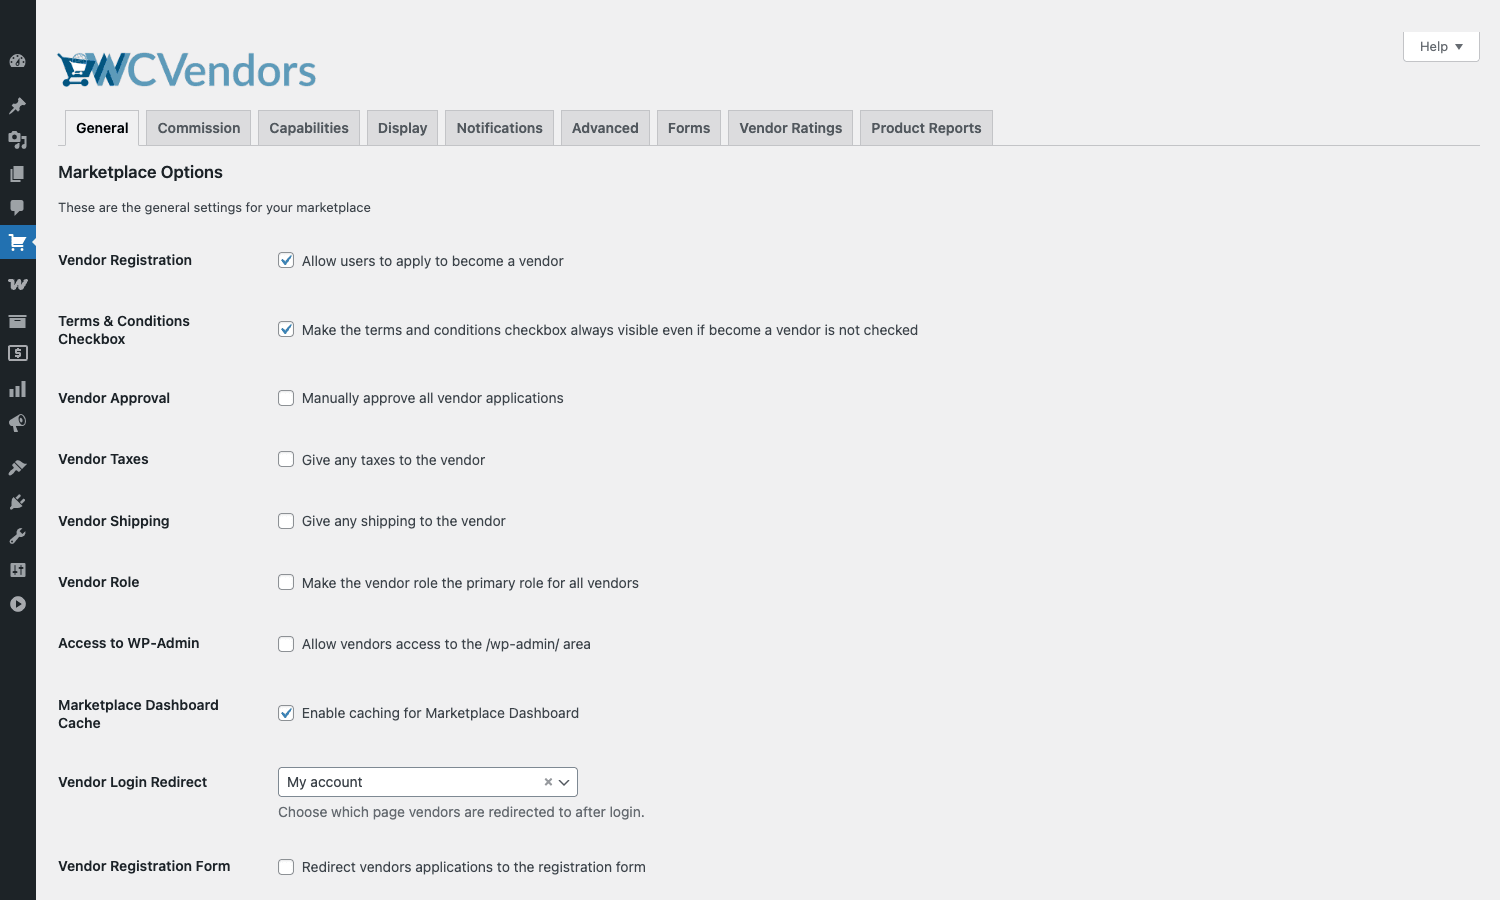
Top-level marketplace switches. Whether vendor registration is open at all. Whether to auto-approve applications or queue them. Whether to give vendors their own tax/shipping line on orders. Whether vendors can see wp-admin (usually off). What the vendor’s primary WP role is. A toggle for the marketplace dashboard cache (leave it on except when debugging numbers).
Commission
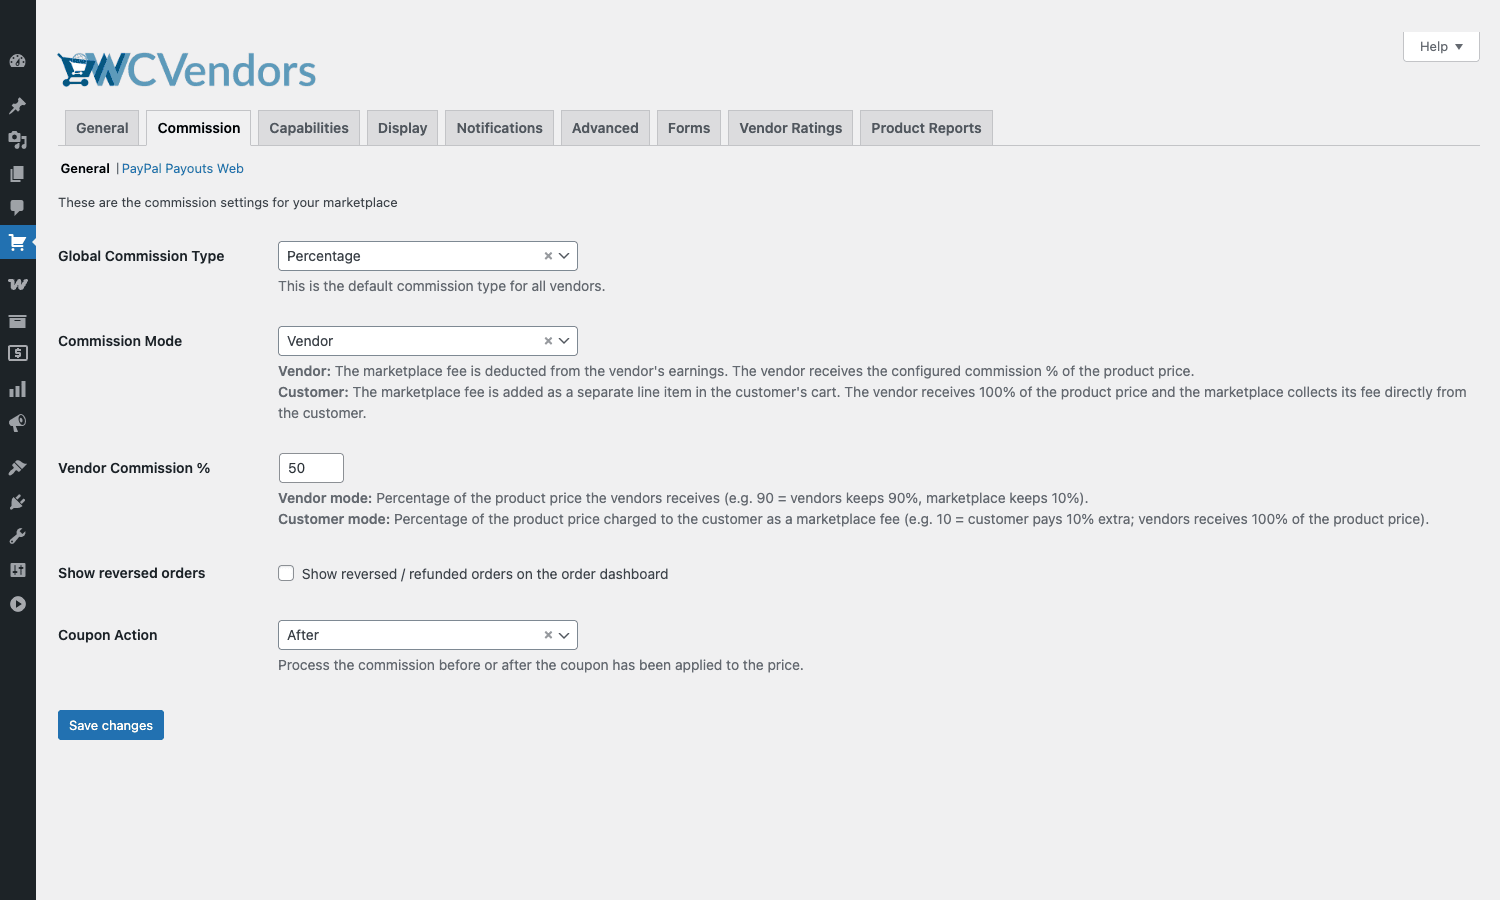
Default commission type (percentage or fixed), the commission mode (deducted from the vendor’s payout vs added as a separate marketplace fee), the global vendor commission percent, and the coupon action (do coupons apply before or after the commission split?). There’s a sub-tab "PayPal Payouts Web" that takes your PayPal API client/secret and the currency.
The "commission mode" choice matters more than people realize. In "Vendor" mode the marketplace fee comes out of the vendor’s earnings, so a product priced at $100 with a 20% marketplace cut means the vendor gets $80 and you get $20 and the customer pays exactly $100. In "Customer" mode the cut is added on top, so the vendor gets $100 and the customer pays $120. Pick once and stick with it; switching mid-marketplace breaks vendor expectations.
Capabilities
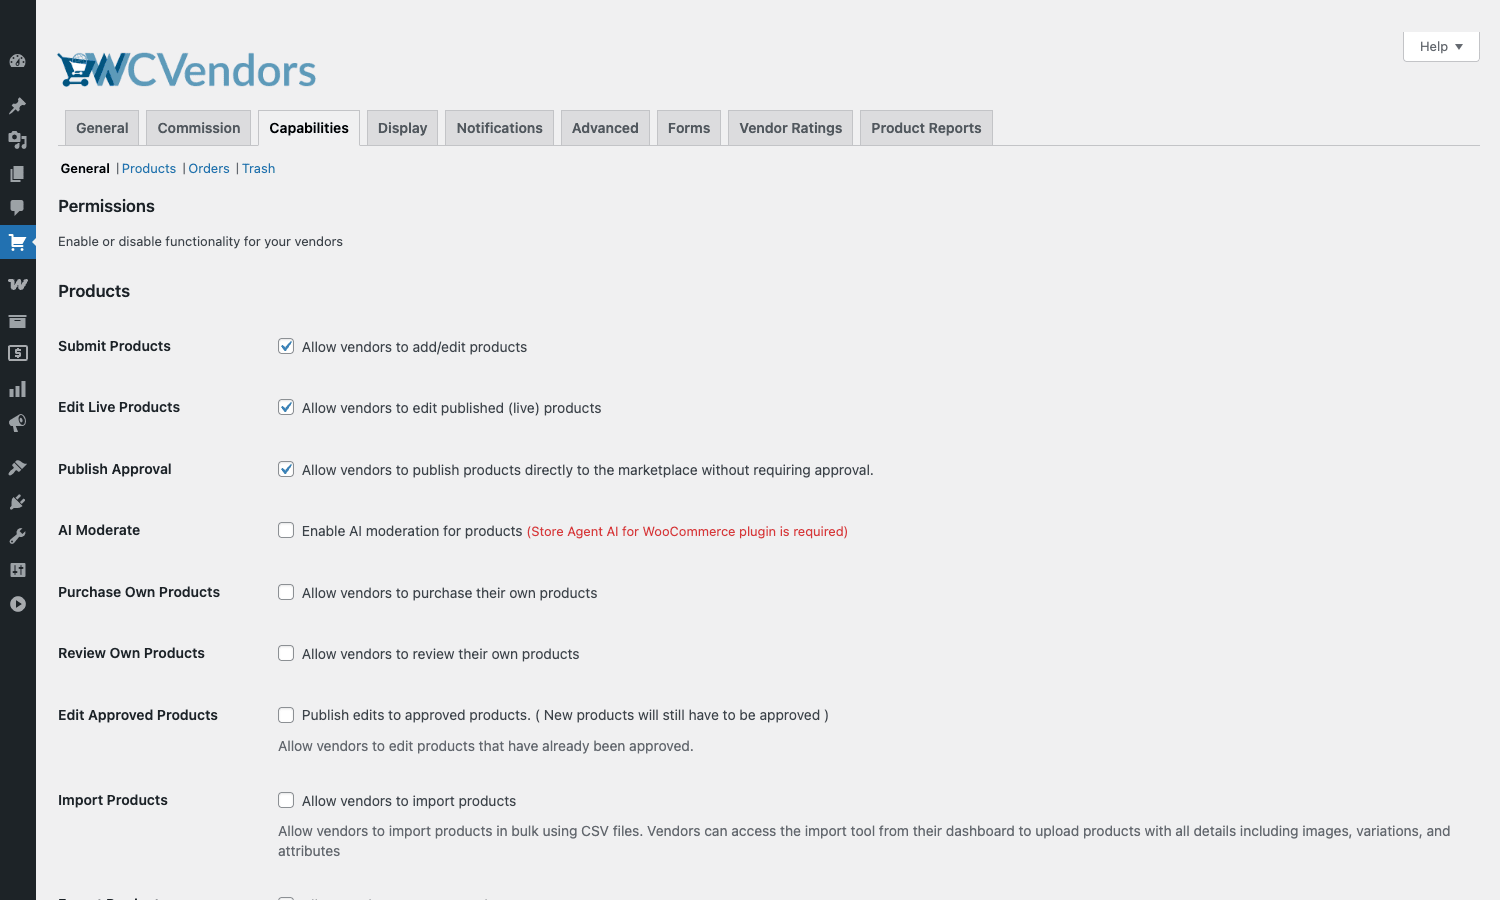
The single most important tab. This is where you tick or untick 20+ checkboxes that decide what vendors can do. Submit products. Edit live (already-published) products. Publish without approval. Manage their own coupons. View other vendors’ products. Import via CSV. Delete products. Edit attributes. Manage their own customers. Each one is independent.
A good starting policy for a new marketplace: allow submit, require approval for new products, allow edit live (but not publish edits to approved products without re-review), allow vendor coupons, deny view of other vendors. Lock everything else down until you trust your vendors.
Display
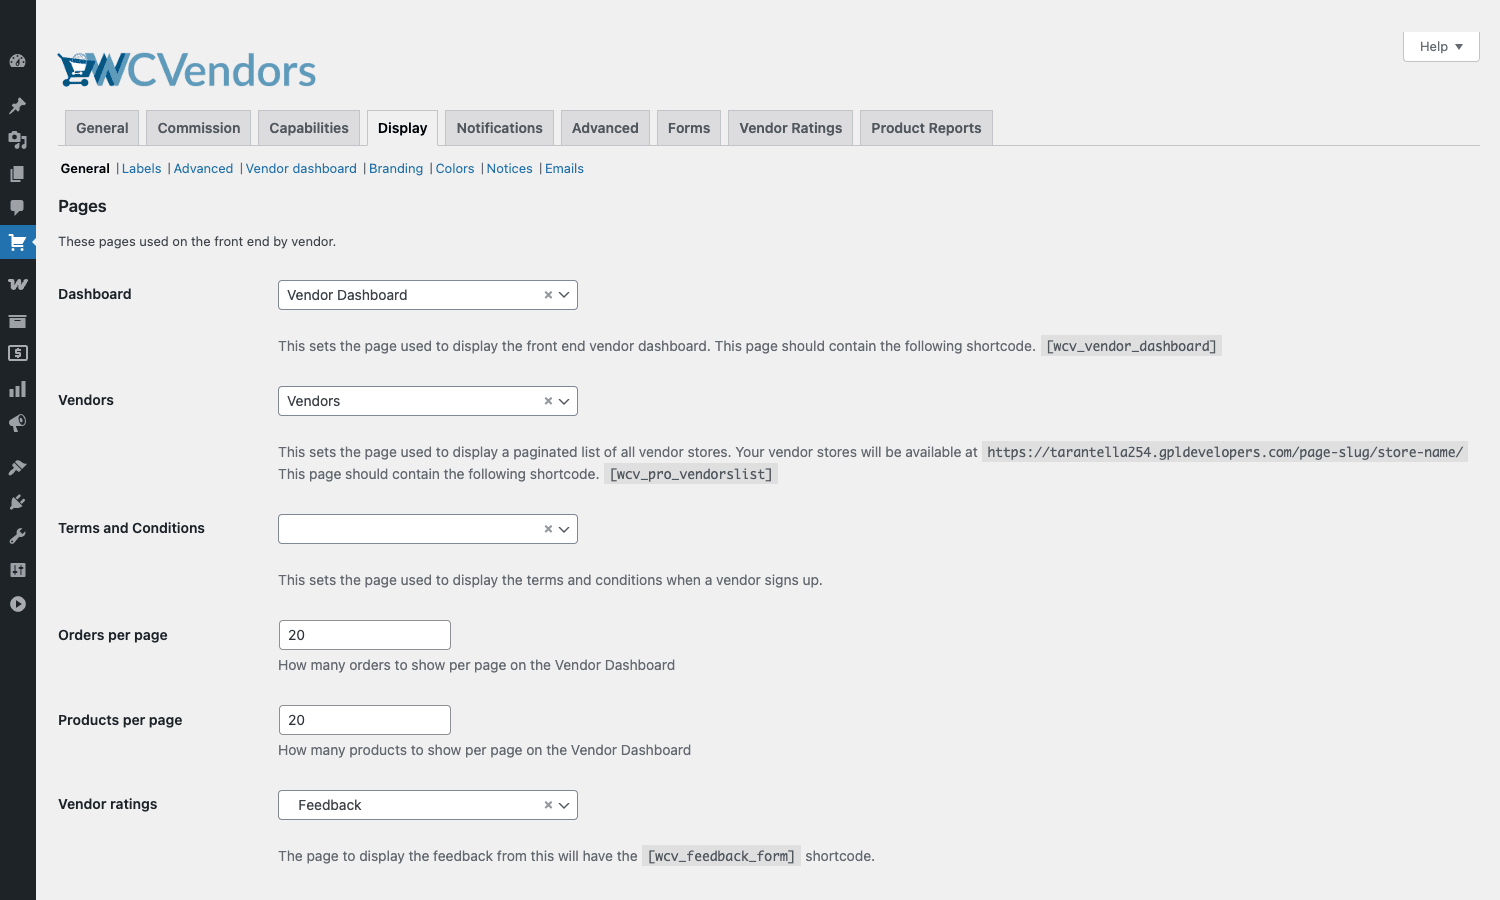
Where the pages live. Which page hosts the dashboard. Which page hosts the vendor list. Which page is the T&C. Which URL slug the store front sits under. How many orders and products to show per page on the dashboard. Whether to show vendor ratings in the store header.
The "Vendor dashboard" sub-tab inside Display also controls colour swatches that the dashboard uses for its charts and buttons. You don’t need to touch this unless you’re rebranding heavily.
Notifications
Toggle individual WooCommerce emails on or off for the marketplace. New vendor application, vendor approved, vendor product submitted, vendor order placed, vendor payout, etc. These are real WooCommerce emails so you can override their templates with the usual woocommerce/emails/*.php override mechanism.
Forms
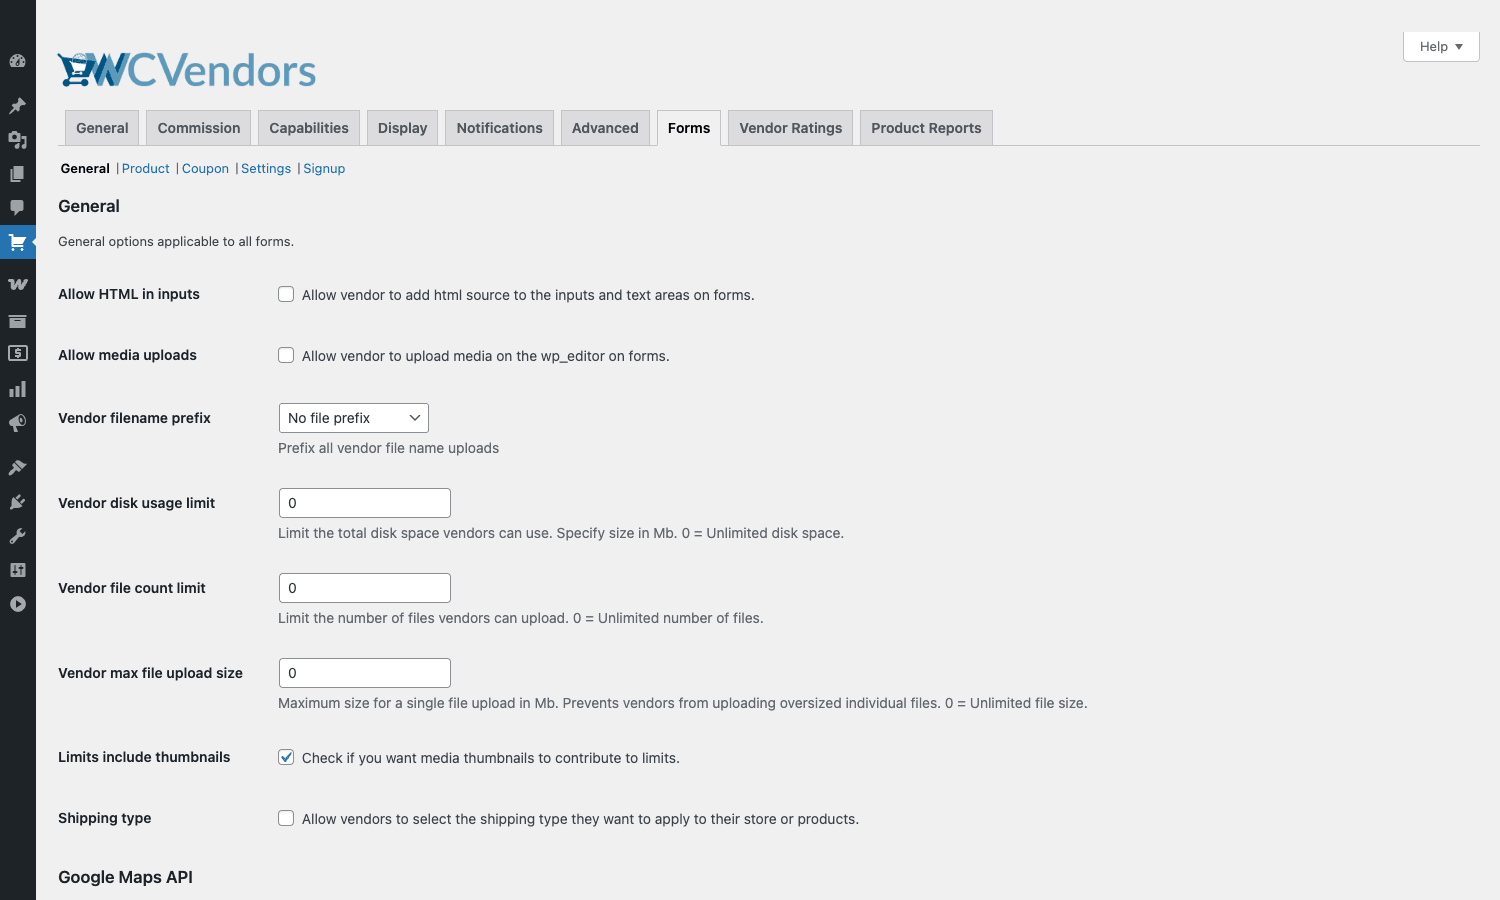
The form behaviours. Allow HTML in inputs (off by default). Allow media uploads from the frontend product form. Vendor disk usage limit. File count limit. Per-file size limit. Whether thumbnails count against the limit. Shipping type (let vendors pick per-product flat-rate or table-rate shipping). Google Maps API key for the store address picker.
The "Product" sub-tab inside Forms is where you choose which product types are available on the vendor form (simple, variable, downloadable, grouped, virtual). Hide grouped if your marketplace doesn’t need it. Hide variable if you only sell single SKUs and you want to keep the form simple.
Vendor Ratings and Product Reports
Vendor Ratings turns the customer-side rating form on or off and decides whether it’s mandatory after order completion. Product Reports is where you flip on the product reporting workflow so customers can flag a vendor product as counterfeit, misleading, or otherwise problematic; you get the reports in a WP_List_Table under "WC Vendors -> Products".
Advanced
Catch-all. Custom CSS, custom JS (the plugin lets you paste an arbitrary block that runs only on the dashboard page), nonce settings, and a "Reset Pro" button that nukes your settings back to defaults. Don’t click that one by accident.
Vendor management, commissions, and payouts
Two screens own this work.
WC Vendors -> Vendors is the vendor list. Each row is a vendor with status (active, pending, inactive), shop name, owner, outstanding commission, registered date, and an actions column. Click into a vendor and you can edit their store name, slug, commission rate (override the global), PayPal email, store description, banner, social links, and the products they own. Approve from "pending" or suspend from "active" right here.
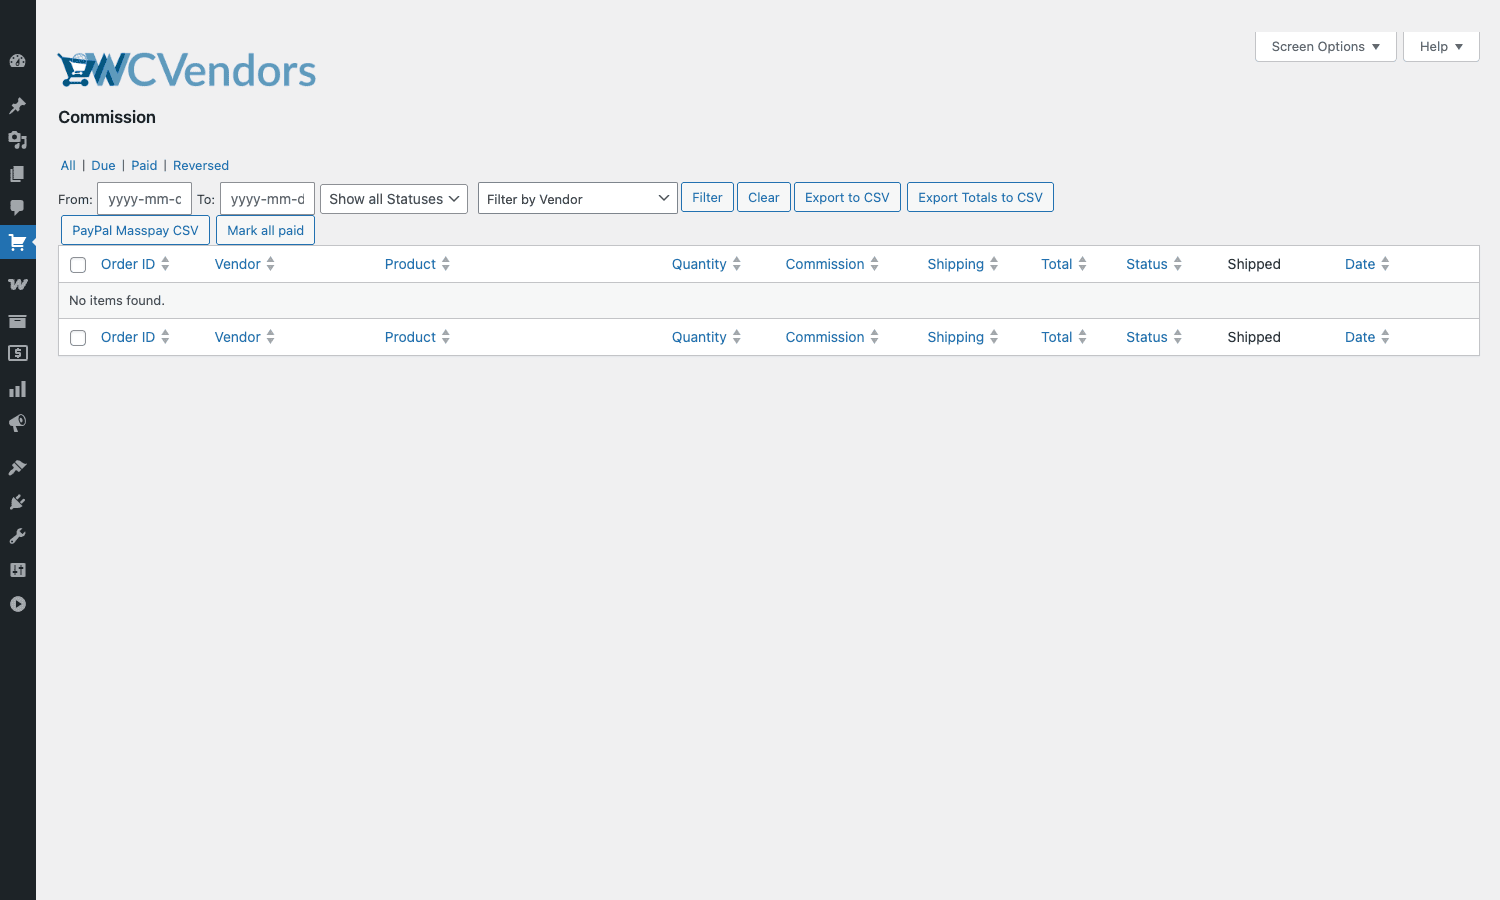
WC Vendors -> Commissions is the running ledger. Every commission row written by an order shows up here with order ID, vendor, product, quantity, commission amount, shipping, total, status (due/paid/reversed), shipped flag, and date. You can filter by date range, status, vendor, and export to CSV. Two buttons sit at the top: "PayPal Masspay CSV" (export a CSV ready to import into PayPal’s Mass Payments tool, the older one) and "Mark all paid" (manual close out, useful if you paid out by bank transfer outside the system).
PayPal Payouts (the API one, not the legacy Mass Pay) is configured under "WC Vendors -> Settings -> Commission -> PayPal Payouts Web". You paste in a client ID and secret from a PayPal app, set the currency, and then trigger payouts from the Commissions screen. The plugin batches and submits, and PayPal reports back per-recipient success or failure.
Stripe Connect (the add-on) is the more modern option. Vendors connect their own Stripe account during signup or from their dashboard settings. At checkout, Stripe splits the payment between the marketplace’s connected account and each vendor’s connected account in real time. The vendor’s funds settle to their bank without you ever holding the money, which is huge for compliance reasons in some jurisdictions.
The frontend vendor dashboard up close
The dashboard page renders the [wcv_pro_dashboard] shortcode. The output is a small left-side nav and a main panel that swaps between sub-views based on URL rewrites. The plugin registers rewrite rules so the URLs look natural (/vendor-dashboard/products/, /vendor-dashboard/orders/, /vendor-dashboard/coupons/) rather than query-string driven.
Default nav items, in order: Dashboard (home), Orders, Products, Coupons, Reports, Settings, Help. You can rearrange or hide any of these with the wcv_dashboard_pages_nav filter (we’ll come back to this in the developer section). You can also add brand-new tabs with wcv_dashboard_custom_pages.
Products tab. The big workhorse. Lists products with thumbnail, name, type, price, stock, status, sales, and actions. Add a new product through a long form: title, description, short description, product type (simple, variable, downloadable, virtual), gallery, regular and sale price (with optional sale schedule), categories, tags, attributes (with the option to make them variations), variations, stock management with low-stock notification, downloadable files (drag and drop), tax class, shipping class, dimensions and weight, purchase note, MOQ (minimum order quantity). Save as draft or publish. If "publish approval" is on, the product goes into a pending queue and the marketplace owner reviews.
Orders tab. Lists every order that includes one of the vendor’s products. Vendor sees the customer’s name and shipping address (and only the shipping address, by default; the billing address is hidden unless you flip a capability), the line items belonging to the vendor (other vendors’ items are not shown), per-item commission, shipping, total. Vendor can add tracking info, mark items shipped, add a note that’s emailed to the customer, and request a refund if your store allows that flow.
Coupons tab. Vendor creates coupons restricted to their own products. Fixed cart, percentage, fixed product. Usage limits, expiration, minimum/maximum spend, exclude sale items, individual use, free shipping, allowed/excluded emails. Standard WooCommerce coupon vocabulary, just scoped to one vendor’s catalogue.
Reports tab. Charts (built on Chart.js) of sales over time, top products by quantity, top products by revenue, top categories. Date range picker. Comma-format export.
Settings tab. Vendor’s own store settings. Store name, slug, description, logo, banner, address (with Google Maps autocomplete if you’ve added a key), opening hours, social links, payout method (PayPal email or Stripe Connect), default product visibility, signature for email notifications.
Real-world marketplace scenarios
The plugin is generic enough to be used very differently across stores. Five concrete examples:
A handmade-goods marketplace. Etsy-style. Vendors sell physical, mostly simple products. You enable per-vendor flat-rate shipping, require approval on new vendors (apply with a portfolio link), set a 15% commission, and run PayPal Payouts weekly. Capabilities allow submit and edit-live; deny publish-without-approval so you can catch counterfeit or inappropriate listings on first review.
A digital-asset marketplace. Themes, fonts, sound packs. Every product is downloadable. Vendors set their own price; you take 30% commission. Enable downloadable files in the form. Use Stripe Connect so revenue splits at checkout and you don’t have to chase payouts. Per-vendor sales charts let sellers see their week-over-week growth.
A B2B wholesale marketplace. Vendors are real businesses selling to retailers. Commissions are negotiated per vendor (override the global on a per-vendor basis). Use a vendor role override so each vendor sees only their own customers. Pair with WooCommerce Wholesale Pro for tiered B2B pricing and tax-exempt orders on top of the marketplace layer.
A subscription box marketplace. Vendors sell recurring boxes. Pair with WooCommerce Subscriptions and the WC Vendors Subscriptions add-on so each renewal generates a commission row automatically. Run payouts monthly.
A non-profit marketplace. Multiple charities sell merch and you keep nothing or only enough to cover Stripe fees. Set commission to 95-100%, use Stripe Connect for compliance (donor money never touches your account beyond fee processing), and use the vendor reports to show each charity their fundraising totals.
Developer reference: hooks, filters, templates
This is where WC Vendors Pro really pulls ahead. The plugin exposes about 360 filters and 270 actions, prefixed with wcv_ and wcvendors_. Almost every UI string, every layout decision, every business rule has a corresponding hook. Below are the ones you’ll actually use, grouped by what they let you do.
Customize the dashboard nav
The wcv_dashboard_pages_nav filter lets you reorder, add, or remove tabs in the vendor dashboard nav. To hide the Coupons tab globally:
add_filter( 'wcv_dashboard_pages_nav', function ( $pages ) {
 unset( $pages['coupons'] );
 return $pages;
} );
To add a brand-new tab with its own page content:
add_filter( 'wcv_dashboard_custom_pages', function ( $pages ) {
 $pages['my-stats'] = array(
 'label' => 'My Stats',
 'slug' => 'my-stats',
 'callback' => 'my_render_vendor_stats',
 );
 return $pages;
} );

function my_render_vendor_stats() {
 $vendor_id = get_current_user_id();
 echo '<h2>Stats for vendor '. esc_html( $vendor_id ). '</h2>';
 //... your custom report...
}
The plugin’s router automatically handles the URL /vendor-dashboard/my-stats/ and calls your callback.
Change the commission for a single product
By default the plugin walks: per-product rate -> per-category rate -> per-vendor rate -> per-role rate -> global rate. If you want to inject logic outside that hierarchy (say, give a vendor 80% on any product priced over $200), filter the commission result:
add_filter( 'wcv_commission_rate', function ( $rate, $product_id, $vendor_id ) {
 $price = (float) get_post_meta( $product_id, '_price', true );
 if ( $price > 200 ) {
 return 80;
 }
 return $rate;
}, 10, 3 );
Restrict which product types vendors can create
The frontend product form shows simple, variable, downloadable, virtual, and grouped by default. To hide grouped and external/affiliate types for everyone:
add_filter( 'wcv_disable_product_type', function ( $types ) {
 $types[] = 'grouped';
 $types[] = 'external';
 return $types;
} );
Send vendors somewhere specific after they log in
By default vendors land on the My Account page. To send them straight to their dashboard instead:
add_filter( 'wcv_login_redirect', function ( $url, $user ) {
 if ( in_array( 'vendor', (array) $user->roles, true ) ) {
 return get_permalink( get_option( 'wcvendors_dashboard_page_id' ) );
 }
 return $url;
}, 10, 2 );
Add an extra field to the vendor signup form
The wcv_form_input_after_<id> action fires right after a named input on any WC Vendors form. To add a "How did you hear about us?" select after the email field on signup:
add_action( 'wcv_form_input_after_user_email', function () {
 if (! is_account_page() ) {
 return;
 }?>
 <p class="form-row form-row-wide">
 <label for="vendor_referral">How did you hear about us?</label>
 <select name="vendor_referral" id="vendor_referral">
 <option value="">Pick one</option>
 <option value="google">Google search</option>
 <option value="friend">A friend</option>
 <option value="social">Social media</option>
 </select>
 </p>
 <?php
} );

// Save the answer to user meta when the form posts.
add_action( 'wcv_shop_settings_saved', function ( $user_id ) {
 if ( isset( $_POST['vendor_referral'] ) ) {
 update_user_meta( $user_id, 'vendor_referral', sanitize_text_field( wp_unslash( $_POST['vendor_referral'] ) ) );
 }
} );
Filter who counts as a vendor
The wcv_is_pending_vendor and wcv_is_vendor filters let you treat any user as a vendor regardless of WordPress role. Useful if you have a multi-role system or store the vendor flag in user meta:
add_filter( 'wcv_is_vendor', function ( $is_vendor, $user_id ) {
 if ( $is_vendor ) {
 return true;
 }
 return (bool) get_user_meta( $user_id, '_is_marketplace_seller', true );
}, 10, 2 );
Override a template
WC Vendors Pro ships every frontend HTML fragment as a template file under wp-content/plugins/wc-vendors-pro/templates/. Override by copying the file you want to the same relative path inside your child theme, prefixed with wc-vendors-pro/. So to customize the order detail page, copy templates/dashboard/orders/details.php to wp-content/themes/<your-child-theme>/wc-vendors-pro/dashboard/orders/details.php and edit there. The wcv_dashboard_template_base_dir filter lets you point WC Vendors at a totally different base directory if you want to keep template overrides in a plugin instead of a theme.
Action: react to a new commission row
Whenever the plugin writes a commission row to the database, it fires wcv_order_commissions_calculated with the order ID. Hook in to push an audit event, send a Slack notification, or update an external accounting system:
add_action( 'wcv_order_commissions_calculated', function ( $order_id ) {
 $order = wc_get_order( $order_id );
 if (! $order ) {
 return;
 }
 // Example: ping an internal endpoint.
 wp_remote_post( 'https://accounting.internal/marketplace/order', array(
 'body' => array(
 'order_id' => $order_id,
 'total' => $order->get_total(),
 ),
 ) );
} );
Other hooks worth knowing
wcv_dashboard_quick_links– the tile shortcuts on the dashboard home view.wcv_pro_dashboard_style,wcv_pro_store_style– swap the dashboard or store CSS file with your own.wcv_pro_excluded_order_statuses– which order statuses skip commission calculation (default skips cancelled, refunded, failed).wcv_allowed_html_tags– the sanitization allowlist for free-text fields. Tighten this if you’ve enabled "Allow HTML in inputs".wcv_get_product_moq– per-product minimum order quantity override.wcv_my_account_dashboard_url– swap the My Account "Vendor Dashboard" link target.wcv_orders_table_rows– mutate the row data passed to the vendor orders table.wcv_commission_tiers_panel_fields– extend the commission tier UI with custom fields.wcv_form_helper_custom_validation– register custom validation rules for the form helper.
Class entry points worth knowing if you’re going to read the source: WCVendors_Pro_Dashboard (the router), WCVendors_Pro_Product_Form (the big product editor), WCVendors_Pro_Commission_Controller (commission math), WCVendors_Pro_Vendor_Controller (vendor profile API), WCVendors_Pro_Form_Helper (the form rendering primitives).
Shortcodes
The Pro plugin registers five shortcodes worth remembering:
[wcv_pro_dashboard]– the entire vendor dashboard.[wcv_pro_dashboard_nav]– just the nav menu, useful if you want to render it in your own sidebar.[wcv_pro_vendorslist]– a paginated, searchable list of vendors. Accepts attributes for orderby, per_page, columns.[wcv_pro_vendor_totalsales]– render a vendor’s total sales count anywhere.[wcv_pro_product_totalsales]– render a single product’s lifetime sales count.
The free plugin also exposes [wcv_stores] and [wcv_recent_products], which work on Pro installs too.
Performance, compatibility, and gotchas
WC Vendors Pro adds a meaningful amount of database work to your WooCommerce store. Every order triggers a vendor lookup per line item and one commission row insert per line item. On a busy store with many small orders, the commissions table grows fast (it’s the <prefix>_pv_commission table). Index health matters. The plugin ships with a "Cache for Marketplace Dashboard" toggle which caches the admin overview numbers; leave it on in production.
The frontend dashboard page does not play perfectly with full-page caching plugins. WP Rocket, LiteSpeed Cache, and WP Super Cache will cache the dashboard for the wrong user if you don’t exclude its URL pattern. Always add /vendor-dashboard/* (or whatever your dashboard slug is) to the cache exclusion list. Pair WC Vendors with WP Rocket and you get good results everywhere else on the site if you set this exclusion.
Edge cases worth knowing about
The plugin’s auto-created pages can drift. If you delete the dashboard page by accident, the dashboard URL breaks and nothing alerts you. Recreate the page, add [wcv_pro_dashboard], and re-select it under Display -> Pages.
If a customer buys from two vendors in the same order, the order ships in two halves and you get two commission rows. Customer sees one order. Vendors see only their half. Refunds split correctly, but partial refunds need manual adjustment in the commission ledger.
The free WC Vendors plugin and the Pro plugin disagree on a few defaults around capabilities. If you’ve been on free and you upgrade, walk through the capabilities tab once and re-tick to your real policy. Don’t trust the migration to preserve every nuance.
The product form upload field uses the regular WordPress media library. If your media library is huge, the modal can be slow on a vendor’s first open. The wcv_form_product_media_uploader_* actions let you swap to a lighter-weight uploader if performance becomes an issue.
WC Vendors Pro’s email templates inherit WooCommerce’s email styling, but several emails are sent only to vendors (not customers). If you’re using a transactional mail provider that filters by recipient, you’ll see two flow types: WooCommerce customer-facing and WC Vendors vendor-facing. Both can be templated.
WPML and Polylang are both officially supported. The plugin’s translatable strings cover most of the dashboard, but a handful of vendor-facing labels live in template files; if you change the language, copy the relevant template into your child theme and translate inline.
GDPR: the plugin extends WordPress’s privacy export/erase tools so a vendor can export and delete their store data on request. The commission ledger keeps anonymized rows after erasure so your bookkeeping stays whole.
Stripe Connect specifics
The Stripe Connect add-on is a separate purchase. Once installed, vendors connect their Stripe account from their dashboard Settings tab via Stripe’s OAuth flow. The marketplace owner’s Stripe Connect platform account holds the master integration. Funds settle direct to the vendor; the marketplace’s cut comes through automatically via Stripe’s application_fee parameter. The only catch is you cannot mix Stripe Connect with PayPal Payouts for the same vendor. Pick one or the other per vendor.
How WC Vendors Pro compares to Dokan and WCFM
The three plugins solve roughly the same problem but with very different design philosophies. Here’s the short version.
Dokan Pro has the prettiest out-of-the-box UI and the most marketing polish. It bundles many features into its Pro tiers (geolocation, live chat, vendor verification, store SEO controls) that other plugins keep as add-ons. It’s also the easiest to set up if you’ve never built a marketplace before; the onboarding wizard genuinely helps. Downsides: it’s pricier, the codebase is larger which means more surface for bugs, and theme overrides take more care because the dashboard markup is busier. See our full Dokan Pro walkthrough for a side-by-side.
WCFM Marketplace Ultimate is the kitchen-sink option. Audit logs, membership tiers, ledger module, delivery boy role, bookings, conversations module, and a stack of REST APIs are all bundled. The vendor dashboard is the densest of the three (which can be a positive or negative depending on your vendors). It’s also the cheapest of the "premium" three. See our WCFM walkthrough for the full tour.
WC Vendors Pro sits in the "small and customizable" niche. The base plugin is leaner. The settings are fewer. The UI is plain. But the hook surface is by far the largest of the three relative to code size, which means you can rewrite almost any piece of behaviour without forking. If you’re a WordPress developer building a bespoke marketplace for a client and you want to write PHP rather than juggle settings, WC Vendors Pro is the friendliest base. If your vendor population is non-technical and you’d rather have a polished dashboard with everything turned on, Dokan or WCFM will get you there faster.
WooCommerce Product Vendors (Automattic’s official extension) and YITH Multi Vendor sit in the lower tier. Product Vendors is genuinely thin and admin-only. YITH is fine for very small marketplaces but doesn’t try to compete with the big three on feature count.
Pricing and licensing
WC Vendors sells Pro from wcvendors.com at the upstream price (currently $199/year base, with bundles for Pro + Pro Shipping + Stripe Connect at higher tiers). License renewals get you updates and support; the plugin keeps working without a license but you stop getting updates from the company directly.
GPL Times. It’s the same plugin code, GPL-licensed (because the upstream is GPL), maintained alongside the major updates from wcvendors.com. We also carry the add-ons that work with it: WC Vendors Stripe Connect, WC Vendors Membership, WC Vendors Bookings, and WC Vendors Subscriptions.
For a real production marketplace handling many vendors and meaningful revenue, I’d still buy direct from wcvendors.com just to have support access. For staging, development, hobby projects, or to evaluate before paying upstream, GPL Times is the simpler path.
Frequently asked questions
Can I use WC Vendors Pro without the free WC Vendors plugin?
No. The free plugin (WC Vendors Marketplace) is the base. Pro requires it. Install free first, then activate Pro on top.
Does WC Vendors Pro work with multiple currencies?
Yes, in two ways. WooCommerce’s own currency setting works as normal (one currency per store). If you need to display prices in different currencies, pair with FOX Currency Switcher Pro for the customer-facing switch; commission math always runs in the store’s base currency.
Can vendors create variable products?
Yes. The frontend product form supports variable products with attributes that become variations, per-variation pricing, per-variation stock, and per-variation images. The variation editor is essentially WooCommerce’s own with a frontend skin.
Can vendors sell downloadable digital products?
Yes. Mark the product as "Downloadable" in the form, drag in the file(s), set a download limit and expiry. The customer gets the WooCommerce download email like any other digital order. Commission processes the same way.
What payment methods can vendors get paid through?
Three out of the box: PayPal Payouts (modern API), PayPal Mass Pay CSV (legacy, still useful for batch payments), and manual mark-as-paid. With the Stripe Connect add-on you get fourth option: real-time split payments at checkout.
How do refunds work on a marketplace order?
The marketplace owner (you) processes the refund in the regular WooCommerce order screen. WC Vendors Pro then reverses the corresponding commission row (or rows, if the order had multiple vendors) so the vendor’s outstanding balance goes down by the refunded amount. Partial refunds can need manual adjustment if you want to refund less than the full line.
Will WC Vendors Pro work with my theme?
Almost always yes. The plugin doesn’t make any unusual assumptions about themes; it renders the dashboard inside whatever container your theme’s the_content() outputs. The vendor store pages use a template the plugin ships, but you can override with a child-theme template if your theme has a strong product-archive style you want to match.
What happens to vendor products if a vendor account is deleted?
You choose. Settings let you reassign the products to another vendor, leave them ownerless under the marketplace, or trash them. The commission ledger retains the historical rows either way for accounting.
Can I run a WC Vendors Pro marketplace alongside a regular WooCommerce store on the same site?
Yes. Products without an assigned vendor (your own products) and products with a vendor coexist. The marketplace cut only applies to products owned by vendors. Your own products keep 100%.
Does the plugin support REST API access?
The Pro plugin itself doesn’t ship many REST endpoints (it uses admin-ajax internally), but the free base WC Vendors plugin exposes vendor data through standard WP user endpoints, and the WooCommerce REST API exposes products and orders with vendor info on the product side. For deeper integrations, hook your own custom REST routes on top.
What about taxes?
Vendor taxes are a tab in General settings. Either the marketplace handles all tax centrally (you collect, you remit) or vendors handle their own (toggle the "give any taxes to the vendor" switch). For marketplace facilitator laws in the US, you almost always want central collection.
How many vendors can WC Vendors Pro handle?
There’s no hard limit. The plugin runs fine on stores with hundreds of vendors. Beyond that the commission table grows large, so make sure your MySQL is sized appropriately and your full-page cache excludes the dashboard URLs. The marketplace dashboard cache toggle helps in admin too.
Final thoughts
I’ve used WC Vendors Pro on three real marketplaces and each time the experience was the same: the first day is slow because you’re walking through settings and capabilities, and after that it stays out of your way. The big sell isn’t the UI, it’s the developer hook surface. If a client says "actually we need vendors to enter VAT IDs on signup, and the commission should drop 5% if the order ships internationally, and the dashboard nav should have a ‘My Reviews’ tab", you can do every one of those things with three filters and an action. No forking, no patches, no fighting the plugin.
Pick this plugin when you want a small, transparent codebase and you don’t mind writing a few hooks. Pick Dokan when you want the polished dashboard out of the box. Pick WCFM when you want every feature bundled and you don’t mind the density. All three will run a marketplace; they just optimize for different owners.
Whichever you pick, do the same homework on day one: choose your commission mode (vendor-deducted vs customer-added) and stick to it, set your capabilities policy before you let any real vendor in, and add the dashboard URL to your cache plugin’s exclusion list before you go live. Those three calls are what separate a marketplace that runs cleanly from one that breaks weirdly in week three.