

I used to leave the WooCommerce checkout exactly as it shipped. Default fields, default order, default everything. Then I actually watched session recordings of people buying, and saw a customer tab back and forth over the "Company name" field three times, unsure whether to fill it in, before abandoning. That field was asking for nothing the store needed. It was pure friction, and it was costing sales.
The checkout is the most expensive real estate on your store. Every field is a small tax on the customer’s patience, and every missing field is data you’ll chase by email later. WooCommerce Checkout Field Editor is the official tool for fixing both problems without code. This is a thorough, honest guide to using it well: the full field editor, the one big compatibility caveat nobody mentions until it bites them, the code-first alternative for when you outgrow the UI, and a real troubleshooting section for when fields won’t show up.
Table of Contents
- What is WooCommerce Checkout Field Editor?
- Why your checkout fields matter more than you think
- The big caveat: classic checkout vs the block checkout
- A tour of the field editor
- Adding a custom field, step by step
- What to remove, what to add
- Editing checkout fields in code
- Don’t break your checkout: field mistakes that cost sales
- Checkout Field Editor vs the alternatives
- Troubleshooting: when fields don’t show or save
- Performance, compatibility, and gotchas
- Pricing and licensing
- FAQ
- Final thoughts
What is WooCommerce Checkout Field Editor?
WooCommerce Checkout Field Editor is an official WooCommerce extension that lets you add, edit, remove, and reorder the fields on your checkout page from a simple admin screen, no code required. It’s the canonical, first-party answer to "how do I change the fields on WooCommerce checkout?".
It manages the three groups of fields WooCommerce shows at checkout: Billing, Shipping, and Additional (the extra fields, including the order-notes area, that appear after the address blocks). For each field you control the label, placeholder, type, whether it’s required, its validation, and its position. You can also hide a default field you don’t want without deleting it outright.
Because it’s built by WooCommerce, the custom values it captures flow into the order, the admin order screen, and the order emails, the way a first-party plugin should. That last part matters: a checkout field plugin that doesn’t carry data to the order is worse than useless.
It is a focused, no-code tool. It does not try to be a form builder or add conditional logic. That focus is both its strength (it’s simple and authoritative) and its limit (we’ll get to the richer alternatives). You can grab WooCommerce Checkout Field Editor from GPL Times and have it reshaping your checkout in about ten minutes, with one important compatibility check first.
Why your checkout fields matter more than you think
Skip this if you already obsess over checkout conversion. If you don’t, here’s why a boring-sounding "field editor" is one of the highest-impact tools on your store.
Every field at checkout does one of three things: it earns its place, it adds friction, or it actively loses you the sale. Baymard Institute’s checkout research has consistently found that the average checkout asks for more fields than it needs, and that each unnecessary field measurably drops completion. The default WooCommerce checkout is reasonable, but it’s generic. It shows a "Company name" field to a store that only sells to consumers, asks for a second address line nobody fills, and never asks for the one thing your fulfilment team actually needs.
There are four reasons to take control of your fields:
- Conversion. Fewer, clearer fields mean fewer reasons to bail. Removing two fields a B2C store never uses is free money.
- Operations. Adding the right field (a delivery date, a PO number, gift-message text) saves a back-and-forth email on every order.
- Compliance. Under GDPR you should only collect data you can justify. An editor lets you strip fields you can’t.
- Localisation. Some markets need a field others don’t (a tax ID in the EU, a building number where addresses work differently).
So the goal isn’t "edit fields for the sake of it". It’s to make the checkout ask for exactly what you need, in the clearest order, and nothing more. The editor is how you do that without touching a line of PHP.
The big caveat: classic checkout vs the block checkout
This is the single most important thing to understand before you buy, and it’s the thing most write-ups quietly skip. So let’s be blunt about it.
WooCommerce now ships two different checkouts. The older classic (shortcode) checkout, built on [woocommerce_checkout], and the newer block checkout, built from Gutenberg blocks. New stores increasingly default to the block checkout.
WooCommerce Checkout Field Editor works with the classic checkout only. The plugin literally declares itself incompatible with the cart and checkout blocks. On a store running the block checkout, the fields you add in the editor will not appear, and WooCommerce shows you (the admin) a warning that says exactly that:
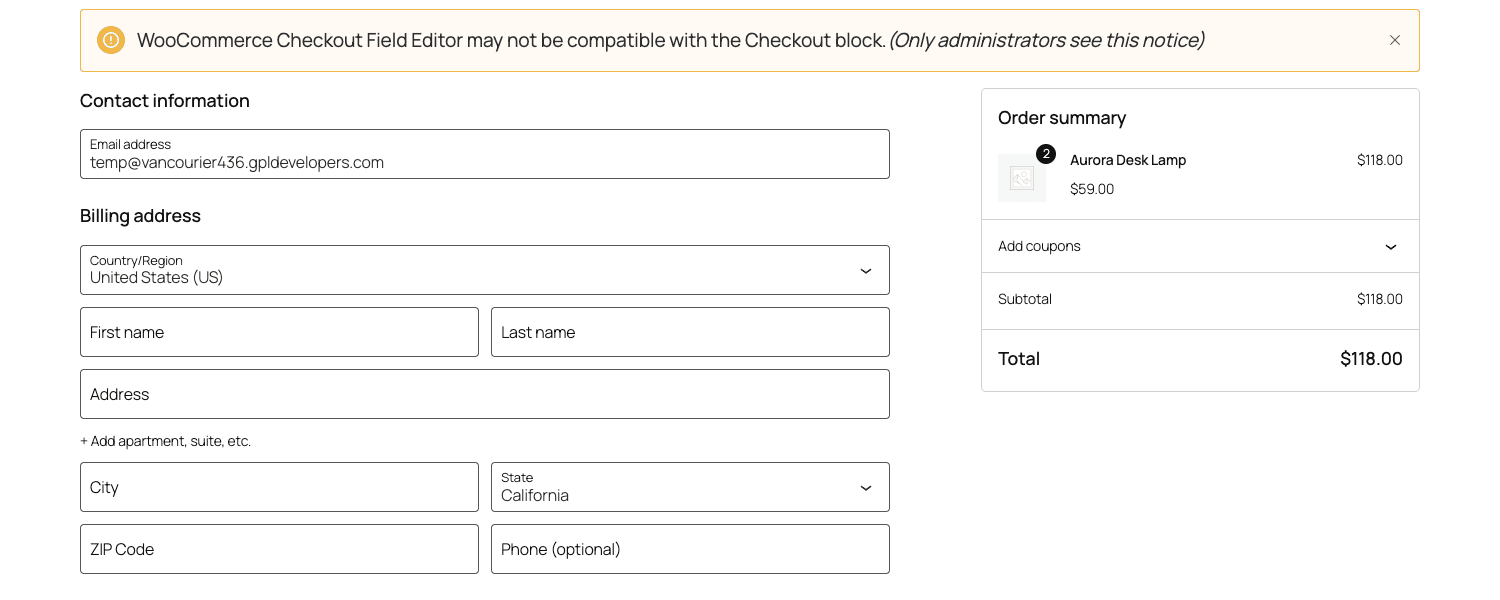
That yellow banner ("WooCommerce Checkout Field Editor may not be compatible with the Checkout block") is WooCommerce telling you the truth. If you see it, your edited fields are not rendering for customers.
You have three honest options:
- Use the classic checkout. If your Checkout page uses the block, open it in the editor, select the Checkout block, and choose Switch to classic checkout (or replace the page content with the
[woocommerce_checkout]shortcode). Then this plugin works fully. - Use the block checkout’s own field API. WooCommerce’s forward path for the block checkout is the Additional Checkout Fields API, a code-based way to register fields that the block checkout supports natively. It’s a different mechanism, covered in the code section below.
- Pick a plugin that supports blocks. Some third-party field editors have added block-checkout support; we compare those later.
Heads-up: decide this first, not after you’ve spent an hour configuring fields. Check whether your Checkout page is the block or the classic version before you buy, because it determines whether this plugin is the right tool at all.
A tour of the field editor
With that settled, the editor itself is refreshingly simple. After you upload and activate the plugin (Plugins » Add New » Upload Plugin, then activate, there’s no setup wizard), you’ll find it at WooCommerce » Checkout Fields. It opens on three tabs, one per field group.
The Billing Fields tab is where most of the action is:
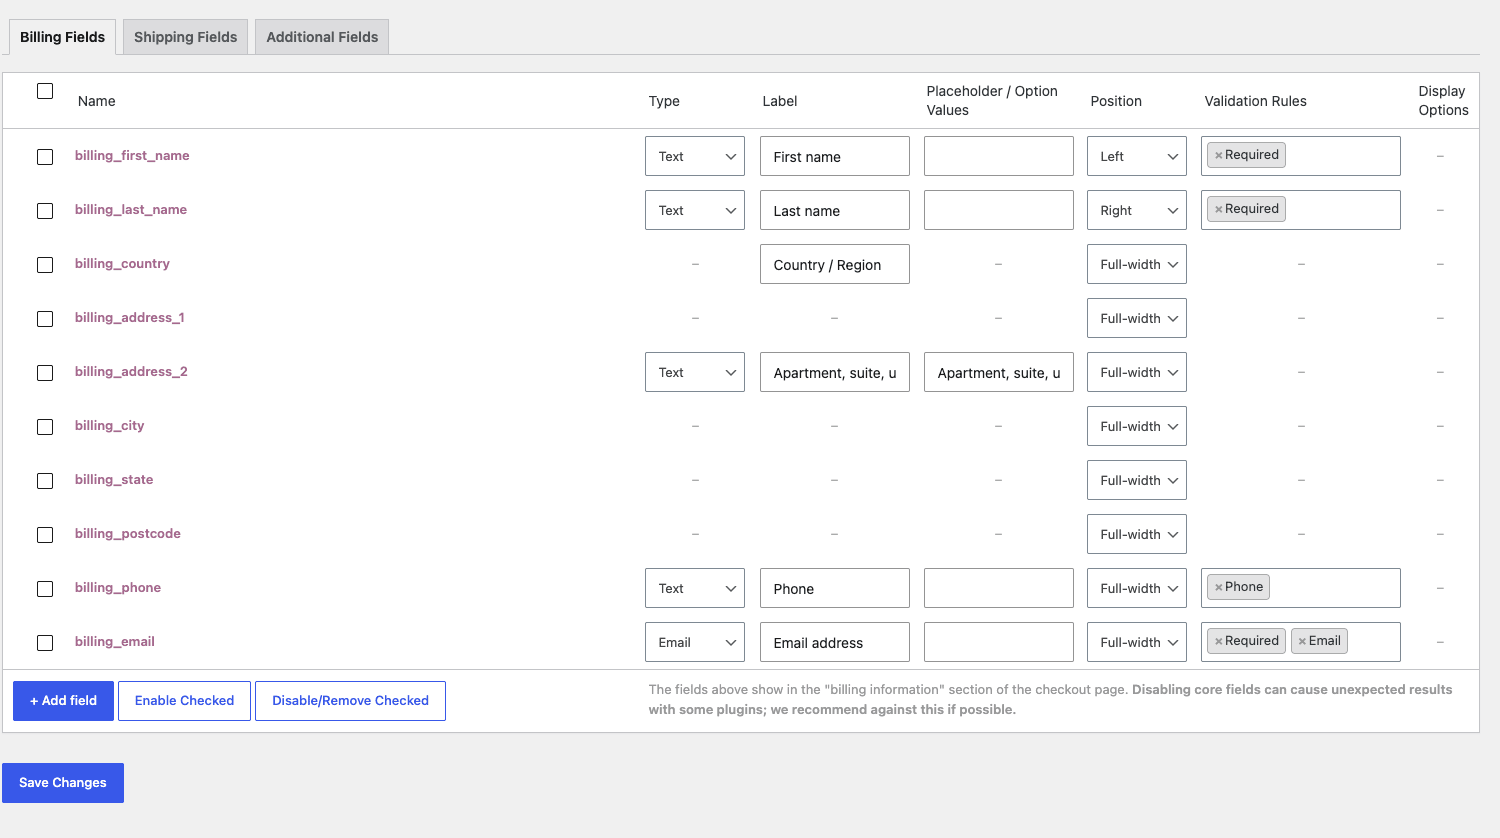
Each row is one field, and the columns give you full control:
- Name is the field key (
billing_first_name, and so on). Custom fields get whatever key you give them. - Type sets the input. The editor offers ten types: text, textarea, select, multiselect, radio, checkbox, password, email, date picker, and heading (for a section title). ("Number" isn’t a separate type; it’s a validation rule that switches a text field into a number input.)
- Label and Placeholder are what the customer reads. Clear labels do real work here.
- Position controls layout: full-width, left, or right (so two fields can sit side by side, like first and last name).
- Validation Rules are chips you add per field: Required, Email, Phone, Number, and so on. This is how you stop bad data at the door.
- Display Options control where the captured value appears afterwards: in order emails and on the order detail pages in admin.
You reorder fields by dragging them, and you hide a default field with Disable/Remove Checked rather than deleting it, which is safer. WooCommerce even warns you, right on the screen, that disabling core fields "can cause unexpected results with some plugins; we recommend against this if possible". Believe that warning.
The Additional Fields tab governs the fields that appear beneath billing and shipping, including the order-notes area:
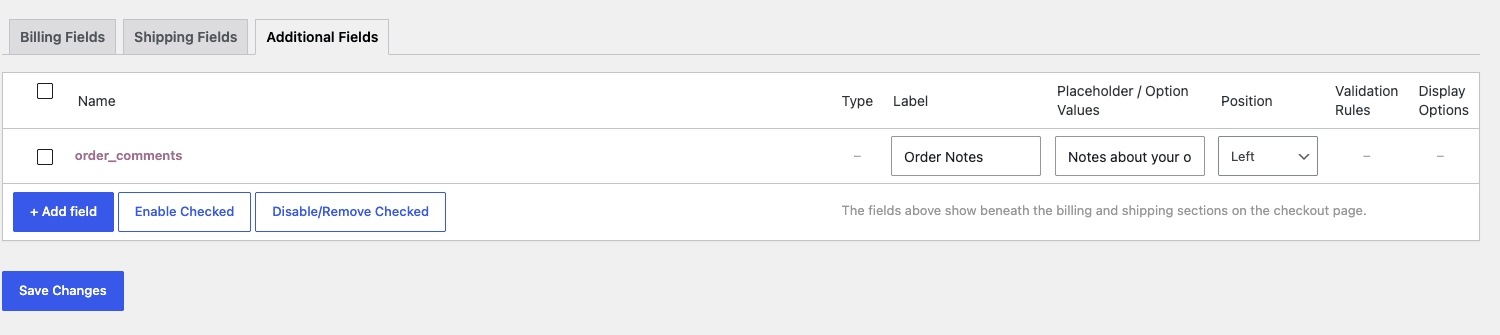
This is the natural home for custom fields that aren’t part of an address, a delivery date, a gift message, a "how did you hear about us?" dropdown. The Shipping Fields tab mirrors Billing for the shipping address. Between the three tabs you can reshape the entire checkout.
Adding a custom field, step by step
Say you sell to businesses and need a VAT or tax number on the invoice. Here’s the full shape of adding it:
- Go to WooCommerce » Checkout Fields and pick the group it belongs in (a VAT number is part of billing, so the Billing Fields tab).
- Click Add field. A new editable row appears at the bottom of the table.
- Fill in the details. Give it a name (
vat_number), a label ("VAT / Tax number"), a placeholder ("e.g. GB123456789"), choose the type (Text), and set the position.
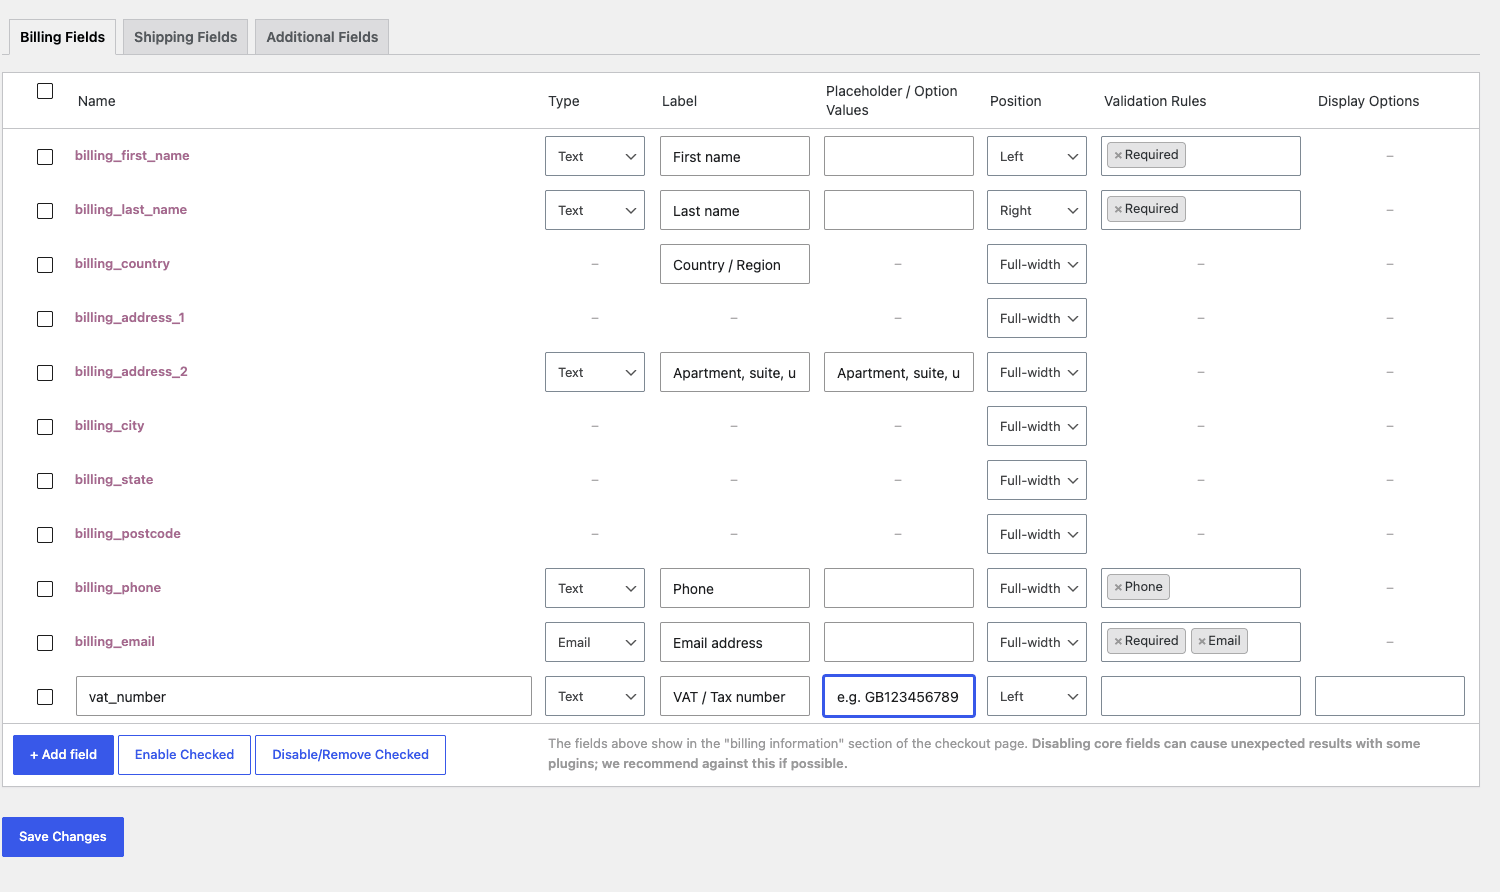
- Set validation. Add the Required chip only if you genuinely need it (a forced field hurts conversion, more on that below).
- Save Changes. The field now shows on the classic checkout, saves to the order, and appears on the admin order screen and emails.
Tip: add a clear placeholder with an example value, like the "e.g. GB123456789" above. It does more to get clean data than a long label, and it costs you nothing.
That’s the whole loop. The same steps add a delivery-date picker (type: Date Picker), a gift message (Textarea), or a "preferred contact method" choice (Radio or Select). Test on the front-end after every change, because your theme’s styling only shows up there, not in the admin preview.
What to remove, what to add
The editor is only as good as the decisions you make with it. Here’s how I’d approach it, by store type, because the right checkout for a print shop is the wrong one for a SaaS.
| If you run… | Consider removing | Consider adding |
|---|---|---|
| A consumer (B2C) store | Company name, second address line | "How did you hear about us?" |
| A B2B / wholesale store | Nothing (keep Company) | VAT/tax number, PO number |
| A local delivery business | Country (if single-country) | Delivery date, delivery instructions |
| A gifting store | Nothing | Gift message, "is this a gift?" toggle |
| A digital / downloads store | Address fields, phone | Just email and name |
A few specifics that pay off:
- Remove what you never use. The "Company" field and "Address line 2" are the usual suspects on a B2C store. Two fewer fields, measurably less friction.
- Add a delivery date with the date-picker type if you do local or scheduled delivery. It turns a flurry of "when can you deliver?" emails into a field.
- Add a tax ID for B2B and EU stores. It’s the single most-requested checkout addition for business sellers.
- Don’t strip address fields a digital store doesn’t need without checking your tax setup first, some tax rules still need a country.
If your products themselves need configuration (engraving, sizes, add-ons), that’s a job for product-level fields rather than checkout fields, handled by something like WooCommerce Extra Product Options. And if you take large orders where customers want to pay over time, pair a clean checkout with WooCommerce Deposits. Checkout fields are for the checkout itself; keep that boundary clear.
Editing checkout fields in code
Here’s something most articles won’t tell you: the no-code editor and writing code aren’t either/or. The editor is the fast path; the WooCommerce core filters are the precise path, and serious stores often use both. It’s worth knowing the underlying WooCommerce core filters the plugin builds on, because they’re how you handle the cases the UI can’t.
These are WooCommerce core filters (not part of this plugin). The master filter is woocommerce_checkout_fields, which receives every checkout field grouped by section:
add_filter( 'woocommerce_checkout_fields', function ( $fields ) {
    // Remove the company field for everyone.
    unset( $fields['billing']['billing_company'] );

    // Make the phone field optional.
    $fields['billing']['billing_phone']['required'] = false;

    // Add a delivery instructions textarea to the order section.
    $fields['order']['delivery_instructions'] = array(
        'type'        => 'textarea',
        'label'       => __( 'Delivery instructions', 'your-textdomain' ),
        'placeholder' => __( 'Gate code, where to leave it, etc.', 'your-textdomain' ),
        'required'    => false,
    );
    return $fields;
} );
To tweak the defaults applied to every address field (placeholders, priorities, classes), use woocommerce_default_address_fields. To save a custom field to the order, hook woocommerce_checkout_create_order (or the older woocommerce_checkout_update_order_meta):
add_action( 'woocommerce_checkout_create_order', function ( $order, $data ) {
    if ( ! empty( $_POST['delivery_instructions'] ) ) {
        $order->update_meta_data( '_delivery_instructions', sanitize_textarea_field( wp_unslash( $_POST['delivery_instructions'] ) ) );
    }
}, 10, 2 );
And to validate a custom field server-side, use woocommerce_after_checkout_validation. Editor-made fields and code-made fields coexist fine (the plugin saves its own fields via woocommerce_checkout_update_order_meta).
The plugin also adds its own hooks, more than it usually gets credit for. wc_checkout_fields_dequeue_address_i18n (a filter) controls whether it dequeues WooCommerce’s address-internationalisation script, which it does by default so your custom field ordering isn’t reshuffled by locale JavaScript:
// Keep WooCommerce's address i18n script (re-enable it) if a theme needs it.
add_filter( 'wc_checkout_fields_dequeue_address_i18n', '__return_false' );
wc_checkout_fields_disable_order_comments (an action) fires when the order-comments field is the only Additional field and gets hidden. And for developers who want to extend the editor itself, there are four filters worth knowing: woocommerce_custom_checkout_fields (register a brand-new field type in the editor’s Type dropdown), woocommerce_custom_checkout_validation (add a validation rule), woocommerce_custom_checkout_position, and woocommerce_custom_checkout_display_options. So you can teach the editor a new field type, say an international phone input, without forking the plugin:
add_filter( 'woocommerce_custom_checkout_fields', function ( $types ) {
    $types['intl_phone'] = __( 'Phone (international)', 'your-textdomain' );
    return $types;
} );
There’s also wc_checkout_field_editor_restricted_field_names, which governs the reserved names (role and location) the plugin refuses and auto-prefixes with cf_ to avoid clashing with WordPress internals.
For the block checkout, none of the classic filters apply. WooCommerce’s WordPress hooks for the block checkout live in the Additional Checkout Fields API, where you register a field with woocommerce_register_additional_checkout_field instead. If your store is on the block checkout and you’re comfortable with code, that’s the supported route rather than this plugin.
Don’t break your checkout: field mistakes that cost sales
Here’s the section I wish every store owner read first, because the checkout is where mistakes are most expensive.
Don’t disable core fields the rest of your stack needs. Shipping plugins, tax plugins, and payment gateways often read the standard address fields. Remove billing_postcode or billing_country to "tidy up" and you can break shipping-rate calculation or tax, sometimes silently. WooCommerce’s on-screen warning about disabling core fields is there for a reason; hide cosmetic fields, leave structural ones.
Don’t make everything required. Each required field you add is another wall the customer has to clear. Mark a field required only when an order genuinely cannot be fulfilled without it. "Nice to have" data should be optional, or you’ll trade the data for abandoned carts.
Don’t collect data you can’t justify. Under GDPR and similar laws, every field that captures personal data needs a lawful basis. Asking for a date of birth or a phone number "just in case" is a liability, not a feature. If you can’t say why you need it, don’t ask for it.
Don’t assume it works on the block checkout. This is the expensive one. If your store uses the block checkout, your edited fields silently won’t appear to customers, and you might not notice until an order arrives missing the info you thought you were collecting. Confirm your checkout type and test a real order end to end.
Don’t skip the front-end test. The admin table is not the checkout. Place a test order after any change and confirm the field shows, validates, saves to the order, and appears in the email. Five minutes of testing beats a week of malformed orders.
Checkout Field Editor vs the alternatives
A few plugins do more than the official editor, so here’s an honest comparison with real numbers. If you want to overhaul the entire checkout experience and not just its fields, that is the job of a checkout-template plugin like CheckoutWC.
WooCommerce Checkout Field Editor (official) costs around $49 a year. It’s the authoritative, first-party choice, simple and reliable for adding, editing, removing, and reordering fields with 10 field types. Its two real limits: no conditional logic or per-field fees, and classic-checkout-only.
Flexible Checkout Fields PRO runs about €69 a year (roughly $75). It adds conditional logic (show a field based on another), per-field fees, and more field types, so it’s the pick when you need a field to appear only for certain choices, or to add a cost at checkout. The trade-off is a heavier plugin and a free base it extends.
YITH WooCommerce Checkout Manager sits around €100 a year (roughly $110) and similarly adds conditional fields, fees, and file uploads. If you already run YITH plugins, it fits your stack; otherwise it’s another vendor to manage.
The honest summary: if you need to add, remove, reorder, and validate fields on a classic checkout, the official editor is the cleanest tool at the lowest price (around $49 a year versus roughly $75 to $110 for the feature-richer ones). Step up to Flexible Checkout Fields or YITH only when you specifically need conditional logic or per-field fees, the two things the official editor’s 10-field-type, no-logic design deliberately leaves out. And whichever you choose, re-check block-checkout support against your store’s actual checkout.
Troubleshooting: when fields don’t show or save
The questions I see most often, with the actual fixes.
My new fields don’t appear at checkout. The number-one cause is the block checkout. If you see WooCommerce’s "may not be compatible with the Checkout block" notice, your Checkout page is using blocks and this plugin’s fields won’t render. Fix: switch the Checkout page to the classic checkout (select the Checkout block and choose "Switch to classic checkout", or use the [woocommerce_checkout] shortcode), or move to the Additional Checkout Fields API. Less commonly, a caching plugin is serving an old checkout, clear the cache and retry in a private window.
The field shows but doesn’t save to the order. Usually the field name clashes with an existing key, or a theme/plugin overrides checkout saving. Give the field a unique name (not one WooCommerce already uses; note the plugin reserves role and location and auto-prefixes them with cf_), and test with your theme’s default checkout template. If you added the field in code, confirm you’re hooking woocommerce_checkout_create_order to persist it.
Required validation isn’t firing. Make sure the Required validation chip is actually set on the field, and that the field type matches the validation (a "number" validation on a text field can behave oddly). For custom server-side rules, add them via woocommerce_after_checkout_validation.
Fields jump to the wrong order or position. WooCommerce’s address internationalisation script re-sorts address fields by locale. The plugin dequeues that script by default to prevent it; if a theme re-enqueues it, your custom ordering can shuffle. Check for theme conflicts, and remember the wc_checkout_fields_dequeue_address_i18n filter controls this behaviour.
Removing a field broke shipping or tax. You disabled a structural field (postcode, country, state). Re-enable it; hide only cosmetic fields. If you need the address for tax but not displayed, that’s a job for code, not removal.
Custom fields aren’t on the invoice or packing slip. The plugin integrates with Print Invoices & Packing Slips, but other PDF plugins may need their own mapping. Check that your document plugin is set to include custom order meta.
Performance, compatibility, and gotchas
A few honest notes after living with it.
Light, but it loads one external asset. This is a small admin tool that hooks the standard checkout field filters, so it adds little front-end weight. The one thing to know: it enqueues a jQuery UI datepicker stylesheet from Google’s CDN (ajax.googleapis.com) on the checkout and edit-address pages, whether or not you actually use a date field. If you’re strict about privacy or self-host every asset, that third-party request is worth being aware of.
Privacy is on you. The plugin adds a suggested privacy-policy notice (under Settings » Privacy), but it does not automatically register your custom fields with WordPress’s personal-data export or erasure tools. The values are stored as order meta, so if you collect personal data, including it in a data request is your responsibility. Collect only what you can justify.
Custom fields ride into order exports. If you run the Customer/Order CSV Export or XML Export Suite extensions, the plugin automatically adds your custom field values to those exports, which is genuinely handy for feeding a 3PL, ERP, or accounting tool.
HPOS era. The plugin works with modern WooCommerce order storage. As always after a major WooCommerce update, place one test order to confirm custom fields still save.
Plays with PDF documents. There’s built-in integration with Print Invoices & Packing Slips so custom fields can appear on those documents; other invoice plugins may need manual mapping.
Gateways read standard fields. Don’t remove standard address fields your payment gateway expects, some gateways pass the billing address for fraud checks and will complain if it’s missing.
Pricing and licensing
WooCommerce Checkout Field Editor is sold as an official WooCommerce extension on an annual licence, around $49 a year, including updates and support for the term. That’s at the affordable end for a WooCommerce extension, which fits its focused scope.
A licence covers a single site and unlocks automatic updates from your WooCommerce.com account. The plugin keeps working if the licence lapses; you just stop getting updates and support, which for anything touching checkout you’ll want to keep current.
This is also where the GPL route helps. The WooCommerce Checkout Field Editor download on GPL Times is the same official extension under the GPL, which is the quickest way to put it on a staging store and answer the one question that decides everything: does it render on your checkout? Test it against your actual Checkout page, classic or block, before you rely on it in production.
FAQ
Does WooCommerce Checkout Field Editor work with the new block checkout?
No, and this is the most important thing to know. The plugin declares itself incompatible with the cart and checkout blocks, and WooCommerce shows admins a warning saying so. It works with the classic [woocommerce_checkout] shortcode checkout only. If your store uses the block checkout, either switch the Checkout page to classic or use WooCommerce’s Additional Checkout Fields API instead.
Can I add custom fields like a VAT number or delivery date?
Yes. Click Add field in the relevant tab (Billing, Shipping, or Additional), give it a name, label, type, and validation, and save. There are 10 field types including text, select, radio, checkbox, and date picker, so a VAT number (text), a delivery date (date picker), or a "how did you hear about us?" choice (select) are all straightforward.
Will custom field values show on the order and in emails?
Yes. Because it’s a first-party plugin, custom values save to the order and appear on the admin order screen and in order emails. One honest caveat: it does not auto-register them with WordPress’s GDPR data-export and erasure tools, the values live as order meta, so handling a data request that involves them is on you. Always place one test order to confirm a specific field carries through, since a theme or email plugin can occasionally interfere.
Does it have conditional logic (show a field based on another)?
No. The official editor is deliberately simple and has no conditional logic or per-field fees. If you need a field to appear only when another has a certain value, look at Flexible Checkout Fields PRO or YITH Checkout Manager, which add that at a higher price.
Can I remove the "Company name" or "Address line 2" fields?
Yes, and on a B2C store you probably should. Use Disable/Remove Checked rather than fully deleting, so it’s reversible. Just don’t disable structural fields like postcode, country, or state, which shipping and tax rely on.
Why did removing a field break my shipping rates?
You almost certainly disabled a field that shipping or tax calculation depends on (postcode, country, or state). Re-enable it. WooCommerce’s on-screen warning about disabling core fields is there precisely because this happens.
Can I reorder the checkout fields?
Yes, drag the rows in the editor to reorder, and use the Position column (full-width, left, right) to place two fields side by side. Note that on address fields, WooCommerce’s locale internationalisation can re-sort them; the plugin dequeues that script by default to keep your order intact.
Is there a free version?
The official one is a paid WooCommerce extension (around $49 a year). There are free checkout-field plugins on WordPress.org from other vendors with more limited features; the official extension’s value is first-party reliability and that it carries data cleanly to the order and emails.
Do I have to buy it every year?
It’s an annual licence (around $49 a year) for updates and support. The plugin continues to function after the term, but for a checkout-adjacent plugin you’ll want to keep updates flowing, especially as WooCommerce’s checkout evolves.
Final thoughts
WooCommerce Checkout Field Editor does one job and does it cleanly: it puts your checkout fields under your control without code. For a classic-checkout store, it’s the fastest way to cut the friction that quietly costs you orders and to collect the information your operations actually need.
The honest catch is the block checkout. This plugin is a classic-checkout tool, full stop, and WooCommerce itself will warn you if you’re on blocks. Check that first, because it decides whether this is the right tool or whether you need the block-native field API instead.
If your checkout is classic and you’ve been living with the default fields, spend twenty minutes in the editor: remove the two fields you never use, add the one your team keeps emailing customers about, and run a test order through to the confirmation email. That small session is one of the cheapest conversion and operations wins available to a WooCommerce store.