

If you’ve been building WordPress sites for a while, you know Elegant Themes by their flagship product: the Divi theme. What gets less attention is the rest of their plugin lineup. Bloom is their email opt-in and lead generation plugin, bundled into the same Elegant Themes Membership that ships Divi. It launched in 2014 and hasn’t changed much since, which is part of the appeal: the feature set is opinionated, the UI is dead simple, and once you’ve built a single opt-in form the muscle memory carries over to every site you put it on.
Table of contents
- What is Bloom?
- The six opt-in types
- Key features
- How a Bloom opt-in actually fires
- Installation and first run
- Touring the Bloom admin
- Email service integrations
- Real-world use cases
- Developer reference: hooks, filters, DB schema
- Performance, compatibility, and gotchas
- Pricing and licensing
- FAQ
- Final thoughts
What is Bloom?
Bloom is a WordPress email opt-in and lead-capture plugin built by Elegant Themes. The plugin lets you create forms that capture a visitor’s email address (and any other field you want) and ship that data to one of nineteen-plus email marketing services: Mailchimp, ConvertKit, ActiveCampaign, AWeber, Drip, HubSpot, GetResponse, ConstantContact, MailerLite, Brevo (formerly Sendinblue), and the rest.
The plugin sits in a competitive market: OptinMonster, Convert Pro, Hustle (from WPMU DEV), Thrive Leads, OptinKit, and a long tail of cheaper tools all do something similar. Bloom’s selling point is bundling: if you’re already paying for the Elegant Themes Membership for Divi, Bloom is included at no extra cost. The plugin’s UI is also genuinely lighter than the competition. OptinMonster has more features, but it also has 30+ menus to navigate; Bloom has six form types and a four-step wizard.
The official product page lives at elegantthemes.com.
The six opt-in types
Bloom’s entire mental model starts with picking a form type. When you click "New Optin" the first thing you see is this:
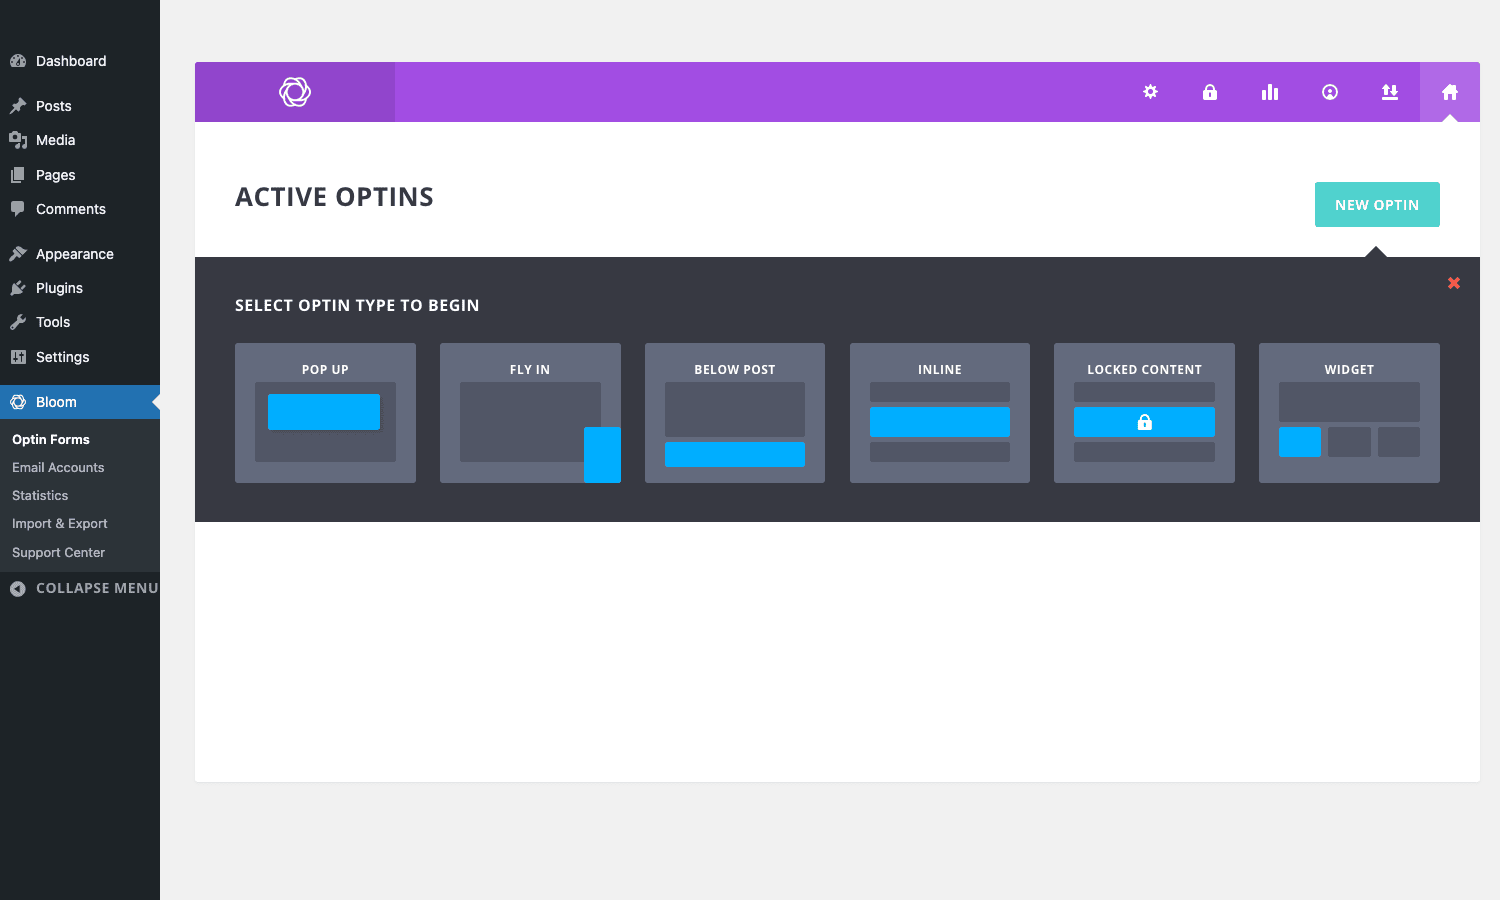
Each of the six tiles represents a placement strategy:
- Pop Up: the classic modal popup. Centered overlay, dimmed background, dismiss-X. Triggered by time on page, scroll percentage, bottom of post, after comment, after purchase, or inactivity.
- Fly In: a smaller popup that slides in from the bottom corner. Less intrusive than a full popup, still gets attention.
- Below Post: rendered inline immediately after the post content. No trigger needed; it’s always there for blog readers who got to the bottom.
- In-Line: a Gutenberg block (or shortcode) you place anywhere in a post or page. Useful for content upgrades where the form has to live mid-paragraph.
- Locked Content: wraps any content in an email-gated block. Visitor sees the first paragraph, then a "subscribe to read the rest" call-to-action.
- Widget Area: drops the form into any WordPress widget area. Great for sidebars on blogs.
Pick a type, name your opt-in, integrate with an email provider, design the form, configure the display rules, and Bloom is collecting emails. The whole flow takes about ten minutes once you’ve done it once.
Key features
Beyond the six form types, the feature set that actually matters in production:
- 100+ pre-made templates. Choose-a-design rather than build-from-scratch. We’ll look at the gallery shortly.
- A/B testing. Built into the core plugin. Each opt-in can have multiple versions, Bloom alternates them between visitors and tracks which converts better.
- 19+ email service integrations. Set up the API once per service, then any opt-in form can send subscribers to any list/tag/group on any of your accounts.
- Visual stats dashboard. Aggregate impressions, conversions, conversion rate per form, plus a sign-up trend line.
- Six trigger conditions. Per form: time delay, scroll percentage, bottom of post, after a comment, after a WooCommerce/EDD purchase, after inactivity (no mouse/keyboard activity for N seconds).
- Custom fields. First name, last name, plus any custom field you want, mapped to your email service’s custom fields.
- GDPR-friendly. Optional consent checkbox, IP address capture toggle, double-opt-in supported by each integration. The GDPR compliance hooks are turned on by default for EU traffic.
- Mobile responsive. Every template degrades cleanly on mobile.
- Custom CSS slot. Per form, override any aspect of the design.
- Import / Export. Move opt-in configurations between sites as JSON. The stats DB tables are separate so they don’t move with the config.
How a Bloom opt-in actually fires
A walkthrough of what happens when a visitor sees and interacts with a Bloom opt-in helps when you’re debugging or designing.
- WordPress request comes in. Visitor loads a blog post.
- Bloom checks display rules. For each active opt-in, the plugin checks: does the current URL match? Has the trigger condition been met (or will it be met by JS)? Has this user already subscribed (cookie check)? Has the form been dismissed recently?
- Eligible opt-ins are inserted into the HTML. They start hidden via CSS.
- Visitor’s browser runs Bloom’s JS. The JS watches for the trigger event (scroll, time, inactivity, etc.) and reveals the form when the trigger fires.
- Visitor fills the form and submits. AJAX call to
admin-ajax.phpwith the form data. - Bloom hands off to the email service. Server-side, the plugin calls the configured email service’s API, passes the email address, name, custom fields, and list mapping.
- Bloom records the event. Insert a row into
et_bloom_statswith the form ID, action type (impression, conversion, dismissal), and timestamp. - Visitor sees the success message. Configurable per form, or redirect to a thank-you URL.
A cookie marks the visitor as "already subscribed" so they don’t see the same form again. The cookie lifetime is configurable per form.
The whole flow is fast and predictable. The two places it can fail are step 5 (network errors) and step 6 (rate limits or API errors from the email service). Bloom logs both into the stats table so you can see what happened.
Installation and first run
Bloom installs like any WordPress plugin.
- Upload the zip via
Plugins -> Add New -> Upload Plugin. - Activate. WordPress adds a top-level Bloom menu item to the admin sidebar.
- Click into Bloom. The default page is the Optin Forms list:
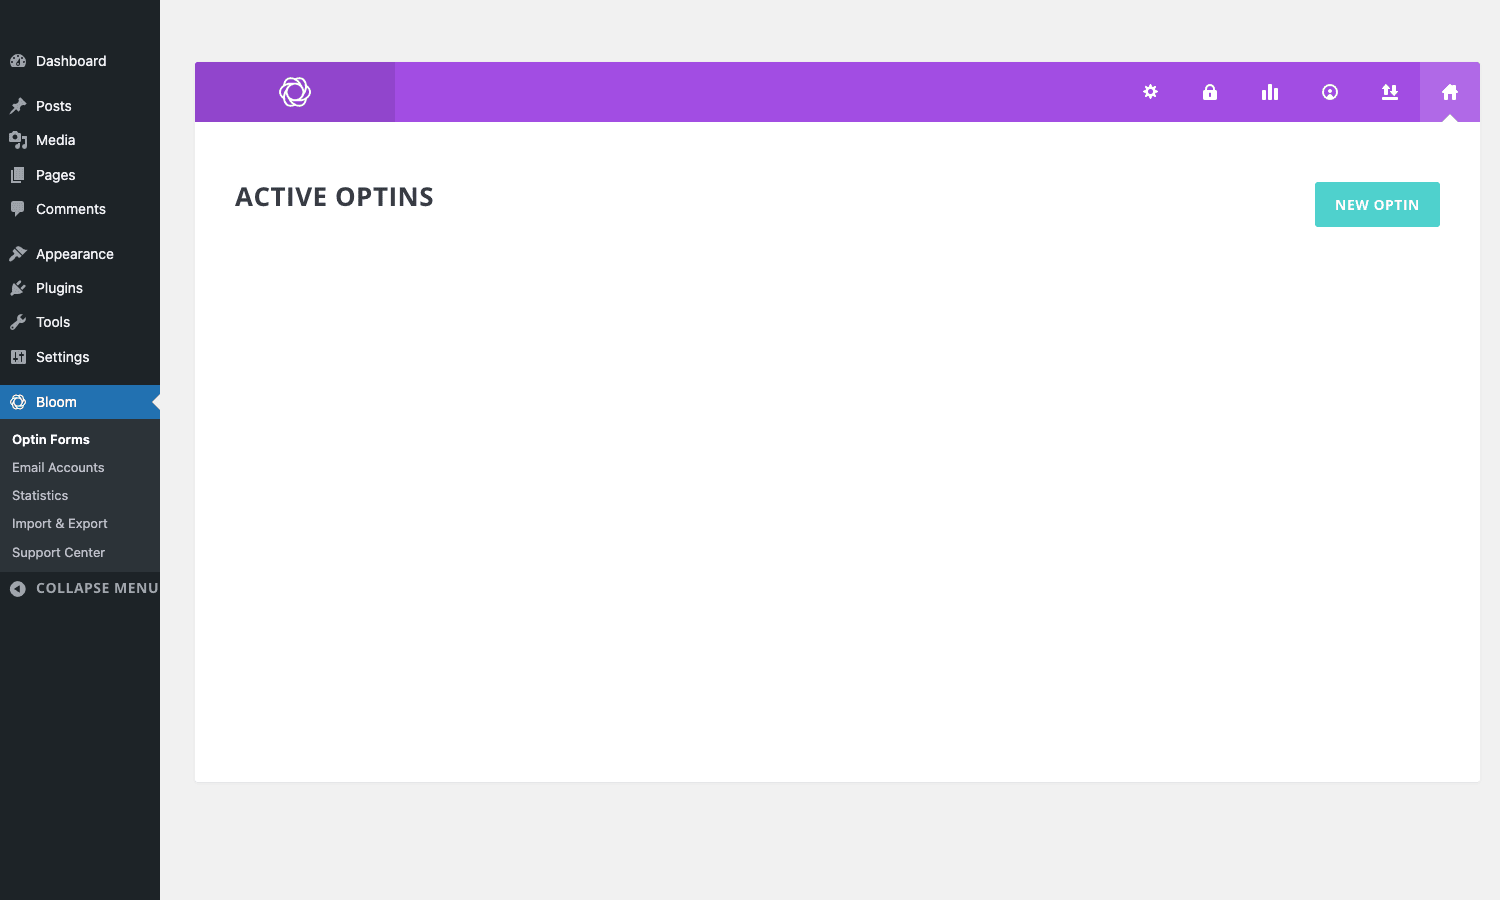
The top purple bar holds Bloom’s own navigation: a gear (Optin Forms / settings), a lock (Locked Content), a chart (Statistics), a person (Email Accounts), an import-export icon, and a home. The left WordPress sidebar shows the Bloom menu structure: Optin Forms, Email Accounts, Statistics, Import & Export, Support Center.
On a fresh install your active optins list is empty. Click NEW OPTIN to start.
Touring the Bloom admin
The plugin’s UI breaks into four areas that match the four steps of the form builder.
Step 1: Setup
After picking a form type, you land on Setup:
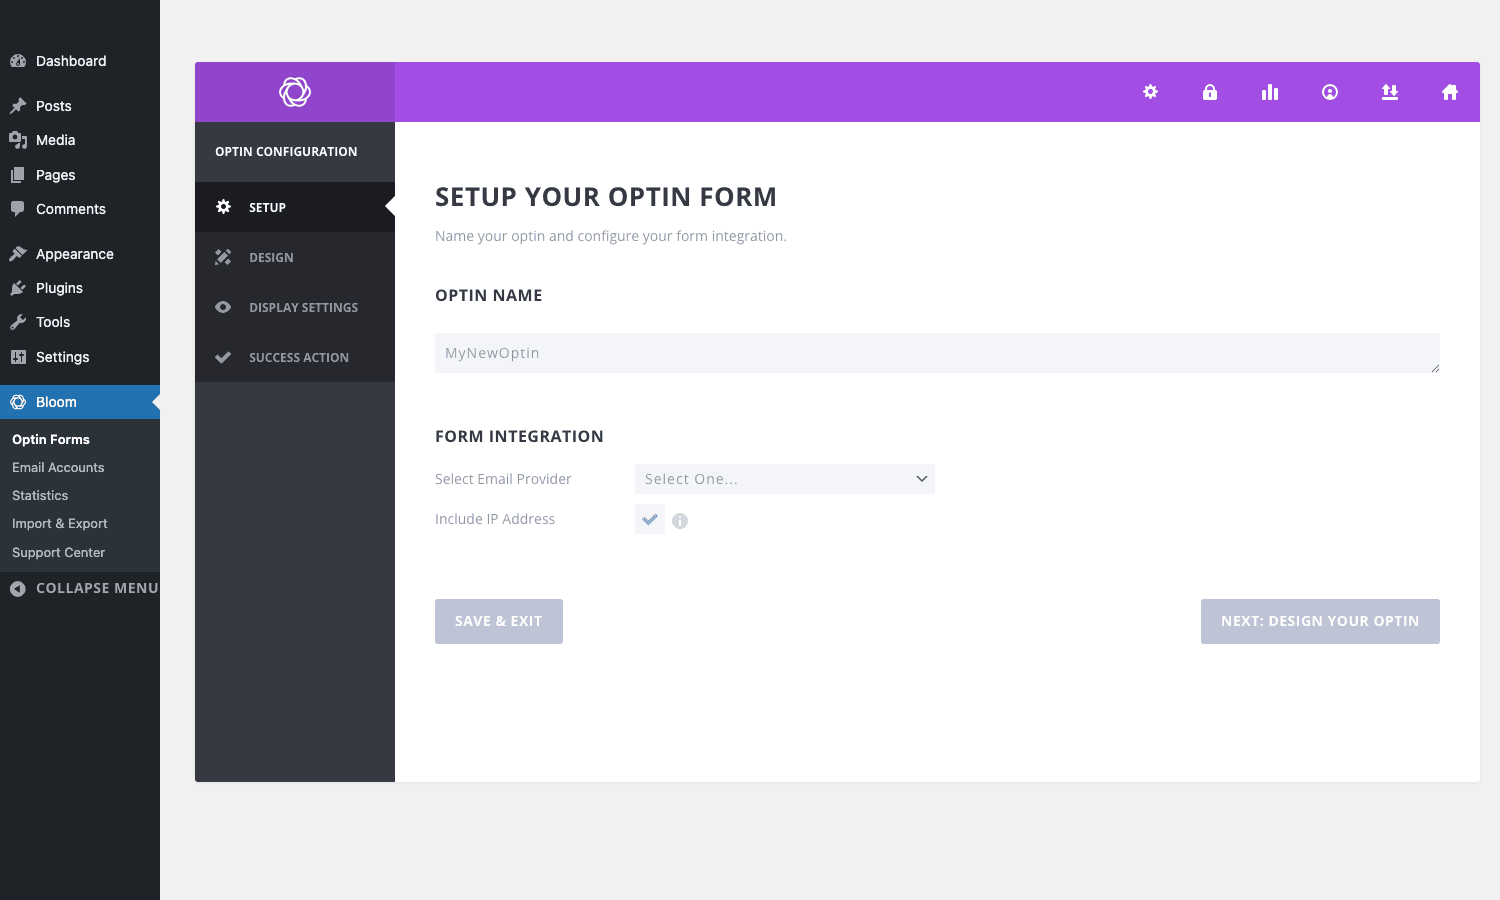
The left side of this view shows the wizard nav: SETUP, DESIGN, DISPLAY SETTINGS, SUCCESS ACTION. You’ll cycle through all four for any new form.
Setup has two main fields: an internal name for the form (for your reference, not visible to visitors), and a Form Integration dropdown that picks which email service the form sends to. Below those is an Include IP Address checkbox (useful for compliance / GDPR review), and a list of any custom fields your chosen email service supports.
Step 2: Design
The Design step is where the gallery comes in. Click DESIGN in the wizard:
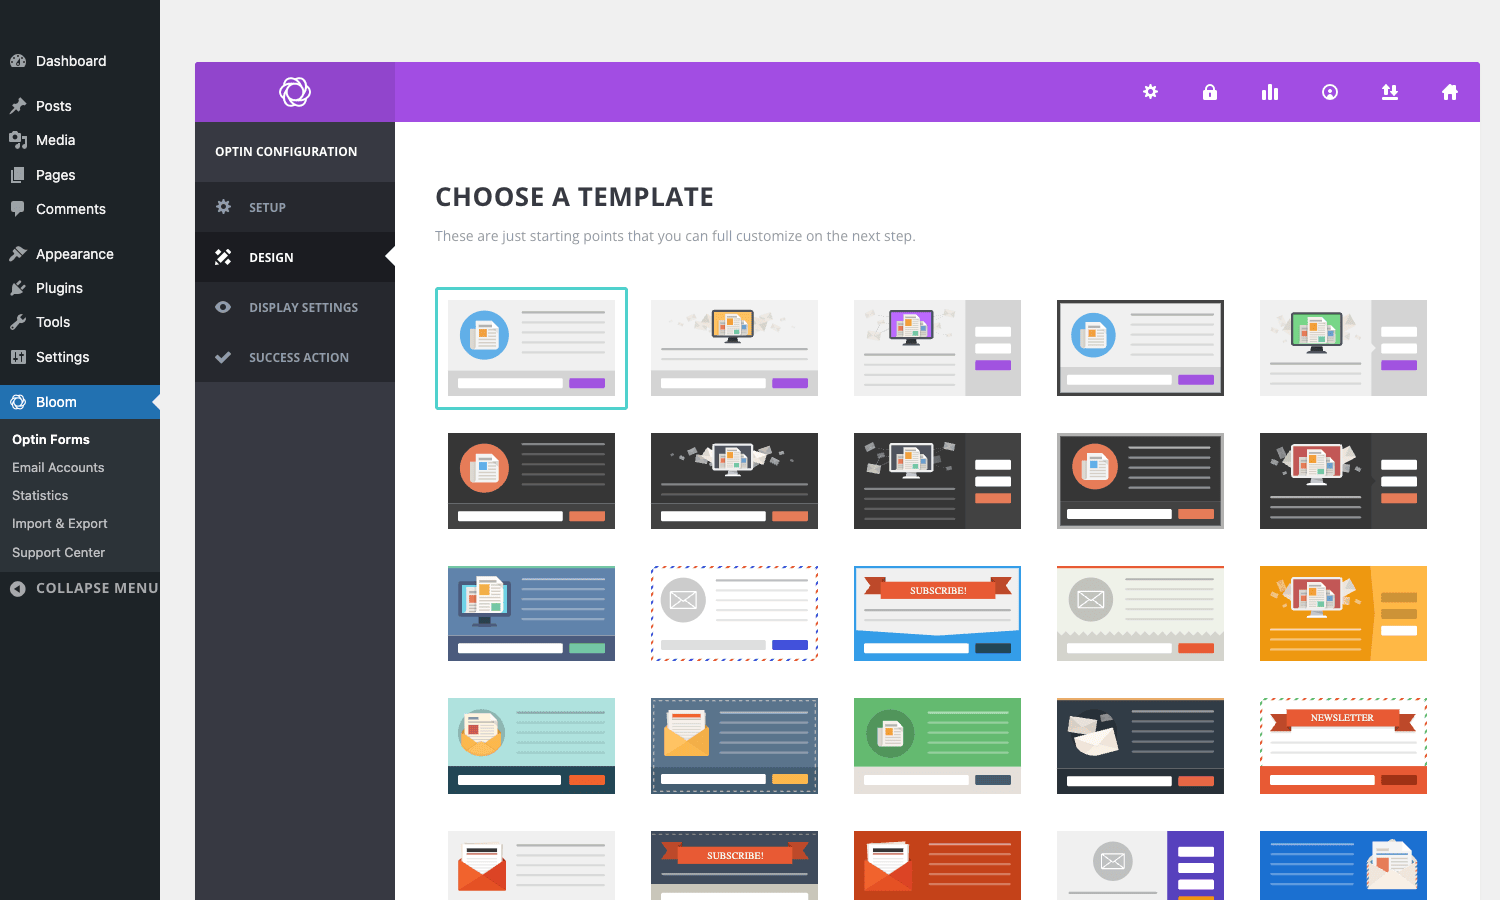
Each tile is a starting point. The first six rows of templates cover the common patterns: light/dark, single-column/two-column, with image / without image, with envelope graphic, with newsletter-magazine ribbon, and so on. Pick one and Bloom drops you into the visual editor where you can:
- Change the form title, message, button text.
- Edit colors (background, text, button, border).
- Change typography (font family, size, weight).
- Toggle which fields show (first name, last name, custom fields).
- Add a header image.
- Tweak the form layout (label position, field stacking).
The visual editor isn’t drag-and-drop like Elementor; it’s structured fields that map to the design. You’re picking from a constrained set of options rather than free-styling. That’s actually a strength: every form ends up looking reasonable even if you have no design taste.
Step 3: Display Settings
This is the most important step. It controls when and where the form fires:
- Display Locations. Per-post-type, per-category, per-tag, per-page, or specific URL lists. Show on every post; show only on posts in the "Tutorials" category; show only on the homepage; etc.
- Trigger. Time on page, scroll percentage, bottom of post, after comment, after purchase, after inactivity.
- Frequency. How often the same visitor sees the form. Show once per session, once ever, every N days, etc.
- A/B Testing. Enable to add multiple variants of this form.
- Auto Open. Whether the form opens automatically or only after the trigger.
Step 4: Success Action
What happens after submission. Options: show a success message, redirect to a URL, or both. The success message is rich-text-editable. Redirect is useful for sending people to a download page or a thank-you page where you also kick off a tracking pixel.
Statistics dashboard
Once forms are live and getting traffic, the Statistics tab is where you live:
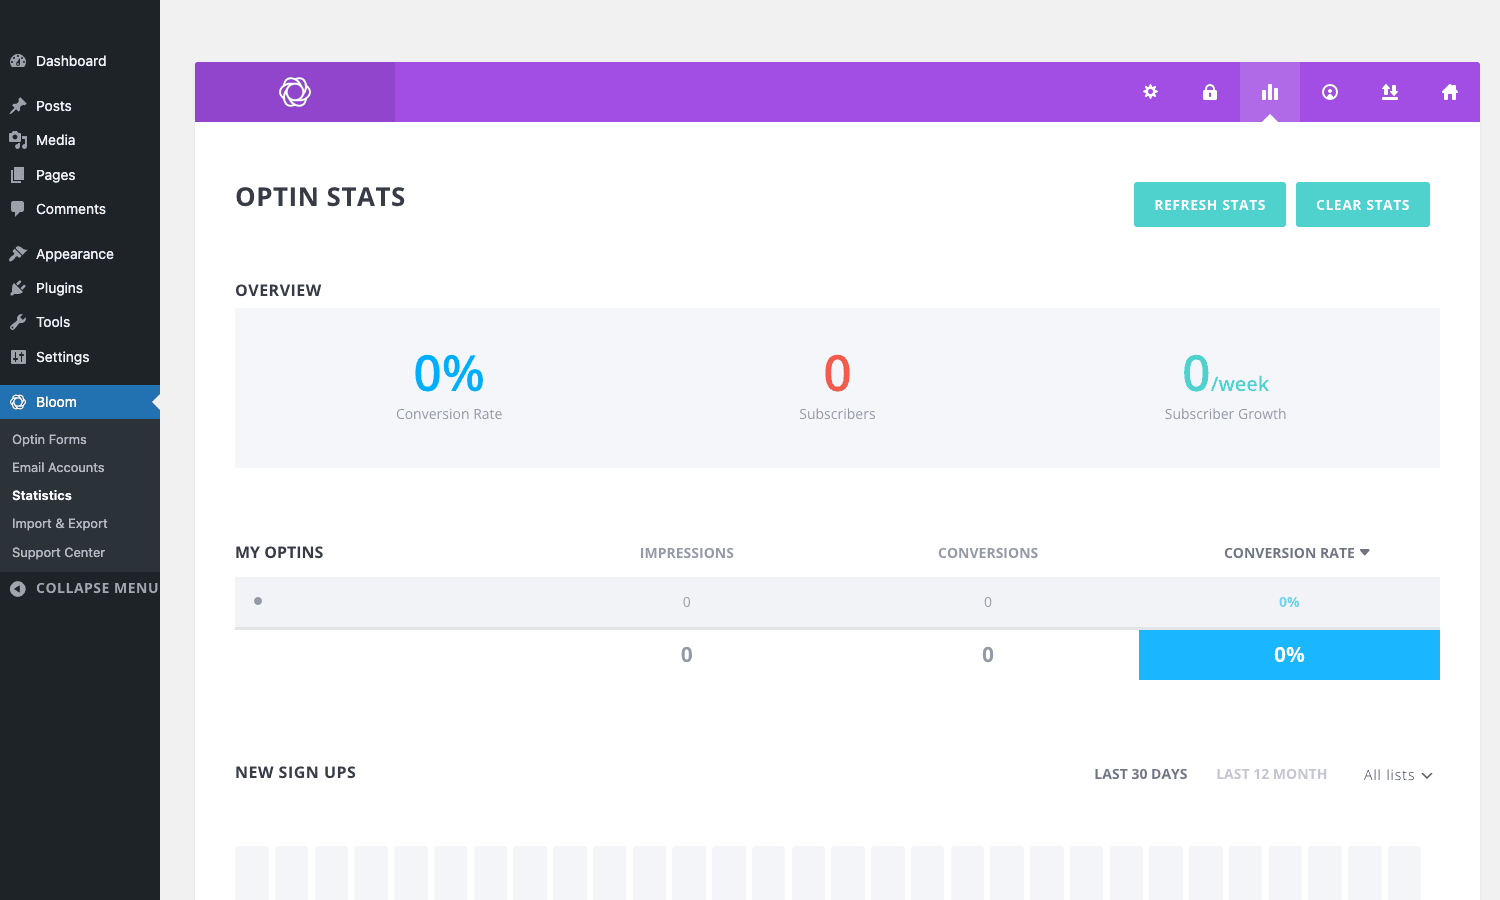
Top row: aggregate conversion rate (across all your optins), total subscribers added, subscribers added per week. Below that: a per-optin table with impressions, conversions, and a colored conversion-rate bar. Below the table: a "New Sign Ups" chart with toggles for Last 30 Days, Last 12 Months, and a per-list filter.
The stats are populated from the et_bloom_stats table. Every impression and conversion writes a row. On a busy site that table grows fast; we’ll talk about cleanup later.
Email Accounts
The integrations tab:
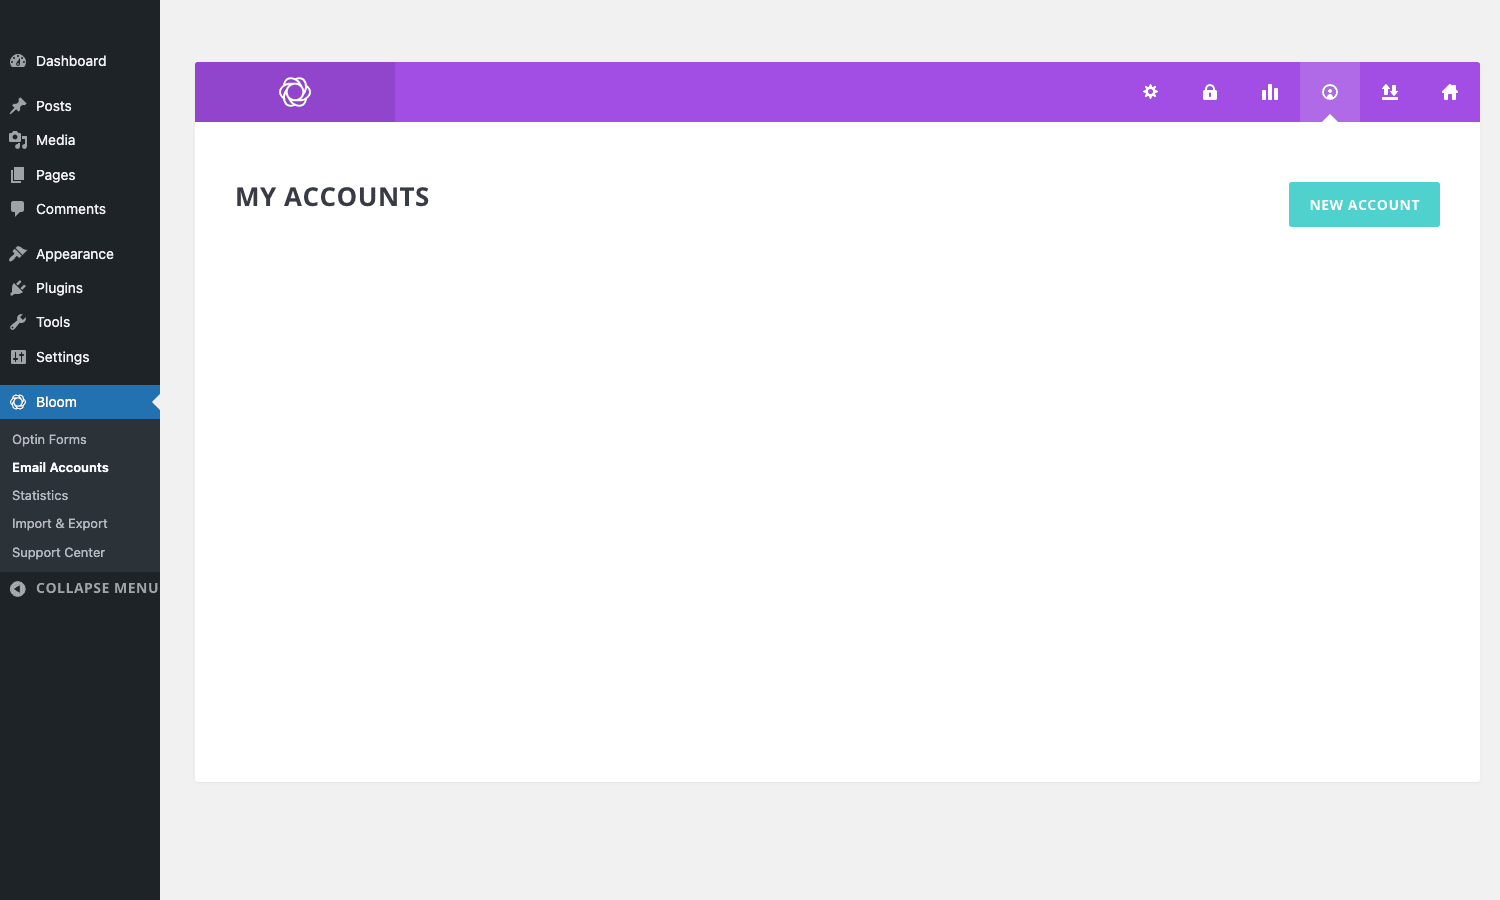
Empty by default. Click NEW ACCOUNT and you pick from the provider list (Mailchimp, ConvertKit, ActiveCampaign, etc.) and paste the API key Bloom needs. Most providers also let you map the integration to a specific list or tag at this point.
You can have multiple accounts per provider. Useful if you run separate Mailchimp accounts for separate client sites and want them all visible from one Bloom install.
Email service integrations
The integration list is one of Bloom’s stronger areas. Out of the box, the plugin connects to:
- Mailchimp
- ConvertKit
- ActiveCampaign
- AWeber
- Constant Contact
- Drip
- Madmimi
- Sendinblue / Brevo
- GetResponse
- iContact
- Ontraport
- HubSpot
- Salesforce
- MailerLite
- MailPoet
- Mailster
- Feedblitz
- Infusionsoft (Keap)
- Emma
- Campaign Monitor
- FluentCRM
- Klaviyo
Each integration handles double-opt-in if the provider supports it (most do). The API key setup is paste-and-test, and Bloom queries the provider to fetch your list / tag / group options so you can map them in a dropdown rather than typing IDs.
There’s no native Zapier integration, but Mailchimp + Zapier covers most use cases for the providers Bloom doesn’t speak to directly. There’s also no webhook output; if you need that, you’d write a small mu-plugin that hooks into Bloom’s submission action.
Real-world use cases
Where Bloom fits cleanly:
Personal blogs and content sites. A blog with a newsletter is the classic Bloom use case. Drop an opt-in below the post, run an exit-intent popup, A/B test the headline.
WooCommerce stores. Use the "after purchase" trigger to add buyers to a customers-only newsletter list. Combine with the post-purchase optin and you’ve got a re-engagement funnel without needing a marketing automation platform.
Membership / online course sites. Locked Content opt-ins gate lesson previews, lead magnets, or sample chapters. Pair with a course platform and you’ve got a free-to-paid pipeline.
Sites already using Divi. If you’re using Divi, Bloom is the obvious add-on. Same design language, same Elegant Themes account, no separate license. The templates also share the Divi aesthetic out of the box.
Agency builds. Configure Bloom once on a master site, export the optins JSON, import on each client site. Repeat across a portfolio.
Lead-magnet downloads. "Subscribe to download our 30-page PDF guide." Use the success-action redirect to a download URL after submission.
Re-targeting capture. Run two A/B variants: short form (email only) vs. long form (email + first name + interest). Measure which converts higher; usually the short form wins.
Multi-author publication. Run one opt-in below every post that pulls subscribers into a master newsletter list, plus per-author opt-ins for the most popular authors (so readers of Author A get added to Author A’s segment). This is how big content sites segment audiences without a dedicated marketing automation tool.
Holiday and seasonal campaigns. Spin up a temporary opt-in form (e.g. "Get our Black Friday guide") with a specific list target, then disable it after the campaign window. Bloom keeps the configuration so you can re-enable it next year without rebuilding.
Affiliate site lead magnets. Use Locked Content to gate a comparison chart, then drop the email into a list that gets your affiliate offers. Conversion-tracking pixels on the success-redirect URL close the loop.
Comparing Bloom with the alternatives
Bloom sits in a market with at least eight serious competitors. The honest comparison:
- OptinMonster. The premium leader. More targeting rules (geo, device, exit intent, page-level), more A/B testing depth, more reporting. Costs ~$9-49/month per site. Worth it if you treat email capture as a strategic channel with a dedicated optimizer.
- Convert Pro by Brainstorm Force. The Astra-team plugin. Better visual editor than Bloom (more like Elementor), more trigger conditions, but priced as a separate subscription. A natural pick if you’re already in the Astra/SureCart ecosystem.
- Thrive Leads (Thrive Themes). The most feature-rich of the bunch. SmartLinks, SmartExit, ribbon bars, in-line forms, slide-ins, lightbox popups, dropdown opt-ins. The catch is Thrive’s pricing tilts higher and the UI is the densest of any opt-in plugin.
- Hustle by WPMU DEV. Part of the WPMU DEV subscription. Cleaner than Thrive Leads, less mature than OptinMonster, similar to Bloom but with a more modern UI. Useful if you already pay for WPMU DEV.
- MailOptin. Free WordPress.org plugin with a paid Pro. Smaller feature set than Bloom but free for the basics. Good entry-level choice.
- WPForms Pro. Not strictly an opt-in plugin, but the form builder is general-purpose and includes opt-in templates. If you already use WPForms for everything else, the opt-in templates can stand in for Bloom.
- Ninja Popups. The CodeCanyon classic. ~$26 one-time. Simpler than Bloom but with surprisingly capable trigger options. Good for one-off site builds.
- Popup Maker. Free on WordPress.org with paid extensions. More general-purpose (popup framework, not just opt-ins). Useful if you also need announcement popups, age verification, etc.
A rough decision tree: if you have Divi, use Bloom. If you have WPMU DEV, use Hustle. If you have a dedicated growth budget and email is critical, use OptinMonster. If you want a one-time cheap purchase, use Ninja Popups or Bloom via GPL Times.
Developer reference: hooks, filters, DB schema
Bloom’s hook surface is well-named and easy to extend. The plugin source is at wp-content/plugins/bloom/ if you want to grep deeper.
Actions
// Fires after a form is submitted (success or fail).
add_action( 'et_bloom_after_order', function( $form_data, $optin_id ) {
 // Send the submission to your own analytics, CRM, etc.
 error_log( "Bloom submit: optin=$optin_id, email=" . $form_data['email'] );
}, 10, 2 );

// Fires at the bottom-of-page position, useful to inject custom HTML.
add_action( 'et_bloom_bottom_trigger', function() {
 echo '<div class="my-tracking-pixel"></div>';
} );

// Fires when the form's close button is rendered. Use to attach
// your own JS handlers or change the markup.
add_action( 'et_bloom_close_button', function( $optin ) {
 // Hook in a tracking event.
} );

// Fires inside the form fields wrapper.
add_action( 'et_bloom_fields', function( $optin_id ) {
 // Add custom hidden fields, honeypots, etc.
} );

// Fires below the form text body. Use to add legal disclaimers.
add_action( 'et_bloom_form_footer', function( $optin_id ) {
 echo '<p class="legal">By subscribing you agree to our terms.</p>';
} );
Filters
// Customize the list of pre-made templates shown in the Design picker.
// Use to add a branded house-template to all your client sites.
add_filter( 'et_bloom_premade_layouts', function( $layouts ) {
 $layouts['my_house_template'] = [
 'name' => 'House style',
 'layout_data' => [ /* ... */ ],
 ];
 return $layouts;
} );

// Change the widget title rendered by Bloom's widget area optin.
add_filter( 'et_bloom_widget_title', function( $title, $optin ) {
 return strtoupper( $title );
}, 10, 2 );

// Restrict which email providers appear in the integration dropdown.
add_filter( 'et_core_api_email_enabled_providers', function( $providers ) {
 // Only show Mailchimp and ConvertKit to client admins.
 if ( ! current_user_can( 'manage_options' ) ) {
 return array_intersect_key( $providers, [
 'mailchimp' => true,
 'convertkit' => true,
 ] );
 }
 return $providers;
} );

// Cap how many lists are fetched per Mailchimp account.
// Useful if you have a Mailchimp account with thousands of lists.
add_filter( 'et_core_api_email_mailchimp_max_lists', function() {
 return 50;
} );
Database schema
Bloom creates two custom tables:
et_bloom_stats– one row per impression or conversion event. Columns:id,optin_id,record_date,event_type(impression / conversion),list_id,ip_address,removed_flag.et_bloom_stats_data– aggregated counters per optin, refreshed periodically to make the Statistics dashboard fast even on busy sites.
If you want to query subscriber growth without going through the admin:
SELECT
 optin_id,
 DATE(record_date) AS day,
 SUM(CASE WHEN event_type = 'conversion' THEN 1 ELSE 0 END) AS conversions,
 SUM(CASE WHEN event_type = 'impression' THEN 1 ELSE 0 END) AS impressions,
 ROUND(
 100 * SUM(CASE WHEN event_type = 'conversion' THEN 1 ELSE 0 END) /
 NULLIF(SUM(CASE WHEN event_type = 'impression' THEN 1 ELSE 0 END), 0)
 , 2) AS conv_rate
FROM wp_et_bloom_stats
WHERE record_date >= NOW() - INTERVAL 30 DAY
GROUP BY optin_id, day
ORDER BY day DESC;
On any site that’s been running Bloom for a while, the stats table can grow to millions of rows. The plugin has a Clear Stats button that wipes the table; you can also write a small WP-CLI command to archive old rows to cold storage.
Shortcodes
Bloom registers two shortcodes for the inline and locked-content optin types:
[bloom_inline_optin id="123"]– render an inline form anywhere.[bloom_locked_content id="123"]Premium content here[/bloom_locked_content]– wrap content in an email-gated block.
Find the form IDs in the URL when you edit the form (?id=N).
Performance, compatibility, and gotchas
A few things worth knowing.
Page caching. Bloom inserts opt-ins via PHP, so the cached HTML includes them. The trigger logic is JS-based, so cached pages still work. Compatible with WP Rocket, WP Fastest Cache, W3 Total Cache, and LiteSpeed.
JS payload. Bloom’s JS adds ~30KB minified. Not huge, but combined with other scripts it adds up. On a tight performance budget, dequeue Bloom’s JS on pages that don’t have an active opt-in.
Stats table bloat. As mentioned, et_bloom_stats grows with every impression. On a 100k-monthly-visitor site, expect ~5M rows after a year. Schedule periodic cleanup via WP-CLI or a custom cron job.
Provider rate limits. Mailchimp, ConvertKit, and the others all have API rate limits (usually generous, but they exist). If you’re getting a sudden spike in submissions, some may fail. The fix is built into Bloom: failed submissions get retried automatically and shown in stats as "errored".
iframe-blocked tracking pixels. If you use the success-action redirect to a thank-you page that fires a Facebook pixel or Google Ads conversion event, modern browsers’ SameSite cookie policy can block the pixel. Test in an incognito window.
Mobile popups and Core Web Vitals. A popup that fires immediately on mobile hurts your CLS (Cumulative Layout Shift) score. Use the time-delay or scroll-percentage trigger on mobile to delay the form until after first paint.
Multilingual sites. Bloom doesn’t have native i18n support for form copy. Workaround: create separate optins per language and target them with display rules (one optin per language-specific URL pattern). The plugin’s PHP strings are translatable via WordPress’s standard mechanisms.
REST API. Bloom doesn’t expose a REST endpoint for submitting forms programmatically. If you need that, hook into et_bloom_after_order and roll your own.
Compatibility with form plugins. Don’t double-up. If you’re using Fluent Forms, WPForms, or Forminator for general contact forms, only use Bloom for email-capture-specific forms. Running both for the same purpose creates A/B testing chaos.
Pricing and licensing
Bloom isn’t sold separately. It’s bundled into the Elegant Themes Membership at no additional cost:
- Yearly Access: ~$89/year (Divi + Extra + Bloom + Monarch).
- Lifetime Access: ~$249 one-time.
If you already have an Elegant Themes Membership, Bloom is effectively free. If you don’t, the membership cost vs. the cost of OptinMonster, Convert Pro, or Thrive Leads (each ~$99-299/year per site) makes ET membership the cheaper option for any site that also wants Divi.
For production sites where you also use Divi, the Elegant Themes Membership is the natural choice (you get the support and auto-updates as part of the membership).
FAQ
Does Bloom work without the Divi theme? Yes. It’s a standalone plugin. You can run it on any WordPress theme. The visual integration with Divi is a bonus, not a requirement.
Can Bloom collect more than just email addresses? Yes. Each form supports first name, last name, and any custom fields supported by your chosen email provider.
Does Bloom support double opt-in? Yes, but it depends on the email provider. Mailchimp, ConvertKit, ActiveCampaign all have built-in double opt-in; Bloom passes the subscription through and the provider sends the confirmation email.
Will it slow my site down? Marginally. The JS payload is ~30KB. On a tight performance budget you can dequeue it on pages without an active opt-in.
Can I import old subscribers into a Bloom opt-in? No. Bloom doesn’t store subscribers itself; it passes them to your email provider. Import subscribers directly into the email provider.
How does Bloom compare to OptinMonster? OptinMonster has more advanced targeting (geo-targeting, exit-intent, time-of-day rules) and more sophisticated A/B testing. Bloom has a simpler UI and is much cheaper if you’re already using Divi. For most sites, Bloom is enough.
How does it compare to Convert Pro? Convert Pro has a more powerful visual editor and more trigger options. Bloom has better template variety and the Elegant Themes ecosystem integration.
Does Bloom integrate with WooCommerce? Yes, partially. The "after purchase" trigger fires when a WooCommerce order completes. Use it to add buyers to a customers list.
Can I export Bloom’s collected emails? Bloom doesn’t store the emails locally; they go straight to your email provider. Export from the provider’s admin (Mailchimp, ConvertKit, etc.).
Does Bloom work with Gutenberg? Yes. There’s a Gutenberg block for inline opt-ins. Locked content also works inside blocks.
Will Bloom be updated to handle new email providers? Yes, Elegant Themes adds new providers in major releases. The list above is current as of writing.
Final thoughts
Bloom is the kind of plugin that’s easy to overlook because it doesn’t try to be everything. It’s a focused email opt-in plugin with six form types, 100+ templates, and 19+ email service integrations. The four-step wizard means you can ship a working opt-in in under ten minutes. The bundling with the Elegant Themes Membership means it’s the lowest-friction choice if you’re already paying for Divi.
The plugin’s biggest weakness is that it hasn’t evolved much in recent years. OptinMonster and Convert Pro have pulled ahead on geo-targeting, exit-intent triggers, and behavioral rules. If you need those, Bloom isn’t the right tool. If you need a clean, predictable, opt-in capture flow that works the same on every WordPress site, Bloom is one of the smaller plugins that does its job extremely well.
Spin it up, build a popup with a Mailchimp integration, and see whether the simplicity matches your workflow.