

WooCommerce ships with "related products" and "cross-sells", and that’s about it. If you want a real Frequently Bought Together panel, a checkbox order bump on the checkout page, a popup that fires after add-to-cart, or a one-click upsell on the thank-you screen, you have to bolt it on. Iconic Sales Booster for WooCommerce is the bolt-on. It bundles those four cross-sell surfaces into one plugin and gives each one its own admin screen, its own stats, and its own developer hooks.
This piece walks through what it does, what it doesn’t do (the name is broader than the scope), and how to actually set it up on a real store. By the end you’ll know whether it fits your store and how to extend it if you’re a developer.
Table of contents
- What Iconic Sales Booster actually is
- The four upsell surfaces
- Installation and activation
- Setting up Frequently Bought Together
- Setting up the after-add-to-cart popup
- Setting up a checkout order bump
- Setting up an after-checkout (post-purchase) upsell
- Settings tour: what each toggle does
- Shortcodes and the Gutenberg block
- Real-world use cases
- Developer reference
- Compatibility, performance, and gotchas
- Pricing and licensing
- How it compares to other tools
- Frequently asked questions
- Final thoughts
What Iconic Sales Booster actually is
Let me clear up the naming first, because the name is bigger than the product. "Sales Booster" sounds like one of those everything-and-the-kitchen-sink suites that promises sticky add-to-cart bars, countdown timers, low-stock urgency badges, recently-viewed carousels, sale-flash decorations and twelve other widgets. Iconic Sales Booster is not that plugin.
What it actually does is narrower and, honestly, better targeted. It is a cross-sell and upsell plugin focused on the four highest-use moments in a typical WooCommerce purchase:
- The product page, before the customer has added anything yet.
- The moment immediately after they click "Add to cart".
- The checkout page, while they’re filling in the address form.
- The thank-you page, after they’ve already paid.
Each of those four moments gets its own dedicated tool. None of them are sticky bars or countdown timers or visual urgency tricks. They are all variations of "show this customer one more thing they might want, at the right time, with a way to add it to the order in one click." If you’ve ever seen a Stripe-style "Want fast shipping? +$5" checkbox at checkout, or a Booking.com style "Add breakfast to your stay" upsell, this is the WordPress version of that.
The plugin is built by Iconic, the same team behind WooThumbs, WooSwatches and a few other commercial WooCommerce extensions. Inside the codebase the main class is Iconic_Woo_Sales_Booster and everything is namespaced with the iconic_wsb_ prefix, including options, hooks and settings keys. It’s HPOS (High-Performance Order Storage) compatible, declared in the plugin bootstrap. It also works with the new WooCommerce Checkout block, not just the legacy shortcode-based checkout.
If you’ve been hand-rolling FBT with






The four upsell surfaces
Before the setup walkthrough, here’s a one-paragraph map of each surface so you know what we’ll be building.
Frequently Bought Together is the panel that appears next to the Add to Cart button on a product page, showing the current product plus two or three related products with checkboxes and a combined "Add Selected to Cart" button. You define the related products on a per-product basis. Optionally, you can give the bundle a discount (flat or percentage) that fires when the customer adds the whole set in one click.
After Add to Cart popup is the modal that appears immediately after the customer clicks "Add to cart". It shows a suggested upsell product with a one-click add button. You define the upsell on a per-product basis (so the wallet’s modal can suggest a card holder, the running shoes’ modal can suggest socks). Different from FBT, this fires after the add-to-cart event rather than instead of it.
Checkout Order Bump is the highlighted, dotted-border offer that appears on the checkout page, usually between the order review and the place-order button. It’s a single product, sometimes discounted, with a single checkbox the customer ticks to add it to the order without leaving checkout. Each checkout bump is its own admin record with its own statistics. You can have many checkout bumps and target them at specific products or cart conditions.
After-Checkout (Post-Purchase) upsell is the offer shown on the thank-you / order-received page. The customer has already paid. If they accept, the upsell is added to their existing order using the payment method they just used, no need to re-enter card details. This is the highest-converting upsell type in most stores because there’s zero added friction.
Each of those four surfaces is independent. You can run any combination. You can target each one differently. None of them are required for the others to work.
Installation and activation
Installation is a normal WordPress plugin install. From a fresh WooCommerce store:
- Go to Plugins, Add New, Upload Plugin in wp-admin.
- Click Install Now then Activate Plugin.
On activation you’ll see a new top-level menu item in the WordPress sidebar called Sales Booster with a chart-area icon. The capability is manage_woocommerce, so any user who can manage WooCommerce (shop manager, administrator) can configure it. Beneath the top-level menu you get three sub-pages: Order Bumps, After Checkout and Settings.
The plugin also adds a new tab inside the WooCommerce product edit screen called Sales Booster, where the per-product Frequently Bought Together and After Add to Cart popup settings live. If you’re using the new WooCommerce Product Block Editor (the React-based one), the same fields appear there too.
There is no setup wizard, no onboarding survey, no "complete your account first" interstitial. You just install it and start configuring. Iconic does ask you to opt in to anonymous telemetry on first load of the settings page; you can click Skip and never see it again.
Setting up Frequently Bought Together
FBT is the highest-touch feature in the plugin, so let’s start here.
If frequently-bought-together is the only upsell you need, a dedicated plugin like YITH WooCommerce Frequently Bought Together focuses entirely on that one box, while Iconic bundles it alongside order bumps and post-purchase upsells.
Step 1: pick a base product and its companions
Open any product in Products, All Products and scroll to the Product data box. You’ll see a new tab called Sales Booster in the left-rail tab list (next to General, Inventory, Linked Products, Shipping, Attributes, Advanced).
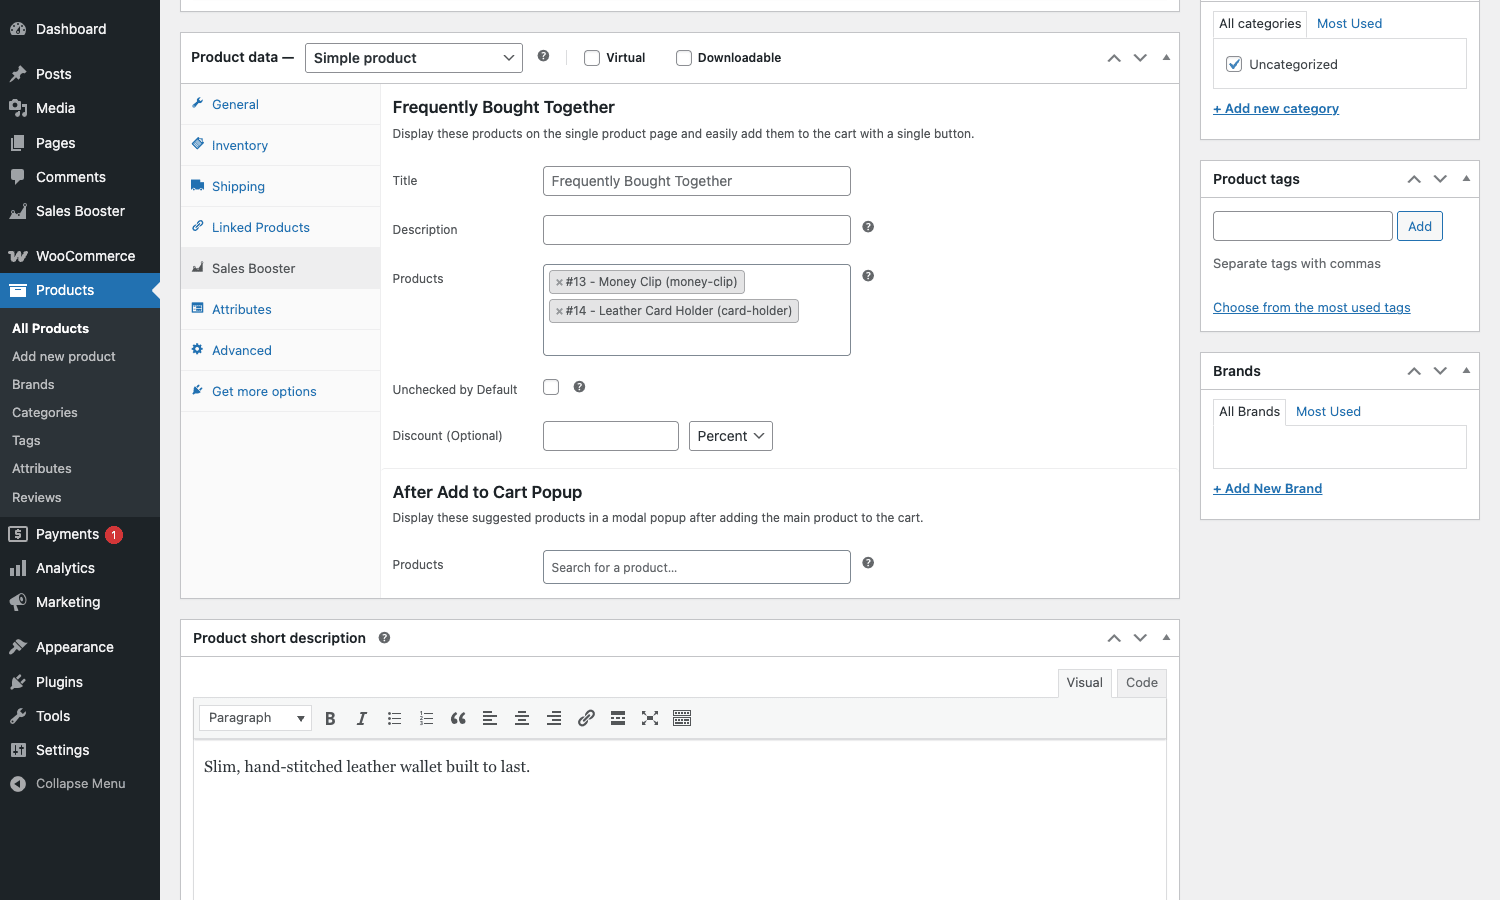
Click into Sales Booster and you’ll see two stacked sections: Frequently Bought Together at the top and After Add to Cart Popup at the bottom. They share the same UI pattern.
The Frequently Bought Together section has these fields:
- Title ("Frequently Bought Together" by default). This is the heading shown above the panel on the product page.
- Description (optional). A short line under the heading.
- Products. A multi-select that lets you search and pick two or three companion products. The current product is always shown first; what you pick here is appended.
- Unchecked by Default. If on, the companion products’ checkboxes start unchecked. Default is on (all boxes ticked), which lifts AOV but is sometimes considered pushy.
- Discount (Optional). The discount that triggers when the customer adds the whole set. Type a number and pick Flat or Percent in the dropdown.
That’s it for the product side. Hit Update and the FBT panel is live on that product’s page.
Step 2: tune the global FBT settings
The per-product setup defines the relationships and the discount. The global settings page defines the rest of the FBT behaviour for every product.
Open Sales Booster, Settings then click the Design tab. The first card is Frequently Bought Together.
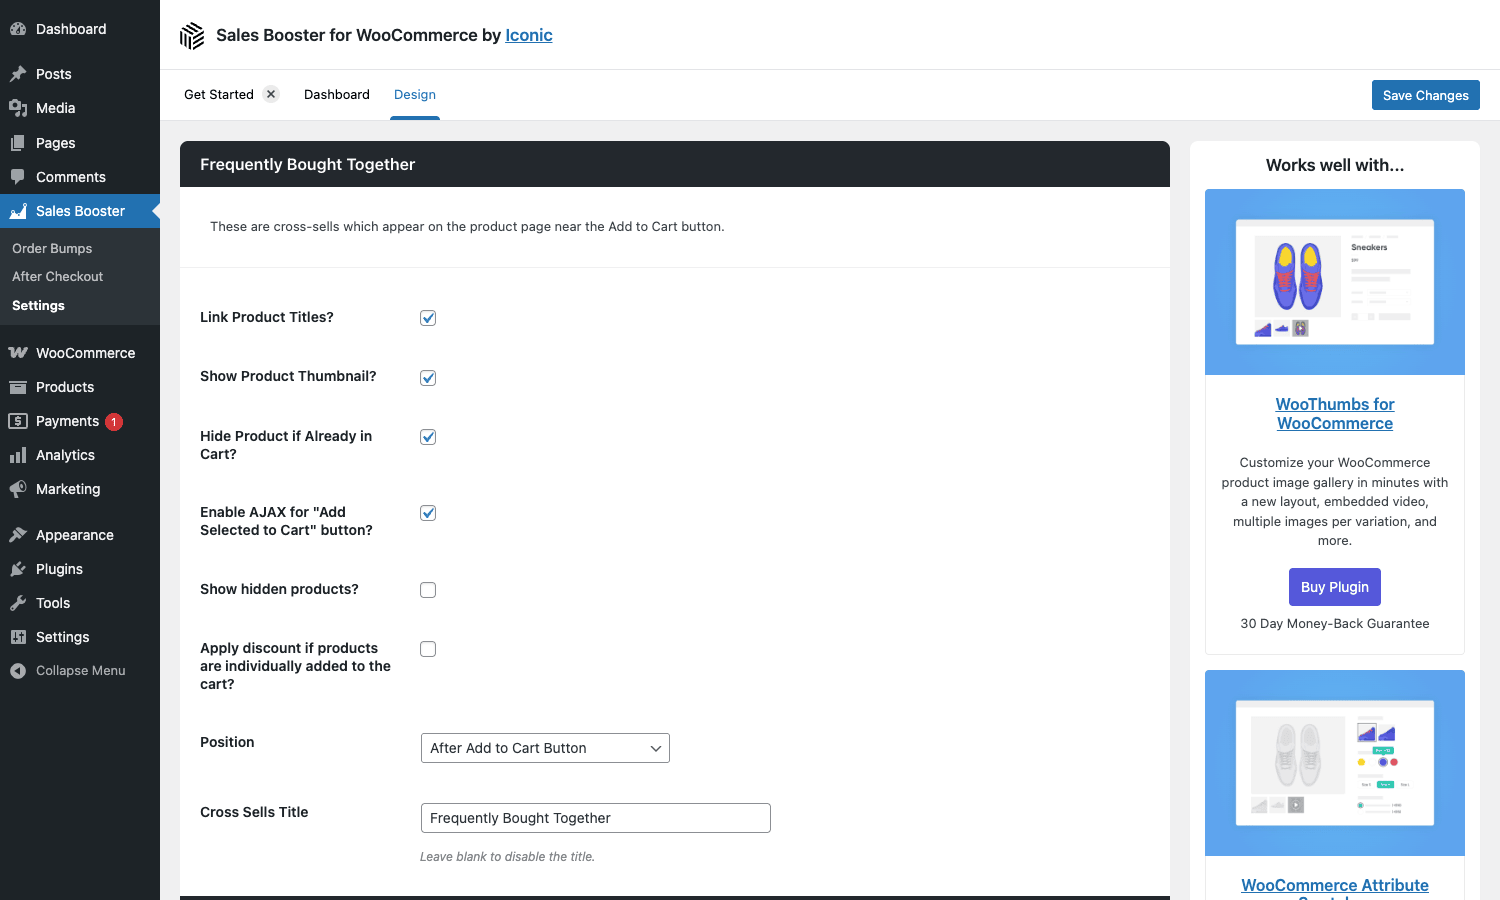
You get these toggles:
- Link Product Titles? Whether companion product names link to their own product pages. Most stores keep this on for SEO and to let curious customers click through.
- Show Product Thumbnail? Thumbnails next to each row. Off if you’re tight on space, on for clarity.
- Hide Product if Already in Cart? A nice touch: if the customer already added the card holder, the wallet’s FBT panel won’t keep suggesting the card holder. Default on.
- Enable AJAX for "Add Selected to Cart" button? Adds without a page reload. Default on. Turn off only if you have AJAX-incompatible cart customizations.
- Show hidden products? Whether to include products with catalog visibility set to "Hidden". Default off (which is correct for most stores).
- Apply discount if products are individually added to the cart? Default off. If on, a customer who happens to add the wallet, the money clip and the card holder via three separate clicks (not the FBT button) still gets the bundle discount. Powerful, but you should know about it because it changes the discount surface area.
- Position. A select with eighteen possible WooCommerce hook positions, plus a "Position Manually with Shortcode" option (more on shortcodes below). Default is "After Add to Cart Button", which puts the FBT panel directly under the Add to Cart button.
- Cross Sells Title. The default heading text for stores that don’t override it per product.
Step 3: how the discount fee actually applies
When the customer ticks all the boxes and clicks Add Selected to Cart, Iconic Sales Booster does this:
- Adds each ticked product to the cart with a special meta key,
iconic_wsb_fbt, recording which "bundle" they belong to. - On the next cart total calculation, checks whether the bundle requirements are met (all related products present in the cart with at least the required quantity).
- If met, applies a negative WooCommerce cart fee labelled "Bought together discount".
The use of a cart fee (rather than a coupon) means the discount stacks cleanly with coupons, doesn’t appear in the customer’s coupon-codes list, and survives partial refunds correctly. It also means the discount is visible to other plugins reading WC()->cart->get_fees(), which is what you want for accurate accounting.
Step 4: place the FBT panel somewhere unusual
If "After Add to Cart Button" doesn’t fit your theme, change the Position dropdown to one of the seventeen other hooks (Before Single Product Summary, Within Single Variation, After Meta, Within Share Area, etc.). The dropdown options correspond one-for-one to WooCommerce template hooks, so any custom hook order that works for add_action works here.
If none of the eighteen fits, choose Position Manually with Shortcode and drop [iconic_wsb_fbt] into your product description, a page builder block, or a theme template via do_shortcode(). You can also pass a product ID like [iconic_wsb_fbt product_id="123"] to render the FBT panel for a specific product outside of that product’s own page (useful on a category landing page or a comparison page).
Setting up the after-add-to-cart popup
The After Add to Cart popup is the simpler cousin of FBT. Two scrolls down from the FBT section on the same Sales Booster product tab is After Add to Cart Popup.
It has one field: Products. You pick one or more upsell products. When the customer clicks Add to Cart on the parent product, a modal appears showing the chosen upsells with their own "Add to my order" button. They can dismiss the modal (continue without the upsell) or accept (add the upsell and continue).
Behaviourally this differs from FBT in three ways:
- Timing. FBT is visible before add-to-cart; the popup fires after.
- Per-product. The popup is product-specific (each product’s add-to-cart triggers its own popup), where FBT shows the bundle on the product page itself.
- No combined discount. The popup is a straight upsell; there’s no FBT-style "buy together and save 10%" discount built into the popup. If you want a discount, use a cart-level coupon or apply it via the
iconic_wsb_fbt_bought_together_discountfilter (see Developer reference).
A frontend Frequently Bought Together panel for a Premium Leather Wallet looks like this:
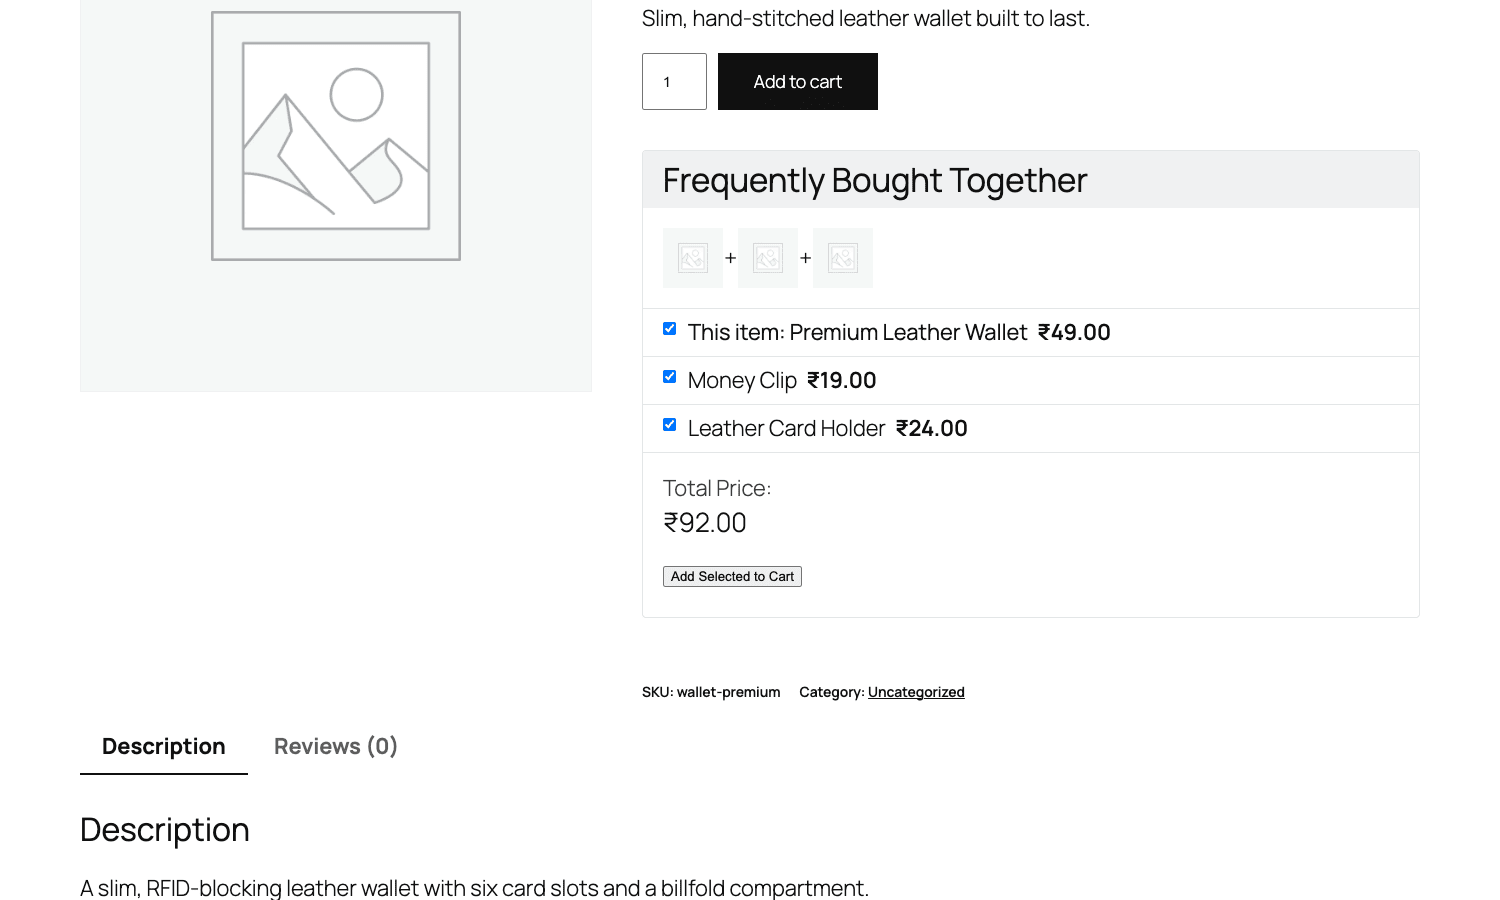
Each row is a checkbox the customer can toggle. The total price updates live as boxes are ticked or unticked. The "Add Selected to Cart" button at the bottom adds everything checked in one AJAX call.
Setting up a checkout order bump
The checkout order bump is the highlighted, framed offer that sits on the checkout page, usually right before the place-order button. It’s the one that makes 6 to 10 percent of customers tick a checkbox they hadn’t planned to tick.
Open Sales Booster, Order Bumps and you’ll land on a list of all checkout bumps. The list table has columns for Title, Impressions, Clicks, Purchases, Added Revenue and Conversion percentage, so you can see how each bump is performing at a glance.
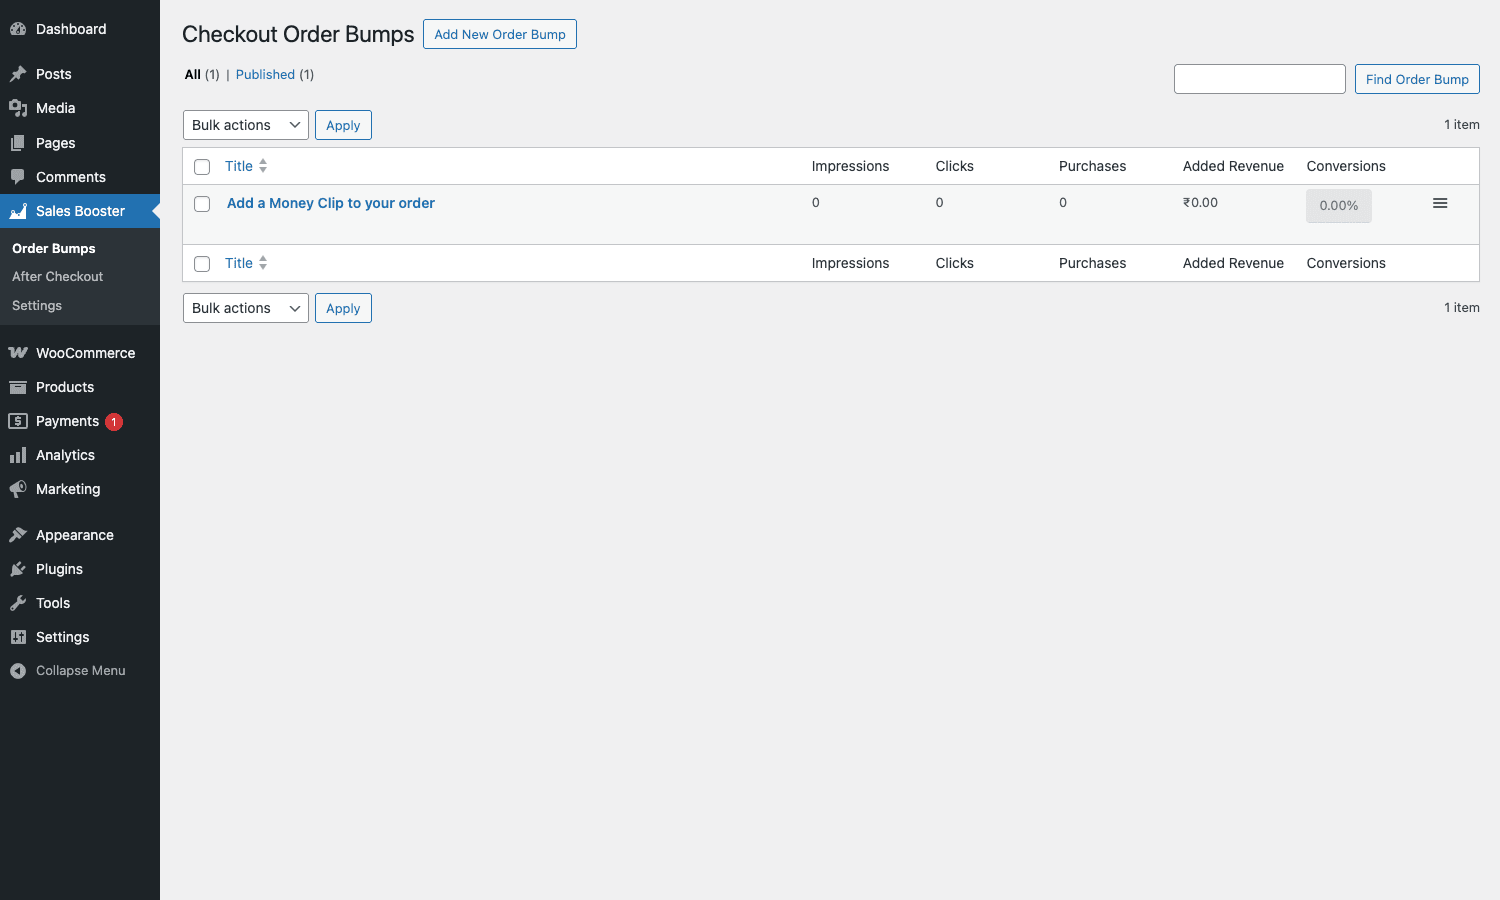
Click Add New Order Bump to create one. The editor is a three-step wizard.
Step 1: Product(s)
You pick which products the bump applies to. The dropdown defaults to "All Products" (the bump fires on every checkout). You can scope it to specific products (the bump only fires when product X is in the cart), specific categories, or specific user roles. There’s also a checkbox "Show Order Bump even if the offer product is already in the cart" so you can override the default "don’t suggest what they already have" behaviour.
This step is where you do most of the targeting work. A common pattern: a bump that fires only when the cart contains a product from the "Bags" category, offering a leather-care kit. Another: a bump that fires for guest checkouts (using the role filter) offering a discount for creating an account.
Step 2: Offer
You pick the offer product (the upsell itself) and the discount. The discount can be a flat amount or a percentage off the offer product’s price. There’s no requirement that the offer be in any particular category or have any particular price; it can be anything in your catalog.
Step 3: Customize
This is where you control how the bump looks on the checkout page.
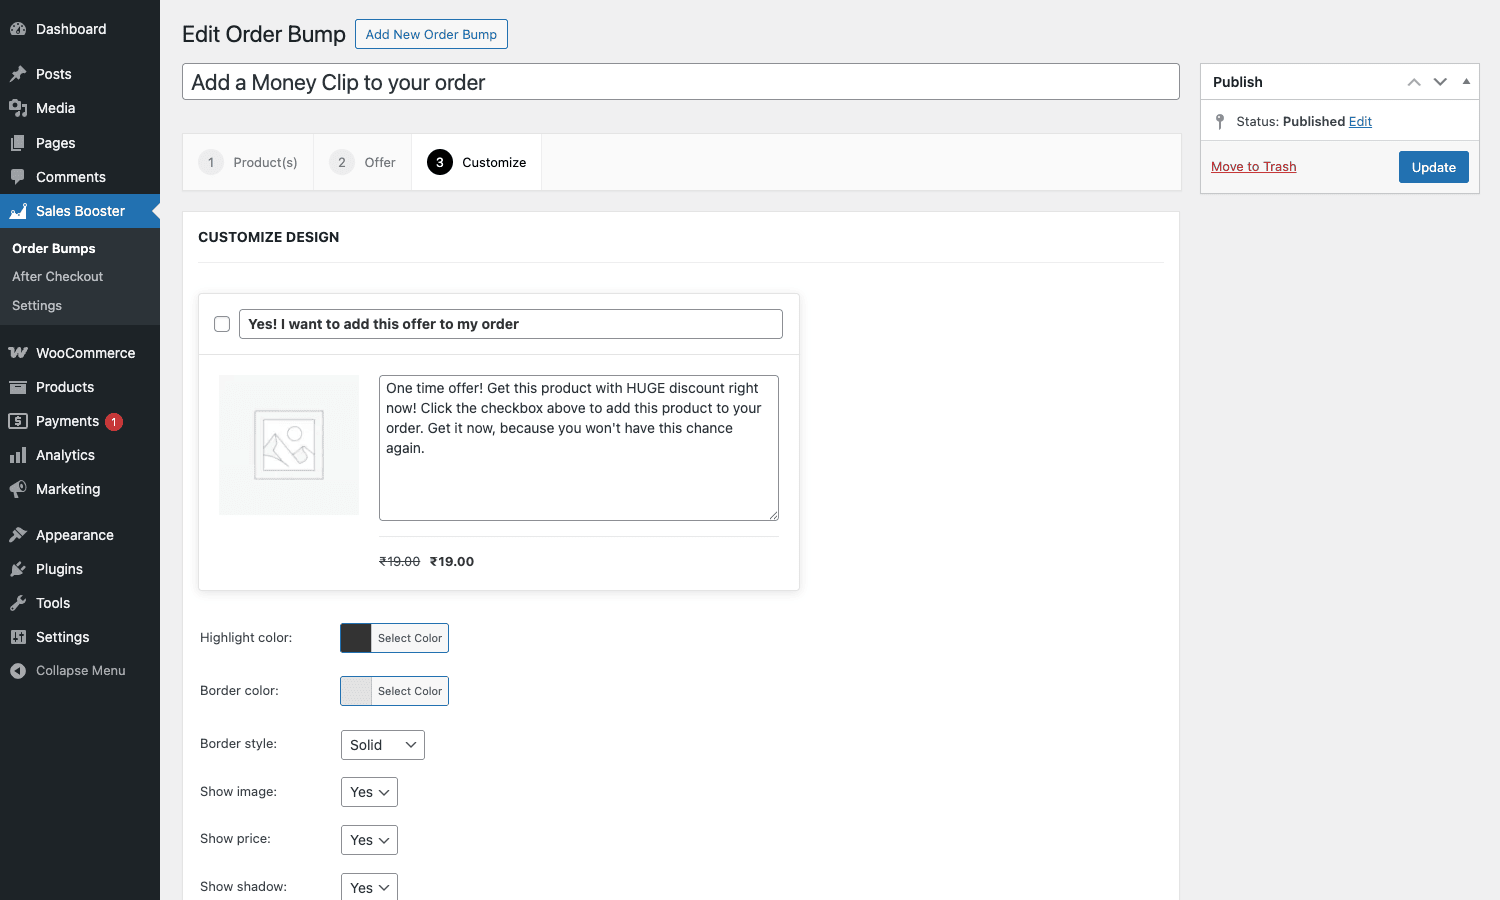
Fields:
- Checkbox text. The line next to the checkbox, e.g. "Yes! I want to add this offer to my order".
- Image. Either the offer product’s gallery image or a custom override.
- Description. The persuasive copy. Default placeholder is overly aggressive ("One time offer! HUGE discount!"). Rewrite it.
- Highlight color (default dark grey). Used for the dotted border around the bump to make it stand out.
- Border color and Border style (solid, dashed, dotted).
- Show image / Show price / Show shadow. Visual toggles.
- Position. Where on the checkout page the bump renders. Choices include "Before Place Order", "Before Order Total", "After Customer Details", and a few others. The plugin uses standard WooCommerce checkout hooks, so any custom hook order in your theme is respected.
Publish the bump and it goes live on the checkout. The first time a real customer sees it, the Impressions column on the list table ticks up. If they tick the checkbox, Clicks ticks up. If they actually complete the order with the offer included, Purchases ticks up and Added Revenue records the revenue contribution. That last column is unusually useful because most "bump" plugins only report clicks, not revenue.
Setting up an after-checkout (post-purchase) upsell
The After Checkout upsell, sometimes called a one-click upsell or post-purchase offer, is the highest-use tool in the plugin. The customer has already paid. The friction to accept the upsell is one click.
Open Sales Booster, After Checkout to see the list of post-purchase offers.
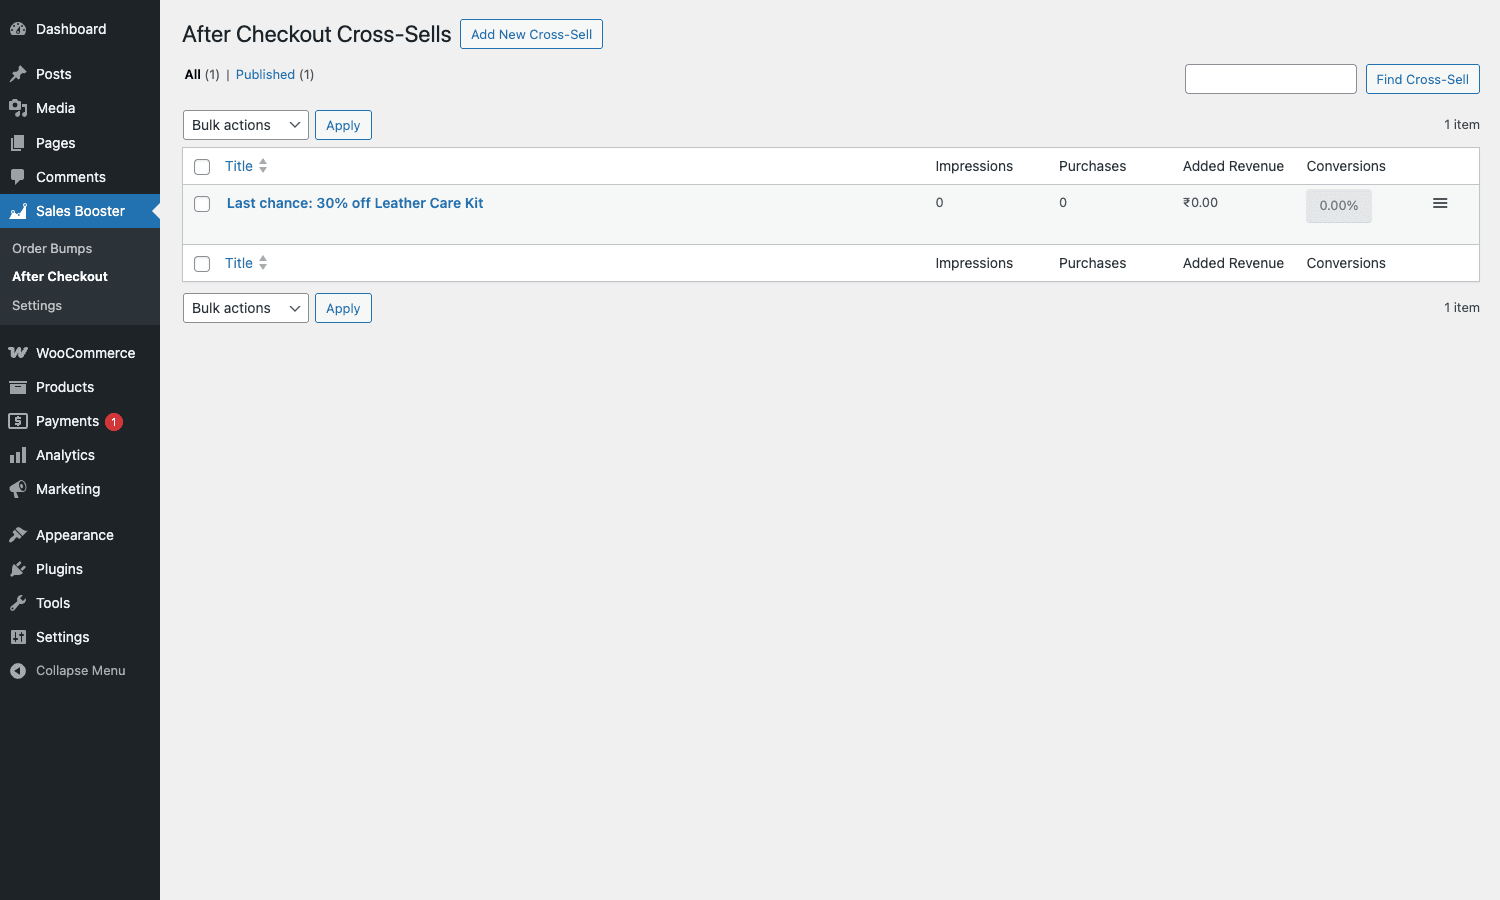
Click Add New Cross-Sell and you’ll get a similar three-step wizard:
- Product(s): who sees this offer (all customers, customers who bought X, customers who bought from category Y, customers in a specific role).
- Offer: the upsell product and discount.
- Customize: the visual.
The big difference is what happens when the customer clicks Add to my order. Instead of a new checkout flow, the plugin adds the offer to the customer’s existing order using the saved payment method, then updates the same order record. The customer doesn’t re-enter card details. The shop sees one updated order in the admin, not two separate orders.
That payment-method reuse is only possible when the payment gateway supports it. Most modern gateways do (Stripe via the official Stripe payment gateway, PayPal, Square, Authorize.net). Older gateways that require a full new transaction won’t work for post-purchase upsells; the plugin gracefully degrades by skipping the offer.
Settings tour: what each toggle does
Beyond the per-feature settings I covered above, the Settings page has a Get Started tab (just documentation links), a Dashboard tab (a quick overview of how many bumps are running and what they’ve earned), and the Design tab where most of the global behaviour lives.
The Design tab is split into sections for each surface: Frequently Bought Together, After Add to Cart Popup, Order Bump (Checkout) and Order Bump (After Checkout). Each section gives you global typography, position, button-text and colour overrides for that surface. Per-bump settings always override the global ones, so the global section is essentially "what every bump looks like by default before you customize one".
There are no analytics, no A/B testing, no list of orders that came from bumps. If you want order-level revenue attribution beyond the per-bump Added Revenue column, plug in a proper attribution tool like Pixel Manager for WooCommerce and watch the conversion events fire from there.
Shortcodes and the Gutenberg block
Iconic Sales Booster registers two shortcodes:
[iconic_wsb_fbt]renders the Frequently Bought Together panel. On a product page it uses the current product; elsewhere passproduct_id="123"to render the FBT for a specific product.[iconic_wsb_order_bump]renders the suitable at-checkout order bump on the current request. It returns an empty string outside of checkout pages.
Both shortcodes are usable inside the classic editor, Gutenberg shortcode blocks, page builders (Elementor’s "Shortcode" widget, Bricks’s shortcode element, Divi’s text module), or via do_shortcode() in a theme template.
The plugin also registers one Gutenberg block, iconic-wsb/fbt, that’s a thin wrapper around the FBT shortcode with a product picker in the block sidebar. Useful when you want a Frequently Bought Together panel inside a long-form product page that isn’t a WooCommerce product (think a "shop the look" page or a blog post promoting a curated set).
Real-world use cases
Use case 1: classic accessory cross-sell on a fashion store
You sell a leather wallet at $49. The natural companions are a $19 money clip and a $24 card holder. Set up a Frequently Bought Together panel on the wallet, point it at those two products, and give the bundle a 10% discount. The wallet page now shows "Frequently Bought Together: Wallet + Money Clip + Card Holder, Total $92, save $9.20". Customers who would have bought just the wallet now buy all three because the saving is real and the friction is one extra checkbox.
Use case 2: warranty / care-kit upsell at checkout
You sell furniture. The average order is $400. Roughly 8% of orders ship out and get a "how do I clean this?" support email. Set up a checkout order bump that offers a $19 leather-care kit at a 25% discount, regardless of which furniture product is in the cart. The bump fires on every checkout. If 6% of customers tick the box, you’ve cut your support ticket volume AND added an extra $1.14 per order across the entire store.
Use case 3: post-purchase impulse upsell
You sell a subscription box at $35/month. After checkout, you offer a one-time gift-wrap upgrade for $6. The customer has already paid. They have to click "Yes, add gift wrap" or "No thanks" before they leave the thank-you page. Conversion rates on post-purchase upsells like this often clear 20%, because the customer is in "I’ve decided to buy" mode and the friction is one tap. The $6 increment is 17% extra revenue per accepted upsell, with no extra customer-acquisition cost.
Use case 4: account-creation incentive at checkout
You want more registered customers. Set up a checkout bump that fires only for guest checkouts (User Roles filter set to "Guest"). The offer is a 10% off coupon that triggers when they create an account at checkout. Customers who would have checked out as a guest see "Create an account and get 10% off this order". Account-creation rate climbs and you now have a future remarketing list.
Use case 5: launch-day bundle for a new SKU
You’re launching a new fragrance. You want to discourage solo purchases (low AOV) and encourage 2-pack purchases for gifting. On the new product, set up Frequently Bought Together pointing at the same fragrance again (Iconic allows the same product twice) with a 15% bundle discount. The product page shows "Buy two and save 15%". This works without setting up a separate "2-pack" SKU, which means inventory and reporting stay clean.
Use case 6: replace WooCommerce native cross-sells
WooCommerce’s built-in cross-sells appear on the cart page and are basically invisible because customers blow past the cart screen to checkout. Move the cross-sell logic to a Frequently Bought Together panel on the product page (where the customer spends more time) and you’ll see a higher click-through rate than the native cart cross-sells ever produced.
Developer reference
Iconic Sales Booster exposes a deep set of filters and a handful of actions. Everything is prefixed iconic_wsb_.
Filter: change the FBT discount before it’s applied
Customize the discount amount based on cart contents, customer role, season, whatever:
add_filter(
 'iconic_wsb_fbt_bought_together_discount',
 function( $discount, $offer_product_id, $cart_product_ids ) {
 // Double the discount for logged-in members of a "vip" role.
 if ( in_array( 'vip', wp_get_current_user()->roles, true ) ) {
 return $discount * 2;
 }
 return $discount;
 },
 10,
 3
);
The filter fires before the discount is added as a cart fee, so anything you return becomes the fee amount.
Filter: validate the bundle differently
By default, the bundle discount applies when every related product is in the cart. If you want a looser rule (any two out of three, for example), override the gate:
add_filter(
 'iconic_wsb_is_valid_cart_discount',
 function( $is_valid, $missing_products, $offer_product_id, $cart_product_ids, $fbt_meta_products_ids ) {
 // Allow the bundle discount if at least 2 of the 3 related products are in the cart.
 $required = count( $fbt_meta_products_ids );
 $present = $required - count( $missing_products );
 return $present >= 2;
 },
 10,
 5
);
This is the cleanest hook for "build your own bundle" logic on top of FBT.
Filter: customize the at-checkout bump position
If your theme uses a non-standard checkout hook order, force the bump to render at a specific point:
add_filter(
 'iconic_wsb_order_bump_position',
 function( $render_hook, $bump ) {
 // Force every checkout bump to render at the same hook regardless of per-bump setting.
 return 'woocommerce_review_order_before_payment';
 },
 10,
 2
);
The same hook is reused for both the at-checkout bump rendering and the table-row wrapping decision (iconic_wsb_order_bump_apply_table_row).
Filter: change the FBT image size
By default the FBT thumbnails use WooCommerce’s "thumbnail" image size. Switch to a smaller or larger size for a particular use case:
add_filter(
 'iconic_wsb_order_bump_image_size',
 function( $size, $manager, $offer_product ) {
 return 'woocommerce_gallery_thumbnail';
 },
 10,
 3
);
The third argument is the offer product object, so you could pick the image size based on the product’s category or attributes.
Filter: gate the bump by custom logic
Hide the bump in specific contexts (B2B accounts, wholesale orders, certain countries):
add_filter(
 'iconic_wsb_check_suitability_at_checkout',
 function( $is_suitable ) {
 // Don't show bumps to wholesale customers; they already get bulk pricing.
 if ( in_array( 'wholesale_customer', wp_get_current_user()->roles, true ) ) {
 return false;
 }
 return $is_suitable;
 }
);
There’s an iconic_wsb_check_suitability_after_checkout companion filter that does the same for post-purchase upsells.
Filter: control how many times the discount applies
By default, if a customer adds three "bundles" to their cart (three sets of the wallet + money clip + card holder), the bundle discount is applied three times. Cap or stack differently:
add_filter(
 'iconic_wsb_fbt_apply_discount_times',
 function( $times, $offer_product_id, $cart_product_ids ) {
 // Apply the bundle discount once per order, no matter how many bundles are in the cart.
 return min( 1, $times );
 },
 10,
 3
);
Filter: customize the FBT discount message
The line that says "You’ll save $9 if you buy these together" is filterable:
add_filter(
 'iconic_wsb_fbt_discount_mesage', // note: 'mesage' typo is in the source
 function( $message, $offer_product_id ) {
 $product = wc_get_product( $offer_product_id );
 return sprintf( 'Bundle %s and save extra!', $product->get_name() );
 },
 10,
 2
);
Yes, the filter name has a typo (mesage not message) that goes back several releases. It’s a known wart; we use it because changing it would break every site that filtered it. Don’t fix the typo when you write your callback.
Filter: pre-filter the product picker in admin
The AJAX product search inside the bump editor returns 30 products by default. Bump it or scope it:
add_filter(
 'iconic_wsb_json_search_products_and_variations_limit',
 function() {
 return 100;
 }
);

add_filter(
 'iconic_wsb_json_search_products_and_variations_result',
 function( $products ) {
 // Hide a specific product from being selectable as an offer.
 unset( $products['internal-sku-only'] );
 return $products;
 }
);
Action: log every saved checkout bump
The plugin fires iconic_wsb_before_save_checkout_bump and iconic_wsb_after_save_checkout_bump whenever a bump CPT entry is saved. Useful for audit logs:
add_action(
 'iconic_wsb_after_save_checkout_bump',
 function( $bump, $update ) {
 $verb = $update? 'updated' : 'created';
 error_log( sprintf(
 'Iconic checkout bump %s by user %d: %s',
 $verb,
 get_current_user_id(),
 $bump->get_title()
 ) );
 },
 10,
 2
);
Filter: turn off frontend assets where they’re not needed
By default the plugin’s frontend JS and CSS load on every WooCommerce page. If you don’t use FBT on category pages and want to save a couple of HTTP requests:
add_filter(
 'iconic_wsb_enqueue_frontend_assets',
 function( $should_enqueue ) {
 if ( is_product_category() || is_shop() ) {
 return false;
 }
 return $should_enqueue;
 }
);
Pair this with a caching plugin like WP-Optimize Premium (which also has its own per-page asset exclusion lists) for full control.
Two custom post types worth knowing about
The two checkout bump types are stored as WordPress custom post types:
at_checkout_obfor at-checkout bumpsafter_checkout_obfor post-purchase cross-sells
They’re private CPTs (public => false), so they don’t have public URLs. They show up in wp post list --post_type=at_checkout_ob and wp post list --post_type=after_checkout_ob if you’re scripting against the database. WP-CLI can create them, update them and delete them like any other CPT.
The bump’s settings are stored in normal post meta with the iconic_wsb_ prefix. To find the offer product ID of a saved at-checkout bump, look at _iconic_wsb_offer_product_id post meta. Discount, conditions, render position and customization options follow the same pattern. If you’re doing bulk imports or programmatic migrations between staging and production, this is enough to script.
Why the locate_template filter is useful
iconic_wsb_locate_template lets you replace any plugin template with a custom one without forking the plugin. The plugin’s templates live in templates/frontend/order-bump/.... To override the FBT row template, copy it to your-theme/iconic-woo-sales-booster/order-bump/product/bump-products.php and the filter will pick it up automatically (the plugin already checks the theme path before the plugin path).
Compatibility, performance, and gotchas
The plugin ships dedicated compatibility shims for several common stack pieces:
- HPOS (High-Performance Order Storage). Compatibility is declared via
FeaturesUtil::declare_compatibility('custom_order_tables', __FILE__, true). Bumps work whether HPOS is on or off. - WooCommerce Checkout block. Supported via a Store API update callback registered under the
iconic-sales-boosternamespace. The block-based checkout fires the bump renderer at the same logical points as the legacy shortcode checkout. - WooCommerce Subscriptions. Bumps work on subscription-product checkouts. The discount fee is recorded on the parent order, not on renewals.
- WooCommerce Bookings. Bumps work on booking products. The plugin defers cart calculations until Bookings finishes its date-validation pass to avoid double-counting fees.
- WPML and WooCommerce Multilingual. Bumps can be translated; the multilingual integration handles the swap.
- Variation Swatches for WooCommerce and WooCommerce Attribute Swatches. Variation pickers inside FBT panels render correctly using whichever swatch plugin is active.
- Divi. A z-index/modal compat shim keeps the after-add-to-cart popup above Divi’s own animations.
What it doesn’t do, and where to plug a hole:
- No A/B testing. If you want to compare two bump variants, run them sequentially (one for a week, another for a week) or use a third-party A/B tool like Nelio AB Testing that hooks into the checkout flow.
- No abandoned-cart recovery. The plugin doesn’t email cart-abandoners. For that you want a dedicated tool. FluentCRM Pro or Klaviyo’s WooCommerce integration are common pairings.
- No funnel pages. If you want sales-page-then-upsell-page-then-thank-you funnel flows (Squarespace-style), use CartFlows Pro or WPFunnels Pro alongside this. Iconic Sales Booster is a "bump and upsell on the existing pages" tool; it’s not a full funnel builder.
- No sticky add-to-cart bar. The product page gets FBT and the after-add-to-cart popup, but no floating bar that follows the customer as they scroll. That’s a different category of plugin and a different conversion lever.
Performance notes
The frontend JS bundle is small (under 30 KB minified, gzip-compressed) and only loads on WooCommerce pages by default. The CSS is similarly lean. The FBT panel doesn’t issue any HTTP requests until the customer clicks "Add Selected to Cart", at which point one AJAX request is made.
The cart-fee logic that applies bundle discounts runs on every cart calculation. On stores with very large carts (50+ items) this could add noticeable cart-calc time. If you see slow cart pages, profile the woocommerce_cart_calculate_fees hook with Query Monitor and you’ll see Iconic’s add_fbt_discount method appear. Mitigations: split very large carts into multiple smaller carts, or add a short-circuit using the iconic_wsb_is_valid_cart_discount filter to bail out early for known-irrelevant cart compositions.
One known wart
The iconic_wsb_fbt_discount_mesage filter name has a typo: "mesage" instead of "message". It’s been there for years. The plugin team has kept it to avoid breaking sites that filter it. If you’re writing a callback, use the misspelled name.
A second minor wart: iconic_wsb_inital_price is also misspelled (should be "initial"). Same story.
Pricing and licensing
Iconic sells Sales Booster directly at iconicwp.com with three tiers (1 site, 5 sites, 25 sites) plus a lifetime / Iconic Plus subscription that includes the rest of their catalog. Annual renewals are the norm; lapse the subscription and you lose updates but the plugin keeps running.
The version on GPL Times is the same plugin under the GPL license that already covers it. You don’t need an Iconic account, you don’t get a license-key prompt, and you get the full feature set including post-purchase upsells. Updates are pushed to the same downloadable file on GPL Times when Iconic ships a new release, so checking back periodically keeps you current.
How it compares to other tools
For Frequently Bought Together specifically, the main alternatives on the WordPress side are:
- YITH WooCommerce Frequently Bought Together. Free + premium. Similar surface area for FBT but no checkout bump and no post-purchase upsell.
- WooCommerce Product Bundles. Different model: lets you create a "bundle" as its own SKU with its own page. Use Product Bundles when you want a dedicated bundle product (and one cart line); use Iconic when you want per-product FBT panels with line-item-level granularity.
- Beeketing. The closest commercial competitor before it shut down. Now defunct.
- Sales Booster for WooCommerce (CodeCanyon). Different plugin from a different vendor; mostly focused on countdown timers and visual urgency rather than upsells.
For post-purchase upsells specifically:
- CartFlows Pro. Full funnel builder. Use CartFlows when you want a sales-page-into-checkout-into-upsell flow that replaces WooCommerce’s default cart/checkout. Use Iconic when you want to add post-purchase upsells to the existing WooCommerce thank-you page without changing the rest of the flow.
- WPFunnels Pro. Visual funnel builder. Same trade-off as CartFlows.
- One Click Upsell Funnel for WooCommerce. Free + pro. Narrower than Iconic (only post-purchase, no FBT or pre-checkout bump).
For a single store, Iconic is usually the cleanest all-in-one if you don’t need the funnel-page concept. If you do need funnel pages, run both Iconic (for FBT and at-checkout bumps on regular product pages) and CartFlows Pro (for any pages that have a dedicated funnel flow). They coexist fine.
Frequently asked questions
Does Iconic Sales Booster slow down my store?
The frontend bundle is small and only loads on WooCommerce pages. The biggest performance question is the bundle-discount cart calculation, which runs on every cart total recompute. On a normal store with a normal cart size (under 20 items), the overhead is negligible. On enormous carts, see the Performance notes above.
Does it work with the new WooCommerce Checkout block?
Yes. Compatibility was added a while back. The plugin registers a Store API update callback under the iconic-sales-booster namespace, so the block-based checkout fires the same bump logic the legacy shortcode checkout does.
Can I have a different FBT panel on every product?
Yes. The companion products and the discount are configured per-product on the Sales Booster tab of the product edit screen. The global Design tab only sets behaviour and styling defaults.
Can I run multiple checkout bumps?
Yes. Each checkout bump is its own CPT entry with its own targeting rules. The plugin picks the most-suitable bump for each checkout based on the bumps’ rules. If you have two bumps that both qualify for the same checkout, the one with the higher priority wins (you can also override via the iconic_wsb_checkout_order_bump_priority_key filter).
Does the post-purchase upsell work with PayPal / Apple Pay / Square?
It works with any gateway that supports re-charging the customer’s saved payment method without re-prompting for card details. The official Stripe gateway, PayPal Standard (with billing agreements), Square, Authorize.net and most modern gateways support this. If the gateway doesn’t support it, the post-purchase upsell is skipped gracefully (the customer doesn’t see it).
Can I import / export bumps between staging and production?
Yes. Bumps are normal WordPress posts (under the at_checkout_ob and after_checkout_ob post types), so any tool that imports/exports posts works. The plugin also has its own Bulk Import/Export class (Iconic_WSB_Bulk_Import_Export) that handles the per-product FBT relationships, which are stored in product meta. The simplest approach: WP All Export Pro, set the post type to at_checkout_ob, export to CSV, then import on the other site.
Does the FBT discount stack with coupons?
Yes. The discount is a WooCommerce cart fee, not a coupon. Coupons and the FBT fee both apply to the same cart and stack additively. If you don’t want them to stack, use the iconic_wsb_is_valid_cart_discount filter to suppress the bundle discount when a coupon is applied.
Can I render FBT outside a product page?
Yes. Use the [iconic_wsb_fbt product_id="123"] shortcode or the iconic-wsb/fbt Gutenberg block, both of which accept an explicit product ID. This is useful on lookbook pages, comparison pages, and landing pages.
Does the plugin track conversions?
Per-bump it tracks impressions, clicks (checkbox ticked), purchases (completed orders that included the offer) and added revenue. It doesn’t push events into Google Analytics, Facebook Pixel, Meta CAPI or any third-party analytics tool out of the box. If you want analytics-side conversion tracking, install a marketing-pixel plugin like Pixel Manager for WooCommerce and configure it to fire add_to_cart events when the bump is accepted.
Can I A/B test bumps?
Not natively. Run sequential tests (one for a week, another for a week) or use a third-party A/B testing tool that integrates with WooCommerce.
What happens if a customer removes the bump offer from their cart?
The plugin’s logic checks the cart state on every recalculation. If the offer is removed, the related bundle discount (if any) is removed too on the next cart calc. No orphan discounts, no stale fees.
Does it work with WooCommerce Subscriptions?
Yes. Bumps fire on subscription product checkouts. The discount is recorded on the parent order; subsequent renewals don’t include the bundle discount unless you explicitly script that behaviour.
Can I limit a checkout bump to specific countries?
Not directly through the UI. The product/category/role targeting in the UI is the standard set. For country targeting, use the iconic_wsb_check_suitability_at_checkout filter and check WC()->customer->get_billing_country() inside your callback.
Final thoughts
Iconic Sales Booster occupies a useful middle ground in the WooCommerce upsell market. It’s not a funnel builder, so don’t reach for it if you want sales pages that replace your normal product pages. It’s not a sticky-bar / countdown / urgency toolkit, so don’t expect those features. What it is, is a tightly-scoped plugin that puts four high-use upsell moments (product page FBT, after-add-to-cart popup, checkout bump, post-purchase upsell) into one consistent admin UI with one consistent filter namespace and one consistent set of conversion stats.
The thing that keeps me coming back to it on client builds is the post-purchase upsell specifically. Adding revenue after the customer has already paid, with one click and no card re-entry, is the highest-use conversion improvement most WooCommerce stores have available to them. Iconic does it cleanly without forcing you to migrate to a custom checkout. The FBT and checkout bump are competent execution of well-understood patterns; the post-purchase upsell is where it punches above its weight.
If you’re already running CartFlows Pro or WPFunnels Pro, Iconic Sales Booster still adds value because those tools focus on funnel-page flows where Iconic focuses on adding bumps to the regular pages. They’re complementary, not competing. If you’re not running a funnel builder, Iconic Sales Booster is probably the single biggest revenue-per-visitor improvement you can install in an afternoon.