


If you already sell anything through WooCommerce, the easiest way to start selling event tickets is to keep WooCommerce as the cart, the checkout, the tax engine, the refund flow, and bolt a ticketing layer on top of the products you already know how to manage. That’s exactly what FooEvents for WooCommerce does. It turns a regular Woo product into an "event", generates a unique ticket per attendee on checkout, and gives you a mobile check-in app and a built-in reporting screen on the back end.
This guide walks through what FooEvents actually does, how to set it up step by step, how to use it for real scenarios (paid conferences, free workshops, multi-day festivals, Zoom webinars), and how developers can extend it. There’s a screenshot for each major screen so you can match what you see in the article with what you’ll see in your own WP admin.
Table of contents
- What FooEvents for WooCommerce is
- Key features
- How FooEvents works for users
- Installation and setup
- Creating your first event
- Configuring the ticket email and design
- Running check-in on event day
- Real-world use cases
- Add-ons that extend FooEvents
- Developer reference
- Performance, compatibility, and gotchas
- Pricing and licensing
- Frequently asked questions
- Final thoughts
What FooEvents for WooCommerce is
FooEvents is a WordPress plugin (from a South Africa based team that’s been shipping it since 2014) that extends WooCommerce with event and ticketing functionality. The "for WooCommerce" part of the name is important. There’s also a stand-alone version of FooEvents that doesn’t require Woo, but WooCommerce is the one most stores want, because it reuses every payment gateway, tax rule, shipping class, coupon, and report you’ve already configured.
Mechanically, the plugin registers:
- A "FooEvents" group of tabs inside the WooCommerce Product Data panel (Event Settings, Ticket Settings, Event Terminology, Event Export, Stationery Builder, Event Expiration, Event Integration).
- A custom post type called
event_magic_tickets, one row per attendee ticket, so each ticket is a real WordPress object you can list, search, and hook into. - A top-level "FooEvents" menu in wp-admin with Tickets, Settings, Reports, Ticket Themes, Getting Started, Import Tickets, and Import Check-ins.
- A REST namespace,
fooevents/api/v1/, that the official FooEvents Check-ins mobile app talks to. - Two Gutenberg blocks (Event Listing and Event Attendees) for the front-end and the editor.
What you sell in WooCommerce is still a normal product. The difference is that when somebody completes the order, FooEvents generates one ticket post per quantity purchased, attaches a unique hash and barcode to each, emails the buyer a styled HTML ticket (with the barcode and an ICS calendar attachment), and then waits for that ticket to be scanned at the door.
The plugin’s value compared to "calendar-first" alternatives like The Events Calendar Pro or Modern Events Calendar is its angle. Calendar plugins are designed around event listings first and treat selling tickets as an add-on. FooEvents treats the ticket as the unit of work. If your goal is "sell tickets, check people in", FooEvents is the more direct path.
Key features
- Tickets as WooCommerce products. Any Woo product type (simple, variable, grouped) can be flipped into an event by ticking one checkbox. Price, tax class, stock, sale price, and shipping all behave like a normal product.
- Five event types out of the box. Single (one day), Sequential days (a fixed sequence of consecutive days), Specific days (pick the dates), Bookable (recurring time slots via the FooEvents Bookings add-on), Seating (a row/seat grid via the Seating add-on).
- Per-attendee ticket emails. A styled HTML email is sent to the buyer with one ticket per attendee. Optionally, the email goes directly to each attendee if you collected their address during checkout.
- QR code or barcode on every ticket. Used by the FooEvents Check-ins mobile app (iOS + Android) or by the Express Check-in scanner add-on on a desktop.
- A built-in mobile app, free for organisers. The free app reads the REST API on your site, lets organisers scan QR codes at the door, and toggles each ticket’s status in real time. It works offline and syncs when it gets back online.
- Custom attendee fields. With the Custom Attendee Fields add-on, you can collect anything per attendee at checkout (T-shirt size, dietary requirements, badge name, photo).
- Magic ticket links. A login-free URL on each ticket lets attendees view, download, or self check-in without an account. Useful for free events where you don’t want to force registration.
- ICS calendar attachment. Every ticket email includes a calendar attachment that adds the event to Google Calendar, Apple Calendar, or Outlook with one click.
- Webinar integrations. Native support for Zoom, Google Meet, Microsoft Teams, and Webex. The plugin auto-generates a meeting per attendee, or assigns one shared meeting to all of them, and embeds the join link in the ticket email.
- PDF tickets via add-on. With the FooEvents PDF Tickets add-on, every email also gets a PDF attachment in addition to the HTML body.
- Per-event "Thank you" redirect. Send buyers of a specific event to a custom thank-you page (a welcome video, a Slack invite, a Discord link) instead of the default Woo order-received page.
- Bulk ticket import. A CSV importer adds tickets without going through the cart. Handy for migrating from a previous ticketing system or comping VIPs.
- Built-in reports. Per-event report with revenue, ticket count, check-in and check-out tallies, plus net revenue / gross revenue / tickets sold line charts.
- WPML and Polylang ready. Plugin ships a
wpml-config.xml, so each event’s title, description, and email fields can be translated per language.
That’s a long list, and it grows further once you add the official add-ons. The free core covers everything most events need.
How FooEvents works for users
The buyer flow is pretty simple, which is the point. It looks like this:
- A visitor lands on a normal-looking Woo product page (your event). They pick a quantity, hit "Add to cart", and check out as they would for any other purchase.
- As part of checkout, if you’ve enabled attendee fields, they fill in name and email per ticket. The cart enforces one row of fields per quantity. If they bought three tickets, they get three rows.
- Payment goes through whatever gateway you’ve configured in WooCommerce. Stripe, PayPal, manual bank transfer, COD, all of them work, since FooEvents doesn’t replace the checkout pipeline.
- The order completes. FooEvents fires
do_action( 'fooevents_create_ticket',... )once per quantity, generates a ticket post for each attendee, assigns it a unique hash, builds a QR/barcode, and emails the buyer (and optionally each attendee individually) the ticket. - The email contains the ticket image, the QR code, event date and venue, an ICS calendar attachment, and a "View ticket" link (the magic-link URL).
- The attendee shows up at the event. The organiser opens the FooEvents Check-ins app on their phone, scans the QR code, and the ticket flips from "Not Checked In" to "Checked In". That single action calls the REST
update_ticket_statusendpoint, which firesdo_action( 'fooevents_check_in_ticket',... )on the server. - Back in wp-admin, the Reports screen now shows a check-in count incrementing in near-real-time.
It’s the kind of flow that disappears when it works. No external accounts to create, no separate ticketing dashboard to learn, no commission per ticket. You’d never know FooEvents existed unless you looked at the admin.
Installation and setup
Either way, the steps are the same.
-
Install WooCommerce first. FooEvents declares
WC requires at least: 8.0.0, so you want a current Woo install. If you’re starting fresh, install WooCommerce from the WordPress.org repository and run through its Setup Wizard so currency, store address, and tax rules are in place. -
Upload and activate FooEvents. In
Plugins -> Add New -> Upload Plugin, pick thefooevents.zipfile and click Activate. The plugin adds a top-level FooEvents item to the admin sidebar and an "Event Settings" tab inside the WooCommerce Product Data box. -
Open
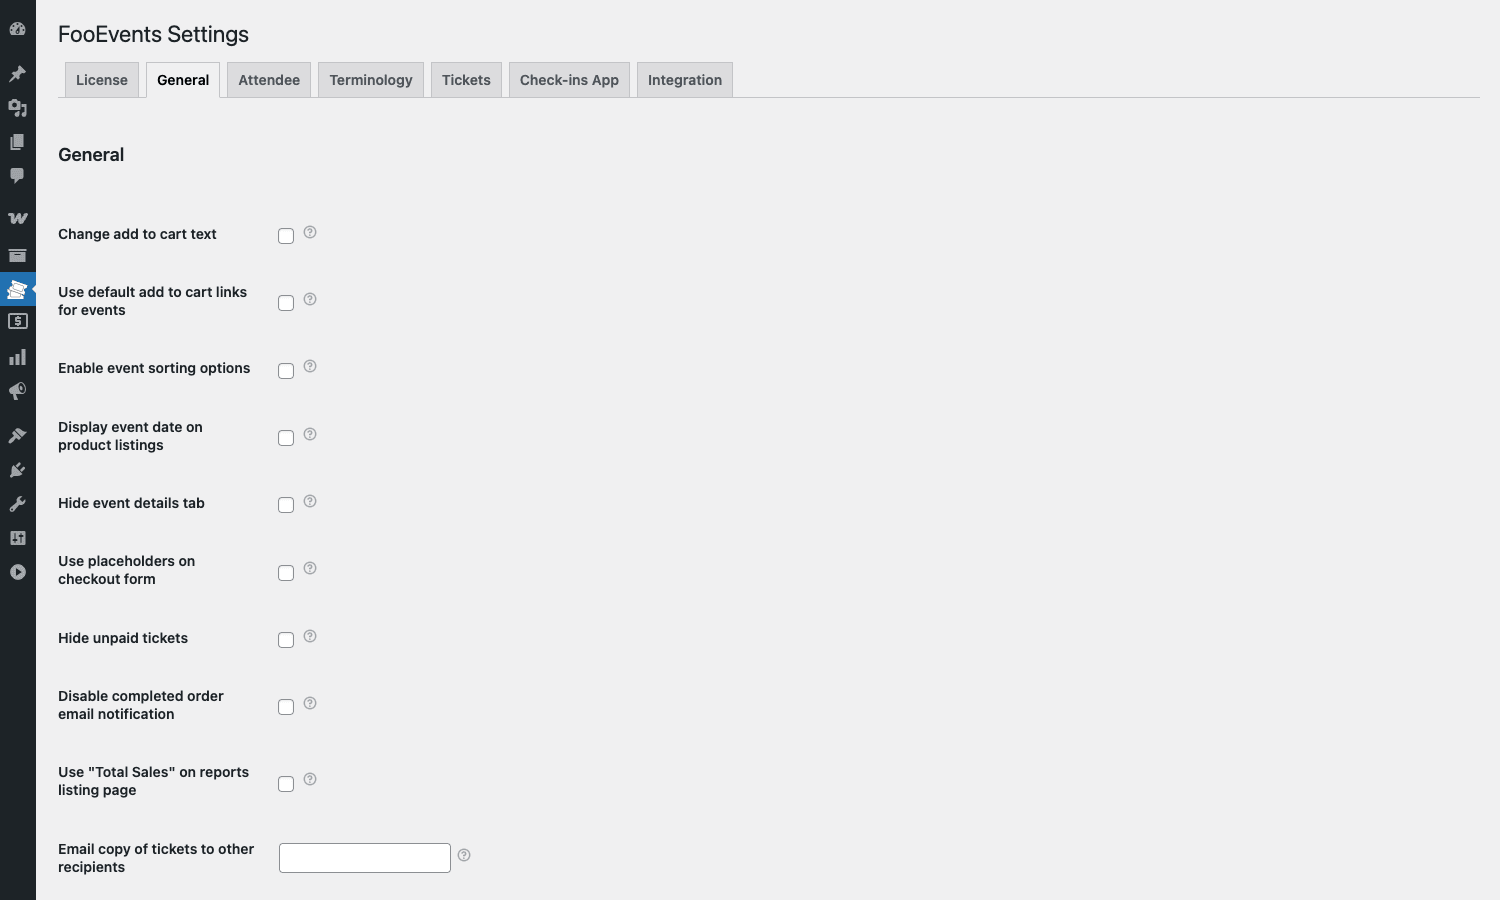
FooEvents -> Settingsonce. Each tab has only a few options and they all default to sensible values, but at minimum confirm:
- General: Whether to display the event date on product listings, whether to use the default WooCommerce "Add to cart" text on event products, whether to hide unpaid tickets from reports.
- Attendee: Which attendee fields are required (first name, last name, email are usually on; phone, company, designation are optional).
- Tickets: The global default ticket theme (you can override per event later).
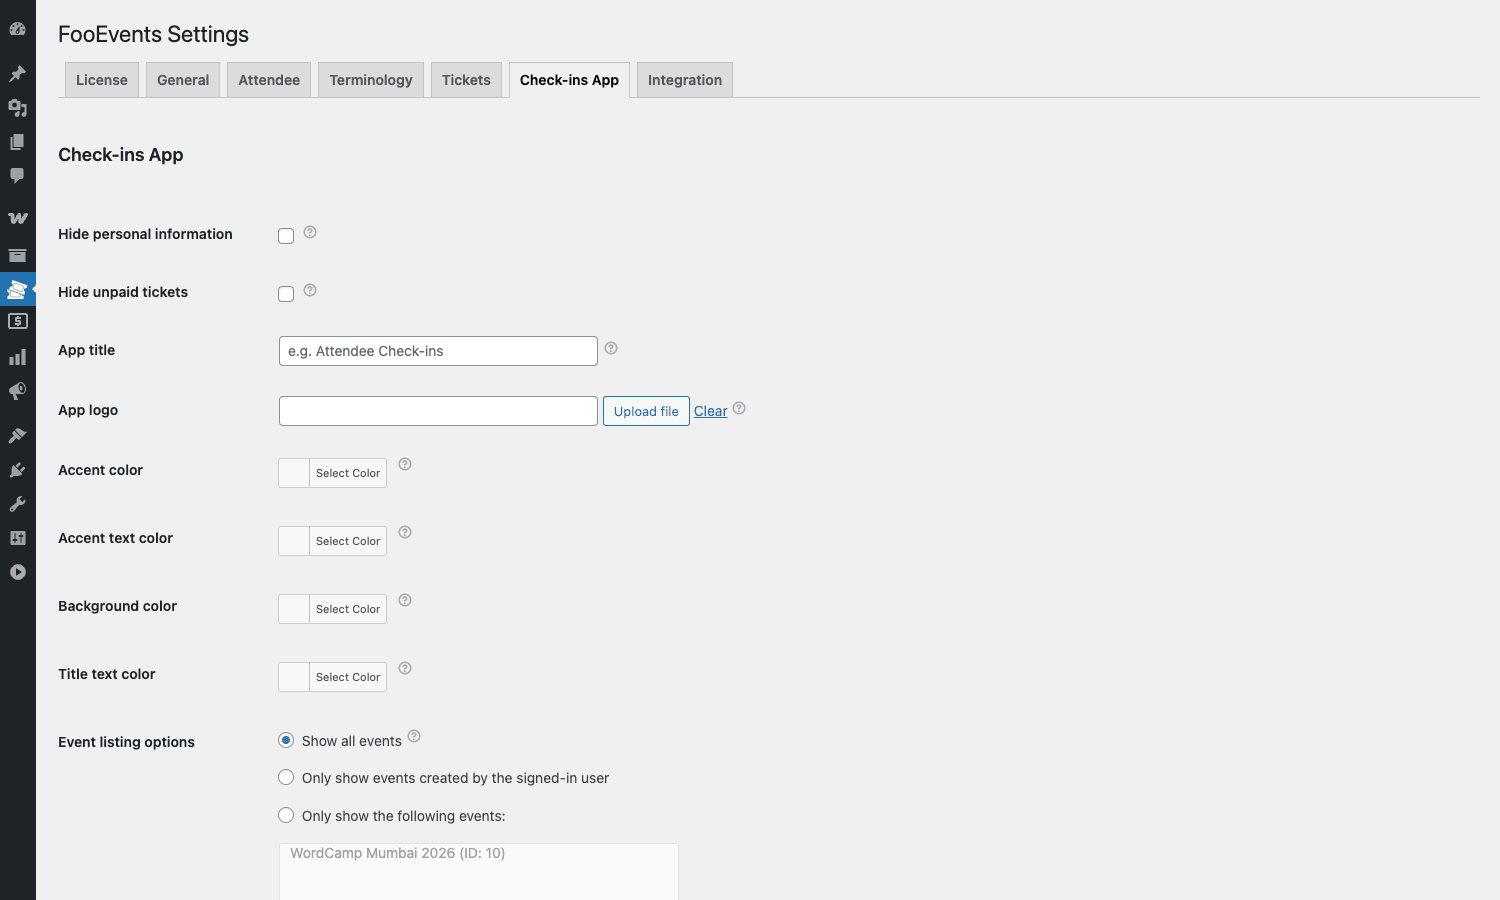
- Check-ins App: Pick a WP user the mobile app will sign in as. This user must have
edit_postscapability, so a Shop Manager works, an Editor works, an Author doesn’t. - Integration: If you plan to run webinars, paste in your Zoom / Webex / Google Meet / MS Teams credentials here.
- (Optional) Decide on a permalink for tickets. The
event_magic_ticketspost type lives at/event_magic_tickets/<id>/by default. Most sites are fine with that. If you want a cleaner URL, you can filter it but most don’t bother since tickets aren’t really meant to be browsed.
That’s the global setup. From here on every event lives inside the WooCommerce Products screen, the same place you create regular products.
Creating your first event
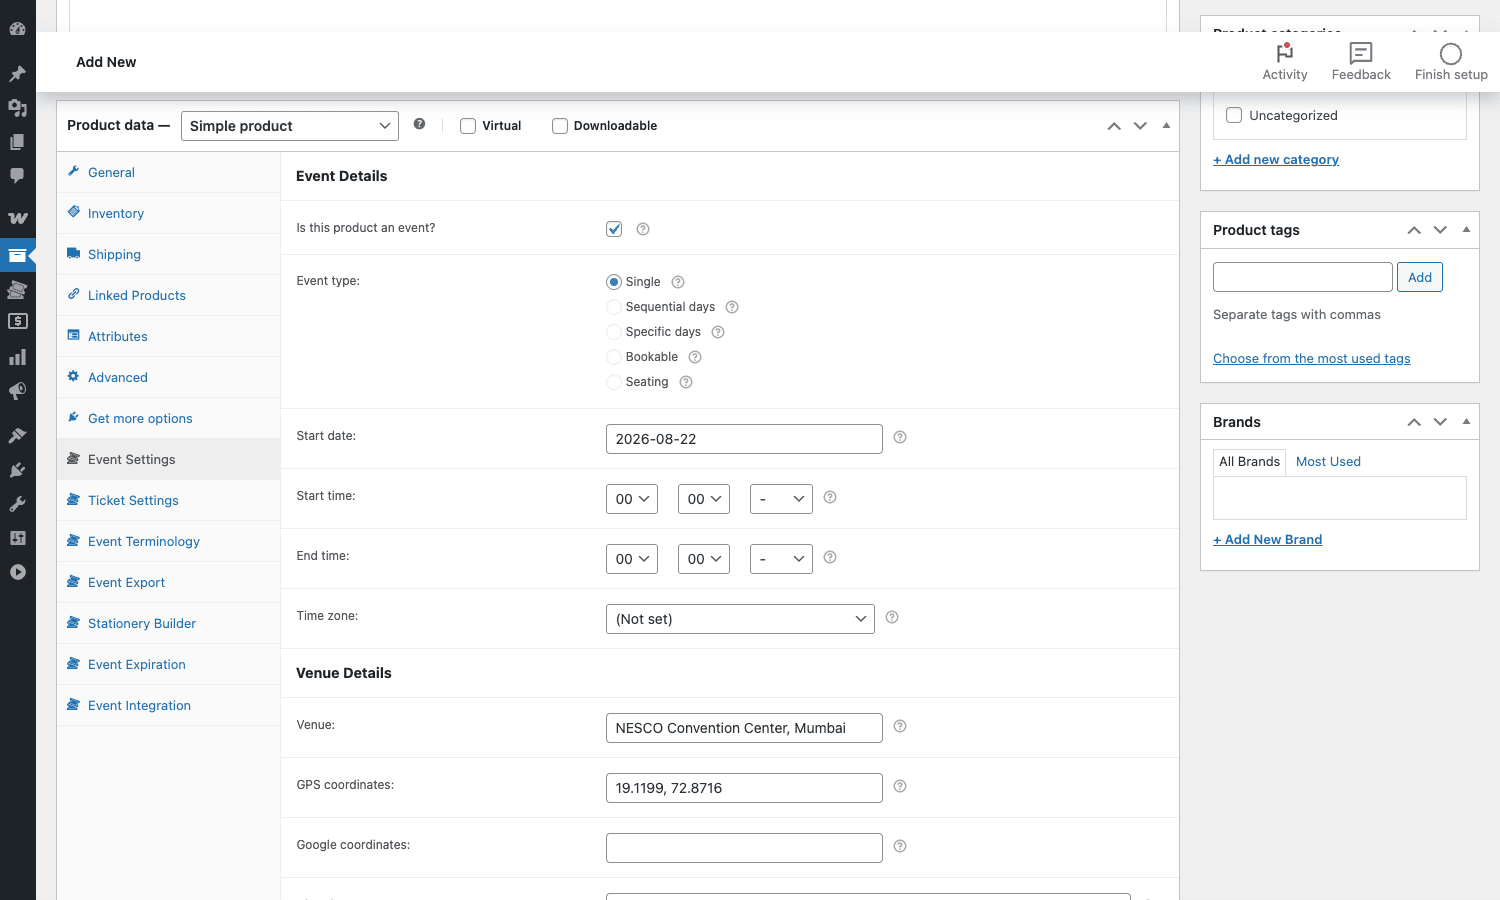
This is where most of the actual configuration happens. Go to Products -> Add New and you’ll see the familiar Woo product editor. The Product Data box now has a row of FooEvents tabs alongside General, Inventory, Shipping, Linked Products, Attributes, Variations, and Advanced.
- Give the product a title (the event name), a description (the event’s "about" copy), a featured image (used on the product page and inside the ticket), and a price. Treat it like any product: assign a category, optionally a brand, optionally a tag.
- Tick the "Is this product an event?" box at the top of the Event Settings tab. The rest of the tab unlocks.
- Pick an event type. Single for a one-day event is the most common; Sequential days for a 3-day workshop; Specific days for "every Tuesday in October"; Bookable for time-slot based bookings (needs the Bookings add-on); Seating for assigned-seat events (needs the Seating add-on).
- Set the start date, start time, end time, and time zone.
- Fill in venue, GPS coordinates (used by the "View on map" link in the ticket email), and optionally a Google Maps link.
- Save the product as Draft and look at the URL bar. You should see
post.php?post=<id>, where<id>is your event’s product ID. That ID is what reports, the mobile app, and the REST API will use to refer to this event.
The other FooEvents tabs are worth a tour:
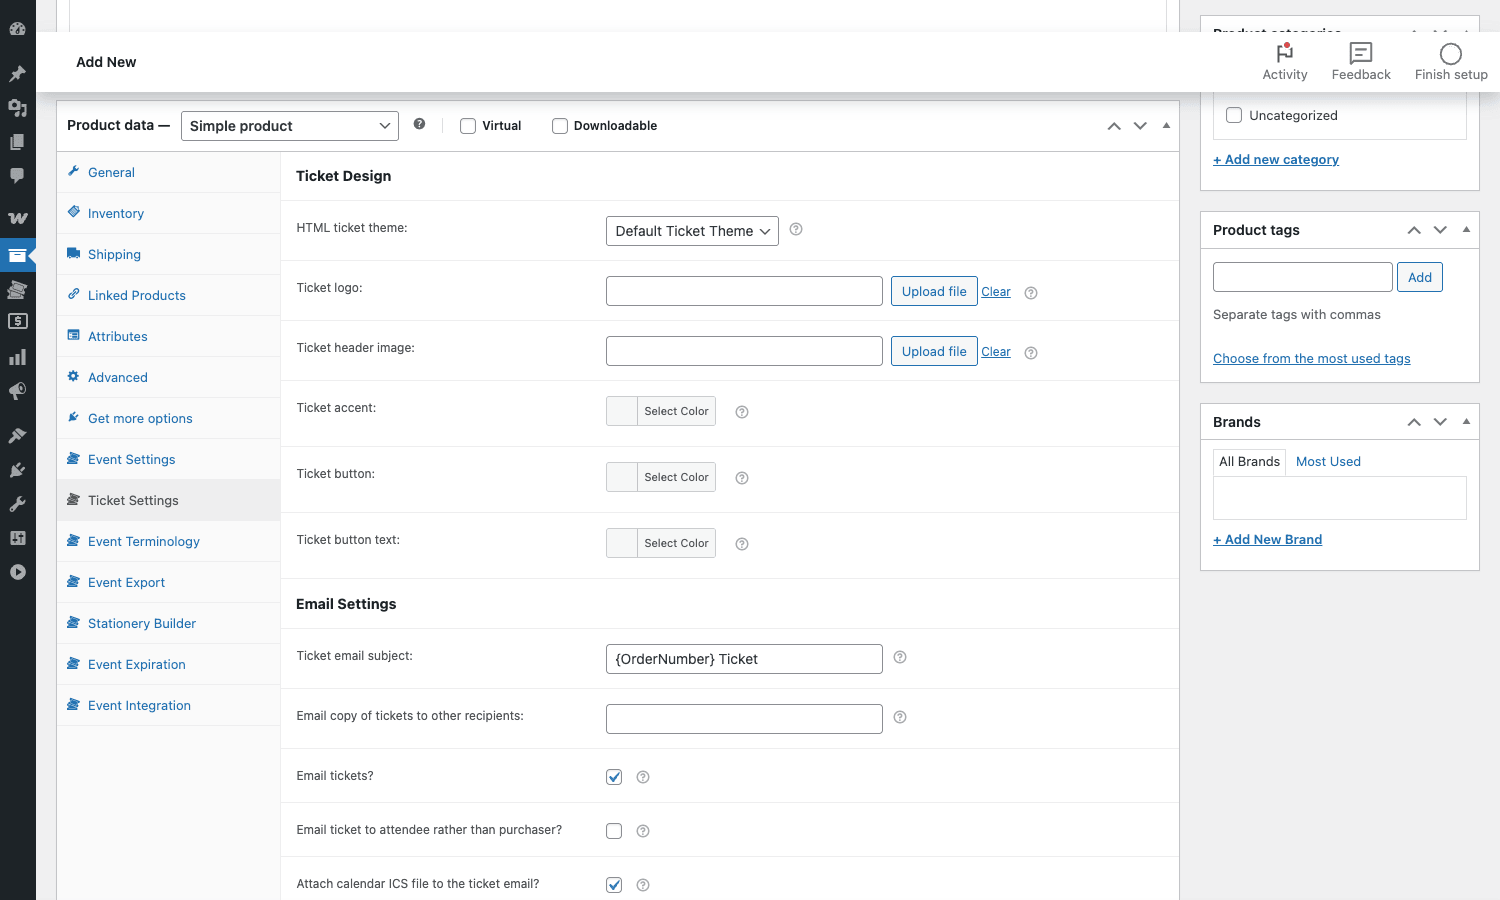
- Ticket Settings is where the per-event ticket design lives. Override the global theme, upload an event-specific logo, choose an accent color, set the ticket-button text, decide whether the buyer or the attendee gets the email, attach the ICS file, set a custom email subject and body.
- Event Terminology lets you re-label the public-facing copy. If you don’t sell "tickets" but "passes" or "seats" or "registrations", change the wording here so the product page, checkout, and email read naturally.
- Event Export is a small CSV exporter for the event’s attendees. Good for printing a sign-in sheet or feeding the list into a name-tag printer.
- Stationery Builder generates printable name badges, lanyards, and seating cards using your attendee list. PDF download, ready for the printer.
- Event Expiration auto-removes the product from the catalog after the event ends so it stops appearing in the shop and search results once it’s over.
- Event Integration is where you bind this specific event to a Zoom / Meet / Teams / Webex room.
Hit Publish, and the event is live. A normal Woo product page is rendered, the only visible difference being that the event date and venue are shown above the product description.
Configuring the ticket email and design
The ticket email is the artifact 99% of buyers actually see, so this is worth a few minutes per event.
In the same product editor, switch to the Ticket Settings tab. The top of the panel lets you pick an HTML ticket theme (the default theme is fine for most events; the Ticket Themes screen under FooEvents -> Ticket Themes is where you’d upload a custom one). Below that you can override the global email subject, header, and body for this specific event with WooCommerce-style merge tags ({OrderNumber}, {AttendeeName}, {EventName}, {TicketNumber}).
A few small toggles in this panel make a big difference:
- "Email ticket to attendee rather than purchaser?" When ticked, each attendee gets their own ticket directly. Useful for company purchases where the buyer is the office admin and the attendees are individual team members.
- "Attach calendar ICS file to the ticket email?" Defaults to on. Leave it on. ICS attachments massively improve attendance because the event lands on the attendee’s calendar.
- "Ticket logo" + "Ticket header image". Logo is a small file (your brand mark). Header image is wide, sits at the top of the ticket. Both are optional.
- "Ticket accent" / "Ticket button" colors. Two color pickers that re-skin the default ticket theme without writing CSS.
The global defaults for all of these live under FooEvents -> Settings -> Tickets. Per-event overrides take priority when set.
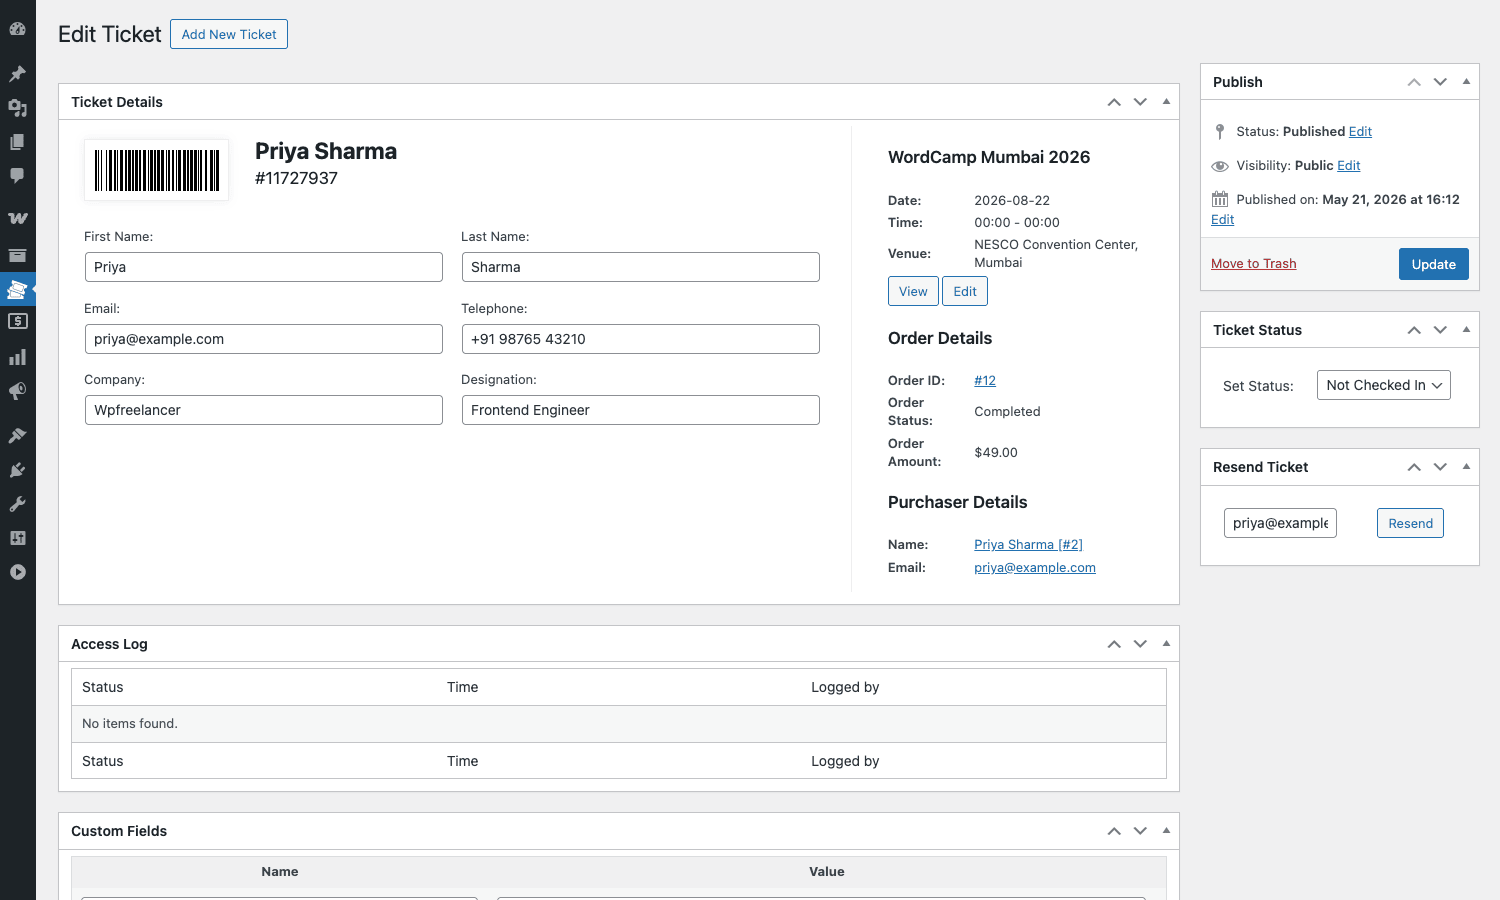
If you want to send a test, go to FooEvents -> Tickets, find a ticket attached to this event, open it, and use the Resend Ticket widget on the right. It re-fires the same email with no side effects.
Running check-in on event day
This is where FooEvents earns the "ticketing-first" label.
You have three options for scanning attendees at the door:
- The official FooEvents Check-ins mobile app. Free on iOS and Android. Sign in with the credentials of the WP user you chose under
FooEvents -> Settings -> Check-ins App. The app downloads the list of events you have access to and their attendees, then you tap an event and start scanning. Each scan posts to/wp-json/fooevents/api/v1/update_ticket_statusand flips the ticket’s status server-side. Offline scans queue locally and sync when the phone reconnects.
The Check-ins App tab in Settings is where you brand the app (logo, accent color, title text) and restrict which events appear in it.
-
The Express Check-in add-on. Adds a desktop scanner UI that you can pull up on a laptop at the registration desk. The browser uses the webcam to scan barcodes. Faster than the mobile app if you have a fixed registration desk and a USB barcode reader, slower if you’re walking around.
-
Manual check-in inside wp-admin. Open the ticket from
FooEvents -> Tickets, change the Ticket Status dropdown on the right from "Not Checked In" to "Checked In", click Update. Every ticket also has a small Access Log that records when it was checked in or out and who did it.
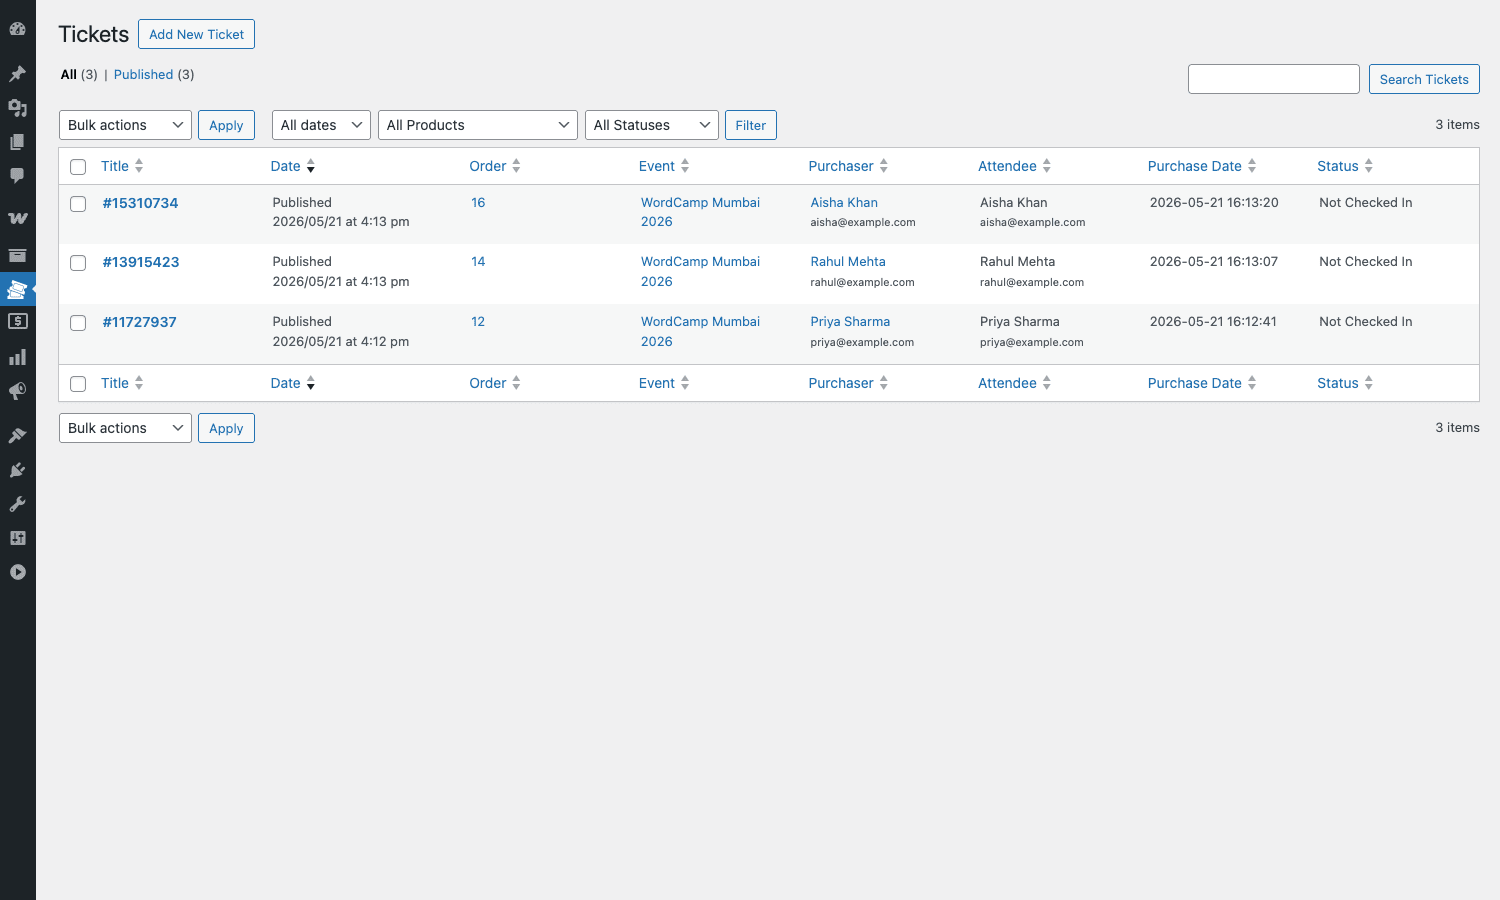
The Tickets list itself is a clean WP_List_Table with sortable columns for the order, event, purchaser, attendee, purchase date, and status. Useful when you need to find one specific person fast at the door.
After the event, head to FooEvents -> Reports -> Edit on your event and you’ll see the per-event report: tickets sold, gross revenue, net revenue, check-in count, check-out count, plus line charts for each. The Canceled tickets toggle lets you include or exclude refunded tickets in the numbers.
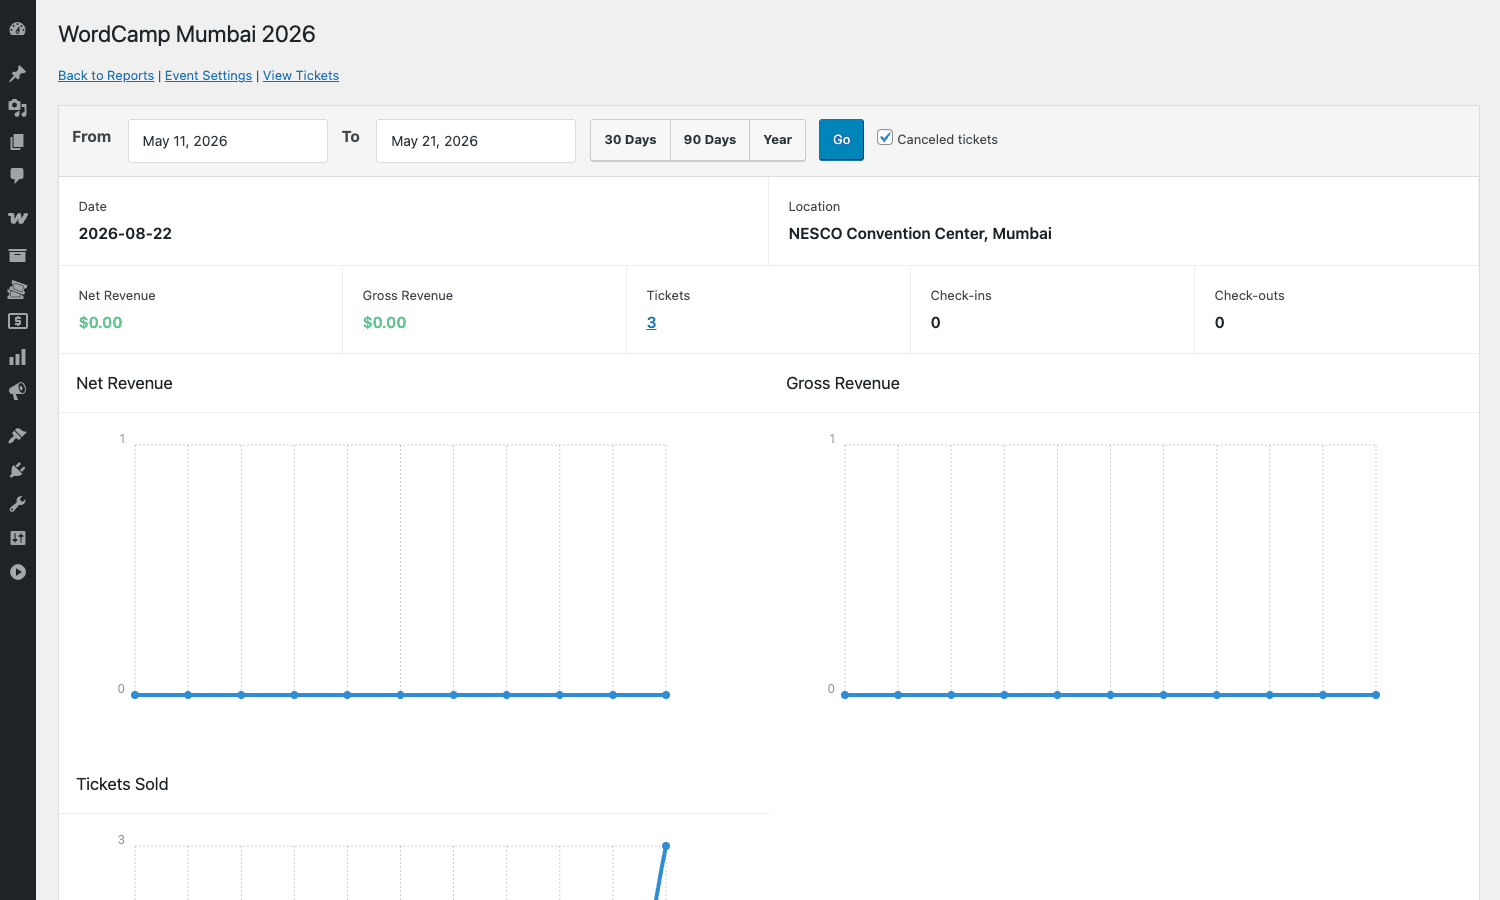
The per-event report is also where you’ll print attendee sign-in sheets or export a CSV for the post-event email follow-up.
Real-world use cases
A few patterns we’ve seen FooEvents used for. Pick one that’s closest to your event, then map it back to the configuration above.
Paid in-person conference
A two-day WordPress conference. You sell Early Bird, Regular, and VIP tiers as three variations of one variable Woo product, all flipped into a single event (or three sequential events if you prefer the cleaner reporting). The Custom Attendee Fields add-on collects T-shirt size and dietary requirements per attendee at checkout. The ticket email includes the ICS calendar attachment and a magic link to a printable PDF (with the PDF Tickets add-on). Day-of, the registration team uses the FooEvents mobile app to scan attendees, the Stationery Builder prints name badges from the attendee list, and the post-event email goes out using the CSV export.
If you want to give early-bird buyers a discount code, pair this with WooCommerce Smart Coupons to manage those codes alongside the product itself.
Free workshop with a deposit
A $10 cash-back workshop. People pay a refundable deposit at checkout to discourage no-shows. You configure FooEvents to email the ticket only to attendees who paid. The ticket carries a magic link that lets them check in without a login. Two weeks after the workshop, you refund the deposit through Woo for everyone whose ticket has WooCommerceEventsStatus = Checked In. The CSV export filtered by status makes the refund batch quick.
Multi-day festival
A four-day music festival. You use the Multi-day add-on so each ticket carries four scan slots, one per day. The Check-ins app scans per day, and the report shows how many distinct people came on day 1, day 2, day 3, day 4 (so you can plan staffing for the last day differently from the first).
Recurring weekly yoga class
A weekly yoga class running every Tuesday. With the FooEvents Bookings add-on, you set Tuesdays 7-8pm as recurring slots. Customers pick which Tuesdays they want, the cart adds one ticket per slot, and each slot reports independently. You set per-event stock so a class can sell out separately each week.
Online webinar with Zoom
A 90-minute paid Zoom webinar. You connect a Zoom Server-to-Server OAuth app in FooEvents -> Settings -> Integration, then on the event’s Event Integration tab pick "Zoom Meeting" and let FooEvents auto-create a meeting per attendee, or one shared meeting for everyone. The Zoom join link replaces the venue address in the ticket email. After the webinar, you can match the Zoom attendance report against the FooEvents check-in log to see who actually showed up.
Membership-gated event
A members-only meetup that only paid members of your community can buy. Combine FooEvents with a membership plugin so the event product is only visible to members. If you’re running WooCommerce Subscriptions, you can wire a recurring fee that auto-enrolls members into a private "Members Lounge" event each month, with the ticket emailed automatically.
Add-ons that extend FooEvents
The free core does most of what a small or mid-size event needs. The add-on family (each sold separately and also available as GPL on GPL Times) plugs in the parts you grow into:
- FooEvents PDF Tickets. Generates a PDF copy of each ticket and attaches it to the email alongside the HTML ticket. Useful for B2B events where the buyer wants a printable artefact for their company file.
- FooEvents Calendar. Renders a public-facing calendar (grid, list, agenda views) of all your published events. Better than a plain product loop if you have many concurrent events.
- FooEvents Multi-day. Adds per-day scanning and per-day stock to multi-day events. The free core supports sequential days but treats the ticket as a single check-in; this add-on enables per-day check-in.
- FooEvents Express Check-in. A faster scanner UI for desktop check-in stations and bulk batch check-ins.
- FooEvents Custom Attendee Fields. Per-event custom fields collected at checkout. Goes beyond the built-in first name / last name / email / phone / company / designation.
- FooEvents Seating. Visual seating-chart designer. Each ticket is bound to a row/seat combination. Used by venues, theatres, and concert halls.
- FooEvents Bookings. Time-slot based booking flow with a per-slot calendar. Different category from WooCommerce Bookings (which is built for service appointments like consultations); FooEvents Bookings is built for recurring event slots.
You install them like any plugin. They detect FooEvents at activation and hook into the same admin menu, so a new tab or sub-screen appears where it makes sense.
Developer reference
This is the section developers care about. FooEvents leans on five action hooks for almost every integration; there are no fooevents_* filter hooks at runtime, so the integration story is mostly action-based. Combine these actions with standard WordPress hooks (woocommerce_order_status_completed, transition_post_status, the_content) and you can do almost anything.
The five core action hooks, with signatures:
do_action( 'fooevents_create_ticket', $ticket_post_id, $product_id, $order_id );
do_action( 'fooevents_create_ticket_admin', $ticket_post_id, $product_id );
do_action( 'fooevents_check_in_ticket', $ticket_post_id, $product_id );
do_action( 'fooevents_not_check_in_ticket', $ticket_post_id, $product_id );
do_action( 'fooevents_canceled_ticket', $ticket_post_id, $product_id );
That’s it. The plugin uses these to wire up its own internal behaviour (sending the email on create, writing to the access log on check_in), but they’re public, so any code in your mu-plugins directory or your child theme’s functions.php can hook into them.
Hook: notify Slack on every ticket sale
A common ask. Post to a Slack incoming webhook whenever a ticket is created, so the events team sees the sale in real time.
add_action( 'fooevents_create_ticket', 'gpl_slack_on_ticket_sale', 10, 3 );
function gpl_slack_on_ticket_sale( $ticket_id, $product_id, $order_id ) {
 $product = wc_get_product( $product_id );
 $attendee = get_post_meta( $ticket_id, 'WooCommerceEventsAttendeeName', true );
 $attendee.= ' '. get_post_meta( $ticket_id, 'WooCommerceEventsAttendeeLastName', true );

 $payload = array(
 'text' => sprintf(
 ':tada: New ticket for *%s* (attendee: %s, order #%d)',
 $product? $product->get_name() : 'event',
 trim( $attendee )?: 'unknown',
 $order_id
 ),
 );

 wp_remote_post( 'https://hooks.slack.com/services/T000/B000/xxx', array(
 'body' => wp_json_encode( $payload ),
 'headers' => array( 'Content-Type' => 'application/json' ),
 'timeout' => 5,
 ) );
}
Hook: log every check-in to a custom audit table
If you need an audit trail beyond the per-ticket Access Log, write each scan into your own table on fooevents_check_in_ticket.
add_action( 'fooevents_check_in_ticket', 'gpl_audit_check_in', 10, 2 );
function gpl_audit_check_in( $ticket_id, $product_id ) {
 global $wpdb;

 $wpdb->insert(
 $wpdb->prefix. 'event_audit_log',
 array(
 'ticket_id' => (int) $ticket_id,
 'event_id' => (int) $product_id,
 'checked_at' => current_time( 'mysql' ),
 'user_id' => get_current_user_id(),
 'ip' => isset( $_SERVER['REMOTE_ADDR'] )? $_SERVER['REMOTE_ADDR'] : '',
 ),
 array( '%d', '%d', '%s', '%d', '%s' )
 );
}
Hook: push attendees into a CRM on ticket creation
Push the buyer (or the attendee) into your CRM, ESP, or marketing automation tool. The example below uses a generic JSON POST, swap in your actual API key and endpoint.
add_action( 'fooevents_create_ticket', 'gpl_sync_attendee_to_crm', 20, 3 );
function gpl_sync_attendee_to_crm( $ticket_id, $product_id, $order_id ) {
 $email = get_post_meta( $ticket_id, 'WooCommerceEventsAttendeeEmail', true );
 if (! is_email( $email ) ) {
 return;
 }

 $body = array(
 'email' => $email,
 'first_name' => get_post_meta( $ticket_id, 'WooCommerceEventsAttendeeName', true ),
 'last_name' => get_post_meta( $ticket_id, 'WooCommerceEventsAttendeeLastName', true ),
 'tag' => 'event-'. $product_id,
 'source' => 'fooevents',
 );

 wp_remote_post( 'https://api.example.com/v1/contacts', array(
 'body' => wp_json_encode( $body ),
 'headers' => array(
 'Content-Type' => 'application/json',
 'Authorization' => 'Bearer '. CRM_API_KEY,
 ),
 'timeout' => 8,
 ) );
}
Hook: send a follow-up email after check-in
A nice touch. Email the attendee a "thanks for showing up, here’s the slides" message the moment they’re checked in, instead of after the event in a batch.
add_action( 'fooevents_check_in_ticket', 'gpl_send_post_checkin_followup', 30, 2 );
function gpl_send_post_checkin_followup( $ticket_id, $product_id ) {
 $email = get_post_meta( $ticket_id, 'WooCommerceEventsAttendeeEmail', true );
 $event = get_post_field( 'post_title', $product_id );
 $slides = get_post_meta( $product_id, 'event_slides_url', true );

 if (! is_email( $email ) ) {
 return;
 }

 wp_mail(
 $email,
 sprintf( 'Welcome to %s', $event ),
 sprintf(
 "Hi! Glad you made it. The slides for today are here: %s\n\nSee you inside.\n",
 $slides?: 'https://example.com/slides'
 )
 );
}
Hook: revoke ticket access on refund
If a buyer refunds their order, you probably want their ticket to be marked canceled so the door scan rejects it.
add_action( 'fooevents_canceled_ticket', 'gpl_revoke_perks_on_refund', 10, 2 );
function gpl_revoke_perks_on_refund( $ticket_id, $product_id ) {
 update_post_meta( $ticket_id, '_revoked_at', current_time( 'mysql' ) );
 update_post_meta( $ticket_id, '_revoked_reason', 'order_refunded' );

 // Optionally remove any external resource you provisioned for this ticket,
 // e.g. a Zoom registrant, a Discord invite, an LMS course enrollment.
}
Programmatic event creation
You don’t have to create events through the admin. Since events are just Woo products with a flag, you can spin up a new one in code. Useful for bulk-importing past events, or for cloning a recurring event each week.
function gpl_create_event_product( $title, $price, $date, $venue ) {
 $product = new WC_Product_Simple();
 $product->set_name( $title );
 $product->set_status( 'publish' );
 $product->set_regular_price( $price );
 $product->set_catalog_visibility( 'visible' );
 $product->set_manage_stock( true );
 $product->set_stock_quantity( 100 );

 $product_id = $product->save();

 update_post_meta( $product_id, 'WooCommerceEventsEvent', 'Event' );
 update_post_meta( $product_id, 'WooCommerceEventsType', 'single' );
 update_post_meta( $product_id, 'WooCommerceEventsDate', $date ); // YYYY-MM-DD
 update_post_meta( $product_id, 'WooCommerceEventsHour', '18' );
 update_post_meta( $product_id, 'WooCommerceEventsMinutes', '00' );
 update_post_meta( $product_id, 'WooCommerceEventsHourEnd', '21' );
 update_post_meta( $product_id, 'WooCommerceEventsMinutesEnd', '00' );
 update_post_meta( $product_id, 'WooCommerceEventsLocation', $venue );
 update_post_meta( $product_id, 'WooCommerceEventsEmailAttendee', 'yes' );

 return $product_id;
}
REST API and the mobile app
The mobile-app endpoint is registered at fooevents/api/v1/ and is gated by custom Username / Password headers (HTTP basic style). The endpoints accept POST and return JSON:
| Endpoint | What it does |
|---|---|
login_status |
Validates credentials |
get_all_data |
Bootstrap: returns the events list + tickets in one call |
get_list_of_events |
Just the events the user can see |
get_tickets_in_event |
All tickets for one event |
get_updated_tickets_in_event |
Tickets modified since a timestamp |
get_single_ticket |
One ticket by ID or hash |
update_ticket_status |
Mark a ticket Checked In / Not Checked In |
update_ticket_status_multiday |
Multi-day ticket scan |
If you ever want to build your own scanner (a custom kiosk, a USB barcode reader plugged into a Pi, a kiosk app for the front desk), you’d hit update_ticket_status with the ticket ID and the new status string. The plugin handles the rest, including firing the fooevents_check_in_ticket action.
There’s a second public REST namespace at fooevents/v1/events/ (GET) that the Gutenberg blocks use to list event products. It’s __return_true permission, so any frontend can read it. Useful if you’re building a custom events landing page in JS and want to pull the list of upcoming events without a custom endpoint.
Useful post meta keys
If you’re writing custom reports or front-end displays, these are the meta keys to read from the event_magic_tickets posts:
WooCommerceEventsTicketHash,WooCommerceEventsTicketID,WooCommerceEventsTicketNumberFormatted(identity of the ticket)WooCommerceEventsAttendeeName,WooCommerceEventsAttendeeLastName,WooCommerceEventsAttendeeEmail,WooCommerceEventsAttendeeTelephone,WooCommerceEventsAttendeeCompany,WooCommerceEventsAttendeeDesignation(attendee details)WooCommerceEventsCustomerID,WooCommerceEventsProductID,WooCommerceEventsOrderID(joins back to Woo)WooCommerceEventsStatus(Not Checked In / Checked In)
And on the event product itself:
WooCommerceEventsEvent(the flag that says "this product is an event")WooCommerceEventsType(single / sequential / select / bookable / seating)WooCommerceEventsDate,WooCommerceEventsHour,WooCommerceEventsMinutes,WooCommerceEventsHourEnd,WooCommerceEventsMinutesEnd,WooCommerceEventsTimeZoneWooCommerceEventsLocation,WooCommerceEventsVenue,WooCommerceEventsGPSWooCommerceEventsEmailAttendee(yes/no for direct-to-attendee emails)
get_post_meta() against any of these reads the field as you’d expect. You can also use them in a meta_query to write WP_Query loops, e.g. "list every published event in the next 30 days".
Gutenberg blocks
Two blocks ship in the free core:
fooevents/event-listingdisplays a grid of upcoming events on the front end.fooevents/event-attendeesdisplays a list of attendees for a chosen event (admin-only by default, useful for a private internal page).
Both are registered via register_block_type in classes/blocks/. The compiled JS bundles live in build/. If you’re building a Gutenberg-first site or a Full Site Editing theme, these blocks save you from having to write a custom block to surface event data.
Shortcode
There’s one legacy shortcode:
[fooevents_attendee_form]
It renders a public-facing attendee details form on whatever page you place it on. Handy if you want to collect attendee info outside the WooCommerce checkout (e.g. on a confirmation page after a free registration). For most cases, the in-checkout attendee fields are what you want and you can ignore the shortcode.
Performance, compatibility, and gotchas
Performance
FooEvents is light. The plugin loads its admin assets only on FooEvents screens (the FooEvents menu plus the event-edit product editor), so it doesn’t add JS or CSS to the front end of pages that don’t render an event. On the front end, an event product page renders the same way a regular Woo product page does, with a small extra block of event meta above the description.
A site with 50 events and 10,000 tickets is well within FooEvents’ comfortable range. Past that, the event_magic_tickets post type starts to get heavy on indexed meta_query lookups; if you’re running 100,000+ tickets, you’ll want some custom indexes on wp_postmeta (specifically on meta_key, meta_value for WooCommerceEventsProductID and WooCommerceEventsStatus).
The check-in app uses near-real-time polling for new tickets, not WebSockets, so a venue with 500 simultaneous scanners isn’t realistic. For most events (one to five scanners) it’s fine. If you need true high-volume parallel scanning, the Express Check-in add-on running on a single tablet at the door is faster than five phones.
Compatibility
FooEvents declares WooCommerce 8.0+ as the minimum. It works fine with the new Cart and Checkout blocks (introduced in recent Woo versions) and falls back to shortcode-based checkout when needed. The plugin is also HPOS-compatible (High-Performance Order Storage), so flipping HPOS on in WooCommerce settings doesn’t break ticket creation.
It plays well with the WordPress block editor (Gutenberg) for the product description and with the classic editor if you’ve installed the Classic Editor plugin. It also ships a wpml-config.xml, so WPML and Polylang both pick up the right strings to translate.
If you use it alongside MonsterInsights Pro for Google Analytics, ticket purchases show up as regular Woo conversions in your GA4 reports, no extra setup needed.
Gotchas
A short list of things that have tripped me up or come up in support threads.
- The plugin’s REST mobile-app user must have
edit_posts. A Shop Manager works, an Editor works, an Author or Customer does not. The error is silent ("invalid credentials") if you pick the wrong role. - Event-type radio is destructive. Don’t switch a product from Single to Sequential days after sales have happened. FooEvents stores the type-specific check-in state per ticket, and changing the type retroactively can leave existing tickets in a weird state. If you need to change it, refund existing tickets first.
- Tax behaviour follows your Woo settings. If your store charges tax on all products, event tickets are taxed too. If event tickets shouldn’t be taxed, set the product’s tax class to "Zero rate".
- The "Checked In" status is permanent unless you toggle it back. If somebody arrives, gets checked in, leaves and comes back, the app doesn’t double-scan; it shows "already checked in". To reset, edit the ticket in wp-admin and change Status back to "Not Checked In".
- Magic links bypass login but not URL guessing. The token is sufficiently long that it’s not brute-forceable, but if your event involves sensitive content, treat the URL like a password. Don’t post it in a public Slack channel.
- The email goes through
wp_mail(). If your site’s transactional email is unreliable, you’ll want a proper SMTP relay (Postmark, SendGrid, Amazon SES) or you’ll lose tickets to spam folders. If you don’t already have a deliverability solution, set up an SMTP plugin before sending real tickets. - No native multi-currency. If you sell the same event in USD on one site and EUR on another, you handle the currency at the Woo level (either two separate products or a multi-currency plugin), FooEvents just reports in your store’s base currency.
Pricing and licensing
FooEvents sells the core "FooEvents for WooCommerce" plugin and each add-on separately on FooEvents.com, with annual or lifetime license options. The core plugin gives you everything we walked through above (events, tickets, email, check-in app, reports, REST API, Zoom/Meet/Teams integration, Gutenberg blocks, basic CSV import/export). The add-ons are paid extensions for specific scenarios (PDF tickets, seating charts, multi-day per-day check-in, custom attendee fields, public calendar view, time-slot bookings).
The plugin is GPL v3 licensed, which is why GPL Times can legally distribute it. If you end up using FooEvents heavily and want to fund its development, an annual license direct from FooEvents.com gets you priority support and direct update access.
Frequently asked questions
Does FooEvents charge a per-ticket fee?
No. Unlike Eventbrite or many SaaS ticketing platforms that take a percentage of every sale, FooEvents has no transaction fees and no per-ticket charge. You pay once for the plugin and keep 100% of revenue. Payment-gateway fees from Stripe, PayPal, etc. still apply, but they’re between you and your gateway, not FooEvents.
Can attendees check themselves in?
Yes, with the magic-link feature. Each ticket has a unique self-check-in URL that the attendee can open from the email; opening it flips the ticket to Checked In. Useful for free events where you don’t want an organiser at the door. For paid events you usually want an organiser scanning the QR code, but the option is there.
Does FooEvents work with the WooCommerce Cart and Checkout blocks?
Yes. The plugin is compatible with the new block-based Cart and Checkout pages WooCommerce introduced. Attendee fields render correctly inside the block checkout, and the ticket email fires the same way. The legacy shortcode-based checkout ([woocommerce_checkout]) also works.
Can I sell tickets and physical merchandise in the same order?
Yes. The Woo cart accepts a mix of event products and regular products. The event products generate tickets, the merchandise products generate a normal order line. Shipping is calculated for the merchandise only since event products are virtual by default.
How does FooEvents compare to Tickera?
Tickera is the most direct competitor since both are ticketing-first WordPress plugins. The two are close on feature set, but FooEvents has a free native mobile app for check-in, native Zoom / Teams / Meet integration, and a more polished email/ticket designer out of the box. Tickera has a stronger affiliate ticketing model. Most event organisers won’t notice the difference; pick whichever you prefer the UI of.
Does it support recurring events?
The free core supports Sequential days (a fixed range like Sept 1-5) and Specific days (pick the dates manually). For true recurring time-slot bookings (every Tuesday 7pm, indefinitely), use the FooEvents Bookings add-on. For a recurring weekly class with a single ticket per class, you can also just duplicate the product each week with a small WP-CLI script.
Does FooEvents integrate with mailing-list tools?
Yes. The plugin has native settings for Mailchimp (subscribe attendees to a list on ticket creation) under FooEvents -> Settings -> Integration. Beyond that, the fooevents_create_ticket action makes it easy to push attendees to MailerLite, ConvertKit, ActiveCampaign, or any other ESP via their REST APIs. See the "push attendees into a CRM" example earlier.
Can I refund a ticket?
Yes. Refund the underlying WooCommerce order the same way you’d refund any product. The plugin listens for the refund and fires fooevents_canceled_ticket, after which the ticket is marked canceled in reports and the door-scan rejects it. If you partially refund (e.g. one ticket of three in an order), only the corresponding ticket is canceled.
How do attendees get their tickets if they buy as a guest?
Whatever email they entered at checkout receives the ticket email. They don’t need a WP account, and the plugin doesn’t force account creation. If you’ve enabled "Email ticket to attendee rather than purchaser", each attendee’s individual email (collected at checkout) gets their own ticket directly.
Where do I find the docs?
Official FooEvents support and docs are at the FooEvents help center. It covers each add-on, the REST API, and includes specific troubleshooting articles for the mobile app and email deliverability.
Final thoughts
If you already run a WooCommerce store and you’re thinking about adding events, FooEvents is the path of least resistance. You don’t introduce a second payment system, you don’t lose your existing customer accounts, you don’t pay per-ticket fees to a SaaS, and you don’t move your data outside WordPress. Every event is a Woo product, every ticket is a custom post, every check-in is a REST call you can hook into.
What I like most is that the plugin doesn’t try to be everything. It does the ticketing layer well and gets out of the way for everything else. The five-action developer surface is small but well chosen: those five hooks cover almost every "I want to do X when Y happens" integration you’d want to write. The reports are concise, not bloated. The mobile app does one job (scan barcodes, flip ticket status). The settings page has six tabs, not sixteen.
That whole loop takes about 15 minutes and tells you everything you need to know about whether it fits your workflow. If you’re coming from a calendar-first plugin like The Events Calendar Pro or Modern Events Calendar, the change in mental model (ticket first, calendar second) takes a few minutes to settle, but the rest of FooEvents is genuinely simple.
Two related reads that pair well with this guide: the WooCommerce Smart Coupons walkthrough (for discount codes on event tickets) and the WooCommerce PDF Invoices write-up (for issuing tax-compliant receipts on every ticket sale).