

If two or more people write for the same WordPress site, you’ve already discovered the gap. WordPress was built for one person hitting Publish on their own posts. The moment you have an editor reviewing a writer’s draft, a content manager scheduling 30 posts across the next quarter, a freelancer waiting on feedback, or an SEO lead asking when the Q3 piece is going live, you start hacking around WordPress’s missing newsroom features.
The default post list (filterable by author and status) is the only built-in tool you get. There’s no calendar view. No kanban board. No editorial comments separate from public comments. No "this draft is awaiting your review" notifications. No way to define custom statuses like Pitch / In Progress / Ready for Edit / Approved / Scheduled.
PublishPress Planner Pro (from PublishPress, the team that forked the original Edit Flow plugin in 2014) is the WordPress plugin that fills that gap. Editorial calendar, kanban board (Content Board), table view (Content Overview), notifications workflow engine, editorial comments separate from public comments, editorial metadata fields, custom post statuses, and a Slack integration. It’s been the editorial-workflow standard for WordPress newsrooms for nearly a decade, with 35,000+ active installs on the free version and an active Pro tier on top.
This is a walkthrough of every feature, the three views (Calendar / Board / Overview), how notifications work, real-world editorial setups for content teams, and how it compares to CoSchedule and Editorial Calendar.
Quick decision guide: do you need PublishPress Pro?
Use PublishPress Planner Pro if you:
- Have 2+ writers/editors/contributors and need a shared editorial view
- Schedule content weeks or months in advance and need a calendar
- Want to assign a piece to a writer and notify the editor when it’s ready for review
- Need custom post statuses beyond WP’s defaults (Draft / Pending / Published / Scheduled)
- Want editorial comments separate from public comments (private team notes)
- Run multiple post types and need consistent workflow across them
Use Editorial Calendar (free WP.org plugin) instead if you:
- Only need a basic drag-drop calendar with no notifications/board/comments
- Don’t pay for Pro features
- Have a one-person blog
Use CoSchedule instead if you:
- Need social media scheduling integrated with the editorial calendar
- Run a multi-channel marketing team (blog + social + email)
- Have budget for CoSchedule’s monthly subscription ($29-$59/user/month)
- Are willing to host editorial outside WordPress (CoSchedule is SaaS)
Stick with WordPress’s default post list if you:
- Are a one-person blogger
- Don’t schedule content in advance
- Don’t have an editor-writer review loop
Table of contents
- The PublishPress ecosystem (it’s more than one plugin)
- Free vs Pro: what the Pro tier adds
- Pricing reality check
- Step 1: Install and find your way around
- Step 2: The Content Calendar (your editorial cockpit)
- Step 3: The Content Board (kanban-style status flow)
- Step 4: The Content Overview (sortable table view)
- Step 5: Configure Settings (post types, statuses, dates, statuses)
- Step 6: Build a notification workflow
- Step 7: Editorial comments and metadata
- Step 8: Custom statuses, user groups, reminders
- Real-world recipes (3 newsroom setups)
- Performance impact
- PublishPress Pro vs CoSchedule vs Editorial Calendar
- 12 common gotchas
- Developer reference: hooks and filters
- FAQ
- Final thoughts
The PublishPress ecosystem (it’s more than one plugin) {#ecosystem}
This is the part that confuses first-time PublishPress users. "PublishPress" isn’t one product, it’s a family of 7 plugins, each handling a different editorial concern:
- PublishPress Planner (this article) – the editorial calendar, board, overview, notifications, comments, metadata. The flagship.
- PublishPress Authors – multiple authors on a single post, author archives, guest authors.
- PublishPress Capabilities – granular permissions per role (who can publish, who can edit other people’s posts).
- PublishPress Checklists – require certain conditions before publish (e.g. featured image set, word count > 500).
- PublishPress Permissions – per-post and per-section access control.
- PublishPress Revisions – workflow for reviewing changes to live posts before they go live.
- PublishPress Series – link posts into series with navigation.
- PublishPress Blocks – Gutenberg block enhancements.
Each is a separate plugin sold separately. This walkthrough covers Planner Pro only, but a real newsroom often runs Planner + Authors + Capabilities + Checklists together (a 4-plugin stack).
Free vs Pro: what the Pro tier adds {#free-vs-pro}
Free PublishPress Planner (from WordPress.org):
- Content Calendar (basic)
- Content Overview (basic table view)
- Content Board (basic kanban)
- Editorial Comments (private team comments on posts)
- Custom Statuses (replace WP’s default Draft/Pending with your own)
- Editorial Metadata (custom fields visible to editors)
- Notifications (basic email when post status changes)
Pro adds:
- Customize Card Data on Content Board (show whatever post fields you want on cards)
- Customize Columns on Content Overview
- Customize Filters across all three views
- Me Mode (filter to only posts you’re involved with)
- Print the calendar, board, or overview
- iCal / Google Calendar subscription feed (subscribe to your editorial calendar in your phone’s calendar app)
- Slack integration (send notifications to Slack channels, not just email)
- Reminders (scheduled reminder emails when post date approaches)
- Notification Workflow Engine (visual builder for complex notification rules)
- Network notifications (multisite)
- Premium support
For a 1-2 person blog with simple workflow, free is enough. For 3+ people, the workflow engine and Slack integration justify the Pro tier.
Pricing reality check {#pricing}
PublishPress Planner Pro pricing (annual):
- 1 site: $129/year
- 5 sites: $179/year
- Unlimited: $339/year
- Lifetime (1 site): $499 one-time
- Lifetime (unlimited): $999 one-time
Renewal is at full price after year one.
The Pro is also available as part of the PublishPress Bundle, $399/year unlimited sites, includes all 7 PublishPress plugins (Planner + Authors + Capabilities + Checklists + Permissions + Revisions + Series + Blocks). For a real newsroom, the bundle is significantly cheaper than buying each separately.
On the GPL Times store, PublishPress Pro (Planner Pro) is part of the GPL membership. Other PublishPress plugins (Authors Pro, Capabilities Pro, Checklists Pro, etc.) are also available individually as members.
What you lose on the GPL-licensed version: automatic updates and direct support tickets. PublishPress support is genuinely helpful (small responsive team), so that’s a real loss for sites that need handholding.
Step 1: Install and find your way around {#step-1-install}
Install path: WP Admin -> Plugins -> Add New -> Upload Plugin -> upload publishpress-pro.zip -> Activate. The plugin adds a new top-level Planner menu in the admin sidebar with sub-items: Content Calendar, Content Overview, Content Board, Settings.
The default landing page on the Planner menu is the Content Calendar. That’s also where 80% of your time goes.
Step 2: The Content Calendar (your editorial cockpit) {#step-2-calendar}
Click Planner -> Content Calendar.
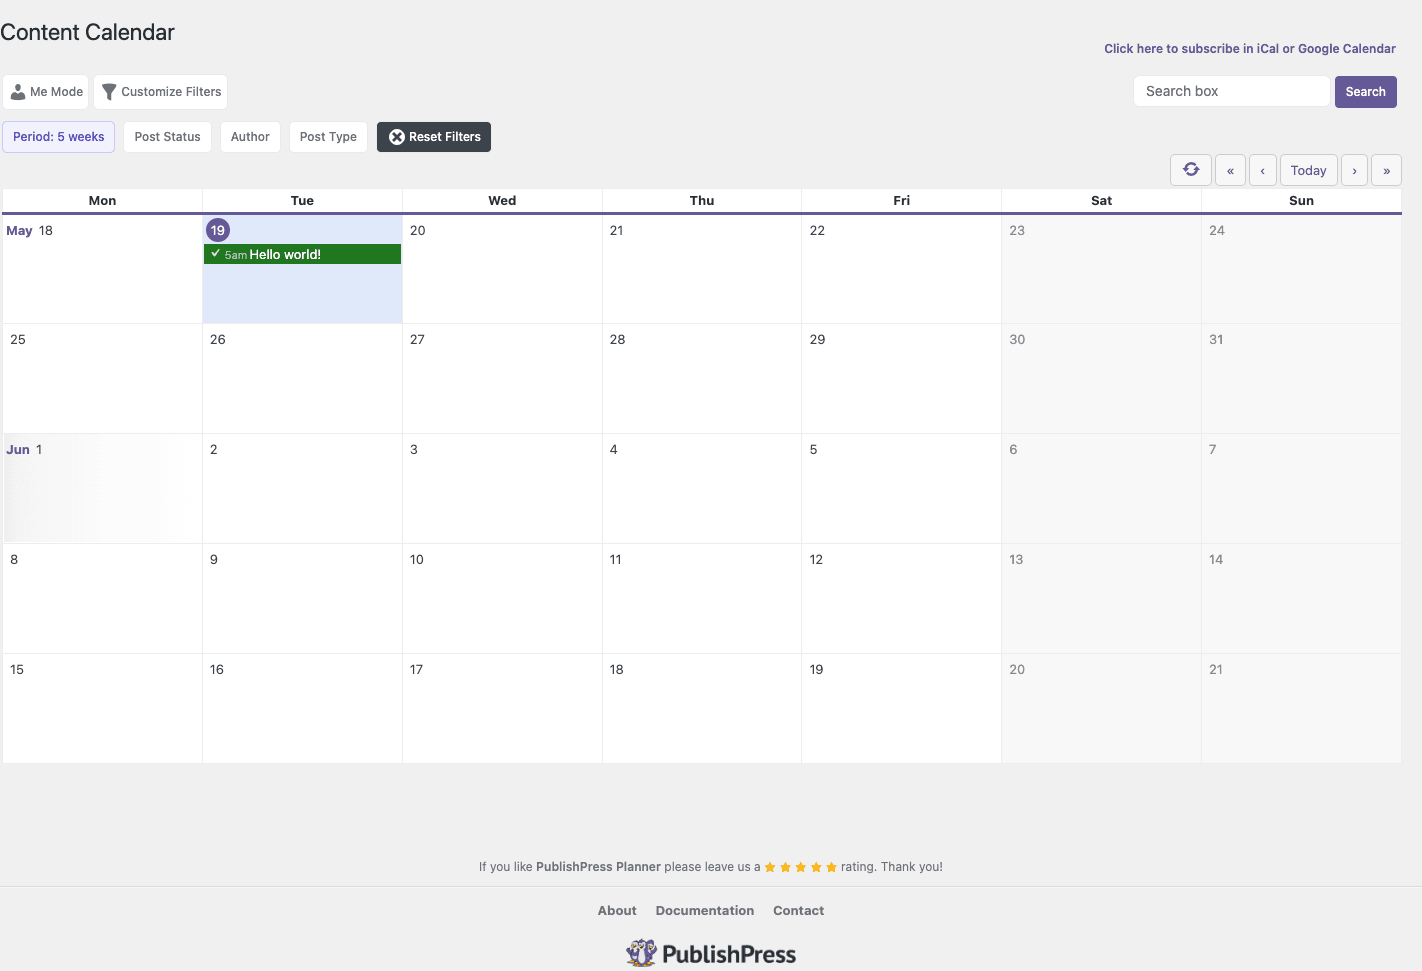
What you’re looking at:
- Date grid: rows are weeks, columns are days (Monday-Sunday by default). Each cell shows posts scheduled for that date.
- Period dropdown (top left): how many weeks to show. Default 5. Can do 3-10 weeks.
- Filters row below: Post Status (Draft / Pending / Published / Scheduled / custom), Author, Post Type. Multi-select.
- Reset Filters clears all selections.
- Search box: keyword search across post titles.
- Me Mode: switch to showing only posts where you’re the author or assigned reviewer. Critical for individual writers who only care about their own queue.
- Customize Filters: add/remove which filter dropdowns appear.
- Period: 5 weeks at the bottom: legend.
- Refresh button (top right): reload data.
- Arrows (left/right) and Today button: navigate weeks.
- Click here to subscribe in iCal or Google Calendar: top-right link generates an iCal subscription URL.
Daily cell display: each post is shown with its status icon (checkmark for published, clock for pending, etc.), publish time, and title. Click any post to open a quick-edit modal where you can change title, content, status, date, author without leaving the calendar.
Drag-drop: drag a post from one date to another to reschedule. Pro tip: this is the single feature editors love most.
Click an empty cell: opens a new-post-on-this-date modal. Inline content creation.
This view replaces "open WP admin -> Posts -> filter by date -> look for what’s scheduled" with a single screen that shows you the next month at a glance.
Step 3: The Content Board (kanban-style status flow) {#step-3-board}
Click Planner -> Content Board.
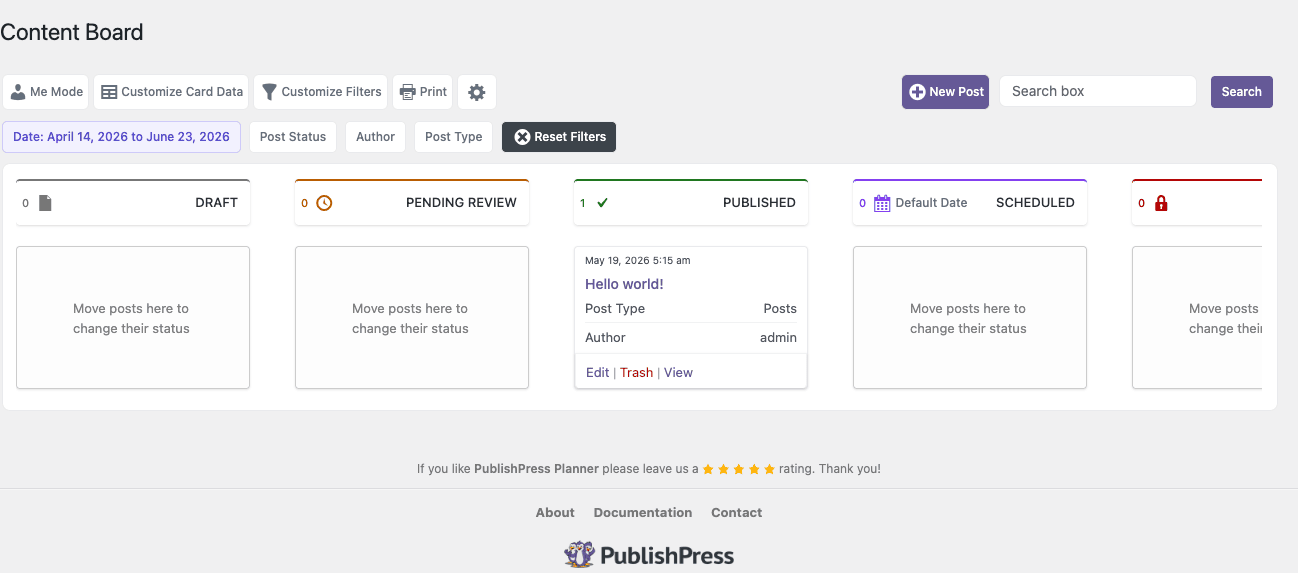
The Content Board is a Trello/Asana-style view of your posts grouped by status:
- Columns: one per post status. Default WP statuses (Draft / Pending Review / Published / Scheduled), plus any custom statuses you defined.
- Cards: each post is a card showing title, date, author, post type, and Edit / Trash / View actions.
- Drag-drop: drag a card from one column to another to change its status. The post saves automatically.
Header buttons:
- Me Mode: filter to only posts where you’re involved (assigned).
- Customize Card Data (Pro only): pick which post fields appear on the card. Example: add Word Count, Featured Image, Categories, Editorial Comments count.
- Customize Filters: which filter buttons appear in the toolbar.
- Print: printer-friendly view of the board (Pro).
- Settings (gear): per-board settings (column count, default sort).
- New Post: create directly into the Draft column.
Filter buttons below the header: Date range, Post Status (which columns show), Author, Post Type. Reset Filters clears.
This is the view for editors and content managers. Writers tend to live in the Calendar; editors live in the Board. The Board makes "what’s in my review queue" instantly visible.
Step 4: The Content Overview (sortable table view) {#step-4-overview}
Click Planner -> Content Overview.
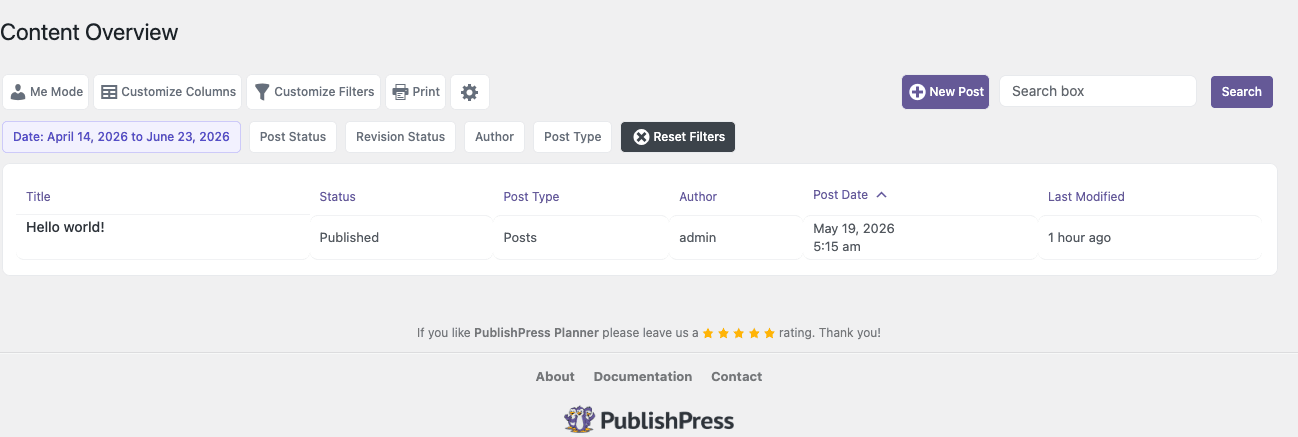
The Content Overview is the most spreadsheet-like view:
- Sortable columns: Title, Status, Post Type, Author, Post Date, Last Modified (click any header to sort).
- Customize Columns (Pro): add columns like Categories, Tags, Word Count, Editorial Metadata custom fields, Featured Image.
- Filters: same as Calendar/Board.
- Date filter: shows posts in a specific date range.
- Revision Status filter (Pro): for the PublishPress Revisions plugin integration.
This is the view for spreadsheet-minded people. Some teams prefer this over the calendar. Same data, different presentation. It’s also the best view for bulk operations (select multiple rows, take action).
The right choice between Calendar / Board / Overview is personal. Most teams use Calendar for planning, Board for daily standup, Overview for bulk operations.
Step 5: Configure Settings (post types, statuses, dates, statuses) {#step-5-settings}
Click Planner -> Settings.
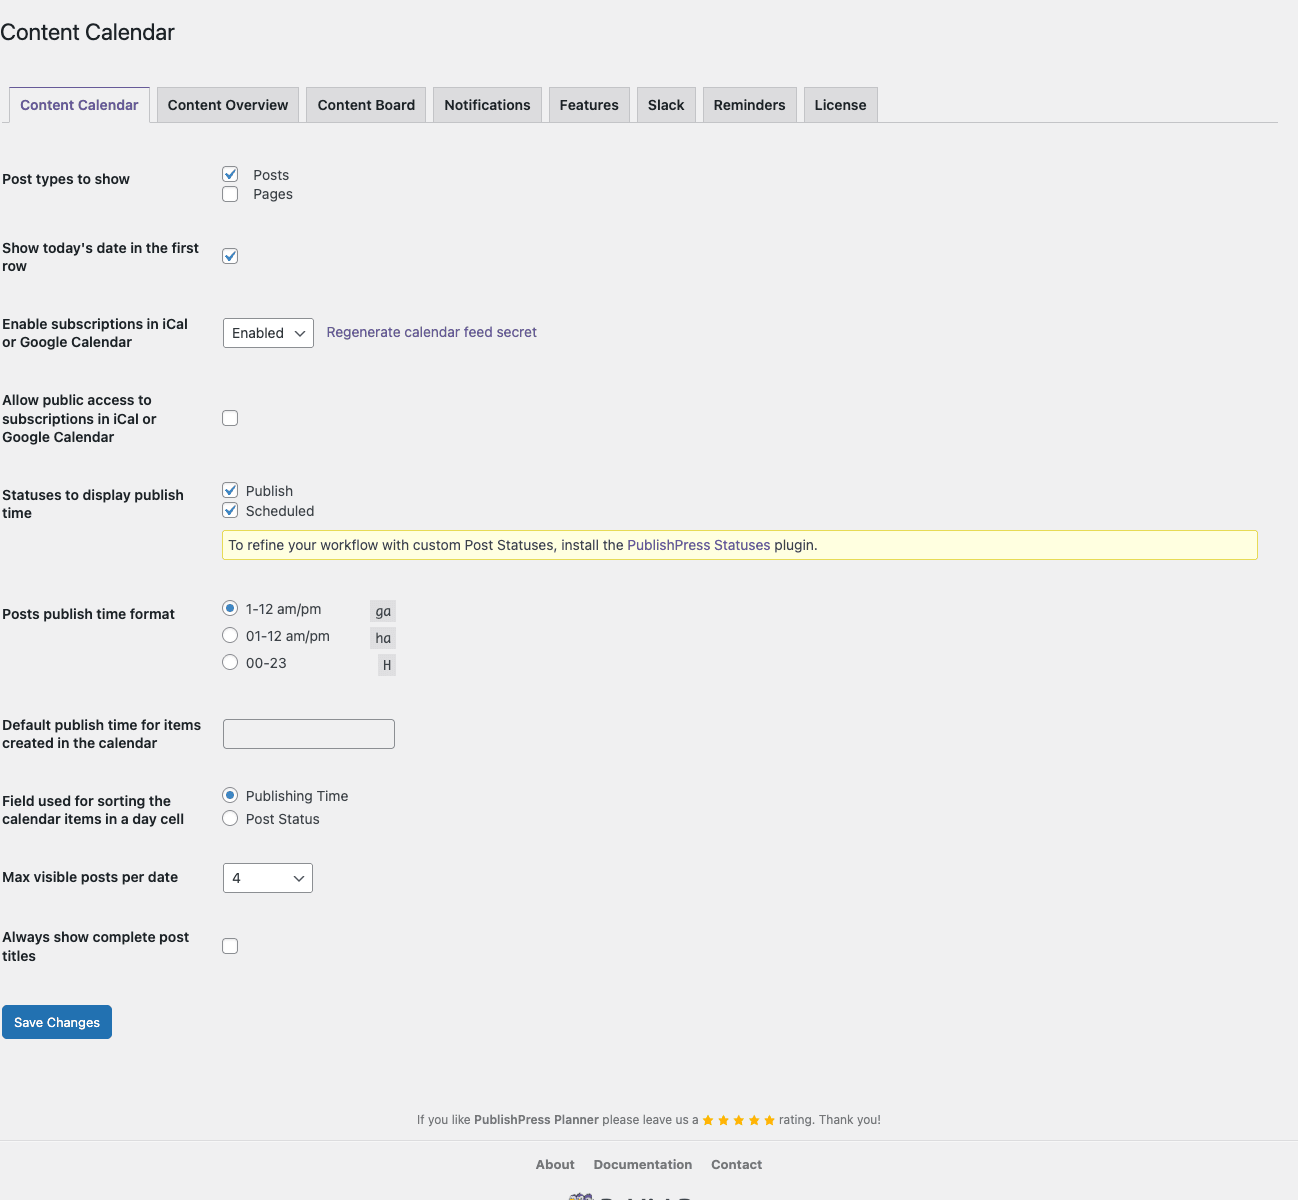
The Settings page has 8 top tabs:
Content Calendar tab
- Post types to show: which WordPress post types appear in the calendar (Posts, Pages, custom post types). Default just Posts.
- Show today’s date in first row: visual indicator.
- Enable subscriptions in iCal or Google Calendar: opens a subscription URL for external calendar apps.
- Allow public access to subscriptions: whether the iCal feed requires login or is public.
- Statuses to display publish time: for which statuses the time appears on the cell.
- Posts publish time format: 1-12 am/pm, 01-12 am/pm, or 00-23.
- Default publish time (Pro): auto-set time when creating posts from the calendar.
- Field used for sorting calendar items in a day cell: Publishing Time or Post Status.
- Max visible posts per date: default 4, configurable.
- Always show complete post titles: vs truncated.
Content Overview tab
Same kind of options but for the table view.
Content Board tab
Configure columns visible by default, and post statuses to include as columns.
Notifications tab
- Always send to me: include current user in all notifications.
- Always send to administrator: include admin in all notifications.
- Default notification channels: Email, Slack (Pro).
Features tab
Toggle on/off plugin modules: Editorial Comments, Editorial Metadata, Custom Statuses, Notifications, User Groups. Granular control over which features are active.
Slack tab (Pro)
Paste a Slack webhook URL. PublishPress will route certain notifications there.
Reminders tab (Pro)
Configure scheduled reminder emails (e.g. "remind me 1 day before this post’s publish date").
License tab
License activation (skip on GPL-licensed version).
Step 6: Build a notification workflow {#step-6-notifications}
The Notifications system is what turns PublishPress from a "view" into a real workflow tool. Click the Notifications link in the sidebar (under Planner) or navigate to Notifications via Settings -> Notifications tab -> Add New Workflow.
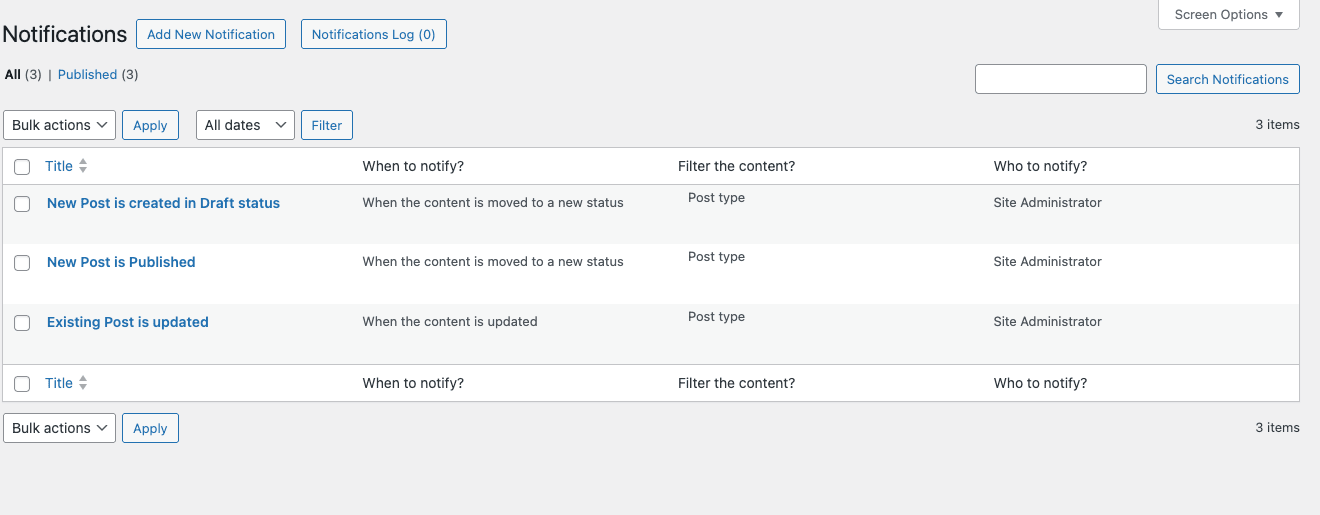
PublishPress ships three default workflows:
- New Post is created in Draft status – notifies the admin.
- New Post is Published – notifies the admin.
- Existing Post is updated – notifies the admin.
Click any to edit, or click Add New Notification to create from scratch.
The workflow editor has 4 sections:
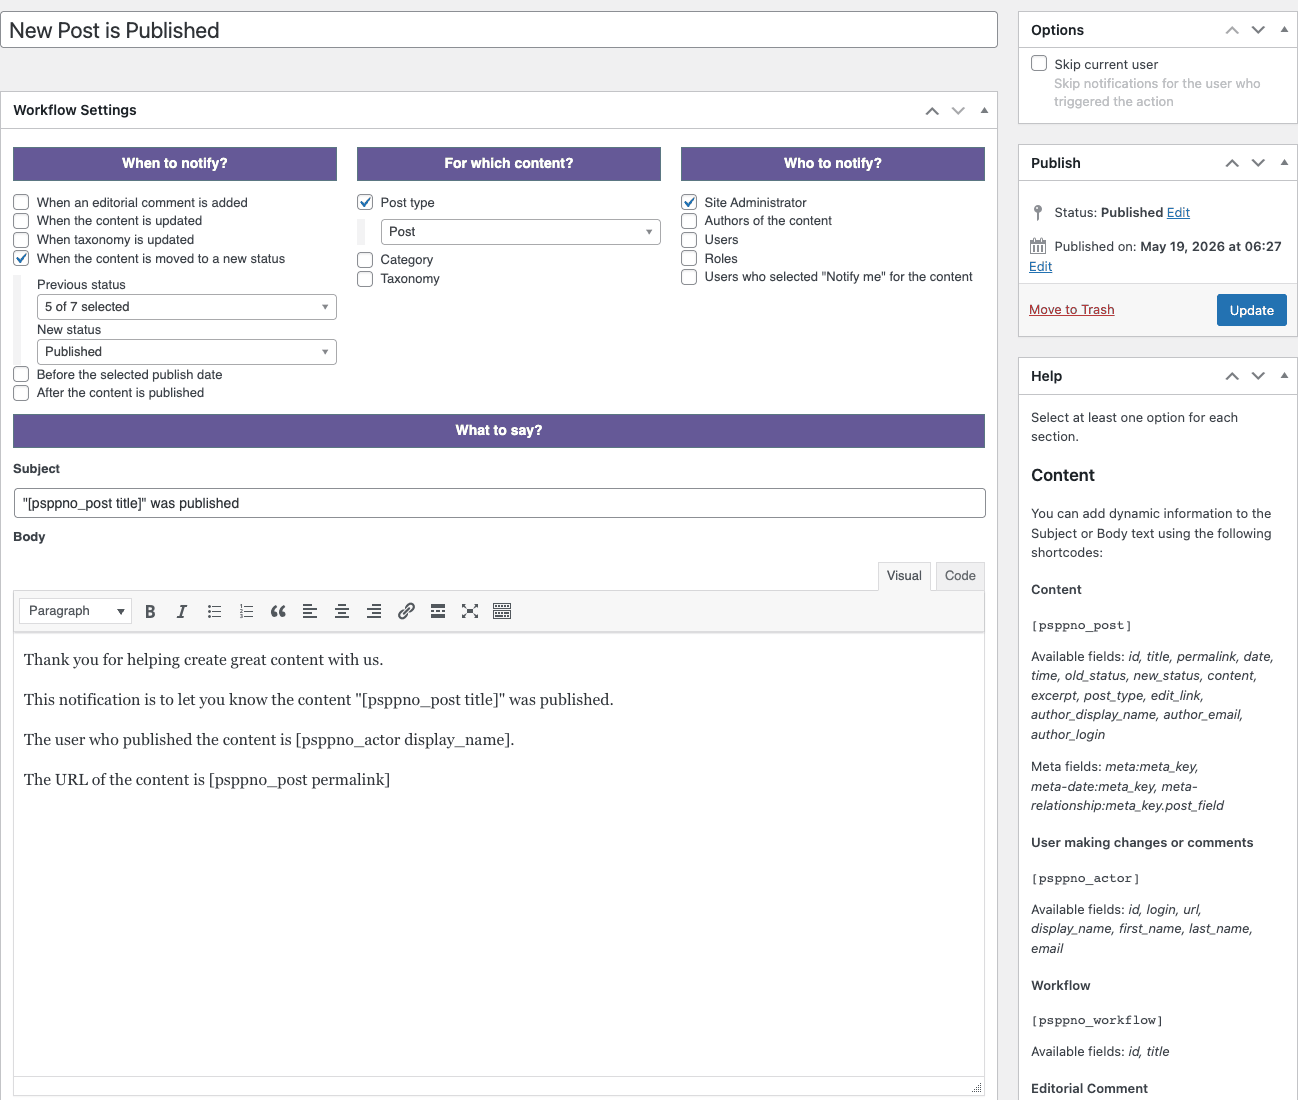
The four configuration areas:
When to notify?
The trigger. Pick from:
- When an editorial comment is added
- When the content is updated (any save)
- When taxonomy is updated
- When the content is moved to a new status (the most common)
For "content moved to new status", you pick:
- Previous status: 5 of 7 selected (the from-states).
- New status: Published (the to-state).
So "send this notification when a post moves FROM any of the 5 statuses TO Published".
Plus optional Before the selected publish date / After the current publish date modifiers.
For which content?
Filters: which post type, which categories, which taxonomies trigger this workflow. Useful for "only notify when a news post is published, not when a recipe is".
Who to notify?
Recipients:
- Site Administrator (always).
- Authors of the content (the post’s author).
- Users (specific user list).
- Roles (everyone with Editor role).
- Users who selected "Notify me" for the content (per-post opt-in).
Multi-select. You can include "Authors of the content" AND "Users with role Editor" simultaneously.
What to say?
The email/Slack content:
- Subject:
[psppno_post_title] was published(with merge tags). - Body: rich text with merge tags.
Available merge tags (visible in the right sidebar):
- Content:
[psppno_post]plus fields like title, permalink, date, status, content, excerpt, post type, edit link, author, meta, etc. - User making changes or comments:
[psppno_actor]with name, login, email, etc. - Workflow:
[psppno_workflow]with title. - Editorial Comment: when triggered by a comment.
- Receiver: the recipient’s name and email.
The merge tags are how you produce specific, useful notifications instead of generic "Something happened to your content" emails.
Slack integration (Pro): same workflow editor; under Who to notify, pick "Slack channel" with the webhook URL configured in Settings -> Slack tab.
Step 7: Editorial comments and metadata {#step-7-comments}
Two features you’ll touch in every workflow:
Editorial Comments
WordPress’s default comments are public. Editorial Comments are private, team-only comments on posts. They appear in a separate metabox on the post edit screen.
Workflow:
- Writer finishes a draft. Clicks "Save Draft".
- Editor opens the post in admin.
- Editor scrolls to the Editorial Comments metabox below the editor.
- Editor leaves a private comment ("Please add a statistic in the third paragraph").
- PublishPress sends the writer a notification with the comment text.
- Writer addresses the comment, replies.
- Comment thread continues until "Resolved".
This is what replaces back-and-forth emails between writers and editors. The full comment history stays with the post.
Editorial Metadata
Custom fields visible only to editors (not in the post content). Examples:
- Pitch summary (textarea)
- Estimated word count (number)
- SEO keyword (text)
- Featured image source (URL)
- Slug priority (dropdown High/Medium/Low)
- Internal review deadline (date picker)
Define fields under Settings -> Editorial Metadata. They appear as a metabox on the post edit screen, visible only to logged-in editors. Available as merge tags in notifications and as columns in Content Overview.
Step 8: Custom statuses, user groups, reminders {#step-8-advanced}
Three more advanced features:
Custom Statuses
WordPress ships 4 statuses: Draft / Pending Review / Published / Scheduled. Add your own under Settings -> Custom Statuses.
Common newsroom statuses to add:
- Pitch (initial idea, before draft)
- In Progress (writer working on it)
- Awaiting Edit (writer done, editor needs to review)
- Awaiting Approval (editor signed off, awaiting senior approval)
- Scheduled (ready, just waiting for publish date)
- Holding (paused indefinitely)
- Killed (rejected, not publishing)
Each gets a color, an icon, and a sort order. Custom statuses replace Draft/Pending in workflows that need more granularity.
User Groups
Group users by team (Writers, Editors, Junior Editors, SEO Team, Social Team). Notifications can target a group rather than individual users.
Workflow: "When post status moves to Awaiting Edit, notify all members of the Editors group."
Reminders (Pro)
Scheduled reminder emails. Configure under Settings -> Reminders.
Common reminders:
- "1 day before scheduled publish": remind the author "Your post is going live tomorrow, last chance to review."
- "3 days after Draft created": remind writer "Your draft hasn’t been updated in 3 days, still on track?"
- "1 hour after Published": remind editor "Confirm this post is live and visible on the front-end."
Real-world recipes (3 newsroom setups) {#recipes}
Recipe 1: Solo blogger with occasional guest writers
Goal: Stay on top of your own schedule, occasionally accept guest contributions.
Stack: PublishPress Planner Pro only.
Setup:
- Custom Statuses: Add Pitch, Awaiting Edit.
- Content Calendar: enable Me Mode for daily check-in.
- Notifications:
- When new post is submitted (status = Pending Review) -> notify me.
- When my own post is moved to Pitch status -> reminder in 7 days.
- Editorial Metadata: SEO Keyword (text field), Word Count Target (number).
Time: 30 minutes setup. Daily use: open Content Calendar each morning.
Recipe 2: Small content agency (4-person team)
Goal: 1 Editor + 3 Writers + occasional Guest Contributors. Writers pick from a pitch backlog, write, submit for review, editor approves and publishes.
Stack: PublishPress Planner Pro + PublishPress Capabilities Pro + WP Mail SMTP.
Setup:
- Custom Statuses: Pitch, Claimed, In Progress, Awaiting Edit, Approved, Scheduled.
- User Groups: Writers (3 users), Editor (1 user).
- Notifications:
- Status changes to Awaiting Edit -> notify the Editor group.
- Status changes to Claimed by Writer -> notify the Editor "writer X claimed pitch Y".
- Status changes to Approved -> notify the Writer.
- Reminders (Pro):
- 2 days after Claimed without status change -> remind writer.
- 1 day before scheduled publish -> remind editor to check the post.
- Slack integration: route "Awaiting Edit" notifications to a #content-review Slack channel.
- Editorial Metadata: Pitch Notes (textarea), Target Word Count, Audience Persona (dropdown).
Time: A full day to set up. Daily use: Editor lives in Content Board, Writers live in Content Calendar with Me Mode on.
Recipe 3: Multi-author publication (15+ writers, 3 editors, 2 senior editors)
Goal: Magazine-style publication with pitch approval workflow, parallel edits, fact-check approval, senior editor sign-off, then publish.
Stack: PublishPress Planner Pro + PublishPress Capabilities Pro + PublishPress Authors Pro + PublishPress Checklists Pro + Slack + WP Mail SMTP.
Setup:
- Custom Statuses: 9 statuses representing each workflow step.
- User Groups: Writers, Junior Editors, Senior Editors, Fact Checkers, Social Team.
- Capabilities (via Capabilities Pro): only Senior Editors can move status to Published.
- Checklists (via Checklists Pro): require Featured Image + Min Word Count + SEO Keyword set + Author Bio attached before status can move to Approved.
- Notifications: 15+ workflows for each status transition, routed to Slack channels for each team.
- Editorial Metadata: Pitch Source, Target Audience, Editorial Lane, Fact-Check Confirmed, SEO Score.
Time: 1-2 weeks to set up, including testing all the notification rules and onboarding the team.
Performance impact {#performance}
PublishPress Planner Pro is lightweight on the admin side because the calendar/board/overview only render when an editor is viewing them.
Front-end impact: zero. PublishPress doesn’t add any front-end CSS, JS, or hooks. Visitors don’t see anything from PublishPress.
Admin impact:
- Content Calendar: 100-300ms TTFB on first load, ~50ms after caching.
- Content Board: similar.
- Editorial Comments metabox: ~20ms on post edit screen.
- Notification workflow: ~10ms PHP overhead per status change.
Notification email delivery: PublishPress uses WordPress’s wp_mail(). Pair with WP Mail SMTP for reliable delivery. Without SMTP, notifications often land in spam or never arrive.
Database: PublishPress adds 3-4 custom tables. On a busy site (thousands of status changes per month) the editorial logs grow modestly. The plugin includes a cleanup tool to truncate old logs.
PublishPress Pro vs CoSchedule vs Editorial Calendar {#comparison}
| Feature | PublishPress Pro | CoSchedule | Editorial Calendar (free) |
|---|---|---|---|
| Content Calendar | Yes | Yes | Yes (basic) |
| Content Board (kanban) | Yes | Yes | No |
| Content Overview (table) | Yes | Limited | No |
| Custom statuses | Yes | Yes | No |
| Editorial comments | Yes | Yes | No |
| Editorial metadata | Yes | Limited | No |
| Notifications | Visual workflow builder | Email + Slack | No |
| Reminders | Yes (Pro) | Yes | No |
| Slack integration | Yes (Pro) | Yes (more polished) | No |
| Social media scheduling | No | Yes (core) | No |
| Email marketing scheduling | No | Yes | No |
| Multi-channel calendar | No | Yes (blog + social + email) | No |
| User groups | Yes | Yes | No |
| Hosted (SaaS) vs WP-native | WP-native | SaaS | WP-native |
| Annual price | $129-$339 | $29-$59/user/month ($348-$708/user/year) | Free |
Use PublishPress Pro if you need WordPress-native editorial workflow, value owning your data, and budget is annual not monthly.
Use CoSchedule if you need integrated social media + email marketing on the same calendar as your blog posts, AND have monthly SaaS budget. CoSchedule is significantly more expensive long-term but does multi-channel.
Use free Editorial Calendar if you only need a basic drag-drop calendar with zero workflow features.
12 common gotchas {#gotchas}
-
Notifications require working email delivery. Install WP Mail SMTP and configure with Mailgun/SendGrid/SES on day one. Otherwise notifications go to spam.
-
Editorial Comments are NOT the same as WordPress comments. They live in a separate database table. They’re not exposed in REST API by default; no SEO impact; no public visibility.
-
Custom statuses break some themes. Themes that use
if (get_post_status() == 'publish')checks will treat your custom statuses as unpublished. Test custom statuses on a staging site. -
The calendar’s iCal subscription URL is permanent and not authenticated by default. Anyone with the URL can view your editorial schedule. Set "Allow public access" to OFF in Settings, then only logged-in users can subscribe.
-
Pro features require valid license activation. On the direct license, paste in Settings -> License. on the GPL-licensed version, license validation is bypassed but premium support is unavailable.
-
Slack webhooks expire if you regenerate them in Slack. Update the webhook URL in PublishPress Settings whenever you change it in Slack.
-
Reminders depend on WP-Cron. If your site has WP-Cron broken (some hosting blocks it), reminders won’t fire. Set up real cron via your host:
*/5 * * * * wget -q https://yoursite.com/wp-cron.php. -
The Notifications log can grow large on busy sites. Tens of thousands of status changes per year = tens of thousands of log rows. Settings has a "Clear log" button.
-
Content Board cards don’t show all post fields by default. Use Customize Card Data (Pro) to add Word Count, Featured Image, Categories.
-
Custom Statuses don’t replace WordPress’s built-in Draft/Pending statuses. They sit alongside. Hide built-in ones in Settings -> Custom Statuses by toggling visibility.
-
The free Editorial Calendar plugin (different product) conflicts with PublishPress Calendar. Deactivate free Editorial Calendar before installing PublishPress.
-
Drag-drop on the Calendar requires JavaScript and a modern browser. Doesn’t work in IE11. Mobile browsers vary; works on iOS Safari and Android Chrome but quirky on older Android browsers.
Developer reference: hooks and filters {#developer-reference}
PublishPress exposes 80+ hooks. Most useful:
Modify which posts appear in the Calendar
add_filter('pp_calendar_posts_query_args', function($args) {
 // Only show posts that have a "calendar_visible" custom field set to "yes"
 $args['meta_query'] = [
 ['key' => 'calendar_visible', 'value' => 'yes'],
 ];
 return $args;
});
Customize the post title HTML in the Calendar
add_filter('pp_calendar_post_title_html', function($html, $post) {
 $word_count = str_word_count(strip_tags($post->post_content));
 return $html. ' <small>('. $word_count. ' words)</small>';
}, 10, 2);
Add a custom capability check for the Calendar create-post action
add_filter('pp_calendar_create_post_cap', function($cap) {
 return 'edit_others_posts'; // Only senior editors can create from calendar
});
Trigger a side effect when editorial metadata is updated
add_action('pp_editorial_metadata_field_updated', function($field_id, $post_id, $value) {
 if ($field_id === 'seo_keyword' &&!empty($value)) {
 // Sync to your CRM
 wp_remote_post('https://crm.example.com/api/keywords', [
 'body' => json_encode(['post_id' => $post_id, 'keyword' => $value]),
 ]);
 }
}, 10, 3);
Custom notification recipient
add_filter('publishpress_notif_run_workflow_receivers', function($receivers, $workflow, $args) {
 // Add the post's first reviewer (a custom field) to the recipients list
 $reviewer_id = get_post_meta($args['post']->ID, 'first_reviewer', true);
 if ($reviewer_id) {
 $receivers[] = ['user_id' => $reviewer_id];
 }
 return $receivers;
}, 10, 3);
Modify the notification subject programmatically
add_filter('publishpress_notif_run_workflow_subject', function($subject, $workflow, $args) {
 $priority = get_post_meta($args['post']->ID, 'priority', true);
 if ($priority === 'urgent') {
 return '[URGENT] '. $subject;
 }
 return $subject;
}, 10, 3);
Override default post types shown in Content Overview
add_filter('pp_content_overview_filter_values', function($values) {
 $values['post_type'] = ['post', 'page', 'news', 'review']; // include custom CPTs
 return $values;
});
Programmatically log an editorial action
do_action('pp_log_editorial_action', $post_id, 'manual_override', 'Editor approved skip-review workflow');
FAQ {#faq}
Is PublishPress Planner free?
Yes, the free version on WordPress.org includes Content Calendar, Content Board, Overview, basic notifications, editorial comments, custom statuses, and metadata. Pro adds the workflow engine, Slack, reminders, customization options, and premium support.
Can I use PublishPress with WooCommerce?
Yes. Add Product as a post type in Settings -> Content Calendar. WooCommerce orders also appear if you toggle order post types.
Does PublishPress work with Gutenberg / block editor?
Yes. All PublishPress features work in both Classic and Gutenberg. Editorial Comments and Editorial Metadata appear as Gutenberg sidebar panels.
Can PublishPress replace Asana / Trello for content teams?
For content workflow specifically, yes. PublishPress lives inside WordPress so writers don’t context-switch. For broader project management (non-content tasks), use a dedicated tool like Asana with PublishPress for content-specific stuff.
Does PublishPress slow down my admin?
Lightly. Calendar/Board/Overview render only when viewed, adding 100-300ms. The metaboxes on post edit screens add ~20ms. No front-end impact.
Can the team see only their own posts?
Yes. Enable Me Mode in any view. For permission-level filtering (e.g. Writer A can’t see Writer B’s drafts), pair with PublishPress Capabilities Pro.
Does it work on multisite?
Yes. License covers one network as one install. Notifications can be network-wide (Pro).
How do I export the calendar to Google Calendar / Outlook?
Settings -> Content Calendar -> Enable subscriptions. Copy the iCal URL. Paste into Google Calendar -> Add by URL.
Can writers create their own pitches?
Yes. Click on an empty calendar cell to create a new post. With custom statuses set, they can save as "Pitch" status.
Does it support multilingual sites?
Yes, WPML and Polylang are compatible. The calendar shows posts of all languages by default; you can filter.
Can I use PublishPress for non-blog content (videos, podcasts, products)?
Yes. Add any post type to the calendar via Settings. PublishPress is post-type-agnostic.
Will my data export if I uninstall?
Yes, PublishPress data is in standard WordPress tables (wp_pp_*). Use a database export tool to back up before uninstalling.
Can I have different calendars for different teams?
Not natively. You could use the Customize Filters feature to give each team a saved view. For truly separate calendars, run multiple WordPress subsites.
Does PublishPress integrate with Trello / Asana / Notion?
Not natively. You’d need Zapier or custom code via the notification hooks.
Is there a mobile app?
No. PublishPress is web-only. The admin works on mobile browsers but isn’t a native app. The iCal subscription URL is what most editors use on mobile (subscribe in their phone’s Calendar app).
Final thoughts {#final-thoughts}
PublishPress Planner Pro is the WordPress editorial workflow plugin. The combination of Calendar + Board + Overview views, custom statuses, notification workflows, editorial comments, and metadata is what turns WordPress from a one-person-publishes-when-they-want CMS into a real newsroom tool.
It’s not the right plugin if your "team" is just you and you publish on the spot. The free Editorial Calendar plugin is enough for that. It’s not the right plugin if you need integrated social media scheduling, that’s CoSchedule’s territory. And it’s not the right plugin if you’re more comfortable in Notion or Trello and don’t want to move editorial into WordPress.
But for a small-to-medium content team that already lives in WordPress and needs a real workflow, PublishPress is genuinely best-in-class. The free tier is more capable than most paid editorial plugins. The Pro tier adds the workflow engine and Slack/reminders that scale to real newsrooms.
Pair PublishPress Planner Pro with WP Mail SMTP for reliable email delivery (critical), Ultimate Member for guest writer profiles, and a security plugin like Solid Security Pro to protect the increased admin surface area of a multi-user newsroom.