

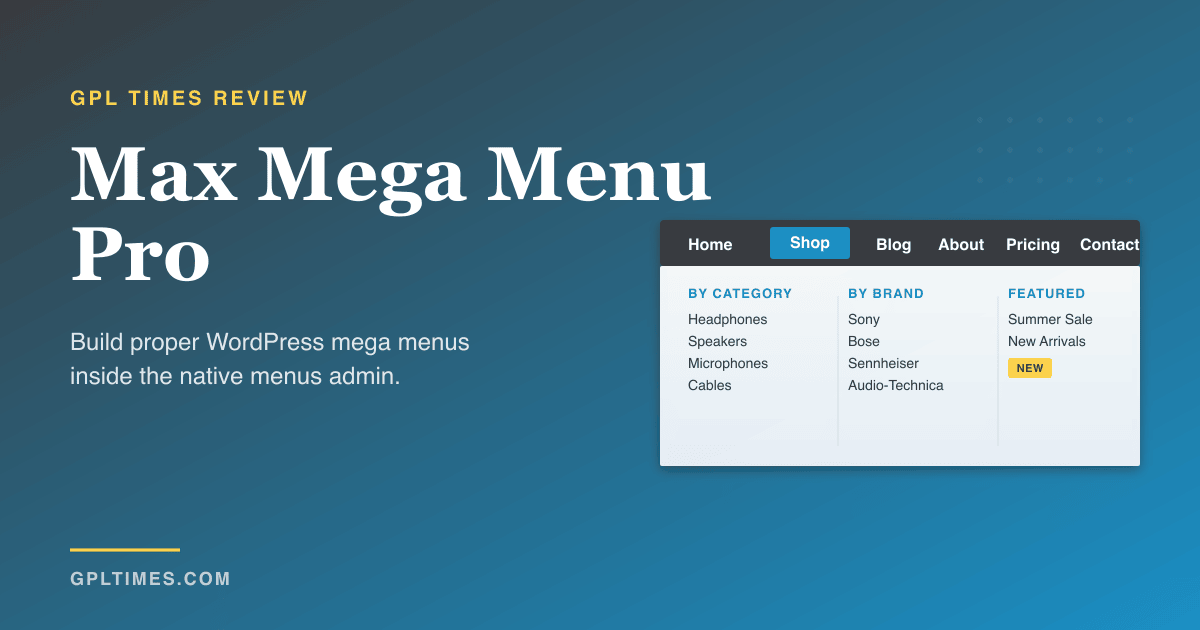
I’ve tried to add a proper mega menu to four different WordPress sites in the past two years. The first one I built by hand, extending walker_nav_menu and adding a hand-rolled flexbox grid inside the panel HTML. It worked. It also broke every time the client wanted to add a column. The second site I used UberMenu, which is powerful but the admin is its own world, replacing the WordPress menus screen with a custom builder. The third was an Astra Pro site, where the built-in mega menu is fine for a couple of columns but starts feeling cramped beyond that. The fourth I built in Elementor with hover containers and absolute positioning, which always looks great on the desktop and falls apart on mobile.
Max Mega Menu Pro is the one I kept hearing about and kept dismissing because, honestly, the name sounded like an early-2010s plugin nobody updates. Then I sat down with a real test site, built a 3-column mega panel under a Shop menu item, hooked up roles, badges, and search-as-replacement, and I have to admit: the integration into the native WordPress menus admin is the right design choice, and the plugin earns its spot.
This is a long walk through what it does, where it shines, where it doesn’t, and a developer reference covering every filter you’ll actually reach for.
Table of Contents
- What is Max Mega Menu Pro?
- Why the design choice matters
- Key features at a glance
- Installation and the first menu
- Building a real mega menu, step by step
- The per-item modal: where the work happens
- Menu themes and styling
- The Pro-only features in detail
- Real-world use cases
- Developer reference: hooks, filters, shortcodes
- Performance and what it costs your page
- Compatibility and gotchas
- Pricing and licensing
- FAQ
- Final thoughts
What is Max Mega Menu Pro?
Max Mega Menu is a WordPress navigation plugin by Tom Hemsley (the company name is megamenu.com). It comes in two halves. The free Max Mega Menu plugin sits on the WordPress.org repository and gives you everything you need to build a functioning mega menu: enable a menu location, drop a few children under a top-level item, and they render as a multi-column panel on hover. The Pro add-on, sold separately, layers on the features most agencies actually need on day one: sticky menus, role-based item visibility, badges, tabbed sub-menus, vertical menus, overlay-on-open, Font Awesome 6 and Genericons icon libraries, plus a long list of menu-item replacements (search box, WooCommerce cart total, login info, BuddyPress avatar).
The Pro plugin is literally an add-on. The main file checks for the free plugin and refuses to do much without it. That’s a slightly unusual structure for a paid WordPress plugin and it means two zips, two activations, but only one Mega Menu menu in the admin. Once both are running you’d never know the codebase is split in half.
What sets Max Mega Menu apart, for me, is what it doesn’t do. It doesn’t replace your theme’s menu walker. It doesn’t add a top-level "Header Builder" page to the WordPress admin. It doesn’t ask you to drop a custom shortcode into a builder canvas (though you can if you want to). Instead, it extends the existing Appearance > Menus screen with one new button on each item and a small accordion on the side panel. You build your menu the way WordPress wants you to build menus, and Max Mega Menu turns it into a mega menu by reading per-item post meta at render time.
Why the design choice matters
Skip this section if you’ve already shipped one or two mega menus. If you haven’t, this is worth understanding because it explains why the rest of the article makes sense.
WordPress menus are a tree. Each menu item is a custom post type (nav_menu_item) with a menu_item_parent pointing to its parent in the tree. When the theme calls wp_nav_menu(), WordPress walks the tree and hands each item to a walker class, which renders the HTML.
Most mega menu plugins solve the "I want a panel with three columns of links" problem in one of three ways:
- They replace the walker entirely. The plugin owns the menu HTML. The theme’s menu output is bypassed.
- They build a separate menu system. Forget Appearance > Menus, the plugin gives you a drag-and-drop builder somewhere else, and you embed the output via shortcode.
- They piggyback on the standard menu tree. Items stay in the WordPress menus admin. The plugin only injects styles and a few class names so the existing structure renders as a mega panel.
Max Mega Menu is firmly in camp 3. UberMenu is camp 1 with a fallback to camp 3. Most theme-builder mega menus (Elementor, Bricks, Divi) are camp 2. Camp 3 is the most theme-compatible because you’re not fighting the theme’s existing menu output, you’re enhancing it.
That choice has a downside too. Because Max Mega Menu doesn’t own the menu HTML, the "Save Menu" button on Appearance > Menus does NOT save your mega menu settings. Those live in a separate _megamenu post meta entry per item and are saved through the plugin’s own modal. New users get bitten by this exactly once and then they remember it forever.
Each menu item gets a _megamenu post meta entry that’s a serialized PHP array of overrides: icon, sub-menu type, panel width, hide-on-mobile, badge text, role visibility, custom styling. The frontend walker reads that meta on render and applies the right classes and attributes.
Key features at a glance
Rather than dump the marketing list, here’s what actually changes how you build a site.
- Three sub-menu display modes. Flyout (a regular dropdown), Mega Menu Standard Layout (column grid), and the Pro additions: Tabbed Sub Menu and Mega Menu Grid Layout. Standard Layout is what 80% of sites actually need.
- Per-item icon picker. Dashicons in the free version. Font Awesome 5/6 and Genericons in Pro. Custom SVG upload in Pro.
- Per-item visibility rules. Hide on mobile, hide on desktop, hide on tablet. Pro adds role-based visibility (logged-in / logged-out / by-role).
- Per-location settings. Each menu location has its own theme, its own behaviour, its own sticky/overlay/mobile options.
- Menu Themes. A separate visual editor for the colours, fonts, padding, hover effects, mobile toggle, badges. You can save themes and apply different ones to different menu locations.
- Pro: Sticky menus. Stick the menu bar on scroll. Desktop only, mobile only, or both. Optional "hide until the user scrolls up" behaviour, which I prefer to a sticky-by-default.
- Pro: Vertical menus. Render the menu as a left/right sidebar instead of a horizontal bar. Useful for app-style sites and docs.
- Pro: Tabbed sub menus. Sub menu opens with tabs on the left and content on the right. Great for help-center style category pickers.
- Pro: Roles and restrictions. Show a menu item only to logged-in users, or only to administrators, or only to logged-out visitors. Useful for "My Account" vs "Sign in" links.
- Pro: Menu Item Badges. Coloured pill labels (NEW, SALE, BETA) on a menu item. Four built-in styles, plus a custom-style override.
- Pro: Replacements. Replace a menu item with a search box, a WooCommerce cart total, an EDD cart count, a logo, a BuddyPress avatar, or arbitrary custom HTML. The shortcodes are also exposed for use anywhere on the site.
- Pro: Custom toggle blocks. Build the mobile toggle bar block by block. Logo on the left, search input in the middle, hamburger on the right. Or any combination you like.
- Pro: Mobile sub-menu type. Per-item: should this sub menu collapse as an accordion on mobile or slide in as a flyout?
- Pro: Image Swap widget. A widget you can drop into a mega panel that swaps one image for another on hover. Genuinely useful for product previews.
- Compatible with Gutenberg. Drop the Max Mega Menu block into a block theme template part. Twenty Twenty-Five and the other block themes get a real header without a third-party header builder.
- Compatible with classic themes. Use
wp_nav_menu()with the menu’s location, or drop the[maxmegamenu]shortcode anywhere, or use the widget.
That list is long. The good news is most of the Pro features are off until you flip a switch, so you’re not paying a performance tax on what you don’t use.
Installation and the first menu
Two installs because the Pro plugin is an add-on, not a standalone:
- From
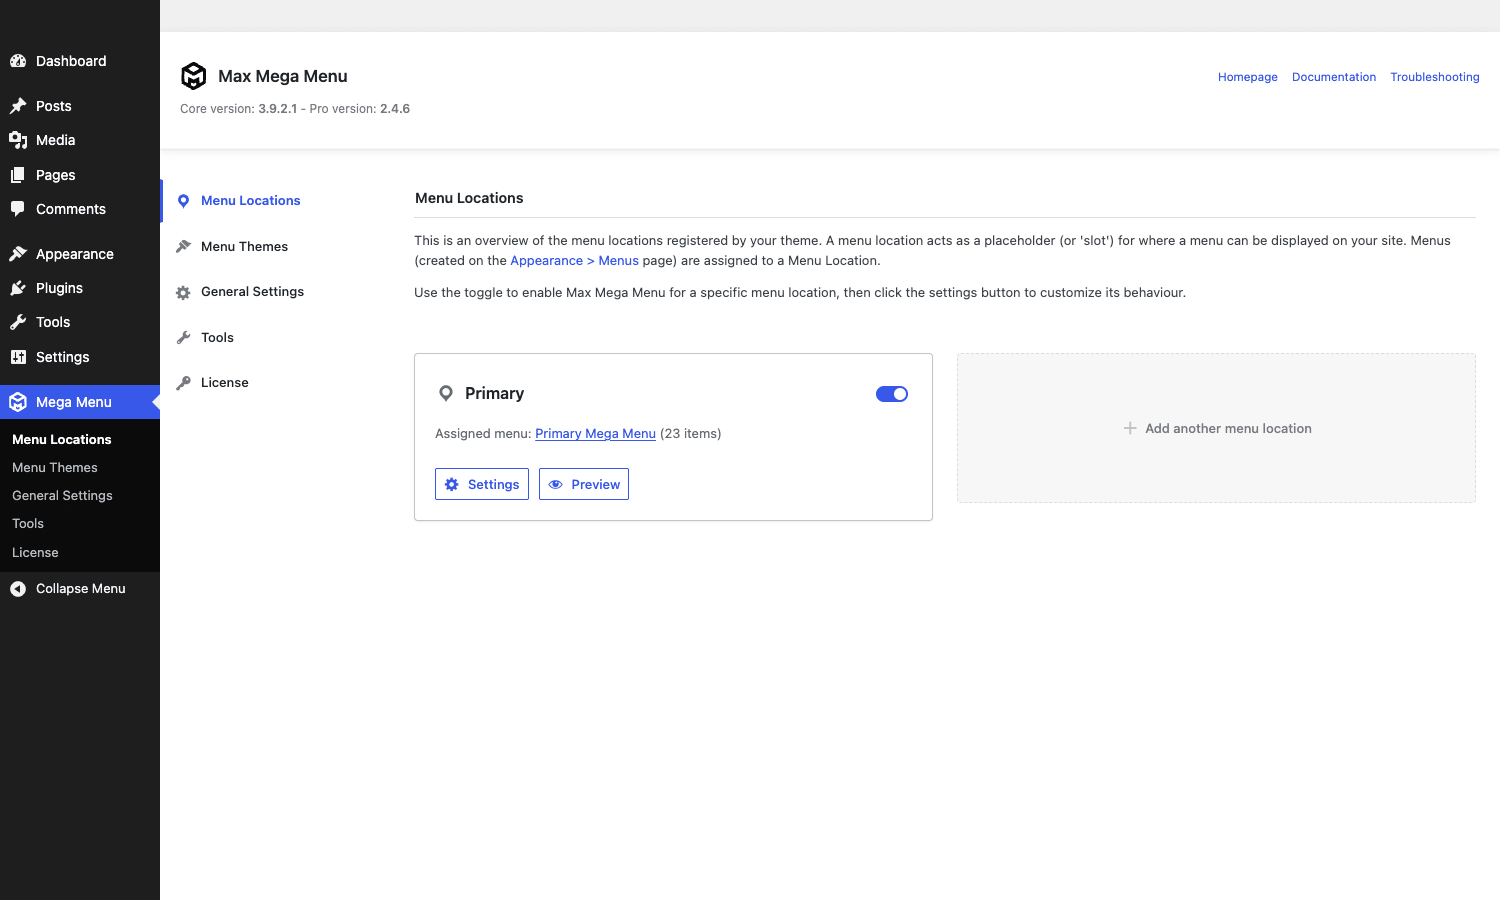
wp-admin/plugins.php, install Max Mega Menu (the free version) from the WordPress.org repository and activate it. - Upload the Max Mega Menu Pro Addon zip via the same Plugins screen and activate it. You’ll see a new menu item in the WordPress admin sidebar labelled "Mega Menu" with sub-items for Menu Locations, Menu Themes, General Settings, Tools, and License.
If you skip the free plugin and only install Pro, you’ll see an admin notice telling you Pro needs the free plugin to work. There’s no fallback, no half-working mode. They go together.
After activation, head to Mega Menu > Menu Locations. This screen lists every menu location your theme registers with register_nav_menus(). Block themes (Twenty Twenty-Five, Twenty Twenty-Four) often register zero menu locations, in which case you’ll see a friendly empty state with a "Get started: Add your first menu location" card. Click it, name your location something like "Primary", pick which menu it should be assigned to, hit Save. Max Mega Menu registers a synthetic location for you.
Then you need to display the menu somewhere on the front end. Three options:
- Block theme. Drop the Max Mega Menu block into your header template part.
- Classic theme that registered the location. The menu renders wherever the theme calls
wp_nav_menu()with that location. - Shortcode anywhere. Use
[maxmegamenu location=max_mega_menu_1]in a page, post, or text widget. Useful for testing.
For the screenshots in this article I ran a Twenty Twenty-Five demo, created a Mega Menu location, assigned a menu with twenty-three items, and dropped the shortcode at the top of the front page. That’s it: front end shows the mega menu, hover the Shop item, the 3-column panel slides down.
Building a real mega menu, step by step
Don’t read this section as a checklist. Read it as the order of operations I actually use on real sites.
Step 1: Build the menu in Appearance > Menus first, ignore Max Mega Menu. Add your top-level items (Home, Shop, Blog, About, Contact). Don’t think about columns yet. Just build the tree.
Step 2: Add column heads as menu items under the parent. Under Shop, add three more items: "By Category", "By Brand", "Featured". These will become column headers in the mega panel. They’re just regular WordPress menu items at depth 1.
Step 3: Add the actual links under each column head. Under "By Category" add Headphones, Speakers, Cables & Audio, Microphones. Under "By Brand" add Sony, Bose, Sennheiser, Audio-Technica. These become depth-2 items in the WordPress tree.
Step 4: Save the menu. WordPress saves the tree.
Step 5: NOW open the Max Mega Menu modal on Shop. Each top-level item has a "Mega Menu" button next to its title in the menu admin. Click it. The modal opens to the "Mega Menu" tab. Set "Sub menu display mode" to "Mega Menu – Standard Layout" and set the column count to 3. Save Changes.
That’s the core flow. Repeat the per-item modal for any other parent you want to mega-menu (Blog, About, etc.).
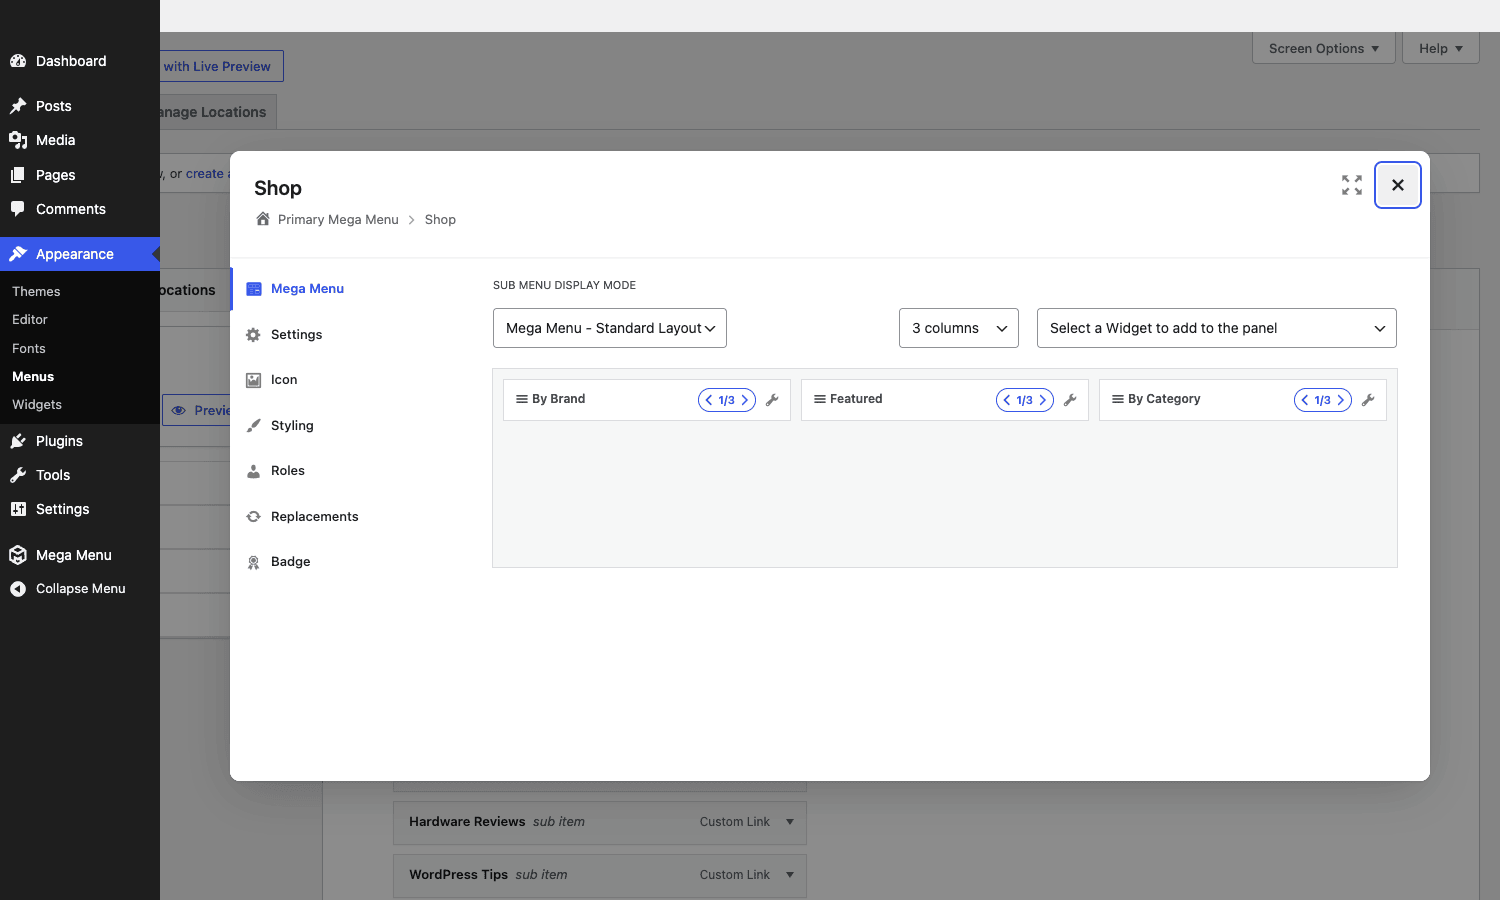
The thing nobody tells you the first time: the columns auto-populate from the existing child items. You don’t drag columns around. You don’t manually assign children to columns. The plugin reads the tree and lays it out as columns based on the column count you chose. Column heads (the depth-1 items) become column titles. Children of those column heads (depth-2) become the column’s link list.
This is also why Max Mega Menu makes you build the menu first. The structure IS the menu tree. Change the tree, the panel layout changes.
If you want widgets inside a column instead of menu links, there’s a "Select a Widget to add to the panel" dropdown on the column toolbar. Drop in a Text widget, a Custom HTML widget, an Image Swap widget (Pro), or a Block Pattern. You can mix widgets and menu items in the same panel.
The per-item modal: where the work happens
This is the single most important screen in the plugin and it’s where new users get lost the most. The modal has six tabs in the free version and seven in Pro:
- Mega Menu. Sub-menu type, panel column count, panel widget drop-in.
- Settings. Per-item: open mode (hover or click), hide on mobile/tablet/desktop, disable link, align panel to item or to viewport edge.
- Icon. Dashicons in free; Font Awesome 5/6, Genericons, custom SVG in Pro.
- Styling. Per-item: override the menu theme’s colours, font weights, padding, hover state for just this item.
- Roles (Pro). Restrict the item to logged-in / logged-out / specific roles.
- Replacements (Pro). Swap the item’s label for a search box, cart total, login info, custom HTML, BuddyPress avatar, etc.
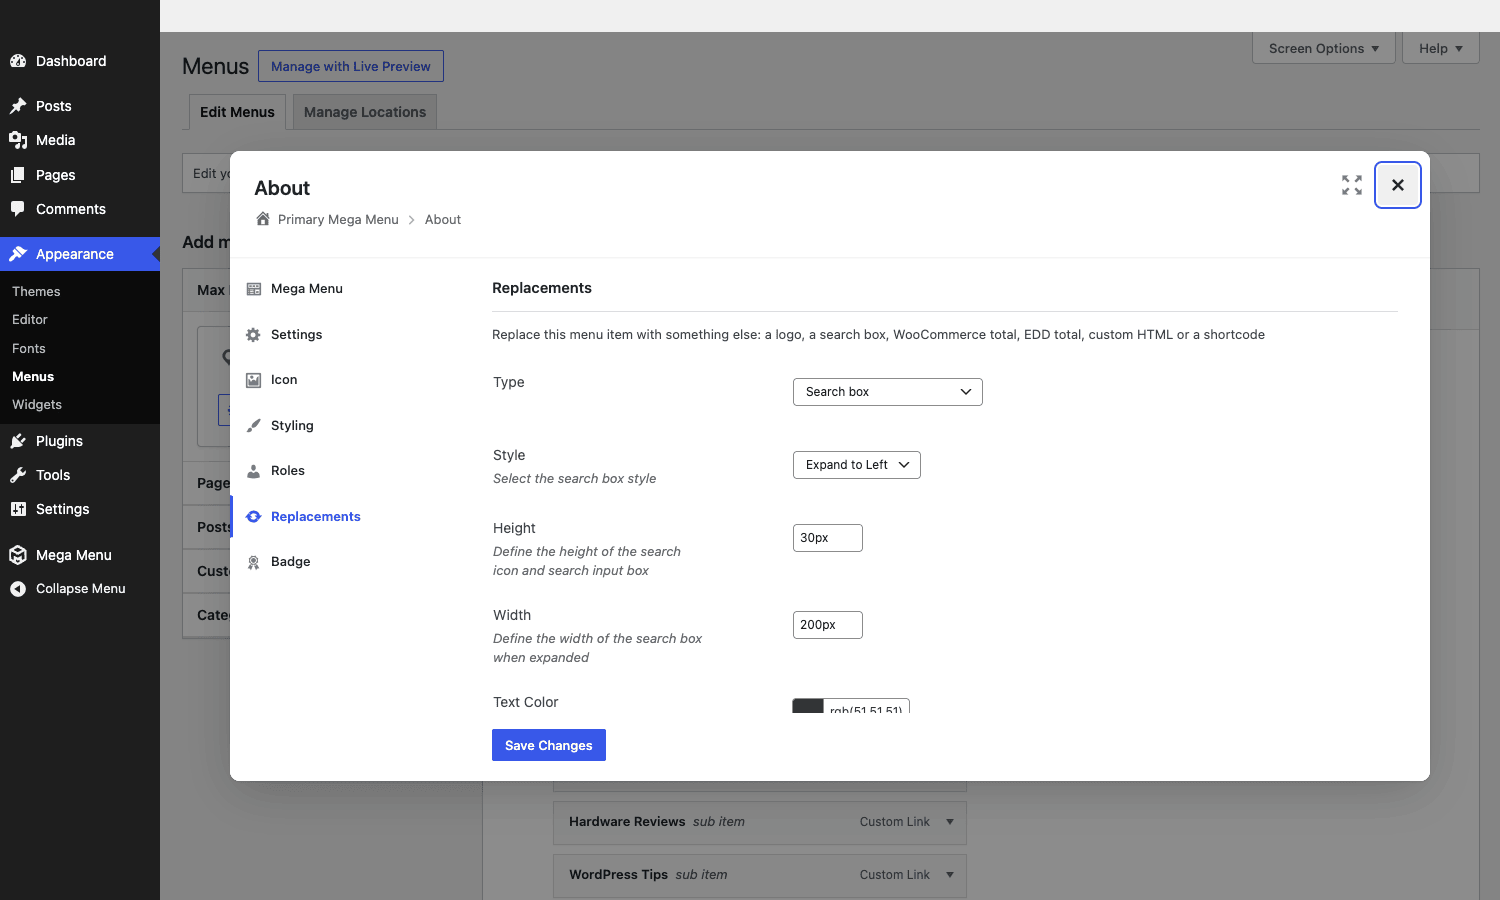
- Badge (Pro). Add a coloured badge with a label.
The modal’s left sidebar is sticky, so you can flip between tabs without losing context. Saving is per-modal, not per-tab, so if you fiddle with the Styling tab and the Badge tab and click Save Changes once, both get saved.
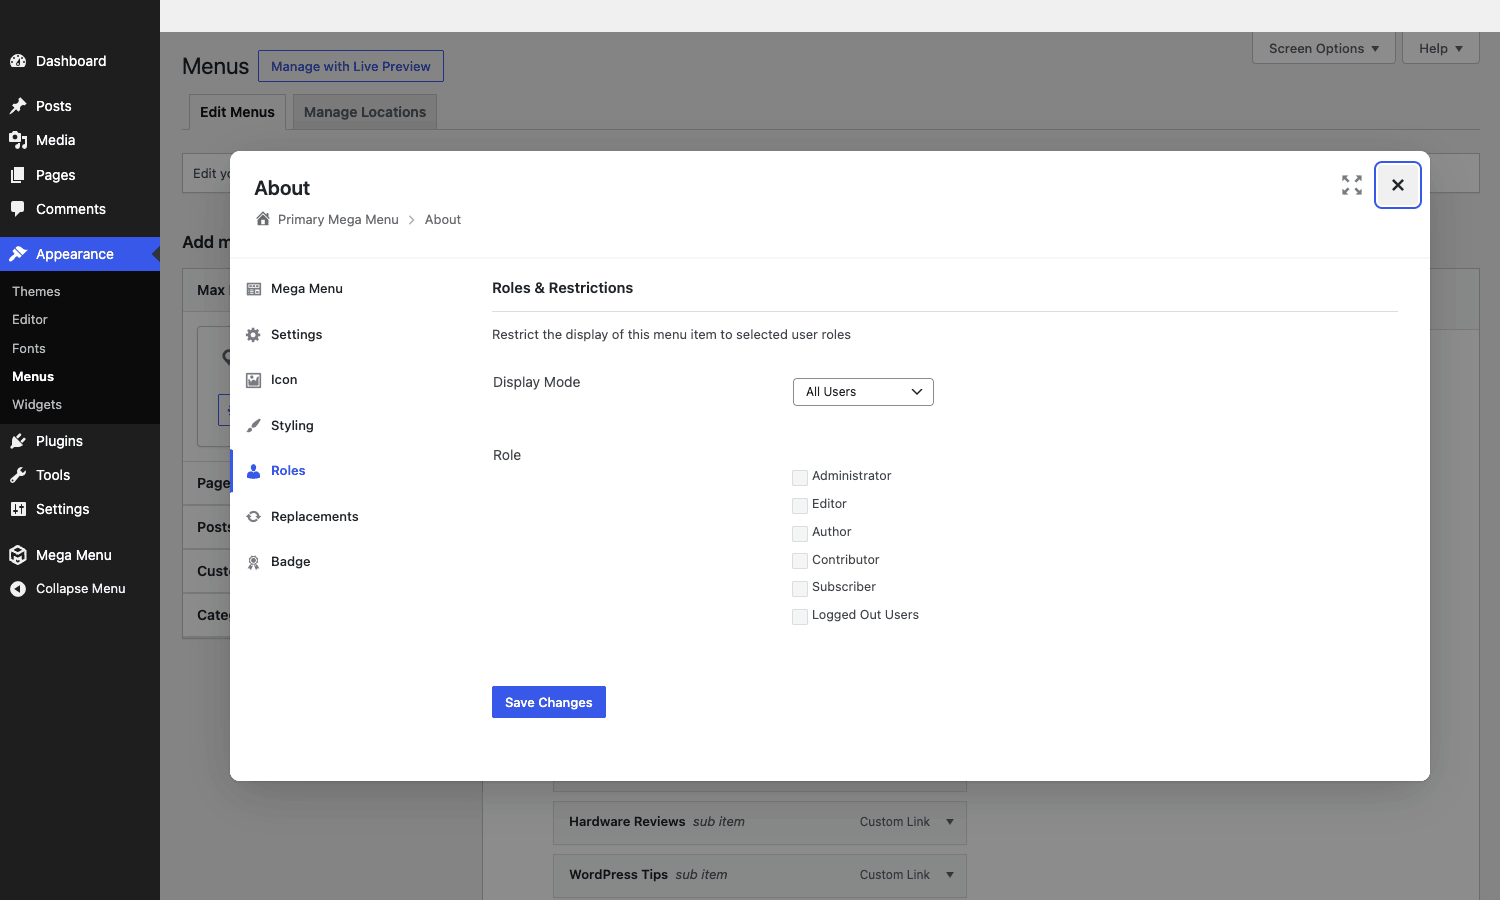
One frustration: the modal opens on click, which means you can’t keyboard-tab through the menu admin without launching a modal you didn’t want. A small thing but it adds up when you’re configuring twenty items.
Menu themes and styling
Menu Themes is the visual editor for everything that’s not per-item. Go to Mega Menu > Menu Themes and you’ll get a left rail with six sub-tabs:
- General Settings. Theme title, arrow icons, line height, z-index.
- Menu Bar. Height, sticky height, background colour (with from/to gradient), padding, border radius.
- Mega Menus. Padding, background colour, item link colours, hover states, column gap, row gap.
- Flyout Menus. Same as above but for non-mega sub menus.
- Mobile Menu. Toggle bar height, toggle bar colour, mobile menu type (slide / accordion), breakpoint.
- Badges (Pro). Style 1-4 colours and typography.
- Custom Styling. A raw CSS textarea for anything else.
You can save multiple themes, duplicate a theme, export/import a theme as JSON, and assign different themes to different menu locations. That last bit matters more than you’d think: a "header" menu and a "footer" menu probably need different sizes and colours, and you don’t want one theme controlling both.
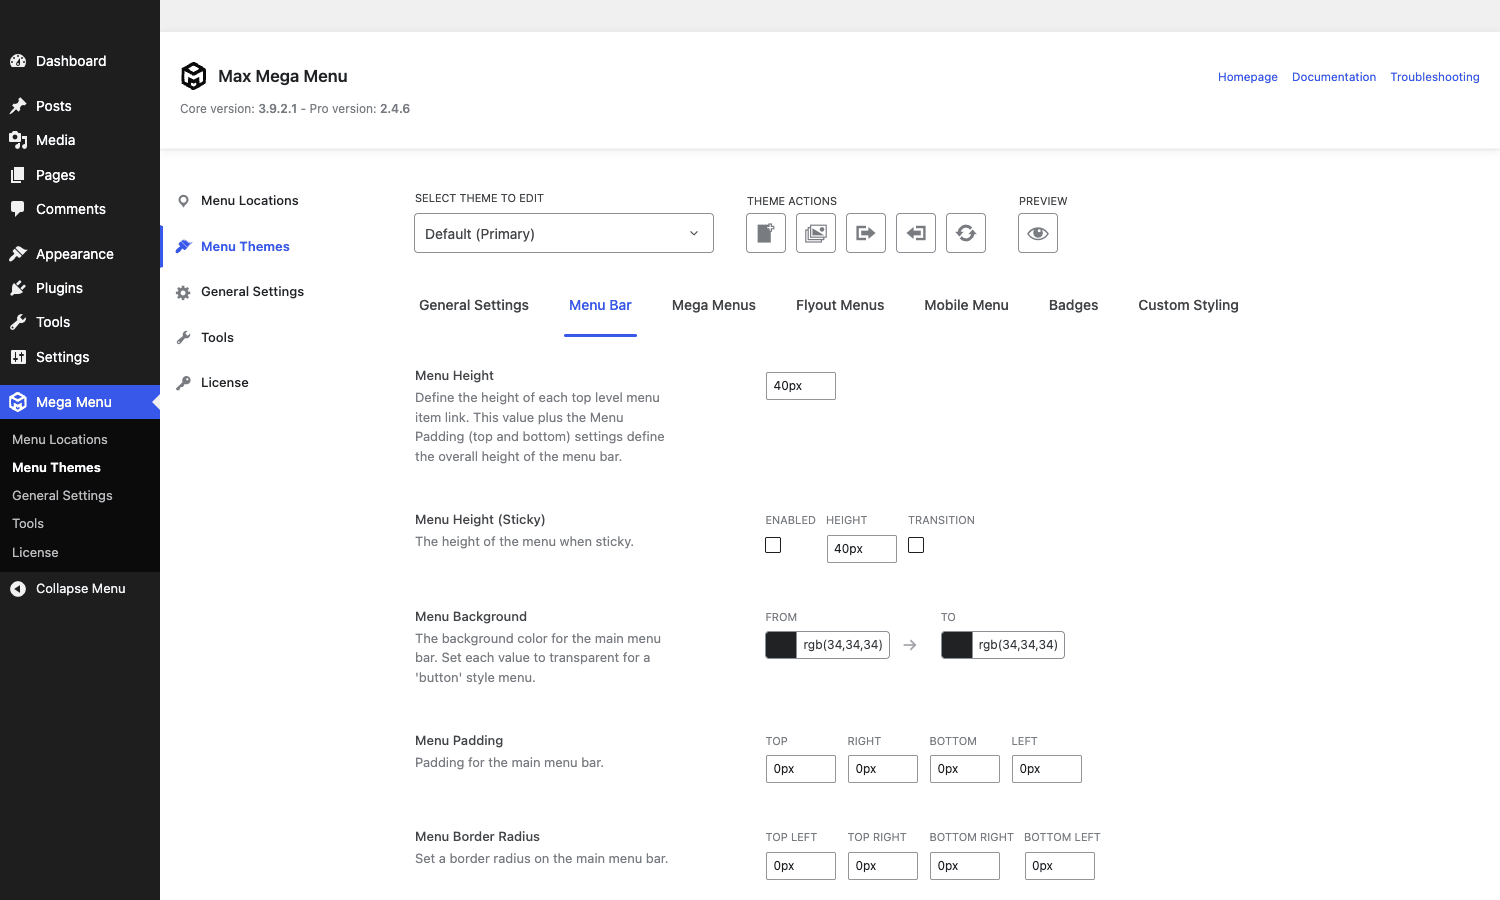
The CSS pipeline is SCSS-based. When you save a theme, the plugin compiles your settings to a SCSS partial, merges it with the base theme SCSS, and writes the final CSS either to a file in wp-content/uploads/maxmegamenu/style.css (the default) or inlines it into the page head. The file-system option is faster on cached requests and is the right default. The inline option helps when you’re behind a strict CDN that won’t serve files from wp-content/uploads.
There’s a small performance cost the first time a theme is saved on a slow shared host: the SCSS compile happens synchronously and can take a couple of hundred milliseconds. Not noticeable to end users (they only see the cached output), just to the admin clicking Save.
The Pro-only features in detail
Let me single out the Pro features that earn the upgrade, and the ones that don’t.
Sticky menus. Worth the upgrade alone if you care about Core Web Vitals. The plugin uses position: fixed with a transition, and the "hide until scroll up" mode (only show the sticky bar when the user scrolls back up) is a much better UX than always-on-top. I prefer this to the half-dozen sticky-header plugins on the repo because it doesn’t duplicate the menu HTML, it just toggles a class.
Roles & Restrictions. Useful but limited. You can hide a top-level item by role. You can’t restrict by user meta, by membership plan, by ACF field, by purchase history. For richer rules you’ll still reach for an integration with your membership plugin. Don’t add 9 roles to one menu item, by the way. The plugin doesn’t cache the role check and you’ll feel it on a busy page.
Badges. Nice. Each style is a different colour scheme baked into the theme editor. Style 1 is red, Style 2 is yellow, etc. You can customise the colours globally in Menu Themes > Badges, or override per-item from the modal.
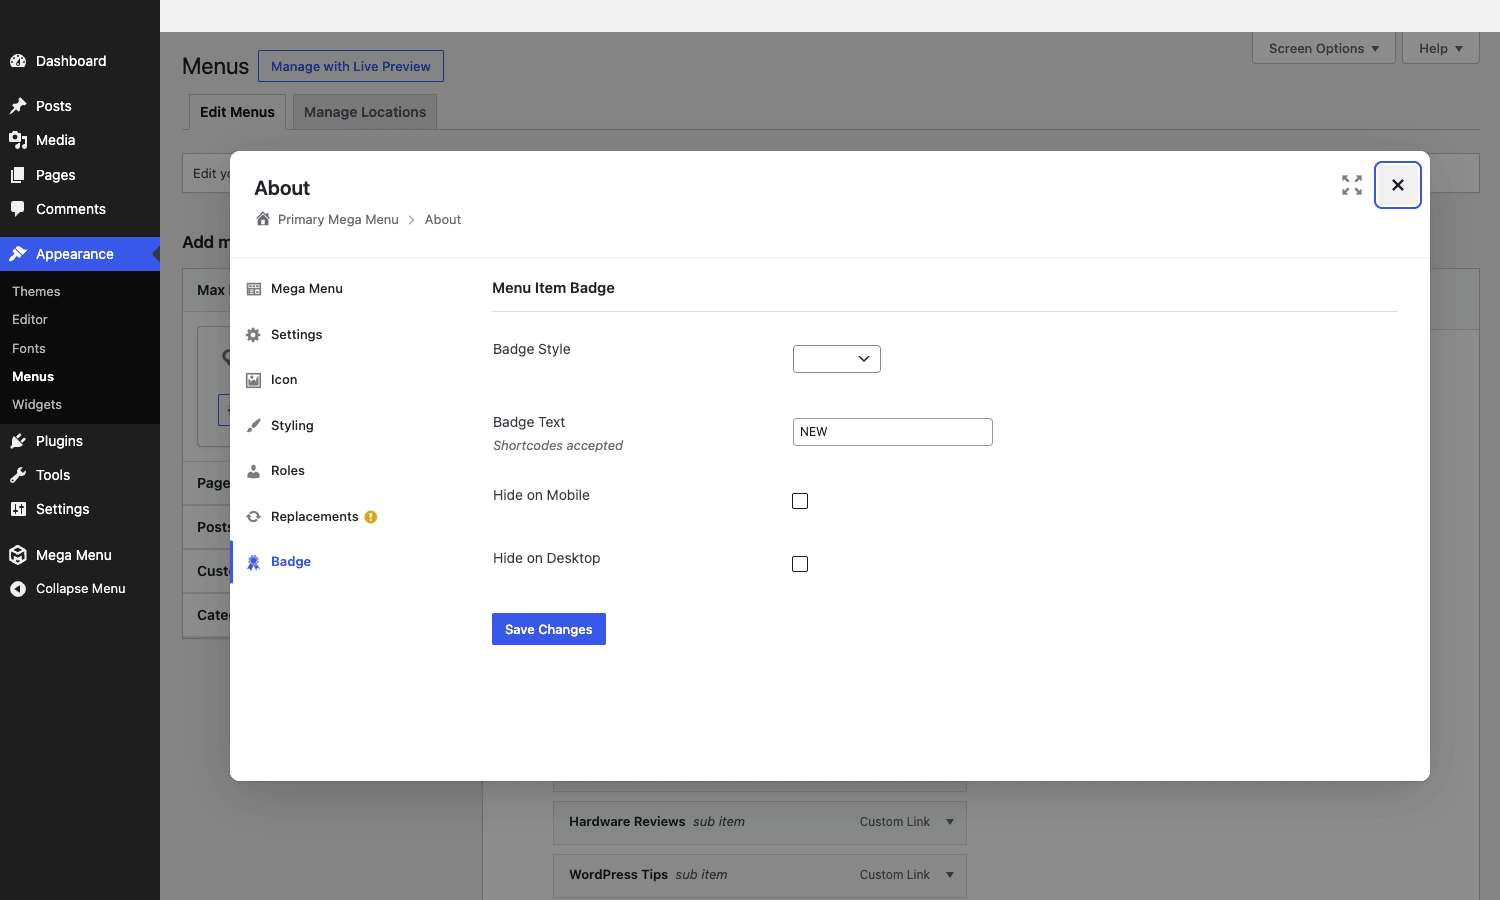
Replacements. This is the one I didn’t expect to use much and now use everywhere. "Replace this menu item with the WooCommerce cart total" sounds gimmicky until you realise you don’t need a separate header widget for the cart, you don’t need a custom shortcode in a sidebar, you just point a menu item at the replacement and it stays in your menu’s HTML, inheriting all the menu’s styling.
Tabbed Sub Menus. Honestly didn’t love this one. The tabs slot into the left of the panel and the content on the right, but the tab labels look cramped on smaller laptops, and there’s no way to put icons inside tabs the way you can in a regular column. Fine for a quick "categorise the columns" effect, not the right call for a help center.
Vertical menus. Genuinely nice. Renders the whole menu as a left-side stack instead of a horizontal bar. Sub menus open to the right. I’d use this on a documentation site over building it from scratch.
Custom toggle blocks. The single feature that finally let me ship a clean mobile header on a Bricks site without writing custom code. You drop logo / search / hamburger into the mobile toggle bar like Lego.
Font Awesome 6. Free version ships with Dashicons (~150 icons, mostly utility), Pro adds the full FA6 library. Doesn’t sound like much, but FA6’s brand icons are what most "Find us on Twitter" header menus need.
Image Swap widget. A widget for inside the mega panel. Default image swaps to a second image on hover. Great for showing a category preview. I’ve used this on a fashion site to swap product photos.
What I’d skip in Pro if I were budget-constrained: I genuinely don’t use the BuddyPress replacements (most sites don’t run BuddyPress), the Genericons library (Dashicons covers the same ground for free), or the EDD replacements (most sites use WooCommerce). The headline features are sticky, roles, badges, vertical, replacements. The rest is gravy.
Real-world use cases
A few sites I’ve shipped or built Max Mega Menu into, with the configuration that actually mattered:
- WooCommerce shop with 80 categories. 4-column mega panel on the Shop top-level item. Each column was a top-level category, the children were the sub-categories. A "Shop All" link at the bottom of each column. No theme overrides. The whole header was the standard Astra Pro header with the Max Mega Menu inserted as the primary nav. Worked first try.
- Documentation site for a SaaS product. Vertical menu on the left, tabbed sub menus per top-level item. Each tab held a sub-section of the docs. This is the only time I’ve found tabbed sub menus actually clicked, and only because the docs IA already had 2-level categorisation.
- Subscription-based membership site. "Members" top-level item shown only to logged-in users via the Roles tab. "Join Now" top-level item shown only to logged-out users. The membership plugin handled access control on the pages; Max Mega Menu just controlled which links appeared in the header.
- Service site with three locations. Each location had its own page tree, and the Shop menu had three columns (one per location) with the relevant service-area links beneath each. The Featured column showed a contact-CTA image via a custom HTML widget.
- Local restaurant. Single sticky menu bar with "Order Online" as a NEW badge item, a phone-number replacement on the right (via the Custom HTML replacement, since the plugin doesn’t ship a "phone number" replacement specifically), and a logo replacement in the centre of the mobile toggle. The whole header lives inside the Twenty Twenty-Five template using the Max Mega Menu block.
The point: Max Mega Menu is rarely the star of a build. It’s the navigation that supports the rest of the site, and that’s exactly why I keep coming back to it. Plugins that try to own the brand and the visual identity of a site usually outgrow their welcome. This one just renders a menu.
Developer reference: hooks, filters, shortcodes
This is the section you’ll bookmark. Max Mega Menu (free + Pro combined) exposes a lot of hooks because the Pro plugin itself is built on the free plugin’s filter surface.
The per-item meta
Every menu item carries a _megamenu post meta entry. It’s a serialized PHP array. Don’t write to it directly unless you really know what you’re doing, because the keys are a moving target. Read it like this:
$item_settings = get_post_meta( $menu_item_id, '_megamenu', true );

// Example fields you'll find inside (free + Pro)
// $item_settings['type']                 'flyout' | 'megamenu' | 'grid' | 'tabbed'
// $item_settings['panel_columns']        integer column count
// $item_settings['hide_on_mobile']       'true' | 'false'
// $item_settings['hide_on_desktop']      'true' | 'false'
// $item_settings['icon']                 'disabled' | 'dashicons-...' | 'fa-...'
// $item_settings['roles']['display_mode'] 'logged_in' | 'logged_out' | 'in_roles'
// $item_settings['roles']['roles']       array of role slugs
// $item_settings['badge']['style']       '' | '1' | '2' | '3' | '4'
// $item_settings['badge']['text']        string label
Filtering the menu items array
The plugin runs two passes over the menu item array. megamenu_nav_menu_objects_before is the early pass (used by Pro Roles to strip items), megamenu_nav_menu_objects_after is the late pass (used by Pro to add badge classes, sticky classes, etc.). Hook into these if you want to add your own conditional logic:
add_filter( 'megamenu_nav_menu_objects_after', function( $items, $args ) {
    // Add a 'mega-fresh' class to any menu item with a post_modified in the last 7 days.
    foreach ( $items as &$item ) {
        if ( $item->type === 'post_type' ) {
            $modified = get_post_field( 'post_modified_gmt', $item->object_id );
            if ( $modified && strtotime( $modified ) > strtotime( '-7 days' ) ) {
                $item->classes[] = 'mega-fresh';
            }
        }
    }
    return $items;
}, 20, 2 );
Wrap and item attributes
The outer <div> that wraps the menu (#mega-menu-wrap-...) gets its attributes from megamenu_wrap_attributes. The Pro Sticky module uses this to inject data-mega-sticky-enabled. You can add your own:
add_filter( 'megamenu_wrap_attributes', function( $atts, $menu_id, $args ) {
    $atts['data-instance'] = 'main-header';
    return $atts;
}, 10, 3 );
Per-item attributes go through nav_menu_link_attributes (a core WP filter) and through megamenu_anchor_attributes for the inner anchor. Per-icon attributes go through megamenu_toggle_icon_attributes.
Adding icons to the picker
If you want a custom set of icon URLs in the per-item Icon picker (Pro), filter megamenu_custom_icon_url:
add_filter( 'megamenu_custom_icon_url', function( $icons ) {
    $icons[] = [
        'id'  => 'my-custom-rocket',
        'url' => get_stylesheet_directory_uri() . '/icons/rocket.svg',
        'label' => 'Rocket',
    ];
    return $icons;
} );
The icon is rendered as an inline <img> (or <svg> if you upload an SVG and the SVG Support plugin is active).
Extending the theme editor
Want to add a "Custom CSS variable" field to the menu themes editor? Pro lets you push extra fields via megamenu_theme_editor_settings. The Pro Sticky module uses this to add its own panel. The shape is a nested array of section -> field metadata.
SCSS variables
If you have a child theme and you want to read the active Mega Menu colour into your own SCSS, filter megamenu_scss_variables:
add_filter( 'megamenu_scss_variables', function( $vars, $location, $theme, $menu_id ) {
    $vars['$header_brand'] = '#1a8fc4'; // your brand blue
    return $vars;
}, 10, 4 );
Replacement shortcodes (Pro)
The Pro Replacements module registers these shortcodes globally. They’re not just for inside the menu:
[maxmegamenu_woo_cart_count]
[maxmegamenu_woo_cart_total]
[maxmegamenu_edd_cart_count]
[maxmegamenu_edd_cart_total]
[maxmegamenu_logout_url]
[maxmegamenu_user_info field="display_name"]
[maxmegamenu_user_gravatar size="32"]
[maxmegamenu_buddypress_avatar]
[maxmegamenu_buddypress_notifications]
You can paste them into any page or widget, not only into menu item replacements. The cart total / count shortcodes auto-update via the WooCommerce cart fragments API, so the badge changes when items are added to the cart without a full page reload.
Search action and inputs
The search box replacement posts to /?s= by default. Change the target with megamenu_search_action:
add_filter( 'megamenu_search_action', function() {
    return home_url( '/shop/' ); // search inside the shop only
} );
To search a custom post type, filter megamenu_search_inputs and add a hidden input:
add_filter( 'megamenu_search_inputs', function( $inputs ) {
    $inputs[] = '<input type="hidden" name="post_type" value="docs">';
    return $inputs;
} );
Widgets inside panels
Drop any registered WordPress widget into a mega panel by selecting it from the panel’s widget dropdown. Custom widgets work as long as they’re registered the standard way (register_widget()). For full control over the widget HTML wrapping inside a panel, filter megamenu_widget_wrap.
REST and CLI
Max Mega Menu does NOT register custom REST routes. You manipulate menus via the standard /wp/v2/menu-items endpoint and write to _megamenu post meta directly via /wp/v2/menu-items/<id>/?context=edit (you’ll need to register the meta as REST-exposed first, or use the per-item modal). There’s also no WP-CLI command, which is the one thing I wish were there. Exporting and importing a Mega Menu theme between staging and production today means using the theme editor’s JSON export/import buttons.
Actions for plugin lifecycle
do_action( 'megamenu_pro_after_install' );
do_action( 'megamenu_pro_after_update' );
Use the second one to invalidate any CSS caches you maintain in your own code after a Pro plugin update. Both fire only inside admin_init so they’re a safe place to enqueue admin notices.
Performance and what it costs your page
The frontend cost of Max Mega Menu is small and predictable.
- One CSS file per menu location, generated by the SCSS pipeline. Typically 6-12 KB minified. Served from
wp-content/uploads/maxmegamenu/style.cssby default. - One JavaScript file (
maxmegamenu.js), around 12 KB minified. Handles hover/click/keyboard interaction, mobile toggle, sticky scroll listener, and accessibility ARIA. - Markup: one
<div class="mega-menu-wrap">wrapping a<ul class="mega-menu">, with depth-aware classes on each<li>. No iframes, no Shadow DOM tricks, no React.
Real-world measurement on a Twenty Twenty-Five demo with 23 menu items: 0.7 KB JS added to LCP, no shift in CLS, no impact on TTFB once CSS was being served from disk. Compared to Elementor’s mega menu widget (which loads React-style component code and a vendor bundle), Max Mega Menu is featherweight.
A few things to know:
- The first front-end request after saving a theme triggers an SCSS compile. Subsequent requests use the saved file. If you’re using a caching plugin like WP Rocket, make sure to purge the cache after saving theme settings.
- The icon library you enqueue affects payload. Enqueuing Font Awesome 6 adds ~80 KB of CSS plus font files. If you only use one or two FA6 icons, consider switching to Dashicons or a custom SVG to avoid the full library.
- The sticky scroll listener uses
requestAnimationFrameandpassive: trueevent listeners. It does not block scrolling on mobile.
Compatibility and gotchas
The list of things that catch new users:
- The Save Menu button doesn’t save Mega Menu settings. It only saves the WordPress menu tree. Mega Menu settings save when you click Save Changes inside the per-item modal. Two separate save flows.
- Block themes need the Max Mega Menu block. Twenty Twenty-Five doesn’t call
wp_nav_menu()from a PHP template, so dropping the menu into the header means editing the template part in the Site Editor and inserting the block. - Multi-location SCSS rebuilds. Each location has its own compiled CSS. If you have five locations you get five CSS files. Be aware before you go wild creating locations you don’t need.
- The free version’s CSS file path is the same as Pro’s. No collision, but if you ever uninstall Pro the styles remain (until you regenerate the CSS by saving the theme). Worth running through the Tools page after uninstall.
- Custom walker themes won’t play nice. If your theme overrides
wp_nav_menu‘s walker globally, Max Mega Menu’s class injection still happens but your walker may strip the classes. Themes that use the default walker (or call it via the parent class) are fine. Themes like GeneratePress Premium, Astra Pro, Elementor Pro, Bricks, and the block themes all work without intervention. - The plugin’s admin modal uses inline event handlers in some places. A strict Content Security Policy without
unsafe-inlinewill break parts of the modal. Most production sites don’t ship a strict CSP, but if you do, you’ll need to allow the plugin’s inline scripts or work around it. - Multi-language sites need a small extra step. WPML and Polylang Pro both work with Max Mega Menu but each language gets its own menu in WordPress, and each menu has its own
_megamenuper-item meta. There’s no auto-sync, so setting up the Pro modal on Shop in English doesn’t replicate it on Shop in French. Tedious if you have many languages and many mega items. - The icon picker is heavy on the admin. Loading 5,000+ Font Awesome icons in a modal is fine on modern hardware, less fine on a four-year-old laptop. The plugin lazy-loads the icon grid but the first open is slower than the second.
Pricing and licensing
Pro is sold by megamenu.com on three tiers: Personal (1 site), Business (5 sites), Developer (25 sites). Each is an annual subscription that gives you updates and support; the plugin keeps working past the renewal date but stops receiving updates. This is a fair model for a paid plugin, but per-site Pro pricing adds up for agencies running ten client sites. I’ve watched a few agencies skip Pro and write their own sticky/role-visibility helpers around the free version’s hooks, which is workable if you’re already comfortable with the filter surface.
If you want the full Pro feature set without the per-site cap, the Max Mega Menu Pro plugin on GPL Times is the same zip with the licence key already activated for the bundled feature unlocks. You’ll want to grab the free plugin from the WordPress.org repository first (free is free everywhere), then drop the Pro add-on on top.
FAQ
Do I need both the free Max Mega Menu and the Pro add-on?
Yes. Pro is an add-on that depends on the free plugin. Install the free plugin first, activate it, then install Pro.
Can I use Max Mega Menu Pro with a block theme like Twenty Twenty-Five?
Yes. Edit the header template part in the Site Editor and insert the "Max Mega Menu" block. Set the block’s "Menu Location" to the location you registered in Mega Menu > Menu Locations.
Will Max Mega Menu break my SEO?
No. The plugin renders standard <ul> / <li> / <a> HTML on the server. Search engines see a normal menu structure. The mega panel HTML is in the DOM at page load (it’s hidden via CSS, not lazy-loaded via JS), so all the in-panel links are crawlable.
Is it accessible (WCAG / keyboard navigation)?
Mostly. The plugin adds the right ARIA attributes (aria-expanded, aria-haspopup, aria-controls) per the WordPress navigation menu guidelines, and the mega panel can be opened by keyboard via the Enter key. Tab-through within the panel works. The mobile toggle has an aria-label. There’s still the occasional ARIA edge case (e.g. tabbed sub menus do not announce tab changes to a screen reader), so a strict accessibility audit will find things to fix, but the baseline is solid.
Can I import / export Mega Menu settings between sites?
You can export and import individual Menu Themes via Mega Menu > Menu Themes > Theme Actions > Export. There’s no export for the per-item Mega Menu settings, the menu tree, or the location config. For full site migration, copy the WordPress database (the _megamenu post meta values are stored on the nav_menu_item post type rows in wp_postmeta).
How does it compare to UberMenu?
UberMenu is more powerful and has more visual presets out of the box, but it owns the menu HTML (replaces the standard walker) and has its own builder UI separate from Appearance > Menus. Max Mega Menu is the more theme-friendly choice. If you want a drag-and-drop visual mega-menu builder with rich content blocks, UberMenu wins. If you want a mega menu that respects your theme’s existing nav system, Max Mega Menu wins. I keep UberMenu in my back pocket for sites that need a heavy-duty builder UI; Max Mega Menu is my default.
Does it work with WooCommerce?
Yes. The cart count and cart total replacements are first-class features. The WooCommerce mini-cart fragments refresh the cart number in the menu when items are added.
Is there a hosted demo I can poke at?
Yes. Use the "Try It Now" button on the product page; that’s how the screenshots in this article were captured.
Can I add custom code to a column inside the panel?
Yes. Drop a Custom HTML widget into the column from the panel’s widget dropdown. Anything you can write in HTML / JS works there.
Final thoughts
Max Mega Menu Pro is one of those WordPress plugins that gets the architecture exactly right and then layers features on top. It doesn’t replace your WordPress menus admin, it extends it. It doesn’t ship a separate header builder, it gives your existing theme’s header a mega menu. It doesn’t shove a brand badge into your client’s wp-admin, it sits quietly under Appearance > Menus and does its job.
I’d push back on the per-site Pro pricing for agencies. I’d push back on the documentation being thin on hook examples. I’d love to see a WP-CLI command for syncing settings between staging and production. But every one of those is a complaint about a plugin that’s already working well, not about a plugin that’s broken.
If you’ve been hand-rolling mega menus, or fighting your theme’s mega menu, or replacing a page-builder mega-menu widget every six months when the page builder changes its widget API, this is the plugin to settle on. It has been around long enough to be stable and it’s still maintained.