

Eventually every WordPress site hits the moment where someone hands you a spreadsheet and says "put all of this on the site." 800 products from a manufacturer feed. 2,000 movie listings from a CSV your editor scraped together. 50,000 real estate listings updating overnight from an MLS XML feed. A migration from Shopify, BigCommerce, or a custom CMS where you’ve got the data but no easy way to get it into WordPress.
You can do this with the WordPress importer if your data happens to be in WordPress’s specific WXR format (it isn’t). You can do it by writing a custom PHP script that loops through rows and calls wp_insert_post() (you can, but you’ll spend a weekend on edge cases). Or you can use WP All Import Pro, which is the plugin built for exactly this job.
I’ll walk through installing WP All Import Pro, importing a sample CSV into WordPress posts step by step, then scaling up to WooCommerce products, custom post types, scheduled imports, and the developer hooks that let you transform data on the way in. If you’ve picked up WP All Import Pro from the GPL Times store, the steps are identical.
Table of contents
- What WP All Import Pro actually does
- Step 1: Install WP All Import (free) and the Pro add-on
- Step 2: Start a New Import and pick your data source
- Step 3: Choose what to create or update
- Step 4: Drag and drop fields onto the WordPress template
- Step 5: Configure unique identifiers and update behavior
- Step 6: Preview and run the import
- Step 7: Schedule recurring imports
- Step 8: Update or re-run an existing import
- Step 9: Import WooCommerce products specifically
- Compared to writing a custom import script
- Common gotchas
- Developer reference: hooks, filters, WP-CLI
- Pricing, licensing, and GPL availability
- Quick reference cheat sheet by use case
- Final thoughts
What WP All Import Pro actually does {#what-it-does}
WP All Import is a WordPress plugin that reads CSV, XML, or Excel files and creates or updates WordPress posts, pages, users, taxonomies, or custom post types from each row. Specifically:
- Reads any CSV or XML structure, you tell the plugin which column or XPath element maps to which WordPress field
- Handles standard fields: title, content, excerpt, slug, author, publish date, featured image, categories, tags
- Handles custom fields: any post meta key, including ACF (Advanced Custom Fields), JetEngine, Pods, MetaBox
- Handles media: downloads images from URLs in your data and attaches them as featured or gallery images
- Handles taxonomies: creates terms on the fly or maps to existing ones
- Updates existing records: matches by unique identifier (SKU, post ID, slug, custom meta) and updates rather than creating duplicates
- Schedules imports: cron or HTTP-triggered, so a daily feed updates your site automatically
- Transforms data with PHP functions: a Function Editor lets you write inline PHP to clean, calculate, or reformat values as they’re imported
The Pro version unlocks: scheduling, image downloading from URLs, FTP/SFTP sources, automatic chunking for huge files, and integration add-ons for WooCommerce, ACF, Yoast SEO, Polylang/WPML, Gravity Forms, and others.
If you’ve ever needed to bulk-create posts and considered writing a script for it, WP All Import is the no-code alternative. If you’ve never imported anything bulk into WordPress, this is the plugin you’ll wish you’d discovered before manually copy-pasting 200 product descriptions.
Step 1: Install WP All Import (free) and the Pro add-on {#step-1-install}
WP All Import has an unusual structure: the free plugin from WordPress.org provides the import engine, and WP All Import Pro is a separate plugin that extends the free version with the Pro features. You need both active for Pro features to work.
- Install WP All Import (free) from Plugins → Add New, search "WP All Import."
- Install WP All Import Pro by uploading the Pro zip via Plugins → Add New → Upload Plugin.
- Activate both.
Or via WP-CLI:
wp plugin install wp-all-import --activate
wp plugin install /path/to/wp-all-import-pro.zip --activate
After activation you’ll see a new All Import menu item in the WordPress admin sidebar with sub-items: New Import, Manage Imports, Settings, Licenses, History. WP All Import also adds Add-Ons under its menu, where you’d install the WooCommerce, ACF, or other extension if you need it.
If you ONLY install WP All Import Pro without the free plugin active, the Pro plugin shows an admin notice asking you to deactivate the Pro version because the free version isn’t running. The two plugins work as a pair, not as a replacement.
Step 2: Start a New Import and pick your data source {#step-2-source}
Go to All Import → New Import in the admin.
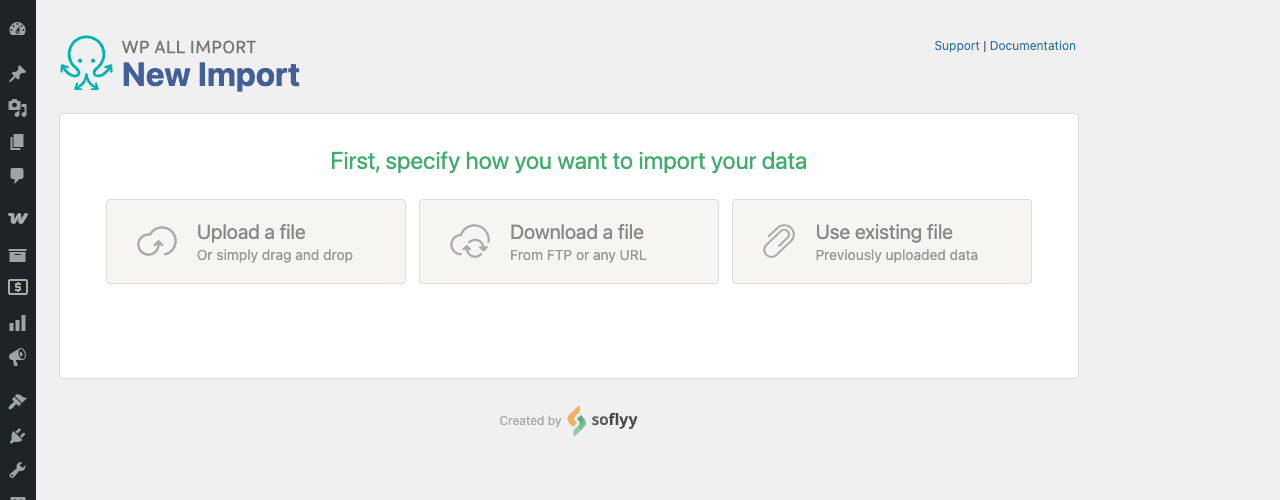
Three ways to bring data in:
- Upload a file, drag a CSV, XML, or Excel file from your computer. Easiest for one-off imports. WP All Import handles files up to a few hundred MB in this mode.
- Download a file (FTP or any URL), point WP All Import at a remote URL or FTP location and it fetches the file. This is what you use for scheduled imports: the same URL gets re-fetched on a schedule, picking up any new data.
- Use existing file, re-use a file you previously uploaded.
Pick one. For a first import I usually upload from disk so I can see the data being processed locally first.
After upload, you’ll see something like this:
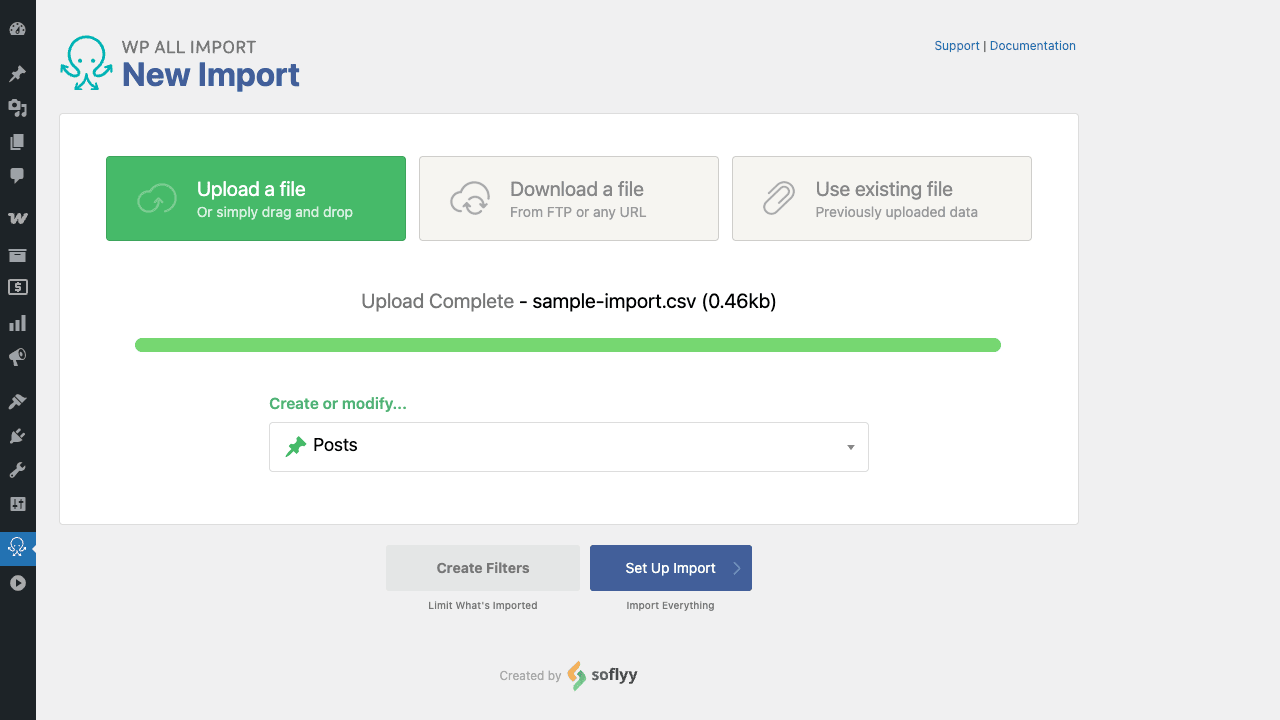
The green progress bar confirms upload succeeded. Below it, a Create or modify dropdown asks what kind of WordPress content you want to make from this data: Posts, Pages, Users, Media, WooCommerce products, or any custom post type registered on the site.
Step 3: Choose what to create or update {#step-3-target}
The dropdown lists every content type WordPress is aware of on the current site. For a typical blog, you’ll see Posts and Pages by default. For a WooCommerce site, you’ll see Products. For a real estate site with a custom listing post type, you’ll see that too.
Pick the target. The plugin doesn’t care whether you’re "creating new" or "updating existing" at this step, that distinction comes later. You’re just telling it where the imported rows should end up.
Two buttons at the bottom:
- Create Filters, opens an extra step where you can filter which rows from the data file get imported. For example, "only rows where
status=published" or "only the first 10 records for testing." Powerful but optional. - Set Up Import, skips filters and goes straight to data mapping.
For a first run, click Set Up Import and skip filters.
Step 4: Drag and drop fields onto the WordPress template {#step-4-mapping}
This is the screen where WP All Import shines: the drag-and-drop data mapper. The right panel shows your source data row by row. The left panel shows WordPress’s fields (title, content, excerpt, custom fields, taxonomies, images). You literally drag a column from the right onto the field on the left.
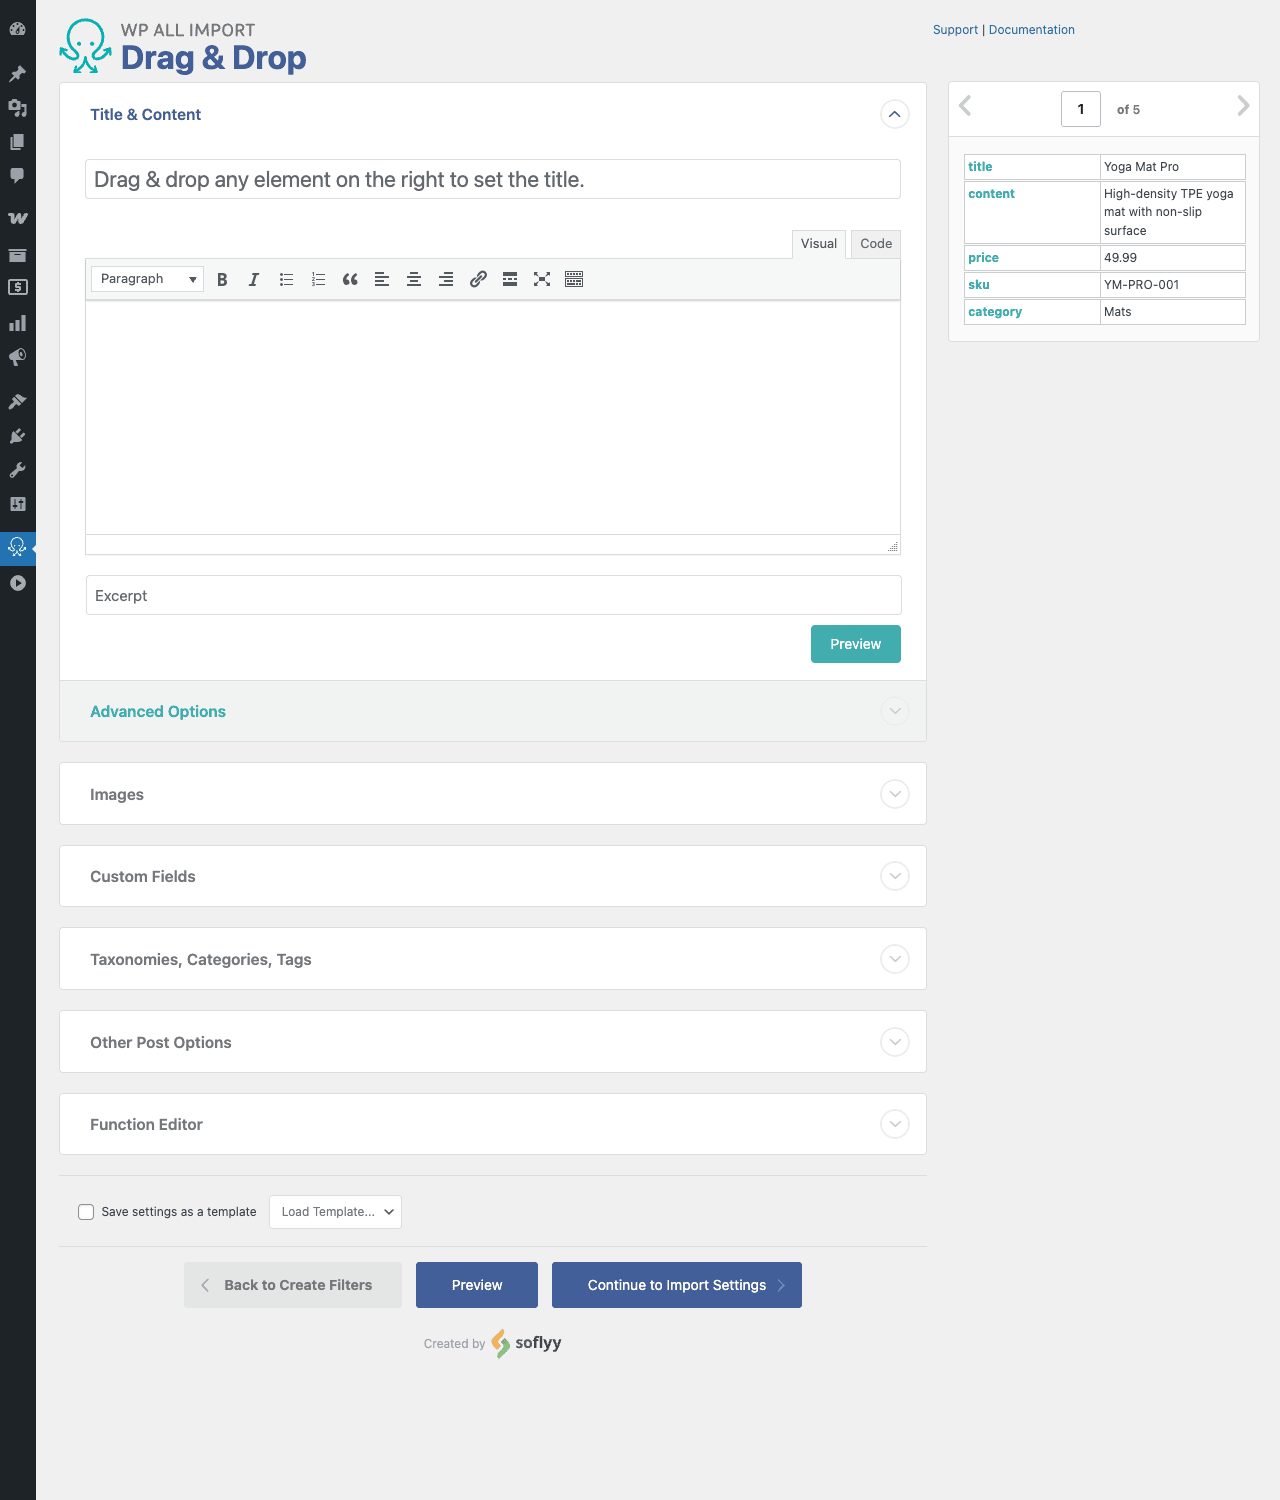
The right-side preview shows row 1 of 5 from my sample CSV: title=Yoga Mat Pro, content=High-density TPE yoga mat..., price=49.99, sku=YM-PRO-001, category=Mats. Below the panel is a small arrow to scroll through rows so you can verify the structure matches what you expect.
On the left:
- Title & Content is open by default. Drag
titlefrom the right into the Title field. Dragcontentinto the WYSIWYG editor area below. WP All Import inserts{title[1]}and{content[1]}shortcodes, those are the live placeholders that get replaced with the row’s actual value for each post. - Advanced Options, auto-generate slug from title, post status (draft vs publish), post date, post author, comment status, password.
- Images, drag the column containing image URLs here; WP All Import downloads each image and attaches it as featured image. Handles multiple images per row (separated by
|or comma), galleries, and image-from-URL or image-from-disk. - Custom Fields, add any meta key/value pair. For my sample I’d add
price→ drag{price[1]},sku→ drag{sku[1]}. Works with any plugin that stores data as post meta. - Taxonomies, Categories, Tags, drag a column representing category names. WP All Import auto-creates categories that don’t yet exist, links to existing ones.
- Other Post Options, sticky posts, comment ping status, parent post (for hierarchies), menu order.
- Function Editor, write inline PHP to transform values. Example: a function that takes
49.99and outputs the WooCommerce-formatted price string.
Two helpful features here:
- Save settings as a template, once you’ve configured a mapping, save it. Next time you import a similar file, load the template and the mapping is pre-filled. Saves a ton of work on recurring imports.
- Preview button (top right of the editing area), shows what the first imported post would look like with your current mapping, before committing. Use it to catch typos in the mapping.
When mapping looks right, click Continue to Import Settings at the bottom.
Step 5: Configure unique identifiers and update behavior {#step-5-unique-id}
This is the single most important screen and the one that trips up first-time users. Import Settings asks: "When this import runs, how should we decide whether to create a new post or update an existing one?"
You see two main options:
- Use the value of a field, designate a column from your file as the unique identifier. Most common is SKU for products, or a custom ID for general data. WP All Import will look for a post that already has a matching SKU; if found, update it; if not, create new.
- Use auto-matching by post title, riskier but sometimes useful. Matches on title text. Falls down if titles aren’t unique.
Below the unique ID field, you’ll see options for what to update on re-runs:
- Keep these fields, checkboxes for fields NOT to overwrite. Useful when editors hand-edit a post and you want subsequent imports to leave their edits alone but still update other fields (price, stock, image).
- Update only when changed, skip rows that haven’t changed since last import. Speeds up incremental imports significantly.
- Delete posts that no longer appear in the file, risky. Enable only when the import file is the authoritative source of truth and you want WordPress to mirror it exactly. Otherwise leave OFF, you don’t want yesterday’s deleted feed item to silently delete all your products tomorrow.
A sensible default for your first import: unique identifier is whatever ID column is in your source data (sku, id, custom external_id); "update only when changed" enabled; deletion disabled.
After this, you can also configure:
- Friendly name for the import (so you find it later in Manage Imports)
- Chunk size, how many records the plugin processes per AJAX request. Default 100 works for most. Lower (10) for memory-constrained shared hosts. Higher (500) for dedicated servers.
- Image options, re-download images every run vs only on first import (huge time saver for large imports where images don’t change).
Click Continue when ready.
Step 6: Preview and run the import {#step-6-run}
The Confirm screen summarizes what will happen: import name, source file, target post type, number of records, whether new posts will be created or existing ones updated.
If the count of records doesn’t match what you expect (your CSV says 500 rows, the preview says 487), the difference is usually:
- Header row counted or not counted (WP All Import excludes the header automatically for CSV)
- Empty rows at the end of the file
- Rows filtered out by your Create Filters configuration if you set any
Verify the counts look right, then click Confirm & Run Import.
WP All Import opens an import progress page that shows live progress: rows processed, time elapsed, estimated time remaining. It runs in your browser via AJAX, so don’t close the tab until it’s done (the plugin pauses if you close, and you can resume from Manage Imports).
For a 5-row sample import, this takes about 3 seconds. For 5,000 rows with images, it can take 15-30 minutes depending on hosting.
When the progress bar hits 100%, you’ll see a summary: X created, Y updated, Z skipped. Click View Imported Posts to see what landed in WordPress.
Step 7: Schedule recurring imports {#step-7-schedule}
For one-off imports, you’re done. For data feeds that update daily or hourly (price lists, inventory, listings), you want WP All Import to re-fetch the file and update WordPress automatically.
On the import setup screen, instead of uploading a local file, choose Download a file and provide:
- URL,
https://supplier.example.com/feed.xmlor an FTP URL - FTP credentials if needed
- Refresh interval, how often to re-fetch
Then in the import settings, set up a recurring schedule. Two options:
- WP All Import scheduling service (paid add-on at app.wpallimport.com), they run the cron for you. Cleanest setup. Doesn’t depend on your site getting traffic.
- Manual cron triggers, they generate two URLs (a "trigger" URL and a "run" URL) and you point your server’s crontab at them. Add to your crontab:
0 2 * * * curl -s 'https://yoursite.com/wp-cron.php?import_key=...&import_id=1&action=trigger' >/dev/null
5 2 * * * curl -s 'https://yoursite.com/wp-cron.php?import_key=...&import_id=1&action=processing' >/dev/null
Trigger schedules the import; processing actually runs it. The 5-minute gap lets the trigger complete first.
For most sites, the manual cron approach via a real crontab (not WordPress’s pseudo-cron) is rock solid and free.
Step 8: Update or re-run an existing import {#step-8-update}
The Manage Imports screen lists every import you’ve configured.
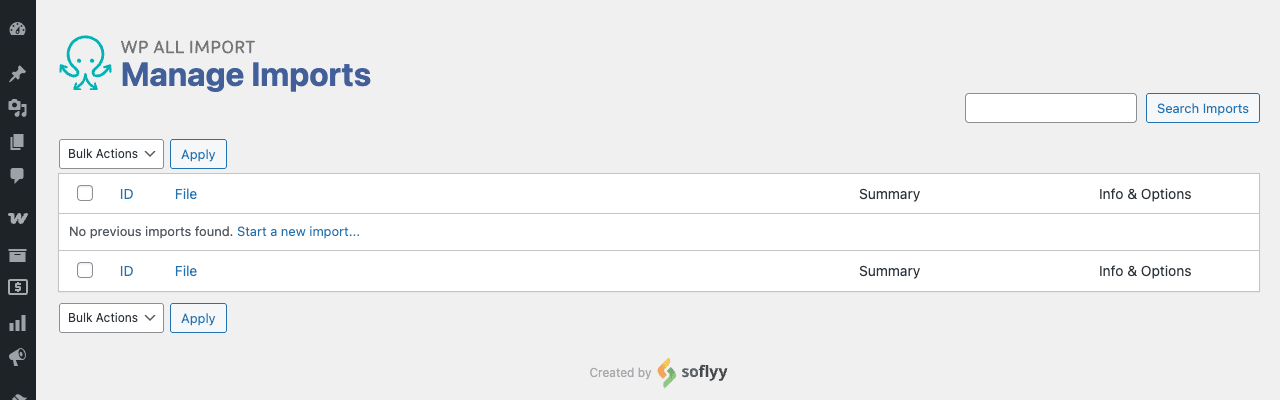
For each saved import, you get actions: Edit (change mapping or settings), Run Import (trigger right now), Import Logs (see what happened), Edit Schedule, Duplicate, Delete. The Run Import action is the manual override, click it any time to fetch the current file and update WordPress immediately.
Re-running an existing import is by far the most common workflow: you set up the mapping once, you keep coming back to Manage Imports to either run on-demand or to check schedule status. Beware that deleting an import doesn’t delete the posts it created, just the configuration. The posts stay.
Step 9: Import WooCommerce products specifically {#step-9-woocommerce}
WooCommerce imports deserve a dedicated step because they’re the most common use case and they have specific gotchas.
Required: install the WooCommerce Import Add-On for WP All Import (separate addon, free for the basic version). Without it, you can’t map to WooCommerce-specific fields like price, stock, SKU, attributes, variations.
After installing the add-on, when you pick "WooCommerce Products" as the target on Step 3, the mapping screen gets a new section: WooCommerce Add-On. There you can map:
- Product Type, simple, variable, grouped, external/affiliate
- General: SKU, regular price, sale price, sale price dates, tax status, tax class
- Inventory: stock status, stock quantity, low stock threshold, sold individually, backorders
- Shipping: weight, dimensions, shipping class
- Linked products: upsells, cross-sells, grouped products
- Attributes: any WooCommerce product attribute, including custom ones, with the option to make them variations
- Variations: for variable products, each variation row needs a parent reference plus variation-specific attributes
Critical settings for product imports:
- Unique identifier MUST be SKU for product imports. Don’t use title (multiple products can share a title for variants). SKU is the only safe choice.
- Stock status behavior is per-row. If your feed has a
stock_statuscolumn, map it. If not, set a global default. - Images, for product galleries, use a multi-image column (URLs separated by
|). For the main product image, use the same column or a separatefeatured_imagecolumn. - Variable products require two passes typically: import the parent products first (one row per product), then a second import for variations (one row per variation, with parent SKU as the link).
This is where the time investment in a clean import data structure pays off. Spend 30 minutes preparing the CSV so each product is one row with all attributes and inventory clearly columned, and the import "just works." Skip that prep, and you’ll be debugging mapping for hours.
Compared to writing a custom import script {#comparison}
The reason WP All Import is worth its price for any real import job: the things it does that you’d otherwise need to write yourself.
- Background processing with chunking, your import doesn’t time out, doesn’t crash on memory limits, doesn’t lose state if the connection drops. A custom
wp_insert_post()loop will hit one of these on real data. - Image downloading with retries, if a supplier’s image server is slow, WP All Import retries. A naive script fails on the first slow image.
- Update vs create logic, built-in. A custom script needs careful SQL or
WP_Queryplus update logic. - Mapping UI, non-developers can update import mappings. A custom script is changes-by-engineer forever.
- Logging, every import keeps a log of which rows succeeded, failed, or were skipped. Custom script: you build this yourself.
- Schedule management, built-in. Custom script needs cron setup, locking to prevent overlapping runs, etc.
- Compatibility with ACF, WooCommerce, Yoast SEO, Polylang/WPML, official add-ons, maintained. Custom script needs every integration written from scratch.
The break-even is around 100 lines of data. Anything bigger, WP All Import wins on time-to-correct.
A few cases where a custom script DOES win: if you need to import into a non-standard database table (not wp_posts), if the data is too structurally weird for WP All Import’s XPath/CSV mapping, or if the import is once and you’ll never touch it again.
Common gotchas {#common-gotchas)
- Import seems to stop halfway with no error. Almost always PHP memory limit or max_execution_time. Increase both in
wp-config.php:
ini_set('memory_limit', '512M');
set_time_limit(0);
Also lower the chunk size in import settings from 100 to 25.
-
Featured images aren’t being attached. WP All Import needs the column to contain full URLs (
https://...) for URL imports. Relative paths and filenames don’t work unless you’ve configured a local image directory. Check the Images section of your mapping has the right column. -
Duplicate posts created on second import run. Unique identifier wasn’t set correctly, or the field used as ID changes between runs. Pick a stable field, SKU for products, a guaranteed-unique custom ID for general content.
-
Custom fields with special characters get truncated. The cause is usually serialization. If you’re mapping to an ACF field that stores an array (a repeater, a checkbox group), use the ACF Import Add-On and let it handle serialization. Don’t try to write serialized PHP yourself in the mapping.
-
CSV with non-UTF-8 encoding produces gibberish. Re-save the CSV in UTF-8 (without BOM) before uploading. In Excel, "Save As → CSV UTF-8."
-
Imports run slower over time. Usually because the WordPress database itself slowed down. Run a database optimization (with WP-Optimize Premium or similar) to defragment tables and clear post revisions.
-
Scheduled imports don’t run. WordPress’s pseudo-cron only fires when someone visits the site. Set up a real server crontab (see Step 7) instead of relying on
wp-cron.phpself-triggering. -
Imports overwrite hand-edited content. Set "Keep these fields" in the import settings, and check the boxes for any fields your editors edit by hand (typically
post_contentandpost_excerpt). WP All Import will then leave those alone on subsequent runs. -
An image URL in the feed returns 403 or 404. WP All Import logs the failure and continues with the rest of the import. Check Manage Imports → Import Logs → View Log for the row number and URL that failed.
-
Server runs out of disk during image-heavy import. Each downloaded image lives in
/wp-content/uploads/plus generates thumbnails. A 10,000 image import can produce 30,000+ files. Monitor disk before importing into a tight environment, or set up an offload like S3 first.
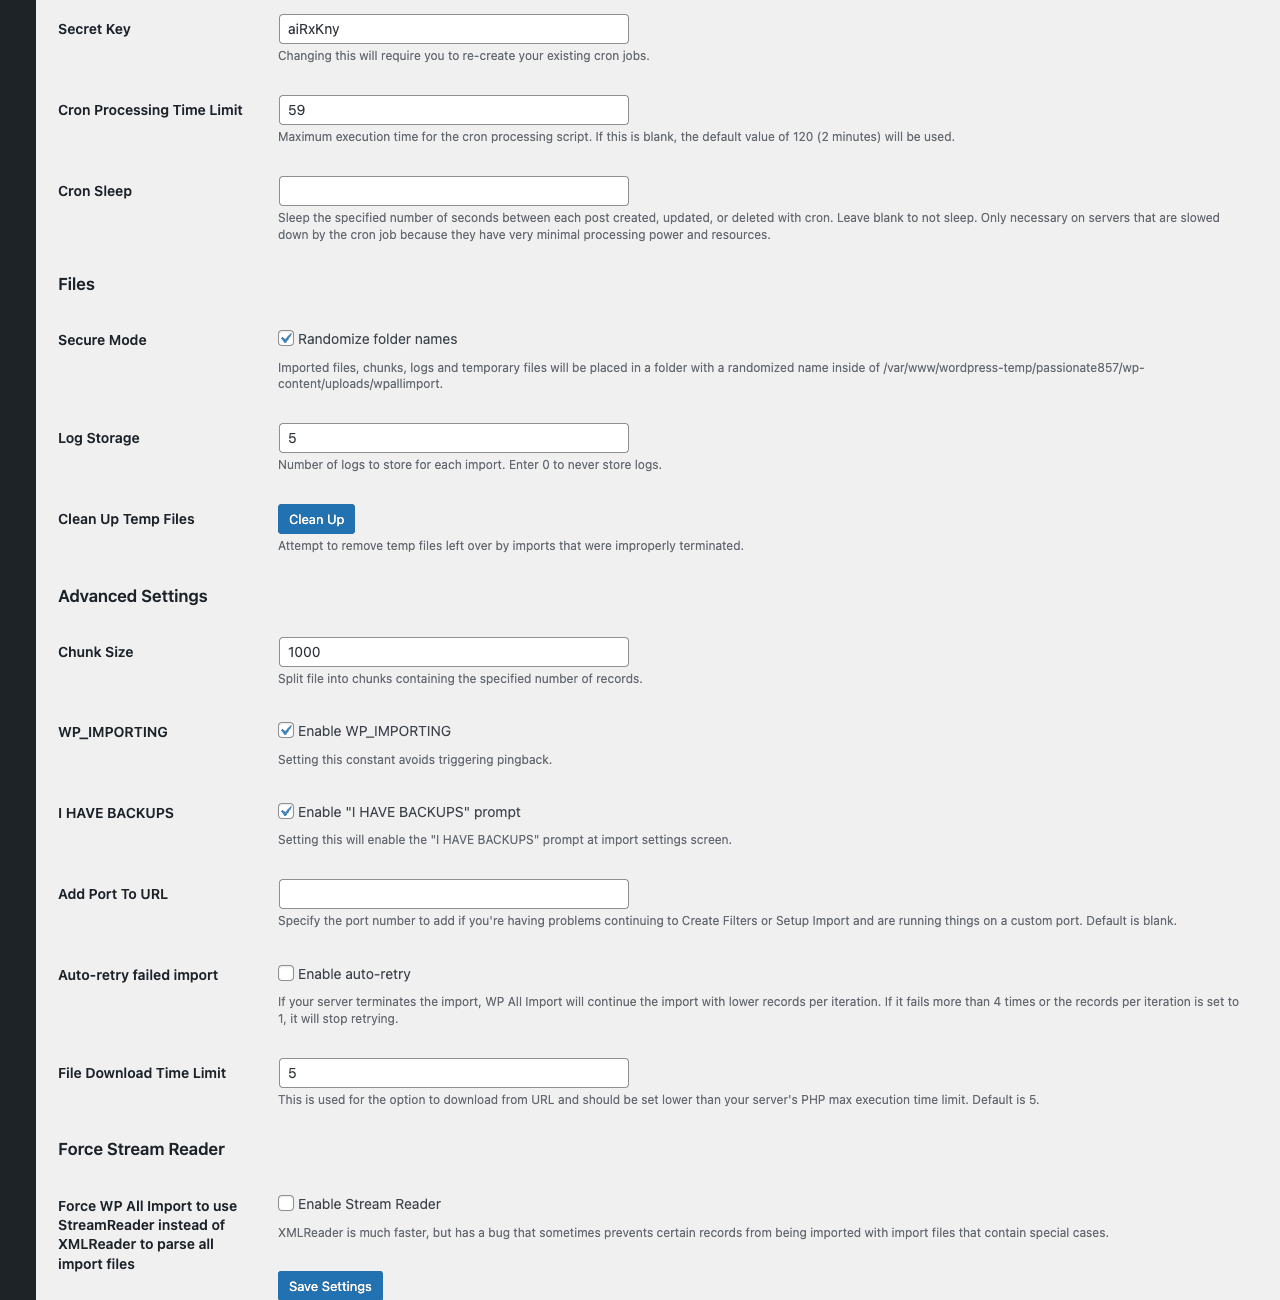
The global settings page (All Import → Settings) is where you fine-tune chunk size, cron behavior, log retention, and a few advanced toggles like Force Stream Reader for very large XML files. The defaults work for most sites; touch these only when you’re hitting a specific issue.
Developer reference: hooks, filters, WP-CLI {#developer-reference}
WP All Import exposes around 100 hooks. The ones I reach for most often:
Modify a post’s data after WP All Import has built it but before saving:
add_action( 'pmxi_saved_post', function( $post_id, $xml_node, $is_update ) {
 if ( $is_update ) {
 return;
 }
 update_post_meta( $post_id, 'imported_at', current_time( 'mysql' ) );
 update_post_meta( $post_id, 'import_source', 'supplier-feed-A' );
}, 10, 3 );
Skip a row from import based on its data:
add_filter( 'wp_all_import_is_post_to_create', function( $continue, $post_data, $import_id ) {
 if ( strtolower( $post_data['post_status']?? '' ) === 'discontinued' ) {
 return false;
 }
 return $continue;
}, 10, 3 );
Fire when an import starts and ends (useful for monitoring and notification):
add_action( 'pmxi_before_xml_import', function( $import_id ) {
 error_log( "WP All Import {$import_id} starting at ". current_time( 'mysql' ) );
} );

add_action( 'pmxi_after_xml_import', function( $import_id, $import ) {
 error_log( "WP All Import {$import_id} finished. Created: {$import->created}, Updated: {$import->updated}" );
}, 10, 2 );
Override the image download timeout for slow image servers:
add_filter( 'pmxi_image_download_timeout', function() {
 return 60;
} );
Customize how an attachment is added (useful when integrating with an offload-to-S3 plugin):
add_action( 'wp_all_import_add_attachment', function( $post_id, $attachment_id, $image_filepath, $is_featured ) {
 if ( $is_featured ) {
 wp_update_post( array(
 'ID' => $post_id,
 'post_excerpt' => 'Featured: '. basename( $image_filepath ),
 ) );
 }
}, 10, 4 );
Modify post content programmatically:
add_filter( 'pmxi_the_content', function( $content, $post_data, $import_id ) {
 if ( $import_id === 7 ) {
 $content = '<div class="imported-content">'. $content. '</div>';
 }
 return $content;
}, 10, 3 );
Match by custom criteria when the built-in unique-ID matching isn’t enough:
add_filter( 'wp_all_import_get_product_id_by_sku', function( $product_id, $sku, $import_id ) {
 if (! $product_id && preg_match( '/^OLD-/', $sku ) ) {
 $new_sku = str_replace( 'OLD-', 'NEW-', $sku );
 $product_id = wc_get_product_id_by_sku( $new_sku );
 }
 return $product_id;
}, 10, 3 );
WP-CLI commands WP All Import adds:
# list all imports configured on the site
wp all-import list

# run a specific import by ID
wp all-import run 1

# run a specific import and only process new records
wp all-import run 1 --only-new

# run continuously until done (no pausing)
wp all-import run 1 --continue
These are useful in deploy pipelines or for triggering imports from a job runner instead of relying on WordPress cron. A typical pattern: cron triggers wp all-import run 1 every 6 hours, logs go to a file, alerts on non-zero exit.
REST API endpoints aren’t exposed by default; if you need to trigger an import from a remote system, the cron URL approach is the documented integration.
Pricing, licensing, and GPL availability {#pricing}
WP All Import Pro is sold on the official wpallimport.com site under multiple tiers based on site count, plus the bundle that includes the WooCommerce, ACF, and User Import add-ons. The plugin is GPL-licensed (mandatory for WordPress plugins), so the code is freely redistributable.
WP All Import Pro at GPL Times includes the full Pro plugin. To use it as a complete data import stack, you’ll typically want:
- WP All Import (free, from WordPress.org)
- WP All Import Pro (Pro features)
- Plus any of the import add-ons you need: WooCommerce, ACF, User, JetEngine, etc.
The add-ons are also GPL and downloadable from the same store.
What that gets you:
- Spinning up staging environments to test an import setup before running it on production
- Migrating one-off without paying for a yearly subscription
- Internal data tools for agency clients who already have their own support process
What it doesn’t get you: official Soflyy support tickets, priority bug fixes, or the optional hosted scheduling service at app.wpallimport.com (which is a separate SaaS, not GPL).
Quick reference cheat sheet by use case {#cheat-sheet}
Migrate from another CMS (Shopify, BigCommerce, custom):
- Export to CSV from the source
- Import via WP All Import + WooCommerce Add-On
- Unique ID: SKU
- Set image column to the CSV’s image URL column
- Disable "delete posts not in file" (you’re not maintaining sync)
Recurring supplier feed (daily inventory update):
- Source: FTP URL or HTTP URL
- Schedule via server cron, not WP-cron
- Unique ID: SKU
- "Update only when changed" enabled
- "Keep these fields" set to
post_content,post_excerpt(editor edits preserved) - Image option: download only on first import
Real estate / classifieds (high volume, infrequent edits):
- Source: MLS XML feed
- Custom post type:
listing - Unique ID: listing’s MLS number (custom field)
- Enable "delete posts not in file", old listings should disappear
- Chunk size: 25 if listings have many images
- Schedule: every 2-4 hours
Bulk user creation (membership site):
- Install User Import Add-On
- Source: CSV with email, name, role, custom meta
- Unique ID: email
- Set role for new users
- Send password reset email post-import (separate plugin or shortcode)
ACF-heavy custom post type (directories, portfolios):
- Install ACF Import Add-On
- Map ACF fields directly (repeater rows, image fields, relationship fields all supported)
- Test the first 5 rows with Preview before full run
- Use the Function Editor to clean up data (e.g., trim, lowercase, format dates)
One-time content migration from Excel:
- Save Excel as CSV UTF-8
- Upload, map, run, done
- Don’t bother with schedule, just delete the import after
Final thoughts {#final-thoughts}
WP All Import is one of those plugins that doesn’t get talked about as much as caching or SEO tools, but the moment you need to import 500 of anything, it’s the difference between a 2-hour job and a 2-week job. The drag-and-drop mapping is the killer feature: once you’ve done it once, every future import is muscle memory.
The trap is treating it like a CSV editor. WP All Import imports cleanly when the CSV is clean. Spend the time to structure your data correctly before importing: one row per item, consistent column names, unique identifiers, UTF-8 encoding, full image URLs. If you do that, the plugin almost always just works. If you don’t, you’ll be untangling weird import results.
Setup order for a new use case:
- Install WP All Import (free) + Pro
- Install any add-on you need (WooCommerce, ACF, User, etc.)
- Prepare a clean CSV or XML with consistent columns and a unique ID per row
- New Import → upload → pick target → drag and drop mapping → set unique ID → run on a small subset first (5 rows via filters)
- Confirm results, then run the full import
- Schedule it if recurring
- Save the import template for next time
After that, every new feed or migration takes you 10-15 minutes from "here’s the file" to "here are the posts."
One adjacent piece worth knowing: when the source of truth is already inside WordPress and you just need to change existing rows in bulk, WP All Import is the wrong shape of tool. For in-place editing of posts, products, and CPTs, the walkthrough of WP Sheet Editor Premium covers when a real spreadsheet UI beats the import-and-reimport dance.