

If you’ve been running a WordPress site for more than a year, three things have happened in the background without you noticing. Your database has filled with thousands of post revisions, expired transients, and orphaned spam comments. Your /wp-content/uploads/ folder has stuffed itself with 2 MB hero images you forgot to compress before uploading. And every visitor is hitting PHP and MySQL fresh on every page load because there’s no page cache. The result is a slow site, a heavy database, and a hosting bill higher than it needs to be.
WP-Optimize Premium is one plugin that addresses all three at once: it cleans the database, compresses images (and converts them to WebP), caches pages, and minifies CSS/JavaScript. It’s made by the same team behind UpdraftPlus, which is a useful tell, the same group that built one of the most reliable backup plugins for WordPress is the one making sure your site stays small enough to back up in the first place.
I’ll walk through installing WP-Optimize Premium and turning on each module in the right order, the gotchas I keep tripping over, and the developer hooks if you want to customize behavior.
Table of contents
- What WP-Optimize Premium actually does
- Step 1: Install and run the welcome wizard
- Step 2: Clean the database safely
- Step 3: Schedule recurring database cleanups
- Step 4: Turn on page caching
- Step 5: Compress existing images (and new ones)
- Step 6: Find and remove unused images
- Step 7: Enable lazy-load
- Step 8: Minify CSS and JavaScript
- Step 9: Run a real-world speed test
- Compared to WP Rocket, W3 Total Cache, and LiteSpeed Cache
- Common gotchas
- Developer reference: hooks, filters, WP-CLI
- Pricing, licensing, and GPL availability
- Quick reference cheat sheet by site type
- Final thoughts
What WP-Optimize Premium actually does {#what-it-does}
WP-Optimize is four optimization tools bundled into one plugin:
- Database cleaner, removes post revisions, auto-drafts, trashed posts, spam comments, transients, and orphaned meta. Optimizes (defragments) MySQL tables. Schedules recurring cleanups so the database doesn’t bloat over time.
- Page cache, serves pre-built HTML to anonymous visitors instead of running WordPress on every request. Reduces page load time from 1-3 seconds to under 200 ms typical.
- Image optimizer, compresses uploaded images using the reSmush.it API (lossy or lossless), generates WebP versions, and identifies unused images sitting in the media library.
- Minify, concatenates and minifies CSS and JavaScript files, removes render-blocking scripts, and optimizes Google Fonts delivery. Also handles HTML minification.
The Premium version adds: WebP conversion, multisite support, lazy-load with native browser lazy-loading, advanced cache exclusions (per-device cache, REST API caching, user-role cache), unused image detection, and priority support.
If you’ve previously used WP Smush Pro or a dedicated cache plugin like WP Rocket, WP-Optimize covers most of their territory in a single plugin. It’s not always the best in every category (a dedicated cache plugin like WP Rocket can be slightly faster to set up), but as one all-in-one tool it covers the 80% case for the price of a single plugin.
Step 1: Install and run the welcome wizard {#step-1-install}
Same as any WordPress plugin:
- Plugins → Add New → Upload Plugin, pick
wp-optimize-premium.zip, click Install, then Activate. - Or via WP-CLI:
wp plugin install /path/to/wp-optimize-premium.zip --activate
After activation you’ll see a new WP-Optimize menu item in the WordPress admin sidebar, and the plugin will pop up its welcome wizard automatically.

The wizard is a four-step quick-start: it offers to clean your database, compress existing images, enable page cache, and turn on minify. For a fresh site with nothing to clean it’s fine to click Exit setup and configure each module individually. For an old site with a lot of accumulated cruft, run the wizard, because it batches everything into one flow.
Either way, you land on the Database screen.
Step 2: Clean the database safely {#step-2-database}
WordPress writes a lot of stuff to the database that you don’t need to keep forever. Every time you save a post, WordPress writes a new revision. Every time you delete a post, it sits in Trash. Every plugin that ever set a temporary cached value writes a transient that might never expire. After a few years, your wp_posts, wp_postmeta, and wp_options tables can be three or four times the size they should be.
Navigate to WP-Optimize → Database in the admin.
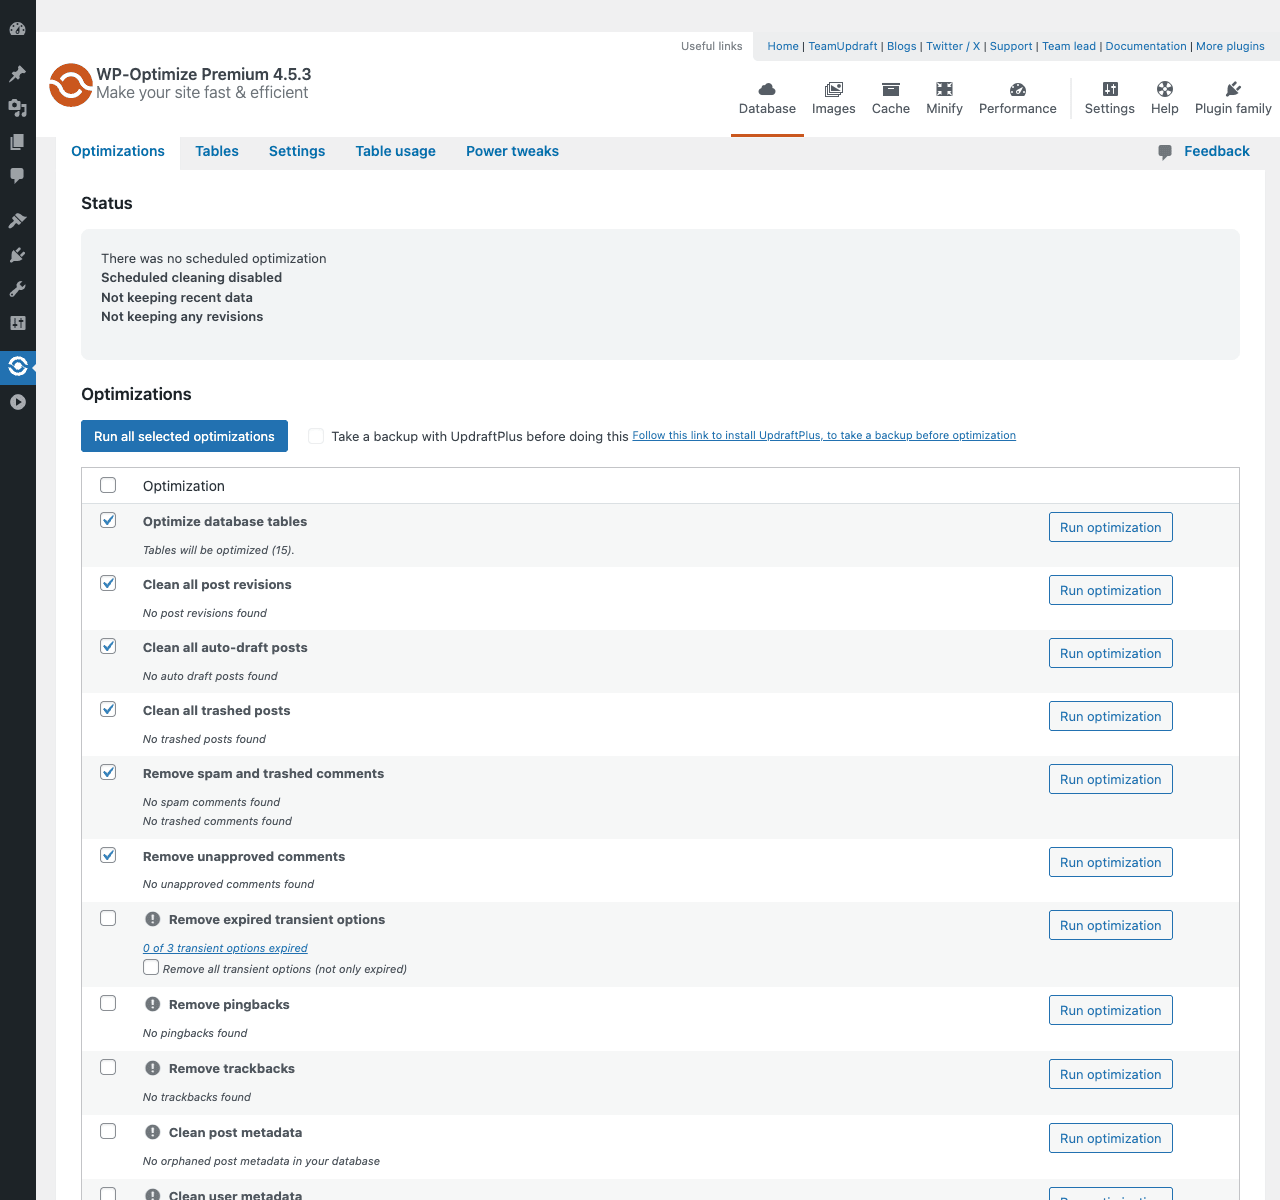
You’ll see a list of optimizations, each with a checkbox and a per-row Run optimization button:
- Optimize database tables, defragments MySQL tables. Always safe. Run this first.
- Clean all post revisions, removes old revisions, keeps the current version. Safe.
- Clean all auto-draft posts, removes posts that were never saved. Safe.
- Clean all trashed posts, empties Trash. Be sure nothing’s in Trash you want to keep.
- Remove spam and trashed comments, empties spam and trashed comment queues. Safe.
- Remove unapproved comments, careful, this includes legitimate pending moderation. Leave unchecked unless you’ve reviewed your comment queue.
- Remove orphaned post meta, meta rows whose parent post no longer exists. Safe.
- Remove pingbacks and trackbacks, old-school WordPress features rarely used today. Safe.
- Clean post metadata, comment metadata, user metadata, orphaned meta. Safe in general but can break plugins that store data in unexpected places (especially older e-commerce plugins).
- Remove expired transients, temporary cached values that have already expired. Safe and recommended.
Two important boxes at the bottom of every optimization: how many records will be affected, and how much space will be reclaimed. WP-Optimize calculates these before you click Run.
Safety advice for first run:
- Take a backup first. If you have UpdraftPlus or any other backup plugin, run a backup before clicking Run optimization for the first time. WP-Optimize is well-tested but database cleanups are irreversible.
- Start with the safe ones. Optimize tables, expired transients, post revisions, auto-drafts. Skip "Remove unapproved comments" until you’ve checked.
- Don’t check "Run all selected optimizations" without reading what’s selected. That button does what it says.
- Watch for the warning at the bottom. WP-Optimize shows a yellow notice if any data will be irrevocably deleted. Read it.
For a typical 2-year-old WordPress blog, the first cleanup usually frees somewhere between 50 MB and 500 MB of database space. For ecommerce sites with lots of orders and customer activity, it can free several GB.
Step 3: Schedule recurring database cleanups {#step-3-schedule}
You don’t want to do this manually every month. Switch to the Settings sub-tab (under WP-Optimize → Database).
You’ll see a section called Scheduled clean-up settings:
- Enable scheduled clean-up and optimization, toggle on.
- Select schedule, Weekly is a good default. Monthly for very low-traffic sites. Daily only if your site sees heavy editorial activity (a busy news site).
- Optimizations to run on schedule, checkboxes for which optimizations should run automatically. Pick the safe ones: optimize tables, clean expired transients, clean revisions older than X days, clean auto-drafts, clean trashed posts older than X days. Leave the dangerous ones (unapproved comments, orphaned meta on multisite) unchecked.
- Retention period, keep N most recent revisions per post, or revisions newer than N days. I usually keep 5 revisions and prune anything older than 30 days; that’s enough to recover from a recent mistake.
Save changes. The cron job will run on its schedule from now on, and you can forget about it.
Tables tab is worth a look once. It lists every table in your database, how big each one is, and whether the engine is InnoDB or MyISAM. If you see a 200 MB wp_options table, you’ve probably got a plugin writing autoloaded options it shouldn’t (a common cause). WP-Optimize won’t fix this automatically but it tells you where to look.
Power tweaks offers a couple of MySQL-level toggles like converting MyISAM tables to InnoDB. Don’t touch unless you know what you’re doing; modern WordPress sites should already be all InnoDB.
Step 4: Turn on page caching {#step-4-cache}
Page caching is the single biggest performance win for most sites. When enabled, WP-Optimize generates a static HTML file every time a visitor loads a page, then serves that HTML file directly on subsequent visits, skipping PHP and MySQL entirely.
Go to WP-Optimize → Cache.
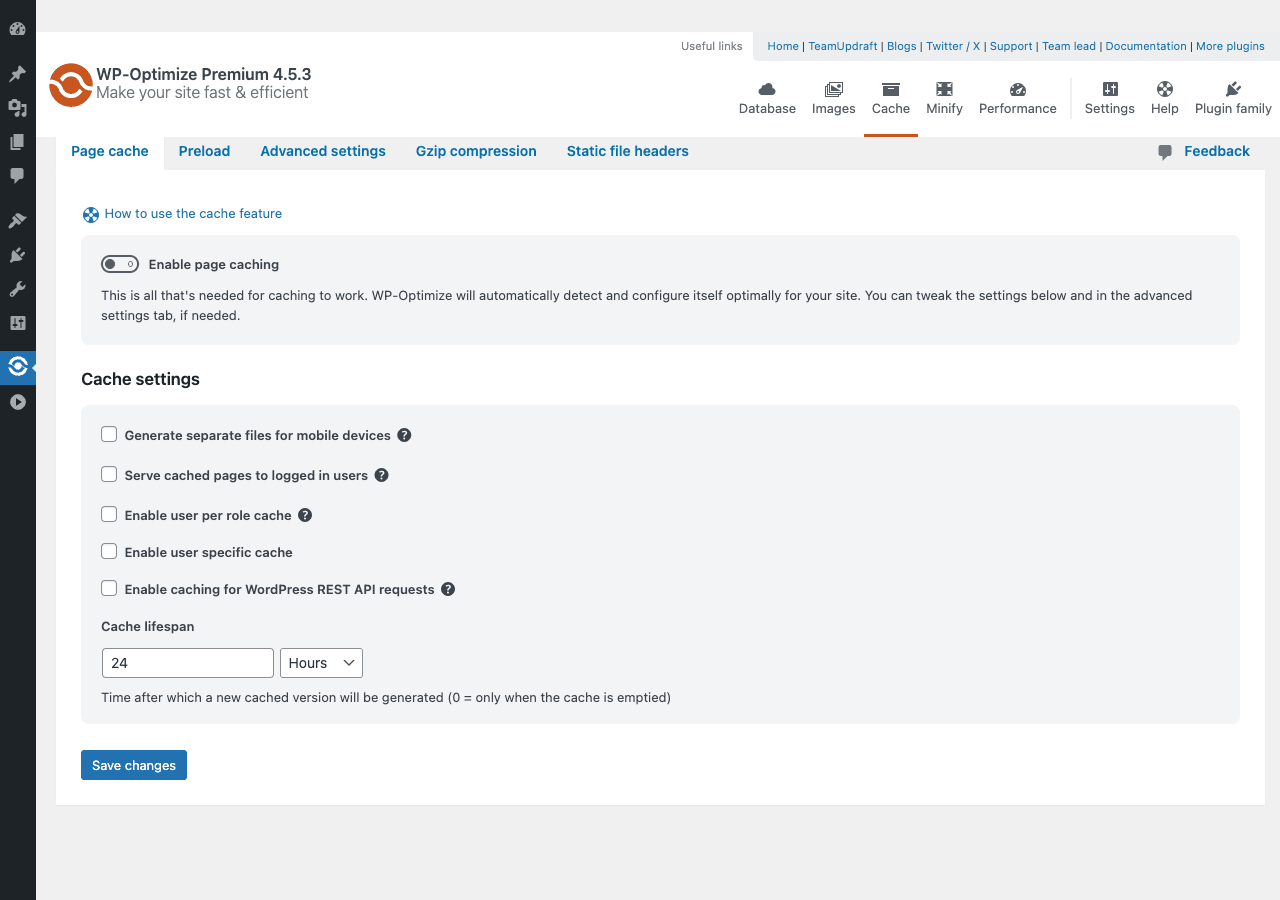
Page cache tab:
- Enable page caching, flip this on. That’s all you need to start caching. The plugin auto-detects your environment and applies sensible defaults.
- Generate separate files for mobile devices, useful if your theme renders meaningfully different HTML for mobile (rare in modern responsive themes). Leave off unless you know you need it.
- Serve cached pages to logged-in users, usually leave off. Logged-in users see admin bars and personalized content; caching them serves stale data. Enable only if your site is read-only for logged-in users.
- Enable user per role cache, Premium. Useful when different user roles see different content (admins vs subscribers). Caches per-role instead of per-user.
- Enable user specific cache, Premium. Caches each user’s view separately. Heavy on disk space.
- Enable caching for WordPress REST API requests, Premium. Caches API responses. Useful if your site is headless or uses lots of REST calls.
- Cache lifespan, 24 hours is the default. Longer (7 days) for static brochure sites; shorter (1 hour) for sites that publish frequently.
Preload tab lets you trigger pre-caching: WP-Optimize crawls your sitemap (or runs through your URLs) and generates cache files proactively, so the first visitor doesn’t pay the cost of generating the cache. Worth running once after enabling, and on a weekly schedule if your traffic is uneven.
Advanced settings tab has exclusion rules: don’t cache URLs matching ^/checkout$, don’t cache for users with a specific cookie, exclude POST requests, etc. The defaults already exclude /checkout, /cart, /my-account, and similar dynamic paths if WooCommerce is active.
Gzip compression and Static file headers are server-level. WP-Optimize writes .htaccess rules for Apache, or you’ll need to write equivalent NGINX config for NGINX servers. The plugin warns you if it can’t write the rules.
Cache exclusions for plugins like WooCommerce, Easy Digital Downloads, BuddyPress are auto-applied. You usually don’t need to think about them.
After enabling, open your site in an incognito window and view source. Look at the bottom of the HTML for a comment like <!-- WP Optimize page cache - https://teamupdraft.com/wp-optimize/ - Last modified:... -->. That confirms caching is working.
Step 5: Compress existing images (and new ones) {#step-5-images}
Most WordPress sites have an image weight problem. Editors upload 5 MB hero images straight from their phone or DSLR without compression. Themes use full-size images where a smaller crop would do. The result is mobile pages that need 8 MB to render and visitors give up before the first paragraph loads.
Go to WP-Optimize → Images.
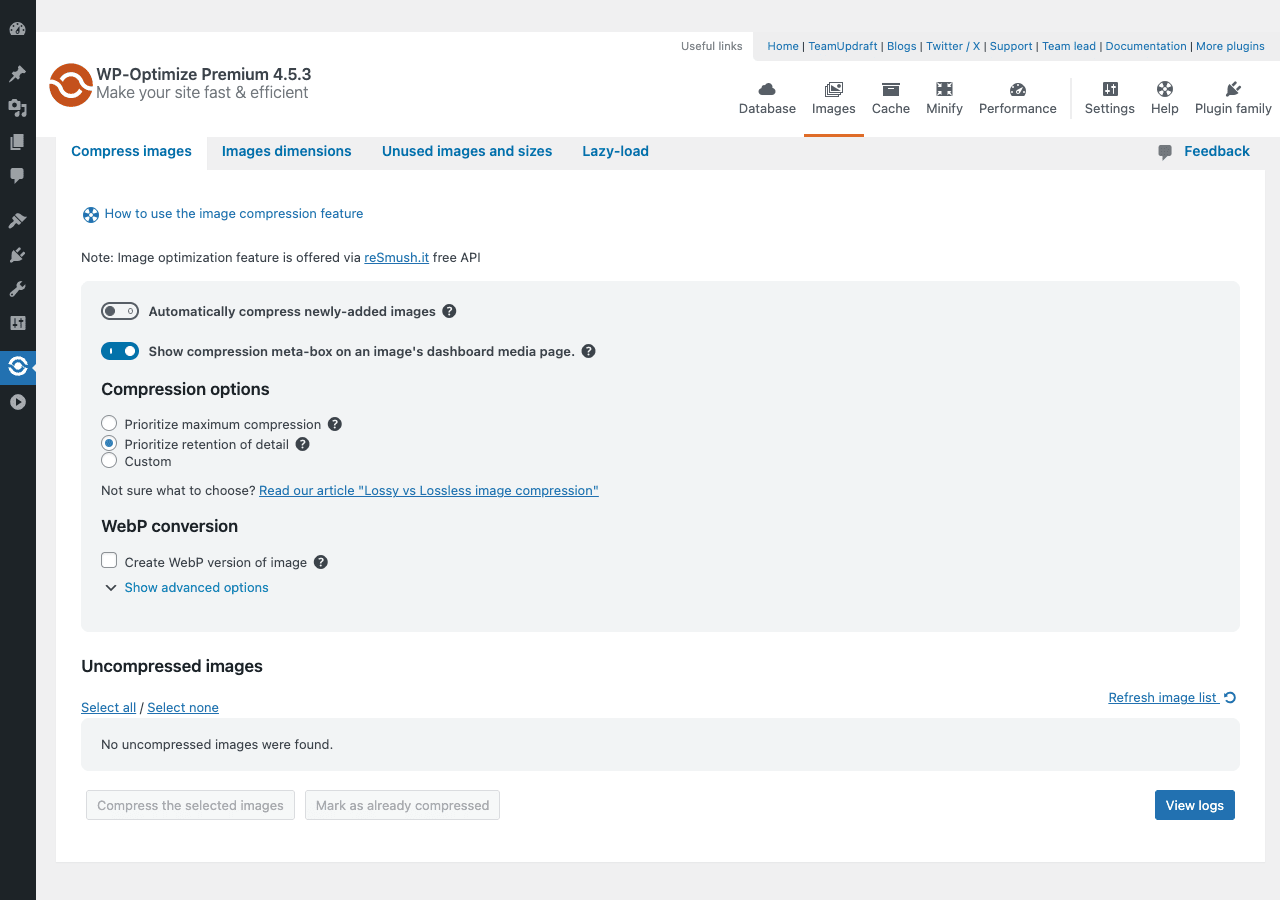
Compress images tab:
- Automatically compress newly-added images, toggle on. Every new upload gets compressed automatically without you doing anything.
- Show compression meta-box on an image’s dashboard media page, enabled by default. Adds a per-image compress button in the Media library.
- Compression options: Prioritize maximum compression (more aggressive, smaller files, very slight quality loss), Prioritize retention of detail (lossless, similar file size to source for already-optimized images, much smaller for unoptimized), or Custom (set your own quality level).
- WebP conversion, Premium. Toggle on. WebP is roughly 25-35% smaller than JPEG at the same quality. WP-Optimize generates a
.webpnext to each.jpgand uses<picture>tags or.htaccessrewrites to serve WebP to browsers that support it (all modern browsers do). - Show advanced options, additional toggles for compression on specific image sizes, server location for the API endpoint, and the maximum number of parallel compressions.
For existing images, scroll down to the Uncompressed images section, click Refresh image list, then Select all and Compress the selected images. Depending on how many images you have, this can take anywhere from minutes (a few dozen images) to hours (multiple thousands). The compression runs through the reSmush.it free API, which is rate-limited but works fine in the background.
A typical compression result for an unoptimized JPEG: a 3.2 MB photo becomes 412 KB. Same visual quality. Page load drops accordingly.
Step 6: Find and remove unused images {#step-6-unused-images}
Premium-only feature. Over time, you upload images, decide not to use them, or delete the posts that referenced them. The image files stay in /wp-content/uploads/. After a few years there can be hundreds of MB of images that aren’t actually rendered anywhere on your site.
Go to WP-Optimize → Images → Unused images and sizes.
WP-Optimize scans all post content, postmeta, theme files, and widget data for image references. Anything that’s never referenced is shown in a list with a thumbnail, filename, file size, and a "Delete" button. You can also bulk-select.
Run the scan first before deleting. Some images might be used in a way WP-Optimize can’t detect (a custom field that stores an attachment URL, a hardcoded reference in a child theme PHP file). The scan tells you which images appear to be unused; you decide whether to actually delete them.
For a 3-year-old site I’d run this once after migrating to WP-Optimize Premium, free up 100-500 MB of disk, and then run it monthly as a maintenance task.
Images dimensions tab is a related Premium feature: scans for posts that load full-size images when a smaller thumbnail would do. It can rewrite the HTML on the fly to point to a smaller image-768x431.jpg instead of the full image.jpg. Saves bandwidth for visitors.
Step 7: Enable lazy-load {#step-7-lazyload}
Modern browsers natively support loading="lazy" on images, which tells the browser to skip loading images until the user scrolls them into view. WordPress 5.5+ has this built in by default for images that have width and height attributes.
WP-Optimize’s lazy-load (under Images → Lazy-load) adds support for:
- Lazy-loading iframes (YouTube, Vimeo embeds) so they don’t fetch the embed until needed
- Lazy-loading background images (CSS
background-image: url()) - Excluding specific images from lazy-loading (your above-the-fold hero image, for example, should NOT be lazy because it’s the first thing visitors see)
Settings:
- Enable lazy-load for images, usually leave off if you’re on WordPress 5.5+, because native lazy-load is already on. Enable if you’re on older WP or want lazy iframes/backgrounds.
- Enable lazy-load for iframes, turn on. Most YouTube/Vimeo embeds don’t need to be fetched until visible.
- Skip classes, comma-separated class names that should NOT be lazy-loaded. Default is
no-lazy. Add your hero image class here.
After enabling, view source on a long blog post and look for loading="lazy" on the <img> tags below the fold. If they’re there, it’s working.
Step 8: Minify CSS and JavaScript {#step-8-minify}
Minify removes unnecessary whitespace, comments, and long variable names from CSS and JS, and (with WP-Optimize) optionally concatenates multiple files into one, reducing HTTP requests.
Go to WP-Optimize → Minify.
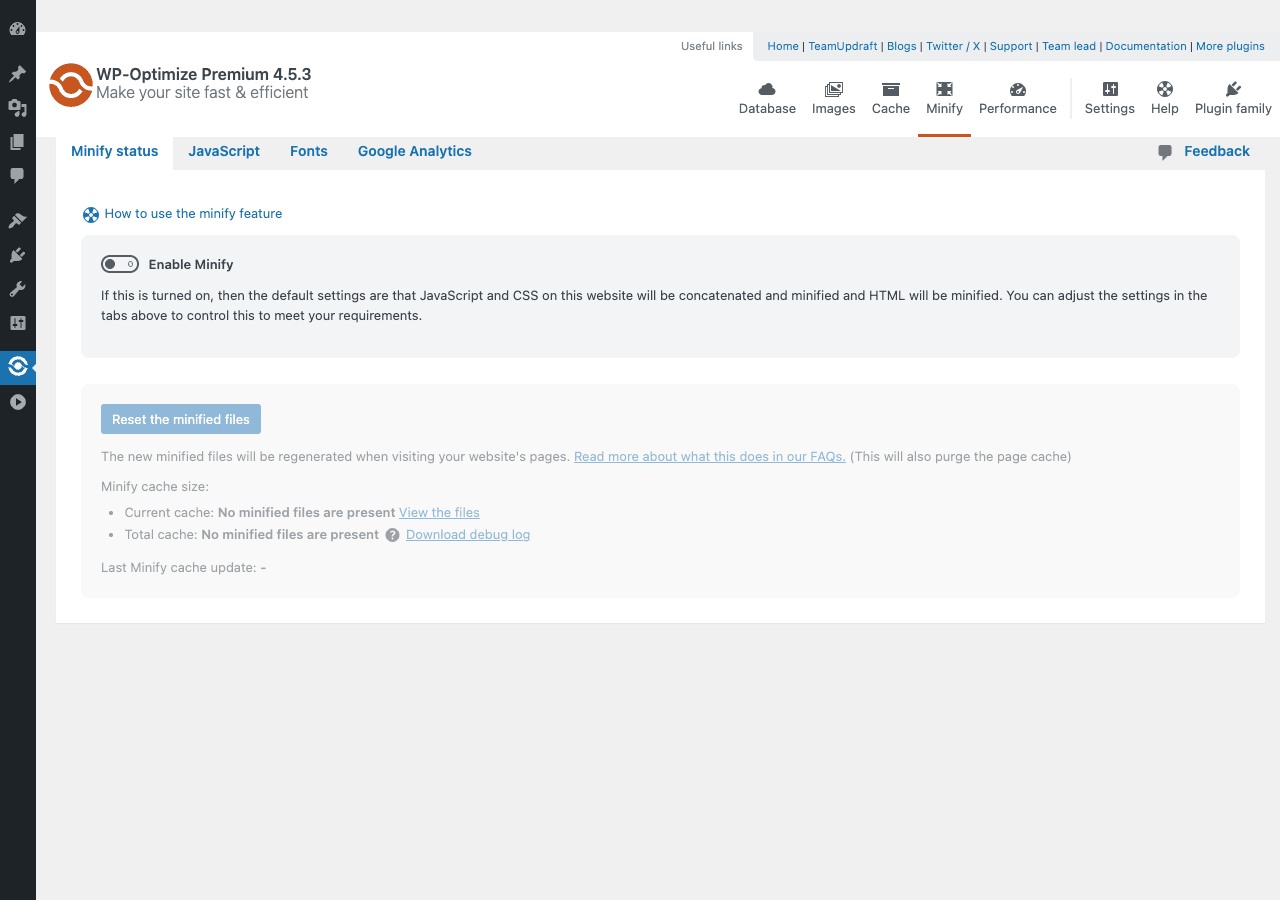
Enable Minify toggle, then explore:
- Minify status tab, overview, with current cache size and Reset button.
- JavaScript tab, enable minify, defer JavaScript, exclude specific JS files. Defer means JS files load asynchronously and don’t block initial page render. Useful but can break sites with tightly-coupled JS that expects everything to load in order; test thoroughly.
- CSS tab, same options for CSS. The "Async CSS" option is more aggressive and can cause Flash of Unstyled Content (FOUC). Use with caution.
- Fonts tab, Google Fonts handling. Switch to "Local fonts" to download Google Fonts at build time and serve them from your own domain, removing the cross-origin DNS lookup.
- Google Analytics tab, minifier-aware Google Analytics handling. Loads the analytics script with
asyncand removes the third-party render-blocking call.
The danger of minify: if your theme or any plugin has JS files that depend on each other in a specific order, deferring or concatenating them can break things. The symptoms range from "the menu doesn’t open on mobile" to "the entire site is blank with a JS error in console."
Always test minify in a staging or local environment first, or at least:
- Enable minify
- Open your site in incognito
- Test the most important interactive features: menu, search, contact form, anything in the footer
- If anything breaks, find the JS file via browser console, add it to the Exclude from minification list
If you can’t get minify to play nicely, leave it off. The performance gain from minify is real but smaller than the gain from caching and image compression; it’s the optional third-tier optimization.
Step 9: Run a real-world speed test {#step-9-test}
Before you call it done, measure. Open one of these:
- PageSpeed Insights by Google
- GTmetrix
Run any URL on your site (homepage, a typical post, a product page if e-commerce). Compare to before you installed WP-Optimize. You should see:
- Larger Contentful Paint (LCP) drop from 3+ seconds to under 1.5 seconds on a typical post (depends on hosting)
- Total page weight drop by 30-60% if image compression and WebP are on
- Time to First Byte (TTFB) drop dramatically if page cache is on
- PageSpeed score climb from 50-70 range to 85-95 range, depending on theme
If you don’t see the improvement, three things to check:
- Browser is loading the cached version after you cleared it, open in incognito.
- Page cache isn’t actually serving, check view source for the WP-Optimize cache comment.
- Hosting is the actual bottleneck, even the best cache plugin can’t fix a slow upstream server. Switch to better hosting if your TTFB is over 800 ms even with cache enabled.
Compared to WP Rocket, W3 Total Cache, and LiteSpeed Cache {#comparison}
Three competing cache plugins worth knowing about, with honest differences:
WP-Optimize Premium is the all-in-one. Database cleanup + cache + images + minify in one plugin. The image compression module is genuinely useful and rare in cache plugins. The downside is none of the four modules is best-in-class on its own; each is "good enough" and the combination is what makes it competitive. Cache is solid but not as feature-rich as WP Rocket for things like critical CSS or per-page exclusions.
WP Rocket is the polished, premium-feeling option. Page cache is the most refined of the lot, the UI is the cleanest, and the defaults work for 95% of sites with no configuration. Lacks built-in image compression (uses a separate plugin called Imagify) and database cleanup is more basic than WP-Optimize. Best if you want one cache plugin to never think about again.
W3 Total Cache is the open-source heavyweight. Most feature-rich, most configurable, hardest to set up correctly. Free version covers most use cases. Worth it if you have a complex caching setup (Redis, Memcached, CDN integration) and want fine-grained control.
LiteSpeed Cache is the best choice if your host runs LiteSpeed or OpenLiteSpeed web server. Server-level cache is significantly faster than PHP-based cache because it sidesteps PHP entirely on cache hits. Free. Don’t use if you’re on Apache or NGINX, since you lose the main advantage.
If you’re on shared hosting with Apache or NGINX and want one tool that does everything, WP-Optimize is a strong pick. If you’re on LiteSpeed hosting, install LiteSpeed Cache and skip WP-Optimize’s cache module (you can still use WP-Optimize for database and images).
Common gotchas {#common-gotchas}
-
Page cache showing wrong content after a post edit. WP-Optimize auto-purges the cache when a post or page is saved, but third-party AJAX-driven changes (vote counts, page-view counters) can produce stale data. Use the WP-Optimize → Cache → Settings → Purge cache button manually after content changes that don’t go through
save_post. -
.htaccessrules conflict with a previous cache plugin. If you previously had W3 Total Cache or WP Super Cache, their.htaccessrules remain after deactivation. Open/wp-content/.htaccessand remove old# BEGIN W3TC... # END W3TCblocks. -
WebP not being served to browsers that support it. Check
.htaccessfor the WP-Optimize rewrite rules near the top. If they’re missing, regenerate them: WP-Optimize → Images → Compress images → toggle WebP conversion off then on. For NGINX, you need to add the rewrite rule manually to your NGINX config (the plugin tells you which rule). -
Database cleanup deleted a plugin’s important transient. Rare but possible if a plugin marks something as "transient" that’s actually load-bearing. If you notice a feature break after a cleanup, deactivate and reactivate the affected plugin, which re-creates its expected options.
-
Minify broke a feature. Most common one. Disable defer JS first, then exclude specific JS files one by one until it works. If you can’t isolate, turn minify off entirely; it’s the lowest-priority optimization.
-
Cache not invalidating when you update a CSS file in your theme. WP-Optimize doesn’t watch theme file changes directly. Bump your theme’s
style.cssversion number in the header, or use the Purge cache button after editing. -
Image compression silently failing. Check the View logs button on the Images tab. Common reason: hit the reSmush.it free API quota. Wait a day and retry, or upgrade to a paid API tier if you have thousands of images.
-
"Schedule cleaning disabled" warning on every page load. You enabled scheduled cleanup but the WordPress cron is not running (the WP cron is "pseudo-cron" and only runs when someone visits the site). For a low-traffic site, set up a real server cron job:
*/15 * * * * curl -s https://yoursite.com/wp-cron.php?doing_wp_cron > /dev/null. -
Multisite: cache configured per-site, not network-wide. WP-Optimize Premium supports multisite but each subsite has its own settings. Use the network admin to apply settings to all subsites at once via the Apply to all sites button.
-
Database optimization is slow on a huge
wp_postmetatable. Tables with 5M+ rows can take several minutes to optimize. WP-Optimize runs the operation in a background queue (Action Scheduler), so the browser tab can be closed while it works. Watch progress under WP-Optimize → Cache → Settings → Task scheduler or via thewp action-scheduler listCLI command.
Developer reference: hooks, filters, WP-CLI {#developer-reference}
WP-Optimize exposes around 50 filters and a handful of action hooks. The most commonly used:
Skip specific URLs from page cache:
add_filter( 'wpo_cache_exceptions_url', function( $exceptions ) {
 $exceptions[] = '/special-dynamic-page/';
 $exceptions[] = '/api/.*';
 return $exceptions;
} );
Exclude specific cookies from cache (so users with that cookie always see fresh content):
add_filter( 'wpo_cache_cookie_exceptions', function( $cookies ) {
 $cookies[] = 'my_session_cookie';
 return $cookies;
} );
Lengthen or shorten the cache lifespan dynamically:
add_filter( 'wp_optimize_get_lifespan_in_seconds', function( $seconds ) {
 if ( is_singular( 'product' ) ) {
 return 6 * HOUR_IN_SECONDS;
 }
 return $seconds;
} );
Hook into the database optimization process to add a custom optimization:
add_action( 'wp_optimize_after_optimizations', function() {
 global $wpdb;
 $wpdb->query( "DELETE FROM {$wpdb->prefix}my_custom_log WHERE created_at < DATE_SUB(NOW(), INTERVAL 90 DAY)" );
} );
Skip specific tables from optimization:
add_filter( 'wp_optimize_get_tables_include_table', function( $include, $table ) {
 if ( $table === 'wp_my_critical_table' ) {
 return false;
 }
 return $include;
}, 10, 2 );
Skip lazy-loading for specific images programmatically:
add_filter( 'wp_optimize_lazy_load_skip_classes', function( $classes ) {
 $classes[] = 'hero-image';
 $classes[] = 'logo';
 return $classes;
} );
Skip a specific JS file from minification:
add_filter( 'wp_optimize_minify_default_exclusions', function( $exclusions ) {
 $exclusions['js'][] = 'my-critical-script.js';
 return $exclusions;
} );
Action hooks worth knowing:
wp_optimize_after_optimizationfires after each individual optimization completes; receives$optimizationand$results.wp_optimize_after_optimizationsfires after a batch of optimizations completes.wpo_save_images_settingsfires when image settings are saved.wpo_admin_after_headerlets you inject custom UI above the admin page header.
REST API endpoints are registered under /wp-json/wp-optimize/v1/ for the cache and optimizer modules. Documented in the plugin’s readme.txt.
WP-CLI commands the plugin adds:
# show plugin version
wp optimize version

# list available optimizations
wp optimize optimizations

# run a specific optimization by name
wp optimize do_optimization --optimization-id=optimize-db

# manage cache: status, purge, enable, disable
wp optimize cache status
wp optimize cache purge
wp optimize cache enable

# manage minify
wp optimize minify status
wp optimize minify reset

# scan and list unused images
wp optimize unused_images

# for multisite, list and run per-subsite
wp optimize sites
These are useful for hooks into deploy pipelines: purge cache after a deployment, run image scan as part of weekly maintenance, etc.
Pricing, licensing, and GPL availability {#pricing}
WP-Optimize Premium is sold on the official TeamUpdraft site (the same group that runs UpdraftPlus and WP-Optimize free) under per-site tiers: 1 site, 2 sites, 5 sites, 10 sites, 25 sites, and unlimited. Each tier unlocks the same Premium feature set; difference is just site count and support level.
Because WP-Optimize is GPL-licensed (mandatory for WordPress plugins), the source code is freely redistributable. Premium at GPL Times includes the full plugin with all Premium features (WebP, multisite, unused image detection, advanced cache options, lazy-load, REST API caching) on as many sites as you like.
This works well for:
- Staging and development sites where you don’t want to burn a paid license
- Personal projects and side projects where official support isn’t critical
- Agencies with internal support that don’t need a vendor support channel
- Trying it out before paying for a paid license
What it doesn’t give you: official TeamUpdraft support tickets, priority bug fixes, or anything that depends on a backend account at teamupdraft.com. The plugin itself works the same.
Quick reference cheat sheet by site type {#cheat-sheet}
Personal blog (a few posts per week):
- Database scheduled cleanup: weekly
- Page cache: on, 24-hour lifespan
- Image auto-compress: on, WebP conversion: on
- Lazy-load iframes: on
- Minify: optional, start with CSS only
WooCommerce store:
- Database scheduled cleanup: weekly, exclude unapproved comments
- Page cache: on, exclude
/cart,/checkout,/my-account - Per-role cache: on (different cache for customer vs guest)
- Image auto-compress: on with WebP
- Don’t minify the WooCommerce JS files; exclude them via the Minify settings
Membership / LMS site:
- Page cache: on, exclude member dashboard URLs, exclude
/wp-json/ - Serve cached pages to logged-in users: OFF
- Image auto-compress: on
- Lazy-load: on
- Database scheduled cleanup: weekly
News / magazine site:
- Page cache: on, 1-hour lifespan (publishing frequently)
- Preload after publish: on
- Image auto-compress: on with WebP
- Minify CSS and JS: on, after testing
- Database cleanup: daily for revisions, weekly for everything else
Multisite network:
- Configure once in network admin, apply to all sites
- Per-site cache directories (default)
- Use WP-CLI for bulk operations:
wp site list --field=url | xargs -I{} wp optimize cache purge --url={}
Final thoughts {#final-thoughts}
The right way to think about WP-Optimize is "regular site maintenance that happens automatically." You install it once, configure the schedule, and forget about it. The database stays small. New images get compressed as they’re uploaded. The cache regenerates on a sensible cadence. Your site stays fast without you remembering to do anything.
The trap with optimization plugins is treating them like a magic speed boost. They aren’t. Hosting still matters more than caching. A well-coded theme matters more than minification. Image size discipline (don’t upload 5 MB photos in the first place) matters more than auto-compression. WP-Optimize is the bottom-of-the-funnel cleanup that catches what slipped through.
The setup order for a new install:
- Install and activate
- Run the database optimization manually first (after a backup)
- Enable scheduled weekly database cleanup
- Enable page caching
- Enable image auto-compression with WebP conversion
- Compress existing images (bulk run)
- Run unused image scan and clean up
- Optionally enable minify after testing in staging
- Measure with PageSpeed Insights before and after
After that you can ignore the plugin for months. Which is the point.