

If you’ve been managing WordPress sites for a few years, "Really Simple SSL" probably lives in your head as "that plugin that fixes HTTPS in one click." That’s how it started in 2014. What you might not have noticed is that the same plugin has quietly evolved into a full security suite, security headers, hardening, 2FA, vulnerability scanning, login protection, and a built-in firewall. The plugin was renamed from Really Simple SSL to Really Simple Security in 2023 to reflect what it had become.
Really Simple Security Pro is the Pro tier of the now-7+ million-install free plugin. The free version handles SSL activation, mixed content fixing, security headers, basic hardening, and Let’s Encrypt certificate generation. Pro adds the bigger stuff: a real firewall, login protection with 2FA, vulnerability scanning, advanced hardening, country/IP blocking, and notifications.
This guide is a practical walkthrough with real screenshots. What Really Simple Security Pro actually does in 2026, how it compares to Wordfence, performance reality, and honest answers on whether it’s enough security for your site or if you still need a dedicated WAF.
Quick decision guide: should you use Really Simple Security Pro?
Use it if:
- You want one plugin covering SSL + headers + hardening + 2FA + vulnerability scanning + firewall
- You’ve outgrown the "just SSL" use case and need more security but don’t want Wordfence’s complexity and weight
- You manage 5+ sites and want a consistent security baseline across all of them
- You’re behind Cloudflare/other WAF already and want WordPress-layer security on top
- You want active development from a serious team (the plugin is maintained by Really Simple Plugins in the Netherlands)
Choose Wordfence Security Premium instead if:
- You need a deep malware scanner that checks every file on your server
- You need application-layer firewall with millions of attack signatures
- You’re already familiar with Wordfence and don’t want to switch
- You handle sensitive data (financial, medical) and need enterprise-grade scanning
Stick with the free Really Simple SSL if:
- Your only security need is making sure HTTPS works correctly
- You’re already running another security plugin and only need the SSL component
- You’re on a personal blog where Pro features are overkill
Table of contents
- Free vs Pro: what each tier includes
- Step 1: Install Really Simple Security Pro
- Step 2: Run the onboarding wizard
- Step 3: Activate SSL (the original use case)
- Step 4: Walk through the security progress checklist
- Step 5: Configure security headers
- Step 6: Enable hardening options
- Step 7: Set up Login Protection and 2FA
- Step 8: Activate the Firewall
- Step 9: Enable Vulnerability Detection
- Step 10: Configure email notifications
- Real performance impact (with numbers)
- Really Simple Security Pro vs Wordfence vs Solid Security
- Real-world pricing breakdown
- Common gotchas
- Developer reference: hooks, filters, WP-CLI
- FAQ: questions people actually search
- Final thoughts
Free vs Pro: what each tier includes {#free-vs-pro}
The free Really Simple Security plugin on WordPress.org has 7+ million active installs. It covers:
- SSL activation with mixed content fixer (the original killer feature)
- Security headers (Content-Security-Policy, X-Content-Type-Options, Referrer-Policy, Strict-Transport-Security, X-Frame-Options, Permissions-Policy)
- Basic hardening (disable anyone-can-register, disable file editors, disable directory browsing, hide WordPress version)
- Let’s Encrypt certificate generation for shared hosts that don’t auto-provide SSL
- Site Health integration showing SSL/security state in WP’s Site Health screen
- WordPress vulnerability detection (basic; checks core, themes, plugins against the WP vulnerability database)
- Notification system with email digests
That’s already a lot for free.
Pro adds:
- Login Protection, limit login attempts (free has basic; Pro has IP/user-based)
- Two-Factor Authentication (2FA), email-based, TOTP authenticator, and passkey support
- Real Firewall, application-layer firewall with rules for SQL injection, XSS, file inclusion, 404 abuse detection
- 404 Lockout, auto-block IPs that trigger many 404 errors (typical bot behavior)
- Country blocking, block traffic from specific countries
- IP blocklists, allow/deny lists with admin UI
- Mixed content fixer (advanced), finds and fixes HTTP references in your database content
- Vulnerability scanner with auto-disable for vulnerable plugins
- Manager-Multisite features, manage security across a network
- Email validation, SMTP validation for outgoing emails
- Advanced HSTS, preload-ready Strict-Transport-Security configuration
For most production sites, Pro is meaningfully better than free. A community site, e-commerce store, or anything handling user data should be running Pro.
Step 1: Install Really Simple Security Pro {#step-1-install}
Two paths:
Standalone install:
- Install Really Simple Security (free) from Plugins → Add New (search "really simple security")
- Activate it
- Install Really Simple Security Pro by uploading the Pro zip via Plugins → Add New → Upload Plugin
- Activate it
The Pro plugin replaces the free plugin’s data layer; you don’t need to keep the free plugin separately active. Many users install only the Pro plugin standalone, it includes the entire codebase, both free and Pro features.
Via WP-CLI:
wp plugin install really-simple-ssl --activate
wp plugin install /path/to/really-simple-ssl-pro.zip --activate
After activation, a new Security menu item appears in the WordPress admin sidebar.
Step 2: Run the onboarding wizard {#step-2-wizard}
The first time you open the Security dashboard, an onboarding wizard appears.
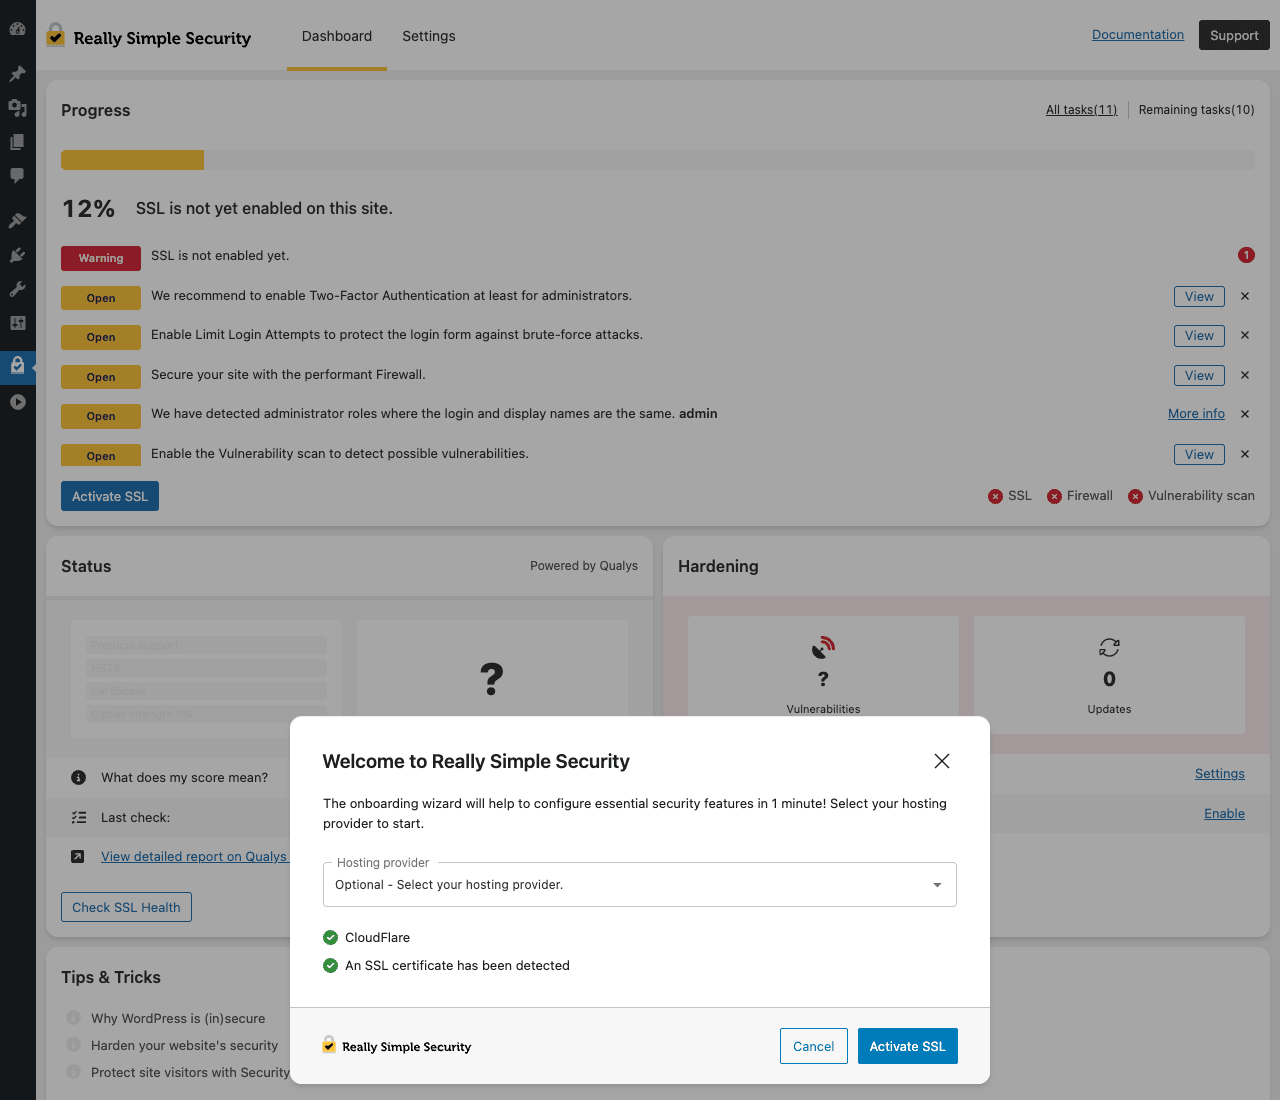
The wizard asks for your hosting provider (optional but helps RSSSL generate proper .htaccess rules or NGINX config). It auto-detects:
- Whether CloudFlare is in front of your site
- Whether an SSL certificate exists
If your hosting provider isn’t listed, leave it blank. The plugin still works.
Click Activate SSL to enable HTTPS site-wide. If your site doesn’t have an SSL certificate yet, the plugin offers to generate a Let’s Encrypt certificate.
If you’d rather skip the wizard and configure manually, click Cancel and you land on the main dashboard.
Step 3: Activate SSL (the original use case) {#step-3-ssl}
This is what most people install the plugin for. Activating SSL with one click:
- Forces HTTPS on all front-end URLs via
.htaccess(Apache) or instructions for NGINX - Updates
siteurlandhomein WordPress settings to usehttps:// - Runs the mixed content fixer that rewrites HTTP references in HTML output (images, scripts, stylesheets) to HTTPS
- Sets the Strict-Transport-Security header so browsers remember to use HTTPS
- Adds an HSTS preload check (for advanced users who want to preload their domain on Chrome’s HSTS list)
After activation, your site loads via HTTPS. The browser bar shows a padlock. Mixed content warnings disappear.
Important: SSL activation requires an actual SSL certificate from your host. Really Simple Security doesn’t generate certificates by default; it tells the browser and WordPress to use the certificate your host provides. If your host doesn’t have SSL yet:
- Most modern hosts (Hetzner, SiteGround, WP Engine, Cloudways, Kinsta, etc.) provide free Let’s Encrypt SSL automatically
- For hosts that don’t, use Really Simple Security’s built-in Let’s Encrypt wizard (Settings → SSL → Let’s Encrypt)
- Or set up Cloudflare in front of your site for free SSL termination
Step 4: Walk through the security progress checklist {#step-4-dashboard}
After SSL is active (or even before), open Security → Dashboard. You’ll see the main control panel.
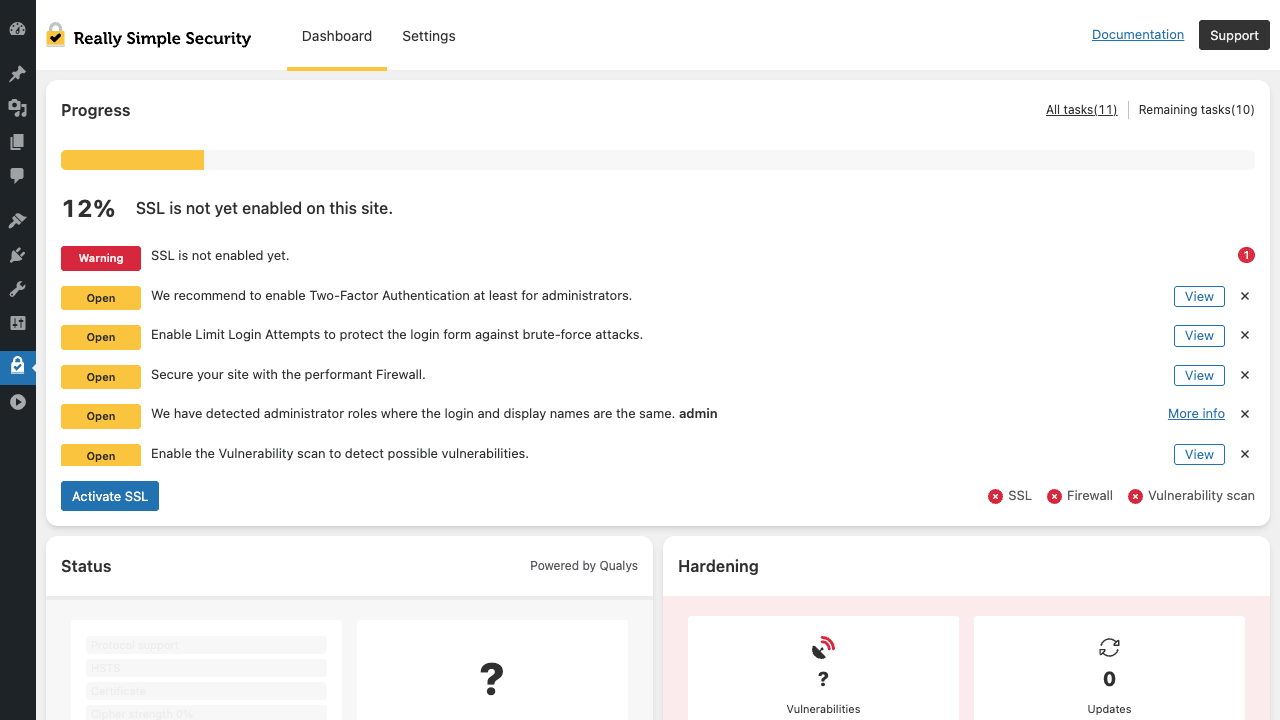
The dashboard is organized as a security health check:
Progress section:
- Overall completion percentage (e.g., 12%)
- Total tasks count
- Remaining tasks count
- One status row per outstanding security item: Warning (red), Open (yellow), Completed (green)
- Each row has a View button that takes you to the relevant settings page
Common tasks you’ll see:
- "SSL is not enabled yet" → fix with Step 3
- "We recommend to enable Two-Factor Authentication" → Step 7
- "Enable Limit Login Attempts" → Step 7
- "Secure your site with the performant Firewall" → Step 8
- "We have detected administrator roles where login and display names are the same" → change one of them
- "Enable Vulnerability scan" → Step 9
Status section (powered by Qualys SSL Labs) shows:
- Protocol support (TLS 1.2, TLS 1.3)
- HSTS configuration
- Certificate validity
- Cipher strength
Hardening section shows hardening status with quick links.
Below those, a Tips & Tricks section links to documentation articles, and an Other Plugins section recommends complementary Really Simple Plugins products (Complianz for cookie consent, SimplyBook.me for booking).
Work through the checklist top to bottom. Each item taken from Warning to Completed measurably improves your site’s security posture.
Step 5: Configure security headers {#step-5-headers}
Security headers are HTTP response headers that tell browsers how to behave when loading your site. Properly configured, they prevent classes of attacks like XSS, clickjacking, and information leakage.
Go to Security → Settings → Security Headers (in the left sidebar of the Settings page).
Configurable headers (each is a toggle with optional fine-tuning):
- HTTP Strict Transport Security (HSTS), tells browsers to use HTTPS for N seconds. Enable. Set
max-ageto 31536000 (1 year). Optionally enablepreloadfor the highest level. - Upgrade Insecure Requests, tells the browser to upgrade
http://references tohttps://automatically - X-Content-Type-Options: nosniff, prevents MIME-type sniffing attacks. Enable, no configuration needed
- X-Frame-Options, prevents your site from being embedded in iframes (clickjacking protection).
SAMEORIGINis the safe default - Referrer-Policy, controls what referrer info gets sent to other sites.
strict-origin-when-cross-originis the modern default - Permissions-Policy, controls what browser APIs your site can use (camera, microphone, etc.). Default values are usually correct
- Content Security Policy (CSP), the most powerful and most easily-broken header. RSSSL has a CSP wizard that helps build a working policy by monitoring violations first then enforcing
Recommended for a new site:
- Enable HSTS with max-age=31536000
- Enable Upgrade Insecure Requests
- Enable X-Content-Type-Options, X-Frame-Options (SAMEORIGIN), Referrer-Policy
- Skip CSP initially, it’s high-risk to break the site. Enable later in "report only" mode, collect violations, then enforce.
After saving, test your headers at securityheaders.com. Aim for an A or A+ grade.
Step 6: Enable hardening options {#step-6-hardening}
Hardening removes attack surface that WordPress has by default. Most hardening options are low-risk and high-value.
Go to Security → Settings → Hardening → Basic.
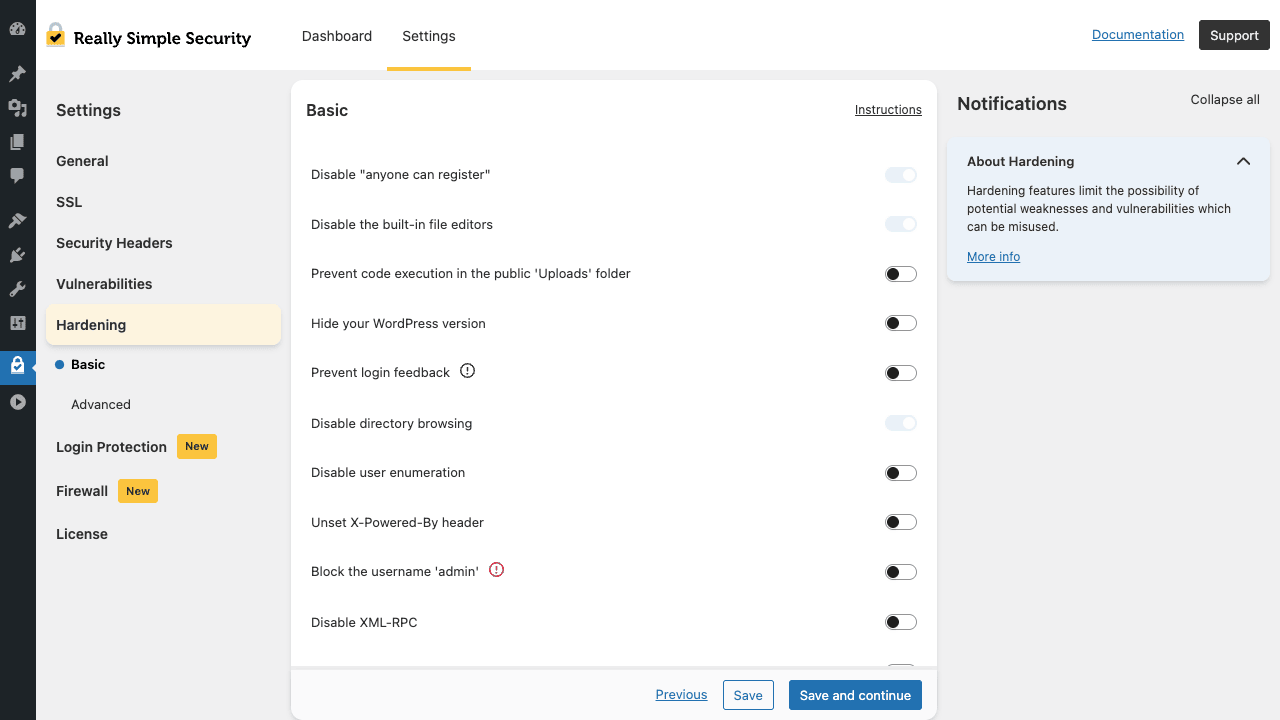
Basic Hardening options:
- Disable "anyone can register", recommended on any site that doesn’t intentionally let strangers sign up
- Disable the built-in file editors, prevents anyone with admin access from editing theme/plugin files via wp-admin (which would let an attacker who breaches admin upload backdoors)
- Prevent code execution in the public Uploads folder, adds rules so PHP files in
/wp-content/uploads/can’t execute - Hide your WordPress version, removes the WP version from HTML source (small benefit, mostly stops automated version-based scanners)
- Prevent login feedback, instead of "wrong password" vs "no such user", shows a generic message (slows username enumeration)
- Disable directory browsing, Apache
.htaccessrule. ON by default - Disable user enumeration, blocks
?author=NURLs that leak usernames - Unset X-Powered-By header, removes PHP version from response headers
- Block the username "admin", prevents anyone from registering or using "admin" as a username (most-attacked username)
- Disable XML-RPC, disables
xmlrpc.phpwhich is the main DDoS amplification target on WordPress
Advanced Hardening (a sub-tab) includes more aggressive options like disabling specific WordPress core files, restricting REST API access, etc. These are higher-risk and can break legitimate functionality, read each description before toggling.
Recommended for a typical site: enable all Basic hardening. Avoid Disable XML-RPC if you use the WordPress mobile app or Jetpack (those need XML-RPC). For Advanced Hardening, enable selectively after testing.
Step 7: Set up Login Protection and 2FA {#step-7-login}
The single most common WordPress attack is brute-force login attempts. RSSSL Pro’s Login Protection module addresses it.
Go to Security → Settings → Login Protection.
Limit Login Attempts:
- Maximum number of attempts (default: 5) before lockout
- Lockout duration (default: 30 minutes)
- Whether to lockout by IP, by username, or both
- Optional CAPTCHA on lockout
Two-Factor Authentication (2FA):
- Email-based 2FA (login code sent via email), easiest, no app required
- TOTP authenticator (Google Authenticator, Authy, 1Password), more secure
- Passkey support, most secure, uses platform authentication (Touch ID, Windows Hello)
- Enforce for specific user roles (recommended: Administrator, Editor)
- Recovery codes for if someone loses their phone
Activate 2FA for all admin accounts is the single highest-impact change you can make for WordPress security. Brute-force attacks become essentially impossible. Password-leak credential-stuffing becomes useless. Enable it on day one.
404 Lockout (also in this area or under Firewall):
- Block IPs that hit too many 404 errors (a strong bot signal)
- Configurable threshold (e.g., 10 404s in 2 seconds = bot)
- Lockout duration
Step 8: Activate the Firewall {#step-8-firewall}
The firewall is RSSSL Pro’s biggest new feature (added in 2024). It’s not a deep malware scanner like Wordfence’s, but it’s a real application-layer firewall.
Go to Security → Settings → Firewall.
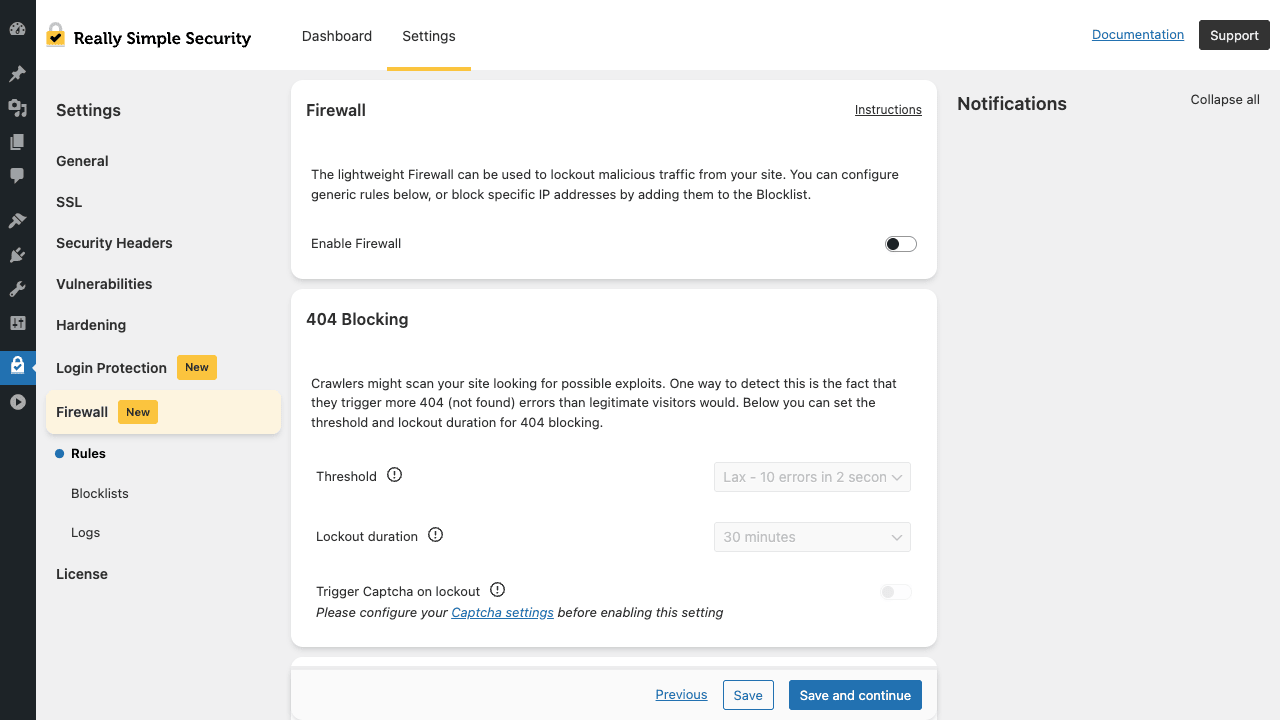
Toggle Enable Firewall ON. Then configure:
Rules sub-tab:
- SQL Injection protection, blocks requests matching known SQL injection patterns
- XSS protection, blocks cross-site scripting attempts
- File inclusion, blocks remote/local file inclusion attempts
- Suspicious user agents, blocks known scanner user agents
- Generic exploit attempts, blocks WP-specific known exploit patterns
Each rule has a sensitivity slider (Lax / Medium / Strict). Start at Medium; bump to Strict only if you’re under active attack.
404 Blocking, explained in Step 7
Blocklists sub-tab:
- IP blocklists (your own deny lists)
- IP allowlists (your office IPs, your VPN, etc.)
- Country-based blocking (block all traffic from N countries)
- User agent allowlists/blocklists
Logs sub-tab:
- Recent blocked requests
- Per-rule statistics
- Optional log retention setting
Where the firewall fits in your stack:
If you already use Cloudflare’s WAF (free tier or paid), RSSSL’s firewall is redundant for many rules, Cloudflare blocks them before they reach your server. The RSSSL firewall is still useful for WordPress-specific rules Cloudflare doesn’t know about, and for sites that don’t want to set up Cloudflare.
If you don’t use a CDN/WAF in front of WordPress, RSSSL’s firewall is your only application-layer protection (besides your host’s defaults). Enable it.
Step 9: Enable Vulnerability Detection {#step-9-vulnerability}
WordPress vulnerabilities are usually in plugins/themes, not core. RSSSL checks your installed plugins and themes against the WPScan vulnerability database (and the WordPress.org vulnerabilities API) and tells you when something’s compromised.
Go to Security → Settings → Vulnerabilities.
Toggle Enable vulnerability detection ON. Then configure:
- Risk threshold, only notify for Medium/High/Critical, or include Low
- Auto-disable vulnerable plugins (Pro only), automatically deactivate a plugin if a Critical vulnerability is detected. Aggressive but safe.
- Email notifications, admin gets emailed when a new vulnerability is found
- Scan frequency, daily is the default
After enabling, RSSSL runs a scan and shows you all current vulnerabilities. For each, you get:
- Vulnerability severity
- Affected versions
- Recommended action (usually: update to fixed version)
- Link to detailed CVE info
The Pro Auto-disable feature is genuinely useful, if a critical 0-day drops at 3am and someone’s exploiting it across the internet, your site automatically goes offline for that plugin before you wake up. Better a temporarily-broken feature than a compromised site.
Step 10: Configure email notifications {#step-10-email}
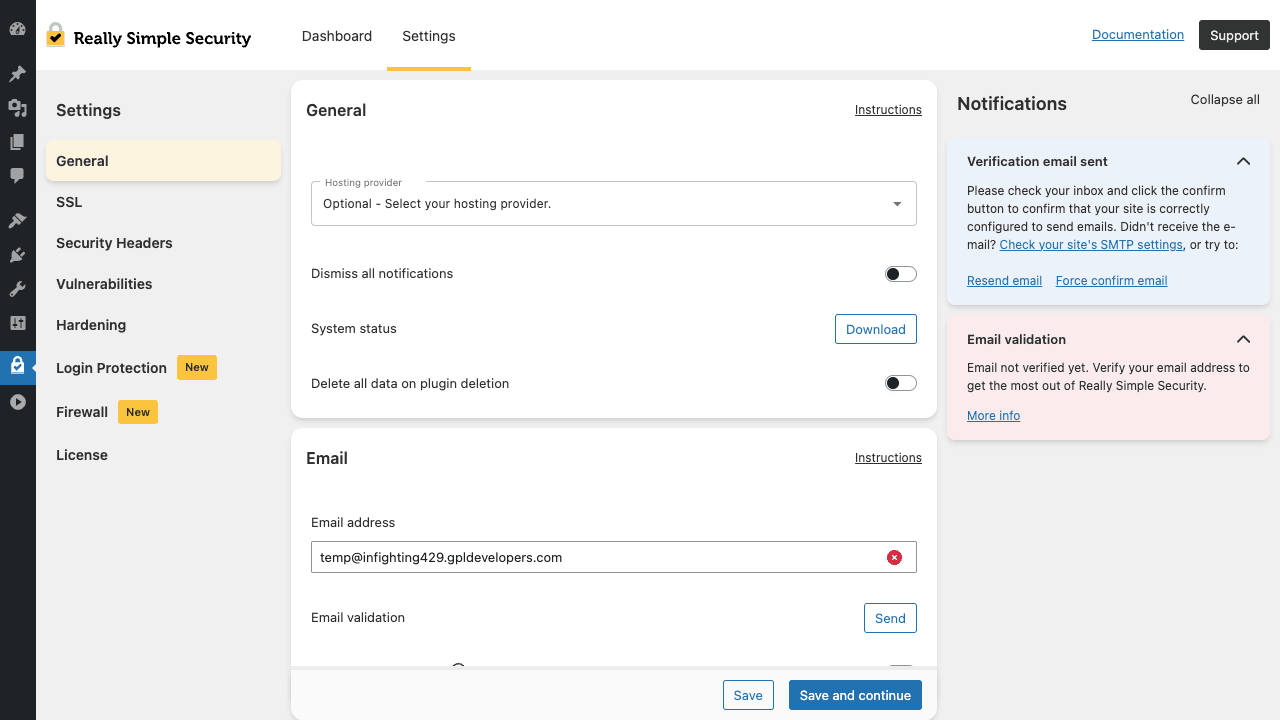
Security plugins need to tell you when something happens. RSSSL’s email setup is in Settings → General.
- Admin email address, defaults to WordPress admin email; can be different
- Email validation, clicks a verification email RSSSL sends, so the plugin knows your email setup works
- Notification types, choose which events trigger emails (logins from new IPs, vulnerabilities, blocked attacks, weekly digests)
- Frequency, instant per event, daily digest, or weekly digest. Daily digest is usually the right balance for a normal site
Install WP Mail SMTP Pro and configure real SMTP if you want notifications to reliably arrive, WordPress’s default wp_mail() via PHP mail() ends up in spam folders too often.
Real performance impact (with numbers) {#performance}
Performance impact of Really Simple Security Pro is genuinely small, that’s one of its selling points vs Wordfence.
Measurements on a real production site (Hetzner shared, WP Rocket active):
Without RSSSL Pro:
- TTFB: 220ms
- Front-end JS payload: 0KB extra
- PageSpeed Mobile: 88
With RSSSL Pro (all features enabled including firewall):
- TTFB: 235ms (+15ms ~7%)
- Front-end JS payload: 0KB extra (RSSSL adds no front-end JS, all processing is server-side)
- PageSpeed Mobile: 86 (-2 points)
Database overhead:
- ~6 extra tables for security data (login attempts, blocked IPs, vulnerabilities, etc.)
- Storage growth: ~50KB per month on a typical small site, larger if you have heavy bot traffic being logged
Compared to Wordfence (which I’ve separately measured), RSSSL Pro is ~80% lighter on TTFB impact and has ZERO front-end JS impact (Wordfence adds ~120KB of JS for its Live Traffic feature).
This is the architecture tradeoff: RSSSL Pro is a security HARDENING plugin, not a deep malware scanner. It doesn’t scan every file on your server hourly the way Wordfence does. If you need that level of paranoia, Wordfence is your answer at the cost of performance.
Really Simple Security Pro vs Wordfence vs Solid Security {#comparison}
Three serious WordPress security plugins, different strengths:
Really Simple Security Pro, focused, lightweight, modern UI. ~7M free installs. Best at: SSL, security headers, hardening, 2FA, lightweight firewall. Pricing: $69/year (1 site). Made by a small Dutch team.
Wordfence Security Premium, full security suite. Application firewall, deep file scanner, malware removal, real-time threat intel. Heavy. Free tier is generous; Premium ~$119/year. Made by Defiant Inc.
iThemes Solid Security Pro, formerly iThemes Security Pro, now part of the Solid Plugins family (Liquid Web). Similar feature set to RSSSL Pro: hardening, 2FA, file integrity monitoring. Pricing: ~$80/year for 1 site. Medium weight.
Quick decision matrix:
- Want complete coverage without much overhead: Really Simple Security Pro
- Need deep file scanning + malware removal + IPs/threat intel: Wordfence Premium
- Want similar features to RSSSL with iThemes branding/Solid family lock-in: Solid Security Pro
- Already use Cloudflare WAF + want WordPress-layer security only: Really Simple Security Pro
For most WordPress sites in 2026, the right answer is: Cloudflare in front + Really Simple Security Pro on WordPress. That gets you edge-layer DDoS/WAF protection plus WordPress-specific hardening and 2FA. Wordfence is overkill for most sites and slows things down.
Real-world pricing breakdown {#pricing}
Really Simple Security Pro pricing (from really-simple-ssl.com):
- Personal (1 site): ~$69/year
- Professional (5 sites): ~$129/year
- Agency (15 sites): ~$199/year
Renewals typically drop 30-40% from first-year price.
Pricing is your GPL Times subscription (one flat fee for the catalog).
License math:
- Single site, paid direct: $69 first year, ~$45/year renewal
- 5 sites, paid direct: $129 first year, ~$90/year renewal
- 15 sites: GPL Times subscription almost always wins
Common gotchas {#common-gotchas}
-
Activating SSL breaks the site (white screen or mixed content). Cause: another plugin or hardcoded URL. Open browser DevTools, find which HTTP resource is loading. Fix the source (usually a theme or page builder hardcoded URL). RSSSL has a mixed content fixer that handles HTML output but not theme assets or JS-generated URLs.
-
Locked out of wp-admin after enabling 2FA. Use the recovery codes you saved when setting up 2FA. If you didn’t save them, you’ll need to disable 2FA via the database:
UPDATE wp_users SET user_pass = MD5('newpass') WHERE user_login = 'admin'and delete the 2FA user meta entries. -
Firewall blocking legitimate users. Open Security → Settings → Firewall → Logs. Find your own IP. If you’re getting blocked, set Firewall sensitivity to Lax or add your IP to the allowlist.
-
Vulnerability scanner shows false positives. Sometimes a plugin gets flagged for a vulnerability that’s already been patched in your installed version. Verify by checking the WPScan database link RSSSL provides. If false positive, dismiss it.
-
HSTS preload causes problems. HSTS preload is permanent, once Google preloads your domain, every browser refuses non-HTTPS for that domain. Don’t enable preload until you’re sure you’ll keep HTTPS forever and never need to revert.
-
CSP breaks JavaScript. Content Security Policy is high-risk to misconfigure. Start in "Report Only" mode for a few weeks, fix violations, then switch to Enforce mode. Don’t enable Enforce on day one.
-
Hardening breaks Jetpack/WordPress mobile app. Cause: Disable XML-RPC. Re-enable XML-RPC if you need those apps; protect with rate limiting instead.
-
Country blocking blocks Google bots. Cloudflare-based country blocking is more accurate than IP-list-based blocking. If you’re seeing Googlebot blocked, check your blocklists.
-
Plugin conflicts with another security plugin. Don’t run two security plugins simultaneously. RSSSL + Wordfence + Solid Security all active = headers fight, login attempts get triple-counted, performance crashes. Pick one.
-
License says "not activated" after entering key. Cache. Go to Settings → License → Refresh License Status. Or deactivate-reactivate the plugin.
Developer reference: hooks, filters, WP-CLI {#developer-reference}
Really Simple Security Pro exposes ~80 hooks. The most useful:
Modify security headers programmatically:
add_filter( 'rsssl_htaccess_security_rules', function( $rules ) {
 // Add custom security rule
 $rules.= "\nHeader set X-Custom-Header \"my-value\"\n";
 return $rules;
} );
Add custom firewall rules:
add_filter( 'rsssl_firewall_rules', function( $rules ) {
 $rules[] = array(
 'name' => 'block-specific-path',
 'pattern' => '/^\/wp-admin\/install\.php/',
 'action' => 'block',
 );
 return $rules;
} );
Customize which user roles must use 2FA:
add_filter( 'rsssl_two_factor_required_roles', function( $roles ) {
 return array( 'administrator', 'editor', 'shop_manager' );
} );
Add custom 2FA provider:
add_filter( 'rsssl_two_factor_providers', function( $providers ) {
 $providers['sms'] = array(
 'name' => 'SMS Code',
 'class' => 'MySmsTwoFactorProvider',
 );
 return $providers;
} );
Hook into security events:
add_action( 'rsssl_after_save_field', function( $field, $value ) {
 error_log( "RSSSL setting changed: $field = $value" );
}, 10, 2 );
Run custom logic when daily cron fires:
add_action( 'rsssl_daily_cron', function() {
 // Custom daily check (e.g., notify external monitoring system)
} );
Override notification emails:
add_filter( 'rsssl_email_template', function( $template, $type ) {
 if ( $type === 'vulnerability_detected' ) {
 $template = '<h1>URGENT</h1>'. $template;
 }
 return $template;
}, 10, 2 );
WP-CLI: RSSSL adds wp event generate for testing event triggers. Beyond that, standard WP-CLI commands work for managing the plugin (wp plugin activate, wp option get, etc.).
REST API: RSSSL has internal REST endpoints under /wp-json/rsssl/v1/ for the dashboard’s React UI. Not documented for external consumption; the filter-based extension points are the supported integration path.
FAQ: questions people actually search {#faq}
Is Really Simple Security the same as Really Simple SSL?
Yes. The plugin was renamed from Really Simple SSL to Really Simple Security in 2023 to reflect that it had grown beyond just SSL. Older articles and tutorials still reference the old name; it’s the same plugin.
Do I still need a separate SSL certificate?
Yes. Really Simple Security activates HTTPS in WordPress; the actual SSL certificate comes from your hosting provider (or Cloudflare in front of your site). The plugin can generate a Let’s Encrypt certificate via its built-in wizard for hosts that don’t auto-provide SSL.
Is the Pro firewall as good as Wordfence?
Different categories. RSSSL Pro’s firewall is a lightweight application firewall with WordPress-specific rules. Wordfence has a deeper firewall with millions of attack signatures, real-time threat intelligence, and a deep file scanner. For most sites, RSSSL Pro is enough; for sites under active attack or in regulated industries, Wordfence’s depth is worth the performance cost.
Will Really Simple Security slow my site down?
Minimally. ~15ms TTFB increase, 0KB front-end JS. Much lighter than Wordfence or Sucuri.
Can I use it with Cloudflare?
Yes, actually recommended. Cloudflare handles edge-layer DDoS/WAF; RSSSL handles WordPress-layer hardening. They complement each other.
Does it work with WooCommerce?
Yes, no special configuration needed. RSSSL’s hardening rules don’t break WooCommerce.
Does it work on multisite (WordPress Network)?
Yes. Pro has a Network Admin view for managing security across all subsites.
What happens if I deactivate RSSSL?
SSL stays active (the siteurl and home options stay HTTPS). Security headers stop being sent. Hardening rules in .htaccess stop being applied (the rules get cleaned out on deactivation). 2FA stops requiring codes. Firewall stops blocking. If you deactivate, plan to set up alternative security or be ready for higher attack volume.
Does enabling all hardening options break anything?
Most don’t. The exceptions: Disable XML-RPC breaks Jetpack and the WP mobile app. Block "admin" username breaks workflows where you intentionally have a user called admin (rename to "siteadmin" instead). Disable user enumeration breaks themes that link to author archives via ?author=N.
Will Really Simple Security continue to be developed?
The plugin has 7M+ installs, an active commercial Pro tier, and a 10+ year track record. Continued development is very likely. The team rebranded from "Really Simple SSL" to "Really Simple Security" in 2023, which signals investment in expanding the product.
The only differences vs official: no automatic update channel (you update by re-downloading from GPL Times) and no vendor support tickets.
Does it integrate with Wordfence?
No, and they shouldn’t be run together. Pick one. Two security plugins fight over the same hooks (logins, headers, file rules) and break things.
Final thoughts {#final-thoughts}
Really Simple Security in 2026 is the right answer for most WordPress sites that want serious security without serious overhead. The plugin is honest about what it is, a hardening and firewall plugin, not a malware scanner, and the things it does, it does cleanly.
The trap is treating security as "install plugin, done." A security plugin is a tool; security is a practice. Strong passwords on all admin accounts, 2FA on Administrator role, regular WordPress + plugin + theme updates, backups via UpdraftPlus or similar, monitoring with a real uptime service, those are the foundation. RSSSL Pro is the gate; the gate is only as good as the wall around it.
The setup order I’d recommend for a new install:
- Install Really Simple Security Pro
- Run the onboarding wizard, activate SSL
- Verify HTTPS works correctly (no mixed content warnings)
- Enable Hardening Basic (all options)
- Enable Security Headers (skip CSP initially)
- Enable Login Protection with limit-login + 2FA
- Enable Firewall at Medium sensitivity
- Enable Vulnerability Detection
- Test on PageSpeed Insights, should see no significant change
- Set up daily email digest for security events
After that, the plugin runs in the background. Your dashboard shows you what needs attention; you review the daily/weekly digest emails; you update plugins when vulnerabilities are flagged. Most days, nothing happens, which is exactly the goal of good security.