

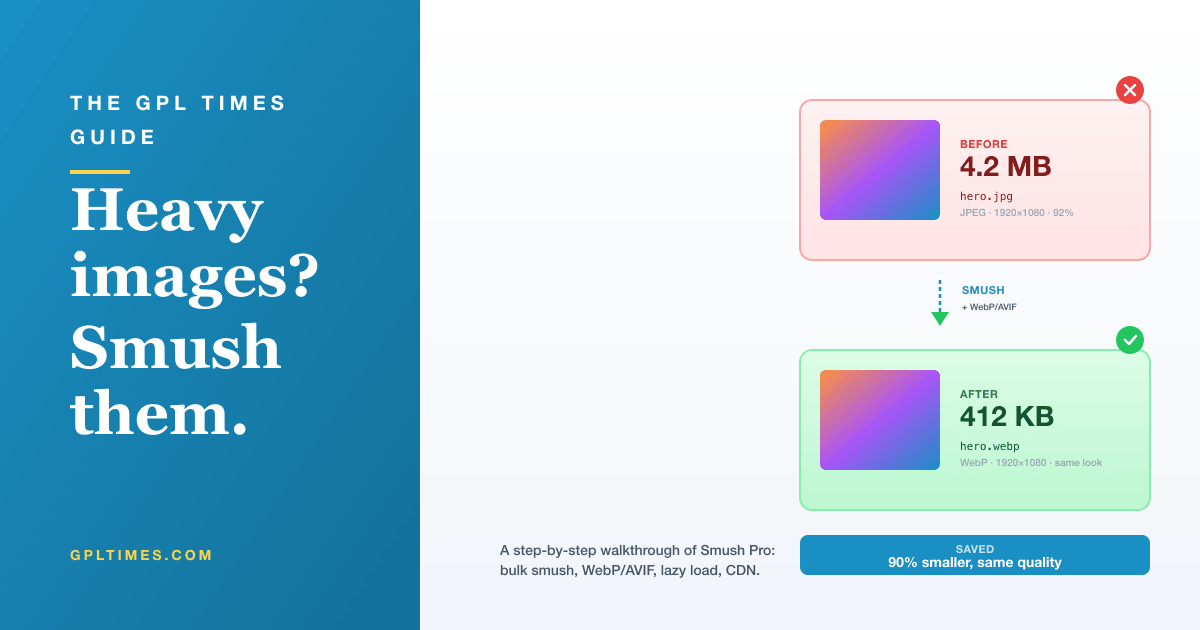
Run any WordPress site through Google’s PageSpeed Insights and the same complaint shows up at the top of nearly every report: "Properly size images" and "Serve images in next-gen formats". Your homepage hero is 4.2 MB. Your blog post is loading a 2 MB PNG when the rendered space is 600 pixels wide. Your product gallery is shipping 8 photos at 5 MB each. Total page weight: 35 MB on a page that should be 1.5 MB.
Image weight is the single biggest performance problem on most WordPress sites. Hosting can be fast, theme can be lean, JavaScript can be deferred, and it doesn’t matter because the browser is still downloading 30 MB of unoptimized photos before the page can fully render. Google’s Largest Contentful Paint metric (the one they use to rank your site in search results) is almost always blocked by an oversized hero image.
You can fix this manually. Open every image in Photoshop, save for web at 80% JPG quality, generate WebP versions, set explicit width/height attributes, configure lazy loading, set up a CDN. For a 10-page site this takes a weekend. For a 1,000-image blog, it’s months of work that you’ll never actually do.
Or you can install Smush Pro. The plugin runs through every image in your media library, compresses each one losslessly (or with mild lossy compression you control), generates next-gen WebP and AVIF variants, lazy-loads images so they only download when scrolled into view, and optionally serves everything through a 119-location CDN. You set it up once, it processes new uploads automatically forever, and your PageSpeed scores climb without you opening a single image file.
This is a step-by-step walkthrough. By the end you’ll have your existing media library fully compressed, automatic optimization running on new uploads, WebP delivery turned on, lazy loading configured, and (optionally) the CDN serving images from a server geographically close to each visitor. Total setup time: 30-45 minutes plus however long the initial bulk smush takes (which runs in the background, so you don’t have to babysit it).
I’ll use Smush Pro for this guide because the Pro features (lossy "Ultra" compression, CDN delivery, WebP/AVIF, bulk smush above 50 images at a time, original-image backup) are what makes the plugin actually useful in production. The free Smush on WordPress.org handles tiny sites but hits the ceiling fast.
What you’ll have when you’re done
- Every image in your existing media library compressed, with size savings tracked.
- All future uploads automatically compressed when they hit the media library.
- WebP and AVIF versions of every image generated, with browser-aware delivery (modern browsers get the smaller WebP/AVIF, older browsers get the JPG/PNG fallback).
- Lazy loading turned on so images outside the initial viewport don’t download until the user scrolls toward them.
- (Optional) A global CDN serving images from 119 edge locations so visitors in any country see the same fast load times.
- A backup of every original image so you can restore them if you change your mind about compression settings later.
Total time to get started: about 30 minutes. The initial bulk smush of your library can take anywhere from 5 minutes to several hours depending on how many images you have, but it runs in the background while you do other work.
What Smush Pro actually does
Smush Pro is a WordPress plugin made by WPMU DEV, a long-running WordPress company that also makes Hummingbird (caching), Defender (security), and Branda (white-label). Smush has been around since 2007, started as a free image compressor, and grew into a full image-optimization stack over the years.
At a technical level, the plugin does five things:
- Lossless compression: Strips metadata from JPG/PNG files (EXIF, GPS, color profiles) and re-encodes the image without quality loss. Typical savings: 5-25%.
- Lossy compression (Pro): Re-encodes with mild quality loss (the "Super" 2X or "Ultra" 5X modes). Typical savings: 30-80% with no human-visible quality difference.
- WebP/AVIF conversion (Pro): Generates next-gen format versions of every image. Modern browsers (which is 95%+ of the world now) automatically load these instead of the original.
- Lazy loading: Adds JavaScript that defers loading of images outside the initial viewport until the user scrolls toward them. This dramatically improves initial page load time.
- CDN delivery (Pro): Routes image requests through a global CDN with 119 edge locations. Each visitor gets images from a server geographically close to them. Also handles WebP delivery and dynamic resizing.
The plugin sits between WordPress and your storage. When you upload an image, WordPress saves the file as usual, then Smush intercepts (via a hook on wp_update_attachment_metadata), runs the file through compression, generates WebP, and updates the file in place. On the front-end, Smush filters image HTML output to add lazy-load attributes and (if CDN is enabled) rewrites image URLs to point at the CDN.
The free version on WordPress.org handles lossless compression and basic lazy loading for libraries up to 50 images at a time per bulk-smush run. For sites with more than a few dozen images, or any of the Pro features (lossy modes, WebP, AVIF, CDN, no-limit bulk smush, original backup), you need Pro.
Step 1: Install Smush Pro
In your WordPress admin, go to Plugins → Add New → Upload Plugin. Choose the wp-smush-pro.zip file, click Install Now, then Activate Plugin. A new "SmushPro" menu appears in the admin sidebar.
You’ll see a one-time welcome screen with a "Quick Setup" button. You can click it to walk through the basics, but I recommend skipping it and going to the Dashboard directly so you can see the full surface area without being funneled through a wizard.
Click SmushPro → Dashboard:
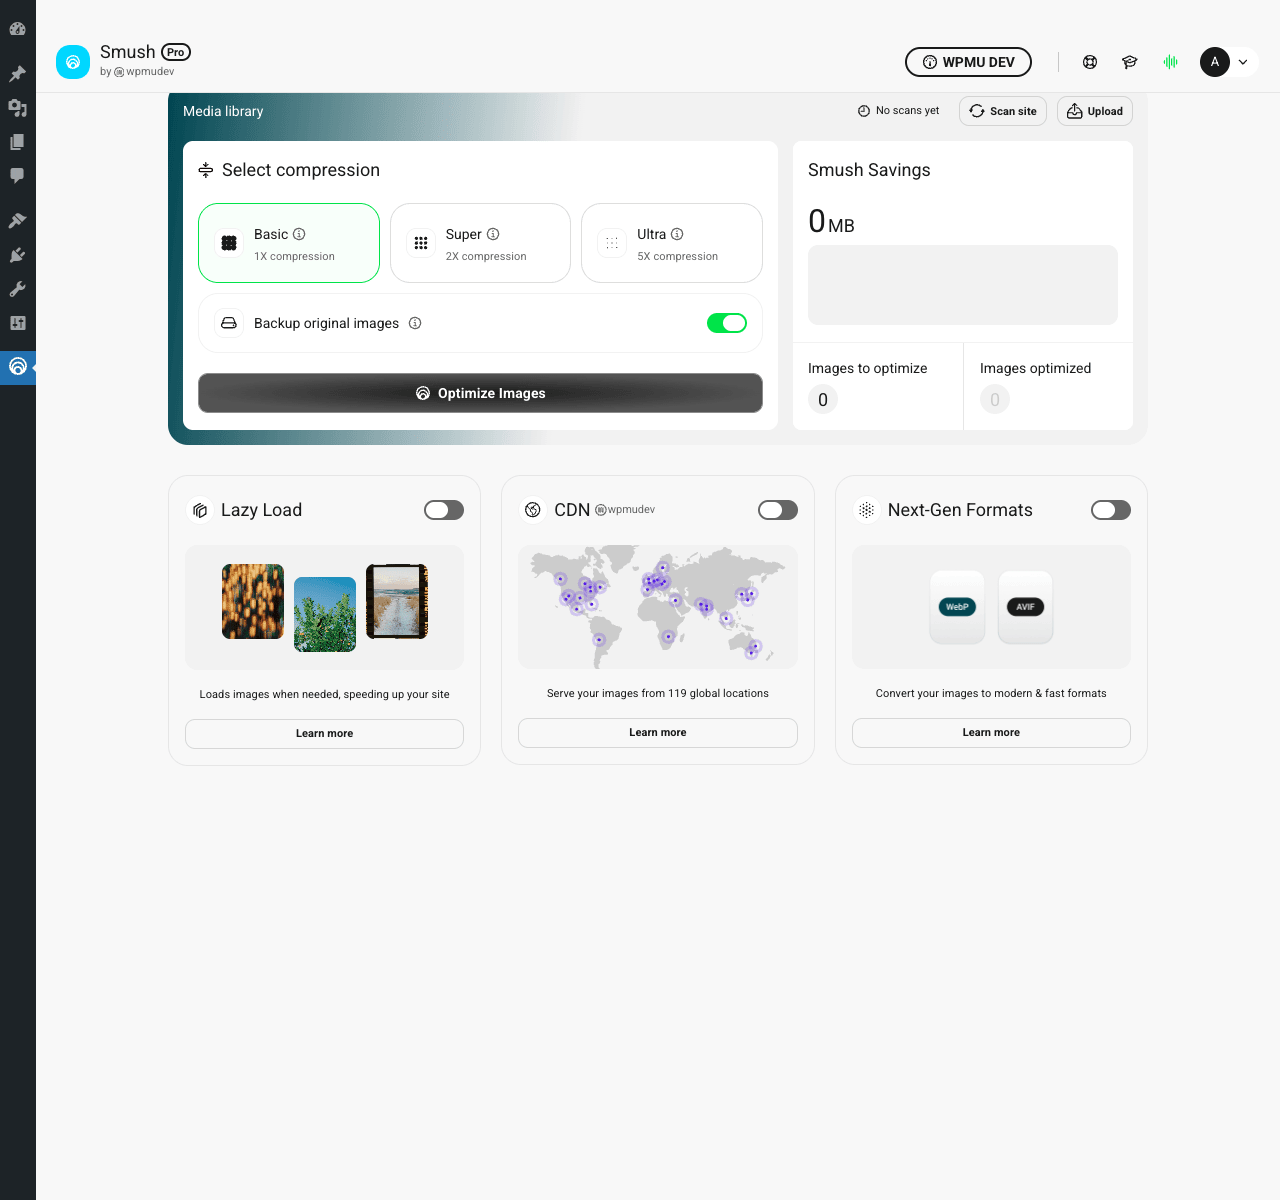
The dashboard is the home of your image optimization workflow. Three things to notice immediately:
- Select compression lets you pick the aggressiveness: Basic (1X, lossless), Super (2X, mild lossy), or Ultra (5X, more aggressive lossy). The further right you go, the smaller the files, but the more visible the quality drop. For most sites, Super is the right choice; Ultra is too aggressive for photography sites but fine for thumbnail-heavy blogs.
- Backup original images is toggled ON by default. Keep it on. This stores an unmodified copy of every image so you can restore the originals if you ever change your mind about compression. Costs disk space but worth it.
- Optimize Images is the button that runs the bulk smush against your existing library. We’ll click this in Step 3 after configuring settings.
Before clicking Optimize Images, check the three feature cards at the bottom (Lazy Load, CDN, Next-Gen Formats). All three are toggled OFF by default. We’ll turn them on selectively over the next steps.
Step 2: Configure compression settings
Click SmushPro → Settings. This is the most important configuration screen. Walk through it carefully:
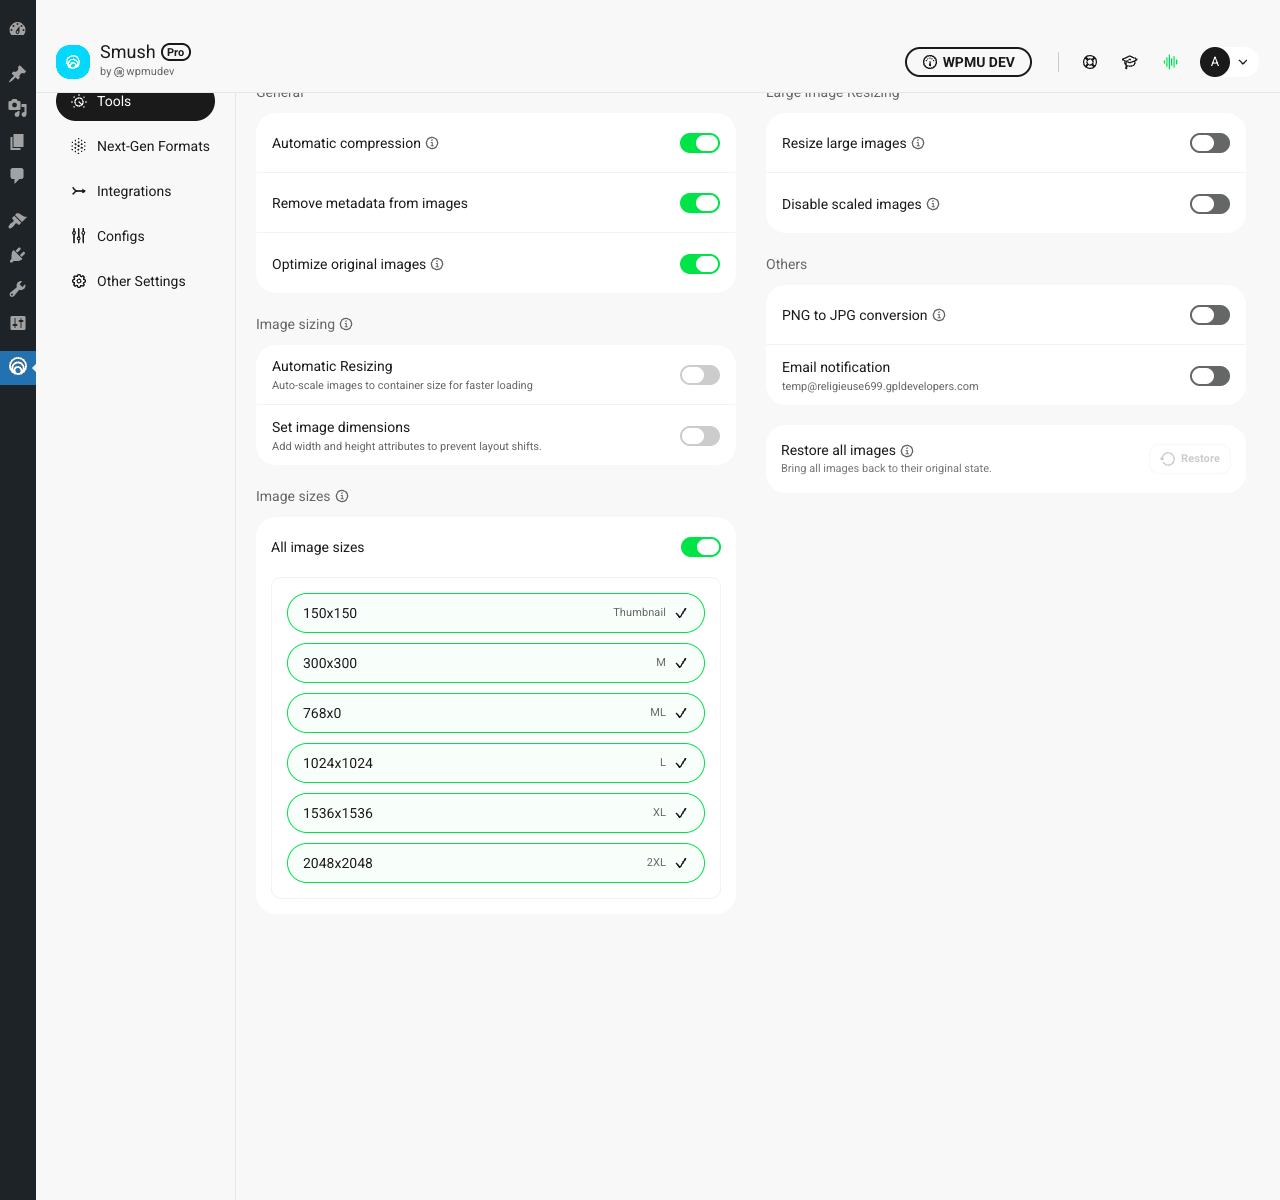
Here’s what to set:
- Automatic compression: ON. This means every new image you upload gets compressed automatically. Without this, you’d have to bulk-smush after every batch of uploads, which nobody actually remembers to do.
- Remove metadata: ON. Strips EXIF data (camera model, GPS coordinates, color profile) that doesn’t affect display but adds 10-50KB per image. For e-commerce or stock-photo sites, this also has a small privacy benefit (no GPS coordinates leaking from your phone-shot product photos).
- Optimize original images: ON. WordPress stores the original upload AND auto-generated thumbnails. Without this, only the thumbnails get optimized. The originals (which are sometimes loaded in lightboxes or downloaded by visitors) stay huge.
In the Image sizing section:
- Automatic Resizing: Set ON if you have lots of oversized images (people uploading 4000px-wide product photos that get displayed at 600px). The plugin will scale them down to a sensible max. Set OFF if you carefully size your uploads already.
- Set image dimensions: ON. Adds
widthandheightattributes to image HTML, which prevents the page from "jumping" as images load (Cumulative Layout Shift in Core Web Vitals).
In the Image sizes section, leave all the WordPress-generated sizes checked. WordPress creates Thumbnail, Medium, Medium Large, Large, 1536×1536, and 2048×2048 versions of every upload. Smush optimizes all of them.
On the right, Large Image Resizing is opinionated:
- Resize large images: Turn ON if you regularly upload phone photos (which are 4000+ pixels wide). Set max width to your theme’s content width (usually 1200-1600px). The plugin will downsize anything bigger before compressing.
- Disable scaled images: Smush’s terminology for WordPress’s "scaled" file (the
-scaled.jpgsuffix WordPress adds automatically to big uploads). For most sites, leave this OFF, let WordPress handle the scaling and Smush optimize the result.
Click Save. The plugin remembers your choices for future uploads.
Step 3: Run your first bulk smush
Now the satisfying part. Go back to the Dashboard. Confirm "Super" is selected (or whatever compression level you decided). Confirm "Backup original images" is ON. Click the big black Optimize Images button.
The plugin scans your media library, counts how many images need optimization (it skips ones already smushed), and starts processing in batches. You’ll see a progress indicator with current image count, total count, and savings accumulated so far.
For a typical 200-image blog, the bulk smush completes in 2-5 minutes. For a 5,000-image e-commerce site, expect 30-60 minutes. The plugin runs through them one at a time, calling the WPMU DEV image compression API for each. You don’t have to leave the tab open, close the browser and come back later, the process resumes where it left off.
After completion, the Smush Savings panel updates to show total bytes saved. Typical numbers I’ve seen:
- Photography sites: 30-50 MB saved per 100 images at Basic, 60-80 MB at Super, 80-120 MB at Ultra.
- Blog sites with stock images: 40-80 MB saved per 100 images at Super.
- WooCommerce stores with phone-camera product shots: 200+ MB per 100 images at Super (these are usually the worst-offending sites).
If you have a big library and the smush takes longer than expected, you can keep using your site normally during it. The plugin processes in the background and doesn’t lock the admin or affect page loads.
Step 4: Turn on Lazy Loading
Lazy loading defers image downloads until the user is about to see them. On a page with 50 images, only the first 3-5 download immediately; the rest load as the user scrolls. This dramatically improves your initial page load and is one of the biggest single wins for Core Web Vitals.
Click SmushPro → Lazy Load & Preload → Lazy Load. Toggle the main switch ON.
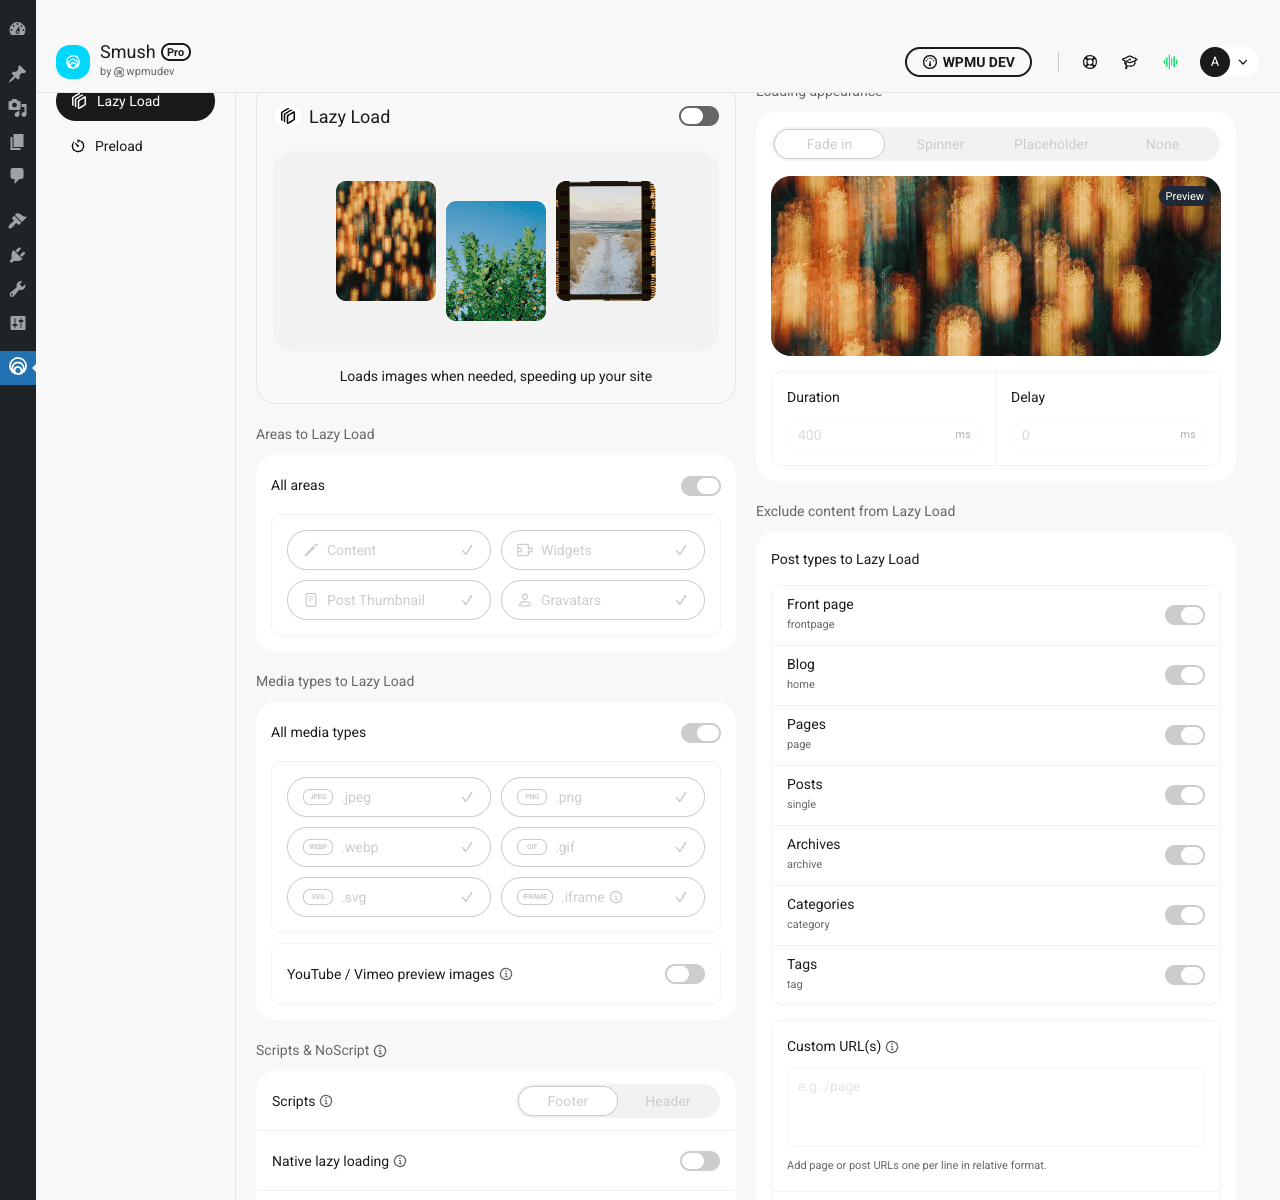
The page is dense with options but the defaults are usually right. Here’s what each section does:
Areas to Lazy Load: which parts of the page get lazy loading applied. "All areas" is the safe default. Uncheck Gravatars only if your comment section is performance-sensitive and you want avatars to load immediately.
Media types to Lazy Load: which file types are lazy-loaded. JPEG and PNG always. WebP yes. GIF yes (animated gifs are some of the worst offenders for page weight). SVG and iframe optionally. iframe is especially useful if you embed many YouTube videos, toggling this on can save megabytes on YouTube preview thumbnails.
Post types to Lazy Load: which pages on your site get lazy loading. Toggle ON for Front page, Blog, Pages, Posts, Archives. Categories and Tags too if you have category landing pages. Some sites turn this OFF on landing pages where you want every image to load instantly for impression purposes (which I’d argue is wrong, but it’s your call).
Loading appearance: how images animate in as they’re loaded. Options: Fade In, Spinner, Placeholder, None. For most sites, Fade In looks the most natural. Spinner is fine but draws more attention. Placeholder shows a blurred low-quality version while the real image loads (Lightroom-style), which feels premium but adds 2-4KB per image.
Important detail: YouTube/Vimeo preview images toggle. If you embed videos using the YouTube/Vimeo blocks, each embed normally loads the full YouTube player iframe (which is HUGE, sometimes 500+ KB just for the player). Smush can replace that with a static thumbnail image that only loads the real player when the user clicks. On a blog post with 5 embedded videos, this can shave 2-3 MB from initial page weight.
Click Save Settings at the bottom. Reload your front-end. Open the Network tab in DevTools. Notice that images far down the page don’t appear in the network requests until you scroll near them.
Step 5: Turn on Next-Gen Formats (WebP/AVIF)
WebP is a Google-developed image format that’s typically 25-35% smaller than equivalent JPG. AVIF is even newer and typically 50% smaller. Modern browsers support both: WebP since 2020 across Chrome/Firefox/Safari, AVIF since 2022. Older browsers fall back to the original JPG/PNG automatically.
Back on the Dashboard, find the "Next-Gen Formats" feature card at the bottom right. Toggle it ON.
The plugin asks how you want to deliver these formats:
- WebP only: Generate WebP files alongside originals. Modern browsers get WebP via Accept header negotiation.
- AVIF + WebP: Generate both formats. Modern browsers get AVIF (smallest), slightly older ones get WebP, ancient ones get the original.
- Picture tag method: Smush rewrites every
<img>tag on the page to a<picture>element with multiple sources. More compatible with weird themes but heavier markup.
For most sites, pick "AVIF + WebP with Accept header method". This is the simplest and the most server-efficient. The plugin writes .htaccess rules (or equivalent Nginx config) so the server itself decides which format to serve based on the browser’s Accept header. No template changes, no markup changes, just smaller files for browsers that support them.
After enabling, the plugin generates AVIF and WebP versions of every image in your library. This is a separate background job from the initial smush, so expect another 5-30 minutes of background processing for the first run. New uploads get AVIF/WebP versions automatically.
To verify it’s working: open your site in Chrome (which supports both formats). Open DevTools → Network tab → reload. Click any image request and look at the Response Headers. The Content-Type should be image/webp or image/avif. The Size column should show notably smaller numbers than before.
Step 6: (Optional) Turn on the CDN
This step is optional but if you have global visitors, it’s the highest-impact single change you can make. Smush Pro includes a CDN with 119 edge locations worldwide. Every image request gets routed to the closest server, dropping image load time from 200-800ms (typical for shared hosting) to 20-80ms (typical for CDN delivery).
Click SmushPro → CDN:
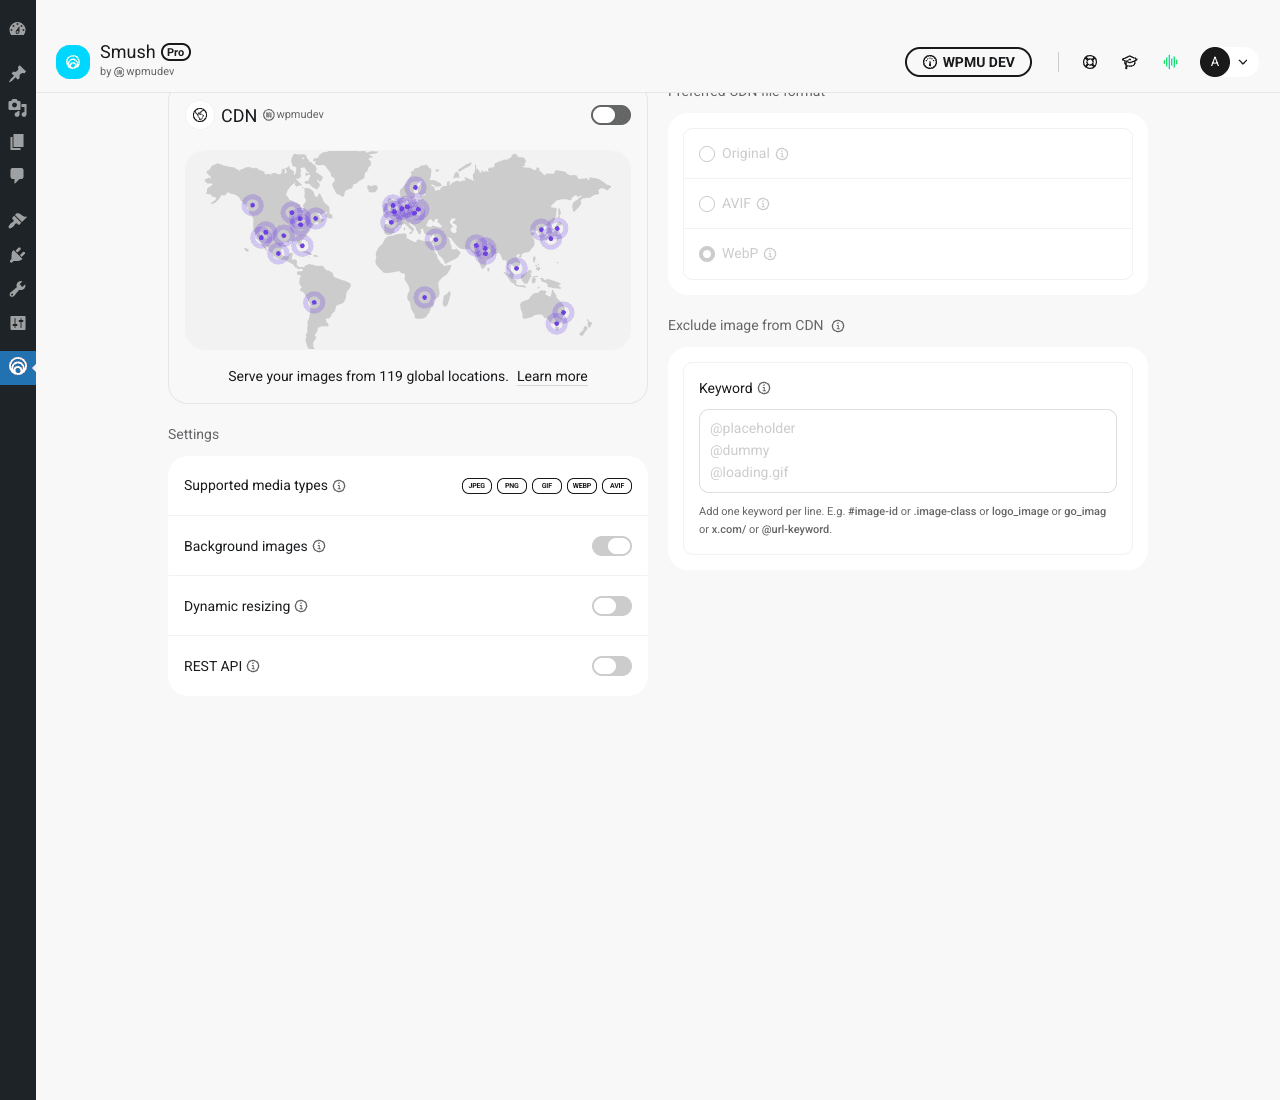
Toggle the main CDN switch ON. You may be prompted to authenticate with your WPMU DEV account first (this is the only feature that requires a real account login; everything else works on any installed copy).
Once active, settings to consider:
- Preferred CDN file format: AVIF if available, WebP as fallback, Original for everything else. The CDN handles the format negotiation automatically.
- Background images: ON if your theme uses CSS
background-imagefor hero sections. The CDN can rewrite these too. - Dynamic resizing: ON. The CDN generates appropriately-sized variants on-demand based on the requesting device’s screen. Saves you from manually generating sizes.
- REST API: OFF unless you have a headless setup that needs CDN-routed image URLs in REST responses.
- Exclude image from CDN: Keywords to skip. Useful for staging-only images or anything you don’t want cached on the CDN.
Reload your front-end after enabling. Open DevTools → Network. Image URLs should now point to something.smushcdn.com or similar (instead of your domain). Response times for images should be dramatically lower, especially for first-time visitors who weren’t already cached.
The CDN feature uses your WPMU DEV monthly bandwidth allowance. Most sites stay well within limits, but if you have very high traffic (millions of monthly visits with heavy image use), monitor your usage in the WPMU DEV hub.
Step 7: Verify with PageSpeed Insights
After all the above, head to https://pagespeed.web.dev and run your site through it. Compare against your before-Smush score (if you have one).
Typical improvements I’ve seen on real sites:
- LCP (Largest Contentful Paint): Drops by 0.5-2.0 seconds on most sites. Sometimes more if the LCP element was a huge unoptimized hero image.
- Image format warnings: Disappear (Google sees WebP/AVIF served and stops complaining).
- Properly size images warning: Disappears if you turned on Automatic Resizing.
- Defer offscreen images warning: Disappears once lazy loading is active.
- Overall PageSpeed score: Usually improves by 10-30 points on the mobile audit, less on desktop.
If your site still shows image-related warnings after Smush is fully configured, the most common cause is hardcoded image URLs in widgets, theme options, or page-builder content that Smush’s URL rewriter didn’t catch. Check the "Areas to Lazy Load" settings and turn on Widgets and Background images if needed.
Step 8: Set up the per-image control workflow
Sometimes you need finer control. A specific photo really shouldn’t be compressed (a high-resolution product hero where every pixel matters). A specific big image should be excluded from lazy loading (a logo above the fold that should appear instantly).
For per-image overrides, go to Media → Library. Each image now has a "Smush" column showing its compression status. Click any image to open the edit screen. The right sidebar has a Smush metabox with these options:
- Re-smush: Re-run compression on this specific image (useful after changing settings).
- Restore: Bring back the original unmodified file (only works if you had backups enabled, see Step 1).
- Ignore: Skip this image in future bulk operations.
- Stats: How much was saved on this image, what compression level was used.
For lazy-load overrides, use the image’s HTML class. Add no-lazyload to any <img> element in your content and Smush skips it. Useful for above-the-fold hero images that should load immediately.
Common gotchas
These are the issues people actually hit, ordered by how often I see them:
1. "Bulk Smush stops at 50 images." You’re running the free version. Pro removes the limit. Upgrade or run the bulk smush in 50-image batches manually.
2. "Images look blurry after Smush." You’re on Ultra compression and your photos are visually demanding (food photography, fashion, fine art). Drop to Super or Basic, then click "Restore" on a few affected images and re-smush at the lower level. Backup-original-images saved you here.
3. "WebP isn’t being served even though it’s enabled." Check your .htaccess (Apache) or Nginx config. The plugin tries to write the rewrite rules automatically but some hosts disallow .htaccess edits. Solution: ask your host to enable them, OR switch to the "Picture tag method" delivery which works regardless of server config.
4. "Lazy load broke my image gallery / lightbox / slider." Sliders sometimes rely on images being immediately available. Add the image classes to the lazy-load exclusion list under Lazy Load → Exclude content from Lazy Load. Most slider plugins document which selectors they use.
5. "PageSpeed still says my images are too big." Smush optimizes what’s in your media library, but if your theme references images via CSS background-image or inline styles, those aren’t always caught. Either move them to the media library, or enable "Background images" under the CDN section.
6. "CDN URLs are mixed (some smushcdn.com, some yourdomain.com)." Means some images are CDN-routed and some aren’t. Usually a caching issue. Flush your page cache (WP Rocket, LiteSpeed, etc.) and reload. If still mixed, check the CDN exclusion list for stray entries.
7. "I lost my originals because backup was off." No recovery from Smush itself. If you have a full WordPress backup (from UpdraftPlus or Duplicator Pro) from before the smush, restore the wp-content/uploads/ directory from it. This is why backup-original-images defaulting to ON is important.
8. "Site speed didn’t change after enabling everything." Image weight is one of many performance factors. If your bottleneck is slow server response time, oversized JavaScript, or render-blocking CSS, optimizing images won’t help much. Pair Smush with a caching plugin like WP Rocket for the rest of the stack.
9. "I have thousands of images and the bulk smush is slow." Normal. The plugin batches API calls to WPMU DEV’s servers, and there’s per-image latency. Patience or run overnight. The smush continues in the background and resumes after browser closes.
10. "Animated GIFs are broken after Smush." Smush sometimes optimizes animated GIFs incorrectly, leaving only the first frame. Solution: under Settings → Animation, set "Animated GIF handling" to "Skip animated GIFs". Or convert GIFs to MP4/WebM video before uploading (modern sites should be doing this anyway).
What about Imagify, ShortPixel, EWWW?
If you’ve shopped around, you’ve seen Imagify, ShortPixel, EWWW Image Optimizer, and TinyPNG mentioned. They’re all in the same category. Quick honest comparison:
- Smush Pro is the most full-featured (compression + lazy load + WebP/AVIF + CDN). The CDN is the differentiator. If you want one plugin to do everything image-related, Smush is the answer.
- Imagify has slightly better compression results in head-to-head tests but charges per image processed (credit-based pricing). Cheaper for tiny sites, more expensive at scale.
- ShortPixel has the best compression efficiency by a small margin. Image API only, no built-in CDN.
- EWWW is the budget option. Free tier handles unlimited images via your own server’s CPU. Slower but free.
For most sites in the 500-5,000 image range, Smush Pro is the right answer because the unlimited bulk smush + CDN combo is hard to beat. For a 100-image small business site, free Smush or free EWWW might be enough.
A short note for developers
Smush exposes a useful hook surface for sites that need custom behavior:
// Skip auto-smush on specific attachments (e.g., images uploaded by specific user roles).
add_filter( 'wp_smush_should_skip_auto_smush', function( $skip, $attachment_id ) {
 $post = get_post( $attachment_id );
 if ( $post && user_can( $post->post_author, 'manage_options' ) ) {
 return true; // admin uploads stay original
 }
 return $skip;
}, 10, 2 );

// Fires after Smush finishes processing an attachment. Use to update your CDN or run additional optimization.
add_action( 'wp_smush_before_update_attachment_metadata', function( $attachment_id, $meta ) {
 do_action( 'my_app_image_optimized', $attachment_id );
}, 10, 2 );

// Modify the image-dimensions detection (useful for proxied or custom-hosted images).
add_filter( 'wp_smush_get_image_dimensions', function( $dimensions, $image_url ) {
 if ( strpos( $image_url, 'my-custom-cdn.com' ) !== false ) {
 return [ 'width' => 1200, 'height' => 800 ];
 }
 return $dimensions;
}, 10, 2 );

// Adjust the query limit for stats (default is 3000 attachments per query).
add_filter( 'wp_smush_query_limit', function() {
 return 5000; // for very large libraries
} );

// Fires when settings change. Use to invalidate dependent caches.
add_action( 'wp_smush_settings_updated', function( $old_settings, $new_settings ) {
 wp_cache_flush_group( 'my_image_cache' );
}, 10, 2 );
If you need to programmatically trigger a smush from your own plugin code:
if ( class_exists( 'SmushCoreSmush_Core' ) ) {
 $core = SmushCoreSmush_Core::get_instance();
 $core->smush_single( $attachment_id );
}
For bulk operations from WP-CLI, the plugin doesn’t ship native CLI commands but you can trigger smush via wp eval:
wp eval '
$ids = get_posts([
 "post_type" => "attachment",
 "post_mime_type" => ["image/jpeg", "image/png"],
 "fields" => "ids",
 "posts_per_page" => 100,
 "meta_query" => [["key" => "wp-smush-stats", "compare" => "NOT EXISTS"]],
]);
foreach ($ids as $id) {
 do_action("wp_smush_single", $id);
}
echo "Queued " . count($ids) . " images";
'
Pricing and where to get it
Smush Pro is sold by WPMU DEV as part of either a standalone Pro plan or the WPMU DEV membership (which includes Hummingbird, Defender, Branda, and a number of other plugins). The membership pricing covers unlimited sites. The standalone Pro tier covers a smaller site count.
The plugin is GPL-licensed. The license sold by WPMU DEV is a support and update license, not a use license. After install, you can use it on any number of sites; the license only gates support, the CDN feature (which requires authentication with WPMU DEV’s CDN service), and the official update channel.
Because of GPL, the plugin file itself is legally redistributable. The CDN feature requires a real WPMU DEV authenticated account because it routes traffic through their commercial CDN infrastructure, so plan for that if CDN is a hard requirement.
For sites where image-driven performance is core to the business (e-commerce, photography portfolios, news sites with thousands of images), the official WPMU DEV membership is worth considering because the CDN bandwidth allowance scales with the plan tier.
Quick reference: which settings to use for which site type
Before wrapping up, here’s a cheat sheet for the most common site types:
- Personal blog with 50-500 images: Smush Pro at Super, Backup ON, Lazy Load ON, WebP ON, CDN optional. 90% of the benefit, minimal config.
- Photography portfolio: Smush at Basic (no quality loss), Backup ON (critical), Lazy Load ON with Fade-in, WebP ON, CDN ON. Photographers care about quality more than file size; lossless is the right choice.
- WooCommerce store with phone-camera product shots: Smush at Super or Ultra (Ultra is fine for product thumbnails), Automatic Resizing ON (force max 1600px), Lazy Load ON, WebP ON, CDN highly recommended. Product images are typically the worst-offender on these sites.
- News site with thousands of stock images: Smush at Super, Automatic Compression ON, CDN ON, Lazy Load ON. The volume + the global audience make CDN especially valuable here.
- Documentation site with 5-20 screenshots per article: Smush at Super, Lazy Load with Native lazy loading toggle (lighter weight than JS-based), WebP ON, CDN optional. Screenshots are PNG-heavy and benefit most from WebP conversion.
- Single-page agency landing site: Smush at Super, careful exclusion of the hero image from lazy loading (it should load immediately), WebP ON, CDN optional.
Final thoughts
Image optimization is one of those tasks that nobody enjoys but everyone needs. Smush Pro turns it into a one-time configuration job instead of a per-image manual effort. Set it up once, let it process your existing library, and forget about it. Future uploads get optimized automatically. PageSpeed scores improve. Visitors get faster pages. Google ranks your content higher because Core Web Vitals are good.
For a beginner the path is short. Install the plugin, set compression to Super, click Optimize Images, turn on Lazy Load and WebP, done. The whole thing takes 20 minutes plus background processing time.
For a developer the plugin is well-built and respects the WordPress hook system. Custom integrations are straightforward through the documented filter and action surface. The image-processing path is hookable at multiple stages (before/after compression, before/after metadata update, on bulk completion).
The places where Smush Pro is not the right answer: if you have a tiny site with 20 images, the free WordPress.org version is fine. If you need image manipulation beyond optimization (like generating social-share variants automatically), pair Smush with a more specialized tool. If you’re running a headless WordPress with a separate frontend, the CDN feature still works but the lazy-load JS doesn’t apply (you’ll implement that on the front-end yourself).
For everything else, especially the very common "WordPress site with too many images that loads too slowly" scenario, Smush Pro is the boring-good default. Install it on a staging site first, do a practice bulk smush, verify the results look right, then deploy to production with confidence.
Setup checklist:
- Install Smush Pro.
- Set compression to Super (or Ultra if you have thumbnail-only images).
- Confirm Backup original images is ON.
- Click Optimize Images and let the bulk smush run.
- Turn on Lazy Load with Fade-in.
- Turn on Next-Gen Formats (WebP + AVIF).
- Optionally turn on CDN if you have global visitors.
- Run PageSpeed Insights before/after to verify improvement.
- Set up a quarterly reminder to check the smush dashboard for any unoptimized stragglers.
That’s it. The next time someone tells you their WordPress site is slow, the first question to ask is "have you optimized your images?". The answer is usually no. Now you know how to fix it.
Useful external references:
- Smush official documentation covers every setting and integration in detail.
- Google PageSpeed Insights for measuring before/after impact of your optimization work.
- Google’s image optimization guide for understanding the underlying principles Smush is implementing.