

A "Contact us for a quote" button is where online sales quietly go to die.
Someone lands on your page, likes what they see, gets to the pricing, and hits a wall that says "email us and we’ll get back to you." Half of them never do. They wanted a number, and you gave them a form and a wait. That gap between interest and price is exactly what Cost Calculator Builder is built to close: it lets a visitor pick their options and watch a live total appear on the page, no email, no waiting, no sales call before they even know if they can afford you.
This is a long, honest walk through what Cost Calculator Builder does, how you actually put a calculator together, where it shines, where it will frustrate you, and a full developer reference with the real hooks and shortcodes. Whether you run a service business tired of writing the same estimate over and over, or you’re a developer wiring a configurator into a WooCommerce store, by the end you’ll know whether this plugin fits your site.
Table of Contents
- What Cost Calculator Builder actually is
- Building a calculator: fields, formulas, and the live total
- Templates: a hundred-plus ready calculators
- Conditional logic: showing the right fields
- Taking payment: PayPal, Stripe, Razorpay, and WooCommerce
- Don’t take payment on an estimate before you test the formula
- Cost Calculator Builder vs the alternatives
- Who should use this (and who shouldn’t)
- Developer reference: shortcodes, hooks, filters, REST
- Performance, the free-base requirement, and the gotchas
- Pricing and licensing
- FAQ
- Final thoughts
What Cost Calculator Builder actually is
Cost Calculator Builder is a WordPress plugin by Stylemix Themes, the same vendor behind MasterStudy LMS and a shelf of other WordPress products. Its one job is to let you build price-estimate and quote calculators that visitors fill in on the front end, watching a running Total update as they go.
You’ve almost certainly used one without noticing. A shipping estimator on a courier site. A "what will my loan cost" widget on a bank page. A "configure your kitchen" tool on a home-improvement store. Cost Calculator Builder is the no-code way to put that kind of thing on your own site without paying a developer to code the math by hand.
Here is the part you need to get right before anything else. The plugin ships in two pieces, and you need both. There is a free base plugin on WordPress.org, and there is the paid PRO add-on. The free base carries the core: the calculator custom post type, the field types, the shortcodes, the templates, the Gutenberg block, and the Elementor widget. PRO layers on the features most businesses actually buy it for: payments, conditional logic, discounts, multi-currency, WooCommerce, the repeater field, and the Orders and Analytics screens.
Heads-up: PRO is not standalone. If you install the PRO add-on without the free plugin, it refuses to run and tells you to go install the free Cost Calculator Builder from WordPress.org first. So the setup is two plugins, activated in this order: install the free base, activate it, then install PRO and activate that. There’s no separate installation ceremony beyond the normal upload-and-activate, which is why I’m folding it into this section instead of giving it a heading of its own. When you get the GPL bundle from GPL Times, both pieces are in there. Activate the free one, then activate PRO, and the full admin appears.
Once both are active you get a new "Cost Calculator" menu in the WordPress admin. That’s your home for creating calculators, browsing templates, wiring up payments, and reading orders. Each calculator you make is stored as a post of the cost-calc custom post type, so it behaves like any other content: it has an ID, it can be exported, and it shows up in the database where you’d expect it.
The plugin is standalone by design. You do not need WooCommerce to use it. WooCommerce is one optional output path (more on that later), but plenty of sites run Cost Calculator Builder purely as an informational widget, a BMI tool, a VAT calculator, a loan estimator, with no store attached at all.
Building a calculator: fields, formulas, and the live total
Here’s where I have to be straight with you about the screenshots. The admin builder is a modern React app, a single-page interface that lives inside the WordPress dashboard. It renders beautifully in a real browser, but the demo sandbox I use to capture admin screenshots serves it blank because of how the SPA boots. So I can’t show you the builder canvas itself. What I can do is describe exactly how it works, because I spent real time inside it.
The builder is a two-pane, drag-and-drop canvas. On one side you have a palette of element types. You drag an element onto the calculator, click it, and a settings panel opens where you name it, set its options, and, crucially, decide how it feeds the total. On the other side you get a live preview of what the visitor will see. It’s the same mental model as a page builder, except every element is a form field with a price attached.
The element types you drag in are the heart of it. Cost Calculator Builder gives you over a dozen, and each one is a different way to capture a number or a choice:
- Total. The output element. This is the running price the visitor watches. Every calculator has at least one, and its value comes from a formula you write referencing the other elements.
- Quantity. A number stepper, "how many units," that multiplies into the total.
- Range (slider). A draggable slider for a value between a min and max. Great for "square footage" or "number of guests."
- Multi-range. A slider with several stops, each mapped to a different price, for tiered pricing.
- Dropdown. A select menu where each option can carry its own price.
- Checkbox. On/off add-ons. Tick "gift wrapping," add its cost.
- Radio. Pick exactly one from a set, each with a price.
- Text and Textarea. Free-text inputs for names, notes, addresses. These don’t usually add cost, they capture information that lands on the order.
- Datepicker. For booking-style calculators where the date matters.
- File upload. Let the visitor attach a spec sheet or a design brief with their quote.
- Group. A container to organize related fields into a labeled section.
- Repeater (PRO). A repeatable block, so a visitor can add "another room," "another passenger," "another line item" as many times as they need. This one is genuinely useful for anything itemized.
- Line. A visual separator to break the form into readable chunks.
- HTML. Drop in your own explanatory text, a note, or a small heading.
- Toggle. A single on/off switch, cleaner than a checkbox for a yes/no option.
The formula is what ties them together. Each element gets an internal reference, and the Total element runs a formula that combines them: add the base rate, multiply by quantity, add the checked add-ons, apply a percentage. You’re not writing PHP here, you’re composing an expression in the builder using the element references and normal math operators. If you’ve ever written a spreadsheet formula, this will feel familiar. If you haven’t, the templates (next section) give you working formulas you can pick apart and learn from.
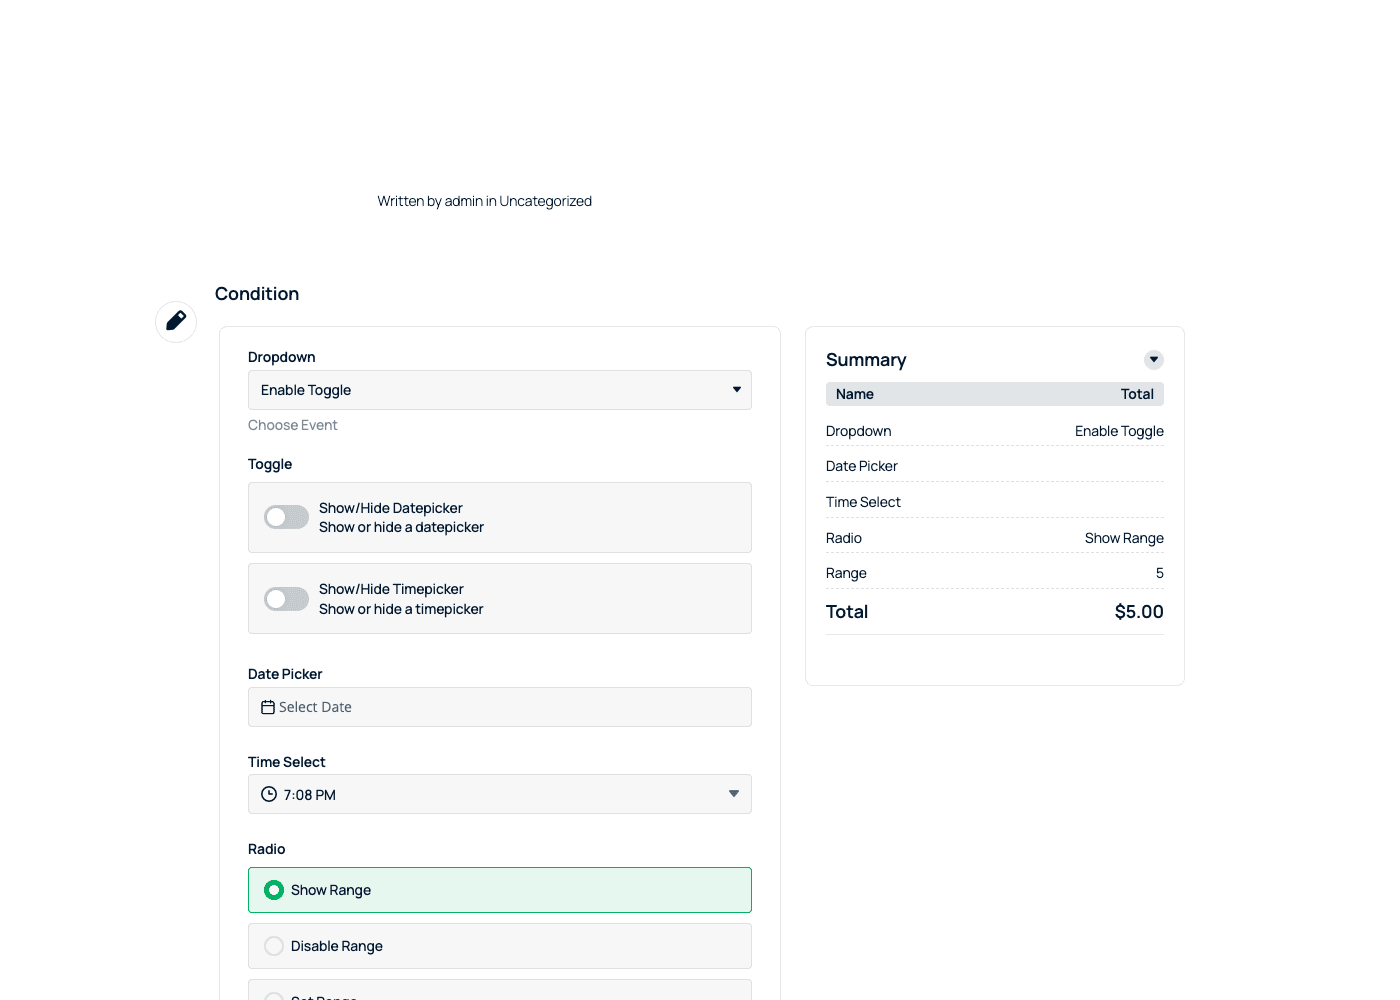
The Summary panel is the detail that sells it. Next to the calculator you can show an itemized Summary: a list of the choices the visitor made and what each one cost, ending in the grand total. Instead of a single mystery number, they see "Base package $200, Rush delivery $50, Gift wrap $10, Total $260." That transparency is what makes people trust the number enough to act on it. In the front-end screenshot for this article you can see a Summary panel doing exactly that next to a live $5.00 example total, with a dropdown, toggles, a date picker and radio options all feeding into it.
Once your calculator is built, you embed it. There are three ways, and you’ll pick based on how your page is built:
- Shortcode. Every calculator has an ID, and you drop
[stm-calc id=42]into any post, page, or text widget. This is the universal method, it works everywhere WordPress renders a shortcode. - Gutenberg block. In the block editor, add the Cost Calculator block and pick your calculator from a dropdown. No hunting for the ID.
- Elementor widget. If you build with Elementor, there’s a native widget you drag onto the canvas. It needs a reasonably current Elementor to appear. Pair it with Elementor Pro and you can drop a calculator into a designed section without touching a shortcode.
Tip: there’s also a [stm-sticky-calc] shortcode that renders a floating, sticky version of the calculator that follows the visitor as they scroll. On a long service page, a sticky calculator keeps the price in view while someone reads your pitch. Small touch, real conversion impact.
Templates: a hundred-plus ready calculators
If the blank-canvas builder sounds like work, here’s the shortcut. Cost Calculator Builder ships a large Templates library, and it is the fastest way to get from zero to a working calculator. In the admin I counted 101 templates in the "All Templates" view, plus a curated set of 27 "Popular" ones. You’ll see this exact screen in the Templates screenshot for this article, the grid of ready calculators you can filter and preview.
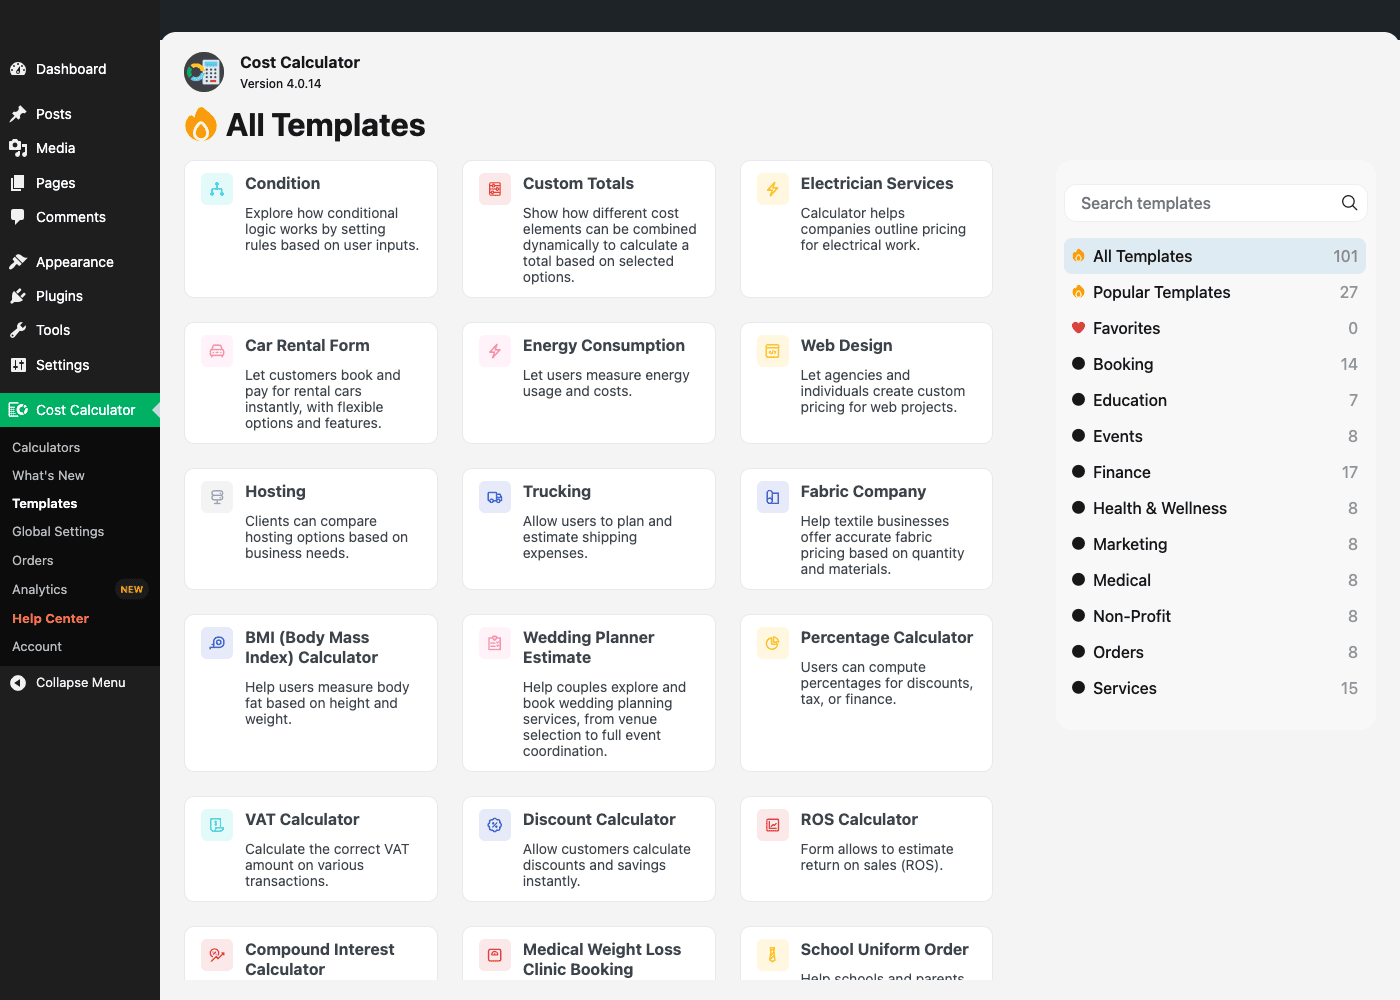
The templates are grouped by industry so you can find something close to your use case:
- Booking (14 templates)
- Education (7 templates)
- Events (8 templates)
- Finance (17 templates)
- Health & Wellness (8 templates)
- Marketing (8 templates)
- Medical (8 templates)
- Non-Profit (8 templates)
- Orders (8 templates)
- Services (15 templates)
The actual templates are refreshingly specific, not generic filler. Browsing through, I found Electrician Services, Web Design, Car Rental Form, Energy Consumption, Hosting, Trucking, Fabric Company, School Uniform Order, and a Medical Weight Loss Clinic Booking. On the informational side there’s a BMI Calculator, a VAT Calculator, a Discount Calculator, a Compound Interest calculator, and a Percentage Calculator. There’s even a Wedding Planner Estimate and a Condition template that exists purely to demonstrate conditional logic.
Each template is a real, working calculator, not a mockup. You click "Use Template" and it spins up a fully wired calculator, formula and all, that you then rename, restyle, and adjust to your pricing. I’d argue this is the single best way to learn the plugin: pick the template closest to your business, hit "Use Template," and reverse-engineer how its formula and fields are put together. You’ll understand the builder faster from one working example than from any documentation.
Note: using a template doesn’t lock you in. Once it’s created it’s just a normal calculator you own and can edit freely. Delete the fields you don’t need, change the prices, rewrite the total formula. The template is a starting point, not a cage.
For a lot of small businesses, honestly, a template plus fifteen minutes of price editing is the whole project. You don’t have to build a calculator from scratch unless your pricing is genuinely unusual.
Conditional logic: showing the right fields
This is a PRO feature, and it’s the one that separates a toy calculator from a real one.
Conditional logic means fields appear, disappear, or change based on what the visitor picks. Without it, every field is always visible and every visitor sees the same wall of options. With it, the form adapts. Choose "Residential" and the commercial-only fields vanish. Toggle "Add insurance" and an insurance-value slider appears. Pick "Rush delivery" and the standard-timeline date picker gets swapped for an express one.
I dug into the "Condition" template in the admin to see how deep this goes, and it’s more capable than I expected. That template has a dropdown labeled "Enable Toggle," a set of toggles that Show or Hide a Datepicker and a Timepicker, and radio buttons offering "Show Range," "Disable Range," "Set Range," and "Set Range & Disable." Flip any of them and the visible fields rearrange in real time, and the live total updates to match. So conditional logic here isn’t just show/hide, it can also set a field’s value or disable it based on another input.
Why this matters for your total: the live total only counts the fields that are currently active. If a conditional rule hides a field, its price drops out of the calculation instantly. That’s what makes a multi-branch quote feel honest, the number always reflects the exact configuration on screen, never a stale sum from options the visitor already deselected.
You might be wondering whether all this recalculation makes the front end sluggish. It doesn’t. The logic runs in the browser as the visitor clicks, so there’s no page reload and no round-trip to the server for each change. The total and the visible fields update the moment you interact.
Conditional logic is fiddly to plan but quick to build. Sketch your branches on paper first, "if they pick X, then show Y," and the rules almost write themselves in the builder.
Taking payment: PayPal, Stripe, Razorpay, and WooCommerce
Here’s where Cost Calculator Builder stops being a widget and starts being a sales channel. In PRO, a calculator can collect money.
There are two distinct ways to take payment, and choosing the right one matters.
Path one: the built-in gateways. PRO bundles five payment options directly into the calculator: PayPal, Stripe, Razorpay, 2Checkout, and a cash/offline option that records a manual order instead of charging a card. The visitor configures their quote, sees the total, and pays right there, either the full amount or a deposit you define. After a successful payment they land on a page carrying the [stm-thank-you-page] shortcode, which shows their confirmation. This path is self-contained, you don’t need WooCommerce at all. It’s ideal for a service business that just wants to collect a deposit on a custom quote without running a full store.
Path two: WooCommerce. If you already run a WooCommerce store, PRO can instead add the calculated result to the WooCommerce cart as a product. The visitor’s configured, priced item flows into your normal WooCommerce checkout, using your existing WooCommerce payment gateways, tax rules, shipping, and order management. This is the right path for a product configurator, custom furniture, print jobs, signage, where the estimate is really "a product with options" and you want it to live alongside the rest of your catalog.
The catch on gateways: they are regional. Razorpay is big in India, 2Checkout covers a broad set of countries, and most Western stores lean on Stripe or PayPal. So which of the five is actually useful depends entirely on where your customers are. Don’t read "five gateways" as "five you’ll all use," read it as "one of these probably fits your market." The cash/offline option is the outlier, it records a manual order rather than charging a card, which is handy for pay-on-delivery or bank-transfer quotes.
Paid submissions become Orders. When someone pays through the built-in gateways, PRO records it on a dedicated Orders screen in the admin (under the Cost Calculator menu). Each order captures what the visitor configured and what they paid, so you have a record to fulfill against. It’s not a full order-management system like WooCommerce’s, but for deposit-taking it’s exactly enough.
Analytics is the newer companion screen. It’s a PRO admin page that tracks how your calculators are being used, views, interactions, conversions, so you can see which calculator actually drives submissions and which one visitors abandon. If you’re running calculators as a lead or sales tool, this is the feedback loop that tells you whether they’re working.
PRO also layers in discounts and coupons (percentage or flat, so you can run a promo on a calculated quote) and multi-currency handling, which matters if you sell across borders and want the total shown in the visitor’s currency.
Don’t take payment on an estimate before you test the formula
Let me name the failure mode that will actually cost you money, because it’s specific to this kind of plugin.
You build a slick quote calculator, wire up Stripe to collect the full amount (or a deposit), and push it live. But the total formula has a bug. A field that should add cost doesn’t. A percentage discount stacks in the wrong order. Tax never gets added at all. Now every single order that comes through is mispriced, and you don’t find out until the money has moved.
Undercharge, and you eat the difference on real work you’ve already committed to doing. Overcharge, and you’re issuing refunds, fielding chargebacks, and burning the trust of a customer who paid you before they’d even spoken to a human. Because payment here happens up front, a formula bug isn’t a quiet estimate error you fix in a follow-up email. It’s money that already moved. Revenue and credibility both on the line, from one wrong operator in a formula.
The fix is boring and it works. Build the total formula deliberately, then test it against a manual calculation, not just the happy path. Add up the cheapest and the most expensive configurations by hand and confirm the calculator agrees, then toggle each conditional branch and recheck the total.
Decide whether the amount you collect is a deposit or the full price, and label it that way so nobody’s surprised. Handle tax as its own visible line, never baked into another field, because invisible tax means remitting money you never collected.
Then run a real end-to-end test in Stripe or PayPal test mode. Complete a payment, confirm the Order records the right amount, and actually read the thank-you page a real customer would see. Ten minutes of testing beats a week of refunds.
Cost Calculator Builder vs the alternatives
There are four ways to solve "let people price a job themselves," and it’s worth being clear about where this plugin sits.
| Approach | Best for | What you get | Recurring cost |
|---|---|---|---|
| Cost Calculator Builder | Live-total pricing, quotes, configurators | 15+ field types, 100+ templates, conditional logic, 5 payment options, 3 embed methods | $0/month (one-time GPL) |
| General form builder (WPForms / Gravity Forms + calc add-on) | General forms with some math | Multi-step forms, entry management, dozens of integrations, calculations bolted on | Annual license, roughly $50 to $200/year per site |
| Bespoke coded calculator | Genuinely unusual pricing logic | Infinite flexibility, exactly your logic | $500 to $2,000 in dev time, then maintenance |
| "Contact us for a quote" form | Nothing, really | A form and a wait | Cheapest, and it loses sales |
Let me put real numbers on the comparison, because "it’s better" is a useless claim.
Field types: Cost Calculator Builder gives you 15+ purpose-built pricing elements (sliders, multi-range, quantity steppers, repeaters) where the price is a first-class property. A form builder’s calculation add-on treats math as an afterthought layered onto text inputs.
Templates: 100+ ready calculators versus, typically, a handful of form templates that aren’t pricing-specific. Starting from an Electrician Services or VAT template is a real head start.
Payment: 5 payment options built in (PayPal, Stripe, Razorpay, 2Checkout, and cash/offline), plus a WooCommerce cart path on top. A calculations add-on usually leans on the parent form plugin’s own payment integrations.
Embedding: 3 methods (shortcode, Gutenberg block, Elementor widget) so it drops into any page-building workflow.
Cost: the GPL bundle on GPL Times is a one-time download at $0/month recurring, versus the annual per-site renewals that most premium form plugins charge.
Now the honest counter, because I’d be selling you something otherwise. A full form builder like Gravity Forms does far more general form work: multi-step surveys, full entry management, conditional emails, and dozens of third-party integrations. If your real need is "collect submissions and route them," a form plugin wins. And a bespoke coded calculator is infinitely flexible, if your pricing genuinely can’t be expressed as a formula, code is the answer, it just costs developer hours up front and forever after. Cost Calculator Builder is the specialized, no-code middle: purpose-built for live-total pricing, and nothing else. That focus is exactly why it’s good at the one thing, and why it’s the wrong tool if the one thing isn’t what you need.
Who should use this (and who shouldn’t)
Let me get concrete with a few personas, because "it depends" helps nobody.
If you run a service business (a web agency, an electrician, a moving company, a cleaning service), this is close to a perfect fit. You almost certainly have a pricing structure in your head or a spreadsheet: base rate, per-unit, add-ons, travel. Turn that into a calculator, put it on your services page, and replace "contact us for a quote" with an instant estimate. Optionally, collect a deposit through Stripe so the serious leads self-qualify by paying. The Electrician Services and Web Design templates exist for exactly you.
If you sell configurable products (custom furniture, a print shop, signage, promotional goods), the WooCommerce path is your route. Let the visitor pick material, size, quantity, and finish, watch the price update, then add the configured item straight to the WooCommerce cart. It flows through your normal checkout, tax, and shipping. You get product configuration without a custom-coded product type.
If you run a finance or health site (loan estimators, mortgage calculators, VAT, BMI, percentage tools), you’ll use it purely as an informational widget. No payment, no store, just a live result that helps a visitor and keeps them on your page. The Finance category alone has 17 templates to start from. This is the lowest-friction use case, you can have a working BMI or loan calculator live in the time it takes to read this paragraph.
If you take deposits on custom work, you’re the sweet spot for the built-in gateways. Collect a Stripe or PayPal deposit on a quoted item without standing up a whole WooCommerce store just to take one payment.
Who should skip it? Two groups. First, if all you actually need is a contact form, use a form builder. WPForms will serve you better and Cost Calculator Builder is overkill. Second, and I mean this as a favor, if your pricing is genuinely too complex or too bespoke to express as a formula, don’t fight the builder for weeks trying to force it. That’s the moment to budget for custom development instead. A tool this good at formula-based pricing is still a tool with an edge, and pretending otherwise wastes your time.
Developer reference: shortcodes, hooks, filters, REST
Now the part developers actually scroll to. Everything below is drawn from the plugin source, so the arguments and names are exact. Don’t guess at these, use them as written.
Shortcodes
The free base registers exactly three shortcodes:
// Render a specific calculator by its post ID.
echo do_shortcode( '[stm-calc id=42]' );

// The post-payment confirmation page (drop this on your thank-you page).
echo do_shortcode( '[stm-thank-you-page]' );

// A floating / sticky version of a calculator that follows the scroll.
echo do_shortcode( '[stm-sticky-calc]' );
These are registered through WordPress’s standard add_shortcode API, so they behave like any core shortcode: usable in post content, in a text widget, or in template code via do_shortcode().
The custom post type
Every calculator is stored as a post of the cost-calc custom post type. You can query them like any other content:
$calculators = get_posts( array(
    'post_type'      => 'cost-calc',
    'post_status'    => 'publish',
    'posts_per_page' => -1,
) );

foreach ( $calculators as $calc ) {
    // $calc->ID is the id you pass to [stm-calc id=...]
}
Order hooks
The two hooks you’ll reach for most fire when a paid submission becomes an order. These live in the free base’s order controller, and the argument lists are exact:
// Fires when a paid submission has been turned into an order.
// $order_create_data   = the order payload (fields, amounts, calculator id)
// $payment_primary_data = the payment details for that submission
add_action( 'ccb_order_created', function ( $order_create_data, $payment_primary_data ) {
    // Push a new order to your CRM, Slack, or an accounting webhook.
    wp_remote_post( 'https://hooks.example.com/ccb-order', array(
        'body' => wp_json_encode( array(
            'order'   => $order_create_data,
            'payment' => $payment_primary_data,
        ) ),
        'headers' => array( 'Content-Type' => 'application/json' ),
    ) );
}, 10, 2 ); // note: two arguments
There’s a companion action that fires around order creation with a single argument, handy when you only care that an order happened and don’t need the payment payload:
add_action( 'ccb_after_create_order', function ( $order_create_data ) {
    // Log the order, bump an internal counter, notify a team channel.
    error_log( 'New calculator order: ' . wp_json_encode( $order_create_data ) );
} );
Watch the argument count. ccb_order_created passes two arguments, so you must declare 10, 2 in add_action, or $payment_primary_data will be null. ccb_after_create_order passes one. Getting this wrong is the classic "why is my second parameter empty" bug.
Filters
The free base leans heavily on a set of filters for sanitizing and shaping data. The most useful ones to know:
// Adjust where the plugin looks for a template file (override a template
// from your own theme or plugin without touching the plugin's files).
add_filter( 'ccb_template_path', function ( $path ) {
    // Point at your own override directory when it exists.
    return $path;
} );

// Hook into how calculator options are updated when a calc is saved.
add_filter( 'calc_update_options', function ( $options ) {
    return $options;
} );

// The plugin's array-sanitization filter, used throughout the save path.
add_filter( 'stm_ccb_sanitize_array', function ( $value ) {
    return $value;
} );

// Modify appearance data before it's applied to the front-end render.
add_filter( 'ccb_appearance_data_update', function ( $data ) {
    return $data;
} );
stm_ccb_sanitize_array in particular is used all over the save and render path, so if you’re extending the plugin’s data handling, that’s the seam to hook.
REST and the admin app
The Gutenberg block talks to the server through the REST namespace ccb-gutenberg/v1, which supplies the block with the list of calculators and their data. The React admin (the builder, the calculators list, settings, orders, and analytics) also communicates with internal AJAX and REST endpoints, but those are auth-gated and meant for the admin app, not a documented public API. Treat ccb-gutenberg/v1 as the block-facing surface and don’t build integrations against the internal admin endpoints, they can change.
WPML
Multilingual sites are covered. The plugin uses wpml_object_id so a calculator resolves to the correct translation when WPML is active. If you run a translated site, calculators map per language as you’d expect.
A few honest notes on the internals
If you go spelunking in the source, you’ll see a lot of PHP files, and it’s worth knowing what’s actually the plugin’s code versus what’s a bundled library. The plugin uses Freemius for licensing, and it bundles the Razorpay PHP SDK to power the Razorpay gateway. Both of those are third-party libraries shipped inside the plugin, not the plugin’s own logic, so don’t credit their code (or blame their quirks) on Cost Calculator Builder itself. And there is no WP-CLI command of its own, if you want to automate calculator creation from the command line, you’ll be scripting against the cost-calc post type and its meta directly, not calling a wp ccb command.
Performance, the free-base requirement, and the gotchas
No plugin is all upside. Here’s what to watch.
The free-base requirement is the big one, so plan for it. PRO does not run alone. On a fresh site you install two plugins, not one, and you activate them in the right order (free base first, then PRO). This trips people up on migrations too: if you copy a site and only bring the PRO plugin, it’ll refuse to load and complain about the missing base. Keep both together. It’s not a dealbreaker, it’s just a fact to remember.
Three embed methods, one thing to test. The shortcode, the Gutenberg block, and the Elementor widget all render the same calculator, but they render it in different page contexts. If your calculator looks perfect in a plain page via shortcode but cramped inside an Elementor column, that’s a container-width issue, not a plugin bug. Test the calculator in the actual context where it’ll live, not just the preview.
Caching and the calculator’s JavaScript. The live total is JavaScript running in the browser, and the calculator loads its own JS and CSS. On a heavily cached or aggressively optimized site, a page-cache or a JS-deferral plugin can occasionally interfere with the calculator scripts, so the total stops updating or a field doesn’t render. If that happens, exclude the calculator’s assets from JS combination/deferral in your caching plugin. This is a common interaction between any interactive front-end widget and a performance plugin, and it’s a two-line exclusion to fix, not a rewrite.
WPML works, but translate deliberately. With WPML active, calculators resolve per language via wpml_object_id. That’s the good news. The catch: you still have to translate the field labels and option text yourself, the plugin routes to the right calculator, it doesn’t magically translate your copy. Budget the translation time.
Performance is generally a non-issue. A single calculator is a modest chunk of JS and CSS. The math runs client-side, so there’s no per-interaction server load. Where you’d notice weight is if you stacked several complex calculators on one page, then you’re loading the assets once but rendering multiple instances. For the normal case, one calculator on one landing page, it’s light.
The honest limit: a very bespoke pricing model can outgrow a formula. If your real pricing needs nested conditionals five levels deep, external API lookups (live shipping rates, real-time currency from a specific provider), or logic that changes based on data the calculator can’t see, you’ll hit the ceiling. The builder is expressive, but it’s a formula engine, not a programming language. When you feel yourself fighting it, that’s the signal to either simplify the pricing you expose or move that logic into custom code via the hooks above. Knowing the edge exists saves you from discovering it three days into a project you can’t finish.
Pricing and licensing
Cost Calculator Builder follows the free-base-plus-paid-PRO model. The base plugin is free on WordPress.org and gets you the builder, the field types, the templates, and the three embed methods. PRO is the paid tier that adds payments, conditional logic, WooCommerce, discounts, multi-currency, the repeater field, and the Orders and Analytics screens. Licensing on the PRO add-on is handled through Freemius, the vendor’s licensing layer.
On GPL Times, the Cost Calculator Builder PRO download gives you the PRO add-on under the GPL, a one-time acquisition with no monthly renewal to keep the plugin working. Remember the pairing rule: you still install the free base from WordPress.org alongside it, because PRO needs the base to run. Getting the PRO GPL bundle from GPL Times is the quickest way to have every payment gateway, the conditional logic, and the WooCommerce path available on a real site so you can price out your own calculators before you commit to a design.
The licensing model is worth understanding for what it means practically: the free base carries the core, so a basic informational calculator (a BMI tool, a percentage calculator) costs you nothing at all. You only need PRO the moment you want to take payment, branch fields conditionally, or push results to WooCommerce. That’s a sensible split, you can prototype the whole idea for free and only reach for PRO when the business case is proven.
FAQ
Does Cost Calculator Builder actually take payments, or just show a number?
It does both, but only in PRO. The free base shows a live total and an itemized summary, which is all you need for informational calculators. PRO adds real payment through PayPal, Stripe, Razorpay, or 2Checkout (plus a cash/offline option that records a manual order), so a visitor can pay their quoted amount (or a deposit) on the spot, or you can route the result into the WooCommerce cart and use your existing checkout. If you’re on the free base only, treat it as a quote display, not a checkout.
Do I really need the free plugin AND the PRO add-on?
Yes, and this catches people out. PRO is an add-on, not a standalone plugin. Install and activate the free Cost Calculator Builder from WordPress.org first, then install and activate PRO on top. If PRO can’t find the base, it refuses to run and tells you to go get the free one. The GPL Times bundle includes PRO, you pair it with the free base from WordPress.org.
How is this different from a form builder like WPForms with a calculations add-on?
A form builder is a general submission tool with math bolted on, and it’s the better choice if your real need is collecting and managing entries, multi-step forms, or dozens of integrations. Cost Calculator Builder is the opposite: a specialized pricing tool where every field type is built around producing a live total, with 100+ pricing-specific templates and five payment options in the box. If the job is "let people price a job themselves," this is purpose-built for it. If the job is "collect and route form submissions," reach for the form builder.
Can it handle really complex, conditional pricing?
Up to a point, and it’s important to know where that point is. With PRO’s conditional logic you can show, hide, set, and disable fields based on other inputs, and the total recalculates live to match. That covers most real-world pricing. But it’s a formula engine, not a full programming language. If your pricing needs external API lookups, deeply nested logic, or data the calculator can’t see, you’ll outgrow it, and that’s the moment to move that logic into custom code (via the hooks) or budget for development rather than fighting the builder.
Does it work with WooCommerce, or is it a WooCommerce plugin?
It’s not a WooCommerce plugin, it runs standalone and plenty of sites use it with no store at all. But in PRO it can add a calculated result to the WooCommerce cart as a product, so a configured item flows through your normal WooCommerce checkout, tax, and shipping. Use that path if you already run a store and want configured items to live in your catalog. Use the built-in gateways if you just want to take a deposit without a full store.
How do I put a calculator on my page?
Three ways, pick whichever matches how you build pages. Drop the [stm-calc id=N] shortcode into any post or page, add the Cost Calculator block in the Gutenberg editor and choose your calculator, or use the native Elementor widget if you build with Elementor. There’s also a [stm-sticky-calc] shortcode for a floating calculator that follows the scroll on long pages.
Will the calculator slow down my page?
Not meaningfully for a normal single-calculator page. The math runs in the visitor’s browser, so there’s no per-click server load, and the plugin loads a modest amount of JS and CSS. The one thing to watch is a caching or JS-optimization plugin interfering with the calculator’s scripts, if the total stops updating after you enable aggressive optimization, exclude the calculator assets from JS combination or deferral, and it’ll work again.
Can I translate a calculator for a multilingual site?
Yes, with WPML. The plugin uses wpml_object_id, so calculators resolve to the correct translation per language. The honest caveat: it routes to the right calculator, but you still translate the field labels and option text yourself, that copy doesn’t translate automatically. Budget the translation time like you would for any content.
Is there a developer API I can extend?
Yes. The plugin fires ccb_order_created($order_create_data, $payment_primary_data) and ccb_after_create_order($order_create_data) when submissions become orders, so you can push orders to a CRM or Slack, and it exposes filters like ccb_template_path, calc_update_options, and stm_ccb_sanitize_array for shaping data and overriding templates. The Gutenberg block uses the ccb-gutenberg/v1 REST namespace. There’s no WP-CLI command of its own, so command-line automation means scripting against the cost-calc post type directly.
Can I try the whole thing before I commit to a real calculator?
Yes, and I’d recommend it. Start from a template that’s close to your use case, hit "Use Template," and pull it apart to see how the formula and fields fit together. It’s the fastest way to learn the builder, and the informational templates (BMI, VAT, loan) work on the free base with no payment setup at all, so you can have something live in a few minutes.
Final thoughts
Cost Calculator Builder does one thing, and it does it about as well as a no-code tool can: it turns "contact us for a quote" into a number on the page. For a service business that keeps writing the same estimate by hand, or a store that wants a real product configurator without a developer, it’s a genuinely useful piece of kit, and the 100+ templates mean you’re rarely starting from scratch.
Go in with clear eyes on two things. You need the free base alongside PRO, always, and you must test your total formula against real math before you ever wire up a live payment. Get those two right and the rest is a pleasant afternoon of dragging fields around.
If your pricing fits a formula, this is the fastest path from "email us" to "add to cart." If it doesn’t, be honest with yourself early and reach for custom code instead of forcing it. Either way, you now know exactly where the line is.