

If you sell ads on your WordPress site, sooner or later you outgrow the "paste the AdSense code in a widget" stage. You want different ads on mobile, ads that skip subscribers, ads that follow GDPR consent, ads that swap mid-article without breaking your full-page cache, and a way to see which ad is actually earning. That’s the gap Advanced Ads Pro is built for.
This is a full hands-on review of the plugin, what it does, where it shines, and a developer reference to the hooks and filters you’ll actually use.
Table of contents
- What is Advanced Ads Pro
- Free Advanced Ads vs Advanced Ads Pro
- Core features at a glance
- How it works for site owners
- Installation and setup
- Creating your first ad
- Placements explained
- Display conditions and visitor conditions
- Cache busting, lazy loading, and click-fraud protection
- Real-world use cases
- Developer reference
- Performance, compatibility, and gotchas
- Pricing and licensing
- Frequently asked questions
- Final thoughts
What is Advanced Ads Pro
Advanced Ads Pro is an extension to the free Advanced Ads plugin by Advanced Ads GmbH, a German team that has been working on this single problem (selling and serving ads from WordPress) for over a decade. The free plugin gives you ad units, basic placements, and AdSense integration. Pro layers on the parts you need once your site stops being a hobby: granular targeting, alternative ad types, performance tweaks, ad-server functionality, and the bits that keep cached pages from showing the same ad to everyone.
The plugin treats every ad as a custom post type (advanced_ads), every group as a taxonomy entry, and every placement as another CPT (advanced_ads_plcmnt). That sounds bureaucratic but it pays off later: you get the same revisioning, scheduling, bulk-editing, and import/export tools you get for posts. If you’ve ever herded ad widgets across a sidebar, header, footer, and "between paragraphs 2 and 3" via theme code, the data model alone is a relief.
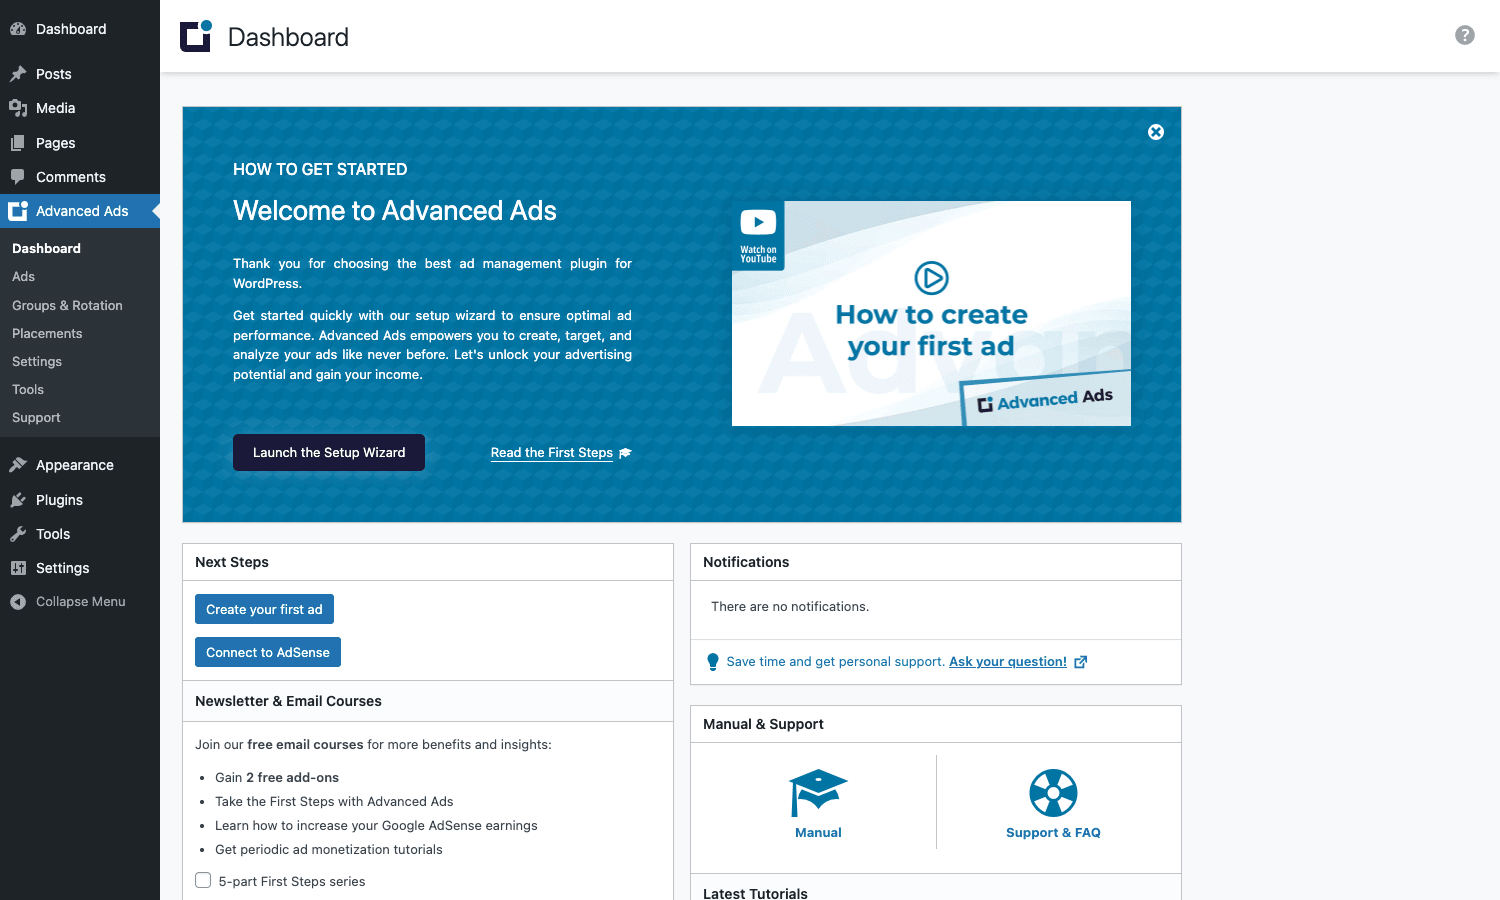
Pro adds 25-ish independent modules. You turn on only the ones you need. If you only want lazy loading and visitor conditions you flip two switches; the rest stay dormant and don’t add weight.
Free Advanced Ads vs Advanced Ads Pro
A quick split before going deeper, because the marketing pages on the official site can blur where free ends and Pro begins.
Free Advanced Ads gives you:
- Ad units (manual / image / rich / AdSense / Ad Group / AMP)
- Basic placements (header code, footer code, before content, after content, content middle, sidebar widget, manual)
- A single set of display conditions (post type, taxonomy, individual page IDs)
- Basic visitor conditions (logged-in vs not, device class)
- AdSense connection wizard
- A dashboard with the seven-day impression count
- Group rotation (random or ordered)
Pro stacks on top:
- 20+ extra placement types (background ads, parallax, sticky, above-headline, custom CSS selector position, post-list between archive posts, repeat injection, anchor)
- Advanced display conditions (page template, post meta, post parent, post age, pagination, ad-blocker detected, AMP)
- Advanced visitor conditions (geolocation, referrer, user agent, browser language, browser width, request URI, capability, impression-based, cookie-based, day-of-week, WPML language, GamiPress, BuddyPress)
- Cache busting (active and passive) for sites behind page caches
- Lazy loading
- Click-fraud protection
- Ads-for-adblockers fallback
- Group refresh (swap ads in place without reloading the page)
- Placement A/B testing
- Ad server (deliver your ads as a script tag on other domains)
- bbPress / BuddyPress / BuddyBoss placements
- Multisite "serve ads from network blog X" mode
Some popular add-ons are sold separately even with Pro: Ad Tracking, Sticky Ads, Slider, Pop-Up & Layer Ads, Selling Ads, Responsive Ads, Google Ad Manager Integration. The All Access bundle is the only way to get every add-on under one license.
Core features at a glance
- Twenty-plus placement types. Background, parallax, sticky, above-headline, content-middle with offset, custom CSS selector position, anchor pop-up, post-list (between posts on archive pages), and code-block placements for
<head>and<body>are the headliners. Each placement is a saved record you can swap ads in and out of without editing theme files. - Granular display conditions. Match by page template, post meta key/value, post parent, post age, taxonomy term, AMP detection, pagination depth. The "ad-blocker detected" condition is the one most ad-recovery flows hang on.
- Visitor conditions. Geolocation (MaxMind GeoLite2, country / state / city), referrer, user agent, request URI parameters, browser language, browser width, capability, cookie, day-of-week, page-impression counter, ad-impression counter, WPML page language, GamiPress, BuddyPress profile field.
- Cache busting. Two modes. Active mode does a small backend request for the ad after the cached HTML is served; passive mode swaps in the right ad client-side using JavaScript. Both let visitor-condition logic still work on pages served from full-page caches like WP Rocket, WP-Optimize Premium, LiteSpeed Cache, or Cloudflare APO.
- Lazy loading. Ads load only when they enter the viewport, configurable per placement.
- Click-fraud protection. Repeat clicks from the same IP within a window are ignored.
- Ads for ad-block users. A fallback ad (often an affiliate link or newsletter prompt) shows when the primary ad is blocked.
- Group refresh. Useful for high-engagement pages: rotate a sidebar ad every 30 seconds without a page reload.
- A/B test placements. Two placements compete for the same slot; the plugin shifts traffic to the winner based on click-through.
- Ad server module. Embed your ads on a remote site via a script tag, similar to Google Ad Manager but self-hosted on your WordPress install.
How it works for site owners
The mental model is three layers: ads are the creative, groups are buckets of ads that rotate, and placements are the slots on your site that fill from an ad or a group. You can also embed an ad directly via shortcode or PHP, but the placement layer is what makes the system flexible. If you ever want to swap the AdSense unit in your sidebar for a Carbon Ads unit, you change the placement; the rest of the site doesn’t care.
A typical flow:
- Create an ad. Pick "Plain Text and Code" if you’re pasting AdSense or another network’s snippet. Pick "Image Ad" if you want WordPress to manage the creative as a media item. Pick "AdSense" if you want the connection wizard to suggest sizes.
- Set the size (matters for layout; the plugin can auto-detect for AdSense).
- Optionally pin display conditions and visitor conditions to the ad itself (these apply no matter where the ad is shown).
- Save.
- Create a placement. Pick a type (header code, before content, custom CSS selector, etc.) and point it at the ad or group.
- Optionally pin display/visitor conditions to the placement (only those apply at this slot).
- Optionally enable lazy loading or cache busting on the placement.
This split means a single ad can run in three placements with three different sets of rules without duplicating the creative.
Installation and setup
Advanced Ads Pro requires the free Advanced Ads plugin installed and active. Both ship as zips.
- In
wp-admin/plugins.php, click Add New, then Upload Plugin. Upload the freeadvanced-ads.zipfirst and activate it. Then uploadadvanced-ads-pro.zipand activate. - After activation, a top-level Advanced Ads menu appears in the WP admin sidebar with sub-pages: Dashboard, Ads, Groups & Rotation, Placements, Settings, Tools, Support.
- The first dashboard view shows a "Welcome to Advanced Ads" card with a setup wizard. The wizard walks you through connecting AdSense (skip if you don’t use it), choosing whether to dismiss ads to logged-in users, and naming your first ad. The wizard is fine for AdSense-only sites; for direct-sold or affiliate ads, skip it and go straight to Ads → New Ad.
- Open Settings → Pro and enable the modules you want. Each module is a checkbox. Save changes.
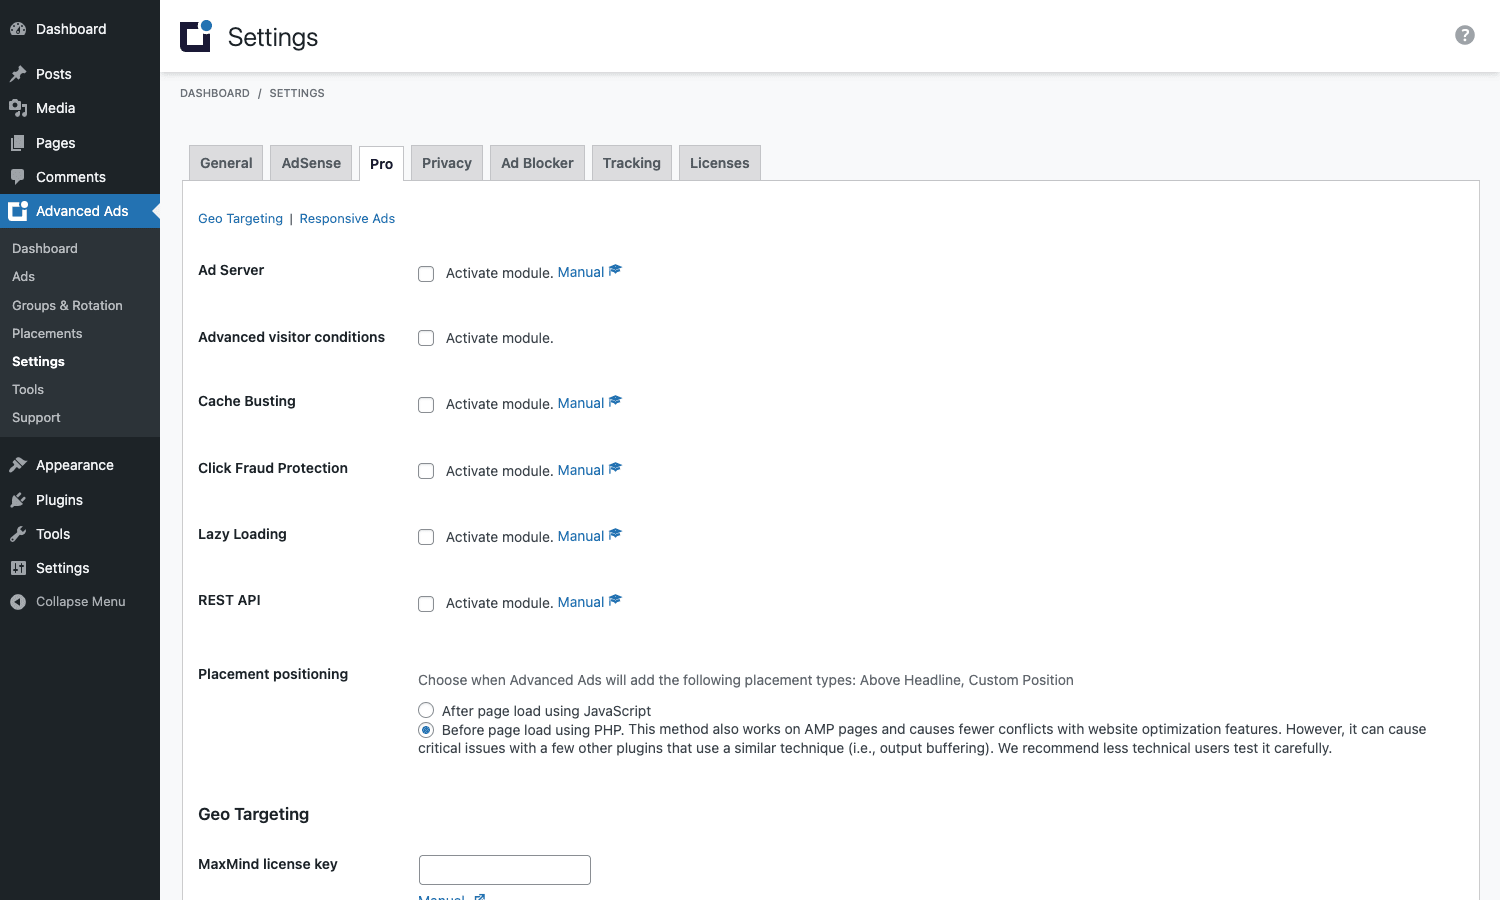
The Pro tab is also where you set "Placement positioning", whether placements like Above Headline and Custom Position inject via PHP output buffering (default, works on AMP) or via JavaScript after page load (better when output buffering conflicts with a builder like Avada or Elementor’s loop conditions). If you see Avada, Divi, or Beaver Builder breaking after activation, switch to JavaScript injection. Most sites can leave it on the PHP default.
The Geo Targeting module needs a free MaxMind GeoLite2 license key. The setup screen has the link; you sign up at MaxMind, get a key, paste it, and the plugin downloads the country and city databases to your uploads folder. This is the only configuration step that touches an external service.
Creating your first ad
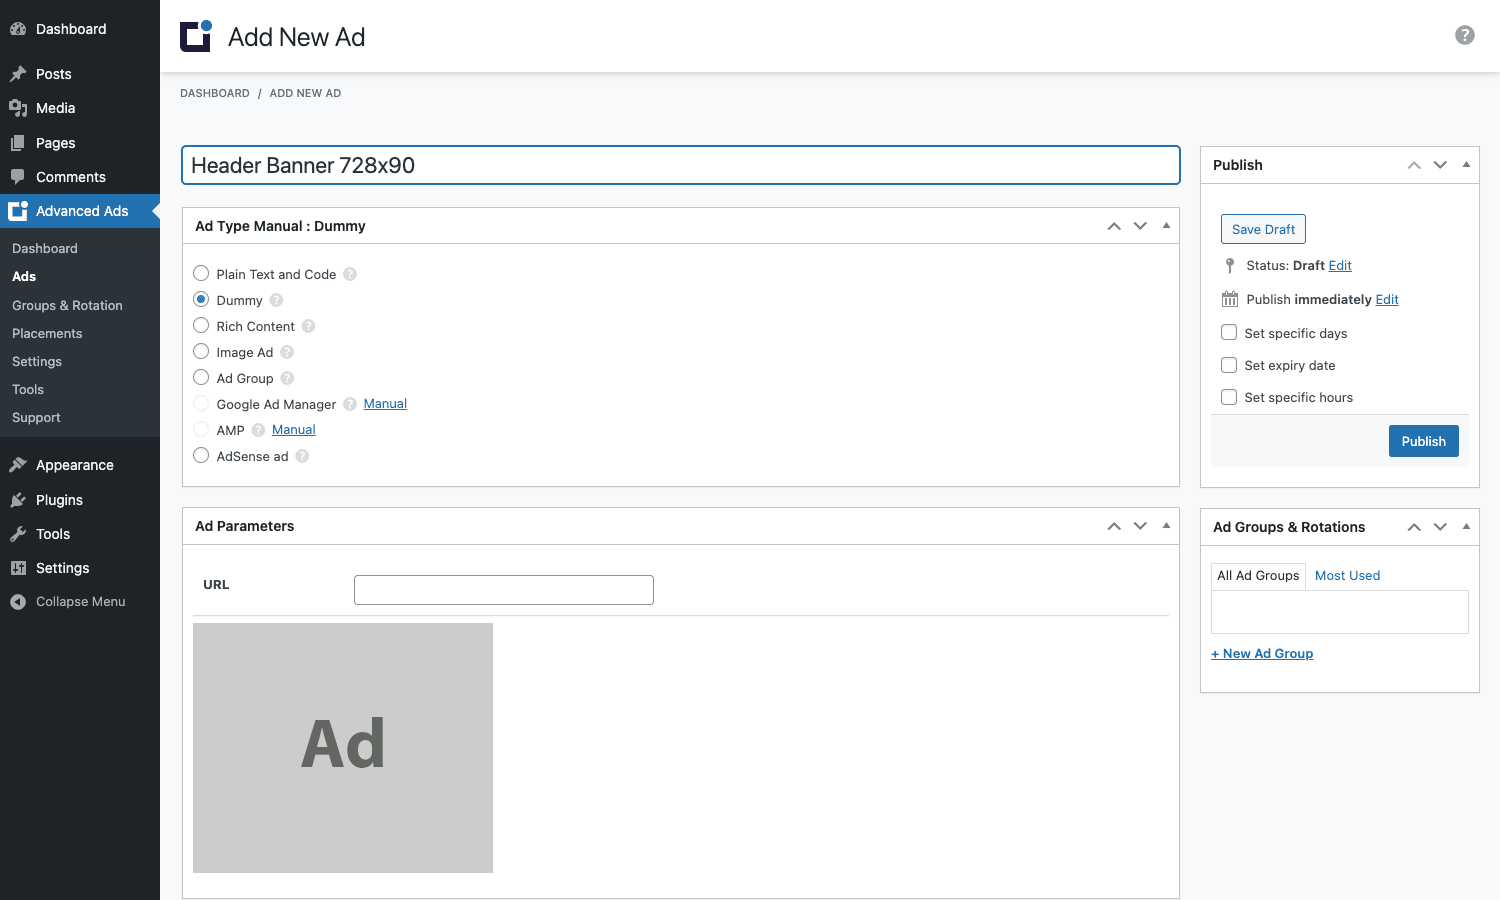
Open Advanced Ads → Ads → New Ad. The first big choice is the ad type:
- Plain Text and Code. For pasted ad-network code (AdSense, Mediavine, Ezoic, Carbon, custom HTML/JS). The plugin doesn’t touch your code; it just wraps it in a div and injects it where the placement says.
- Image Ad. For a self-hosted image with an optional click-through URL. Good for affiliate banners or your own product promos.
- Rich Content. A full TinyMCE editor for ads that need formatting.
- Ad Group. Lets one "ad" actually be a rotation of multiple ads (useful for placements where you don’t want to set up a separate group + assign it).
- Google Ad Manager. Single-tag GAM integration; needs the GAM Integration add-on for the full setup.
- AMP. Separate fields for the AMP version of the ad (different markup constraints).
- AdSense ad. AdSense connection wizard, supports Auto Ads.
- Dummy. A grey placeholder. Useful when you’re testing placements without burning impressions.
Below the type selector are the Ad Parameters (URL, target, image dimensions if relevant). Then Layout / Output controls float, alignment, margins, and whether to wrap the ad in the theme’s default container.
Further down sits the Targeting metabox, with two sub-tabs: Display Conditions (where the ad can show) and Visitor Conditions (who sees it). The default is "show to everyone, everywhere it’s embedded". You tighten that with conditions.
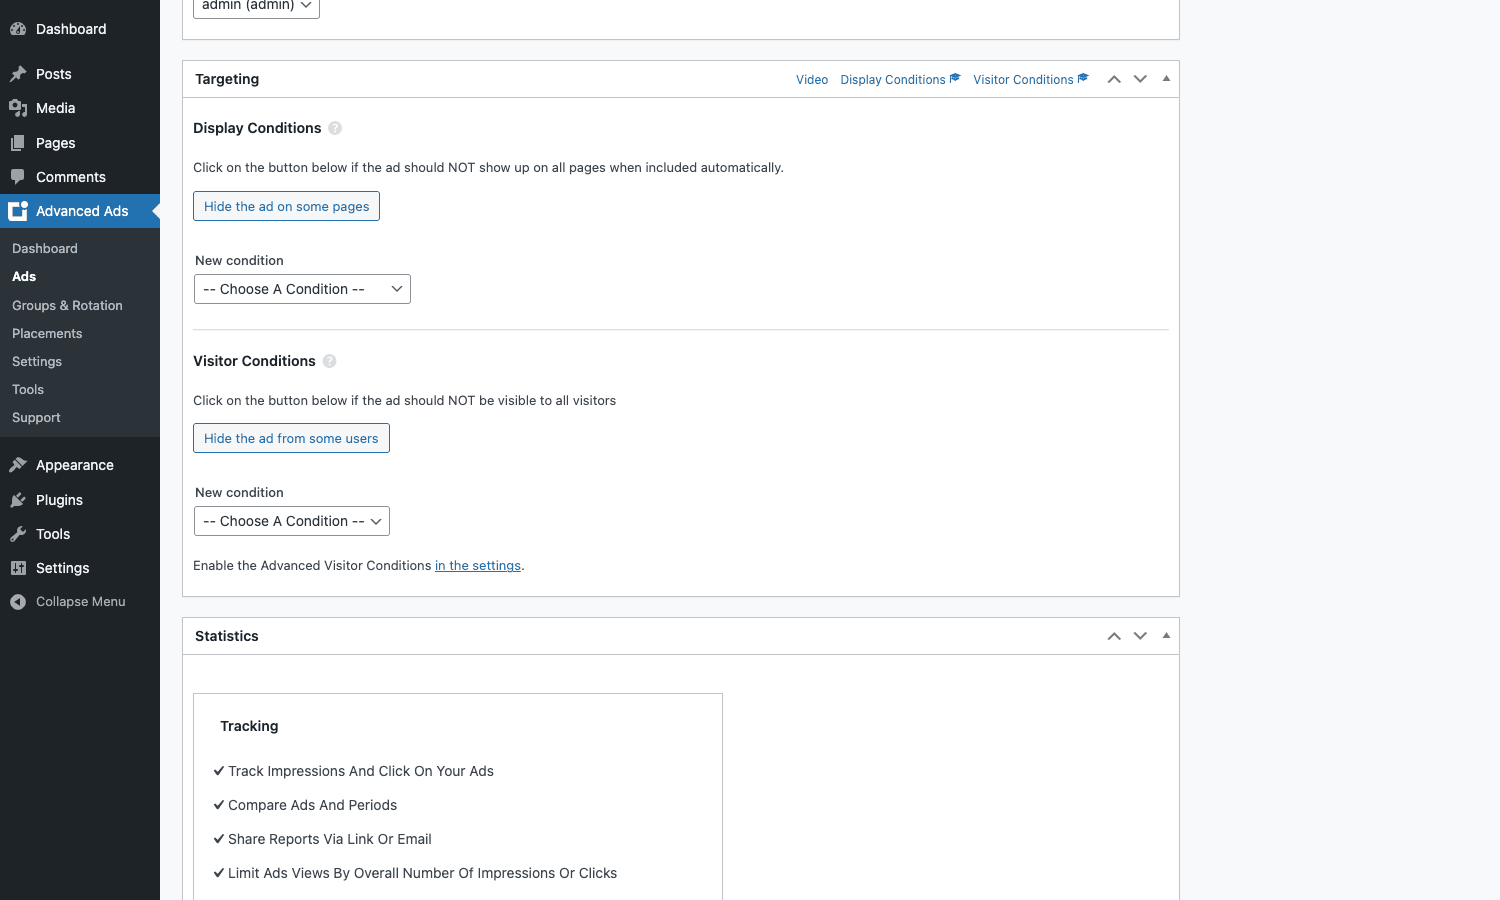
Finally there’s Statistics (impression count and click count if you have the Ad Tracking add-on) and Tracking (a teaser to install the Ad Tracking add-on if you don’t).
Hit Publish. The ad is now in your library. It still won’t appear on the front end until you embed it via shortcode, widget, or placement. That’s intentional; saving an ad doesn’t risk running an unfinished creative live.
After publishing a handful of ads, the Ads list looks like this:
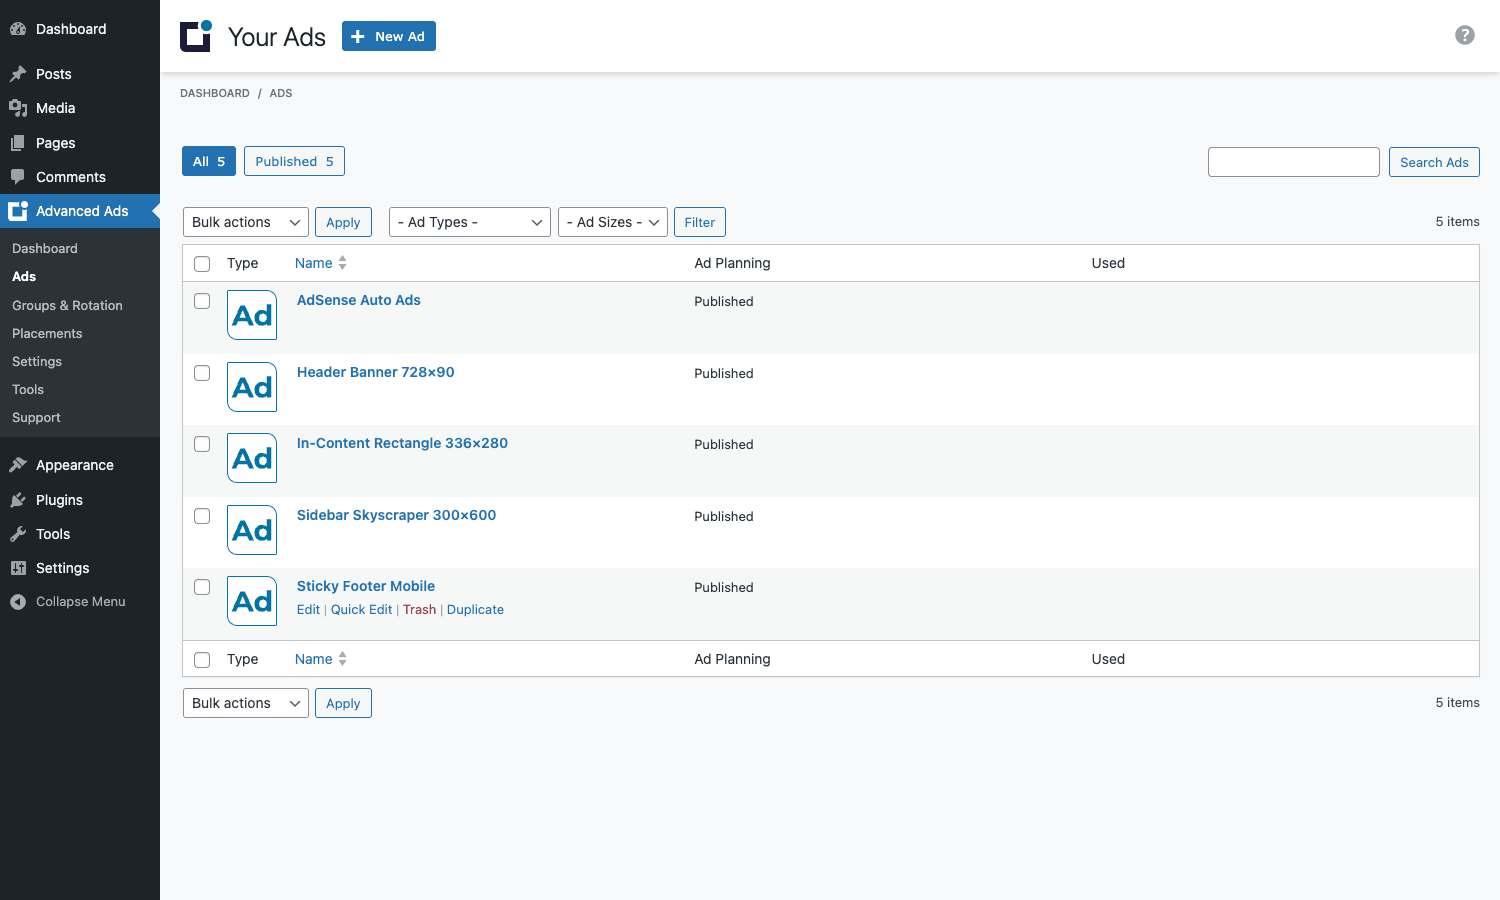
A "Duplicate" row action ships with the Pro Duplicate Ads module; one click clones the ad including all parameters and conditions. This is the fastest way to spin up multiple variants of the same creative for A/B testing.
Placements explained
Placements are where the magic happens. Open Advanced Ads → Placements → New Placement and you’ll see a grid of placement types:
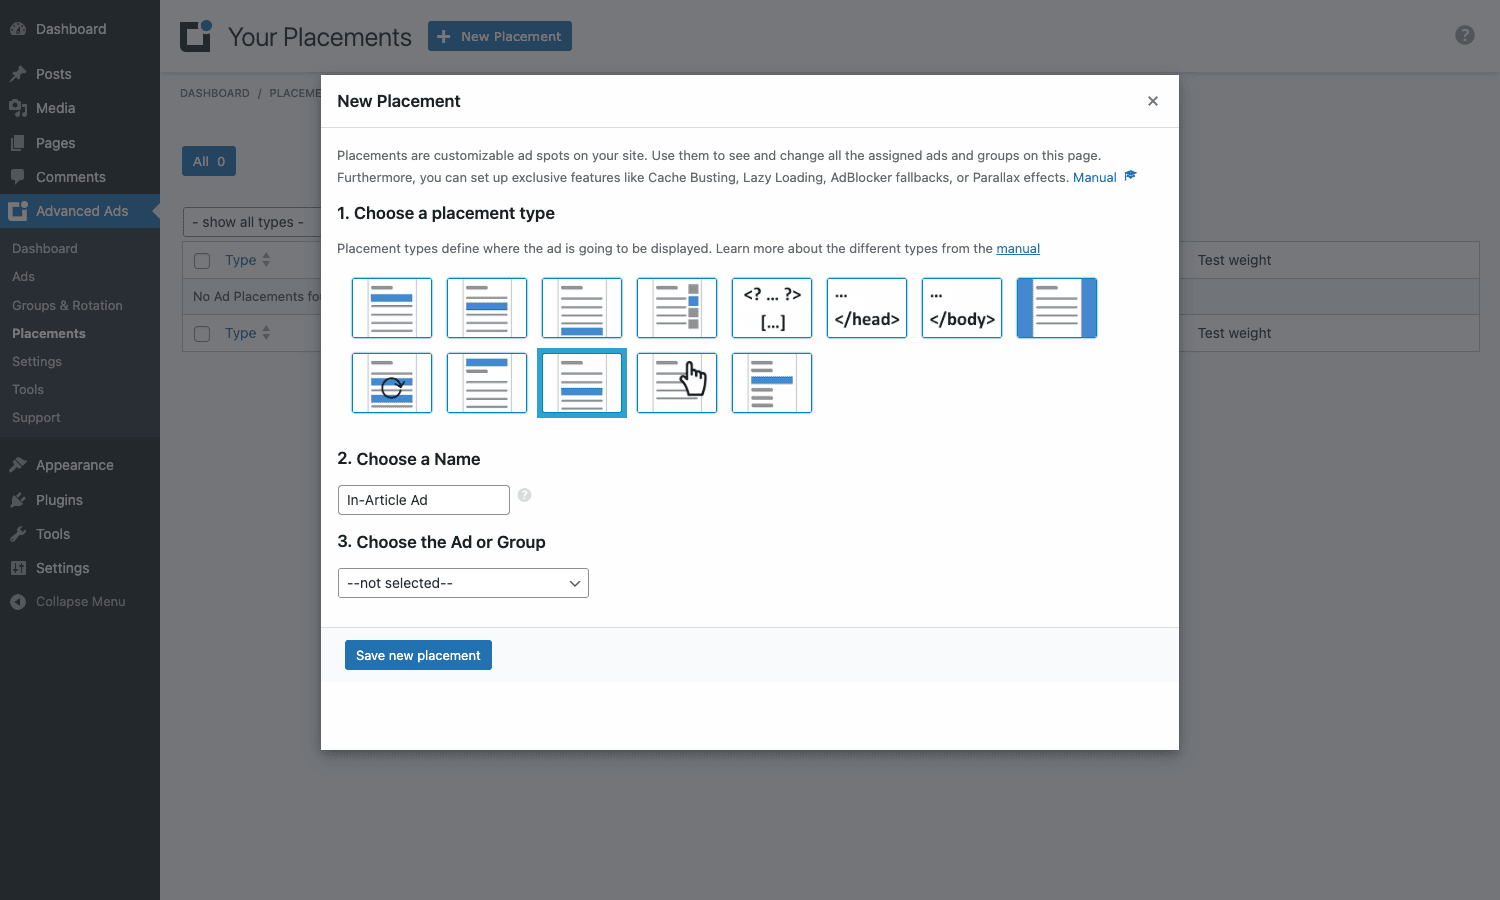
The 13 types in the picker, from most to least common:
- Before Content: injects before the post body inside
the_content. - Content: injects in the middle of the post body, after a chosen paragraph, image, or word count.
- After Content: injects after the post body.
- Sidebar Widget: registers a widget you drop into any sidebar.
- Manual Placement: gives you a shortcode and PHP snippet so you can hand-place the ad in your theme template or with a block.
- Header Code: injects before the closing
</head>tag (good for AdSense Auto Ads or analytics-style ad tags). - Footer Code: injects before the closing
</body>tag. - Background Ad: full-page background image or video with an exclusion zone for the main content.
- Random Paragraph: injects after a random paragraph in the post body (helps with banner blindness).
- Above Headline: injects above the post’s
<h1>. - Post Lists: injects between posts on home, category, archive, or search list pages.
- Custom Position: injects before or after any CSS selector. Pick
.entry-content > p:nth-of-type(3)or.elementor-section-stretchedand the ad lands there. - Anchor Ad / Layer Ad / Pop-Up: sticky bar, dimming overlay, or modal. Requires the Sticky Ads or Pop-Up add-ons for advanced styling.
After choosing a type, name the placement, pick the ad or group it should serve, and save.
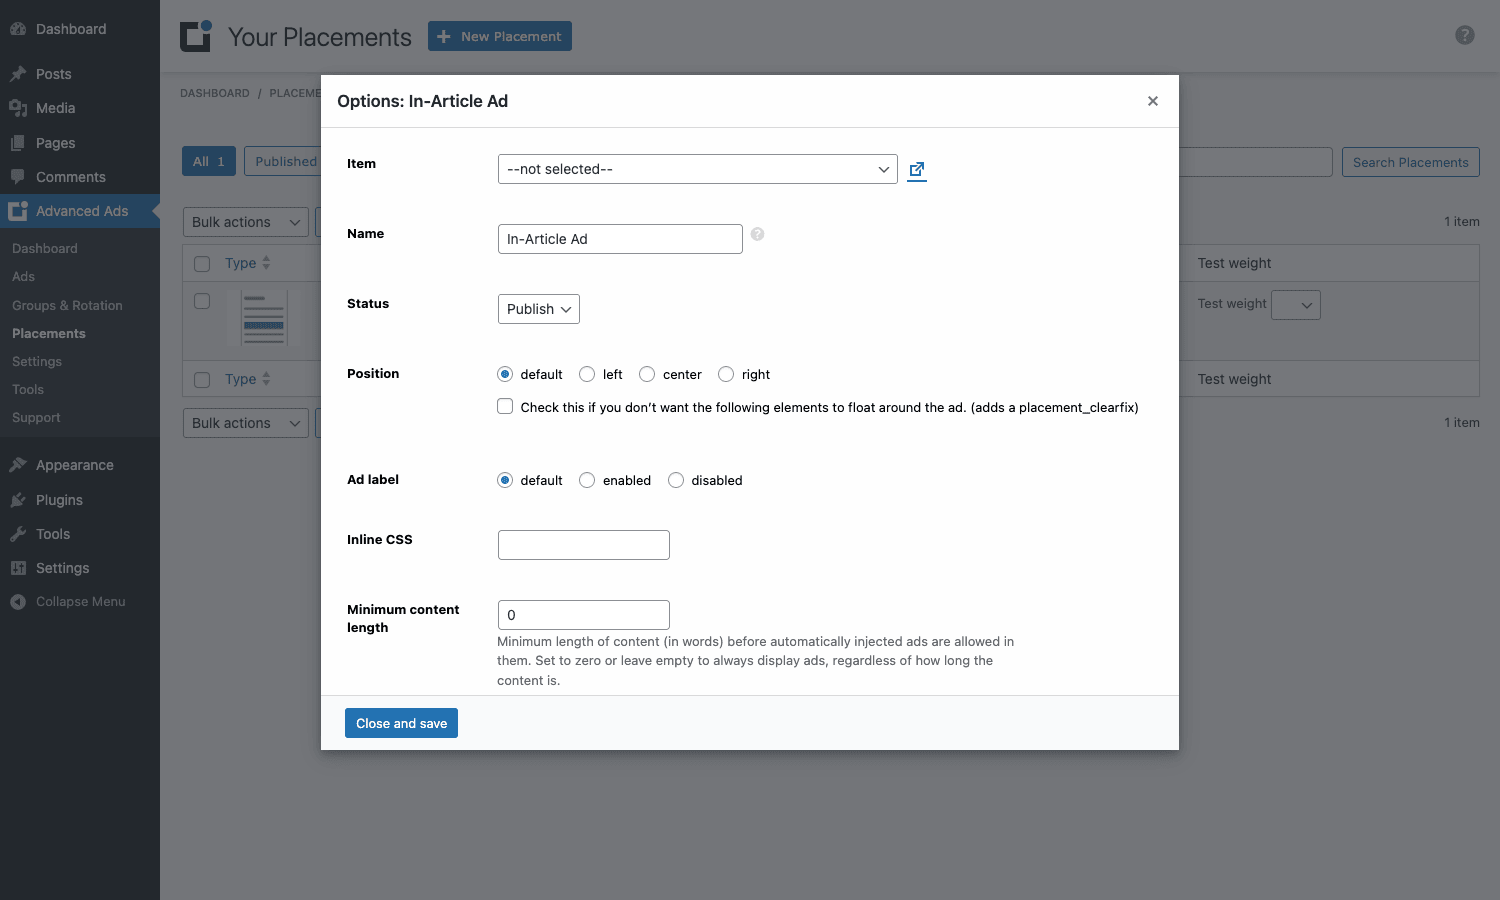
The placement options dialog is where you configure the per-slot behaviour:
- Item: the ad or group this slot serves.
- Position: default, left float, center, or right float (Pro adds the float-clear toggle).
- Ad Label: show the small "Advertisement" disclosure or hide it.
- Inline CSS: quick way to override margins without editing your theme.
- Minimum content length: only inject if the post is over N words. Stops the plugin from serving an ad on a thin "Hello World" page.
- Cache busting: enable per-placement.
- Lazy loading: enable per-placement, with an offset distance.
- Display conditions and Visitor conditions: applied only when this placement fires.
Saving the placement immediately makes ads start appearing in matching pages.
Manual placement and shortcodes
For developers who want explicit control, every placement also has a Manual Placement mode that exposes a shortcode and a the_ad_placement() PHP function. Drop the shortcode into a Gutenberg shortcode block, a Classic editor post, an Elementor shortcode widget, or a theme template file:
[the_ad_placement id="in-article-ad"]
[the_ad id="42"]
[the_ad_group id="3"]
The id is the placement slug, not the post ID. From PHP:
the_ad_placement( 'in-article-ad' );
the_ad( 42 );
the_ad_group( 3 );
Manual mode is useful when you have a custom hero or sidebar layout that the automatic placements can’t reach, or when an ad network requires the script tag to render at a specific point in the DOM (above-the-fold AdSense, for example, has placement guidelines that hand-placement satisfies more cleanly).
Display conditions and visitor conditions
This is the part that justifies the Pro license for most buyers.
Display conditions answer "on which pages can this ad even appear?" Combine as many as you want with AND/OR logic:
- Post type: only single posts, only pages, only your
case_studyCPT. - Categories / tags / taxonomies: restrict to taxonomy terms.
- Individual posts/pages: pick exact post IDs.
- Page template: only the "Full Width" template.
- Post meta: only posts where
meta_key=is_premiumandmeta_value=yes. Pro feature. - Post parent: only descendants of page X. Pro feature.
- Post age: only posts younger than N days. Pro feature.
- Pagination: only the first page of a multi-page post, or only page 2+. Pro feature.
- AMP: only AMP versions of pages. Pro feature.
- Ad-blocker detected: only show this ad when an ad blocker is active (the "ad-recovery" pattern).
Visitor conditions answer "who sees this ad?":
- Geolocation: country, state, or city via MaxMind GeoLite2.
- Referrer: only visitors landing from a specific domain (Google, Facebook, Reddit).
- User agent: match by browser string regex.
- Request URI: only when the URL contains a specific query param.
- Capability: visible to roles
read/edit_posts/your custom capability. - Browser language: match the browser’s preferred language.
- Browser width: only when viewport is between X and Y pixels.
- Page impressions: only after the visitor has seen N pages.
- Ad impressions per period: frequency capping (3 times a day, 10 times a week).
- New or recurring visitor: first-time vs return visitor.
- Cookie: only when cookie key=value matches.
- Day of the week: Monday-Friday only.
- WPML page language: when WPML is installed, only the German translation.
- GamiPress: based on points, ranks, achievements.
- BuddyPress: based on profile fields, group membership.
The bit most buyers underestimate is how much these compose. "Show this Christmas-themed AdSense unit only on posts in the Recipes category, only to visitors from the US or Canada, only after their third pageview, only on weekends in December" is a single ad with five conditions stacked. The plugin handles the bookkeeping; you write zero code.
Cache busting, lazy loading, and click-fraud protection
These three modules show up in almost every Pro setup.
Cache busting
If you use any full-page cache, the HTML served to visitor A and visitor B is identical. That breaks visitor-condition ads (everyone sees the same one) and ad-impression counters (everyone counts as the same impression). Cache busting solves it by fetching the ad after the cached HTML lands.
Two modes:
- Passive cache busting. The cached HTML includes a small JavaScript stub. After the page renders, the stub asks the server which ad to show, gets the HTML back, and swaps it in. Works on every full-page cache (WP Rocket, WP-Optimize, LiteSpeed, WP Super Cache, Cloudflare APO). This is the default and the right pick for almost everyone.
- Active cache busting. A subrequest fetches the ad before the page is sent. Reduces CLS because the slot is filled at render time. Slower per page load, and not all caches support it cleanly.
Cache busting is enabled per placement, not site-wide. You can leave a static fallback ad cached normally and turn cache busting on only for the geo-targeted unit.
Lazy loading
Ads load when the slot enters the viewport, not when the page parses. Configurable per placement, with an offset (load 200 pixels before the slot is visible). Good for Lighthouse scores; if your ad creative was previously the largest contentful paint, lazy loading usually fixes that.
Don’t combine lazy loading with cache busting on the same placement unless you’ve tested the timing. Some networks count the impression only when the ad is in the viewport; others count on script execution. Cache busting + lazy loading can stack delays.
Click-fraud protection
When a single IP clicks the same ad more than N times in M minutes, subsequent clicks are not registered with the ad network. The ad still displays; only the click is dropped. This protects AdSense accounts from accidental or malicious click bombing. The defaults (3 clicks in 5 minutes) work for most sites.
Real-world use cases
Frequency-capped sidebar AdSense. A general-news site shows AdSense in the sidebar, but the same visitor reads ten articles per session. Without frequency capping the visitor sees the same ad ten times and stops noticing. With "Ad impressions per period = 3 per session", a fresh ad rotates in after the third pageview.
Geographic compliance ad. A travel site runs an affiliate banner for a US-only hotel platform. Visitor condition = "country = United States". Visitors from other countries see a different banner. Same ad slot, two different creatives, zero theme code.
Above-the-fold AdSense unit with cache busting. A news site runs WP Rocket with full-page caching and wants AdSense Auto Ads. Without cache busting, AdSense limits the unit because the same impression "fingerprint" hits its servers. Cache busting fetches a fresh ad ID per pageview and the AdSense fill rate recovers.
Ad-blocker recovery. A free WordPress.org plugin documentation site runs banner ads, but a high share of visitors use uBlock. Display condition = "ad-blocker detected = yes" on a fallback ad that links to a Patreon page or a paid course. Visitors with no blocker see the regular AdSense unit; ad-block visitors see the Patreon CTA. Revenue from the ad-block segment goes from zero to non-zero.
Article-specific affiliate placement. A reviews blog has a "Tool of the Week" affiliate offer that should only run on review-type posts. Display condition = "post type = post" AND "category = reviews" AND "post age = under 60 days". The offer rotates off automatically when posts get older than two months.
BuddyPress member-only message. A community site shows a "Become a moderator" recruitment banner only to members with a specific profile field set, using the BuddyPress visitor condition. Same site uses GamiPress condition to surface a different banner to users above 500 points.
Developer reference
Pro exposes a lot of filters. Some are essential, some are obscure. The ones you’ll actually reach for in a custom build:
Filter: customize where content injection looks for paragraphs
When the "Content" placement picks a position like "after the 3rd paragraph", it parses the_content for <p> tags. If your theme builds posts with a different element (<div class="content-block"> for example), the parser misses your blocks. Override the selector:
add_filter( 'advanced-ads-pro-inject-content-selector', function ( $selector, $placement ) {
 if ( $placement['type'] === 'post_content' ) {
 return '//div[contains(@class, "content-block")]';
 }
 return $selector;
}, 10, 2 );
The filter receives an XPath expression. Returning a different XPath changes which DOM nodes count toward the "after the Nth element" calculation.
Filter: gate the ads-by-hours module from PHP
The Ads by Hours scheduling module asks "is this ad allowed to show right now?" before injecting. You can override the answer with a filter, useful when you need to honour a setting from another plugin (a holiday flag, a maintenance mode, etc.):
add_filter( 'advanced-ads-can-display-ads-by-hours', function ( $can_display, $ad ) {
 if ( get_option( 'site_in_maintenance' ) ) {
 return false;
 }
 return $can_display;
}, 10, 2 );
Filter: customize visitor cookie behaviour
The visitor-condition module sets an advanced_ads_visitor cookie to track impressions and pageview counts. If you have a GDPR cookie banner that requires explicit consent, gate the cookie:
add_filter( 'advanced_ads_allow_visitor_cookie', function ( $allowed ) {
 if ( function_exists( 'has_cookielaw_consent' ) ) {
 return has_cookielaw_consent( 'statistics' );
 }
 return $allowed;
} );
This is the cleanest integration point with Cookiebot, Complianz, or any custom consent-manager: the plugin won’t write the cookie until your consent function returns true.
Filter: rewrite the click-fraud script selector
The Click Fraud Protection module attaches click listeners by CSS selector. If your ad creative uses a non-standard wrapper:
add_filter( 'advanced-ads-pro-background-click-matches-script', function ( $selector ) {
 return '.my-custom-ad-wrapper a, .advads-background-ad a';
} );
Filter: change geolocation country mapping
For sites that need to treat the EU as a single region, override the country map after geolocation:
add_filter( 'advanced-ads-geo-countries', function ( $countries ) {
 $eu = [ 'DE', 'FR', 'IT', 'ES', 'NL', 'BE', 'AT', 'PL', 'PT', 'IE', 'GR', 'FI', 'DK', 'SE', 'LU', 'CZ', 'HU', 'RO', 'BG', 'SI', 'SK', 'EE', 'LV', 'LT', 'CY', 'MT', 'HR' ];
 foreach ( $eu as $iso ) {
 $countries[ $iso ] = 'European Union';
 }
 return $countries;
} );
Filter: override the group output
When you need to wrap an entire ad group in a custom container before rendering:
add_filter( 'advanced-ads-group-output', function ( $output, $group ) {
 return '<div class="my-ad-frame" data-group="' . esc_attr( $group->id ) . '">' . $output . '</div>';
}, 10, 2 );
Action: hook into the REST ad request
When an ad is served via the REST endpoint (used by passive cache-busting and the ad-server module), the plugin fires advanced-ads-rest-ad-request with the ad object. Useful for logging, A/B-test assignment, or auditing:
add_action( 'advanced-ads-rest-ad-request', function ( $ad, $request ) {
 error_log( sprintf(
 '[Advanced Ads] Served ad %d to %s for URI %s',
 $ad->id,
 $request->get_header( 'X-Forwarded-For' ) ?: $_SERVER['REMOTE_ADDR'],
 $request->get_param( 'uri' )
 ) );
}, 10, 2 );
Filter: lazy-load offset per placement
The default lazy-load offset is 0 (load when the slot is in the viewport). Override per placement:
add_filter( 'advanced-ads-lazy-load-placement-offsets', function ( $offsets ) {
 $offsets['default'] = 300; // 300 px in advance for all placements
 $offsets['sidebar-skyscraper'] = 0; // load exactly at viewport for sidebar
 return $offsets;
} );
Filter: skip pro features for specific ads
Pro adds a "needs backend request" check before serving certain ads (cache-busted ones). If you want to short-circuit for an internal ad that doesn’t need fresh delivery:
add_filter( 'advanced-ads-pro-ad-needs-backend-request', function ( $needs, $ad ) {
 if ( in_array( 'static', wp_get_object_terms( $ad->id, 'advanced_ads_groups', [ 'fields' => 'slugs' ] ), true ) ) {
 return false;
 }
 return $needs;
}, 10, 2 );
Shortcodes you should know
The three Pro-exposed shortcodes:
[the_ad id="42"], render a specific ad by post ID.[the_ad_group id="3"], render a group (the group rotates inside).[the_ad_placement id="in-article-ad"], render a manual placement by its slug.
Each shortcode also has a PHP function equivalent: the_ad( 42 ), the_ad_group( 3 ), the_ad_placement( 'in-article-ad' ).
Performance, compatibility, and gotchas
Advanced Ads Pro is lighter than most ad-management plugins. Empty-state overhead is ~20-30 KB JS and ~15 KB CSS, lazy-loaded after the rest of the page. The plugin runs no heavy JS on the front end if no ads are configured.
Watch for these gotchas:
- Builder conflicts on Above Headline and Custom Position. The PHP output-buffering method these placements use can conflict with Avada, Beaver Builder, Divi, and Elementor’s loop conditions in rare configurations. Switch "Placement positioning" to "After page load using JavaScript" in Settings → Pro. The trade-off is a brief blank slot on first render.
- AMP and JavaScript-injected placements. JavaScript injection doesn’t work on AMP pages. If you serve AMP via Official AMP Plugin or AMP for WP, leave Placement positioning on the PHP default.
- Lazy loading + AdSense Auto Ads. Don’t lazy-load AdSense Auto Ads; the Auto Ads script needs to run early to identify slots.
- Cache busting on Cloudflare APO. APO caches HTML at the edge. Passive cache busting still works (because it’s a client-side fetch back to your origin), but the cache-buster fetch itself isn’t cached and adds origin load. Consider rate-limiting the ad endpoint at Cloudflare.
- Visitor cookie and GDPR. The plugin sets a cookie for impression counting. If you operate in the EU and your consent banner blocks "statistics" cookies until consent, use the
advanced_ads_allow_visitor_cookiefilter shown above to gate the cookie. - Geo database freshness. MaxMind ships GeoLite2 updates twice a week. The plugin downloads once, then never again unless you manually trigger a refresh. Schedule a monthly cron to re-download if accuracy matters for your business.
- Click Fraud Protection vs CDN IPs. If your visitors are behind a corporate VPN or shared mobile carrier, clicks from many real users will appear to come from the same IP. The default 3-clicks-in-5-minutes threshold may flag legitimate clicks as fraud. Raise the threshold or whitelist known shared-IP ranges.
- The Pro plugin needs the free plugin. Don’t deactivate Advanced Ads thinking Pro will keep working; Pro fatal-errors without it.
Pricing and licensing
The vendor sells Advanced Ads Pro on a yearly-renewal model:
- Pro single-site: $59/year
- Pro 5 sites: $79/year
- Pro unlimited: $149/year
- All Access (Pro + every add-on): $399/year
Add-ons sold separately (each $39-$79/year) include Ad Tracking, Sticky Ads, Slider, Pop-Up & Layer Ads, Selling Ads, Responsive Ads, and Google Ad Manager Integration. If you need three or more of those, All Access is the cheaper bundle.
This is the route most agencies take when they manage many ad-running sites; paying $149/year per client adds up fast. For a single site that depends on ad revenue, the vendor license is also fine and you get direct support from the Advanced Ads team.
If you want analytics on top of ads (revenue dashboards, page-level RPM tracking), pair Advanced Ads Pro with MonsterInsights Pro for Google Analytics integration or Pixel Manager for WooCommerce if you sell products alongside running ads. For a friendly intro to analytics setup, our MonsterInsights walkthrough covers the data side, and the Pixel Manager review explains the tracking side.
Frequently asked questions
Do I need the free Advanced Ads plugin too?
Yes. Advanced Ads Pro is an extension. The free plugin handles the core ad data model, custom post types, and the basic shortcodes. Pro plugs in extra modules. Install free first, then Pro.
Does this work with AdSense Auto Ads?
Yes. You can either use the Auto Ads code as a Header Code placement (lets AdSense decide everything) or pair Auto Ads with manually-placed AdSense units for the slots you want under your control. The plugin has a documented AdSense module that walks you through the Auto Ads snippet.
Will it slow down my site?
The plugin itself is light. The thing that slows ad-monetized sites down is the ad-network JavaScript (AdSense, Mediavine, Ezoic), not Advanced Ads Pro. Lazy loading the ad slots and using cache busting on cached pages mitigates most of that. Test with PageSpeed Insights before and after enabling lazy loading; the LCP improvement is usually noticeable.
Does cache busting work with Cloudflare?
Yes, both passive and active modes work behind Cloudflare. Cloudflare’s standard caching (HTML pass-through with cf-cache-status: DYNAMIC) is invisible to the plugin. APO (Automatic Platform Optimization) caches HTML at the edge; passive cache busting fetches the ad from your origin via a separate XHR which bypasses APO automatically.
Can I A/B test placements?
Yes, with the Placement Tests module. Create two placements at the same position, mark them as "test placements" against each other, set a traffic-split percentage, and watch which one wins on click-through. The module persists assignments in cookies so a returning visitor sees the same placement.
Does it support consent management?
Indirectly. The plugin doesn’t ship a consent banner, but it exposes the advanced_ads_allow_visitor_cookie filter that any consent plugin (Cookiebot, Complianz, Iubenda, GDPR Cookie Consent) can plug into. Most consent plugins do this automatically; for custom setups you write a one-line filter.
Can I sell ad space to advertisers from the WordPress admin?
The free plugin doesn’t include a "vendor / advertiser" front-end. The Selling Ads add-on sold separately by Advanced Ads adds a self-serve advertiser portal. If you’re at the scale where you take direct bookings, that’s the add-on to grab.
Will it conflict with WP Rocket, WP-Optimize, or LiteSpeed Cache?
No, as long as you enable cache busting on placements that need fresh ads per request. Static ads (a single banner used everywhere) cache fine. Geo-targeted, frequency-capped, or A/B-tested ads need cache busting. All major page-cache plugins are tested and supported.
How do I add tracking impressions and clicks?
The free plugin has placement statistics for impressions only. For click tracking and exportable reports, install the Ad Tracking add-on (sold separately, also available on the GPL Times Ad Tracking page). The add-on records every impression and click against the ad post, shows per-day charts in the admin, and exports CSV.
What happens to my ads if I uninstall the plugin?
Ads are stored as standard custom posts (advanced_ads post type) so they stay in the database. They just stop being injected. Reactivating the plugin restores everything as it was. If you uninstall the free plugin too, the CPT is removed but the post rows usually remain orphaned in wp_posts until you clean them up.
Can I use it in a multisite?
Yes. The plugin works on multisite as a per-site install, and the Pro extension adds a "share ads from network blog X" mode where you store all ads on a master site and pull them into individual subsites. License-wise the unlimited license covers an entire multisite network.
Does it work in the block editor?
Yes. There’s a Gutenberg block that wraps the manual placement shortcode, so you can drop ads into specific posts via the block inserter. You can also keep using the shortcode if you prefer.
Final thoughts
If you sell ads on WordPress and you’ve outgrown the free plugin’s targeting, this is the upgrade that justifies its price tag. The modular architecture means you don’t pay a CPU tax for features you don’t use, and the conditions system is genuinely deep: any "show this ad to that visitor at that time" rule I’ve ever needed to build was already a checkbox here.
It’s not the lightest ad plugin on the market (a few simpler alternatives exist if you only need AdSense in a sidebar), and it’s not as glamorous as Google Ad Manager (the enterprise option for sites with sales teams). But for everything between "AdSense widget" and "full GAM deployment", Advanced Ads Pro is the WordPress-native answer. The fact that the same plugin ships passive cache-busting, lazy loading, click-fraud protection, ad-blocker fallback, and a developer-friendly hooks API means a single tool covers the entire monetization workflow without bolt-ons.
You can read the official documentation at the wpadvancedads.com manual for vendor-side reference, join the Advanced Ads support forum on WordPress.org for community questions, and check the free Advanced Ads listing on WordPress.org for vendor changelogs and ratings. The hook list and register_post_type semantics behind every ad and placement live in the WordPress custom post types reference if you want to dig into how the data model is built. For the codebase itself, the plugin is GPL and the source is browsable inside any install at wp-content/plugins/advanced-ads-pro/. If you want to inspect every hook before deciding, that’s where to look.
Grab Advanced Ads Pro from GPL Times, install it on a staging site, and spend an hour wiring up two or three placements with conditions. By the end of that hour you’ll know whether this is the plugin that solves your particular ad headache, and in my experience it usually is.