

The WordPress login page is, by some distance, the most attacked URL on the open internet. If you check the access logs on a site that’s been online for a week, you’ll see hits to /wp-login.php from IPs you’ve never heard of, trying usernames like admin, administrator, your domain name without the TLD, your first name, and a handful of names that sound made up. Most of them are bots scanning IP ranges and throwing dictionaries at every WordPress install they find. A few are pointed attacks. Either way, the front door is loud, and "use a strong password" stops being a strategy the moment a botnet decides to hammer your login form for nine hours straight.
Loginizer is the plugin most WordPress sites end up reaching for when they want to fix this without installing a full security suite. It’s been around for years, is used on over a million sites in its free form, and the Pro version (made by Softaculous, who you might know from the installer that ships with most cPanel hosts) adds the bits that actually matter once the brute-force basics are covered: two-factor authentication, reCAPTCHA, country blocking, rename wp-login.php, social login, passwordless login, and a handful of hardening toggles.
This guide walks through what Loginizer does, how to set it up on a real WordPress site, what each tab in the admin actually controls, and how developers can hook into it.
Table of contents
- What Loginizer does
- Core features at a glance
- Installation and first run
- The Dashboard tab
- Brute force protection in detail
- Two factor authentication
- reCAPTCHA, hCaptcha, and Cloudflare Turnstile
- Country blocking
- PasswordLess login
- Security Settings, rename login, and hide wp-admin
- Social login and SSO
- File checksums and tamper detection
- Developer reference, hooks and shortcodes
- Performance, compatibility, and gotchas
- How Loginizer compares to other login plugins
- Pricing and licensing
- Who should install Loginizer
- Frequently asked questions
- Final thoughts
What Loginizer does
Loginizer’s job is narrow on purpose. It does not scan your site for malware, it does not run a web application firewall, it does not patch known vulnerabilities, and it doesn’t try to replace your backup plugin. What it does instead is lock down the part of WordPress that the attackers actually point their tools at, which is the authentication flow.
Concretely, that means three layers:
- Stopping repeated bad logins. Track failed login attempts per IP, lock the IP out after a configurable threshold, and email you when something looks off.
- Making the login form less reachable to bots. Add CAPTCHA challenges, optionally block whole countries, optionally move the login URL to something other than
/wp-login.php, and optionally hide/wp-adminbehind a rename. - Strengthening individual user accounts. Two-factor authentication via email or authenticator app, per-role enforcement, passwordless email-link login, a challenge question, and the ability to cap how many devices a single user can be signed in on at once.
That’s the whole product in one paragraph. There are a lot of toggles inside each layer, which is the rest of this article.
Two important things to know up front. First, Loginizer ships as a free wordpress.org plugin plus a separate Pro plugin that you install alongside it. They cooperate at runtime; you don’t uninstall the free one when you add Pro. Second, Softaculous (the publisher) maintains it alongside the Softaculous Auto-Installer that a lot of shared hosts use to one-click install WordPress, so the plugin lands on a lot of new WordPress sites by default at the hosting layer. That’s the network-effect reason it’s one of the most-installed login-security plugins on the web.
Core features at a glance
- Brute force lockout by IP. Three failed attempts, fifteen-minute lockout, five lockouts before an extended twenty-four hour ban. Every number is configurable.
- IP whitelist and blacklist. Permanent allow- and deny-lists, including CIDR ranges and dash-delimited ranges like
192.0.2.10-192.0.2.30. - Two-factor authentication. Email OTP, TOTP via Google Authenticator / Authy / 1Password / Bitwarden, user-defined challenge question, or force OTP-by-email only after suspicious activity.
- CAPTCHA on login, registration, lost-password, comments, and WooCommerce. Choose between Google reCAPTCHA v2 Checkbox / v2 Invisible / v3 (score-based), Cloudflare Turnstile, hCaptcha, or a built-in math captcha if you’d rather not send traffic to a third-party.
- Country blocking. Whitelist or blacklist whole countries using the bundled MaxMind GeoIP database. Logged separately, so you can see exactly what was blocked.
- Rename wp-login.php and rename /wp-admin. Move the login URL to something only humans who know the new slug can reach, and optionally rename the admin folder URL as well.
- PasswordLess login. Users type their username or email, get a one-time login link in their inbox, and skip the password entirely.
- Auto-blacklist on banned usernames. If anyone tries to log in as
admin,administrator,test,root, or any other username on your block list, their IP is banned instantly, with no retry budget. - Social login. Sign in or register with Google, Facebook, Apple, X (Twitter), Microsoft, GitHub, LinkedIn, Twitch, or Discord. There’s a key-less mode that uses Loginizer’s own OAuth proxy if you don’t want to register apps with each provider.
- Single Sign-On magic links. Generate a one-time login URL for any user account, useful for support and for impersonation when a customer is stuck.
- Disable or rename XML-RPC. Kill
xmlrpc.phpoutright or rename it, with a separate toggle to remove the pingback URL header. - Limit concurrent logins. Decide how many devices a user can be signed in on; force-logout the oldest when the cap is exceeded.
- File checksums. Compare your WordPress core files against the official MD5 checksums to detect tampered files.
- CSV export of every failed-attempt log. Useful for incident response and for showing a hosting company exactly what’s been happening.
Installation and first run
Installation is the same as any WordPress plugin. From a fresh site:
- Go to
Plugins > Add New, search for "Loginizer", and install the free plugin. (Or upload the Pro zip you got from the GPL Times store viaPlugins > Add New > Upload Plugin.) - Activate it. You’ll see a new "Loginizer Security" item in the WordPress admin sidebar.
- If you’re using Pro, install and activate
Loginizer Proalongside the free one. Both stay active. The Pro plugin adds the extra menu items (Two Factor Auth, Country Block, PasswordLess, Single Sign On, Social Login, Security Settings, File Checksums). - Walk through
Loginizer Security > Brute Forcefirst. The defaults are sensible, but I usually drop "Max Retries" from 3 to 2 and bump "Extend Lockout" from 24 hours to 72. The threshold for the first lockout doesn’t need to be generous; legitimate users mistype their password once, maybe twice, almost never three times in a row. - Whitelist your own office or home IP under the "Whitelist IP" panel before you do anything else. This is how you avoid locking yourself out while you experiment with the other tabs.
- Then move on to Two Factor Auth, reCAPTCHA, and Security Settings in that order.
The free plugin’s brute-force engine works out of the box. The Pro features all start in a disabled / not-configured state, so nothing changes until you go in and turn them on. That makes Loginizer a low-risk install: putting the plugin on a site doesn’t suddenly change the login experience for your users.
The Dashboard tab
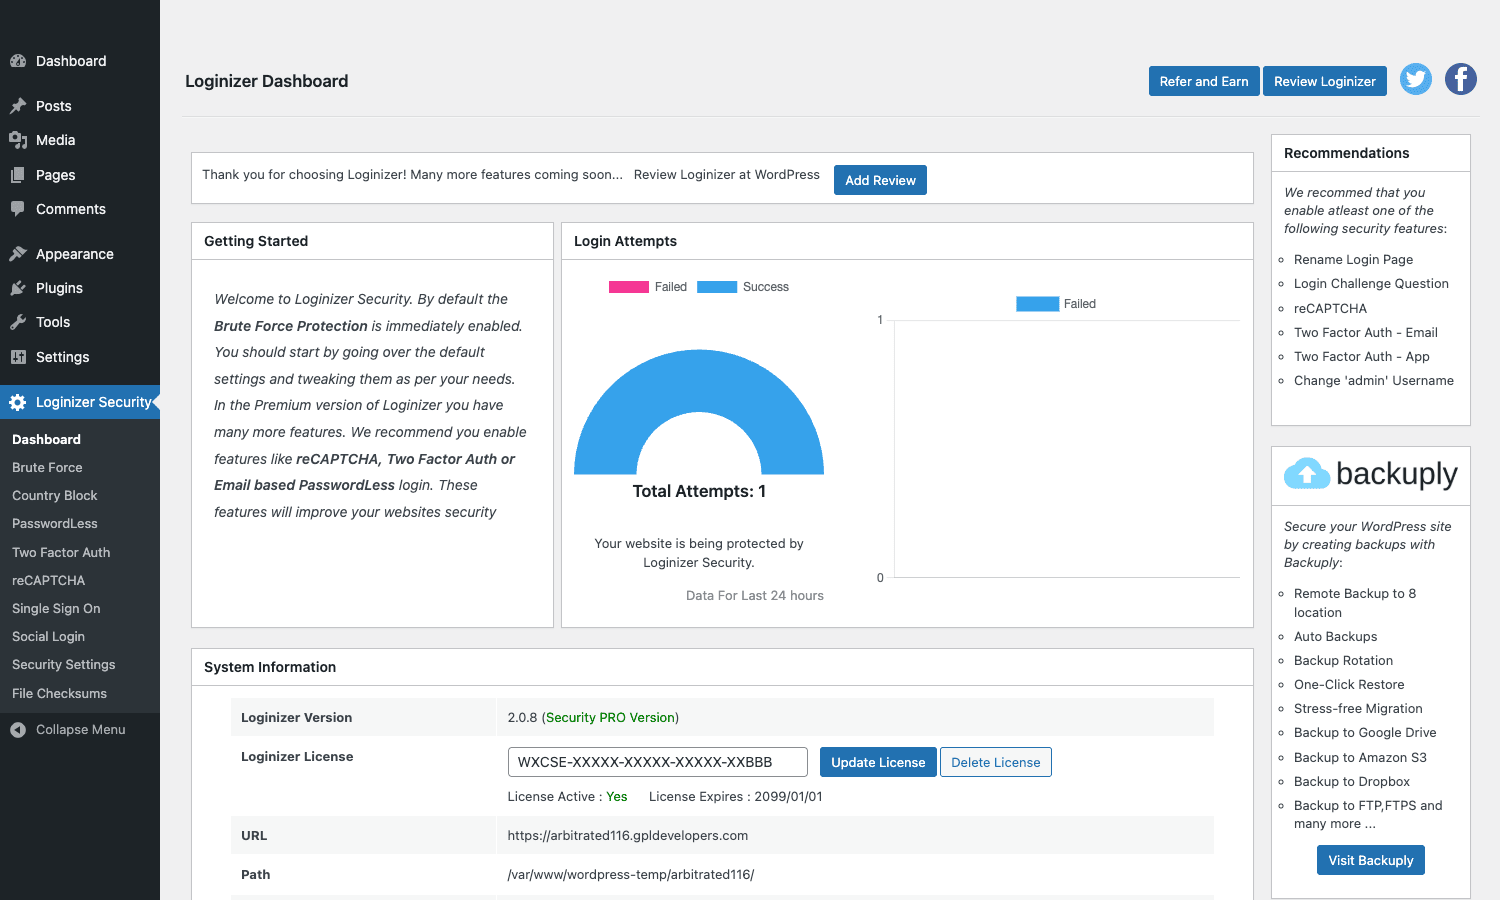
The Dashboard is a single-screen overview: how many login attempts the plugin has seen recently, a donut chart of failures versus successes, your license status, the file paths Loginizer is operating on, and a short "Getting Started" block linking to the other tabs.
This is mostly an at-a-glance health check rather than a working surface. The numbers it shows are pulled from the logs in the Brute Force tab, so if you see "Total Attempts: 412" on a site that’s been online for a week, you’ve got a fair sense of how loud the door is being knocked on.
The right-hand "Recommendations" panel is worth reading once. It’s a checklist of the security features Loginizer can do but isn’t doing yet, things like enabling reCAPTCHA, turning on 2FA, renaming the login page, changing the admin username. Treat it as a setup TODO list rather than dashboard noise.
Brute force protection in detail
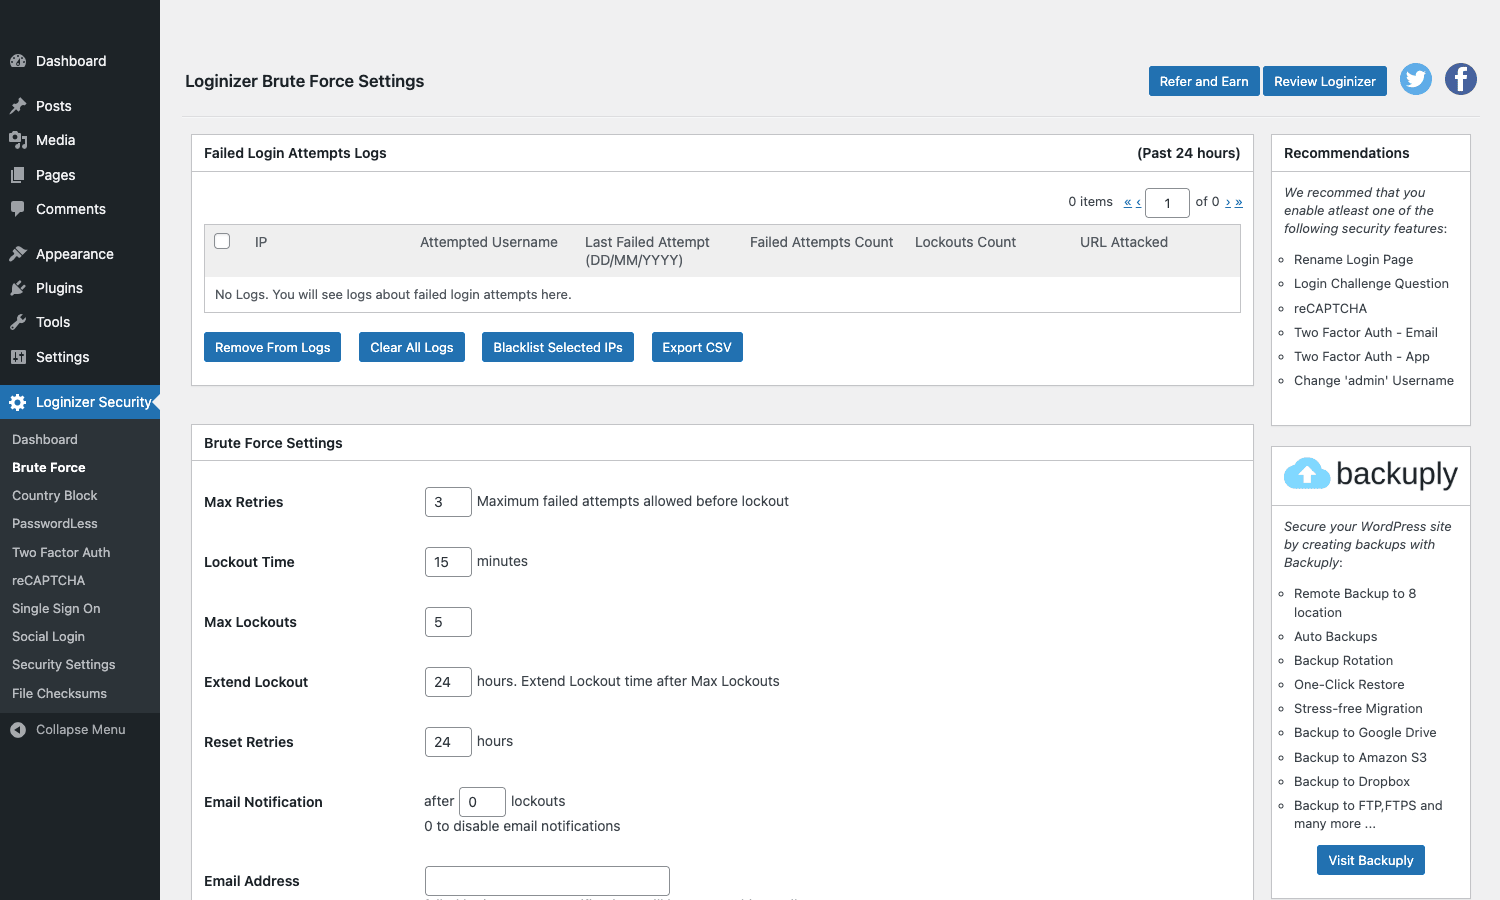
The Brute Force tab is the heart of the free plugin and the first place to spend time. It has two panels: a live log of failed attempts at the top, and a settings form below.
What the numbers mean
- Max Retries is how many bad login attempts a single IP can make before it’s temporarily locked out. Default is 3.
- Lockout Time is how long that temporary lockout lasts. Default is 15 minutes.
- Max Lockouts is how many short lockouts an IP can rack up before it gets a longer one. Default is 5.
- Extend Lockout is the length of that longer lockout in hours. Default is 24.
- Reset Retries is how long the failure counter persists before it resets to zero. Default is 24 hours.
- Email Notification sends you an email after the configured number of lockouts.
A bot that fires off ten thousand attempts will, with defaults, fail three times, get locked out for 15 minutes, come back, fail three more, get locked out again, and after five lockouts get a 24-hour ban. In practice the bot drops the IP and rotates to a new one well before that, which is exactly the point. You’re not trying to catch every attacker; you’re trying to make the cost of attacking your single site high enough that the attackers move on to easier targets.
Whitelist and blacklist
The two panels below the settings let you permanently allow or deny IPs. The format accepts:
- A single IPv4 or IPv6 address.
- A range with a dash:
192.0.2.10-192.0.2.30. - A CIDR block:
192.0.2.0/24.
The whitelist is also your "I locked myself out, what now" recovery route. Add your home IP before you start tinkering with any of the more aggressive features. If you’ve already locked yourself out without whitelisting, you can SSH in or use phpMyAdmin and delete the rows for your IP from the wp_loginizer_settings table to clear the lockout.
Failed-attempt logs
The top of the page is a paginated table of every failed attempt: IP, username they tried, last attempt time, total failed count, lockout count, and the URL they were attacking (Loginizer logs wp-login.php, but also XML-RPC and WooCommerce login if those are routed). There’s a button to export the whole thing to CSV, which is what you use when you need to send your hosting provider an actual list of offending IPs.
A pattern you’ll see fast: most failed logins come from a small number of source IPs trying a very large number of usernames. The "Username Auto Blacklist" feature (in Security Settings) is the right counter to that. If you add admin, administrator, root, test, your domain name without the TLD, and one or two variations, any IP that tries any of those gets a permanent block immediately, no retry budget.
Two factor authentication
The Two Factor Auth tab is where Loginizer starts to look less like a brute-force plugin and more like a full login-security layer.
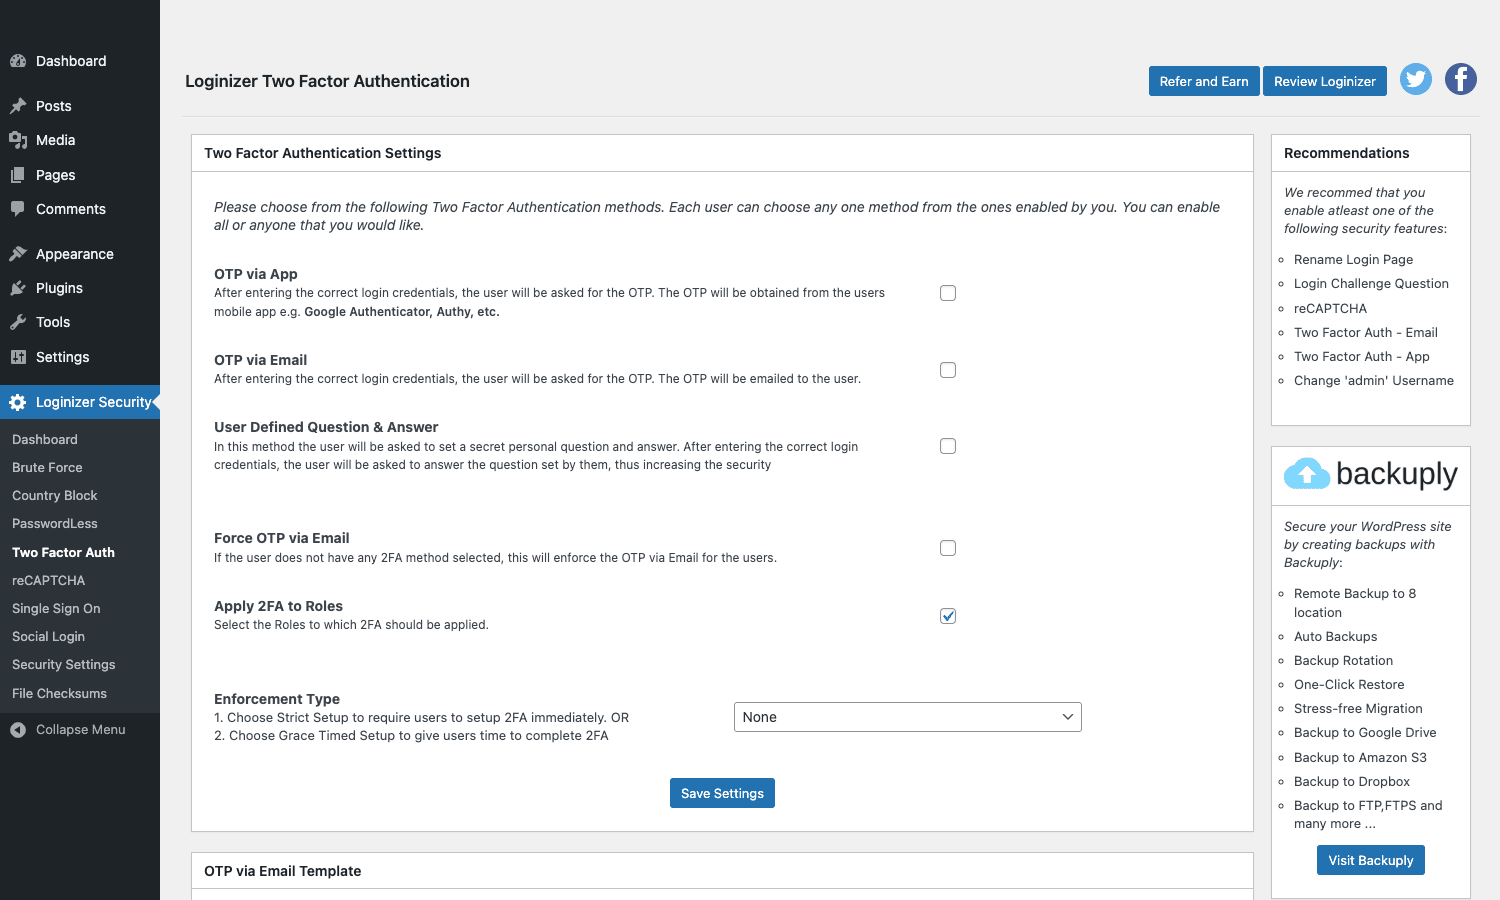
There are four authentication methods you can enable, alone or in combination:
- OTP via App (TOTP). Each user gets a QR code under their
My Securitypage; they scan it with Google Authenticator / Authy / 1Password / Bitwarden / Aegis / any compatible app. From then on they enter a six-digit rotating code on login. - OTP via Email. A six-digit code is emailed at login. The user types it into a second form to complete the sign-in. Less secure than TOTP (anyone with access to the user’s inbox is in), but vastly better than no second factor at all and works for users who don’t have a smartphone.
- User-defined Challenge Question. The user sets a question and an answer ahead of time, and is prompted on login. Treat this as a soft factor; it’s resistant to mass automated attacks but not to a targeted one.
- Force OTP via Email after N failed logins. Adaptive 2FA: don’t bother users with a second factor for ordinary logins, but if their account is being attacked, require email OTP for the next few attempts. Excellent default for a customer-role audience that would otherwise grumble about 2FA setup.
Enforcement modes
Two settings worth pointing at:
- Apply 2FA to Roles lets you require 2FA for a specific role. Administrator? Yes, always. Editor? Probably. Subscriber? Usually optional. The dropdown lets you pick which roles are required to set up 2FA, and the plugin redirects them to the setup page on next login until they do.
- Enforcement Type under that is where you choose between "must set up before they can log in" and "soft suggestion they’ll see on the dashboard". For an admin role, set it to hard enforcement.
The flow for a user with 2FA enabled is: enter username + password on wp-login.php -> get redirected to a Loginizer interstitial that asks for the OTP -> on success, land in /wp-admin/. The interstitial page is ?action=loginizer_security on the wp-login URL.
reCAPTCHA, hCaptcha, and Cloudflare Turnstile
A second factor stops attackers who already know a valid password. A CAPTCHA stops attackers who don’t, by making the login form too expensive to mass-submit. Loginizer’s reCAPTCHA tab lets you turn on a CAPTCHA challenge across multiple endpoints.
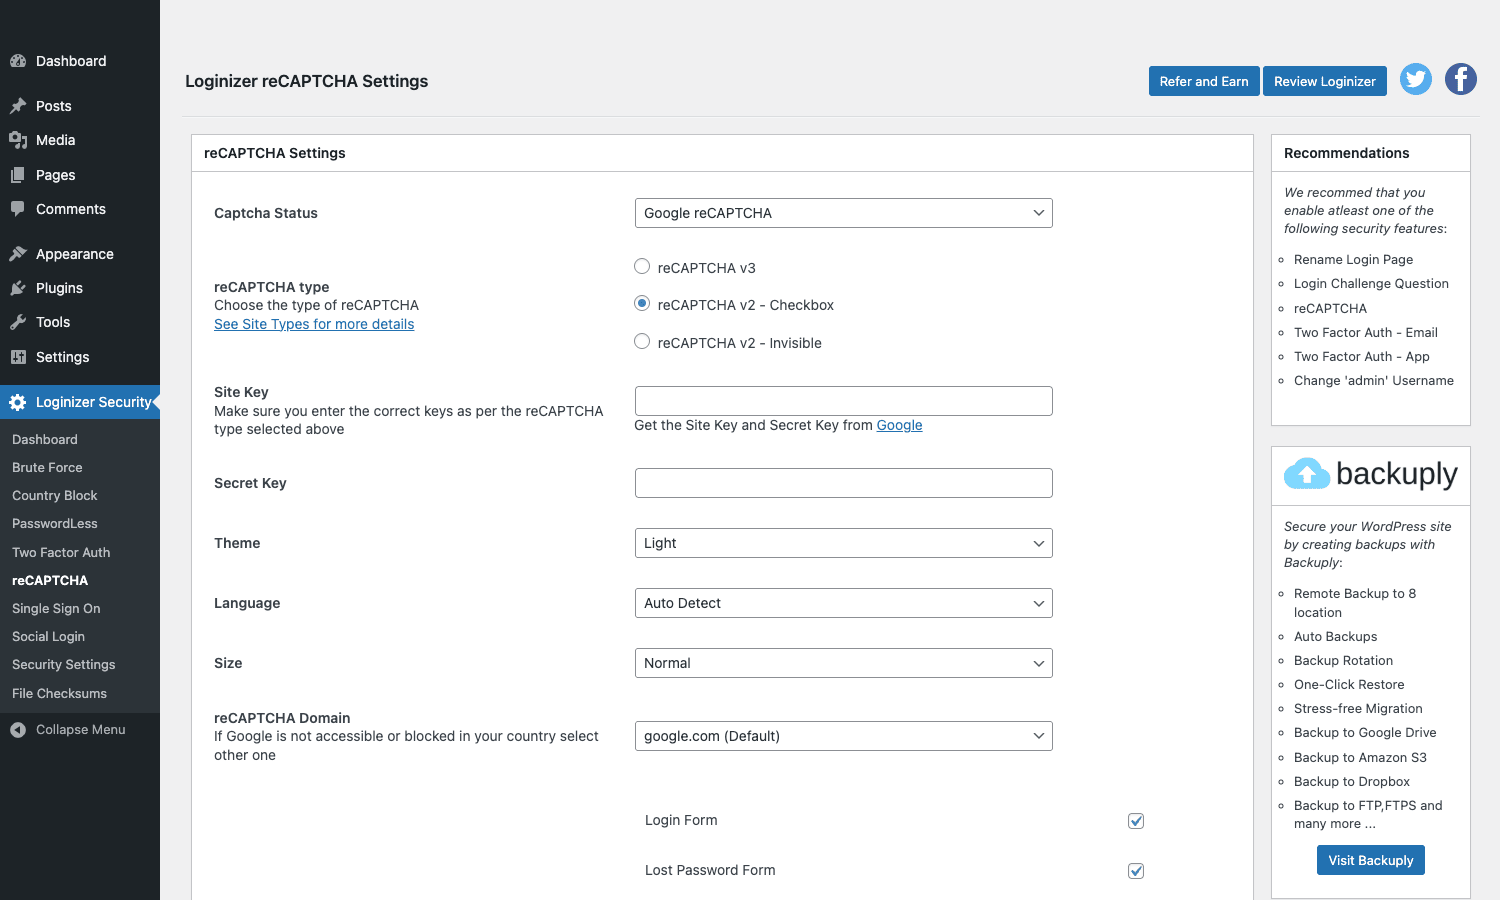
Choosing a provider
You have four options:
- Google reCAPTCHA v2 Checkbox ("I’m not a robot"). Most familiar, most accessible. Requires a free site key + secret key from Google’s reCAPTCHA admin console.
- Google reCAPTCHA v2 Invisible. Same engine, no checkbox; runs in the background and only challenges on suspicious sessions.
- Google reCAPTCHA v3. Scores each request 0.0 to 1.0; you set a threshold (Loginizer’s default is 0.5) and anything below is blocked. Better UX, more configuration, and you have to monitor the score distribution to find the right threshold for your site.
- Cloudflare Turnstile or hCaptcha. Privacy-focused alternatives. Turnstile is the one to pick if you’re already using Cloudflare in front of the site; the keys come from the Cloudflare dashboard. hCaptcha is a drop-in reCAPTCHA replacement from the privacy world.
- Math Captcha. No third party at all. Loginizer asks "What is three plus four?" and expects "seven". Surprisingly effective against unsophisticated bots; useless against any attacker who’s spent ten minutes parsing your HTML. Good for low-traffic sites that don’t want the GDPR / privacy paperwork that comes with sending traffic to Google.
Where the CAPTCHA appears
Below the provider configuration is a checklist of WordPress endpoints. Tick each one you want protected:
- Login Form
- Lost Password Form
- Registration Form
- Comments
- WooCommerce Login
- WooCommerce Registration
- WooCommerce Checkout
Comments and Registration are the highest-value picks if you’ve got an open WooCommerce store or a blog with comments enabled, because those are usually noisier than the login form.
If you’re already running a more complete caching plugin like WP Rocket, the reCAPTCHA JS is small enough that it doesn’t meaningfully hurt page speed, and Loginizer only loads it on the forms you’ve explicitly enabled, not on every page.
Country blocking
The Country Block tab is the bluntest tool in the kit. If 95% of your customers are in two or three countries and 95% of your attack traffic comes from outside those, blocking the rest of the world is a one-checkbox win.
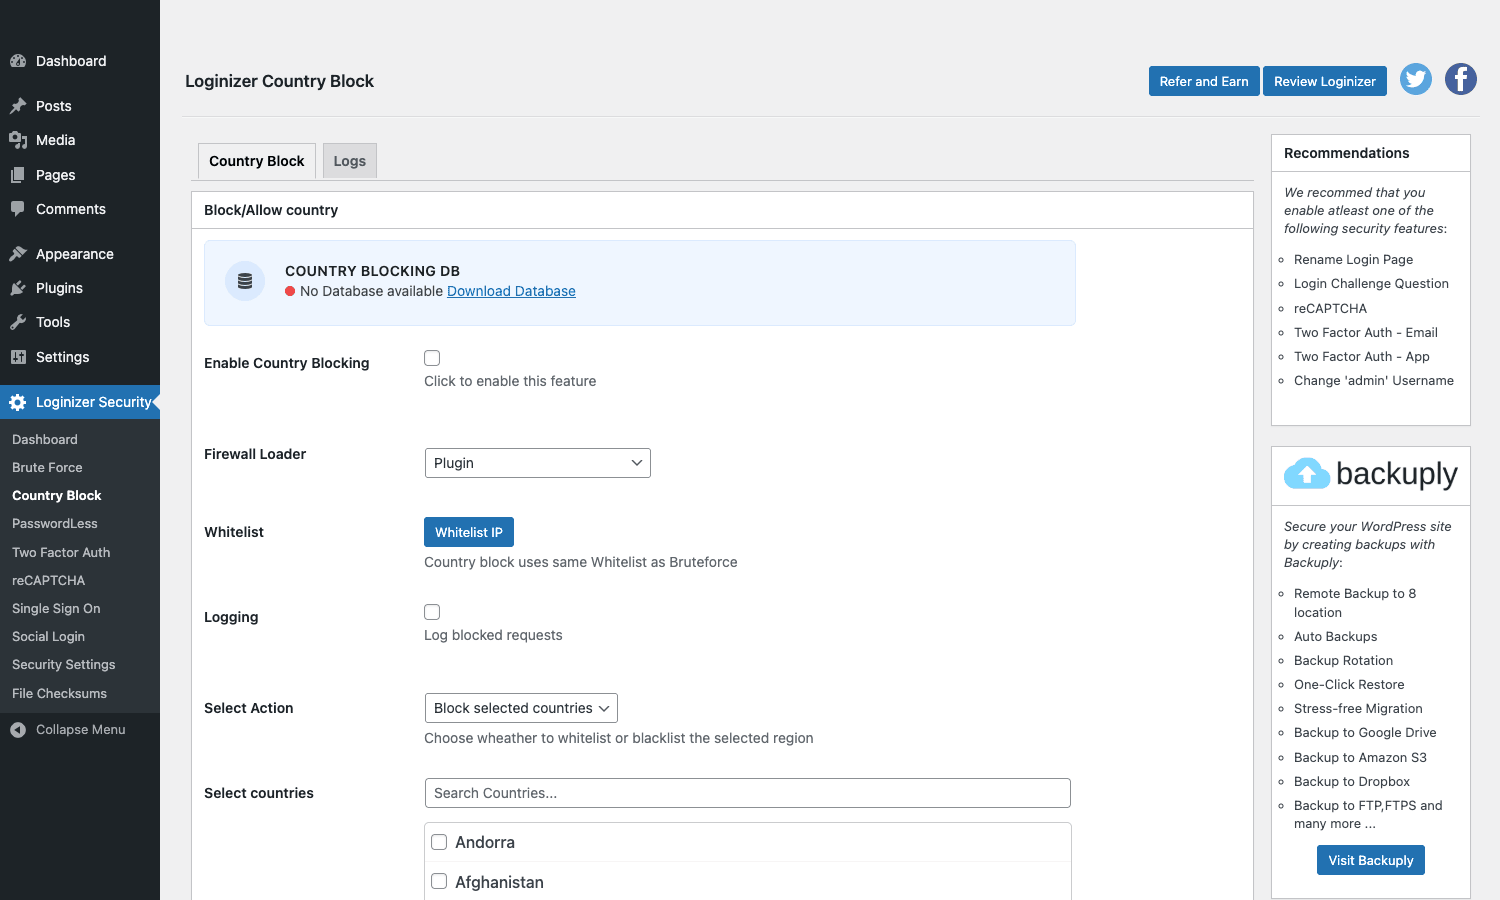
The first time you open the panel, you’ll be prompted to download the MaxMind GeoIP database. It’s a few megabytes and lives in the plugin folder, so the IP lookups are local (fast) and don’t depend on a third-party API.
After that you choose between:
- Block selected countries. Pick a list; everyone from those countries gets the blocked-screen.
- Allow only selected countries. Pick a list; only those countries can reach the login URL. Everyone else gets the blocked-screen.
The whitelist mode is the more useful one for a site whose audience is geographically narrow. If you run a UK-only WooCommerce store, allowing just GB and maybe a couple of neighbouring countries cuts the surface dramatically. You can still let your own IP through via the brute-force whitelist, which sits above the country block in the pipeline.
The Logs sub-tab records every country-blocked request, with country code and timestamp. Helpful for verifying the filter is working and for spotting if a real customer in a blocked country is being denied, in which case you can either un-block the country or add their IP to the whitelist.
One thing to note: country blocking on the login URL is different from blocking the country at the firewall or CDN level. Loginizer’s block only kicks in when the request hits PHP, so it doesn’t reduce server load the way a Cloudflare WAF country block would. If you’re under heavy attack, push the country block up to the edge; if you just want a clean way to say "no logins from outside our market", Loginizer’s plugin-level block is fine.
PasswordLess login
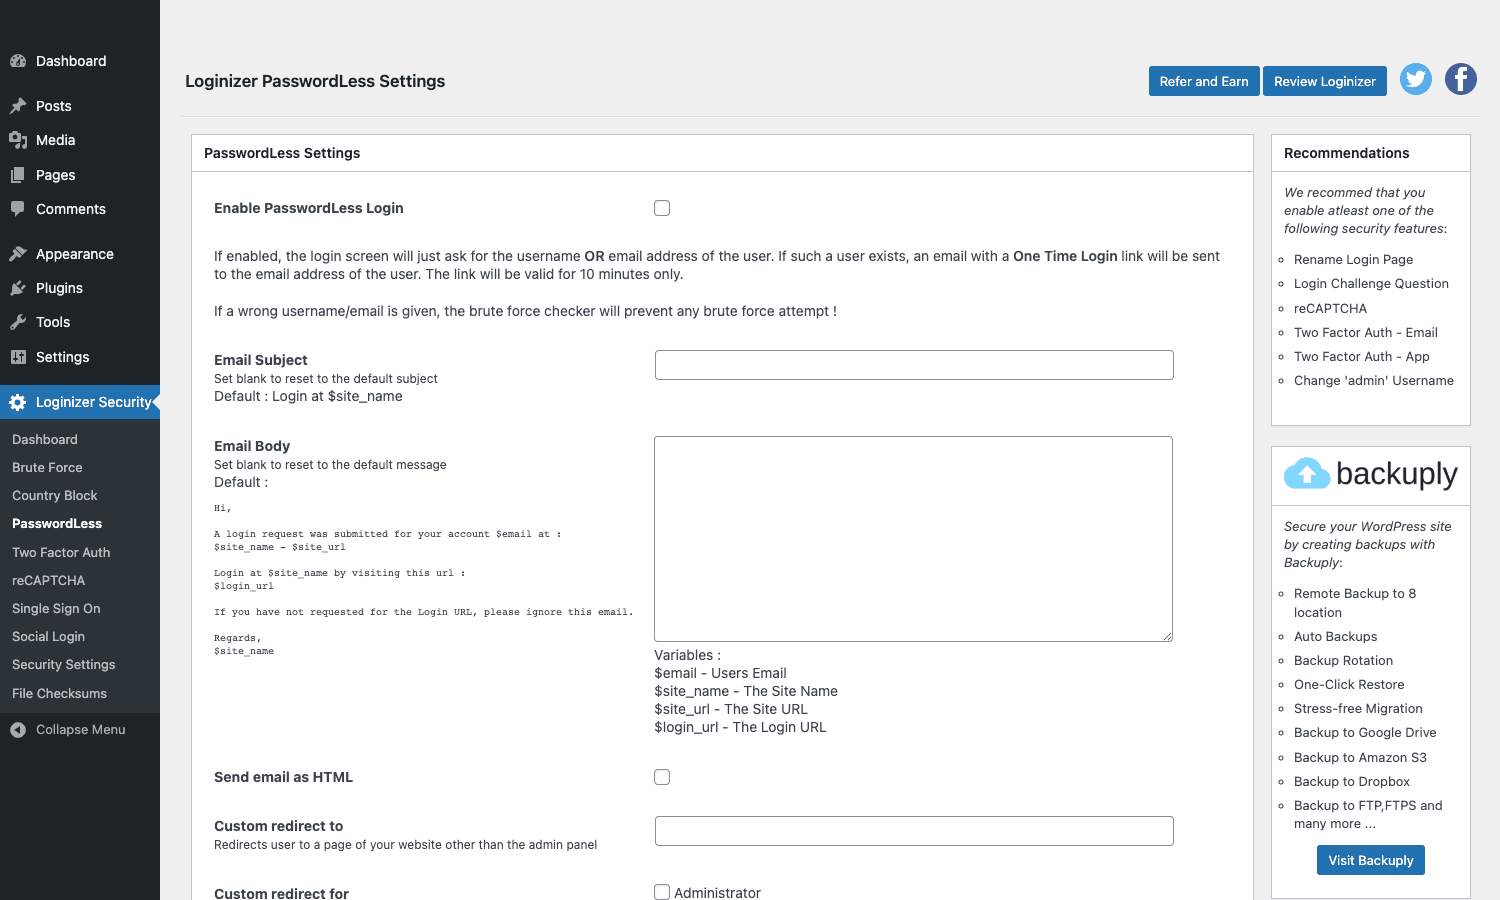
The PasswordLess tab is one of the more divisive features. Enable it and your users can sign in by typing their username or email and clicking a link that gets emailed to them, with no password ever entered. The link expires in 10 minutes by default.
Why it’s good:
- Passwords are the worst part of any login flow. Email-link login eliminates the most common support ticket ("I forgot my password").
- It moves the trust to the email address, which is usually a strong identity already (the user has 2FA and a strong password on their email provider).
- It works on mobile and desktop with no app install.
Why it might not be for you:
- It’s only as secure as the user’s email account. If a customer’s email is breached, your site is breached.
- If your transactional email is unreliable (a lot of cheap shared hosts have terrible mail deliverability), users hit the button, never get the link, and complain.
- Brute-forcing a passwordless flow is harder than brute-forcing a password, but the attack changes shape: you’d be attacking the email account or the mail relay instead.
The settings page lets you customise the subject and body of the email, set a custom redirect after login, and limit how many incorrect attempts trigger a brute-force lockout. There’s also a "send email as HTML" toggle that’s worth turning on if you want links to render as buttons rather than long URLs.
If you want the simplicity of magic-link login without committing your whole user base to it, leave the feature enabled but don’t advertise it. Users who know to click "Login with email link" use it; others use their password as usual.
Security Settings, rename login, and hide wp-admin
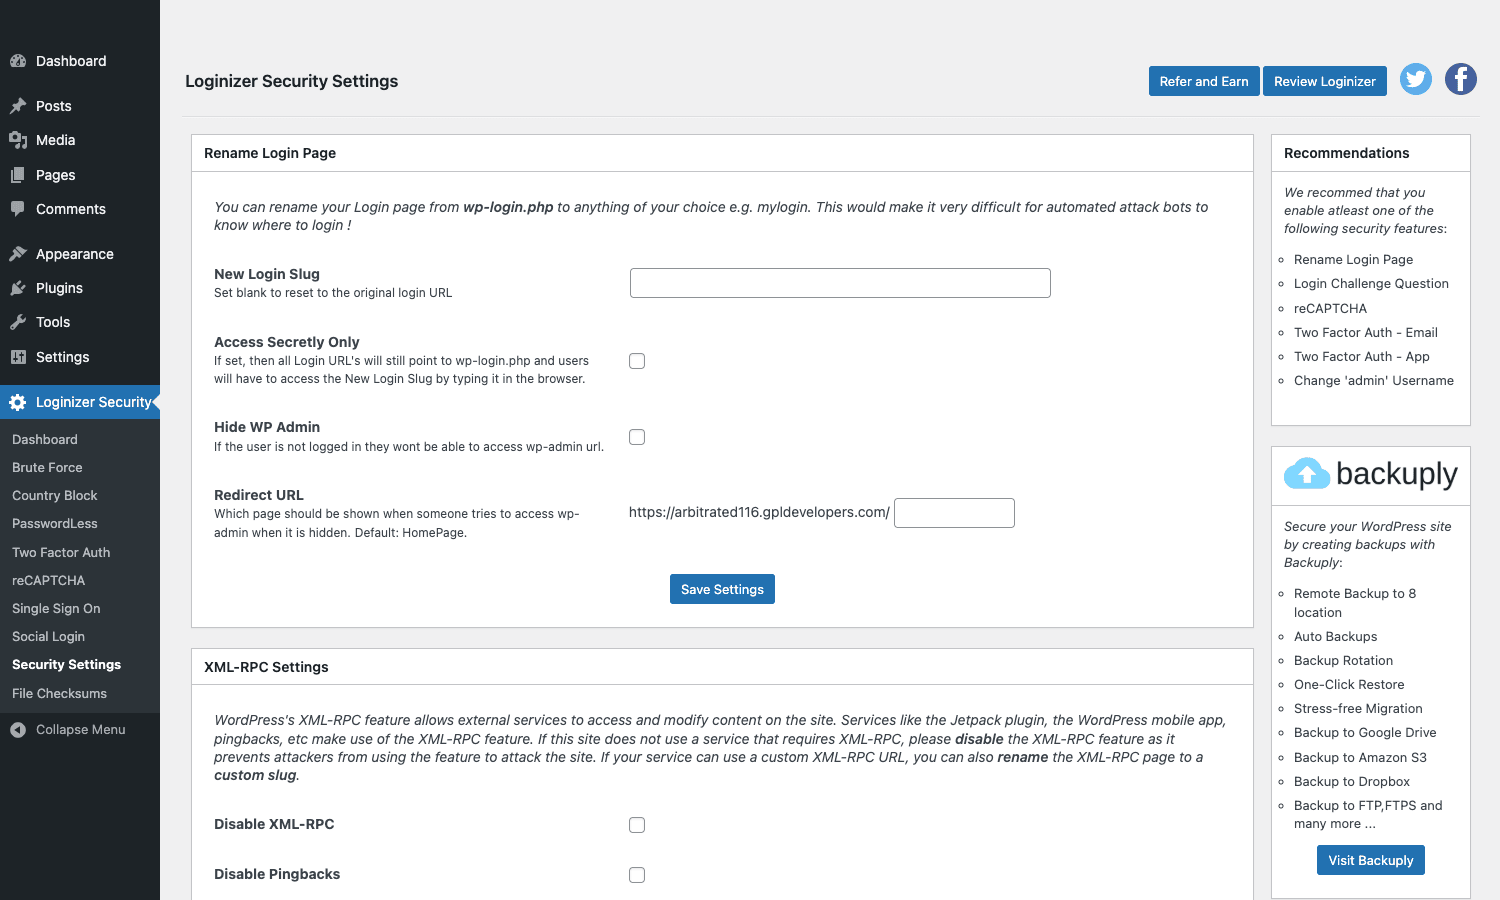
The Security Settings tab is a grab bag of hardening toggles that don’t fit anywhere else. Most of them are zero-configuration: tick the checkbox, optionally type a value, save.
Rename Login
Change /wp-login.php to anything you want. Set "New Login Slug" to (say) secret-door, and from that moment on, requests to /wp-login.php 404 and the login form only renders at /secret-door.
This single change kills the overwhelming majority of attack traffic against the login URL, because almost every bot is hardcoded to wp-login.php. The bots still hit, but they get 404s and can’t even attempt a login.
There’s a "Rename Login with Secrecy" companion option that’s useful if you have a plugin or theme that still posts to wp-login.php (some WooCommerce extensions do). With secrecy on, the old URL still works internally but doesn’t render the login form publicly, so server-side redirects keep working while the public URL becomes the new slug.
Hide WP Admin
Change /wp-admin to a custom path, e.g. office. Then /wp-admin returns 404 for anyone not already logged in, and the dashboard lives at /office. Useful if you also want to obscure that the site is running WordPress at all, though once someone is poking at your /wp-content/ URLs and your wp-json REST endpoints, the cat is fairly out of the bag. Treat hide-wp-admin as another small layer rather than a magic invisibility cloak.
For more aggressive URL obfuscation (asset paths, REST routes, theme paths, plugin paths), reach for a dedicated tool like Hide My WP. Loginizer’s hide-wp-admin is intentionally narrow, just the login surface.
XML-RPC
Three options, in increasing order of paranoia:
- Disable Pingbacks. Stops the most common XML-RPC abuse (pingback DDoS amplification) without breaking the rest of XML-RPC. Safe default.
- Rename XML-RPC. Move
xmlrpc.phpto a different filename. Breaks Jetpack and some legacy mobile apps that hardcode the path; fine otherwise. - Disable XML-RPC. Kill it entirely. Breaks everything that uses XML-RPC, which on a modern WordPress install is fewer things than it used to be.
If you use Jetpack, the WordPress mobile app, or any plugin that integrates over XML-RPC, stick with "Disable Pingbacks" only and leave the rest of XML-RPC alive.
CSRF Protection
Tick this and Loginizer adds a session-tied token to your admin URLs, so the URL of /wp-admin/edit.php becomes something like /wp-admin/edit.php?_lz=abc123. Predicting this URL is hard, which closes off a class of CSRF attacks that rely on knowing the exact admin URL. Mostly invisible to users.
Other toggles
- Auto blacklist usernames. Type the usernames you want banned (one per line). Any login attempt using one of those names gets the source IP banned permanently.
- Email Notification on Successful Login. Sends an email to the user whenever someone logs into their account. Used to be table stakes; got noisy at scale, so most sites turn this on only for admin accounts.
- Change Admin Username. Rename the literal
adminuser in-place if you’ve still got one.
Social login and SSO
The Social Login tab lets users sign in or register with Google, Facebook, Apple, X, Microsoft, GitHub, LinkedIn, Twitch, or Discord. It supports the WooCommerce my-account page and the Ultimate Member account page as well as the standard WordPress login.
Each provider works in two modes:
- Bring your own keys. Register an OAuth app with the provider, paste the client ID and secret into Loginizer. Standard pattern; gives you full control over the OAuth app branding (your name on the consent screen).
- Key-less Social Auth. Loginizer brokers the OAuth handshake through its own server using a shared app. Faster to set up, less control. The consent screen shows "Loginizer" instead of your site’s name. Available for Google, GitHub, X, LinkedIn so far, with more on the way.
There’s a [loginizer_social] shortcode you can drop into any post or page, and a loginizer_social_shortcode widget you can place inside a sidebar.
Single Sign On is a separate tab and not the same thing. SSO in Loginizer means "give me a one-time login URL for this user account", which is what you use when a customer is locked out and needs you to log in as them to fix something. You generate a magic link from the SSO tab, paste it to the user, they click it, they’re in. No password ever changes hands.
File checksums and tamper detection
The File Checksums tab compares every core WordPress file on your server against the official MD5 checksums published by wordpress.org. Anything that doesn’t match is either modified or extra; in both cases you probably want to know about it.
This is not a malware scanner. It only checks core files (not plugins, not themes, not uploads), and it doesn’t analyse what the changes are, only whether the file matches the original. If you’ve ever edited wp-config.php or had a host inject a beacon into your core files, this will tell you. If a plugin is compromised, this won’t.
For broader file scanning, you’d combine Loginizer with Wordfence Premium, Solid Security Pro, or WPMU DEV Defender, all of which include full-site malware scanning. Loginizer’s checksum check is a useful 30-second confidence check, not a replacement for any of those.
Developer reference, hooks and shortcodes
This is the part where Loginizer’s design choices matter. The plugin does not define its own loginizer_* action/filter API for external code to hook into. Instead, every Loginizer behaviour is implemented as a callback on a standard WordPress core hook, and you extend or override it by hooking the same WordPress core hook at a different priority.
That’s worth knowing up front because if you go searching for "loginizer filter to do X", you won’t find one. You’re looking for the right WordPress core hook to attach to.
Custom database tables
Loginizer creates two custom tables on activation:
{prefix}loginizer_logs– one row per failed login attempt. Used by the Brute Force tab’s log viewer.{prefix}loginizer_settings– lockout state, blacklisted IPs, whitelisted IPs, and ranges.
If you ever need to clear a lockout from the database directly:
DELETE FROM wp_loginizer_settings WHERE name = 'lockout' AND ip = '203.0.113.42';
Replace the table prefix as needed. Useful when you’ve locked yourself out and don’t have whitelist access yet.
Option keys
The settings are stored in wp_options under these keys. You can read them, write them, or back them up at the plugin layer if you want to keep config in version control:
loginizer_options– free plugin settings (retries, lockout times).loginizer_security– rename login slug, hide WP admin slug, redirect URL.loginizer_2fa– 2FA configuration.loginizer_captcha– reCAPTCHA / Turnstile / hCaptcha config.loginizer_epl– PasswordLess settings.loginizer_social_settings– social-login app keys.loginizer_wp_admin– hide-wp-admin slug.loginizer_username_blacklist– banned usernames (one per line).loginizer_domains_blacklist– banned registration domains.loginizer_checksums– last file-checksum run.
Hook: exempt a user from the brute-force lockout
Loginizer hooks wp_authenticate_user at priority 30 to check the IP lockout. To exempt a specific account, hook the same filter at a lower priority and short-circuit:
add_filter( 'wp_authenticate_user', function ( $user, $password ) {
 if ( is_wp_error( $user ) ) {
 return $user;
 }
 if ( in_array( $user->user_login, [ 'system-monitor' ], true ) ) {
 return $user; // Skip Loginizer's check for this account.
 }
 return $user;
}, 5, 2 );
Priority 5 runs before Loginizer’s priority-30 callback. Use this pattern for service accounts that legitimately retry a lot.
Hook: customise the lockout message
Loginizer prints the lockout message via wp_die(). To replace the wording, intercept the title and message strings:
add_filter( 'wp_die_handler', function ( $handler ) {
 return function ( $message, $title = '', $args = [] ) use ( $handler ) {
 if ( is_string( $message ) && strpos( $message, 'You have been locked out' )!== false ) {
 $message = 'Access denied. Contact support@example.com to restore access.';
 }
 $handler( $message, $title, $args );
 };
} );
Drop this in a small custom plugin (not in functions.php, so it survives theme changes). It only triggers on Loginizer’s lockout screen because of the substring match.
Hook: log every successful login to a syslog
Loginizer fires wp_login on success. Hook the same action to forward to your own logging pipeline:
add_action( 'wp_login', function ( $user_login, $user ) {
 $ip = $_SERVER['REMOTE_ADDR']?? 'unknown';
 error_log( sprintf(
 '[login] user=%s id=%d ip=%s ua=%s',
 $user_login,
 $user->ID,
 $ip,
 substr( $_SERVER['HTTP_USER_AGENT']?? '', 0, 200 )
 ) );
}, 99, 2 );
Pair this with WP Activity Log Premium if you want a structured audit trail; Loginizer’s logs only cover failures.
Hook: block registration from disposable email domains
Loginizer Pro has a domains-blacklist setting, but if you want it programmatic:
add_filter( 'registration_errors', function ( $errors, $sanitized_user_login, $user_email ) {
 $bad_domains = [ 'mailinator.com', 'tempmail.com', 'guerrillamail.com' ];
 $domain = strtolower( substr( strrchr( $user_email, '@' ), 1 ) );
 if ( in_array( $domain, $bad_domains, true ) ) {
 $errors->add( 'disposable_email', __( 'Disposable email addresses are not allowed.' ) );
 }
 return $errors;
}, 20, 3 );
Runs before Loginizer’s own registration_errors callback and combines cleanly with the plugin’s UI-managed list.
Shortcodes
Two shortcodes are registered:
[loginizer_social]renders the configured social-login buttons inline. Drop into a post, a page, or a widget area.[loginizer_pro_recaptcha]renders a reCAPTCHA widget inside any form. Use it if you build a custom contact form and want to reuse the same reCAPTCHA config Loginizer uses on the login page.
The [loginizer_social] shortcode accepts attributes:
[loginizer_social size="medium" style="round" providers="google,github,linkedin"]
Providers must already be configured on the Social Login tab.
REST endpoints and custom URL handlers
Loginizer registers a couple of init-time URL handlers on login_form_* actions rather than REST routes:
login_form_loginizer_2fa_notice– the 2FA interstitial.login_form_loginizer_security– the security challenge page.
There aren’t any REST routes the plugin exposes for external consumption. The plugin’s own JS uses admin-ajax.php for AJAX (QR code generation for 2FA setup, etc.).
Per-user My Security page
Pro adds a Loginizer Security per-user menu (?page=loginizer_user) that lets non-admin users configure their own 2FA, challenge question, and PasswordLess preferences. The menu shows up for anyone with the read capability, which is every logged-in user. If you want to hide it from a specific role, hook admin_menu at a high priority and remove_menu_page( 'loginizer_user' ) when the current user matches.
Performance, compatibility, and gotchas
Performance
Loginizer is light. The free plugin loads almost nothing on the front-end. Pro loads its reCAPTCHA JS only on pages that have the reCAPTCHA widget enabled (login, register, comments, lost-password, WooCommerce). The country-block lookup happens at PHP request time and uses the local MaxMind file, so it’s fast (sub-millisecond).
The brute-force log table can grow large on a heavily attacked site. There’s a "Clear All Logs" button at the top of the Brute Force tab; I usually clear it every couple of months on an actively attacked site and keep the CSV exports if I need history.
The plugin caches almost nothing in transients. State lives in custom DB tables, which is fine because they have proper indexes and the queries are tight.
Compatibility
- WooCommerce. First-class. The reCAPTCHA tab has dedicated WC checkboxes; the social login works on the my-account page; the 2FA setup page works for WC customers too.
- Multisite. Works. License is sold per network. Settings are per-site by default, with a network admin override.
- Caching plugins. No conflicts I’ve ever seen with WP Rocket, W3 Total Cache, or LiteSpeed Cache. Loginizer touches login URLs, which caching plugins already bypass.
- Cloudflare and reverse proxies. Important: Loginizer reads the client IP from
$_SERVER['REMOTE_ADDR']by default, which is the proxy’s IP, not the user’s. Under Cloudflare, every "attacker" will look like a Cloudflare edge IP and you’ll lock out legitimate users. Fix: set the IP detection method to "X-Forwarded-For" or "CF-Connecting-IP" inLoginizer > Country Block > Firewall Loader(which doubles as the global IP detection setting). On WordPress + Cloudflare, useCF-Connecting-IP. - WP-CLI. Loginizer doesn’t register WP-CLI commands. You can still manage option values with
wp option get loginizer_options, etc. - PHP version. Requires PHP 5.5+. Tested up to current PHP 8.x. No issues on modern stacks.
- Ultimate Member, BuddyPress, MemberPress. The reCAPTCHA + social login + 2FA all integrate with these. There are specific code paths in
init.phpfor BuddyPress registration and Ultimate Member account tabs.
Gotchas
- The Cloudflare / proxy IP issue above is the most common support ticket. If you’re locking out users seemingly at random, check the IP detection method first.
- Renaming
wp-login.phpwill break any plugin or theme that hardcodes the URL. Test in staging before flipping it on production. Examples: some WooCommerce extensions, some membership plugins, some Slack/Teams notification integrations. - Hiding
/wp-admincan break Heartbeat for editors if your custom code or another plugin requestsadmin-ajax.phpvia the old URL. Loginizer rewrites most of these, but odd plugins occasionally slip through. - 2FA enforcement with no recovery is dangerous. If you lock down 2FA as "required" for admins and the admin loses their phone before backup codes are saved, you’ll be deleting the
loginizer_2fauser meta over SSH. Always test the recovery flow. - Force OTP via email assumes your transactional mail works. On hosts where WordPress’s
wp_mail()is unreliable, this becomes a self-DOS. - Country blocking the wrong country. Loginizer’s GeoIP is good but not perfect. The Logs sub-tab is the fix; check it weekly for the first month.
xmlrpc.phpdisabled breaks the WordPress mobile app and Jetpack. Use "Disable Pingbacks" only if you want those to keep working.
How Loginizer compares to other login plugins
There are a lot of WordPress security plugins. Here’s roughly where Loginizer fits.
- Wordfence Premium is the heavyweight: WAF, malware scanner, real-time IP threat feed, login security included. Heavier on resources, broader scope. If you want one plugin to do everything, Wordfence is the obvious pick. If you only want login security and don’t need the WAF, Loginizer is lighter.
- Solid Security Pro (formerly iThemes Security) covers similar ground to Loginizer plus file integrity, database backups, and more aggressive hardening. Bigger surface, more toggles. Loginizer’s UI is cleaner; Solid’s feature set is broader.
- WPMU DEV Defender is the comparable plugin in the WPMU DEV ecosystem. Similar 2FA, login security, file integrity. Picks up from there with WPMU DEV’s broader hub.
- WP Cerber Security is the closest direct competitor to Loginizer Pro. Both are login-focused. Cerber tends to be more granular on bot-detection signals; Loginizer has a friendlier setup flow.
- Hide My WP is the URL-obfuscation specialist. Renames asset paths, REST routes, theme paths, plugin paths, the whole structure. Loginizer’s hide-wp-admin is a subset of this. If you want full obfuscation, pair the two.
- Really Simple Security Pro focuses on HTTPS, headers, and policy hardening. Doesn’t really overlap with Loginizer; they’re complementary.
- WP Activity Log Premium is the audit-trail piece Loginizer doesn’t do. Loginizer logs failed login attempts; WP Activity Log logs every meaningful change anyone makes to your site. Pair them.
- Limit Login Attempts Reloaded is free and popular. Does only the brute-force basics. Loginizer’s free tier is roughly equivalent; Loginizer Pro is what you upgrade to when you want everything else (2FA, country block, rename login, social login, etc.) in one place rather than three.
- WPS Hide Login is a one-trick plugin that just renames
wp-login.php. Loginizer’s Security Settings tab does that and more, so if you’ve already got Loginizer there’s no reason to add WPS Hide Login.
In short, Loginizer is the right size for sites that want strong login security without buying into a full security suite. If you want one plugin to do brute force + 2FA + reCAPTCHA + country block + rename login + social login, this is it. If you want all of that plus malware scanning, WAF, and a vulnerability database, Wordfence is the better fit.
Pricing and licensing
Loginizer is dual-distributed.
- The free plugin on wordpress.org/plugins/loginizer covers brute force, IP blacklist/whitelist, logs, custom error messages, and a few basic hardening toggles. It’s enough for a hobby site.
- The paid Pro add-on (Personal, Multisite, Business tiers) unlocks 2FA, PasswordLess, reCAPTCHA on all forms, country blocking, rename login, hide wp-admin, social login, SSO, and file checksums. The tiers differ by how many sites you can use the license on.
- License renewal is annual and covers updates and support. If you don’t renew, the plugin keeps working; you just stop getting updates.
Pro is the one to grab if you want any of: 2FA, country block, rename login, or social login.
Who should install Loginizer
You should install the free Loginizer if:
- You run a WordPress site, full stop. Brute-force protection is table stakes; the free plugin gives it to you for free.
You should upgrade to Loginizer Pro if any of these are true:
- You want 2FA, especially for administrator and editor accounts.
- You want reCAPTCHA / Turnstile on login, register, comments, or WooCommerce forms.
- You want to block whole countries from your login URL.
- You want to rename
/wp-login.phpor/wp-admin. - You want social login (Google / Facebook / etc.) on your WordPress or WooCommerce site.
- You run an agency and want one plugin to set up on every client site instead of stitching together three.
You should look elsewhere if:
- You want a full-site malware scanner (use Wordfence Premium or Solid Security Pro).
- You want a WAF that runs before PHP (use Cloudflare’s WAF, or a host-level one).
- You want extreme URL obfuscation across the whole site (use Hide My WP).
The honest answer for most sites is: install the free Loginizer for the brute-force layer, install Loginizer Pro on top if you want 2FA and reCAPTCHA, and pair both with a separate malware scanner if security is a real concern. That gets you 90% of what an attacker could throw at the login surface, with one purchase and one settings page.
Frequently asked questions
Does Loginizer work alongside Wordfence?
Yes. They cover different surfaces. Wordfence’s login security module overlaps with Loginizer somewhat, so if you have both you’ll want to disable Wordfence’s 2FA and let Loginizer handle it (or vice versa, your call). The brute-force counters are independent and shouldn’t fight.
What happens if I lock myself out?
Two recovery routes. First, if you whitelisted your IP before the lockout, you can still log in. Second, if you didn’t, SSH in (or use phpMyAdmin) and delete the lockout row from wp_loginizer_settings, or rename the Loginizer plugin folder via FTP so it deactivates itself. The plugin doesn’t tie itself into core in a way that prevents disabling it.
Will the rename-login feature break Jetpack?
It can if Jetpack’s connection tries to call wp-login.php directly, though modern Jetpack uses the REST API for most things. If you see Jetpack connection errors after enabling rename-login, turn on "Rename Login with Secrecy" so the old URL still works behind the scenes.
Does Loginizer slow down WordPress?
Not meaningfully. The free plugin is tiny; the Pro plugin loads its scripts only on the forms that need them. The brute-force lookup is one DB query per failed login. You won’t see it on a real-world performance benchmark.
Can I migrate Loginizer settings between sites?
Yes, in two ways. Export the wp_options rows with the loginizer_* keys, plus the custom tables wp_loginizer_settings and wp_loginizer_logs, then import them on the new site. Or use a config-management plugin to ship the option values. There’s no built-in export/import in Loginizer itself, which is the one feature I’d ask for in a future release.
Do I have to use Google reCAPTCHA?
No. Loginizer supports Cloudflare Turnstile, hCaptcha, and a built-in math captcha as alternatives. If you want to avoid sending login-form traffic to Google for privacy or GDPR reasons, pick Turnstile or hCaptcha.
Will country blocking break my site for travellers?
Possibly, if a user travels to a blocked country and tries to log in from there. The user-facing fix is to whitelist their personal IP. The structural fix is to use the country block only for the registration form and unauthenticated-access surfaces, not for logged-in users, by combining it with the brute-force whitelist. The MaxMind GeoIP DB is also occasionally wrong about IP-to-country mapping, especially for VPN users.
Is Loginizer good for WooCommerce stores?
Yes. The reCAPTCHA tab has dedicated WooCommerce checkboxes (login, register, checkout), the social login plugs into the WC my-account page, and the 2FA flow works for customers as well as admins. If you also want to harden the checkout against card-testing fraud, pair Loginizer with WooCommerce’s own anti-fraud tooling or a dedicated tool.
Can I require 2FA for some roles and not others?
Yes. Under Two Factor Auth > Apply 2FA to Roles, pick the roles that must enrol. Subscribers / customers usually get a soft suggestion; editors and admins get hard enforcement. The role list is multi-select.
Final thoughts
Loginizer is one of those plugins where the answer to "should I install it" is almost always yes. The free version gives you brute-force protection that you genuinely want on every WordPress site, with no configuration to mess up. The Pro version is the one to grab when you decide that 2FA on your admin account is non-negotiable, or that you want reCAPTCHA on the comments form, or that you want to stop logging in at /wp-login.php like everyone else.
The plugin is also pleasingly narrow. It doesn’t try to be a security suite. It doesn’t run a scanner or a WAF or a backup tool. It does login security, with enough surface area to handle every reasonable login-related concern, and then it gets out of the way. That’s the right design.
The first thing to do once it’s active is whitelist your own IP under Brute Force. The second thing is turn on 2FA for your admin account. After that you can take your time with the rest of the tabs.