

Most form plugins make you bounce between two interfaces. You build the form in one plugin’s admin screen, then embed a shortcode in your Elementor page and hope the styling matches. MetForm Pro by Wpmet does it differently: the form lives as a real Elementor widget on the canvas, and every field is just another Elementor widget you can drag, style, and arrange. If you already build pages with Elementor, that single decision saves more time than every other feature combined.
This walkthrough goes through the whole plugin in order: what it is, how to install and set it up, every settings tab, the per-form options, the developer hooks and REST endpoints, and where it sits compared to other form builders. It is long because the plugin has a wide surface (30+ field types, eight integration categories, payments, multi-step, conditional logic), and skipping any of it would leave you wondering whether MetForm Pro can do the thing you need. By the end you should know.
Table of contents
- What MetForm Pro is
- Core features
- How to install and activate
- Creating your first form
- The form-settings modal explained
- Pro-only field widgets
- Conditional logic and multi-step forms
- Integrations and webhooks
- Payments with Stripe and PayPal
- Form entries, exports, and PDF export
- Developer reference
- Performance, compatibility, and gotchas
- MetForm Pro versus the alternatives
- Pricing and licensing
- Common use cases
- Frequently asked questions
- Final thoughts
What MetForm Pro is
MetForm Pro is a WordPress form builder from Wpmet, the same team behind ElementsKit and ShopEngine. Its defining trait is that it is Elementor-first. Every input is an Elementor widget. The form container is an Elementor widget. Conditional logic, multi-step navigation, payment fields, signature pads, all of it lives inside the Elementor editor, not a separate admin screen.
You also get a standalone admin area at WP Admin / MetForm where you can manage saved form templates, view entries, configure global integrations, and set defaults. But the editing experience is firmly on the Elementor canvas, and the article spends most of its time there.
There is a free version on wordpress.org with the basic widgets (text, email, textarea, select, radio, checkbox, file upload, date, time, password, URL, number, country list, ratings, hidden, GDPR consent). The Pro version layered on top of it brings the higher-value features: conditional fields, multi-step forms, payment processing, all the third-party integrations, calculations, signature, repeater, advanced authentication, post creation from form submissions, and PDF export.
If you already use Elementor and you have ever fought the friction of styling another form plugin to match your design system, MetForm Pro is worth a close look.
Core features
Here is a high-level list of what you get. Each item is covered in more depth further down.
- 30+ field types, including basics (text, email, password, URL, number, tel, textarea, select, radio, checkbox, switch, date, time), Pro extras (signature, range slider, rating, image select, toggle select, color picker, simple repeater, map location, like/dislike, credit card, text editor), and structural widgets (next-step / prev-step / progress-step for multi-step flows).
- Drag-and-drop editing on the Elementor canvas. Add a MetForm widget to any page, click Edit Form, drop in field widgets, style each one with Elementor’s normal style controls.
- Per-field conditional logic. Show or hide a field based on the value of another, in real time.
- Multi-step forms with named steps, a progress indicator, and per-step validation.
- Calculation fields that read values from other fields and produce a derived number (line totals, BMI, loan repayment, you name it).
- 30+ ready-made form templates in the form picker: contact, feedback, booking, product order, loan application, job application, admission, support, conditional logic, calculation, plus quiz templates.
- Eight integration categories: Mailchimp, AWeber, ActiveCampaign, GetResponse, ConvertKit, MailerLite, MailPoet, Fluent CRM, Help Scout, Zoho, HubSpot, Google Sheets, Google Drive, Dropbox, Twilio SMS, Stripe, PayPal, plus webhooks.
- WooCommerce checkout action that adds a form submission as a cart item, with the price coming from a calculation field.
- Form-to-post action that turns a submission into a real WordPress post (custom post type aware).
- Authentication actions for login and register flows, so a form can sign a user up or log them in.
- Submission storage in the database with CSV export and PDF generation per entry.
- Email verification before storing the submission, using a confirm link sent to the submitter.
- Form scheduling so a form only accepts submissions between two dates, with custom waiting and expired messages.
- Submission limits to cap total entries, useful for time-limited offers and signup caps.
- hCaptcha / reCAPTCHA / Smart Form anti-spam controls in the global settings.
- GDPR consent field built in, with custom consent text per form.
How to install and activate
You install MetForm Pro the same way you install any other premium WordPress plugin.
Step 1: Install the free MetForm plugin
MetForm Pro is an add-on, not a standalone plugin. The Pro plugin extends the free one with extra widgets and integrations. Go to Plugins / Add New, search for "MetForm", and install plus activate. The free plugin will also prompt you to install Elementor if you don’t have it; you need Elementor for the editor to work.
Step 2: Install MetForm Pro
Upload the MetForm Pro zip via Plugins / Add New / Upload Plugin. Activate it. The plugin auto-detects that the free MetForm is present and starts adding its widgets to Elementor’s panel.
Step 3: Enter your license key
Go to MetForm / License and paste in the key you received with the plugin. The license unlocks updates and the Pro widgets.
Step 4: Set up reCAPTCHA and global API keys
This is the only mandatory configuration before you build your first form. Open MetForm / Settings and pick the GENERAL panel. You’ll see fields for Google reCAPTCHA site key and secret, a Google Maps API key (only needed if you use the map widget), and Smart Form options (the latter trims required JS for simpler forms).
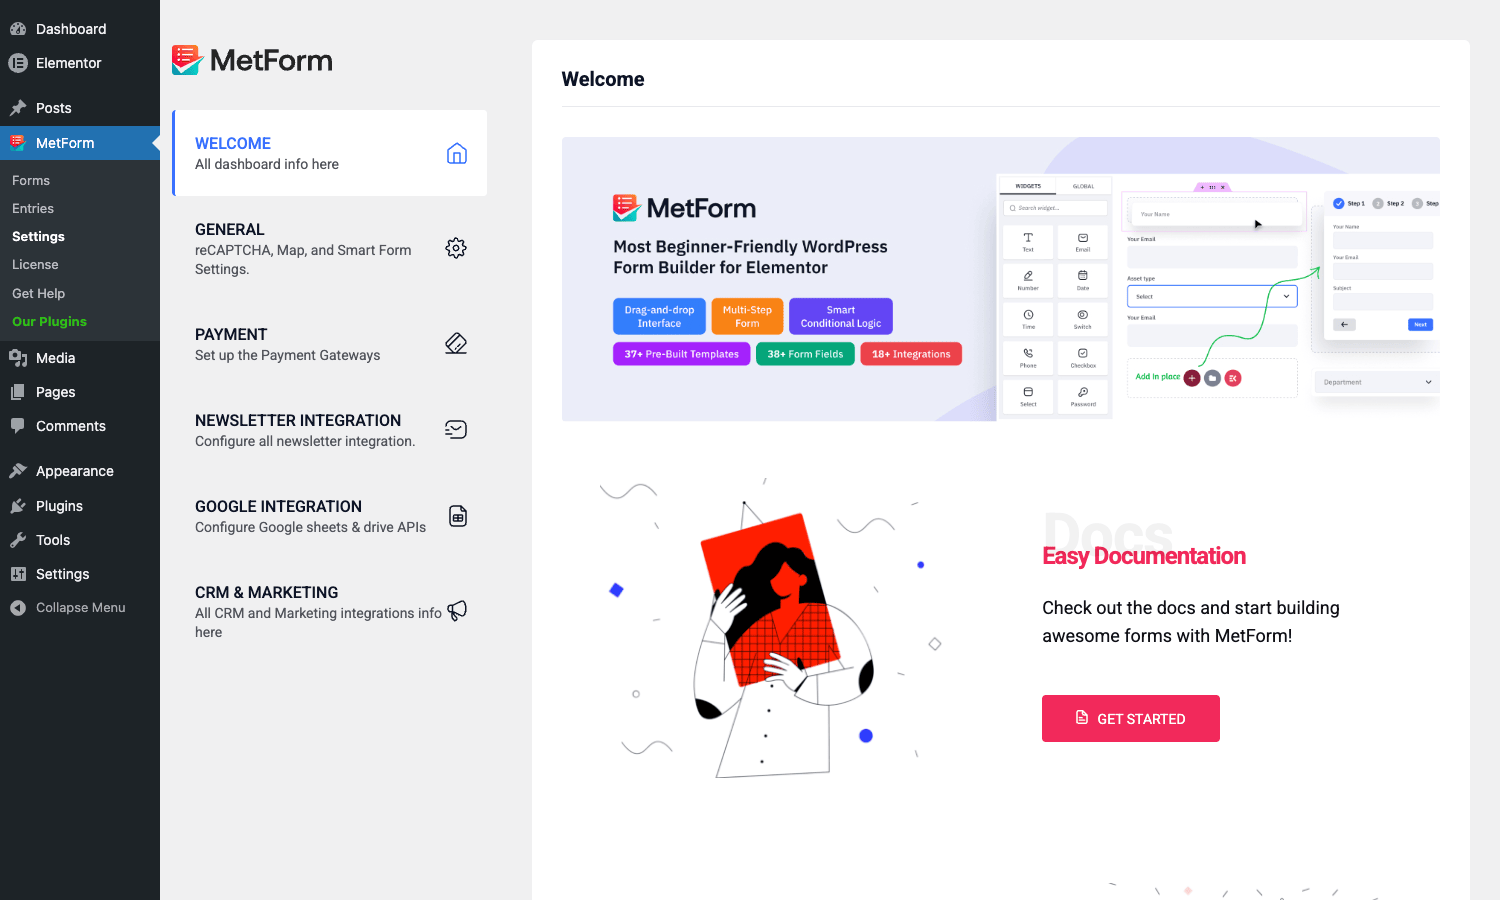
The left rail of this Settings dashboard is the single most useful screen in the plugin. Every tab on the left is independent. You can configure Payment without ever opening Newsletter Integration. The CRM & Marketing tab is only relevant if you push leads to Help Scout, Zoho, or HubSpot. If you’re only building a contact form, you can leave most of these blank.
Creating your first form
The form-creation flow has three steps: pick a template, name the form, and edit it inside Elementor.
Step 1: Open the template chooser
Go to MetForm / Forms and click Add New Form. A modal opens with all the ready-made templates.
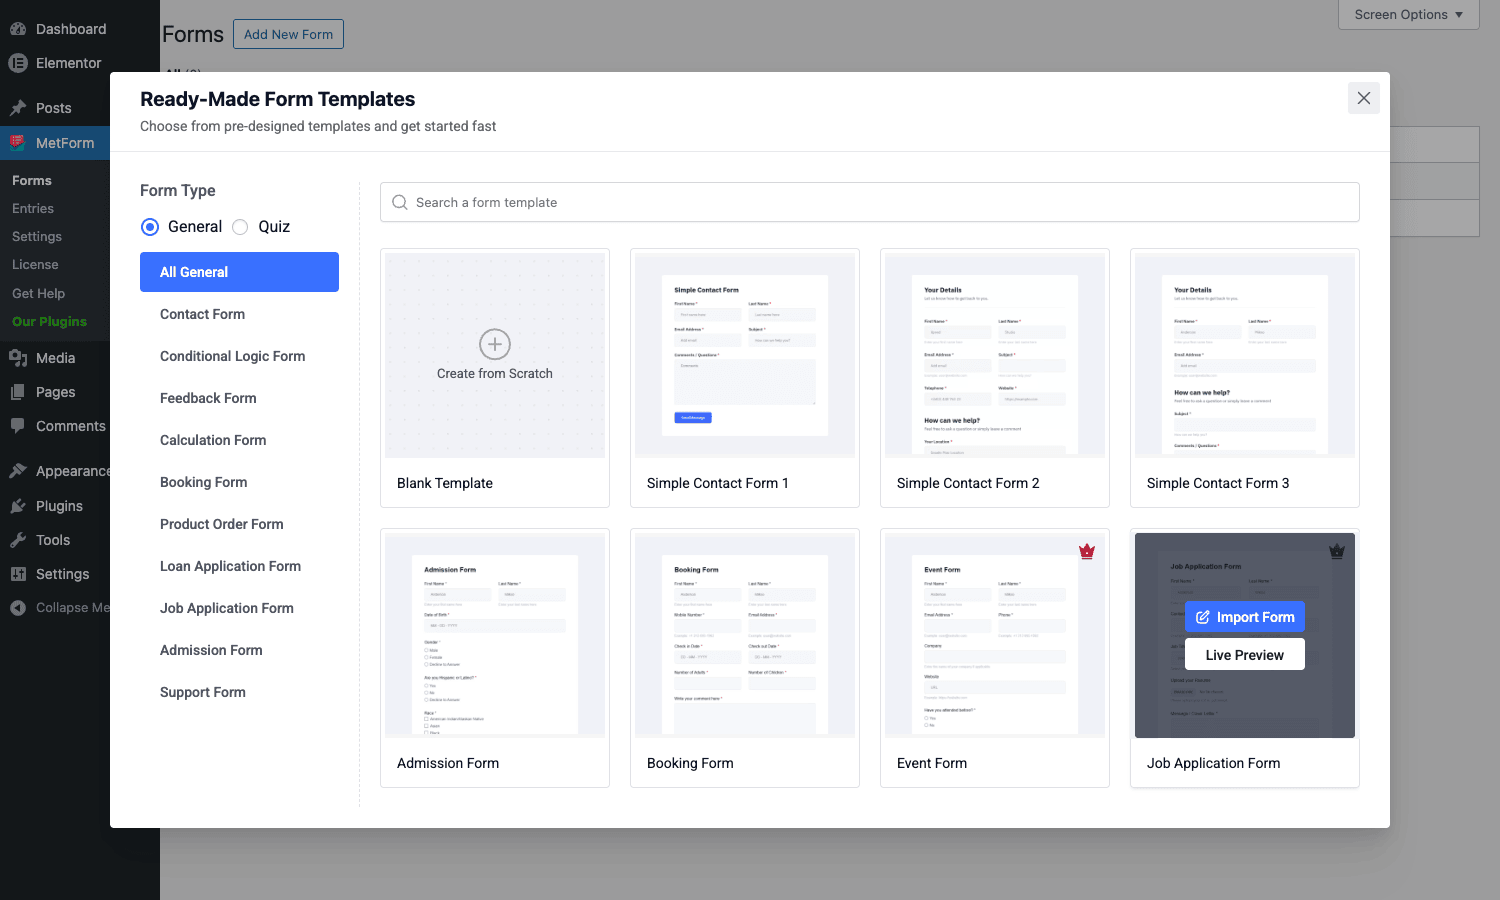
The left column groups templates by purpose (Contact Form, Conditional Logic Form, Feedback Form, Calculation Form, Booking Form, Product Order Form, Loan Application, Job Application, Admission, Support). You also get a Quiz mode at the top if you want to build a graded form. Pick the closest match and click Import Form on the card, or start from Blank Template if none of them fit.
Step 2: Name the form
After picking a template, MetForm asks for a name and which builder to use. Elementor is the default. The "MetForm Builder" option is marked Upcoming, so for now Elementor is the only working choice.
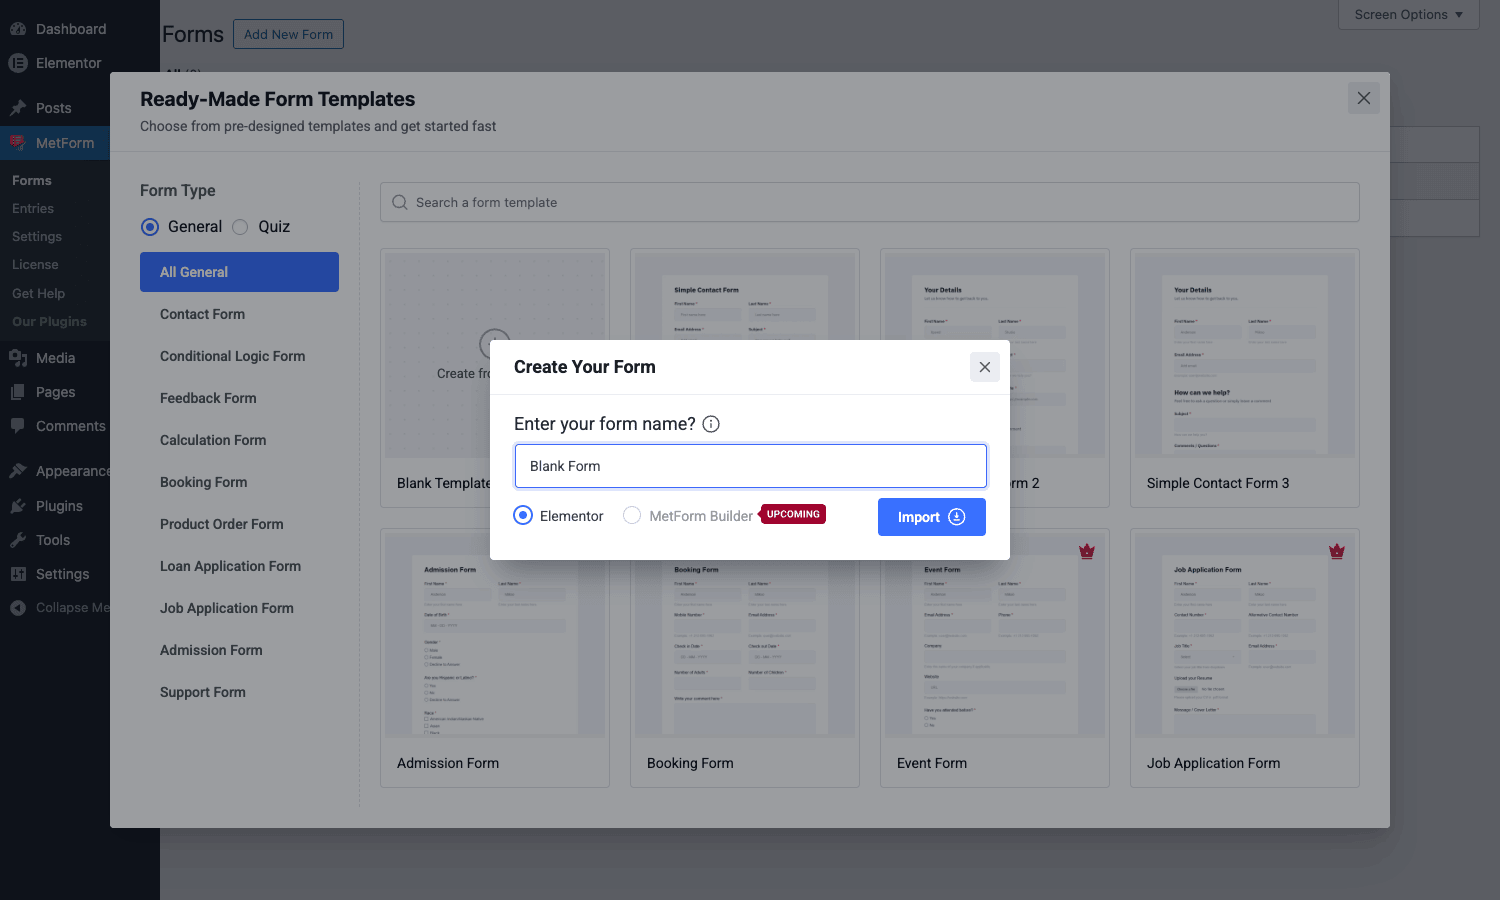
Pick a clear, descriptive name. The name shows up in your forms list, in entry exports, and in shortcode references, so don’t call it "Form 1".
Step 3: Edit on the Elementor canvas
After clicking Import you land in Elementor with the MetForm widget on the canvas. The left panel switches into Edit MetForm mode and shows three accordion sections: Form (the main edit), Multistep Settings, and Response Message.
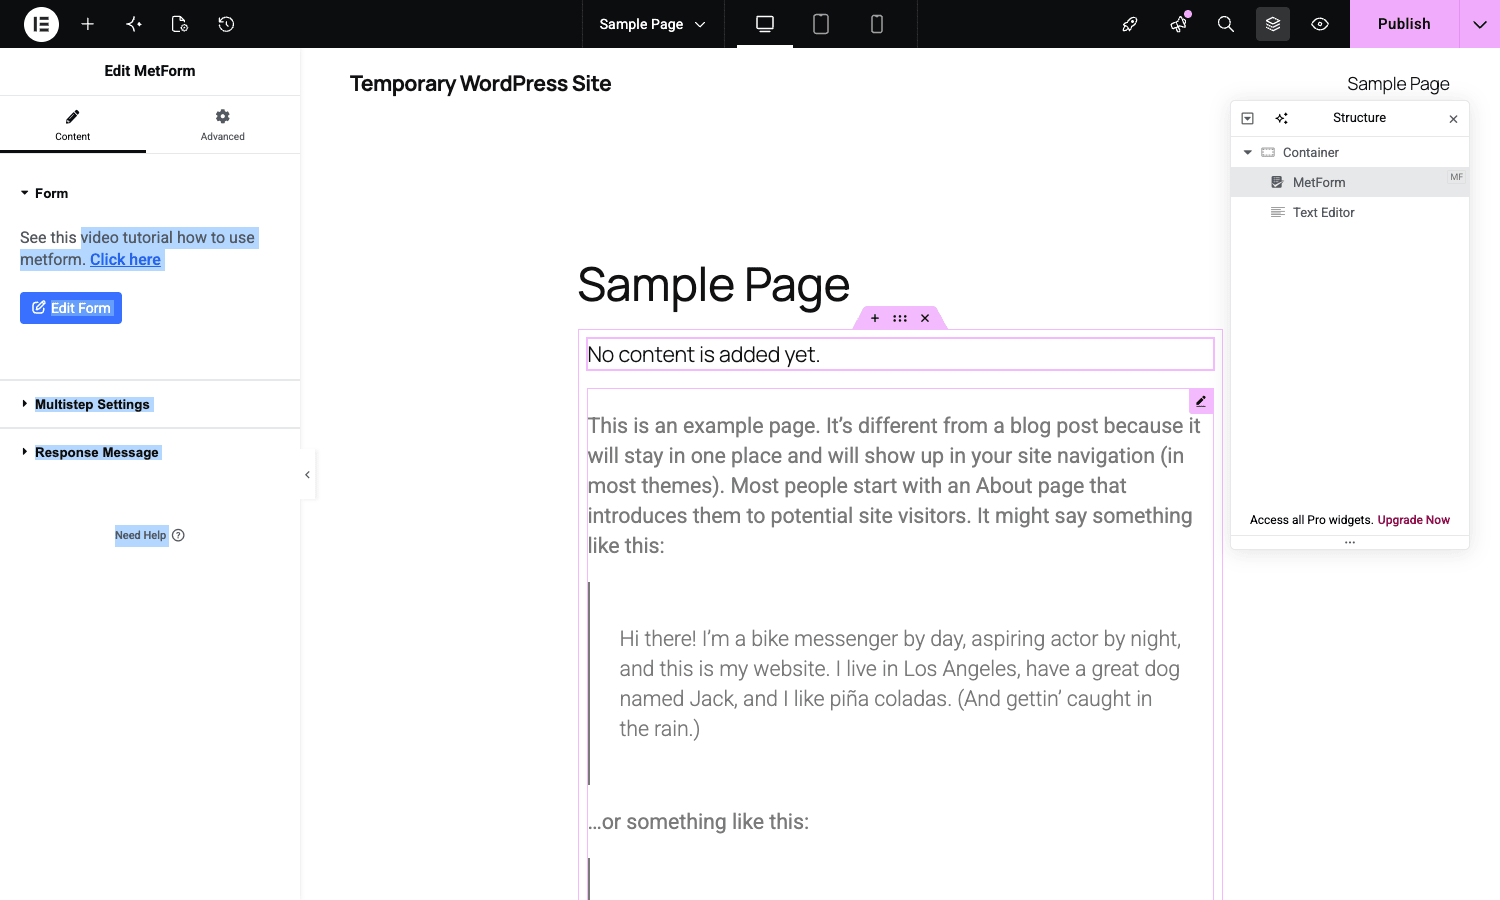
Click the blue Edit Form button to open the form’s interior. The canvas swaps out the rest of the page and shows just the form’s fields, each of which is a separate Elementor widget you can click on, restyle, or delete. Drag in new fields from the panel on the left (search for "mf-" to filter to MetForm widgets).
The shift is subtle but important. You are not editing a form in a popup, you are editing real Elementor widgets that happen to behave as form fields. Margin controls, typography controls, hover states, advanced motion effects, custom CSS – all of Elementor’s tooling applies to each field.
Step 4: Place the form on a page
Forms are saved as a custom post type (metform-form). To use one on a real page, edit any post or page, drop in the MetForm widget, and pick the saved form from the dropdown. Or use the shortcode shown next to the form in MetForm / Forms: [metform form_id="6"]. The shortcode works inside the block editor, Elementor’s Shortcode widget, or anywhere shortcodes run.
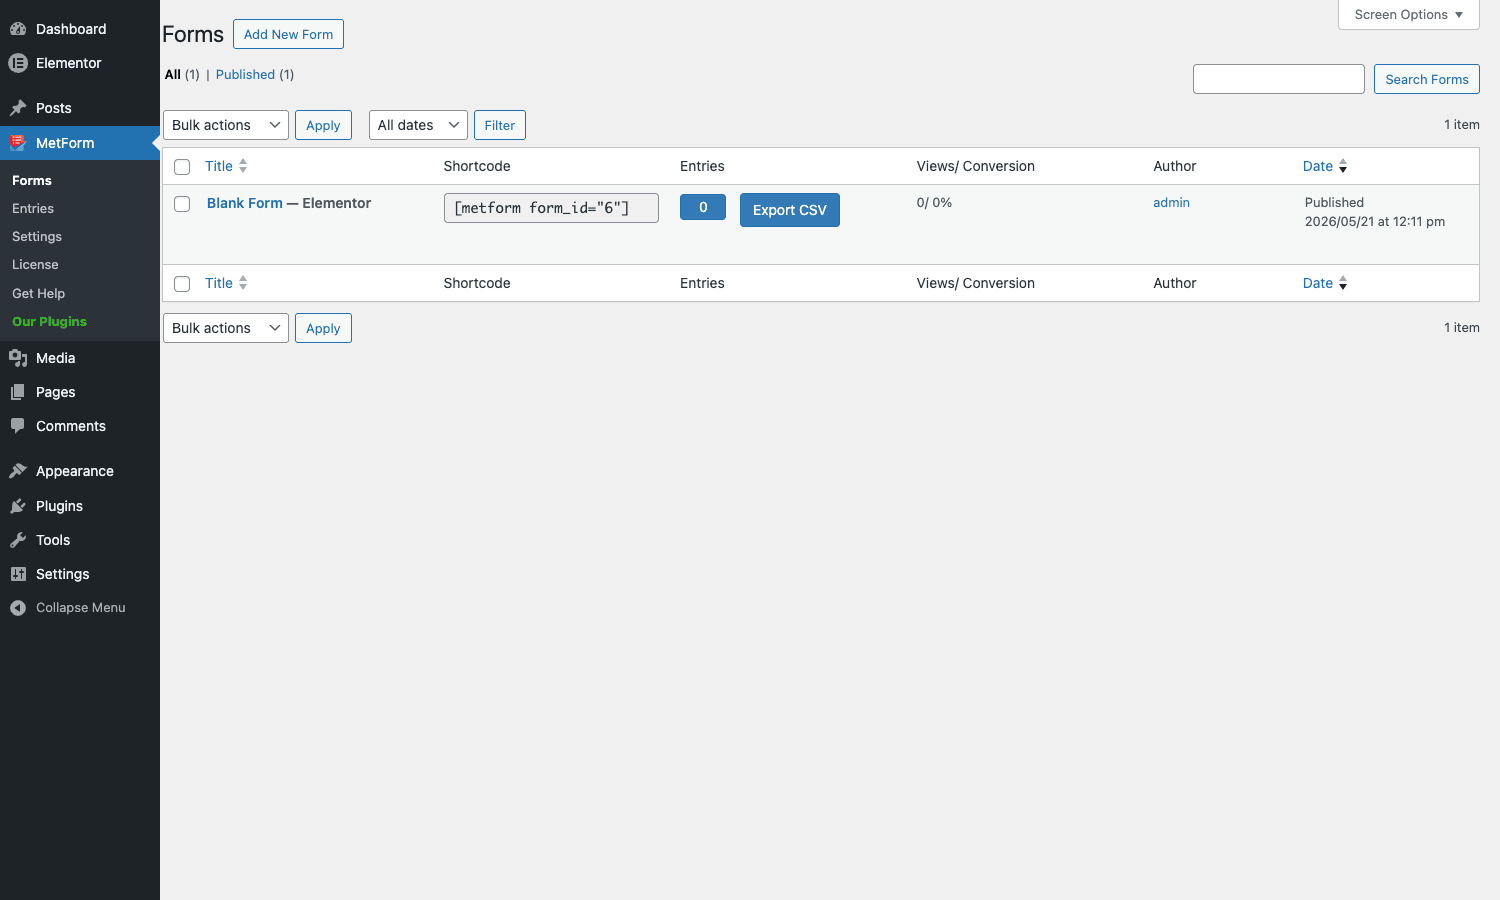
The list view exposes view count and submission count per form, which is unusual – most form plugins show submissions but not raw view counts. That ratio is useful for spotting forms that get a lot of impressions but never convert.
The form-settings modal explained
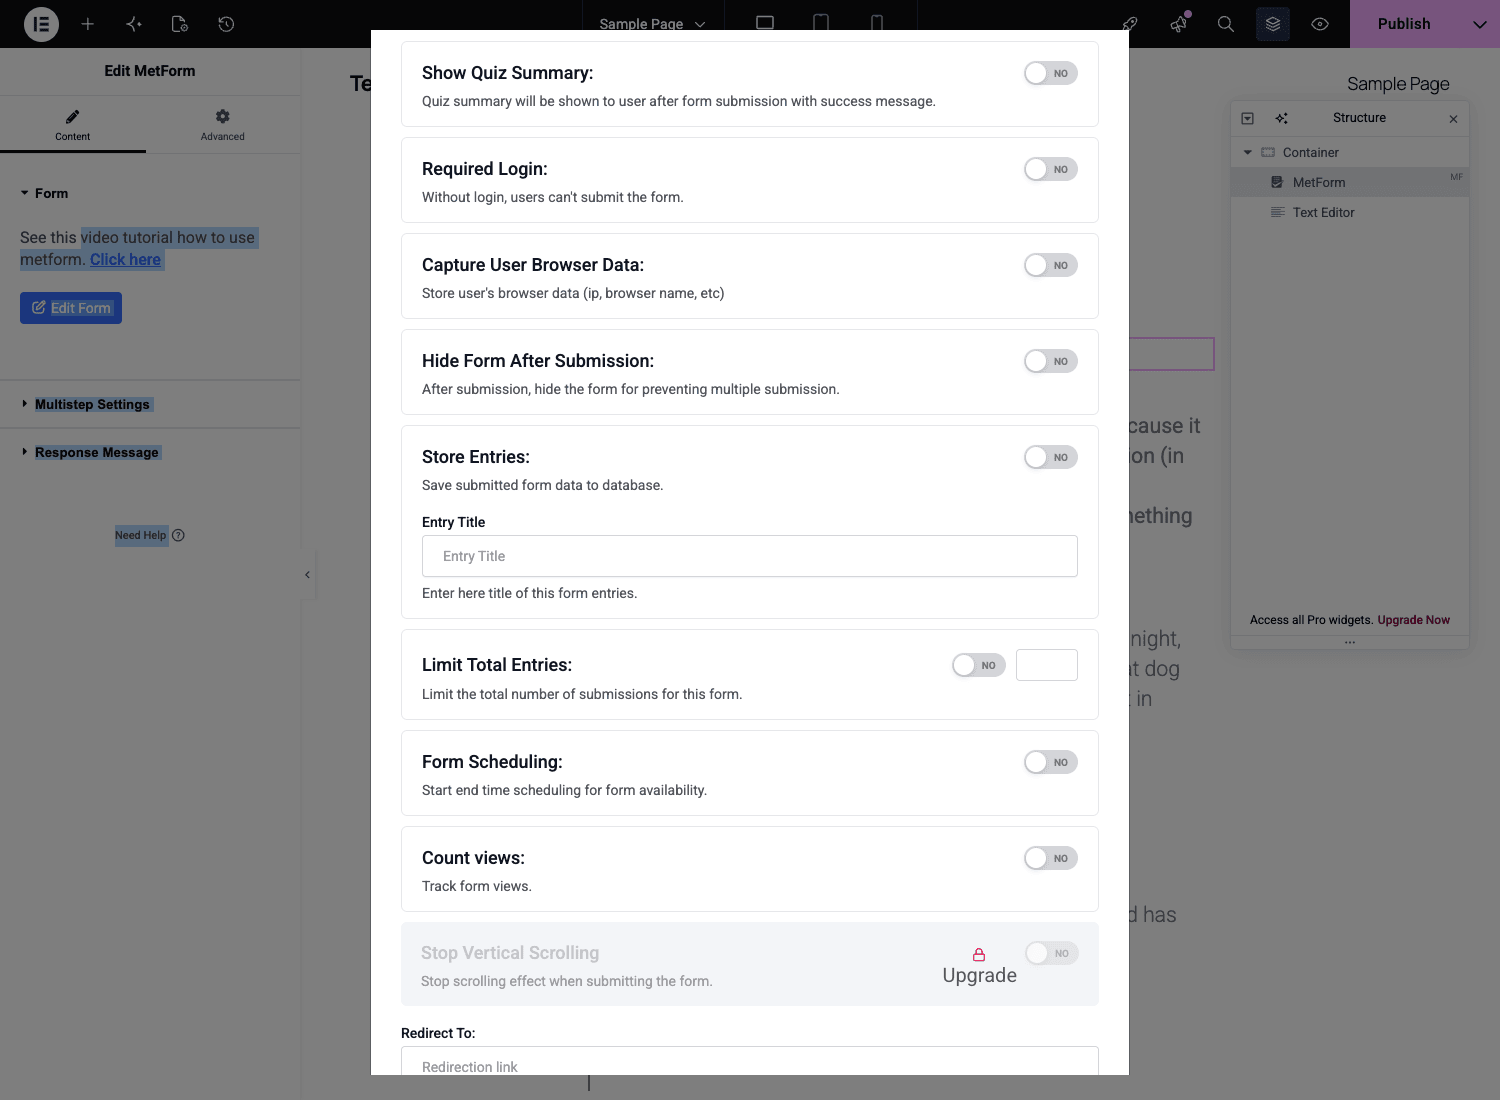
When you click Edit Form, a separate modal opens on top of the editor. This is where you control everything that isn’t the visible field layout. It has eight tabs across the top.
General
Sets the basics. Title, success message, store entries on/off (with a custom entry title template that can reference submitted values), required-login toggle, capture-user-browser-data toggle (saves IP and user agent), hide-after-submission toggle, total entry limit, form scheduling (start and end dates with custom waiting and expired messages), view counter, optional redirect URL on success.
The capture-user-browser-data option is worth a second look. It records IP and browser string so you can spot bot floods or coordinate replies. Disable it if your jurisdiction requires explicit consent for IP storage.
Confirmation
Controls what the user sees after they hit Submit. Either show an inline success message, or redirect to a URL. If you redirect, you can append submitted field values to the URL with merge tags so the destination page can read them via query string.
Notification
Email notifications. By default the site admin gets an email when the form is submitted. You can add additional recipients, customize the from-name and reply-to (useful for routing replies straight to the submitter), and write a custom email body using merge tags that reference each form field.
Integration
The catchall tab for everything in the Newsletter Integration and Google Integration global settings. Once you’ve added your global API keys (in MetForm / Settings), each form lets you pick which provider to push to. You can map form fields to list fields, choose a list/audience, and add tags or groups.
Payment
If you have a payment field in the form (Stripe or PayPal), this tab is where you decide whether the form actually triggers a charge, what the amount is (fixed or pulled from a calculation field), the currency, and what the success and cancel pages are. Sandbox mode is a per-form toggle.
CRM
Routes submissions to Help Scout (creates a conversation), Zoho (creates a lead or contact), or HubSpot (creates a contact). Same field-mapping pattern as the newsletter integrations.
Auth
For login and register forms, this tab is where you set the default user role for new accounts, whether email verification is required, the post-register redirect, and what to do if the email already exists.
Post
For form-to-post forms, this tab is where you choose the destination post type (built-in or custom), the post status (Draft, Pending, Publish, or based on user role), the default author, and the field-to-postmeta map. This is how MetForm Pro turns a frontend form into a real-world content workflow: visitor fills the form, the entry becomes a Draft post in a custom post type, an editor reviews and publishes.
Pro-only field widgets
The free version covers the standard inputs. Pro adds twelve more. Each one is a real Elementor widget under the "Metform Pro" category in the widget panel.
- mf-mobile – international phone number input with country flag dropdown and ISO validation. Backed by libphonenumber.
- mf-calculation – read values from other fields, evaluate an expression, output a derived number. The display is read-only on the front-end so users can’t tamper with the total.
- mf-image-select – choice field where each option is a thumbnail image instead of a label. Useful for product variants or quiz visual answers.
- mf-toggle-select – choice field where each option is a card-style button. Same purpose as image-select but text-only.
- mf-simple-repeater – a group of fields the user can add or remove. The same name and email pair, repeated for each invited guest, for example.
- mf-map-location – Google Map with a movable pin, returns lat/long and a formatted address. Needs the Maps API key set in MetForm / Settings / General.
- mf-color-picker – color input with a swatch + hex code. Niche but handy for tools and customizers.
- mf-payment-method – Stripe or PayPal payment field. Used together with the Payment form-settings tab.
- mf-signature – canvas-based signature input. The signature is saved as a PNG and attached to the entry.
- mf-like-dislike – simple thumbs up / down field.
- mf-credit-card – direct credit card capture (Stripe-tokenized so the card never touches your server).
- mf-text-editor – rich text input, useful for longer free-form answers that should keep formatting.
And the three structural widgets that make multi-step possible:
- mf-next-step – button that advances to the next form step.
- mf-prev-step – button that goes back one step.
- mf-progress-step – the indicator at the top showing which step the user is on.
Conditional logic and multi-step forms
These two features deserve their own section because they are the strongest reason to upgrade from the free plugin.
Conditional fields
Every field has a Conditional Logic section in its Elementor sidebar. Turn it on, pick a control field (any other field in the form), pick a comparison (equals, not equals, contains, greater than, etc.), enter a value, and decide whether the current field should show or hide when the condition is true. You can chain multiple conditions with AND / OR.
A typical pattern: a contact form has a "Reason for contact" select with options like Sales, Support, Press. Each of those reveals a different set of follow-up fields. Sales shows a budget range and a deadline. Support shows the product version and the error message. Press shows the publication name. The user only sees the fields relevant to their reason, which is dramatically less intimidating than seeing all twenty fields at once.
Conditional logic also drives Pro features like dynamic calculation fields. A calculation field can pull values from any visible field; hiding a field with conditional logic excludes it from the formula at runtime, so a price total adapts to whatever options the user has picked.
Multi-step forms
Split a long form into smaller steps. Drop the mf-progress-step widget at the top, then group fields between mf-next-step buttons. Each section between two next-step buttons becomes a step. Add a mf-prev-step button so users can go back. Per-step validation runs when the user clicks Next, so they can’t skip past required fields without filling them.
The form-settings modal has a Multistep Settings section with options like animation (slide left/right vs fade), per-step titles for the progress bar, and whether to scroll to the top of the form on step change. Combined with conditional logic, multi-step is how you build long forms that don’t feel long. A 30-field application form can become eight steps of three or four fields each, and abandonment rates fall accordingly.
Integrations and webhooks
The integrations are configured in two places. Global API keys go in MetForm / Settings (under Newsletter Integration, Google Integration, CRM & Marketing). Per-form mappings go in the form-settings modal’s Integration / CRM / Payment tabs.
Newsletter integrations
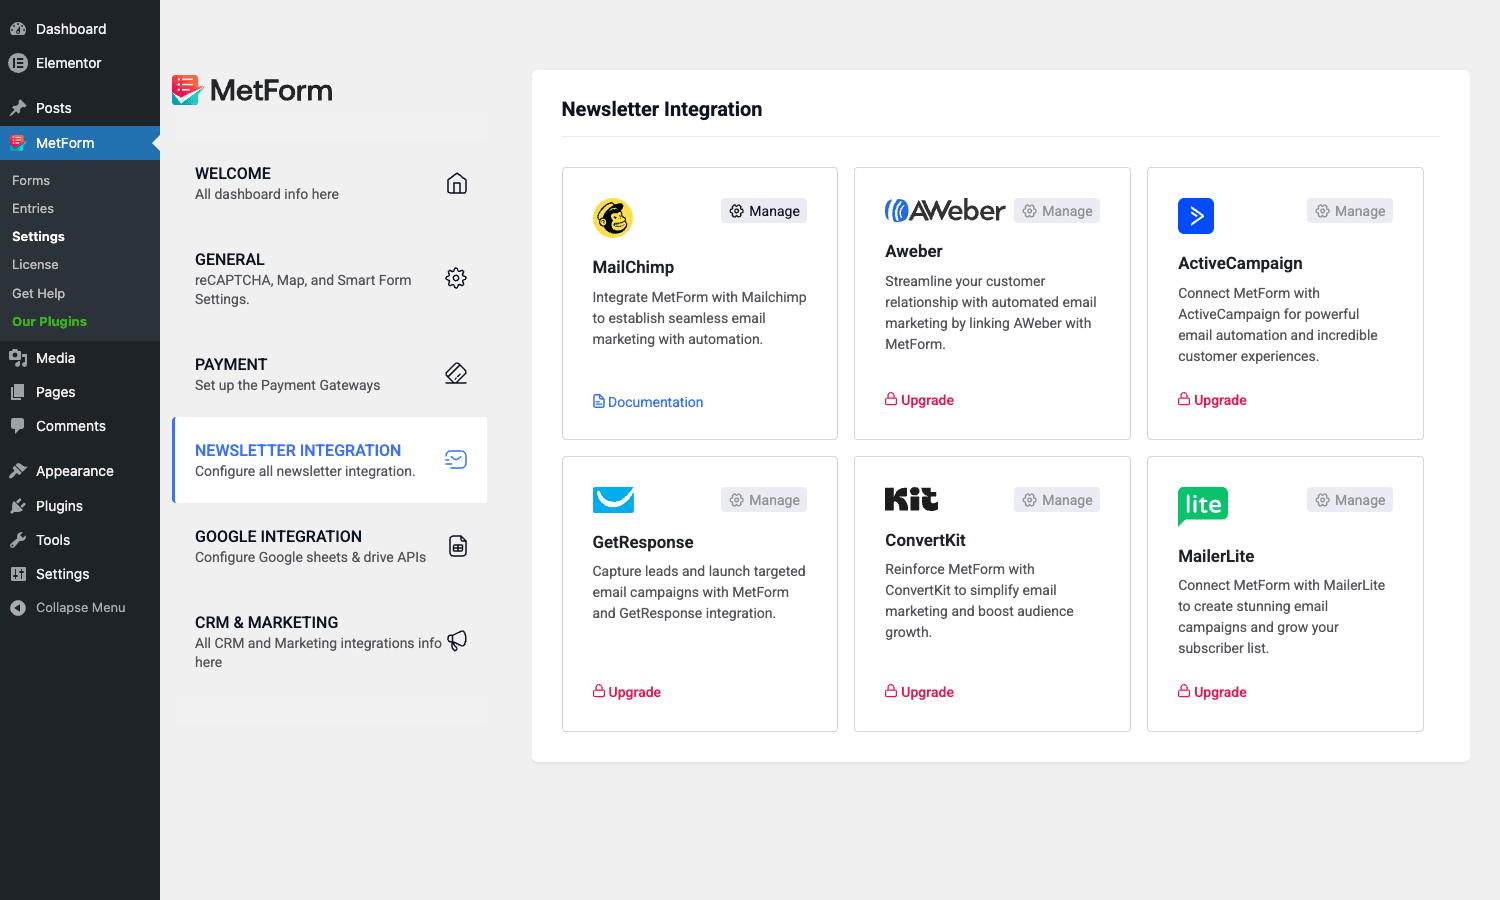
Six options ship out of the box: Mailchimp, AWeber, ActiveCampaign, GetResponse, ConvertKit, MailerLite. Each one is configured with an API key (or OAuth token, for those that support it) and exposes a list / audience picker once connected. MailPoet and Fluent CRM are configured per-form rather than globally, because they read directly from your WordPress database. After a successful submission, MetForm Pro pushes the email and any mapped fields (first name, last name, tags) to the chosen list.
CRM integrations
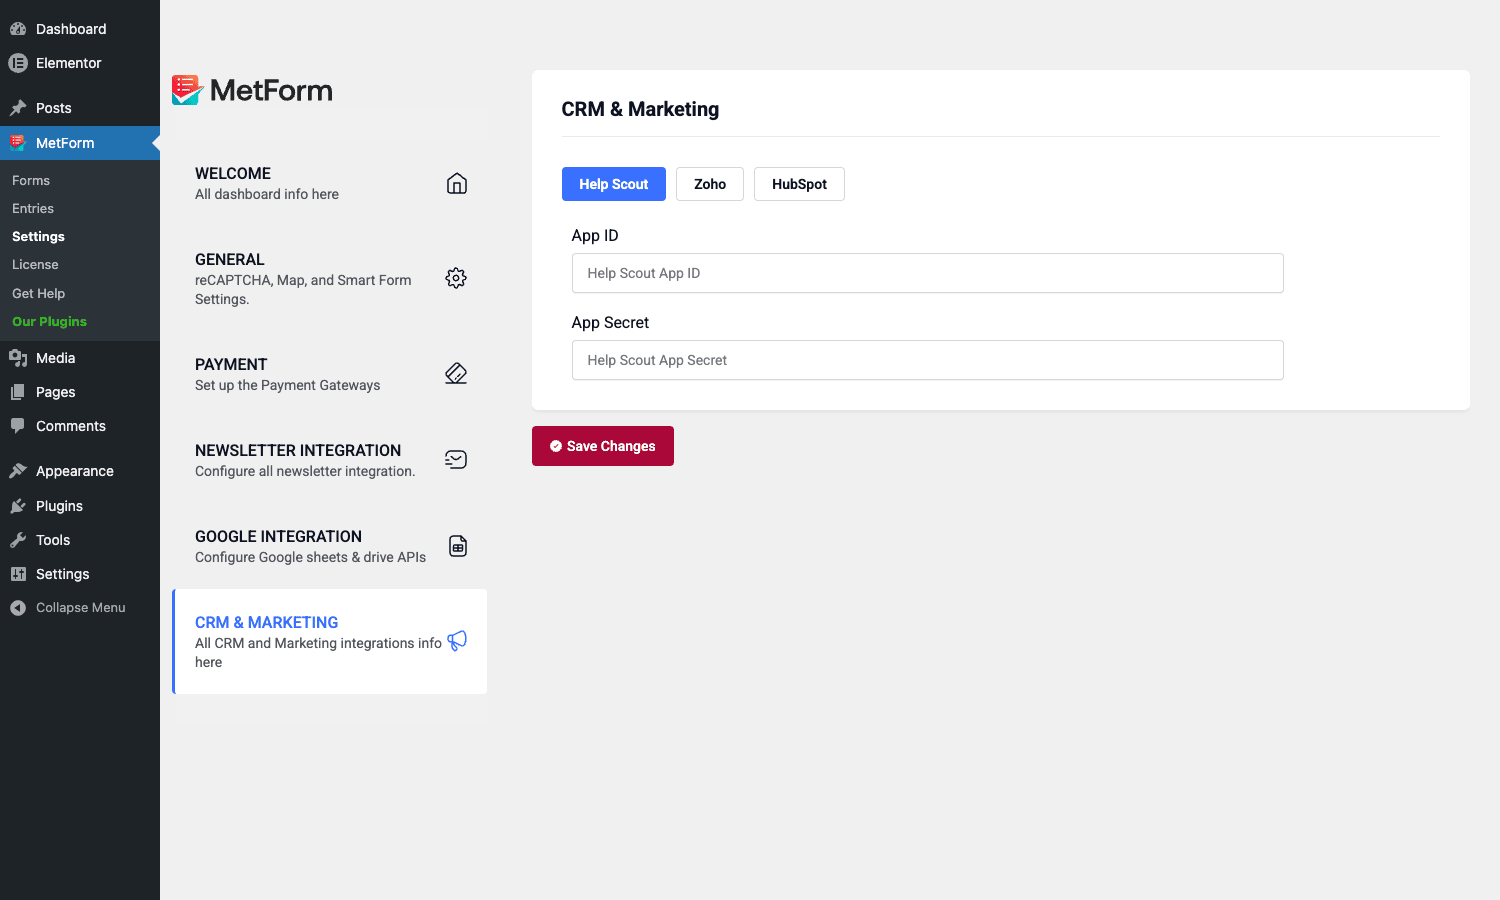
Three options here: Help Scout, Zoho, HubSpot. Help Scout creates a new conversation in your shared inbox. Zoho creates a Lead (or a Contact, depending on the integration mode) in Zoho CRM. HubSpot creates a Contact and lets you set lifecycle stage. Zoho in particular needs the right data center selected; if you’re outside the US, pick the regional endpoint in settings or the integration will fail silently.
Storage and webhooks
Google Sheets, Google Drive, Dropbox, and webhooks are the non-CRM destinations. Google Sheets appends a row per submission, with the column order set automatically from the form’s fields. Google Drive and Dropbox accept file uploads from the form and store them in your cloud account. Webhooks fire a POST with a JSON body of the entry data to any URL you configure; this is how you wire MetForm Pro into Zapier, Make, n8n, or your own internal automation.
Twilio SMS
If you have a Twilio account, MetForm Pro can fire an SMS notification to a number you specify on each form submission. Configured in MetForm / Settings under the SMS section (which the Twilio integration adds).
Payments with Stripe and PayPal
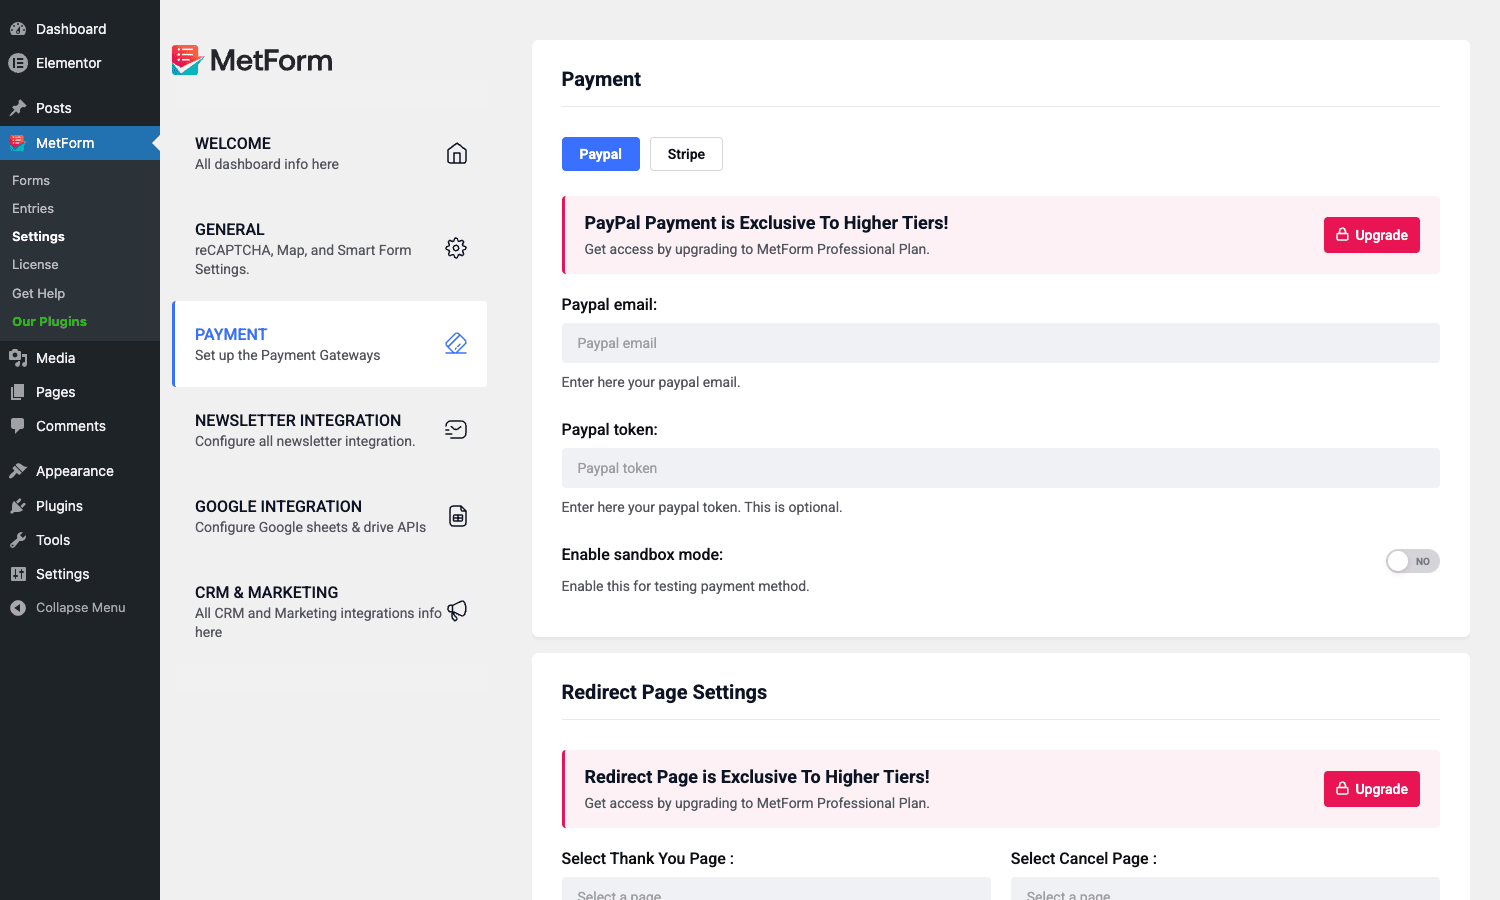
Two gateways are supported: Stripe and PayPal. They are configured globally in MetForm / Settings / Payment (you enter your live or test API keys once), and then enabled per form in the form-settings modal’s Payment tab.
The flow is:
- Add a Payment Method widget (mf-payment-method) to your form. The widget renders a Stripe or PayPal button at runtime.
- Optionally add a Calculation widget. If you do, MetForm Pro uses its computed value as the charge amount, so the form effectively becomes a configurable product page (pick options on the left, see the price update on the right, pay the right amount).
- In the Payment tab, set the currency, the success page, the cancel page, and whether to test in sandbox mode.
The vendored Stripe SDK lives in core/integrations/payment/stripe-php/, so MetForm Pro doesn’t depend on you installing Stripe’s Composer package. The credit-card widget (mf-credit-card) tokenizes cards via Stripe Elements before sending anything to your server, so PCI scope stays narrow.
PayPal is currently sandbox-and-redirect only (no in-page PayPal Smart Buttons). After submission the user is bounced to PayPal, then redirected back to your success or cancel URL via the IPN handler in core/integrations/payment/ipn/.
A reasonable use case: order forms where the price depends on options (size, color, add-ons), donation forms where the user types the donation amount, event registration where the price depends on ticket type and attendee count. For a full e-commerce catalog, use WooCommerce instead. MetForm Pro’s WooCommerce integration can also turn a form submission into a WooCommerce cart item, so you can use MetForm to collect configuration data and hand off the actual checkout to WooCommerce.
Form entries, exports, and PDF export
If Store Entries is enabled on a form (it is by default), every submission becomes a row in the metform-entry custom post type. View entries at MetForm / Entries. The list shows submission title, source form name, referral page, email-verified status, date, and per-row export actions.
Click into an entry to see the full submitted payload, formatted as a label-value table. From there you can also download the entry as a CSV or as a PDF. The PDF export is generated server-side by core/integrations/pdf-export/ and includes any uploaded images and signatures inline.
For bulk export, the Forms list has a per-form Export CSV button. That dumps every entry for the form into a single CSV, which is what you want for offline analysis or to import into your CRM.
The Submission column in the Forms list shows 0/ 0% until you have entries. The percentage is the conversion rate against form views; this only makes sense if you’ve left Count views on in the form settings, since otherwise the denominator is zero.
Developer reference
This section is for the people who will customize MetForm Pro programmatically. Hooks, filters, and patterns the plugin exposes for site builders and theme developers.
Action: extend the dashboard with a custom tab
MetForm’s dashboard uses dynamic tabs. To add your own sub-tab in MetForm / Settings, hook two actions: one for the tab nav, one for the tab content.
add_action('metform_settings_subtab_my_panel', function () {
 echo '<a class="mf-setting-nav-link" href="#mf-my_panel">My Panel<br><small>Extra Settings</small></a>';
});

add_action('metform_settings_subtab_content_my_panel', function () {
 echo '<div id="mf-my_panel" class="mf-setting-tab-content">';
 echo '<h2>My Custom Settings</h2>';
 echo '<p>Whatever I want here.</p>';
 echo '</div>';
});
This is how the plugin itself adds the Payment, Newsletter, Google, and CRM panels. Reuse it for site-specific options.
Filter: register additional Pro-style input widgets
The free MetForm plugin enumerates its known input widgets in a filter. MetForm Pro hooks into it to add the twelve Pro widgets. You can do the same for an in-house widget.
add_filter('metform/onload/input_widgets', function ($widgets) {
 $widgets[] = 'mf-my-custom-input';
 return $widgets;
});
Pair this with a widget class that extends \Elementor\Widget_Base and registers under the metform-pro Elementor category.
Action: hook the plugin-loaded event
Fires after MetForm Pro finishes initializing. Useful if you have a plugin that depends on MetForm Pro being available.
add_action('xpd_metform_pro/plugin_loaded', function () {
 // safe to reference MetForm_Pro\Plugin::instance() here
});
REST: extend MetForm Pro’s API
MetForm Pro’s REST routes follow the pattern /wp-json/metform-pro/v1/{prefix}/{action}/{param}. The base class is MetForm_Pro\Base\Api, which abstracts the route registration so subclasses just declare $prefix and $param and implement methods named get_{action}, post_{action}, etc.
namespace My_Plugin;

use MetForm_Pro\Base\Api;

class My_Route extends Api {
 public function config() {
 $this->prefix = 'my-feature';
 $this->param = '/(?P<id>\d+)';
 }

 public function get_thing() {
 return ['id' => $this->request['id'], 'value' => 'hello'];
 }
}

add_action('init', function () {
 new \My_Plugin\My_Route();
});
After that, a GET to /wp-json/metform-pro/v1/my-feature/thing/42 runs get_thing() and returns the array as JSON.
Render hook: inject content into form tabs
The form-settings modal exposes a mf_push_tab_content_{parent_id} action that lets you append content inside any tab.
add_action('mf_push_tab_content_general', function () {
 echo '<div class="mf-input-group">';
 echo '<label>My Extra Setting</label>';
 echo '<input type="text" name="my_setting">';
 echo '</div>';
});
This is what you’d use to add a custom field to the General tab of the per-form settings.
Email-verification webhook
MetForm Pro can require users to confirm their email before the entry is stored. The confirm endpoint is at /wp-json/metform-pro/v1/email-verification/confirm/{unique_key}. If you build a custom email template that wraps the verification link in your own branding, you’ll want to know that pattern.
License filter
The plugin loads license state from api.wpmet.com/public/license.
Performance, compatibility, and gotchas
Form plugins have a reputation for being heavy. They load form-specific JS on every page, even pages that don’t have a form, and the validation libraries pile up. MetForm Pro is reasonably well-behaved by form-plugin standards but it isn’t free.
Asset loading
MetForm Pro only loads its frontend JS and CSS when a page actually renders a MetForm widget or shortcode. On a page without a form, the plugin’s assets don’t enqueue at all. This is the right behaviour; some competing plugins enqueue globally.
That said, on a page with a form, MetForm Pro pulls in jQuery, Elementor’s frontend, libphonenumber (for the mobile widget if used), Stripe.js (if you have a payment field), Google Maps JS (if you have a map widget), and the plugin’s own form bundle. The page weight on a contact form sits around 250 KB of JS, which is normal for the category but still worth knowing.
Elementor dependency
The free MetForm plugin will not register its admin menu without Elementor active. Install Elementor first, then MetForm, then MetForm Pro. If Elementor is deactivated later, MetForm’s admin pages disappear (the plugin throws a "MetForm requires Elementor" notice on the Plugins page). Your saved forms are not deleted; they reappear the moment Elementor is reactivated.
WooCommerce integration
The WooCommerce integration is a hidden gem and a known source of confusion. It’s enabled by default when both plugins are active, but the cart action only fires for forms that have a calculation field. If you can’t get a form to add itself to the cart, check that your calculation widget is set up correctly and that the form-settings modal has WooCommerce as the destination.
reCAPTCHA quirks
Google reCAPTCHA v3 is supported but it can flag legitimate submissions as low-score and block them. Test with a real browser, not just a headless smoke test, and consider switching to hCaptcha if you see false positives. The Smart Form mode in General settings reduces required JS but is less aggressive at filtering spam, so use it only on forms with low spam risk.
Edge cases
A few things that bite people:
- Conditional logic and required fields. A hidden field that is also required will silently block submission. Set a field as not required if your conditional logic might hide it.
- Calculation rounding. The calculation widget evaluates math at JavaScript precision. Currency totals can show 19.349999… instead of 19.35. Wrap the calculation in
round(expr, 2)to fix. - Email verification race. If you have email verification on, the submission isn’t stored until the user clicks the confirm link. Don’t rely on a webhook firing immediately, it fires after confirmation.
- Sandbox mode payments. Sandbox is per-form, but the API keys are global. If you forget to switch keys to live after testing, your "production" form will keep going to Stripe test mode. Double-check before launch.
- Map widget needs a paid Google Cloud project. Google Maps no longer has a free tier; you need a billing account on Google Cloud and a Maps JavaScript API key. The plugin will silently 403 if your key is missing the right APIs.
MetForm Pro versus the alternatives
For users picking between MetForm Pro and other options, here is how it compares.
Versus Elementor Pro’s built-in Form widget
Elementor Pro ships with a Form widget. It is included in your Elementor Pro license and handles basic contact / signup forms well. MetForm Pro is the right choice if you need conditional fields (Elementor Pro’s Form has none), multi-step (Elementor Pro’s Form has none), payments (Elementor Pro’s Form has none), or a saved entries database (Elementor Pro’s Form just emails the result by default; "Submissions" is a separate feature with limits). Elementor Pro is fine for "name, email, message" forms; MetForm Pro is necessary for anything beyond that.
Versus form-builder-style plugins (WPForms, Gravity Forms, Fluent Forms)
WPForms, Gravity Forms, and Fluent Forms Pro all live in their own admin UI. You build the form there, then embed a shortcode. That works fine, but the form’s visual styling is constrained to whatever options the plugin’s editor exposes. MetForm Pro inverts this: each field is an Elementor widget you can drag and style without leaving Elementor.
If you don’t use Elementor, MetForm Pro is the wrong choice. WPForms, Gravity Forms, or Fluent Forms Pro will be a better fit. If you do use Elementor heavily and you’ve been wishing form styling matched the rest of the page exactly, MetForm Pro is built for that scenario.
Formidable Forms Pro and WS Form PRO sit in the form-builder camp too. Formidable leans into views and data-display; WS Form leans into precision UI control. Both are worth a look if you care more about data-out than styling.
Versus other Elementor addon suites
The big Elementor widget packs (Essential Addons for Elementor, Premium Addons Pro for Elementor, ElementsKit Pro) all include a form widget of some kind. ElementsKit Pro is the closest because it shares the Wpmet codebase with MetForm and integrates similarly. Essential Addons’ form is basic. Premium Addons’ contact form is fine for short forms. None of them have the depth that MetForm Pro brings around conditional logic, multi-step, payments, and integrations. If you already use one of those widget packs for general Elementor enhancement, MetForm Pro slots in alongside; you don’t need to pick one or the other.
Versus JetEngine forms
JetEngine has its own form builder that ties tightly into JetEngine’s CCT (custom content types) and dynamic content. If you’re building a directory or a complex content app on JetEngine, its forms are the natural choice because they understand JetEngine’s data model out of the box. MetForm Pro is more general-purpose and easier to use for marketing-style forms (contact, signup, application). For directories and listing-driven sites, JetEngine. For everything else on Elementor, MetForm Pro.
Versus Forminator and FormCraft
Forminator (free from WPMU DEV) is a solid free option with quizzes and polls baked in. FormCraft and Everest Forms Pro live in the form-builder-plugin space. Both are sensible if you don’t use Elementor.
Pricing and licensing
Wpmet sells MetForm Pro on its own website with three tiers: a single-site license, an unlimited-site license, and a lifetime option. Pricing fluctuates with promotions, so check wpmet.com for the current rate. The license includes one year of updates and support; renewing extends it.
MetForm Pro is GPL-licensed, which is why it’s available on GPL Times. You don’t get vendor support, but you do get the full feature set and ongoing version updates from the store.
The free MetForm plugin stays free on wordpress.org and is required as the base. The Pro plugin only adds widgets and integrations; it does not replace the free one.
Common use cases
Real scenarios where MetForm Pro fits well:
1. Multi-step contact form for a service business
A digital agency wants a contact form that asks About You, About Your Project, and Your Budget across three steps. The steps reveal different fields based on whether the project is "Website", "Marketing", or "Other". The final step pre-fills the timeline based on the budget. The whole thing matches the agency’s brand because every field is styled in Elementor.
2. Configurable product order form
A custom poster shop. The user picks a size (small/medium/large with image-select), picks a finish (matte/glossy with toggle-select), specifies quantity, and the form calculates the line total live. Stripe takes the payment and the user sees a thank-you page. No WooCommerce needed; the form is faster and lighter for a single-product shop.
3. Job application with file upload and email verification
A hiring portal. The form has a multi-step layout (Personal Info, Experience, Resume Upload), with the upload going to Google Drive. Email verification is on so applicants confirm their email before the entry is stored. The submission triggers a Help Scout conversation tagged "Jobs / 2026". HR replies from inside Help Scout.
4. Donation form with arbitrary amounts
A non-profit. The form has a Donate text field where the user types an amount, plus a Frequency select (one-time / monthly). The calculation widget rolls those into a single charge, and the Stripe widget collects payment. The submission goes to Mailchimp’s donor list with the amount as a tag.
5. Quiz with graded results
A driving school. The form is set to Quiz mode (set in the form-settings General tab). Each multiple-choice question has a correct answer assigned in its widget options. After submission the form shows a Quiz Summary with the user’s score and which answers they got wrong. The entry is stored so the school can see overall pass rates.
6. Frontend post submission for a community site
A small magazine wants reader-submitted stories. The form has a title, content (rich text editor widget), category select, and image upload. The form-to-post action turns each submission into a Draft post in the "Stories" custom post type. Editors review, edit, and publish from the normal WordPress editor.
Frequently asked questions
Does MetForm Pro work without Elementor?
No. MetForm Pro is an Elementor extension. The free MetForm plugin requires Elementor, and the Pro plugin requires the free plugin. If you don’t use Elementor, look at WPForms, Gravity Forms, Fluent Forms Pro, or WS Form PRO instead.
Can I export form entries to my CRM?
Yes. Direct integrations exist for Help Scout, Zoho, HubSpot, Mailchimp, AWeber, ActiveCampaign, GetResponse, ConvertKit, MailerLite, MailPoet, and Fluent CRM. For anything else, use webhooks to fire submissions into Zapier, Make, n8n, or your own endpoint.
Does MetForm Pro support file uploads?
Yes. The file-upload widget is in the free plugin. Pro adds direct upload to Google Drive and Dropbox so files don’t sit on your server.
How are submissions stored?
In a custom post type called metform-entry. Each submission is a post; the field values are stored as post meta. Standard WordPress backup tools capture them automatically.
Can I limit the number of submissions per form?
Yes. In the form-settings General tab there’s a Limit Total Entries option with a custom "form has reached its limit" message. There’s also Form Scheduling for time-based limits.
Is there spam protection?
Yes. Google reCAPTCHA (v2 and v3), hCaptcha, and a "Smart Form" honeypot mode. Configure once in MetForm / Settings / General and toggle on per-form as needed.
Can MetForm Pro handle payments?
Yes, via Stripe and PayPal. The mf-payment-method widget renders the gateway button at runtime. Amounts can be fixed or derived from a Calculation field, so configurator-style pricing works out of the box.
Will MetForm Pro slow down my site?
It only loads its frontend JS on pages that actually contain a MetForm widget or shortcode. On a contact-form page expect around 250 KB of additional JS, which is normal for the category. Pages without forms are not affected.
What happens when my license expires?
The plugin keeps working; you just stop getting updates and vendor support.
Can I migrate forms between sites?
The forms are a custom post type so they export with the standard WordPress export tool. You can also copy the form’s database row directly. Just make sure the destination site has both MetForm and MetForm Pro active first.
How do I add custom validation to a field?
Use the Elementor widget’s Validation section, which exposes regex patterns, min/max length, and required toggles. For server-side validation, hook into MetForm’s submission filter (the free plugin exposes metform/entry/submit and similar) and reject the submission with an error message.
Final thoughts
The reason MetForm Pro is interesting isn’t any single feature. It’s that the team picked a specific user (an Elementor builder) and built every feature around what that user needs. The form is on the canvas. The fields are Elementor widgets. The styling is Elementor’s normal style controls. The integrations are configured once globally and reused per form. The conditional logic and multi-step add the depth that makes the plugin justify its Pro price.
If you don’t use Elementor, MetForm Pro is the wrong choice and there are better alternatives. If you do use Elementor heavily and you’ve been wrestling with shortcoded forms that look pasted in, this is a meaningfully better workflow. Drop the MetForm Pro plugin from GPL Times onto a staging site, spend an hour building a multi-step form with conditional logic and a payment field, and you’ll know within that hour whether it fits how you work.
For developers, the plugin is a good citizen. It uses normal action and filter hooks, exposes a clean REST base class, and doesn’t override Elementor’s data model. Extending it (custom widgets, custom dashboard tabs, custom submission hooks) follows ordinary WordPress and Elementor patterns.
Worth a serious look if your stack already runs on Elementor and you’ve outgrown the basic form widgets.
Useful references:
- MetForm on wordpress.org – the free base plugin
- Wpmet documentation site – vendor docs for MetForm and MetForm Pro
- Elementor documentation – Elementor’s own docs, useful for understanding the editor MetForm builds on
- WordPress developer hooks reference – the action/filter API patterns described above