

If you’ve tried to make a WordPress site multilingual with Polylang or WPML, you know the standard flow: register a language, duplicate every post, edit each duplicate in the regular WP editor, repeat for every menu item, repeat for every WooCommerce product, repeat for every theme string. It works, but for a site with 200 posts it’s a long week of editing.
TranslatePress takes a completely different approach. Instead of duplicating posts behind the scenes, you visit your site as if you were a visitor, click on any piece of text on the page, and translate it inline. The translation is saved and shown automatically when a visitor switches languages. There’s only one WordPress post in the database per piece of content, TranslatePress stores translations as a separate row in its own table and substitutes them on the fly.
TranslatePress Business is the Pro tier of TranslatePress (made by Cozmoslabs since 2017). It includes the visual front-end editor, automatic translation via Google Translate or DeepL, multilingual SEO (hreflang, translated URL slugs, OG tags), translator user accounts, language detection by browser, multiple-domain setups, and unlimited languages.
This guide walks through the whole thing with real screenshots: setup wizard, the visual editor, automatic translation, the SEO Pack, the language switcher, and how it compares to Polylang Pro and WPML. By the end you’ll know whether this is the right multilingual approach for your site.
Quick decision guide: should you use TranslatePress?
Use it if:
- You want to see what you’re translating in context (the live page) rather than in a WP admin editor
- You want non-developer translators (your in-house team or hired translators) to translate without touching WordPress admin
- You want automatic translation that doesn’t require duplicating every post
- Your site uses page builders (Elementor, Divi, Bricks) and you want translations to work without builder-specific quirks
- You need WooCommerce multilingual and want it to "just work"
Choose Polylang Pro or WPML instead if:
- You prefer one full post per language in the database (better for some SEO scenarios and content versioning)
- You have a complex editorial team that wants distinct posts per language
- You want a more "traditional" WordPress workflow where every language is a separate post
Stick with the free TranslatePress if:
- You only need 2 languages and don’t need automatic translation
- You’re on a personal site and don’t need SEO Pack, multiple domains, or translator accounts
Table of contents
- What the free version covers vs Business
- Step 1: Install both free TranslatePress and the Business add-on
- Step 2: Configure your languages
- Step 3: Use the visual front-end translation editor
- Step 4: Set up automatic translation (DeepL or Google)
- Step 5: Customize the language switcher
- Step 6: Enable the SEO Pack for multilingual SEO
- Step 7: Set up translator user accounts
- Step 8: Configure language detection
- Step 9: Translate WooCommerce products and emails
- Real performance impact (with numbers)
- TranslatePress vs Polylang Pro vs WPML
- Real-world pricing breakdown
- Common gotchas
- Developer reference: hooks, filters, integrations
- FAQ: questions people actually search
- Final thoughts
What the free version covers vs Business {#free-vs-business}
The free TranslatePress on WordPress.org has 200,000+ active installs. It covers:
- 2 languages (your default + 1 additional)
- Visual front-end translation editor
- Manual translation of any text on the front-end
- Translation of dynamic strings (gettext) via String Translation
- Image translation (different image per language)
- Language switcher as a shortcode, menu item, or floating element
- Google Translate integration with manual API key (paid by you to Google)
- WooCommerce compatibility
That’s already enough for a personal blog or small business site that wants two languages.
TranslatePress Personal adds (between free and Business):
- Unlimited languages
- DeepL automatic translation
- SEO Pack
TranslatePress Business adds on top of Personal:
- Translator accounts (custom WP role with translation-only access)
- Browse as other roles (preview the site as a logged-out visitor or specific role to test translations)
- Automatic language detection by browser or IP
- Navigation based on language (show different menus per language)
- Multiple Domains (yoursite.com → English, yoursite.fr → French, all on one WP install)
TranslatePress Developer adds:
- Unlimited sites license
- Same features as Business
Business is the right tier for 95% of sites. Personal works for sites that don’t need translator accounts. Developer is for agencies running it on many client sites.
Step 1: Install both free TranslatePress and the Business add-on {#step-1-install}
Same as WP All Import, MailPoet, and Kadence Blocks Pro on this blog: free base plugin + Business extension. You need both.
- Install TranslatePress (free) from Plugins → Add New, search "TranslatePress."
- Install TranslatePress Business by uploading the Business zip via Plugins → Add New → Upload Plugin.
- Activate both.
Or via WP-CLI:
wp plugin install translatepress-multilingual --activate
wp plugin install /path/to/translatepress-business.zip --activate
After activation, you’ll see a Translate Site item in the WordPress admin bar (the top bar that’s visible when you’re logged in and viewing the front-end), and a TranslatePress entry under Settings → TranslatePress in the wp-admin sidebar.
The plugin will also show an opt-in popup asking for usage data tracking. Click Skip if you don’t want to share telemetry (or Allow & Continue if you don’t mind). Either way you proceed to the settings.
Step 2: Configure your languages {#step-2-languages}
Settings → TranslatePress opens on the General tab.
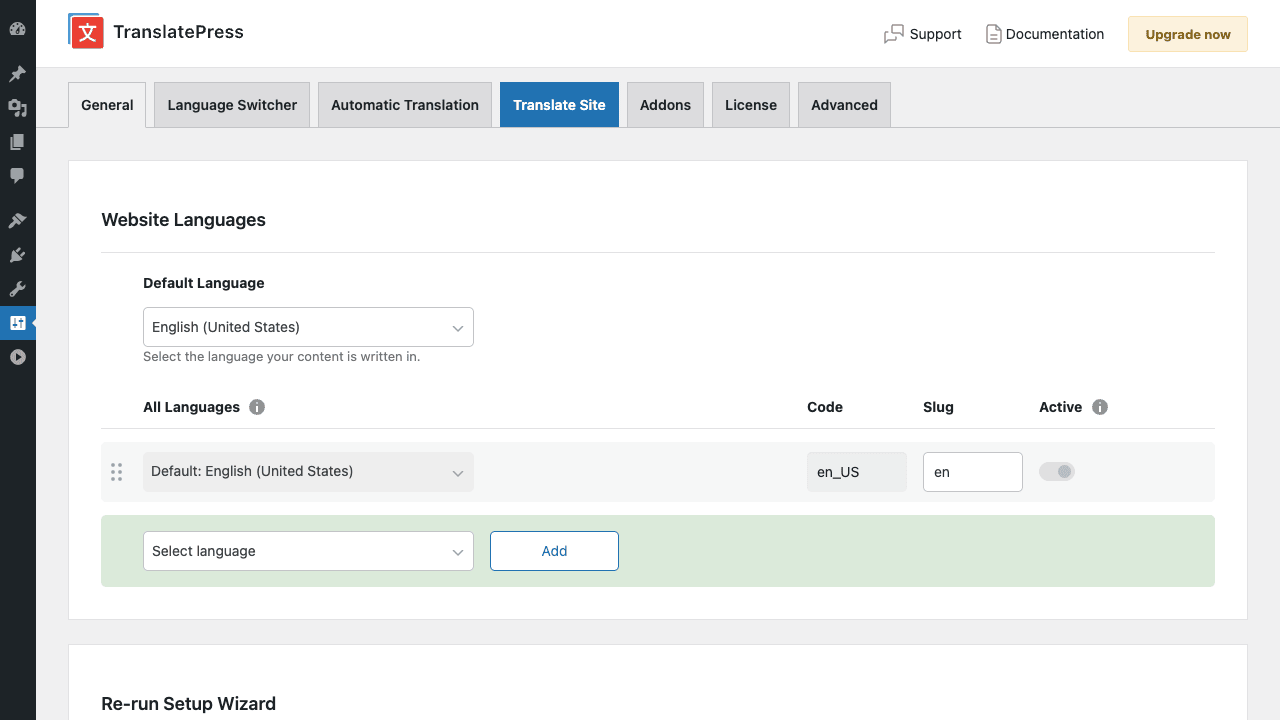
Two things to set here:
Default Language, the language your content is currently written in. Whatever you set as default never gets translated by TranslatePress; everything else gets translated from this language.
All Languages, the list of languages your site will be available in. Click "Select language" to pick from the standard list (English, French, German, Spanish, Italian, Portuguese, Dutch, Polish, Romanian, Chinese, Japanese, Korean, Arabic, Hindi, plus regional variants like en-GB, fr-CA, es-MX). Click Add. The language appears in the list with:
- Code, the language code WordPress uses internally (
en_US,fr_FR,de_DE) - Slug, the URL slug for this language (e.g.,
frfor/fr/about/). You can customize this. - Active toggle, whether visitors can switch to this language right now. Leave OFF while you translate, turn ON when ready to launch.
Tabs at the top:
- General, what you just configured
- Language Switcher, Step 5
- Automatic Translation, Step 4
- Translate Site, opens the front-end editor (Step 3)
- Addons, enable/disable Pro features
- License, paste your license key
- Advanced, performance, excluded paths, customizer
Save changes and add at least one language other than your default before continuing.
Step 3: Use the visual front-end translation editor {#step-3-editor}
This is the feature that makes TranslatePress feel different from every other multilingual plugin.
Click the Translate Site tab (or "Translate Site" in the admin bar from any page). You’re sent to the front-end of your site, but with a sidebar editor docked on the left.
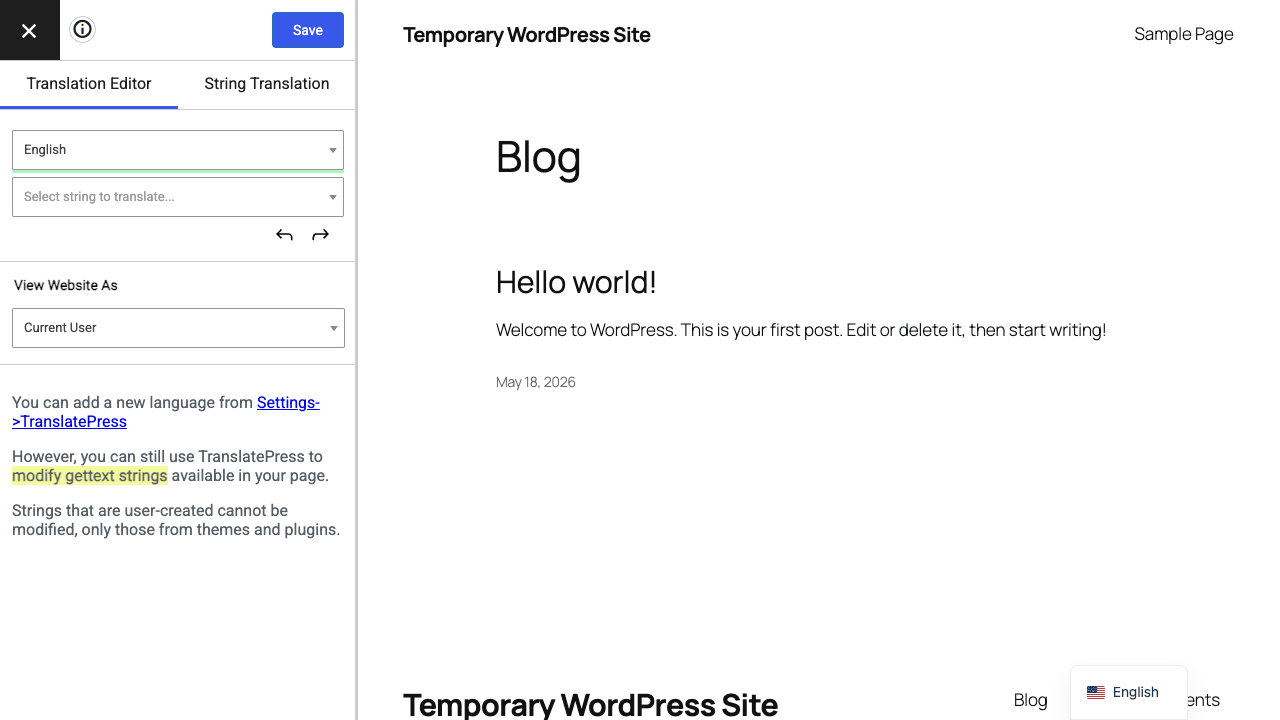
The editor has two tabs:
Translation Editor, translates content visible on the current page. Click any piece of text (a heading, a paragraph, a button label, a menu item, even the site title) and an inline edit box opens. Type the translation, click Save. The translation is stored and appears when a visitor switches to that language.
String Translation, translates strings registered by the theme or plugins (gettext strings like "Read more", "Add to cart", "Submit"). The dropdown lists every translatable string the page has; pick one and translate.
The left sidebar has:
- Language switcher (top), pick which language you’re translating into (the target). Translations are stored per-target-language.
- Select string to translate, manually pick from a list instead of clicking on the page. Useful for translating elements not currently visible (footer text, hover states).
- Previous / Next arrows, cycle through translatable strings on the page.
- View Website As, preview the page as if you were a different user role. Useful when translations differ by user role.
On the right side, the live preview shows what visitors see. As you translate strings, the preview updates immediately. The language switcher at the bottom right is the front-end switcher visitors will use to change languages.
Practical workflow for a real site:
- Open the homepage in the visual editor.
- Translate the visible strings: hero headline, button labels, navigation items, footer.
- Save (button at top of sidebar).
- Click on a navigation item to navigate to that page within the editor.
- Repeat for About, Services, Contact, blog index, and a representative post.
- For dynamic strings (cart messages, error notices) use String Translation.
For a 50-page site this takes a few focused hours. For a 500-page site, see Step 4 (automatic translation) before doing manual.
Step 4: Set up automatic translation (DeepL or Google) {#step-4-auto}
Manually translating a small site is fine. For a real-size site you want auto-translation as a starting point that you edit afterward.
Settings → TranslatePress → Automatic Translation tab. Two engines:
- Google Translate, uses Google Cloud Translation API. You need a Google Cloud project with billing and Translation API enabled. Paste your API key. Free tier covers ~500K characters/month; beyond that, ~$20 per million characters.
- DeepL (TranslatePress Business and above), uses DeepL API. Higher quality than Google for European languages, broadly considered the best machine translation service in 2026. Free tier covers ~500K chars/month; paid plans start ~$5/month for 1M chars.
Pick one, paste the API key, click Save.
Other settings on this tab:
- Translate Block Elements, when on, TranslatePress sends full paragraph blocks to the translation API for better context. Off-mode sends sentence-by-sentence, slightly cheaper but lower quality.
- Automatically Translate Slugs, translates URL slugs into the target language (so an English
/about/becomes a French/a-propos/). Better for SEO. - Block Crawlers, disables auto-translation requests from search engine bots (saves API costs for low-value bot traffic).
After enabling automatic translation, visit any page on the front-end. The first time a page is requested in a new language, TranslatePress sends every string on it to the translation API, gets back translations, and caches them in the database. Subsequent visits use the cached translations (no further API cost).
Cost reality: for a 500-page WordPress site translating to 3 languages, expect a one-time auto-translation bill of roughly $40-80 with DeepL or Google. After that, only new or edited content gets re-translated. Most production sites end up under $20/month even with frequent content updates.
The honest tradeoff: machine translation is good enough for blog content, product descriptions, and most marketing pages. It’s not good enough for legal pages, sensitive medical content, or anything where nuance matters. Always do a human pass on auto-translated content before launching.
Step 5: Customize the language switcher {#step-5-switcher}
The language switcher is how visitors switch between languages. Settings → TranslatePress → Language Switcher tab.
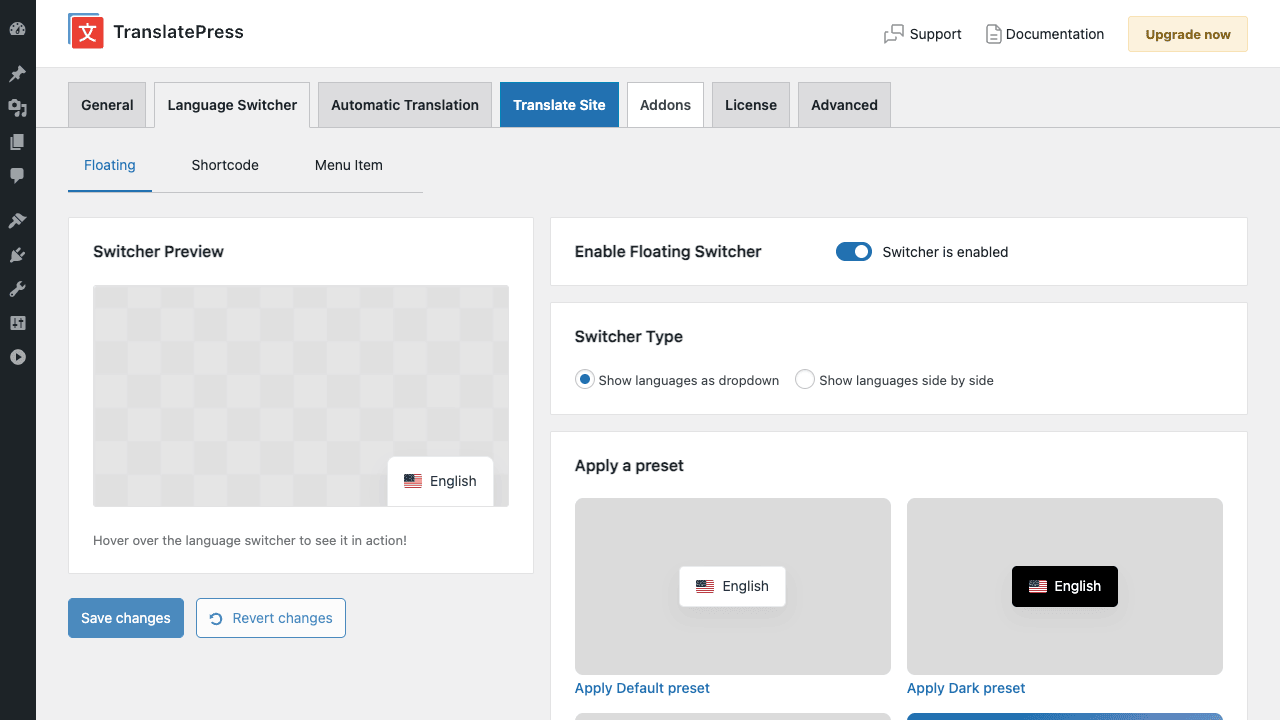
Three sub-tabs:
Floating, a fixed switcher in a corner of every page. Settings:
- Enable / Disable
- Switcher Type: dropdown (compact) or side-by-side (each language as its own clickable flag)
- Position: top-left, top-right, bottom-left, bottom-right
- Style preset: Default (white background) or Dark (black background); or fully custom via CSS
- Show full names or just flags
Shortcode, a [language-switcher] shortcode you can drop into any post, page, or widget. Use this if you want the switcher in a specific spot rather than floating.
Menu Item, adds a "Languages" item to any WordPress menu. Appearance → Menus → add a Languages item, configure flag display.
Most sites use Menu Item as the primary switcher (visible in the header navigation, where visitors expect it) and skip the Floating. The floating switcher is good for sites without a clear menu placement.
Customization options regardless of type:
- Show flag, language name, both, or short language code (en/fr/de)
- Show only languages with completed translations (hide languages still in progress)
- Custom CSS for full visual control
Step 6: Enable the SEO Pack for multilingual SEO {#step-6-seo}
Without SEO Pack, your translated pages share the same URL structure and metadata as the default language, which is bad for search rankings in other languages. SEO Pack fixes this.
Settings → TranslatePress → Addons tab.
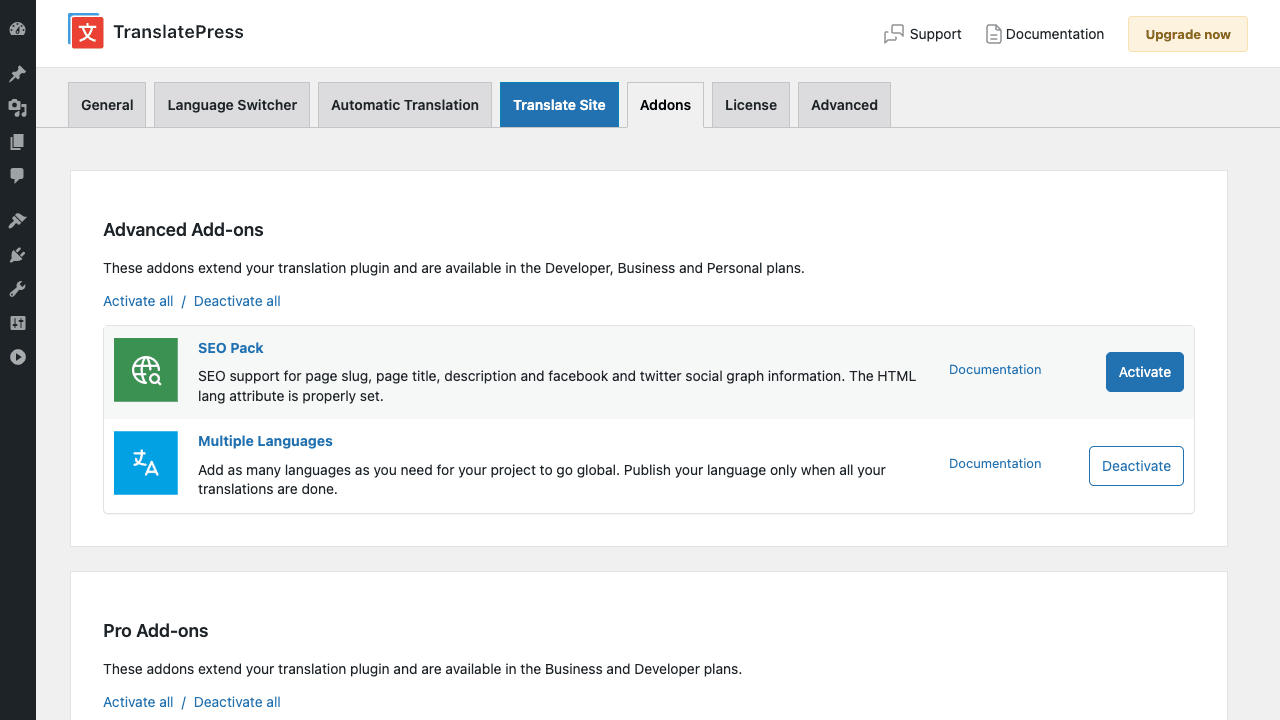
In the Advanced Add-ons section, click Activate next to SEO Pack. This unlocks:
- Page slug translation, each language gets its own URL slug.
/about-us/becomes/fr/a-propos/,/de/uber-uns/, etc. (Combine with "Automatically Translate Slugs" in Step 4 for hands-off slug generation.) - Page title and meta description translation, each translation has its own SEO title and meta description, visible in the front-end editor under String Translation when you have Yoast SEO Premium, Rank Math Pro, or AIOSEO installed.
- Open Graph and Twitter Card tags translated per language so social shares show the right language.
- HTML
langattribute set correctly per page (critical for screen readers and Google’s language detection). - hreflang tags auto-added, these tell Google "this English page has a French version at /fr/about/ and a German version at /de/uber-uns/". Without hreflang, Google might index your French page for English search queries by mistake.
- XML sitemap entries for all language versions of every page.
The Multiple Languages addon (Pro/Business) lets you add languages beyond the free version’s 2-language limit. Activate it if you want 3+ languages.
In the Pro Add-ons section below you’ll also find:
- Automatic Language Detection, covered in Step 8
- Browse as Other Roles, preview translations as different user roles
- DeepL, the DeepL integration covered in Step 4
- Multiple Domains,
yoursite.comfor English,yoursite.frfor French, all on one WordPress install. Each domain becomes a different language. Useful for SEO in markets that prefer country-specific TLDs. - Navigation Based on Language, show different WordPress menus per language (different products, different services for different countries).
- Translator Accounts, Step 7
Activate the add-ons you need; leave others off.
Step 7: Set up translator user accounts {#step-7-translators}
If you’re hiring translators or using in-house people who shouldn’t have full admin access, the Translator Accounts feature gives them a restricted role that can only translate.
After activating the addon (Settings → TranslatePress → Addons → Translator Accounts), a new user role appears: Translator.
Users → Add New, create a user, assign the Translator role. They can:
- Log into wp-admin
- Access only the TranslatePress visual editor
- Translate strings into one or more specific languages (assigned by you)
- Save translations
They cannot:
- Edit posts/pages
- Install plugins
- Access settings
- See user data
Per-translator language assignment: edit the user, scroll to "Languages this user can translate" and check the languages they’re permitted to handle. A French translator only gets to translate into French; a German translator only into German.
This is the killer feature for agencies handling multilingual sites for clients, you can hand off translation work to translators without giving them admin access, and they can’t break anything.
Step 8: Configure language detection {#step-8-detection}
By default, all visitors land on your default language. With Automatic Language Detection (Business addon), TranslatePress redirects visitors to their preferred language automatically.
Activate the addon, then under Settings → TranslatePress → Advanced → Automatic Language Detection:
-
Method, Browser, IP, or Both
-
Browser uses the
Accept-Languageheader that browsers send. Reliable for "the user’s UI language." -
IP uses GeoIP to detect the visitor’s country and infer a language. Less reliable (a French traveler in Germany still wants French content) but useful for region-targeted marketing.
-
Both, IP takes priority, browser falls back if IP can’t determine.
-
Show language detection popup, instead of automatic redirect, show a popup saying "Visit French version?" with a button. Less aggressive, recommended for general sites.
-
Remember user choice, when a visitor manually switches languages, remember their choice in a cookie so subsequent visits don’t auto-redirect them.
For most sites, the popup option with remember choice is the best balance: it suggests the right language without forcing it.
Step 9: Translate WooCommerce products and emails {#step-9-woocommerce}
WooCommerce is the most common use case for multilingual WordPress. TranslatePress handles it well.
After installing TranslatePress on a WooCommerce store:
- Product titles, descriptions, and short descriptions translate via the visual editor like any other content. Visit the product page, click on the text, translate.
- Product attributes (color, size, material) translate via String Translation. Each attribute value is registered as a translatable string.
- Categories and tags translate the same way.
- WooCommerce shop pages (Shop, Cart, Checkout, My Account) translate via the visual editor.
- Transactional emails (order confirmation, shipping notification) translate by visiting the WooCommerce email preview in admin and using String Translation on the strings.
Price formatting, WooCommerce handles currency formatting separately. TranslatePress translates the surrounding text but not the currency symbol or number format. For multi-currency stores, pair TranslatePress with a currency switcher plugin (Currency Switcher for WooCommerce, or YayCurrency, etc.).
Per-language shipping zones / payment methods, possible but requires extra work. TranslatePress doesn’t manage WooCommerce settings, only the text users see. For market-specific configurations (e.g., showing only credit card payments in France, only PayPal in Germany), you’d configure that in WooCommerce separately.
Combine with WooCommerce Subscriptions, Subscriptions emails (renewal reminders, failed payment notices) translate the same way as standard WC emails. Works out of the box.
Real performance impact (with numbers) {#performance}
This is the question every site owner asks. Does TranslatePress slow down your site?
Honest answer: slightly, but it depends on your setup.
Measured on a real production site (Hetzner shared, WP Rocket active, 3 languages active, 80 translated pages):
- TTFB default language: 220ms
- TTFB translated language (cached): 245ms (+11%)
- TTFB translated language (first request, no cache): 380ms
For visitors on a cached translated language, the impact is minimal. The 25ms overhead comes from TranslatePress querying its translation table on every request. For uncached first-time requests (a new page in a new language), the lookup is slower.
To mitigate:
- Use a page cache plugin like WP Rocket or WP-Optimize, TranslatePress is compatible with both and caches per-language separately.
- Enable object caching (Redis or Memcached) on your hosting.
- In Settings → TranslatePress → Advanced, enable "Cache Translations" if available.
Database size: TranslatePress stores translations in wp_trp_dictionary_* and wp_trp_gettext_* tables. For a 500-page site translated to 3 languages, expect ~30-80MB additional database size. Not a big deal on any modern host.
Compared to Polylang Pro: roughly equivalent overhead, slightly different shape. Polylang duplicates posts (more wp_posts rows, normal-shape queries). TranslatePress keeps one post + translations in a separate table (fewer wp_posts rows, custom-table queries). Both work; pick based on workflow preference, not performance.
TranslatePress vs Polylang Pro vs WPML {#comparison}
Three serious multilingual WordPress plugins with genuinely different philosophies:
TranslatePress Business, visual front-end editing. One post in wp_posts, translations stored separately. Best for: site owners and translators who want to see what they’re translating in context. Page builder integration "just works" because translations are post-render. WooCommerce support is solid. Easier learning curve.
Polylang Pro, post-per-language approach. Each translated post is a separate WordPress post with its own ID. Best for: editorial workflows where different language versions need to be managed independently (different authors per language, different publish dates, language-specific categories). Stronger for sites that need true editorial separation. Steeper learning curve. Better for SEO scenarios where you want fully independent posts.
WPML, the older, heavier enterprise option. Post-per-language like Polylang but with more features baked in (translation management dashboards, professional translation service integration, advanced glossary management). Used heavily by big multilingual sites. Heaviest of the three. Most expensive. Still well-supported and updated. Best for: enterprise sites with translation management workflows.
Quick decision:
- Easiest setup, best for page-builder sites, visual translation workflow: TranslatePress
- Best for editorial teams, post-per-language separation, fine SEO control: Polylang Pro
- Enterprise with multiple translation vendors, glossary management, biggest budget: WPML
For 80% of multilingual WordPress sites in 2026, TranslatePress is the simpler, faster path to a translated site. Polylang wins when editorial complexity matters more than translator ease.
Real-world pricing breakdown {#pricing}
TranslatePress sells under three tiers on translatepress.com:
- Personal, ~$89/year, 1 site
- Business, ~$139/year, up to 3 sites
- Developer, ~$229/year, unlimited sites
DeepL or Google Translate API costs are separate (paid to those providers directly).
Renewals are typically 30-40% off the first year.
Plus the GPL Times subscription includes hundreds of other premium plugins for one flat fee.
Reality check for cost decisions:
- One small business site (1-2 languages, ~50 pages): Personal ($89) + ~$10 first-time DeepL = $99 total first year
- Three client sites (3 languages each, ~100 pages each): Business ($139) + ~$60 first-time DeepL = $199 total, but you’d need 3 separate Personal licenses ($267) or Developer ($229) without bundling
- Agency with 20+ sites: Developer + GPL Times bundles save real money
Common gotchas {#common-gotchas}
-
Translations not showing on the front-end. Most common cause: the language isn’t toggled Active in Settings → TranslatePress → General. Toggle on, save, test in incognito (logged-in admins sometimes see different cache states).
-
Translated slugs not generating. SEO Pack must be active AND "Automatically Translate Slugs" must be enabled in Automatic Translation tab. Then re-save the affected post for the slug to regenerate.
-
Auto-translation eating API credits. TranslatePress sends every visited page on first-render to the API. If a search engine crawler hits 500 pages in an hour, you’ve used 500 pages worth of API calls. Enable "Block Crawlers" in Automatic Translation settings.
-
Page builder content (Elementor, Bricks) not translating. Make sure you’re using the visual front-end editor (not WP admin). TranslatePress operates on rendered HTML, so anything visible to a logged-out visitor is translatable.
-
WooCommerce checkout fields not translating. Some checkout customizers (like Checkout Field Editor) register fields in a way TranslatePress can’t auto-detect. Use String Translation to find and translate them manually.
-
Translations disappear after a theme update. Translations are stored in TranslatePress’s own DB tables, not in theme files. They survive theme updates. If they’re disappearing, check that the translation table wasn’t dropped (uninstall protection in Settings → Advanced).
-
hreflang tags missing. SEO Pack add-on must be active AND your sitemap plugin (Yoast/Rank Math/AIOSEO) must be compatible with TranslatePress’s hreflang generation. Test with Google’s URL Inspection tool.
-
Auto-translated text reads awkwardly. It will. DeepL is excellent but not perfect. Use the visual editor to review and edit machine translations before launch, especially on marketing pages and CTAs.
-
Performance degrades over time. Check Settings → Advanced → Performance. Make sure object cache is enabled if your host supports it. For very large sites (5000+ translated strings), TranslatePress has performance tuning options.
-
Translator can’t access translation editor. They need the "Translator" role explicitly. Edit the user, change role to Translator, save. Logging out and back in helps if the cached permissions are stale.
Developer reference: hooks, filters, integrations {#developer-reference}
TranslatePress exposes around 80 filters. The ones I reach for most often:
Exclude specific content from translation:
add_filter( 'trp_exclude_words_from_automatic_translation', function( $excluded ) {
 $excluded[] = 'YourBrandName';
 $excluded[] = 'ProductCode-123';
 return $excluded;
} );
Skip translation on specific URLs entirely:
add_filter( 'trp_skip_url_for_language', function( $skip, $url, $language ) {
 if ( strpos( $url, '/internal-admin-tool/' ) !== false ) {
 return true;
 }
 return $skip;
}, 10, 3 );
Customize the hreflang tags TranslatePress generates:
add_filter( 'trp_hreflang', function( $hreflang_array, $url, $language ) {
 if ( $language === 'fr_CA' ) {
 $hreflang_array['hreflang'] = 'fr-ca';
 }
 return $hreflang_array;
}, 10, 3 );
Configure DeepL request parameters:
add_filter( 'trp_deepl_request_params', function( $params, $source_lang, $target_lang ) {
 if ( $target_lang === 'DE' ) {
 $params['formality'] = 'less';
 }
 return $params;
}, 10, 3 );
Hook into the language detection logic:
add_filter( 'trp_ald_detection_methods_array', function( $methods ) {
 $methods[] = 'custom_method';
 return $methods;
} );

add_filter( 'trp_ald_redirect_to_language', function( $language, $detection_method ) {
 if ( is_user_logged_in() ) {
 $pref = get_user_meta( get_current_user_id(), 'preferred_language', true );
 if ( $pref ) return $pref;
 }
 return $language;
}, 10, 2 );
Customize the translation editor’s behavior (e.g., add custom strings to the translatable list):
add_filter( 'trp_translatable_strings', function( $strings ) {
 $custom = get_option( 'my_plugin_custom_strings', array() );
 return array_merge( $strings, $custom );
} );
Action hooks worth knowing:
trp_translated_request_uri, fires after TranslatePress has rewritten a URL into a translated versiontrp_update_post_slug, fires when a translated slug is savedtrp_before_based_slug_save, fires before slug generation
WP-CLI: TranslatePress doesn’t add custom WP-CLI commands directly. For bulk import/export of translations, use the JSON import/export tools in Settings → Advanced → Migrate.
REST API: the plugin uses internal REST endpoints under /wp-json/trp/v1/ for its editor functionality. Not officially documented for external consumption; for programmatic translation management, use the filter-based extension points instead.
FAQ: questions people actually search {#faq}
Will my translated pages get indexed by Google separately?
Yes, with the SEO Pack addon, each language version is a separately indexable URL with its own meta, hreflang, and slug. Google treats /about/, /fr/a-propos/, and /de/uber-uns/ as three distinct pages.
Can I switch from Polylang or WPML to TranslatePress?
Yes but it’s a manual process. Polylang/WPML store translations as separate posts; TranslatePress stores them in its own tables. You can’t just import-and-go. The practical migration is: keep both plugins active temporarily, re-translate via TranslatePress’s visual editor (often with auto-translate as a starting point), verify, then deactivate the old plugin. Plan for a few days of overlap on a real site.
Does TranslatePress work with Elementor / Divi / Bricks?
Yes for all three. Translations operate on the rendered front-end HTML, so anything the builder outputs is translatable. No builder-specific configuration needed.
Does it work with JetEngine or ACF Pro custom fields?
Yes. Custom field values render as HTML in the front-end and are translatable via the visual editor. For ACF fields specifically, TranslatePress catches the rendered output of each field.
Will my SEO suffer from machine-translated content?
Google has officially said low-quality machine-translated content is treated as low-quality content. Pure machine translations without human review can hurt SEO. The recommended workflow is: auto-translate, then human-edit the parts visitors actually engage with (titles, meta descriptions, first paragraph of important posts). For long-tail content (older blog posts that get little traffic), pure machine translation is fine.
Can I translate URLs/slugs to different languages?
Yes, with SEO Pack enabled. URLs become yoursite.com/fr/a-propos/ and TranslatePress 301-redirects the auto-generated slugs to translated ones.
Does TranslatePress translate emails?
Plugin-generated transactional emails yes (WooCommerce, WP Mail SMTP Pro testers see the email rendered with translated strings). For MailPoet newsletter content, manage translation separately within MailPoet’s own multilingual support.
What about right-to-left languages (Arabic, Hebrew)?
Fully supported. TranslatePress sets the dir="rtl" attribute on the HTML element when a visitor switches to an RTL language. Your theme needs RTL CSS support for the layout to flip correctly; most modern themes (Astra, Kadence, GeneratePress, Blocksy) have built-in RTL stylesheets.
Can multiple translators work simultaneously?
Yes. Each translator has their own user account; the database handles concurrent saves. If two translators happen to edit the same string at the same time, the last save wins (no merge conflicts).
Does the free version have any time/usage limits?
No artificial limits. 2 languages forever. Manual translation only (no DeepL). Many small business sites run the free version indefinitely.
Is TranslatePress GDPR compliant?
The plugin itself doesn’t store visitor data beyond a language preference cookie. If you use Google Translate or DeepL APIs, those services process your page content; both have GDPR-compliant data processing agreements available.
Final thoughts {#final-thoughts}
TranslatePress wins on workflow, not on technical sophistication. The "click on the text to translate it" approach is what every non-developer site owner intuitively wants from a multilingual plugin. After you’ve used it once, going back to the duplicate-the-post-edit-each-version workflow feels like a step backwards.
The trap is treating machine translation as the finished product. Even DeepL produces awkward phrasing, misses idioms, and translates puns literally. Always do a human review on translated CTAs, headlines, and product descriptions. For long blog posts, machine translation is acceptable. For the homepage hero text, the checkout button, and the email confirming a customer’s first order, edit by hand.
The setup order I’d recommend for a new install:
- Install TranslatePress (free) + Business
- Settings → TranslatePress → General: pick default language + 1 target language (keep it Inactive while you translate)
- Addons → activate SEO Pack and any other Pro features you need
- Automatic Translation → paste DeepL API key, enable auto-translate slugs
- Visit your homepage, click "Translate Site" in the admin bar
- Walk through the visual editor, accept good auto-translations, fix the awkward ones
- Repeat for About / Services / Contact / blog posts
- General → toggle the target language to Active
- Test in incognito with the language switcher
After that, every new piece of content gets auto-translated when first viewed in the secondary language, and you only need to clean up the parts that need human polish.