

The simplest WordPress migration workflow looks like this: click Export on the old site, download a single file, click Import on the new site, drag the file onto it, wait, done. That’s it. No SFTP, no database export/import, no search-and-replace SQL scripts, no Duplicator installer with its 47 confirmation screens. Just one file, two clicks per site.
All-in-One WP Migration (by ServMask) is the WordPress plugin that made this workflow famous. 5+ million active installs, in the top 10 most-installed WordPress plugins ever. The free version works up to a 50MB upload limit. The Unlimited Extension (the paid Pro tier) removes that limit, letting you move any-size site without touching server config or splitting the export into chunks.
This guide walks through what All-in-One WP Migration actually does, how the free plugin pairs with the Unlimited Extension, the export and import flows with real screenshots, search-and-replace use cases, and honest comparison with Duplicator Pro and UpdraftPlus.
Quick decision guide: should you use All-in-One WP Migration?
Use it if:
- You want the simplest possible migration workflow (one file in, one file out)
- You’re moving between hosting providers and don’t want to learn each host’s migration tool
- You build sites locally and push to production (or vice versa) frequently
- You need search-and-replace baked into the migration (changing domain or table prefix)
- You don’t mind a one-time license fee for the Unlimited Extension to skip the 50MB free-version limit
Choose Duplicator Pro instead if:
- You need scheduled backups + migration in one tool
- You want incremental backups (only changed files since last backup)
- You need cloud storage integration (S3, Google Drive, Dropbox)
- You’re migrating very large sites (50GB+) and want streaming uploads
Choose UpdraftPlus instead if:
- Your primary need is backups, with migration as a secondary use
- You want backups scheduled and stored in multiple cloud locations
- You’re not actually migrating, just protecting
Stick with the free All-in-One WP Migration if:
- Your site is under 50MB (small blog, fresh install)
- You only need migration occasionally, not as part of a workflow
Table of contents
- What "Unlimited Extension" actually unlocks
- Step 1: Install free All-in-One WP Migration + the Unlimited Extension
- Step 2: Understand the three core screens
- Step 3: Export your site (with real settings explained)
- Step 4: Use search-and-replace during export
- Step 5: Configure advanced export options
- Step 6: Pick the right export destination
- Step 7: Import the site on the destination
- Step 8: Manage backups stored on the server
- Step 9: Set up cloud storage extensions
- Step 10: Common migration scenarios walked through
- Real performance and file size impact
- All-in-One WP Migration vs Duplicator Pro vs UpdraftPlus
- Real-world pricing breakdown
- Common gotchas
- Developer reference: hooks, filters
- FAQ: questions people actually search
- Final thoughts
What "Unlimited Extension" actually unlocks {#unlimited-extension}
The free All-in-One WP Migration plugin has 5M+ active installs on WordPress.org. It includes:
- Full-site export, single
.wpressfile containing database + uploads + themes + plugins + custom code - Drag-and-drop import with WordPress’s standard
upload_max_filesizelimit (often 2-50MB on shared hosting) - Search and replace on export, replace any text in the database (most common: changing the domain)
- Advanced export options to exclude specific tables, plugins, themes, or media
- Free destination support: Local file download only
The Unlimited Extension (the paid Pro tier in this article) adds:
- Unlimited upload size, import any-size file without touching
php.inior.htaccess. This is the killer feature. - Chunked upload, splits large files into small chunks that bypass server upload limits
- Streaming uploads, handles slow connections without timing out
That’s literally the only thing the Unlimited Extension does. It removes the upload limit on import. For free, you can export any size site (the export creates the file on the server). The bottleneck is the import, and for sites over the host’s upload_max_filesize, you can’t import without either changing PHP settings (often impossible on shared hosting) or buying the Unlimited Extension.
Other paid ServMask extensions (sold separately):
- Dropbox Extension, push exports to Dropbox
- Google Drive Extension, push to Google Drive
- Amazon S3 Extension, push to S3 bucket
- OneDrive Extension, push to OneDrive
- Box Extension, push to Box
- Backblaze B2 Extension, push to B2
- FTP Extension, push to FTP/SFTP server
- WebDAV Extension, push to WebDAV
- DigitalOcean Spaces Extension, Backup Plus, etc.
Step 1: Install free All-in-One WP Migration + the Unlimited Extension {#step-1-install}
You need both plugins active. The free plugin provides the migration engine; the Unlimited Extension hooks into it to remove the upload size limit.
- Install All-in-One WP Migration (free) from Plugins → Add New, search "all-in-one wp migration"
- Activate it
- Install All-in-One WP Migration Unlimited Extension by uploading its zip via Plugins → Add New → Upload Plugin
- Activate it
Or via WP-CLI:
wp plugin install all-in-one-wp-migration --activate
wp plugin install /path/to/all-in-one-wp-migration-unlimited-extension.zip --activate
After activation, a new All-in-One WP Migration menu item appears in the WordPress admin sidebar with sub-items: Export, Import, Backups, Settings.
The Unlimited Extension doesn’t add its own menu item, it silently lifts the upload limit on the existing Import page. When you visit Import after installing both plugins, you should see "Maximum upload file size: Unlimited" instead of "Maximum upload file size: 50MB".
Step 2: Understand the three core screens {#step-2-screens}
All-in-One WP Migration has exactly three screens you’ll use regularly:
- Export, create a
.wpressmigration file from this site - Import, restore a
.wpressfile onto this site - Backups, list of
.wpressfiles stored on this site’s server
Plus a Settings screen for advanced configuration (HTTP timeout, chunk size, etc.) you rarely need to touch.
That’s it. No setup wizard, no configuration step before first use. Install, click Export, click Import. Most plugins try to be more, All-in-One WP Migration’s discipline in staying focused is a feature.
Step 3: Export your site (with real settings explained) {#step-3-export}
Navigate to All-in-One WP Migration → Export.
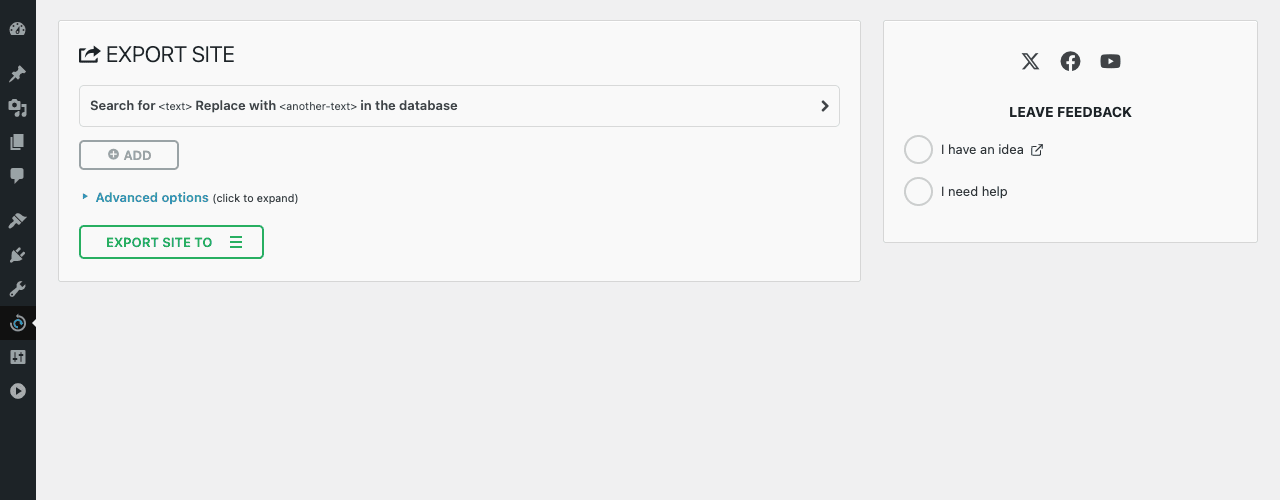
The Export Site page is deliberately simple:
- Search/Replace inputs, replace text in the database during export (Step 4)
- Add button, add additional search/replace pairs
- Advanced options, exclude specific data from the export (Step 5)
- EXPORT SITE TO, dropdown to pick the destination (Step 6)
Default workflow for a simple migration:
- Leave search/replace empty (or fill in if you’re changing domain)
- Skip Advanced options
- Click EXPORT SITE TO → File
- The plugin generates a
.wpressfile and shows a progress bar - After ~30 seconds to several minutes (depending on site size), a download button appears
- Click to download the file to your computer
The .wpress file is the complete migration package, database, uploads, themes, plugins, and any non-WordPress files in wp-content.
File size to expect:
- A fresh blog with default theme: 5-10MB
- A typical small business site: 30-100MB
- An e-commerce site with product images: 200MB-2GB
- A media-heavy site (gallery, video uploads): 5-50GB
- A multisite network: can be 100GB+
ServMask claims no real upper limit. In practice, 50-100GB exports work on most hosts; larger gets unwieldy due to disk space for the temporary file.
Step 4: Use search-and-replace during export {#step-4-search-replace}
This is the unsung superpower of All-in-One WP Migration. Most migrations require changing references to the old domain (and other strings) throughout the database. Tools like WP-CLI’s wp search-replace or the Better Search Replace plugin handle this separately. All-in-One WP Migration does it inline during export.
Common use cases:
Migrating from a local environment to production:
- Search:
http://localhost:8888Replace with:https://yoursite.com - Or:
http://my-site.local→https://my-site.com
Migrating between domains:
- Search:
https://oldsite.comReplace with:https://newsite.com - Search:
oldsite.comReplace with:newsite.com(catches HTML references too)
Staging to production:
- Search:
https://staging.yoursite.comReplace with:https://yoursite.com
Changing database table prefix:
- Search:
wp_Replace with:myprefix_ - (You also need to update
wp-config.phpon the destination after import)
Add multiple search/replace pairs by clicking Add. Each pair runs independently during export. The plugin handles serialized data correctly (where naive find/replace would break PHP arrays).
Common gotcha: Don’t search for or replace <text> literally, those are placeholder examples in the UI. Type your actual search and replace strings.
Step 5: Configure advanced export options {#step-5-advanced}
Click Advanced options (click to expand). You’ll see toggles to exclude specific data from the export:
- Do not export spam comments, useful if you have thousands of spam comments slowing down the export
- Do not export post revisions, saves significant space on edit-heavy sites
- Do not export media library, for migrations where the media is hosted elsewhere (CDN, S3 already)
- Do not export database, exports only files (rare, for theme/plugin transfers between sites)
- Do not export themes, useful when the destination already has the theme installed
- Do not export must-use plugins, for migrations where the destination has its own mu-plugins
- Do not export plugins, moves only content, not plugin configurations
- Do not export cache, excludes cached files from caching plugins
- Do not replace email domain, by default, search/replace also touches
@oldsite.comemail addresses; toggle this off if your users have email addresses you want to preserve
Recommended for most migrations:
- Enable "Do not export spam comments" (always)
- Enable "Do not export post revisions" if you don’t need the edit history
- Enable "Do not export cache" (it’ll regenerate on the destination)
Leave the others off unless you have a specific reason. The point of All-in-One WP Migration is one-file simplicity; excluding things splits your data across multiple migration approaches.
Step 6: Pick the right export destination {#step-6-destination}
Click the EXPORT SITE TO dropdown to choose where the export file goes:
- File, download to your computer (free, default)
- FTP (paid extension), push to an FTP server
- Dropbox (paid extension), push to your Dropbox account
- Google Drive (paid extension), push to Google Drive
- Amazon S3 (paid extension), push to S3 bucket
- OneDrive (paid extension), push to OneDrive
- Box (paid extension), push to Box
- Backblaze B2 (paid extension), push to B2
- DigitalOcean Spaces (paid extension), push to Spaces
- WebDAV (paid extension), push to WebDAV destination
For one-off migrations, File is enough. Download the .wpress, upload it on the destination site, done.
For repeated migrations or scheduled site exports, the cloud extensions are useful. They automate the "where does the file end up" step so you don’t manually shuffle downloads.
Important: even with cloud destinations, you still need the Unlimited Extension (or equivalent free server config) to import a large file on the destination. The cloud extensions only handle the export side.
Step 7: Import the site on the destination {#step-7-import}
On the destination WordPress site (where you want the migration to land), install both plugins (Step 1) and navigate to All-in-One WP Migration → Import.
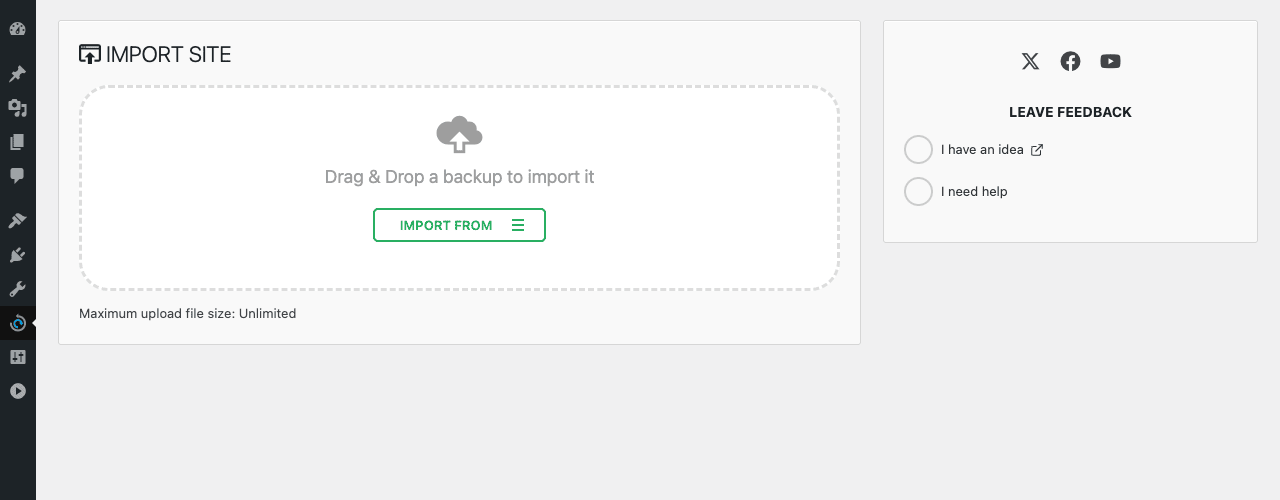
The Import page has two import methods:
- Drag & Drop, drag the
.wpressfile from your computer onto the page - IMPORT FROM dropdown, pick a remote source (cloud storage, URL, FTP, etc.)
The critical indicator at the bottom: "Maximum upload file size: Unlimited"
Without the Unlimited Extension, this would show your server’s PHP upload_max_filesize (typically 2MB-50MB on shared hosting). With the extension, it shows "Unlimited", meaning chunked uploads work for any size.
Import workflow:
- Drag the
.wpressfile onto the drop zone, OR pick a remote source via IMPORT FROM - The plugin uploads the file (chunked for large files; progress bar shows completion)
- After upload, a confirmation dialog warns: "This will overwrite your website. Are you sure?"
- Click Proceed
- The plugin extracts the file, replaces the database, restores files, runs search-and-replace
- After 30 seconds to many minutes (depending on size), the site is fully restored
- You’re automatically logged out, log back in with the credentials from the source site (not the destination)
The last point is critical and often surprises first-time users: import OVERWRITES the destination’s user accounts with the source’s accounts. After import, the destination’s admin password and username come from the source site.
Step 8: Manage backups stored on the server {#step-8-backups}
Beyond ad-hoc exports, All-in-One WP Migration can store backups on the server itself.
Navigate to All-in-One WP Migration → Backups.
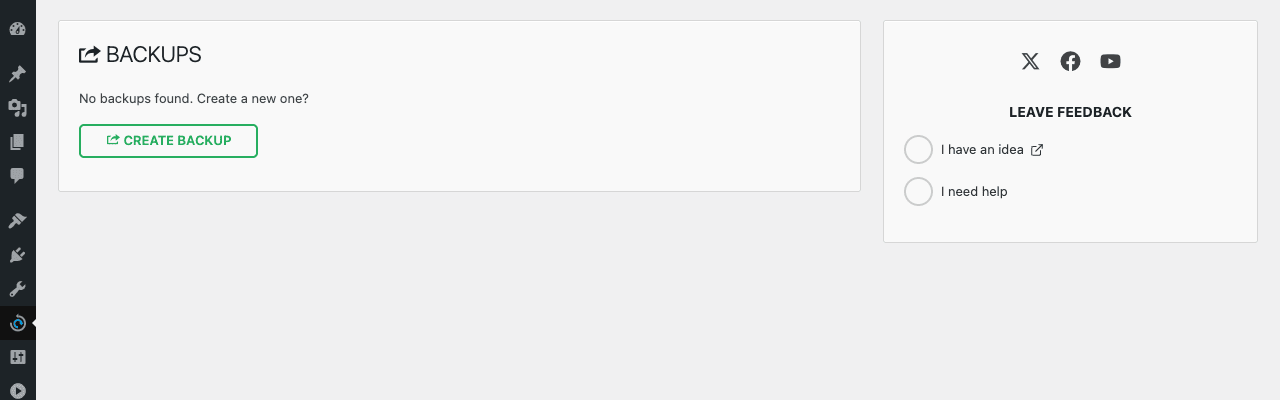
The Backups page lists all .wpress files stored in /wp-content/ai1wm-backups/ on this server. Initially empty.
Create a backup:
Click CREATE BACKUP. The plugin generates a .wpress file (same format as Export → File) and stores it on the server. Multiple backups accumulate; each shows date, size, and action buttons.
Per-backup actions:
- Restore, replace the current site with this backup (same as import but skipping the upload step)
- Download, pull the file to your computer
- Rename, give it a meaningful name
- Delete, remove from server
Use cases:
- Pre-deployment backup, before activating a new plugin or running a major update, click Create Backup. If something breaks, click Restore.
- Snapshot before client demo, keep a known-good state to revert to after client testing.
- Server-side backups in addition to off-site, combine with UpdraftPlus for true backup redundancy (local + cloud).
Caveat: Backups on the same server are NOT real backups in the disaster-recovery sense. If your server gets hacked or fails, the backups disappear with it. For real backup protection, use a tool that pushes off-server (UpdraftPlus, WP-Optimize Premium, or pair All-in-One WP Migration with one of the cloud extensions).
Step 9: Set up cloud storage extensions {#step-9-cloud}
For automated off-site backups or shared exports between team members, install one of the cloud storage extensions:
- Install the cloud extension (e.g., Dropbox Extension) as a separate plugin
- Activate it
- Go to All-in-One WP Migration → Settings → [Extension Name]
- Authenticate with the cloud provider (OAuth flow)
- Pick a folder where exports should land
After setup, EXPORT SITE TO dropdown shows the cloud extension as a destination. Click it, and the export pushes directly to the cloud, no local download needed.
Recommended pairings for serious workflows:
- Agency migrating between client sites: Dropbox or Google Drive Extension
- Personal site with cloud backup: Backblaze B2 (cheapest at scale)
- Enterprise: Amazon S3 (most reliable, flexible storage classes)
- OneDrive / Box for businesses on those ecosystems
Step 10: Common migration scenarios walked through {#step-10-scenarios}
Scenario 1: Move site from staging to production (different domains)
- On staging: Export with search/replace
staging.yoursite.com→yoursite.com - Download the
.wpressfile - On production: install WordPress, install All-in-One WP Migration + Unlimited Extension
- Import the
.wpressfile - Log in with the staging credentials, verify the site
Scenario 2: Move from local dev to live server
- On local: Export with search/replace
http://my-site.local→https://my-site.com - Download the file
- On live server: fresh WordPress install, AIOWM + Unlimited
- Import, log in with local credentials
- Update WordPress to live admin email if different
Scenario 3: Clone a site for staging
- On production: Export the site
- Set up a staging environment (subdomain or different domain)
- On staging: import the
.wpressfile - Search/replace staging URL after import (some hosts have built-in tools; or use Code Snippets Pro to run a one-off snippet)
Scenario 4: Migrate from one hosting provider to another
- On old host: Export to local file
- Sign up with new host, install WordPress
- On new host: install AIOWM + Unlimited
- Import the file
- Update DNS to point to new host
- After DNS propagates (24-48 hours), verify everything works on the new host
Scenario 5: Disaster recovery from a hacked site
- Wipe the WordPress install completely (delete files, drop tables)
- Fresh WordPress install
- Install AIOWM + Unlimited
- Import your most recent clean
.wpressbackup (from before the hack) - Update all plugins, themes, WordPress core
- Run a security scan (Wordfence or Really Simple Security Pro)
- Change all admin passwords
Scenario 6: Test new plugins on a copy of production
- On production: Export
- On a separate clone site: Import
- Activate the new plugins on the clone, test thoroughly
- If they work: install them on production normally
- If they break things: restore the original production from a backup
Real performance and file size impact {#performance}
All-in-One WP Migration is a "use it and uninstall" plugin for most users, you don’t run it continuously, you fire it occasionally for migrations. So performance impact is mostly about export speed and final file size.
Export time on a typical small business site (5GB database + 1.5GB media):
- Hetzner shared hosting (8GB RAM, NVMe SSD): ~2 minutes
- Shared WP Engine: ~90 seconds
- Cheap shared hosting (no SSD): ~6 minutes
File size compression:
- AIOWM uses gzip compression on the
.wpressformat - A 7GB site typically compresses to a 3-4GB
.wpressfile - Sites heavy on images compress less (images already compressed)
Import time is typically 2-3x export time:
- Same 5GB site imported: ~4-8 minutes
- 50GB site: 30-90 minutes
- 100GB+: hours
Server resources during export/import:
- CPU spike for ~1-2 minutes per GB processed
- RAM usage: ~512MB peak (configurable in Settings → Chunk Size)
- Disk I/O: heavy during the operation, normal afterward
For migrations under 5GB: AIOWM is dramatically simpler than alternatives.
For 5-50GB: Still works fine, just takes longer; use a cloud destination to avoid local downloads.
For 50GB+: Consider Duplicator Pro’s incremental backup approach instead.
All-in-One WP Migration vs Duplicator Pro vs UpdraftPlus {#comparison}
Three popular WordPress migration/backup plugins, different focuses:
All-in-One WP Migration + Unlimited Extension, simplest UI, fastest "just move one site" experience. Single .wpress file format. Best for: one-off migrations, staging<->production swaps, between-host moves. Limited backup automation (you manually create backups).
Duplicator Pro, full backup + migration suite. Scheduled backups, incremental backups, cloud storage integration baked in. More complex UI. Best for: agencies maintaining client sites, sites needing both backup AND migration in one tool.
UpdraftPlus, backup-first plugin with migration as a secondary feature (Migrator add-on). Best for: scheduled backups to multiple cloud destinations. Migration UX is less smooth than AIOWM but acceptable.
Quick decision matrix:
- One-off migration, simplest workflow: All-in-One WP Migration + Unlimited Extension
- Regular backups + occasional migration: Duplicator Pro or UpdraftPlus
- Primarily backups: UpdraftPlus
- Agency managing many sites: Duplicator Pro
- Very large sites (50GB+) with frequent changes: Duplicator Pro’s incremental backups
- Local development → production workflow: All-in-One WP Migration
For most WordPress users in 2026, AIOWM + Unlimited Extension is the cleanest answer for migration specifically. Pair with UpdraftPlus or WP-Optimize Premium for backups.
Real-world pricing breakdown {#pricing}
ServMask sells extensions individually on servmask.com:
- Unlimited Extension: ~$69/year for unlimited sites (sometimes lifetime deal)
- Each cloud storage extension (Dropbox, Google Drive, S3, etc.): ~$99/year per extension
- Bundles: ~$300+/year for the full set
Costs add up fast if you buy each extension separately. Most agencies opt for either the lifetime bundle (when available) or use a wholesale plugin bundle.
Pricing is your GPL Times subscription (one flat fee).
License math:
- Single Unlimited Extension purchase: $69/year
- Unlimited + 3 cloud extensions (Dropbox, Google Drive, S3): ~$370/year
- GPL Times subscription: covers all of the above + hundreds of other plugins
For agencies handling multi-extension setups, GPL Times is meaningfully cheaper.
Common gotchas {#common-gotchas}
-
"Maximum upload file size: 50MB" still shown after installing the Unlimited Extension. Cause: extension not activated, or active but conflict with another plugin. Verify both AIOWM and Unlimited Extension are active, deactivate any conflicting upload-handling plugin (some security plugins block large uploads).
-
Import gives "PHP timeout" error. Increase
max_execution_timeinphp.inito 600+, or split a very large.wpressfile into multiple smaller pieces (export with exclusions, then import separately). -
Site loses its theme after import. Cause: the destination didn’t have the theme files installed. Fix: install the theme manually before importing, OR ensure the export includes themes (it does by default; check Advanced options that you didn’t accidentally exclude themes).
-
404s on every page after import. Permalinks need to be re-flushed. Go to Settings → Permalinks → Save Changes (no change needed, just clicking Save rebuilds the rewrite rules).
-
WooCommerce orders missing after import. Cause: WooCommerce orders moved to a custom table in newer WC versions. The free AIOWM exports all standard tables but might miss custom orders table on older Unlimited Extension versions. Update both plugins to latest, re-export.
-
Import fails with "MySQL has gone away" error. Increase MySQL’s
max_allowed_packetandwait_timeoutserver config. Or split the database export into smaller chunks. -
Login fails after import. You logged in with the destination’s credentials. After import, the source site’s user accounts overwrite the destination. Log in with the source site’s admin password.
-
Search-and-replace not catching everything. AIOWM’s search-and-replace handles serialized data, but doesn’t touch object cache or external services. After import, hard-refresh the page (Cmd+Shift+R or Ctrl+Shift+R) and clear any cache plugin caches.
-
.wpressfile corrupted error on import. Re-export from the source; the file may have been corrupted during download. Use a checksum (md5sumon both ends) to verify the file is identical. -
Plugin won’t install / "headers already sent" error. Conflict with a heavy security plugin or premature output (whitespace before
<?php). Deactivate all other plugins, install AIOWM + Unlimited, then reactivate one at a time.
Developer reference: hooks, filters {#developer-reference}
AIOWM exposes a small set of filters for tuning the migration:
Increase chunk size for faster imports on capable servers:
add_filter( 'ai1wm_max_chunk_size', function( $size ) {
 return 50 * 1024 * 1024; // 50 MB chunks
} );
Increase max retries on chunk failures (for flaky connections):
add_filter( 'ai1wm_max_chunk_retries', function( $retries ) {
 return 20;
} );
Customize HTTP timeouts for very large files:
add_filter( 'ai1wm_http_reset_timeout', function( $timeout ) {
 return 60 * 5; // 5 minutes
} );

add_filter( 'ai1wm_completed_timeout', function( $timeout ) {
 return 30 * 60; // 30 minutes
} );
Add custom export destinations (advanced; for extension developers):
add_filter( 'ai1wm_export_buttons', function( $buttons ) {
 $buttons['mycloud'] = array(
 'title' => 'My Custom Cloud',
 'icon' => 'cloud',
 'callback' => 'my_custom_export_callback',
 );
 return $buttons;
} );
Hook into backups list rendering:
add_action( 'ai1wm_backups_left_end', function() {
 echo '<p>Total backups stored on server</p>';
} );
WP-CLI: AIOWM does NOT add custom WP-CLI commands. For automated migrations, the recommended approach is to use the cron-friendly REST endpoints from the cloud extensions, not WP-CLI scripts. For one-off migrations, the GUI is the supported path.
REST API: AIOWM exposes internal endpoints under /wp-json/ai1wm/v1/ for its own progress polling. Not officially documented for external consumption.
FAQ: questions people actually search {#faq}
Is All-in-One WP Migration free?
Yes, the main plugin is free on WordPress.org with 5M+ installs. The 50MB upload limit on imports is what drives most users to buy the Unlimited Extension (~$69) which removes the limit.
Why is there a 50MB limit in the free version?
It’s not actually a plugin restriction. The free plugin uploads the file via the standard PHP upload_max_filesize, which is typically 50MB on shared hosting. The Unlimited Extension implements chunked uploads that bypass upload_max_filesize entirely. The "50MB" you see is just your server’s PHP setting.
Can I just increase PHP upload_max_filesize and skip the Unlimited Extension?
Yes if your host allows it. Many shared hosts cap upload size at 50-100MB regardless of what you set in php.ini. For sites over the cap, the Unlimited Extension is the path.
Will it migrate WooCommerce sites?
Yes. Tables, orders, customers, subscriptions, products, all included. Works with WooCommerce Subscriptions and most WC extensions out of the box.
Will it migrate multisite networks?
The standard plugin migrates individual subsites. For full network migration, ServMask sells a separate Multisite Extension.
Does it work between different WordPress versions?
Yes, with caveats. Migrating from WP 6.5 to WP 6.9 typically works fine. Migrating to a significantly older WordPress version (e.g., 6.9 → 6.0) might fail on tables/columns that didn’t exist in the older version. Match versions when possible.
Is the.wpress format proprietary?
Yes. ServMask invented the format. It’s well-documented but not industry-standard. To extract a .wpress file outside All-in-One WP Migration, a free CLI extractor tool is available on GitHub (community-maintained).
Can I migrate just part of a site (only WooCommerce orders, only one custom post type)?
Not natively. AIOWM is a whole-site migration tool. For partial migration, use WP All Import Pro for content-only, or write a custom migration script with WP-CLI.
Does it handle hosting providers that block PHP from doing migrations?
Some shared hosts block large PHP operations during the day (e.g., Cloudways during traffic spikes). Schedule the migration during off-peak hours. Use SSH/SFTP backup as a fallback if PHP keeps timing out.
Does it work with managed WordPress hosting (WP Engine, Kinsta, Cloudways)?
Yes. These hosts have their own migration tools but they often don’t work as smoothly as AIOWM. Use AIOWM when the official tool fails or for cross-host migrations.
What happens if the import is interrupted (browser crash, network drop)?
The plugin keeps the temp file and you can resume the import. If resumption fails, delete the temp file in /wp-content/ai1wm-backups/ and re-upload.
The free base plugin is on WordPress.org so it auto-updates. There’s typically a delay of 1-2 weeks behind official releases.
Final thoughts {#final-thoughts}
All-in-One WP Migration wins on one thing: simplicity. The whole tool is three screens, Export, Import, Backups, and the workflow is so basic that you don’t need to read documentation to use it. That’s not just polite; it’s a competitive advantage in a category (WordPress migration) where competing tools have spent 10 years adding complexity.
The trap is treating it as your backup solution. AIOWM is great at migrations and acceptable at on-server backups. It’s NOT a real backup solution because the backups live on the same server. Pair it with UpdraftPlus, Duplicator Pro, or one of the cloud storage extensions to get true off-site backup protection.
The setup order for a new install:
- Install free All-in-One WP Migration from WordPress.org
- Install All-in-One WP Migration Unlimited Extension (Pro tier)
- Activate both
- Visit Import → verify "Maximum upload file size: Unlimited"
- Visit Export → run a test export to File to verify everything works
- Optional: install a cloud extension (Dropbox, Google Drive, S3) for off-site backups
- Document your search/replace pairs somewhere, for repeated migrations between specific environments, save the strings so you don’t re-type them
After that, migrations are click-click-done. The simplicity is the feature.