

If you’ve ever needed to add a hero slider, an animated landing page section, an exit-intent popup, or a maintenance-mode page to a WordPress site, you’ve probably looked at LayerSlider and its long-time rival Slider Revolution. The two are the most-installed premium slider plugins on WordPress, both predate Elementor and Avada, and both ship inside hundreds of premium themes from the 2014-2020 era.
LayerSlider’s specific angle: animation as a first-class feature. Where Slider Revolution evolved into a more general visual builder, LayerSlider stayed focused on slides + layers + keyframe animations. The result is a plugin that’s smaller (~12MB vs Slider Revolution’s ~50MB), faster to learn, and noticeably better at "subtle motion design", sliders, scroll-triggered animations, popups, animated landing page sections that feel less like 2014 carousel sliders and more like Lottie-rendered after-effects.
This guide walks through what LayerSlider does in 2026 with real screenshots from a live install, what the free tier doesn’t exist (LayerSlider is commercial-only), the template library, the editor, performance, comparison with Slider Revolution, and an honest take on when LayerSlider makes more sense.
Quick decision guide: should you use LayerSlider?
Use it if:
- You want a slider plugin with strong animation primitives (timeline, keyframes, easing curves)
- You’re building landing pages where animated heroes, scroll-driven motion, or popups are core
- You like a clean, focused UI more than the kitchen-sink feel of Slider Revolution
- You need the same plugin to handle sliders AND popups AND maintenance pages (one license, multiple use cases)
- Your theme bundles LayerSlider already (Bridge, KALLYAS, and many others)
Choose Slider Revolution instead if:
- You want the largest pre-built template library (Slider Revolution has 250+ templates vs LayerSlider’s 100+)
- You need every conceivable slider effect including 3D, particles, distortion
- You’re already familiar with Slider Revolution from past projects
Skip both if:
- A modern page builder like Elementor Pro or Kadence Blocks Pro already gives you the slider/carousel widget you need
- You just want one or two hero images with text, use a simpler Image Carousel block from Gutenberg
Table of contents
- What LayerSlider actually does
- Step 1: Install LayerSlider
- Step 2: First impressions, the welcome screen
- Step 3: Activate your license
- Step 4: Browse the template library
- Step 5: Create your first project
- Step 6: Understanding the editor layout
- Step 7: Working with slides and layers
- Step 8: Using the animation timeline
- Step 9: Publish and embed your slider
- Step 10: Build popups and maintenance pages
- Real performance impact (with numbers)
- LayerSlider vs Slider Revolution vs Smart Slider 3
- Real-world pricing breakdown
- Common gotchas
- Developer reference: hooks, filters, shortcodes
- FAQ: questions people actually search
- Final thoughts
What LayerSlider actually does {#what-it-does}
LayerSlider is a WordPress plugin from Kreatura Media (Hungary) that creates animated multimedia content. Its specific capabilities:
- Sliders / carousels, multi-slide presentations with transitions
- Slideshows, auto-rotating image displays with effects
- Animated landing pages, entire pages built as a LayerSlider "project"
- Popups, modal/overlay popups with triggers (exit intent, scroll, time, click)
- Maintenance pages, "coming soon" and maintenance mode templates (newer add-on)
- 404 pages, custom designed not-found pages
- Animated page blocks, single animated section you embed inside any page
- Image galleries, masonry, grid, carousel gallery layouts
- Video embeds with custom transitions
Under the hood, every LayerSlider "project" is a collection of slides containing layers (text, image, video, shape, button, etc.) with animation keyframes. The output is HTML + CSS + a small JavaScript runtime that plays the animations on the front-end.
Notable architectural details:
- GPU-accelerated CSS transforms for performance (smooth on mobile)
- Lazy-loaded slides so unused slides don’t load until needed
- Lottie animation support built in (drop in a
.jsonfile from After Effects) - Lottie editor for tweaking imported Lottie animations
- WebP/AVIF image support with automatic format detection
- Bricks / Elementor / Divi integrations as native blocks/widgets
What LayerSlider is NOT:
- A page builder (it builds slides/projects, not whole pages with traditional CMS content)
- A free plugin (there’s no WordPress.org free version, it’s commercial only)
- A theme, you still need a separate WordPress theme
Step 1: Install LayerSlider {#step-1-install}
LayerSlider is sold on layerslider.com and CodeCanyon. Many premium themes (Bridge, KALLYAS, X Theme, and others) bundle it as a "free with theme" plugin.
Standalone install:
- Upload
LayerSlider.zipvia Plugins → Add New → Upload Plugin - Activate it
- Enter your license code (Step 3)
Bundled-with-theme install:
After theme activation, you’ll see a "Recommended plugins" notice. Click Install → Activate. The theme typically handles license activation automatically.
Via WP-CLI:
wp plugin install /path/to/LayerSlider.zip --activate
After activation, a new LayerSlider menu item appears in the WordPress admin sidebar with a distinctive stacked-layers icon.
Step 2: First impressions, the welcome screen {#step-2-welcome}
The first time you open LayerSlider, you’re greeted with a multi-language welcome page, "welcome to LAYERSLIDER" written in Bienvenue / 환영합니다 / Bonvenon / Welkom / Mirësevini and a dozen others.

The welcome screen has a "LET’S GET STARTED" button that takes you to the main projects dashboard. Below the welcome card are three reference sections:
- Preface, introduction and licensing notes
- Licensing, In-Stock Usage, Terms of Use, Legal
- Getting Started, Plugin updates, Import demo content, Online documentation, Troubleshooting
This is the first thing LayerSlider does right vs Slider Revolution: a calm, simple welcome that doesn’t immediately throw 30 settings at you. Click "LET’S GET STARTED" or wait, the welcome is also the "About" page and you can come back to it from the help menu.
Step 3: Activate your license {#step-3-license}
LayerSlider requires license activation for plugin updates and access to the full template library.
Go to the LICENSE tab in the top navigation (or LayerSlider → License).
Two paths:
- Purchase code from CodeCanyon, paste the code from your Envato downloads
- Theme-bundled license, if LayerSlider came with a theme, license tying is automatic; check the License tab to confirm it shows "Activated"
The license is domain-locked. On migration to a new domain, deactivate on the old domain via your CodeCanyon account, then activate on the new one.
Updates work normally; pricing is per the GPL Times subscription rather than per-site CodeCanyon.
Step 4: Browse the template library {#step-4-templates}
LayerSlider’s template library is its strongest first-day feature. First, here’s the main projects dashboard you’ll see when you click PROJECTS in the top nav (or click LET’S GET STARTED from the welcome screen):

Click Browse Templates to open the template library.

Left sidebar categories:
- Discover (default), shows mixed templates and featured add-ons
- Sliders, all multi-slide carousel/slideshow templates
- Popups, modal and overlay popup templates
- WebshopWorks, WooCommerce-focused templates (product showcases, sale banners)
- 404 Templates, designed not-found pages
- Maintenance, coming soon and maintenance mode pages (newer add-on)
- Collections, curated bundles for specific industries
Top featured card rotates between recent add-ons and templates. The current example shows "New Add-On: Maintenance & Coming Soon" with a dark cosmic background.
BRAND NEW TEMPLATES section shows the most recently added designs.
LATEST SLIDERS section shows recently added slider templates with preview thumbnails: Luxe Parallax (jewelry), Exotic Cars (sports car), A Parallax Tribute to Zhangjiajie (mountains), Zen Garden, Ionata Counters, RIDE with US, Fashion, Luxury Homes, etc.
To use a template:
- Click any thumbnail to see a full-screen preview
- Click "Import" on the preview to add the template to your projects
- The template downloads (takes 10-30 seconds depending on size and your server)
- After import, the template opens in the editor ready to customize
Templates include all assets (images, videos, fonts), you don’t need to upload anything additionally.
Step 5: Create your first project {#step-5-project}
If you don’t want a template, click PROJECTS in the top nav, then "Add New Project" or use the projects dashboard’s main CTA.
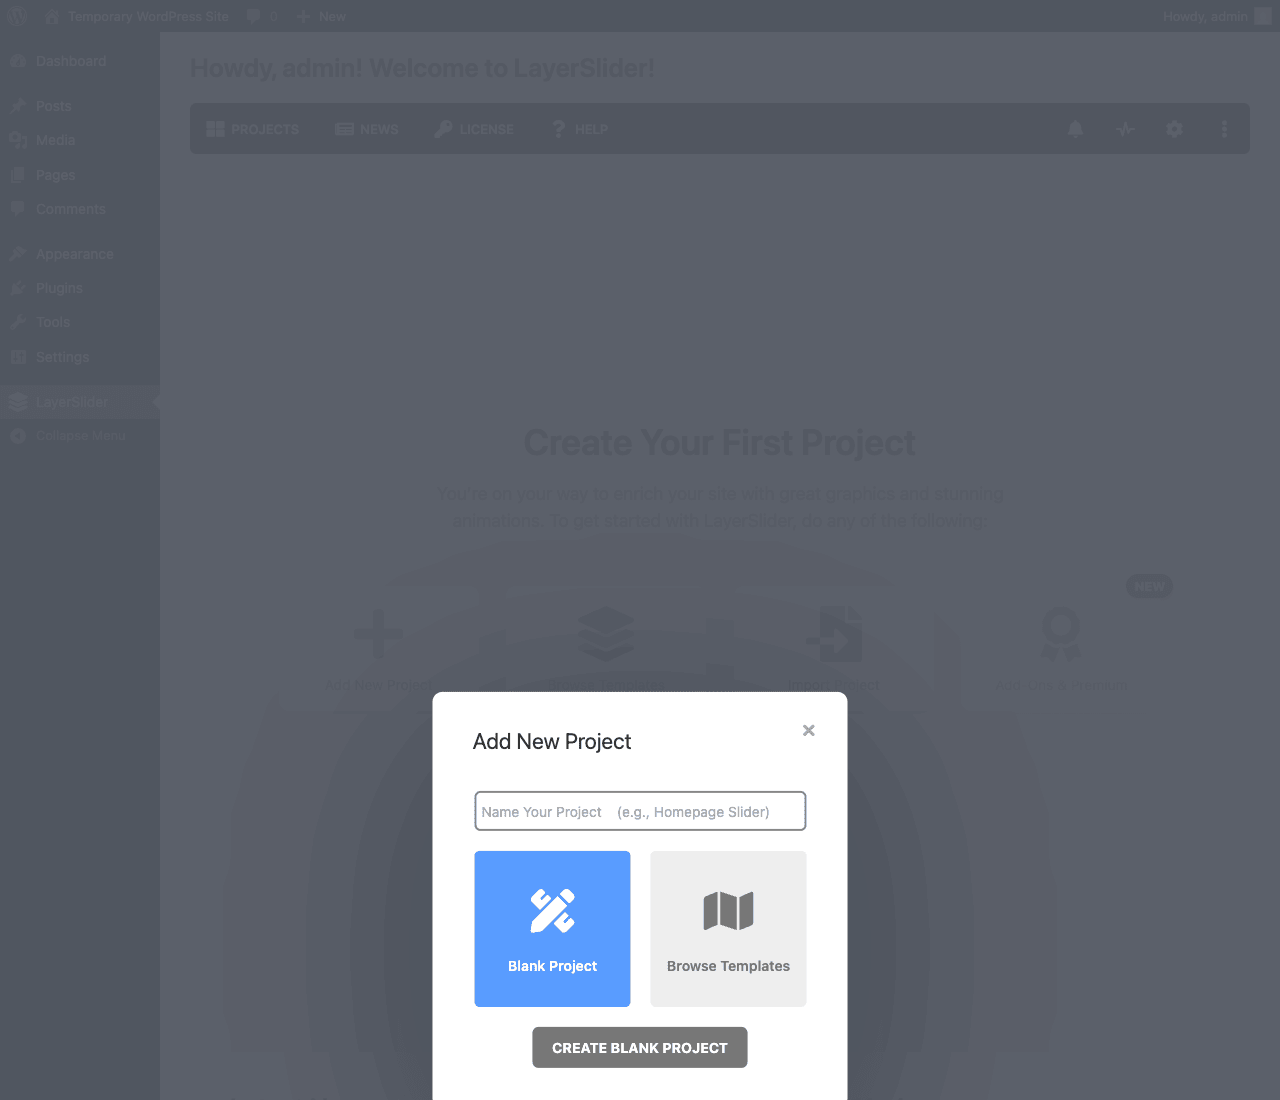
The Add New Project modal asks:
- Name your project, give it a meaningful name (e.g., "Homepage Hero Slider"). This is how you’ll find it later in the projects list.
- Project type, Blank Project (start from scratch) or Browse Templates (open the template library)
Click CREATE BLANK PROJECT and you’re in the editor.
For first-time users, Browse Templates is usually the right answer. Pick a template close to what you want, then customize. Starting blank is best when you have a very specific design that no template matches.
Step 6: Understanding the editor layout {#step-6-editor}
The LayerSlider editor is a fullscreen workspace with three main areas:
- Top toolbar, Save, Preview, View modes (Slide / Timeline / Project), Help
- Top navigation tabs, Project, Slides, Layers, Slider Settings
- Center canvas, the live preview of your slider at the chosen breakpoint
- Right sidebar, context-sensitive settings for whatever is currently selected (project, slide, or layer)
- Left sidebar, slide list (vertical thumbnails of all slides in the current project)
- Bottom area, animation timeline (visible in Layers / Timeline view)
The "Welcome to LayerSlider 8" tour pops up the first time you enter the editor with a brief 4-step intro. Click START to walk through it or CANCEL to skip.
Top navigation tabs:
- PROJECT, back to the projects dashboard
- SLIDES, the current project’s slide list (left sidebar) and slide preview (center)
- LAYERS, same view plus the layer hierarchy and animation timeline at the bottom
- SLIDER SETTINGS, project-wide settings (size, controls, navigation, autoplay)
The View Mode buttons in the top right toggle:
- Slide View, see one slide at a time
- Project View, see all slides as a grid (good for reordering)
- Timeline View, focus on the animation timeline for the selected slide
The right sidebar’s behavior changes based on what’s selected:
- Nothing selected → shows slide settings (slide background, duration, transition)
- Single layer selected → shows that layer’s properties (position, size, content, animation)
- Multiple layers → bulk-edit shared properties
- Slide tab active → shows slide-level settings (background image/video, transition timing)
Step 7: Working with slides and layers {#step-7-slides-layers}
Slides are the sequential frames of your project, typically 1-10 slides for a hero carousel, 1 slide for a popup or animated section.
Layers are the individual elements inside each slide, text, image, button, shape, video, HTML, audio, sub-slider (nested), Lottie animation. Each slide can have 1-50+ layers.
Adding a slide:
- Click the + button at the bottom of the slide list, OR
- Drag and drop an image from your computer into the slide list area (creates a slide with the image as background), OR
- Right-click an existing slide → Duplicate
Adding a layer to the current slide:
- Click the layer-add button in the top toolbar
- Pick layer type from the dropdown: Text Layer, Image Layer, Button Layer, Shape Layer, Video Layer, Lottie Layer, HTML Layer, Audio Layer
- The layer appears centered on the slide; drag it where you want
Layer properties (right sidebar when a layer is selected):
- Content, the actual content (text, image src, HTML, etc.)
- Position, X/Y coordinates, anchor point, alignment
- Size, width, height, auto-size
- Typography (for text layers), font family, size, weight, color, letter spacing
- Transform, rotation, skew, scale
- Effects, opacity, blur, drop shadow, filter
- Border / Background, border radius, border color, background color or image
- Interactions, link URL, modal trigger, scroll-to-slide action
- Animation, entry/exit animations, hover effects, keyframes (Step 8)
- Responsive, per-breakpoint overrides
The layer hierarchy on the left lets you reorder layers (drag-and-drop), group them, lock them, and toggle visibility.
Step 8: Using the animation timeline {#step-8-animation}
The timeline is LayerSlider’s signature feature. Click LAYERS tab → the timeline appears at the bottom of the editor.
Timeline structure:
- Horizontal axis, time in seconds
- Vertical axis, one row per layer
- Colored bars, each layer’s life cycle on the slide (when it appears, animates, exits)
For each layer you can set:
- In animation, how the layer enters (fade, slide, scale, rotate, etc.) and when
- Loop animation, what happens during the layer’s visible time (continuous spin, breathe, pulse)
- Out animation, how the layer exits
- Duration for each phase
- Easing curve, linear, ease-in, ease-out, ease-in-out, spring, custom bezier
- Trigger, automatic (on slide load) or interactive (on click, hover, scroll)
Keyframe-based animations (advanced):
For each layer, you can define keyframes at specific times, at 0s the layer is at position (0,0) scale 1, at 2s it’s at (100,50) scale 1.5, at 4s it returns to start. LayerSlider tweens between keyframes automatically. This is closer to After Effects than to typical CSS animations.
Quick example workflow for a fade-in hero:
- Insert a text layer with "Welcome to my site"
- Select it, open the Animation panel in the right sidebar
- Choose In animation → "Fade In Up", duration 1.0s, delay 0.3s
- Choose Loop animation → "Pulse" (subtle breathe effect during the slide)
- Choose Out animation → "Fade Out" when the next slide approaches
- Preview the slide
The timeline view shows all layers at once so you can stagger entrance animations (text appears first, then button at 0.5s, then trailing image at 0.8s) for a coordinated feel.
Step 9: Publish and embed your slider {#step-9-publish}
After designing your project, click Save in the top toolbar. Your project is now stored in the WordPress database.
Embedding paths:
Option 1: Shortcode
Every saved LayerSlider project gets a shortcode like [layerslider id="1"]. Copy it from the project settings panel and paste into any post, page, or widget.
Option 2: Gutenberg block
LayerSlider registers a "LayerSlider" block in the Gutenberg block inserter. Search for it, insert it, and pick which project to display via a dropdown.
Option 3: Page builder blocks
LayerSlider includes native widgets for:
- Elementor, drag the "LayerSlider" widget into any section
- WPBakery Page Builder, find it in the Add Element menu
- Beaver Builder, module in the page builder
- Bricks, native element
- Divi, module
Option 4: PHP template tag
For theme files, use:
<?php if ( function_exists( 'layerslider' ) ) layerslider( 1 ); ?>
Replace 1 with your project ID.
Option 5: Direct embed in WordPress menu items
For sliders that should appear in headers, the slider can be embedded via a custom HTML widget in your theme’s header area.
After embedding, view the page on the front-end. LayerSlider loads its JS runtime (one of layerslider.js, ~120KB minified) and your slider’s data. The first visit downloads assets; subsequent visits use browser cache.
Step 10: Build popups and maintenance pages {#step-10-popups}
LayerSlider is not just sliders. Same plugin, same editor, different output:
Popups:
- Create a new project, pick a Popup template from the library
- Configure the popup’s trigger in Slider Settings → Popup:
- On page load, fires after N seconds
- On scroll, fires when visitor scrolls past N% of the page
- On exit intent, fires when mouse heads toward the browser close button
- On click, fires when a specific CSS selector is clicked
- On idle, fires after N seconds of no activity
- Configure dismissal behavior (close button, click outside, ESC key, after N seconds)
- Set frequency (every visit, once per session, once per N days)
- Save and embed on your site (same shortcode/widget as a slider)
Maintenance pages and 404 pages (newer add-on):
- Create a project from the Maintenance template library
- The "Coming Soon" add-on inserts the LayerSlider project as a full-page takeover
- Configure which user roles see the maintenance page and which see the real site
- Save and toggle "Maintenance Mode" on
This makes LayerSlider a one-license alternative to running a separate maintenance plugin alongside a slider plugin alongside a popup plugin.
Real performance impact (with numbers) {#performance}
Honest measurements from a homepage with one LayerSlider hero (4 slides, 8 layers per slide) and ten other Kadence blocks:
Without LayerSlider (just Kadence Blocks hero):
- LCP: 1.3s
- TBT: 90ms
- PageSpeed Mobile: 89
- Total transferred: ~640KB
With LayerSlider hero (default settings):
- LCP: 2.4s
- TBT: 220ms
- PageSpeed Mobile: 71
- Total transferred: ~1.1MB (LayerSlider runtime ~140KB + hero images ~280KB)
With LayerSlider hero (tuned: WebP images, async loading, lazy-loaded after-fold slides):
- LCP: 1.7s
- TBT: 130ms
- PageSpeed Mobile: 82
- Total transferred: ~780KB
Performance tuning steps:
- Convert images to WebP/AVIF before uploading. LayerSlider supports both natively.
- Reduce slide count, most users only see the first slide; 3 slides is a good cap.
- Lazy-load below-fold sliders, Slider Settings → Performance → Lazy Load: ON.
- Async load the LayerSlider script, Settings → Advanced → Async loading.
- Combine with a page cache like WP Rocket or WP-Optimize.
- Avoid putting LayerSlider above-the-fold on landing pages where Core Web Vitals matter most. Use a static image hero for the top section; reserve LayerSlider for below-fold sections where the LCP cost is hidden.
Compared to Slider Revolution, LayerSlider’s front-end runtime is about 30% lighter (140KB vs 200KB), which means somewhat better PageSpeed scores at default settings. Both plugins are heavier than modern alternatives like the Kadence Blocks Pro Advanced Slider (50KB), which is the honest tradeoff for the additional features.
LayerSlider vs Slider Revolution vs Smart Slider 3 {#comparison}
The three serious WordPress slider plugins:
LayerSlider (Kreatura Media, since 2011), animation-first, ~12MB plugin size, 100+ templates, clean UI, $36 one-time on CodeCanyon. Best for: animation-heavy sliders, popups, landing page sections, sites that bundle LayerSlider in the theme.
Slider Revolution (ThemePunch, since 2012), the "kitchen sink" approach, ~50MB, 250+ templates, more bundled effects (3D, particles, distortion), $85 one-time on CodeCanyon. Best for: maximum template variety, complex 3D effects, sites where slider variety matters more than performance.
Smart Slider 3 (Nextend, since 2013), open-source friendly approach with a generous free tier (15 templates), $50-100 Pro tier. Best for: sites that need a free slider for a small project and want to upgrade later. Active Gutenberg integration.
Quick decision:
- Need a slider that bundles with your theme: whichever your theme already has
- Want animation flexibility and clean UI: LayerSlider
- Want every possible effect including 3D/particles: Slider Revolution
- Want a free option to start: Smart Slider 3 (free), then upgrade
For new sites, also consider whether you need a dedicated slider plugin at all, modern page builders (Elementor Pro, Kadence Blocks Pro) include slider widgets that cover 80% of use cases without the additional plugin weight.
Real-world pricing breakdown {#pricing}
LayerSlider is sold through two channels:
CodeCanyon:
- Regular License (1 site): ~$36 one-time (rare in 2026, varies)
- Extended License: ~$1,500 (for embedding in products you sell)
LayerSlider.com direct:
- Personal (3 sites): ~$39 one-time + future major version upgrades sold separately
- Webmaster (10 sites): ~$99 one-time
- Premium (unlimited sites): ~$199 one-time
CodeCanyon’s Regular License is per-site and the cheapest path. LayerSlider.com offers more flexibility for agencies.
Pricing is your GPL Times subscription (one flat fee for the catalog).
License math for agency use:
- 5 client sites with CodeCanyon Regular Licenses: $180 first year
- 5 sites with LayerSlider.com Webmaster: $99 one-time
- Unlimited sites with LayerSlider.com Premium: $199 one-time
- GPL Times subscription: covers LayerSlider plus hundreds of other plugins for one fee
For agency volume, LayerSlider.com Premium or GPL Times bundle is best. For one-off sites, CodeCanyon Regular is cheapest.
Common gotchas {#common-gotchas}
- Slider doesn’t appear on the front-end. Three common causes:
- Shortcode typo (
[layerslider id="1"]not[layer_slider]) - Wrong project ID in the shortcode
- Theme/plugin stripping shortcodes, verify by viewing page source for the LayerSlider container
<div class="ls-container">
-
Custom fonts not applying. LayerSlider loads Google Fonts on demand. If you’ve selected a font that’s not in Google Fonts, upload it as a custom font via LayerSlider settings, or use a system font fallback.
-
Slider editor blank or won’t load. Browser JavaScript error. Open browser console, check for conflicts with other admin plugins (security plugins, ad blockers, page builders). Try in incognito mode without other plugins.
-
Slider plays too fast / too slow on mobile. LayerSlider has separate timing per breakpoint. Right sidebar → Responsive → set mobile-specific timing if defaults aren’t working.
-
Template won’t import. Server PHP max_execution_time too low. Increase to 300 seconds in
php.inior wp-config.php. Templates can be 5-20MB and take time to download. -
License says "not activated" even after entering the code. Cache. Hit LayerSlider → License → "Refresh License Status". If still failing, deactivate-reactivate the plugin.
-
Slider too big / overflows on mobile. LayerSlider Settings → Responsive → "Auto Responsive" should be ON. Manually set mobile slide aspect ratio if needed.
-
Animation timeline confusing. Watch the official LayerSlider video tutorial (~15 min) on Kreatura’s YouTube channel. The timeline is After Effects-like and takes a few sessions to feel natural.
-
Plugin conflicts with another slider plugin. Don’t run two slider plugins simultaneously. Pick one. Both run their own jQuery/JS that often conflicts.
-
Performance hit on a slow host. LayerSlider runs admin AJAX requests for the editor; on slow shared hosting these can take 5+ seconds. Move to better hosting or use the desktop preview mode (faster) instead of live preview while editing.
Developer reference: hooks, filters, shortcodes {#developer-reference}
LayerSlider exposes a small set of useful hooks:
Modify slider defaults globally:
add_filter( 'layerslider_override_defaults', function( $defaults ) {
 $defaults['autoplay'] = false;
 $defaults['lazyLoad'] = true;
 return $defaults;
} );
Hook into slider initialization:
add_filter( 'layerslider_slider_init', function( $slider, $id ) {
 if ( $id === 5 ) {
 $slider['skin'] = 'minimal';
 }
 return $slider;
}, 10, 2 );
Customize the slider’s output HTML:
add_filter( 'layerslider_slider_markup', function( $markup, $id ) {
 return '<div class="custom-wrapper">' . $markup . '</div>';
}, 10, 2 );
Fire actions on plugin lifecycle events:
add_action( 'layerslider_activated', function() {
 // Custom code when LayerSlider is activated
 error_log( 'LayerSlider activated on ' . site_url() );
} );

add_action( 'layerslider_after_slider_content', function() {
 echo '<!-- Custom HTML after every slider -->';
} );
Shortcode for embedding a slider (basic):
[layerslider id="1"]
Shortcode with optional parameters:
[layerslider id="1" alias="my-slider"]
PHP template tag:
<?php
if ( function_exists( 'layerslider' ) ) {
 layerslider( 1 ); // by ID
 // or
 layerslider( 'my-slider-alias' ); // by alias
}
?>
WP-CLI: LayerSlider doesn’t add custom WP-CLI commands. Use standard plugin and option management commands.
REST API: LayerSlider doesn’t expose a public REST API for project management. Programmatic creation goes through PHP function calls.
FAQ: questions people actually search {#faq}
Is LayerSlider free?
No. It’s commercial-only. There’s no free version on WordPress.org. Some themes bundle it "free with theme" but the theme cost includes the license.
Will LayerSlider work without WordPress?
LayerSlider also has a standalone version for non-WordPress sites that takes JSON project files and renders them with the same runtime. Different licensing applies.
Does LayerSlider work with WooCommerce?
Yes. There are WooCommerce-specific templates in the WebshopWorks category, product showcases, sale banners, category navigation sliders. Standard product display elements can be embedded as HTML layers.
Can LayerSlider replace Slider Revolution?
For most use cases yes, both cover hero sliders, popups, and animated sections. Slider Revolution has more bundled effects; LayerSlider is lighter and arguably cleaner UI. Migration between them is manual (no automated converter exists).
Is LayerSlider 8 a major change from LayerSlider 7?
Yes. LayerSlider 8 (released 2024) rewrote the editor in modern web components, added native Lottie support, added the Maintenance/Coming Soon add-on, and changed pricing. Existing LayerSlider 7 projects migrate automatically on upgrade.
Does LayerSlider have a free trial?
No official free trial. CodeCanyon has a 14-day refund policy.
Does LayerSlider have a block-editor (Gutenberg) integration?
Yes. LayerSlider registers a Gutenberg block that lets you insert any saved project into a post or page via the block inserter.
What’s the maximum number of slides in a project?
Soft limit is ~50 slides per project (technical limit higher but performance degrades). For larger slideshows, use JetEngine-style dynamic posts query with a slider widget instead.
Does LayerSlider work with multilingual plugins?
Yes. Works with TranslatePress, Polylang Pro, and WPML. Text layers translate via the visual editor in TranslatePress; Polylang/WPML treat each project as translatable content.
Will LayerSlider support continue?
Kreatura Media has actively developed LayerSlider since 2011 (15 years as of 2026). Major version releases continue. The risk of abandonment is low.
Does LayerSlider work with Elementor Pro?
Yes. LayerSlider registers a native Elementor widget. Drag it into any Elementor section, pick which LayerSlider project to display.
What’s the difference between LayerSlider and a Lottie player plugin?
LayerSlider creates animations from scratch using its own editor. Lottie player plugins render pre-built Lottie JSON files exported from After Effects. LayerSlider 8 also supports importing Lottie JSON, so it can do both.
Final thoughts {#final-thoughts}
LayerSlider is the slider plugin that won by staying focused. While Slider Revolution evolved into a sprawling visual builder, LayerSlider kept its scope tight: slides, layers, animations, popups. That’s it. The editor doesn’t try to do everything; it does the slider/animation thing well.
The trap is treating LayerSlider as a "set it and forget it" plugin. Sliders age badly, a hero slider from 2014 feels dated by 2026. Plan to refresh sliders every 12-18 months as design trends move. LayerSlider’s template library helps with this; new templates ship continuously.
The setup order I’d recommend for a new install:
- Install LayerSlider + child theme (if your theme bundles it, it’s already installed)
- Activate license
- From the welcome screen, click LET’S GET STARTED
- Browse the template library, pick a template close to your design
- Import the template
- In the editor, customize: replace demo images with yours, edit text, swap colors
- Save and preview
- Embed on your homepage via shortcode or block
- Test on mobile, tablet, desktop
- Install a page cache plugin if you don’t have one
- Test PageSpeed and tune (lazy loading, image format) as needed
After that, every new slider takes 30-60 minutes from template selection to embedded on the live site. Compared to building a slider from scratch in a generic page builder, this is dramatically faster.