

You run a WordPress site in English. Your analytics show you have visitors from Spain, France, Mexico, Brazil, and Germany. They land on your site, scan a few paragraphs, realize they don’t fully understand, and leave. You could be capturing them as customers, subscribers, or readers. Instead, they’re a 1.8-second bounce.
The fix is obvious: make the site available in their language. The technical question is "how", and the actual answer involves a lot of moving pieces. You need translated posts. Translated pages. A translated menu. A translated theme (because the buttons, labels, and form fields are in English). A translated WooCommerce store if you’re selling. A language switcher in the header. Search engines need to know which version is which. URL structure needs to be either /es/, es.yoursite.com, or yoursite.es. And ideally one person should be able to publish in three languages without it becoming their full-time job.
Polylang Pro is the plugin that handles all of this without forcing you to learn an entirely new content management workflow. It adds language columns to your existing post and page lists. It lets you write a translation of any post by clicking a "+" icon next to the language flag. It generates a language switcher widget you can drop anywhere. It handles SEO hreflang automatically. And it doesn’t require a separate database or a separate theme.
This is a step-by-step walkthrough. By the end you’ll have a working multilingual WordPress site with two or three languages, you’ll know how to translate any post or page, you’ll have a language switcher in your menu, and you’ll understand what to do when something quirky happens (because multilingual setups have more quirks than single-language ones, and most of them have known fixes).
I’ll use Polylang Pro for this guide because the Pro features (machine translation, shared slugs, language-specific media, WooCommerce support, advanced URL options) are what make it production-grade. The free Polylang on WordPress.org handles basic translation for hobby sites; serious multilingual deployments use Pro.
What you’ll have when you’re done
- A WordPress site running in 2+ languages, with each post and page translatable to each language.
- A language switcher in your header or footer that lets visitors flip between languages with one click.
- URL structure that search engines understand:
/es/about/,/fr/about/,/de/about/(or subdomains, or country-code TLDs, your choice). - Properly configured hreflang tags so Google sends Spanish-speaking visitors to your Spanish pages.
- Translated menus, widgets, and theme strings without modifying your theme code.
- A workflow where translating new content takes the same 30 seconds as writing it (because the editor is the same).
Total setup time: about 60 minutes for two languages including translating a few sample posts. The ongoing per-post translation time depends on how much content you have.
What Polylang Pro actually does
Polylang is a WordPress plugin made by WP SYNTEX, a French company that has been building Polylang since 2011. It’s one of the two major WordPress multilingual plugins (the other being WPML). Polylang’s free version is on WordPress.org with over 700,000 active installs. The Pro version is the commercial extension.
The technical model is "one WordPress install, multiple language versions of each post". Polylang stores a translation relationship between posts: post 42 (English) is the translation of post 87 (Spanish) of post 105 (French). When a visitor views the site in Spanish, WordPress queries are filtered to return only Spanish posts. The visitor sees only Spanish content. When they click the language switcher, they’re sent to the translated version of whatever page they’re on.
This is different from running three separate WordPress installs (you’d manage three copies of plugins, themes, settings) or using WordPress Multisite for languages (you’d manage three subsites). Polylang keeps everything in one site, with language as a property of each post/page.
The "Pro" upgrade adds: machine translation via DeepL, Google Translate, or LibreTranslate, language-specific media uploads, shared post slugs (so the URL is the same in every language), language-specific custom fields, language-specific WooCommerce integration, language switcher block, advanced URL structures, and priority support.
Step 1: Install Polylang Pro
In your WordPress admin, go to Plugins → Add New → Upload Plugin. Choose the polylang-pro.zip file, click Install Now, then Activate Plugin.
The plugin automatically launches its setup wizard:
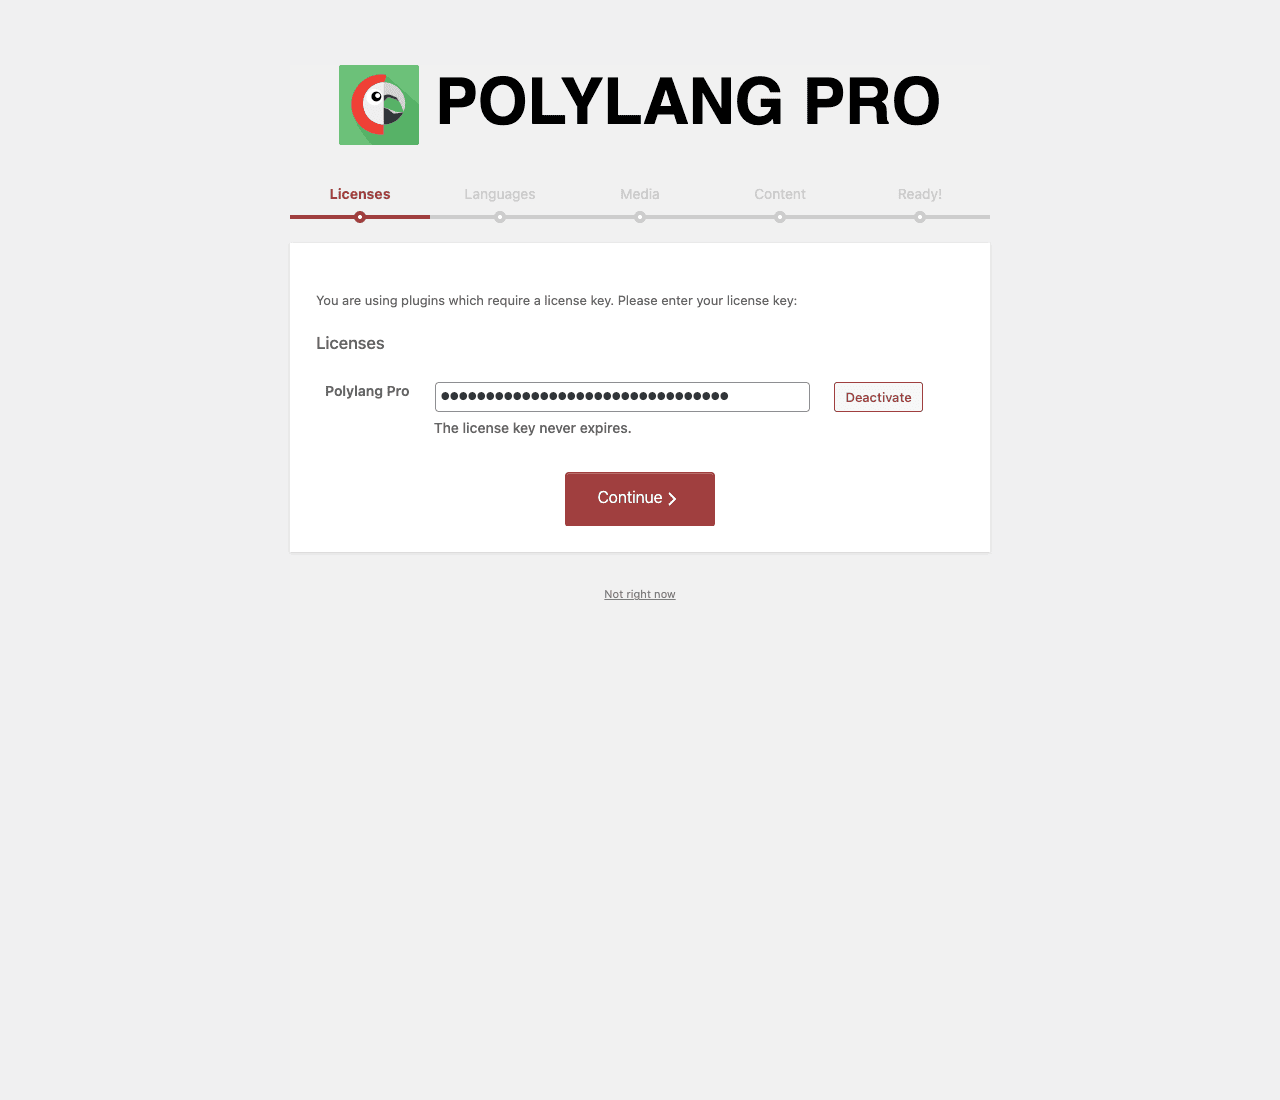
The wizard walks through five steps:
- Licenses: Enter your Polylang Pro license key.
- Languages: Add the languages you want to use.
- Media: Decide whether to translate media library items.
- Content: Tell Polylang what to do with existing content.
- Ready: Finish and start translating.
Click Continue (or "Not right now" if you’re testing without a license, the plugin still works).
Step 2: Add your languages
The wizard’s next step (or Languages → Languages if you skipped the wizard) is where you tell Polylang which languages your site will support:
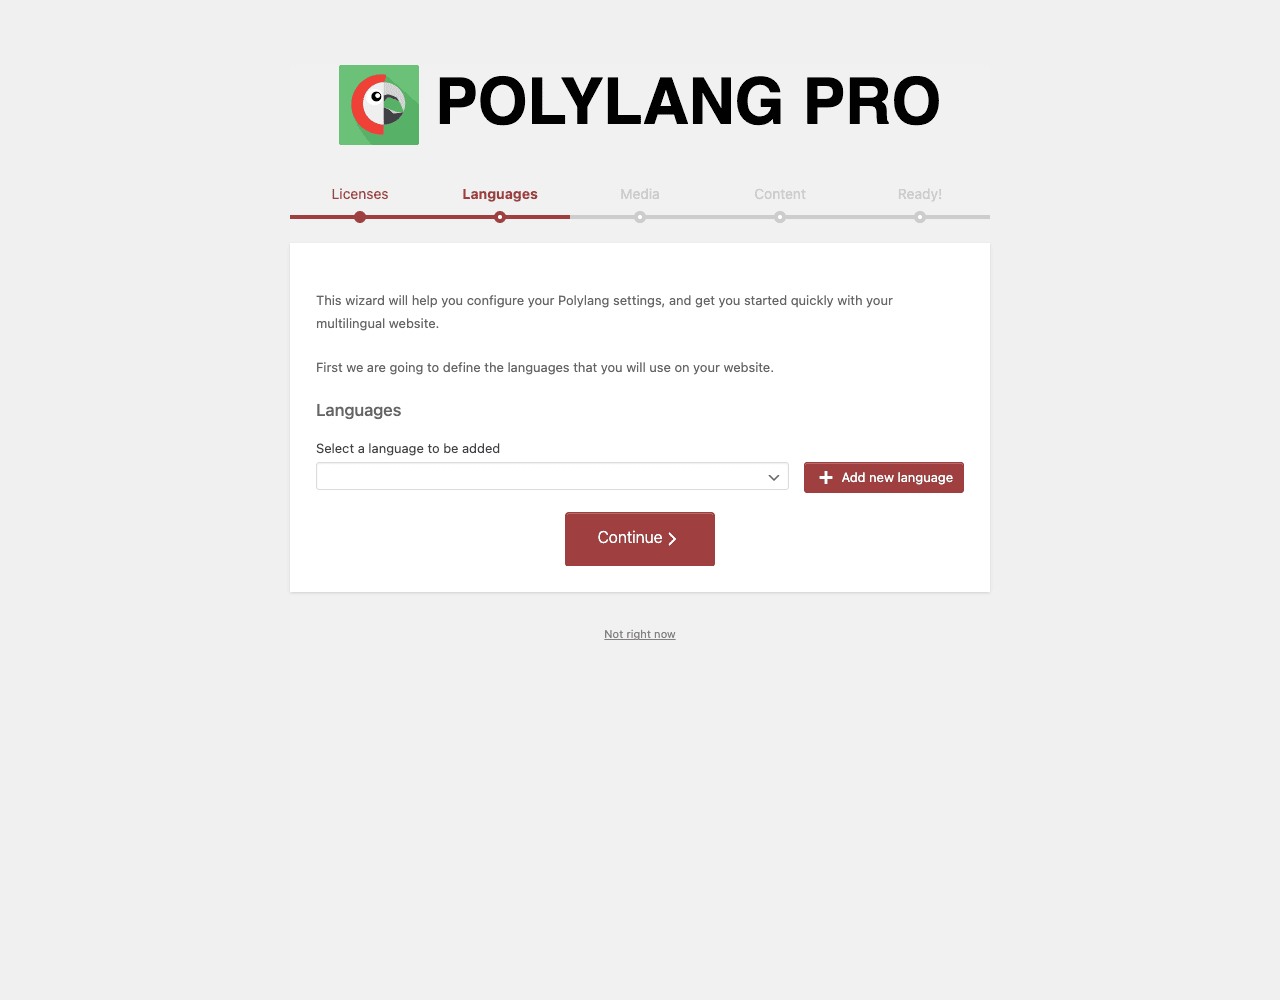
For each language:
- Choose a language from the dropdown. The list includes 60+ pre-configured languages with proper locales, codes, and text directions. Pick "English (United States)" for your default English, "Español" for Spanish, "Français" for French, etc.
- The plugin auto-fills the Full name (e.g., "English"), Locale (e.g.,
en_US), Language code (e.g.,en), Text direction (left-to-right or right-to-left for Arabic, Hebrew, Persian), and a Flag. - Click Add new language.
Repeat for each language. For a typical 2-language site, you add 2 (e.g., English + Spanish). For Europe-focused sites, you might add 4-5 (English, French, German, Spanish, Italian).
After saving, the Languages admin page looks like this:
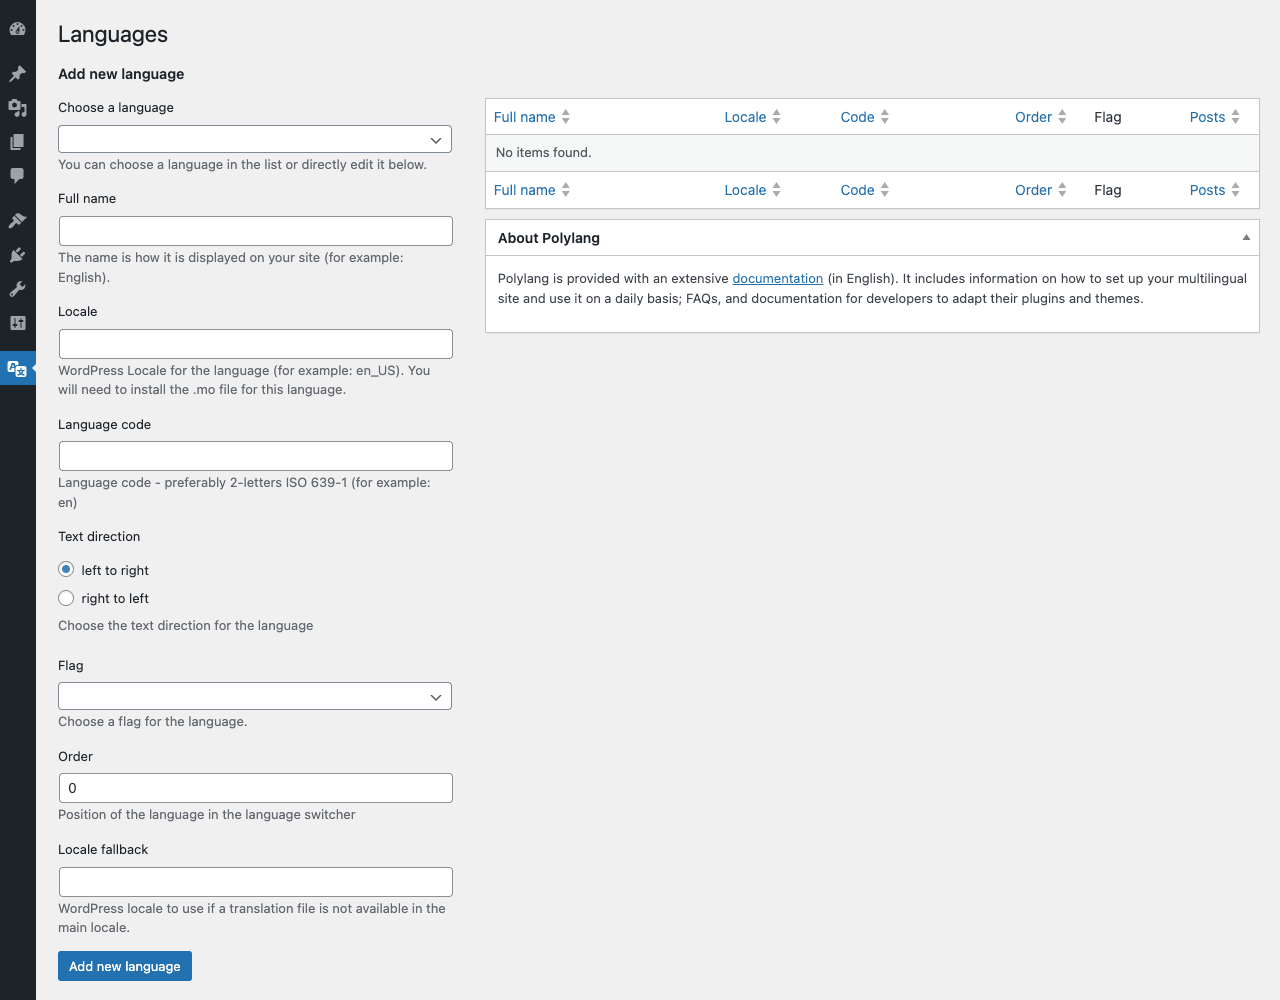
Important note about order: The first language you add becomes the default. The Order column controls where each language appears in the language switcher (0 first, then 1, 2, etc.).
Important note about flags: Polylang ships with country flags for every language. Some communities prefer not to use flags (because a language is not always tied to a single country, e.g., Spanish is spoken in 20+ countries). If you want text-only switchers, you can override this in Settings later.
Step 3: Configure URL structure
The next decision is how language appears in your URLs. Polylang offers three structures, each with tradeoffs:
-
/es/page/(directory): The default. URLs becomeyoursite.com/page/for the default language andyoursite.com/es/page/for Spanish. Easy to set up, works on any hosting. Recommended for most sites. -
es.yoursite.com(subdomain): Different subdomain per language. URLs becomeyoursite.com/page/andes.yoursite.com/page/. Requires DNS configuration. SEO-wise treated as separate sites by Google (some find this advantageous for ranking in country-specific markets). -
yoursite.es(different domain per language): URLs becomeyoursite.com/page/andyoursite.es/page/. Requires owning each domain. Strongest signal to search engines that you serve different markets. Most complex to set up.
Set this under Languages → Settings → URL modifications. For a first-time setup, leave at default directory style.
Other settings worth understanding:
-
Hide URL language information for default language: ON by default. The English URL stays
yoursite.com/page/, only Spanish gets/es/. Cleaner for primary-language visitors. Turn off if you want explicit/en/for all language URLs. -
The language is set from: Decide whether the language comes from the content URL (
/es/page/) or from the browser’s Accept-Language header. URL-based is more reliable. Browser-based feels magic but breaks bookmarking and sharing. -
Detect browser language: Optional. Automatically redirects first-time visitors to their preferred language version. Some find it helpful, some find it annoying (people search Google in English even when they speak Spanish). Test before enabling.
Step 4: Translate your first post
This is where Polylang’s UX shines. Open any existing post or page in the editor. The right sidebar now has a "Language" box:
- A dropdown showing the current language of this post.
- Translation links: a row of language flags. Each flag has either a pencil icon (translation exists, click to edit) or a + icon (no translation yet, click to create).
To translate your About page from English to Spanish:
- Open the English About page in the editor.
- In the Language box, click the + icon next to the Spanish flag.
- A new blank post opens, with the language set to Spanish and the original page linked as the English version.
- Write/paste the Spanish version of your content.
- Publish.
Polylang remembers the relationship between the English and Spanish versions. When a visitor on the English About page clicks "Español" in the language switcher, they land on the Spanish About page (not the homepage, not the Spanish blog archive).
You can also use the Pro feature Translate with DeepL/Google Translate: instead of clicking +, click the small "Machine translate" button. The plugin sends the English content to your configured translation API (you need a DeepL or Google Cloud Translation API key) and returns a translated draft. You review, edit, publish. Saves 60-80% of the manual typing for routine content.
Cost note: DeepL Pro starts at €5/month for 1M characters. Google Cloud Translation charges per character ($20 per million). For most blogs translating 5-10 posts per week, monthly cost is under $5.
Step 5: Add the language switcher to your menu
Visitors need a way to switch languages. The standard pattern is putting the switcher in the header menu.
Go to Appearance → Menus. Edit your primary menu. On the left, you’ll see a new "Language switcher" panel (added by Polylang). Click "Add to menu". You can configure:
- Display as a dropdown: Compact, just two language abbreviations show.
- Display languages names: "English", "Español", "Français".
- Display flags: Shows the country flag image.
- Hide the current language: Removes the current language from the switcher (so an English visitor sees only "Español" and "Français" options).
For most sites, "Display languages names + Display flags" is the right combination.
Save the menu. Visit your site. Click the language switcher. You should be sent to the translated version of the current page.
If you don’t want the switcher in the menu, you can also use:
- The Polylang Language Switcher block (Pro). Drop it in any page or post.
- The Language Switcher widget. Drag it into any widget area (sidebar, footer).
- The
[language-switcher]shortcode for embedding in post content.
Step 6: Translate your menu items
The menu items themselves need to be translatable. Polylang Pro handles this automatically: when you edit your menu, you’ll see tabs for each language at the top. Click the Spanish tab, build a Spanish version of your menu (linking to Spanish pages), save. The plugin auto-shows the right menu version based on the current language.
Some menu items don’t need translation: a logo or a "Home" icon. For these, Polylang lets you mark a single menu item as "Show for all languages" so you don’t have to duplicate it across language tabs.
Step 7: Translate widgets, theme strings, and plugin strings
The hardest part of multilingual sites isn’t the posts, it’s everything else. Sidebar widgets. Footer credits. Cookie consent banners. Login form labels. Search box placeholders. These often live in your theme’s PHP files or in plugin admin settings.
Polylang Pro has three layers for this:
Widgets: Go to Appearance → Widgets. Each widget now has a Language dropdown at the bottom. Set "All languages" to show in every language, or pick a specific language to limit it. For a multilingual sidebar (one widget per language showing different content), add three copies of the same widget type and assign each to a different language.
Theme/Plugin Strings: Go to Languages → Translations. Polylang shows a list of every translatable string it has detected in your theme and plugins. Add the translation for each. Common strings to translate:
- Search box "Search…" placeholder
- "Read more" button text
- Footer copyright line
- Email signup form labels
- Cookie banner text
If a string isn’t in the list, you may need to wrap it in __( 'string', 'text-domain' ) in your theme (this is standard WordPress i18n pattern) or use the Polylang pll_register_string() function.
WooCommerce strings: If you run WooCommerce, install the companion plugin Polylang for WooCommerce (separate Pro purchase). It translates product names, descriptions, categories, attributes, and even the cart/checkout pages.
Step 8: Configure SEO and hreflang
This step is critical for getting search traffic from non-English speakers. Polylang automatically generates hreflang tags in the <head> of every page. These tags tell Google "this is the English version, the Spanish version is at /es/page/, the French version is at /fr/page/, send each visitor to the right one".
To verify hreflang is working: open your site, view source on any translated page. Look for <link rel="alternate" hreflang="es" href="..."> tags. You should see one per language plus an x-default pointing to your primary language.
For sitemap.xml, if you use Yoast SEO or Rank Math (which we’ve covered before), they automatically integrate with Polylang. Each language gets its own sitemap (sitemap-es.xml, sitemap-fr.xml). Submit each one to Google Search Console as a separate property if you want detailed per-language traffic data.
For meta titles and descriptions: edit each language’s version of the post and set the SEO meta separately. Yoast and Rank Math both show language-aware SEO fields automatically.
Step 9: Verify everything works on the front-end
After all this configuration, spot-check it on the public site:
- Visit your homepage. Click the language switcher. You should land on the homepage in the new language.
- Visit a translated post in language A. Click the switcher. You should land on the same post in language B (not on the homepage of language B).
- Visit a post that has NO translation in language B. The switcher should either hide the language B option or send you to language B’s homepage (depending on your "Hide URLs that don’t have a translation" setting).
- Right-click → View Source on a page. Check that the
<html lang="...">attribute is set correctly to the current language code. - Search Google for
site:yoursite.com inurl:/es/. Confirm Google is indexing your Spanish pages separately.
If any step fails, the most common cause is permalinks. Go to Settings → Permalinks and just click Save (without changing anything). This flushes the permalink rewrite cache, which Polylang relies on for URL structure.
Step 10: Set up machine translation (Pro feature)
If you’re translating dozens or hundreds of posts, manual translation is too slow. Polylang Pro integrates with three machine translation services:
-
DeepL (recommended for European languages): The best translation quality in the industry. €5/month for 1M characters. Sign up at deepl.com/pro-api, get an API key, paste into
Languages → Translations → Machine Translation → DeepL. -
Google Cloud Translation: Slightly cheaper. Requires a Google Cloud account and project. Slightly worse quality than DeepL for European pairs, better for non-European pairs.
-
LibreTranslate: Open source, self-hostable. Free if you run your own LibreTranslate server. Good for cost-conscious sites with the technical capacity to host the service.
Once configured, every post’s translation creation flow gets a "Translate with DeepL" option. Click it, the plugin generates a translated draft, you review and publish.
Important: machine translation is great for drafts, not for publish-as-is. Read everything before publishing, especially:
- Product names and proper nouns (machine translators sometimes translate brand names).
- Idioms ("It’s raining cats and dogs" becomes nonsense in Spanish).
- Currency and date formats (the translator might leave $5 as $5 even though European audiences expect €5).
- Cultural references (a US-centric joke doesn’t always work in French).
For high-value content (landing pages, sales copy), pay a human translator. For routine blog posts and product descriptions, machine + human review is fine.
Polylang vs WPML
The other major WordPress multilingual plugin is WPML. Both are good. Quick honest comparison:
-
Polylang Pro stores translations as separate posts with a relationship. Lighter, more performant, but requires more plugins to handle WooCommerce and other complex integrations. Cheaper.
-
WPML uses a more invasive translation management system with translation jobs, professional translators marketplace built-in, and stronger WooCommerce integration out of the box. Heavier, but covers more out-of-the-box use cases.
Pick Polylang Pro if you want lighter weight, cheaper, or you mostly translate content yourself. Pick WPML if you have a translation team, need professional translator workflows, or run heavy WooCommerce/membership/LMS integrations.
For a single-instructor course site, blog, or small business site, Polylang Pro is the more affordable and simpler choice. For an enterprise multilingual deployment with multiple translators, WPML’s workflow tools justify the higher price.
Common gotchas
These are the issues I’ve actually seen people hit:
1. "My translated pages return 404." Settings → Permalinks → Save (without changing anything). This flushes the rewrite cache that Polylang depends on for /es/ URLs. Run this after every change to URL settings.
2. "The language switcher doesn’t appear in my menu." Polylang’s menu integration requires the menu to be assigned to a menu location in your theme. Go to Appearance → Menus → Manage Locations and confirm.
3. "WooCommerce product names show in English on the Spanish version." You need the Polylang for WooCommerce companion plugin. The core Polylang Pro doesn’t translate WooCommerce-specific fields by default.
4. "Some theme strings are still in English." The theme needs to use WordPress’s translation functions (__(), _e(), etc.) for Polylang to detect strings. If a string is hardcoded in HTML, it won’t show up in the translation list. Either ask the theme author to wrap it properly, or use Polylang’s pll_register_string() function to manually register it.
5. "Search returns no results in Spanish." WordPress’s default search uses the SQL LIKE operator on post_content. If your search isn’t finding Spanish content, install a search plugin like SearchWP that handles multilingual content properly. Polylang automatically filters search results by current language.
6. "Google isn’t indexing my Spanish pages." Two checks: (a) Confirm your robots.txt isn’t blocking /es/. (b) Confirm hreflang tags are present (view source on any page). (c) Submit the per-language sitemap to Google Search Console. (d) Wait 2-4 weeks; Google takes time to discover and index new URL paths.
7. "Machine translation API quota exceeded." DeepL and Google Translate have monthly limits. Polylang doesn’t cache translations across regenerations, so re-translating a post burns API quota. Limit the number of posts you machine-translate per month, or run translations in batches with breathing room.
8. "Spanish URLs include /category/ instead of /categoria/." Polylang Pro supports translated URL slugs (so the category base becomes /categoria/ for Spanish). Enable under Languages → Strings translations → URL translations. Then translate each URL fragment.
9. "My SEO plugin shows duplicate metadata across languages." Polylang integrates with both Yoast and Rank Math. Make sure both are updated to recent versions. The SEO plugin should auto-detect Polylang and show language-aware metadata fields.
10. "I added a language by mistake and want to remove it." Languages → Languages → click the trash icon next to the language. WARNING: posts in that language stay in the database but become orphaned (no language assigned). You can re-assign them via Languages → Tools → Manage languages.
A short note for developers
If you build themes or plugins for multilingual sites, Polylang’s hook surface is useful:
// Fires after Polylang is initialized. Use to register translatable strings.
add_action( 'init', function() {
 if ( function_exists( 'pll_register_string' ) ) {
 pll_register_string( 'site_tagline', 'A WordPress site by Acme', 'My Theme' );
 pll_register_string( 'cta_button', 'Get Started', 'My Theme' );
 }
} );

// Get the translation of a registered string.
$translated = pll__( 'A WordPress site by Acme' );
echo pll__( 'A WordPress site by Acme' ); // echoes the current language version
// Or for echo-and-translate:
pll_e( 'Get Started' ); // outputs the translation

// Get current language slug.
$current = pll_current_language(); // returns 'en', 'es', etc.

// Get current language as full info.
$lang = pll_current_language( 'name' ); // 'English', 'Español', etc.
$locale = pll_current_language( 'locale' ); // 'en_US', 'es_ES', etc.

// Get all languages on the site.
$all_languages = pll_languages_list(); // ['en', 'es', 'fr']

// Get the translation of a post in another language.
$es_post_id = pll_get_post( $en_post_id, 'es' );

// Get translations of a category/term.
$es_cat_id = pll_get_term( $en_cat_id, 'es' );

// Check if Polylang is active before calling its functions.
if ( function_exists( 'pll_current_language' ) ) {
 // Safe to use Polylang functions.
}

// Hooks for query modifications.
add_filter( 'pll_get_post_types', function( $post_types ) {
 // Add a custom post type to the list of translatable types.
 $post_types['my_custom_type'] = 'my_custom_type';
 return $post_types;
} );

// Customize hreflang output.
add_filter( 'pll_rel_hreflang_attributes', function( $attributes ) {
 // Modify hreflang tags before they're output.
 return $attributes;
} );
For URL building from PHP that respects the current language:
$url = pll_home_url(); // homepage URL in the current language
$switcher_data = pll_the_languages( [
 'show_flags' => 1,
 'show_names' => 1,
 'echo' => 0,
] ); // get the language switcher HTML
The full developer reference is at polylang.pro/doc and includes details on the REST API, custom post type registration patterns, and conditional template rendering.
Pricing and where to get it
Polylang Pro is sold by WP SYNTEX on an annual-license-per-site model. Tiers: Single Site, Business (5 sites), Agency (25 sites). All tiers include the same features; only the site count and support level differ.
The plugin is GPL-licensed. The license sold by WP SYNTEX is a support and update license, not a use license. After install you can use it on any number of sites; the license only gates support replies and the official update channel.
Because of GPL, the plugin file itself is legally redistributable.
For real multilingual production sites, the official WP SYNTEX license is worth considering once you’re past the prototyping stage. The support team responds to complex multilingual setup questions that general WordPress support can’t help with.
Quick reference: setup cheat sheet by site type
Before wrapping up, here’s a one-paragraph guide for common multilingual scenarios:
-
English blog adding one extra language (Spanish or French): Install Polylang Pro, add 2 languages, translate your About + Contact + last 10 posts. Add language switcher to header menu. Done.
-
E-commerce store going from one country to multi-country: Install Polylang Pro + Polylang for WooCommerce. Add languages. Translate product titles/descriptions. Translate the cart/checkout pages. Set up per-language currencies in WooCommerce if needed. Consider subdomain URL structure for clearer SEO signals.
-
Documentation site that needs all docs in 5 languages: Polylang Pro with machine translation (DeepL). Translate the core 50 most-visited docs by hand, machine-translate the rest with human review for accuracy. Set up sitemap per language. Submit each sitemap to Google Search Console.
-
Course/membership site: Polylang Pro + your LMS plugin. Most LMS plugins (LearnDash, Tutor LMS Pro) integrate well with Polylang. Translate course descriptions, lesson content. Quiz content too if it’s user-facing.
-
Corporate site with 15 languages: This is enterprise territory. Polylang Pro handles it technically, but you’ll likely also need a translation management system (Crowdin, Lokalise) that exports/imports content. Or move to WPML which has more enterprise-grade workflows.
-
Site with mostly English content but a few translated landing pages: Polylang Pro is overkill. Use a simple "page-per-language" approach with manual URLs, or just create two separate pages and link between them.
Final thoughts
Polylang Pro turns "make this WordPress site multilingual" from a several-week engineering project into a 60-minute setup plus ongoing per-post translation work. The dual-pane editor experience (write English on the left, click + next to the Spanish flag, write Spanish version) feels natural after the first few translations. Machine translation gets you 80% of the way for routine content; human review handles the rest.
For a beginner the path is short. Install, add languages, translate your most important pages, add the switcher to your menu, publish. Within 90 minutes your site speaks to a wider audience.
For a developer the plugin is well-designed and respects WordPress conventions. The function API is clean (pll_current_language(), pll_get_post(), pll__(), pll_e()). Custom post types and custom taxonomies are made translatable with a single filter. The hreflang output is correct by default. SEO plugin integrations work without extra config.
The places where Polylang Pro is not the right answer: if you need a translator marketplace, automatic translation memory, or enterprise-grade workflows, WPML’s stack is more complete. If you only need one extra page or two translated, manual page creation is fine without a plugin. For the very common "make this WordPress site bilingual or trilingual" scenario, Polylang Pro is the boring-good default.
Setup checklist:
- Install Polylang Pro.
- Run the setup wizard, add your languages.
- Translate your About, Contact, and Homepage.
- Add the language switcher to your menu.
- Translate menu items per language.
- Translate widgets and theme strings.
- Set up machine translation if you have lots of content to translate.
- Verify hreflang in page source.
- Submit per-language sitemaps to Google Search Console.
- Watch your international traffic grow over the next 30-90 days.
Start with a staging site, add a second language to a 5-page test site, walk through the translation flow once or twice, then deploy to your real site with confidence.
Useful external references:
- Polylang official documentation covers every screen, setting, and developer hook.
- Google’s guide to multilingual SEO explains the underlying hreflang/SEO concepts Polylang implements.
- WordPress translation handbook for understanding the i18n functions (
__(),_e(),_x()) that themes and plugins need to use for Polylang to detect strings.