

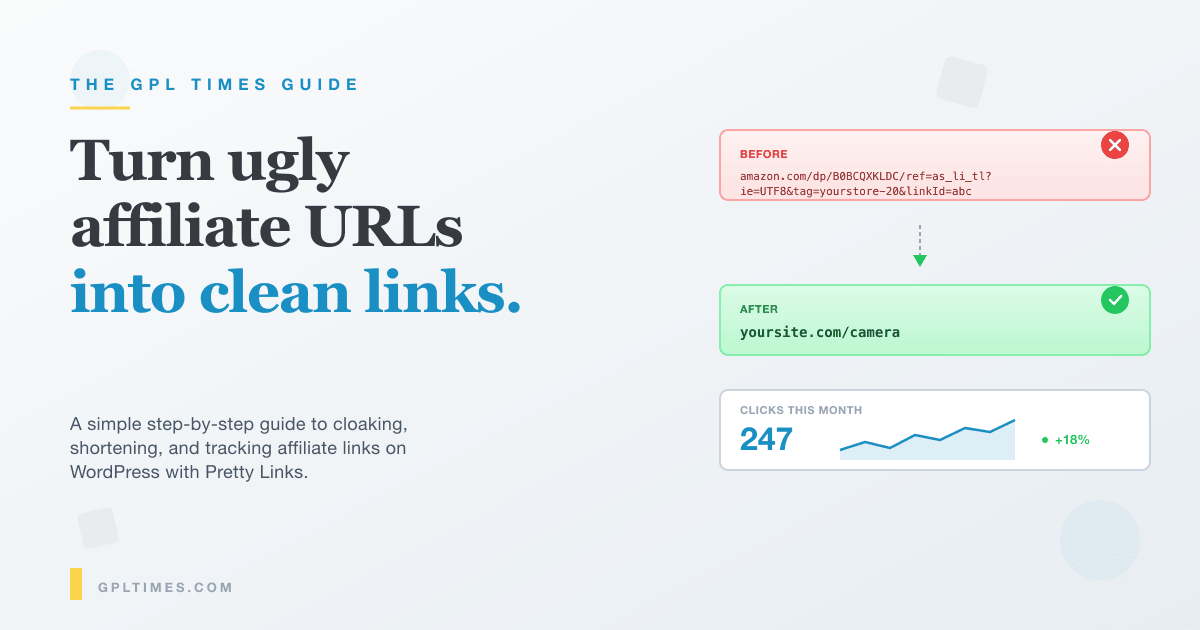
If you have ever pasted an Amazon affiliate link into a blog post, you have seen what makes affiliate links annoying. The link looks like this:
https://www.amazon.com/dp/B0BCQXKLDC/ref=as_li_tl?ie=UTF8&camp=1789&creative=9325&creativeASIN=B0BCQXKLDC&linkCode=as2&tag=yourstore-20&linkId=abc123def456
It is 200 characters of gibberish. Readers who hover over it see the tracking parameters and sometimes get suspicious. If Amazon ever changes the URL structure (which they do), every post you wrote with that link breaks. And you have no idea how many people actually clicked it.
Pretty Links solves all three of those problems with one trick: it lets you turn that ugly URL into something like yoursite.com/camera. When someone clicks yoursite.com/camera, Pretty Links instantly redirects them to the real Amazon URL, counts the click, and you have a clean, brandable, trackable link.
This guide walks through the entire setup in plain language. By the end, you will have a working pretty link on your site, you will know how to drop it into a blog post, and you will be able to see who clicked it. No marketing fluff, just the steps.
What you’ll have when you’re done
- A WordPress site with the Pretty Links plugin installed and ready.
- A pretty link like
yoursite.com/camerathat redirects to your real affiliate URL. - A click counter so you can see how many people followed your link.
- The ability to change the destination of
yoursite.com/camerain one place if the affiliate URL ever changes, without editing any blog posts.
Total time: about 15 minutes.
What is Pretty Links?
Pretty Links is a WordPress plugin that creates short, branded redirect URLs on your own domain. You enter a long URL (an affiliate link, a referral URL, a Spotify track, anything), pick a short slug like /camera, and the plugin creates yoursite.com/camera that redirects to the long URL. It also counts every click.
The free version is on the WordPress.org plugin repository and handles the basics. The Pro version adds automatic keyword replacement (turn any mention of "Bluehost" in your posts into a link automatically), reporting, geo-targeting, link rotation, and PrettyPay payment links. For most starting affiliate marketers, the free version is enough. The Pro version becomes worth it once you have 20+ links and want to manage them at scale.
I am using Pretty Links Pro for this walkthrough because that is what most people who pay for the plugin will see. Every step below works identically in the free version unless I note otherwise.
Step 1: Install Pretty Links
In your WordPress admin, go to Plugins → Add New → Upload Plugin. Choose the pretty-link.zip file you downloaded, click Install Now, then Activate Plugin.
A new "Pretty Links" menu appears in the admin sidebar. You will see submenu items: Pretty Links, Add New Pretty Link, Categories, Tags, Clicks, Reports, Tools, Options.
If this is your first time, the plugin sets a default URL slug prefix to /, which is what gives you the clean yoursite.com/your-slug style. You don’t need to change this unless your existing site already uses that pattern for something else.
Step 2: Create your first pretty link
Click Pretty Links → Add New Pretty Link. You will see this form:
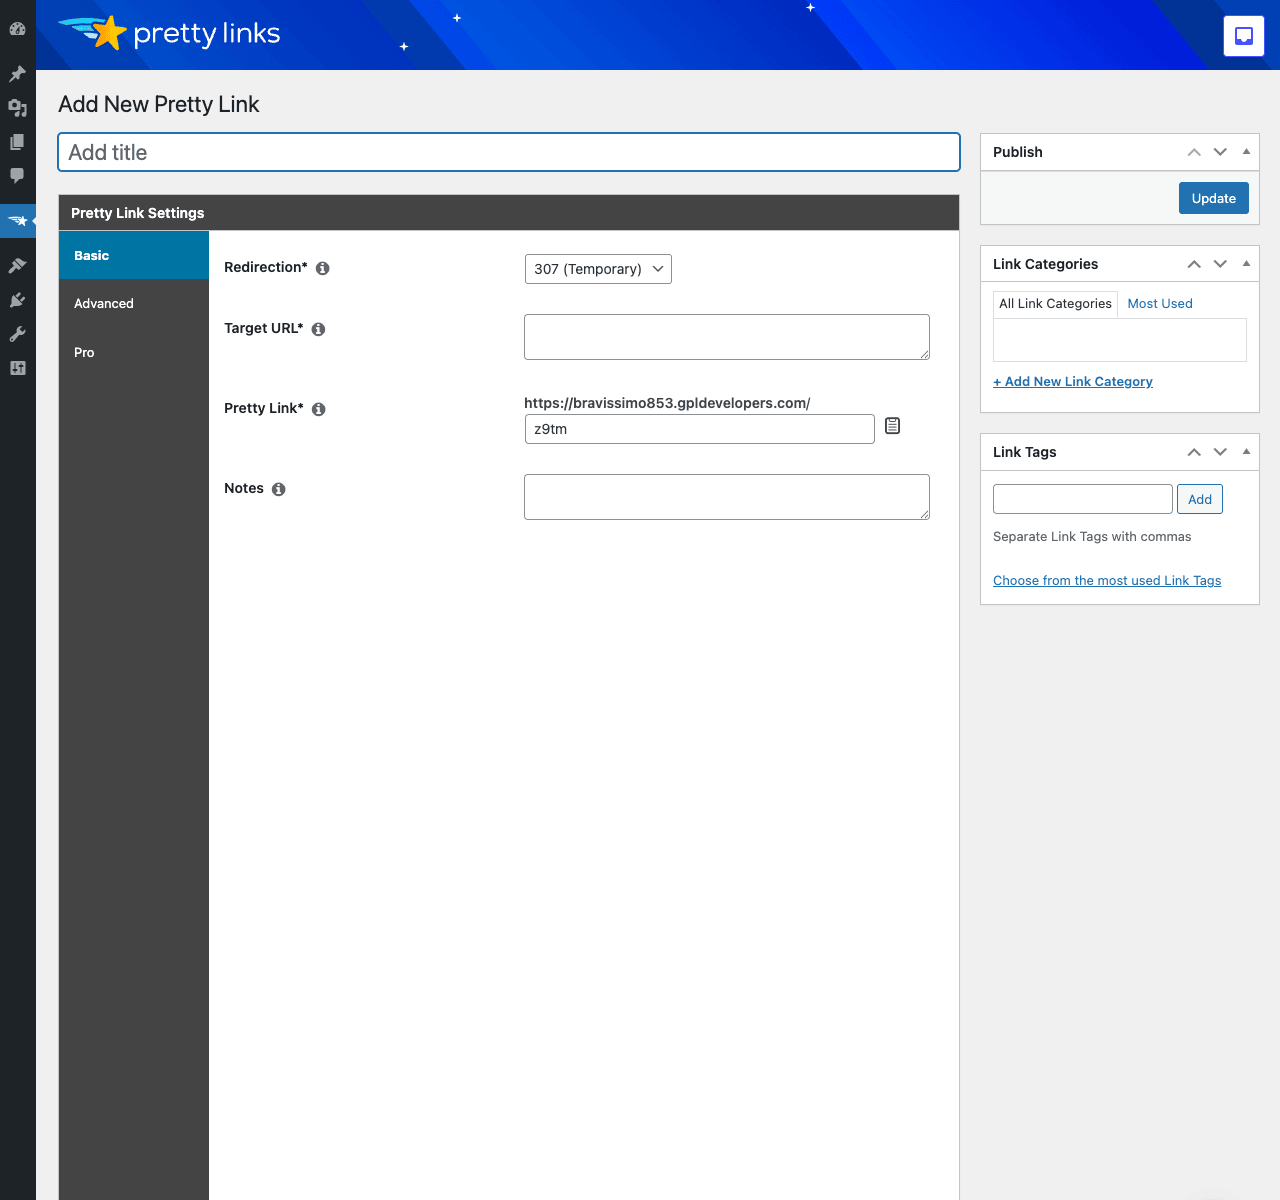
Here is what each field means:
- Title: A name for yourself. Not visible to readers. Use something memorable like "Bluehost Hosting" or "My Favorite Camera".
- Redirection: Pick
307 (Temporary)unless you have a specific reason to change it. (More on this below in the redirection types section.) - Target URL: This is the long ugly URL you want to hide. Paste your full affiliate URL here, with all its tracking parameters.
- Pretty Link: This is the part after your domain that readers will see. Type something short and memorable. For an Amazon camera affiliate link, just type
camera. The full pretty link becomesyoursite.com/camera. - Notes: Optional. Use for reminders to yourself like "expires Dec 2026" or "from Maya’s affiliate program".
For our example, fill it in like this:
- Title:
My Favorite Camera - Target URL:
https://www.amazon.com/dp/B0BCQXKLDC/ref=as_li_tl?ie=UTF8&camp=1789&creative=9325&creativeASIN=B0BCQXKLDC&linkCode=as2&tag=yourstore-20&linkId=abc123def456 - Pretty Link:
camera
Click the blue "Update" button in the Publish box on the right. The pretty link is now live. If you go to yoursite.com/camera in your browser, you will land on the Amazon page.
Step 3: See your link in the list
Click Pretty Links in the sidebar. You will see your link in a table:
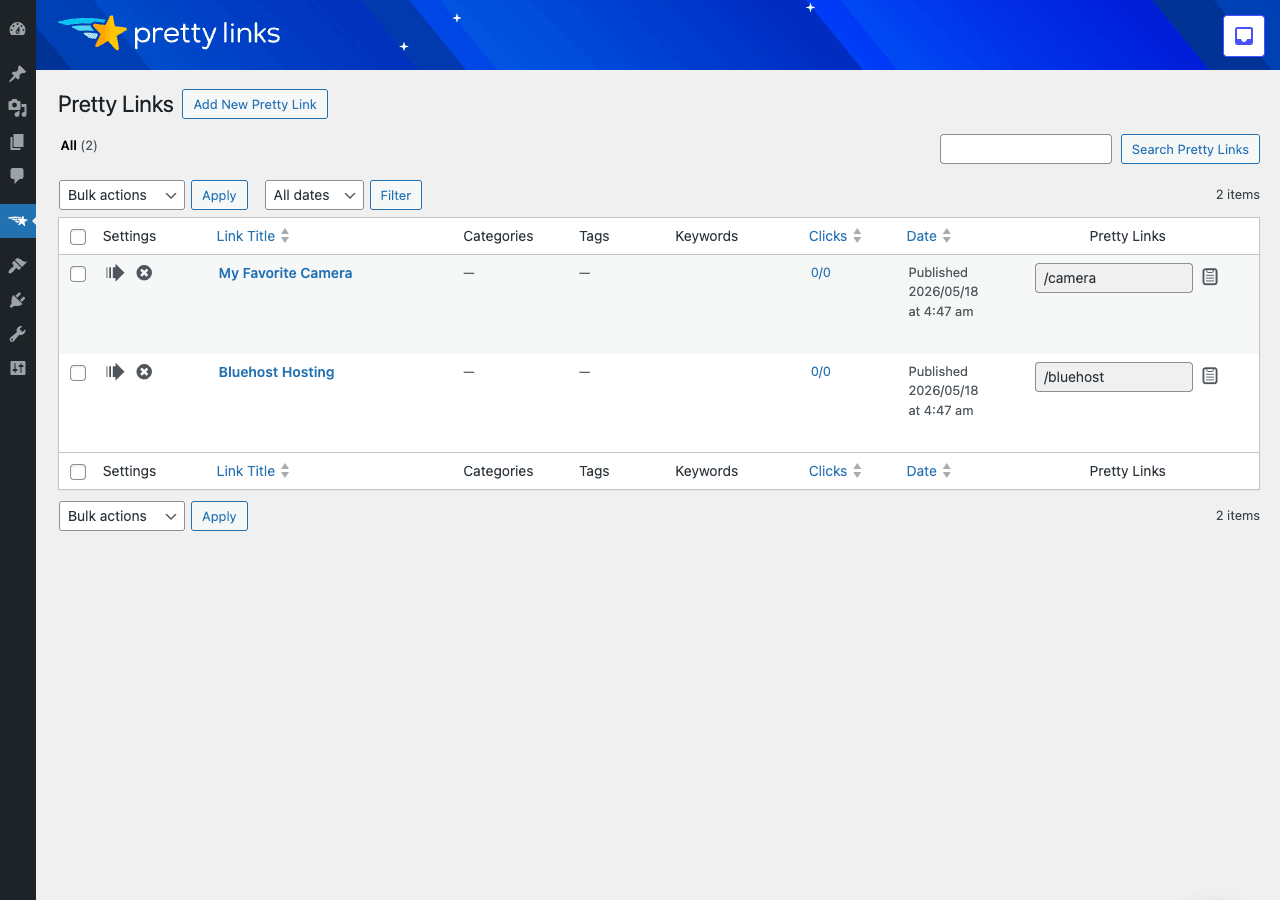
You can see I have created two example links here: "My Favorite Camera" (slug /camera) and "Bluehost Hosting" (slug /bluehost). The Clicks column shows 0/0 for each, that is "unique clicks / total clicks". As people click the links, those numbers go up.
The icons next to each link let you copy the pretty URL to your clipboard (the right arrow icon), delete the link, or edit it. The pretty link slug is also editable directly from this list, click the value and change it inline if you want a different slug.
Step 4: Use the pretty link in a blog post
Now the easy part. Open any post or page in your WordPress editor. Type some text where you want the link:
"I shot this entire video on my favorite camera."
Select the words "my favorite camera". Click the link icon in the toolbar (or press Cmd+K / Ctrl+K). Instead of pasting the long Amazon URL, paste your pretty URL: https://yoursite.com/camera. Click Apply.
The link in your post now reads "my favorite camera" and points to yoursite.com/camera. When a reader clicks, they hit your domain first, the plugin counts the click, then redirects to Amazon. The reader does not see the long URL when they hover.
That’s the whole flow. Type, link, publish. The reader sees a clean link on your domain.
Tip: Use the Pretty Links sidebar in the editor
Pretty Links Pro adds a sidebar panel inside the post editor (look for the small Pretty Links icon in the top right of Gutenberg). Click it, and you can browse all your pretty links and insert one into your post without opening a separate tab. Way faster once you have 10+ links.
Step 5: Track your clicks
After a few people have clicked your link (or you have tested it yourself a couple of times), go to Pretty Links → Clicks. You will see this report:
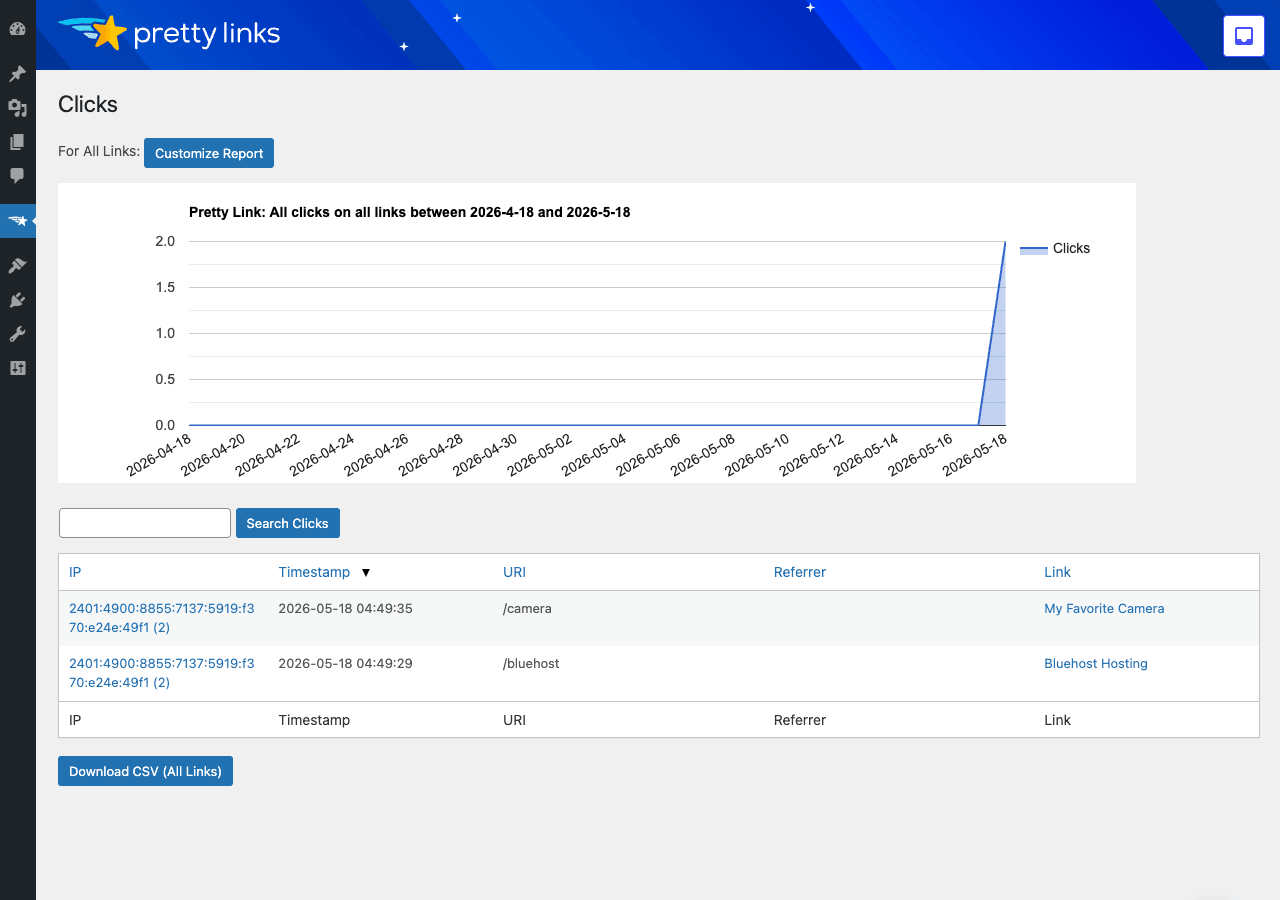
The chart at the top shows clicks per day across all your links over the last 30 days. The table below shows every individual click with the visitor’s IP, the timestamp, which slug they clicked, where they came from (the referrer URL), and which link it matched.
The "Customize Report" button lets you filter to a specific link, a specific date range, or exclude clicks from specific IPs (useful for ignoring your own visits during testing).
You can also click any individual link in the main Pretty Links list to see clicks for just that link. The same chart appears, scoped to one URL.
Step 6: Change the destination later (without editing posts)
This is the killer feature. Say Amazon changes their URL structure and your camera affiliate URL breaks. With normal links, you would have to find every blog post that mentions that camera and update each one. With Pretty Links, you do this:
- Go to
Pretty Links → Pretty Links. - Click "Edit" next to "My Favorite Camera".
- Change the Target URL to the new working URL.
- Save.
That’s it. Every blog post that links to yoursite.com/camera now goes to the new destination automatically. No post edits, no broken links. This is also how you would change a link from an Amazon affiliate URL to an eBay affiliate URL if you switched programs.
Understanding redirection types
The form had a dropdown for "Redirection" with several options. Here is what they actually mean:
- 307 (Temporary) is the default and what most people should use. The link redirects, no tracking parameters are passed back to the search engine. Best for normal affiliate use.
- 301 (Permanent) tells search engines "this URL has permanently moved". Avoid for affiliate links because it can pass your domain’s SEO authority to the affiliate destination.
- 302 (Found) is similar to 307 but with subtly different cache behavior. Use 307 instead.
- Cloaked Redirect keeps your pretty URL visible in the browser address bar even after the redirect (uses an iframe). Some affiliate programs (notably Amazon) explicitly prohibit this. Read your program’s terms before using.
- Pretty Bar Redirect (Pro) shows a thin top bar with your branding on the destination page. Useful when you control the destination too, like sharing a link to your own podcast episode through a tracking URL.
- JavaScript Redirect uses JS instead of HTTP. Slower and worse for users; only use if you have a specific reason.
If you are not sure, leave it at 307.
Tip: Categories and tags for organization
Once you have 20+ links, the flat list gets unwieldy. Pretty Links has Categories (broader buckets like "Hosting", "Cameras", "Books") and Tags (more granular labels like "amazon", "expired", "high-converting"). Use Categories liberally, Tags sparingly.
You assign these on the Add New / Edit form using the right sidebar widgets (visible in the first screenshot). The list view can then be filtered by category from a dropdown at the top.
Tip: The auto-keyword replacement feature (Pro)
This is the feature that makes Pro worth it for me. Under each pretty link’s Pro tab (visible in the editor’s left tab list), you can add "Keywords". If you put Bluehost as a keyword on your "Bluehost Hosting" pretty link, every time the word "Bluehost" appears in any of your posts, Pretty Links automatically replaces it with the pretty link.
Use case: you write a long blog post mentioning a hosting company 8 times. With keyword replacement, every mention becomes a clickable affiliate link without you doing anything manually. Set it once on the pretty link, applies everywhere on the site.
Caveats: be careful not to over-link. Most affiliate programs (Amazon included) have rules about disclosure that require visible notice when content is sponsored. Auto-linked keywords can make the disclosure boundary fuzzy. Use a sitewide disclosure footer to stay on the right side of program terms.
Common gotchas
These are the issues I have seen people hit:
1. "My pretty link returns a 404." This usually means your WordPress permalink structure is set to "Plain" instead of "Post name". Go to Settings → Permalinks and pick "Post name". Save. Pretty Links needs friendly permalinks to work.
2. "The link works in admin but redirects to my homepage on the front end." Same fix as above. Permalinks not configured.
3. "I want my pretty links under a folder like /go/ instead of just /." Go to Pretty Links → Options → General and set the "Pretty Links Prefix" to /go/. Your pretty links become yoursite.com/go/camera instead of yoursite.com/camera. Useful if you do not want your pretty links polluting your URL namespace.
4. "Caching plugin is breaking my redirects." Some caching plugins (especially aggressive full-page caches) cache the pretty link redirect, which means clicks stop incrementing. Most decent cache plugins (WP Rocket, LiteSpeed, W3 Total Cache) have an exclusion list. Add your pretty link prefix path (e.g. /go/* or /camera) to the cache plugin’s "Never cache URLs" setting.
5. "Affiliate program flagged my link." Some programs ban cloaking. Amazon Associates specifically allows pretty links that 307-redirect (not iframe-cloaked) and have visible disclosure on the page. Check your specific affiliate program’s terms. If in doubt, use 307 redirects, never use Cloaked Redirect, and add an FTC-compliant disclosure on every page that contains affiliate links.
6. "Clicks page is empty even though I tested." Click tracking is on by default but check Options → General → Track Hit Counts is enabled. Also check that your testing was on the public front-end of the site (the yoursite.com/camera URL), not the admin edit page.
A short note for developers
Pretty Links exposes a few PHP hooks worth knowing about if you are building tooling around it. The most useful ones:
// Fires every time a click is logged. Use to push the click event to your analytics.
add_action( 'prli_record_click', function( $data ) {
 // $data has 'link_id', 'click_id', 'url'.
 do_my_analytics_push( $data['link_id'], $data['url'] );
} );

// Fires after a new pretty link is created. Use to sync to an external system.
add_action( 'prli-create-link', function( $link_id, $values ) {
 // $values has the raw form data.
 do_action( 'my_app_pretty_link_created', $link_id, $values['url'] );
}, 10, 2 );

// Modify the destination URL right before the redirect happens.
add_filter( 'prli_target_url', function( $target ) {
 // $target is an array with 'url', 'link_id', 'redirect_type'.
 // Use to append your own UTM params, A/B test variants, etc.
 $target['url'] = add_query_arg( 'utm_source', 'my-blog', $target['url'] );
 return $target;
} );
If you need to query pretty links programmatically:
global $wpdb;
$prli_table = $wpdb->prefix . 'prli_links';
$links = $wpdb->get_results( "SELECT id, name, slug, url FROM $prli_table WHERE param_struct != ''" );
The plugin also has a WordPress custom post type called pretty-link, so WP_Query( ['post_type' => 'pretty-link'] ) works for high-level loops.
Pricing and where to get it
Pretty Links is sold by Caseproof (the same team that makes MemberPress and Easy Affiliate). The free version on WordPress.org handles the basics described in Steps 1-6 above. The Pro version (Executive Edition, Super Affiliate Edition) adds the keyword replacement, reports, geo-targeting, link rotation, link insertion in posts via shortcode, and PrettyPay.
The plugin is GPL-licensed. The license sold by Caseproof is a support and update license, not a use license. After install you can use it on any number of sites; the license only gates support and the official update channel.
Because of GPL, the same plugin file is legally redistributable. Same plugin, same features.
For affiliate marketers running the plugin as a core part of their revenue, the official Caseproof license is worth the cost once you are profitable. The support team is responsive and the plugin gets regular updates.
Final thoughts
Pretty Links does one job and does it well. It turns your ugly affiliate URLs into clean branded URLs on your own domain, counts the clicks, and lets you change destinations without editing posts. That is the whole product, and that is genuinely useful.
If you are just starting with affiliate marketing on WordPress, install the free Pretty Links from WordPress.org. The free version handles 90% of what hobbyist affiliate marketers need. Upgrade to Pro when you start managing 20+ links, want auto-keyword replacement, or want detailed reports.
If you write blog posts that link to anything affiliated, you should be using a link cloaker. Whether that’s Pretty Links, ThirstyAffiliates, or something else, the principle is the same: never paste a raw affiliate URL into a post. Always go through a redirect you control, so you can change destinations later, see who clicked, and present a clean link to your readers.
The next 15 minutes after you read this article: install the plugin, create one pretty link for an affiliate program you are already in, update your most popular blog post to use it, and watch the clicks start coming in. That is the entire workflow. Everything else is variations on the same theme.